Acura TLX 2017 Service Manual
Manufacturer: ACURA, Model Year: 2017, Model line: TLX, Model: Acura TLX 2017Pages: 75, PDF Size: 10.99 MB
Page 31 of 75
54 || 55
AUDIO AND CONNECTIVITY
AUDIO AND CONNECTIVITY
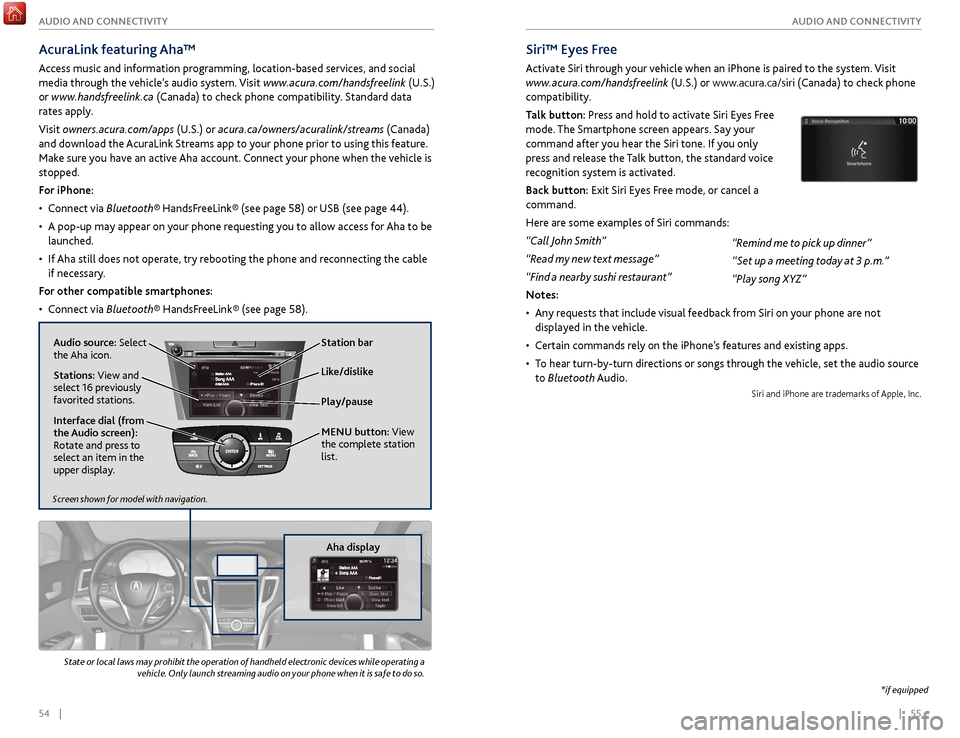
AcuraLink featuring Aha™
Access music and information programming, location-based services, and social
media through the vehicle’s audio system. Visit www.acura.com/handsfreelink (U.S.)
or www.handsfreelink.ca (Canada) to check phone compatibility. Standard data
rates apply.
Visit owners.acura.com/apps (U.S.) or acura.ca/owners/acuralink/streams (Canada)
and download the AcuraLink Streams app to your phone prior to using this feature.
Make sure you have an active Aha account. Connect your phone when the vehicle is
stopped.
For iPhone:
•
C
onnect via Bluetooth® HandsFreeLink® (see page 58) or USB (see page 44).
•
A pop-up may appear
on your phone requesting you to allow access for Aha to be
launched.
•
If
Aha still does not operate, try rebooting the phone and reconnecting the cable
if necessary.
For other compatible smartphones:
•
C
onnect via Bluetooth® HandsFreeLink® (see page 58).
Play/pause
State or local laws may prohibit the operation of handheld electronic devices while operating a
vehicle. Only launch streaming audio on your phone when it is safe to do so.
Audio source: Select
the Aha icon. Station bar
Like/dislike
Stations: View and
select 16 previously
favorited stations.
Interface dial (from
the Audio screen):
Rotate and press to
select an item in the
upper display. MENU
button: View
the complete station
list.
Screen shown for model with navigation.
Aha display
*if equipped
Siri™ Eyes Free
Activate Siri through your vehicle when an iPhone is paired to the system. Visit
www.acura.com/handsfreelink (U.S.) or www.acura.ca/siri (Canada) to check phone
compatibility.
Talk button: Press and hold to activate Siri Eyes Free
mode. The Smartphone screen appears. Say your
command after you hear the Siri tone. If you only
press and release the Talk button, the standard voice
recognition system is activated.
Back button: Exit Siri Eyes Free mode, or cancel a
command.
Here are some examples of Siri commands:
“Call John Smith”
“Read my new text message”
“Find a nearby sushi restaurant”
Notes:
•
An
y requests that include visual feedback from Siri on your phone are not
displayed in the vehicle.
•
C
ertain commands rely on the iPhone’s features and existing apps.
•
T
o hear turn-by-turn directions or songs through the vehicle, set the audio source
to Bluetooth Audio.
Siri and iPhone are trademarks of Apple, Inc.
“Remind me to pick up dinner”
“Set up a meeting today at 3 p.m.”
“Play song XYZ”
Page 32 of 75
56 || 57
Talk Button Tips
•
When using
the Talk button, wait for the beep before saying a command.
•
T
o bypass the system prompts, simply press the Talk button again to say your
command.
•
Speak in a clear
, natural voice.
•
R
educe all background noise.
•
A
djust the dashboard and side vents away from the microphone in the ceiling.
Fan speed may be temporarily reduced during voice recognition operation.
•
Close
the windows and moonroof.
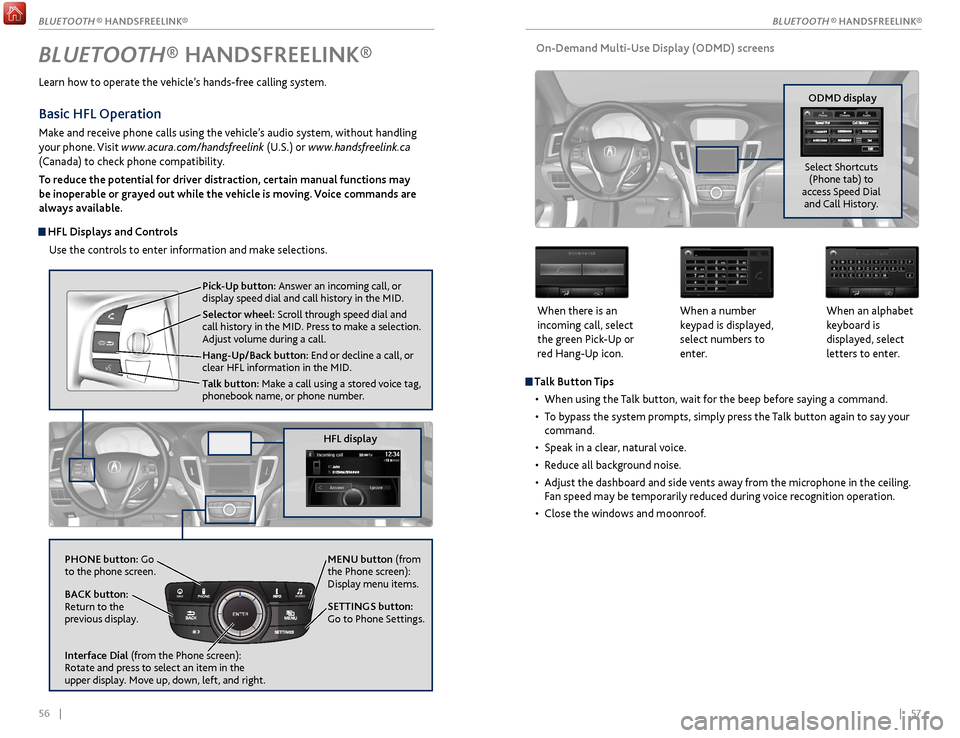
On-Demand Multi-Use Display (ODMD) screens
When there is an
incoming call, select
the green Pick-Up or
red Hang-Up icon. When a number
keypad is displayed,
select numbers to
enter. When an alphabet
keyboard is
displayed, select
letters to enter.
ODMD display
Select Shortcuts (Phone tab) to
access Speed Dial and Call History.
BLUETOOTH® HANDSFREELINK®
Learn how to operate the vehicle’s hands-free calling system.
Pick-Up button: Answer an incoming call, or
display speed dial and call history in the MID.
Selector wheel: Scroll through speed dial and
call history in the MID. Press to make a selection.
Adjust volume during a call.
Hang-Up/Back button: End or decline a call, or
clear HFL information in the MID.
Talk button: Make a call using a stored voice tag,
phonebook name, or phone number.
NAVAUDIOAUDIONAV
PHONE button: Go
to the phone screen.
BACK button:
Return to the
previous display.
Interface Dial (from the Phone screen):
Rotate and press to select an item in the
upper display. Move up, down, left, and right. MENU button (from
the Phone screen):
Display menu items.
SETTINGS button:
Go to Phone Settings.
Basic HFL Operation
Make and receive phone calls using the vehicle’s audio system, without handling
your phone. Visit www.acura.com/handsfreelink (U.S.) or www.handsfreelink.ca
(Canada) to check phone compatibility.
To reduce the potential for driver distraction, certain manual functions may
be inoperable or grayed out while the vehicle is moving. Voice commands are
always available.
HFL Displays and Controls
Use the controls to enter information and make selections.
HFL display
BLUETOOTH ® HANDSFREELINK®
BLUETOOTH ® HANDSFREELINK®
Page 33 of 75
58 || 59
Making a Call
You can make calls using several methods.
Dialing a Number
Enter a 10-digit phone number to call.
Using voice commands
1.
Pr
ess the Talk button.
2.
Say
“Dial” and the number. For example, “Dial
3-1-0-5-5-5-1-2-3-4.”
3.
The
system begins to dial.
Using the menu
Use the interface dial to make and enter selections. This is inoperable while the
vehicle is moving.
1.
Pr
ess PHONE.
2.
Pr
ess MENU.
3.
Select Dial.
4.
F
rom the navigation screen or the ODMD, enter
the phone number. Select the green phone icon
to call.
Using the ODMD
Select items on the screen by touching them. This is inoperable while the vehicle
is moving.
1.
Select Shortcuts.
2.
Select Phone.
3.
Select Dial.
4.
Enter
the phone number and select the green
phone icon to call.
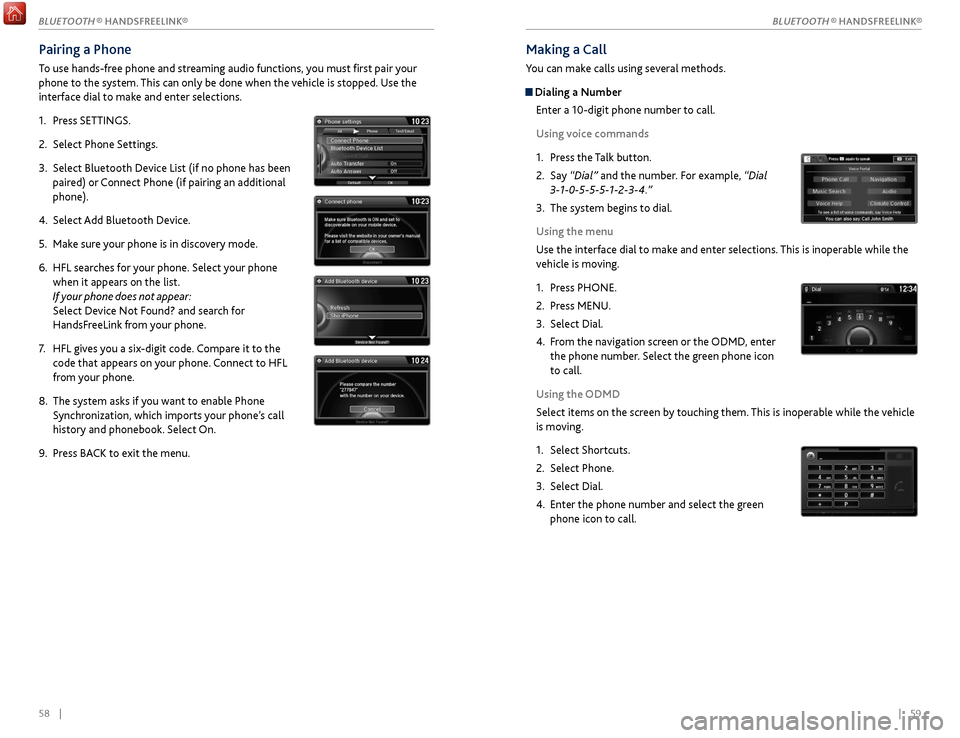
Pairing a Phone
To use hands-free phone and streaming audio functions, you must first pair your
phone to the system. This can only be done when the vehicle is stopped. Use the
interface dial to make and enter selections.
1.
Pr
ess SETTINGS.
2.
Select
Phone Settings.
3.
Select Bluetooth Device List (if no phone has been
pair
ed) or Connect Phone (if pairing an additional
phone).
4.
Select
Add Bluetooth Device.
5.
Mak
e sure your phone is in discovery mode.
6.
HFL sear
ches for your phone. Select your phone
when it appears on the list.
If your phone does not appear:
Select Device Not Found? and search for
HandsFreeLink from your phone.
7.
HFL giv
es you a six-digit code. Compare it to the
code that appears on your phone. Connect to HFL
from your phone.
8.
The system asks if
you want to enable Phone
Synchronization, which imports your phone’s call
history and phonebook. Select On.
9.
Pr
ess BACK to exit the menu.
BLUETOOTH ® HANDSFREELINK®
BLUETOOTH ® HANDSFREELINK®
Page 34 of 75
60 || 61
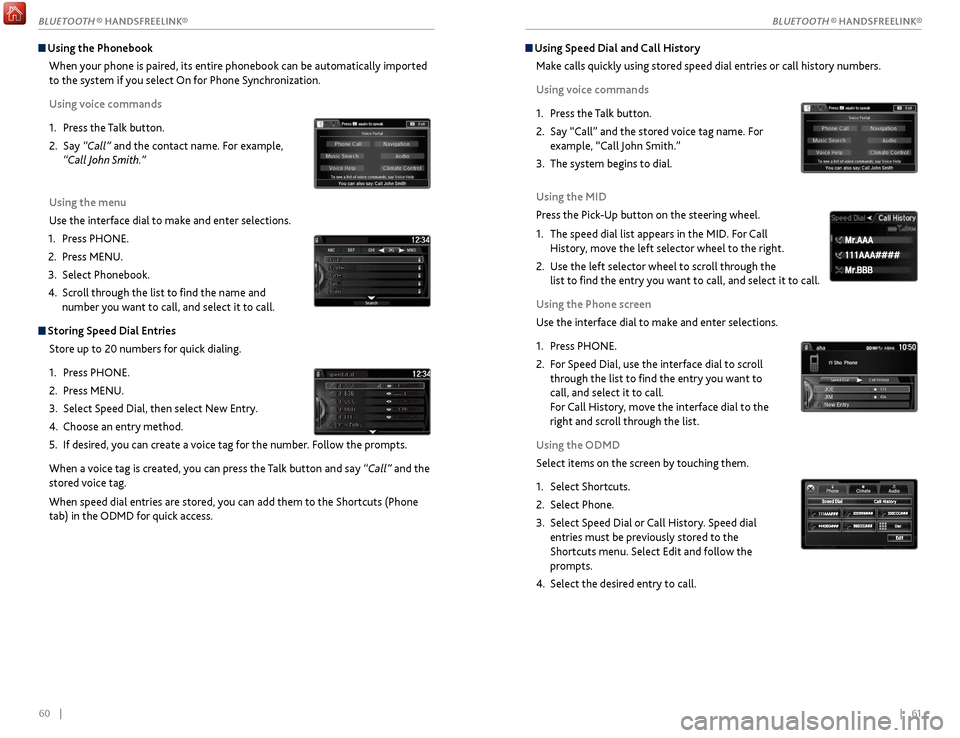
Using Speed Dial and Call History
Make calls quickly using stored speed dial entries or call history numbers.
Using voice commands
1.
Pr
ess the Talk button.
2.
Say “Call” and
the stored voice tag name. For
example, “Call John Smith.”
3.
The
system begins to dial.
Using the MID
Press the Pick-Up button on the steering wheel.
1.
The speed
dial list appears in the MID. For Call
History, move the left selector wheel to the right.
2.
Use the
left selector wheel to scroll through the
list to find the entry you want to call, and select it to call.
Using the Phone screen
Use the interface dial to make and enter selections.
1.
Pr
ess PHONE.
2.
F
or Speed Dial, use the interface dial to scroll
through the list to find the entry you want to
call, and select it to call.
For Call History, move the interface dial to the
right and scroll through the list.
Using the ODMD
Select items on the screen by touching them.
1.
Select Shortcuts.
2.
Select Phone.
3.
Select Speed
Dial or Call History. Speed dial
entries must be previously stored to the
Shortcuts menu. Select Edit and follow the
prompts.
4.
Select the desir
ed entry to call.
111AAA#### Mr.AAA
Mr.BBB
111AAA#### Mr.AAA
Mr.BBB
Using the Phonebook
When your phone is paired, its entire phonebook can be automatically imported
to the system if you select On for Phone Synchronization.
Using voice commands
1.
Pr
ess the Talk button.
2.
Say
“Call” and the contact name. For example,
“Call John Smith.”
Using the menu
Use the interface dial to make and enter selections.
1.
Pr
ess PHONE.
2.
Pr
ess MENU.
3.
Select Phonebook.
4.
Scr
oll through the list to find the name and
number you want to call, and select it to call.
Storing Speed Dial Entries
Store up to 20 numbers for quick dialing.
1.
Pr
ess PHONE.
2.
Pr
ess MENU.
3.
Select
Speed Dial, then select New Entry.
4.
Choose an entry method.
5.
If
desired, you can create a voice tag for the number. Follow the prompts.
When a voice tag is created, you can press the Talk button and say “Call” and the
stored voice tag.
When speed dial entries are stored, you can add them to the Shortcuts (Phone
tab) in the ODMD for quick access.
BLUETOOTH ® HANDSFREELINK®
BLUETOOTH ® HANDSFREELINK®
Page 35 of 75
| 6362 |
Learn about Acura’s advanced connectivity services.
AcuraLink Messages
Receive messages on vehicle features, safety and emissions recall campaigns,
maintenance reminders, and diagnostic information. Some message features
require a phone connection. Visit www.acura.com/handsfreelink (U.S.) or www.
handsfreelink.ca (Canada) to check phone compatibility.
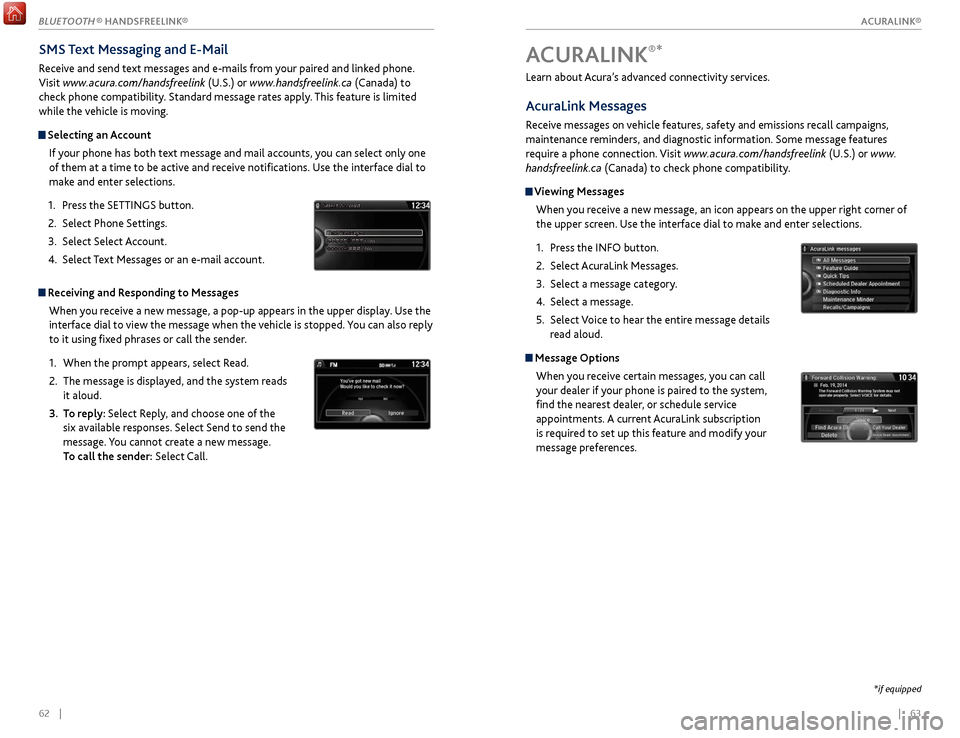
Viewing Messages
When you receive a new message, an icon appears on the upper right corner of
the upper screen. Use the interface dial to make and enter selections.
1.
Pr
ess the INFO button.
2.
Select A
curaLink Messages.
3.
Select a message category
.
4.
Select a message.
5.
Select
Voice to hear the entire message details
read aloud.
Message Options
When you receive certain messages, you can call
your dealer if your phone is paired to the system,
find the nearest dealer, or schedule service
appointments. A current AcuraLink subscription
is required to set up this feature and modify your
message preferences.
ACURALINK®*
*if equipped
SMS Text Messaging and E-Mail
Receive and send text messages and e-mails from your paired and linked phone.
Visit www.acura.com/handsfreelink (U.S.) or www.handsfreelink.ca (Canada) to
check phone compatibility. Standard message rates apply. This feature is limited
while the vehicle is moving.
Selecting an Account
If your phone has both text message and mail accounts, you can select only one
of them at a time to be active and receive notifications. Use the interface dial to
make and enter selections.
1.
Pr
ess the SETTINGS button.
2.
Select
Phone Settings.
3.
Select
Select Account.
4.
Select
Text Messages or an e-mail account.
Receiving and Responding to MessagesWhen you receive a new message, a pop-up appears in the upper display. Use the
interface dial to view the message when the vehicle is stopped. You can also reply
to it using fixed phrases or call the sender.
1.
When
the prompt appears, select Read.
2.
The message is
displayed, and the system reads
it aloud.
3.
T
o reply: Select Reply, and choose one of the
six available responses. Select Send to send the
message. You cannot create a new message.
To call the sender: Select Call.
xyz xyz
ACURALINK®
BLUETOOTH ® HANDSFREELINK®
ACURALINK®
Page 36 of 75
| 65
NAVIGATION64 |
Learn how to enter a destination and operate the navigation system.
Basic Navigation Operation
A real-time navigation system uses GPS and a map database to show your current
location and help guide you to a desired destination. You can operate the system
using voice commands or the system controls.
To reduce the potential for driver distraction, certain manual functions may
be inoperable or grayed out while the vehicle is moving. Voice commands are
always available.
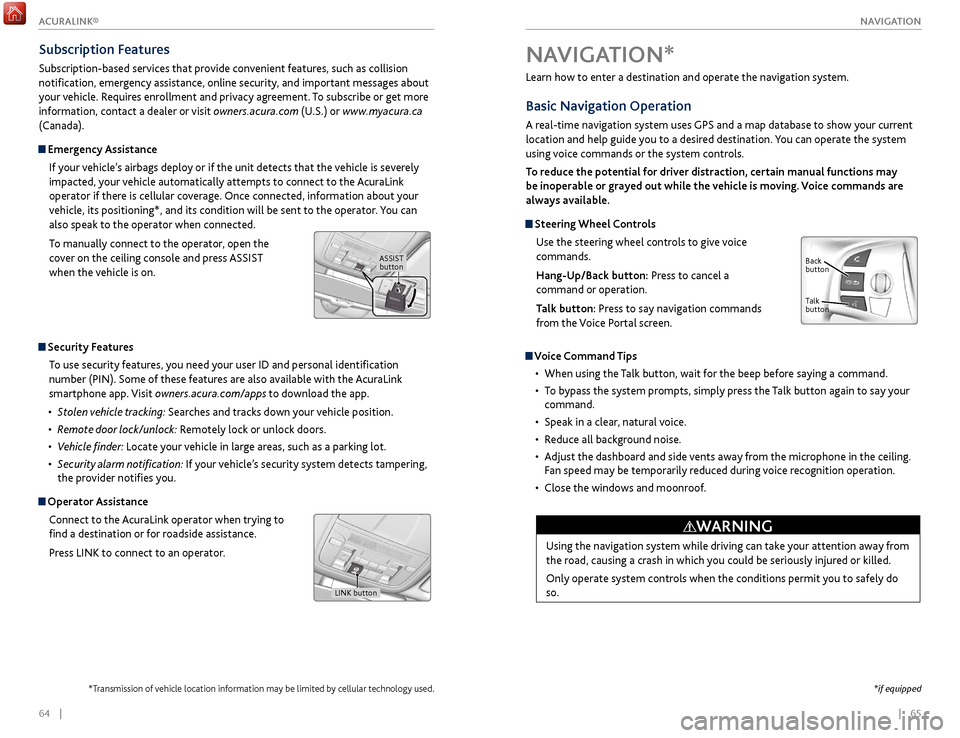
Steering Wheel Controls
Use the steering wheel controls to give voice
commands.
Hang-Up/Back button: Press to cancel a
command or operation.
Talk button: Press to say navigation commands
from the Voice Portal screen.
Voice Command Tips
•
When using
the Talk button, wait for the beep before saying a command.
•
T
o bypass the system prompts, simply press the Talk button again to say your
command.
•
Speak in a clear
, natural voice.
•
R
educe all background noise.
•
A
djust the dashboard and side vents away from the microphone in the ceiling.
Fan speed may be temporarily reduced during voice recognition operation.
•
Close
the windows and moonroof.
Using the navigation system while driving can take your attention away from
the road, causing a crash in which you could be seriously injured or killed.
Only operate system controls when the conditions permit you to safely do
so.
WARNING
NAVIGATION*
Talk
button Back
button
*if equipped
Subscription Features
Subscription-based services that provide convenient features, such as collision
notification, emergency assistance, online security, and important messages about
your vehicle. Requires enrollment and privacy agreement. To subscribe or get more
information, contact a dealer or visit owners.acura.com (U.S.) or www.myacura.ca
(Canada).
Emergency Assistance
If your vehicle’s airbags deploy or if the unit detects that the vehicle is severely
impacted, your vehicle automatically attempts to connect to the AcuraLink
operator if there is cellular coverage. Once connected, information about your
vehicle, its positioning*, and its condition will be sent to the operator. You can
also speak to the operator when connected.
To manually connect to the operator, open the
cover on the ceiling console and press ASSIST
when the vehicle is on.
ASSIST button
Security Features
To use security features, you need your user ID and personal identification
number (PIN). Some of these features are also available with the AcuraLink
smartphone app. Visit owners.acura.com/apps to download the app.
•
S
tolen vehicle tracking: Searches and tracks down your vehicle position.
•
R
emote door lock/unlock: Remotely lock or unlock doors.
•
V
ehicle finder: Locate your vehicle in large areas, such as a parking lot.
•
S
ecurity alarm notification: If your vehicle’s security system detects tampering,
the provider notifies you.
Operator Assistance
Connect to the AcuraLink operator when trying to
find a destination or for roadside assistance.
Press LINK to connect to an operator.
LINK button
*Transmission of vehicle location information may be limited by cellular technology used.
ACURALINK®
Page 37 of 75

66 || 67
NAVIGATION
NAVIGATION
System Guidance Volume
Adjust the navigation system guidance volume. This does not affect audio or
Bluetooth® HandsFreeLink® volume, which is controlled by the volume knob. Use
the interface dial to make and enter selections.
1.
F
rom the map screen, press the interface dial to
display the map menu.
2.
Select
Guidance Volume.
3.
A
djust the volume to your preferred level.
4.
Pr
ess BACK to exit the menu.
Voice PromptTurn the voice prompt feature on or off. Use the interface dial to make and enter
selections.
1.
Pr
ess SETTINGS.
2.
Select S
ystem Settings.
3.
Select V
oice Prompt.
4.
Select Off
or On.
On: Provides voice prompts.
Off: Voice prompts are disabled.
Navigation Display and Controls
Use the controls to enter information and make selections. Some manual
functions are inoperable while driving.
NAVAUDIOAUDIONAV
NAV button:
Display the map
screen or directions
when en route. INFO
button:
Select items such
as calendar, traffic
incidents, and
AcuraLink messages.
BACK button:
Return to the
previous display.
SETTINGS button:
Change Navi settings. MENU button:
Enter destination
information.
button: Change
screen brightness. Use
the interface dial to
make adjustments. Interface dial
(from
the map screen):
Rotate to zoom in
or out of the map.
Press to display the
map menu. Rotate
and press to select
items.
GPS
signal
strength Traffic
incident icon*
Traffic
status* Traffic flow*
Current
map scale Current
vehicle
position
Map
orientation
Current streetLandmark
icon
*subscription feature
Page 38 of 75

68 || 69
NAVIGATION
NAVIGATION
Place Name
Enter a place name stored in the navigation database using voice commands (U.S.
models only). Press the Talk button to enter the Voice Portal screen.
1.
F
rom the Voice Portal, say “Navigation” and then
“Place name.”
2.
Say a category
. For example, “ATM/Bank.”
3.
Say the
name of the point of interest. For
example, “ABC Bank.”
4.
The system interpr
ets the name. If necessary,
you may have to clarify similar matches.
If there is more than one point of interest with
the name, a list of matches appears in order of
closest distance. Use the interface dial to select
an entry.
5.
Use the
interface dial to select “Set as
destination” to set the route.
You can also enter the place name manually when
the vehicle is stopped. While on the map screen, press
the MENU button and use the interface dial to select
Place Name. Enter the name one letter at a time, and
follow the prompts.
Find Nearest Place Enter a destination by category and distance using voice commands. Press the
Talk button to enter the Voice Portal screen.
1.
Say
“Navigation” and then “Find nearest POI
category” and a place. For example, “Find nearest
ATM.”
2.
A list
of the nearest places in your area is
displayed by shortest distance to destination.
3.
Use
the interface dial to select an entry.
4.
Use the
interface dial to select “Set as destination” to set the route.
ODMD Shortcuts
You can add up to six destinations to the Shortcuts (Places tab) in the ODMD.
The addresses must be previously stored in the navigation system address book.
1.
Select Shortcuts.
2.
Select Places.
3.
Select No Entry
to store a previously stored
address book entry, or select a stored entry to
route to it.
Entering a Destination
Use several methods to enter a destination.
Home Address
Store your home address in the system so you can easily route to it. Use the
interface dial to make and enter selections.
1.
Pr
ess the SETTINGS button.
2.
Select
Navi Settings.
3.
Select Edit
Go Home.
4.
Enter
the address and select OK.
When your home address is stored, you can press the Talk
button and say
“Navigation” and then “Go home” at any time. You can also select Go Home from
the destination menu.
Street Address
Enter a street address using voice commands (U.S. models only). Press the Talk
button to enter the Voice Portal screen.
You can also enter the address manually when the vehicle is stopped. While
on the map screen, press the MENU button and use the interface dial to select
Address. Follow the prompts.
1.
F
rom the Voice Portal screen, say “Navigation”
and then “Address.”
2.
The system pr
ompts you to say the entire
address. For example, say “1-2-3-4 Main Street, Los
Angeles, California.”
3.
The system interpr
ets the address by state, city,
street, and address number. If necessary, you
may have to clarify similar matches.
4.
Say
“Set as destination” to set the route.
Page 39 of 75

70 || 71
NAVIGATION
NAVIGATION
Taking a Detour
You can calculate a detour route manually if you encounter a road closure or
other obstacle. Use the interface dial to make and enter selections.
1.
When en r
oute, press the MENU button.
2.
Select Detour
. The system attempts to calculate
a new route by avoiding the next 5 miles (8 km)
while on a freeway or 1 mile (1 km) while on a
surface street.
AcuraLink Real-Time Traffic™*
View traffic flow, incidents, and construction in major metro areas. You can also
route around congestion or incidents when you have a destination set. Use the
interface dial to make and enter selections. Available in the U.S. only.
1.
F
rom the map screen, press the interface dial to
enter the map menu. Select Traffic Incidents.
2.
A list
of incidents on your route appears. Select
the incident you want to avoid.
3.
Select
Avoid. Repeat as necessary to select other
incidents.
4.
Select R
ecalculate Route.
*Requires AcuraLink subscription.
Canceling Your RouteYou can cancel your route at any time.
1.
When en r
oute, press the MENU button.
2.
Select
Cancel Route. The route is cleared and the
map screen returns.
Routing
After a destination is set, you can alter or cancel your route.
Map Legend
During route guidance
Next
guidance
point
Estimated
time to
destination
Distance to
destination
Destination
Calculated
route
Distance
to next
maneuver
Turn-by-Turn Directions
Shows a more detailed view of the next maneuver on the multi-information
display. Use the right selector wheel on the steering wheel to bypass the display.
Upcoming
maneuver
Current route
Page 40 of 75
72 || 73
DRIVING
DRIVING
Maximum Load Limit
Carrying too much cargo or improperly storing it can affect your vehicle’s handling,
stability, stopping distance, and tires, and make it unsafe.
Your vehicle is not designed to tow a trailer. Attempting to do so can void your
vehicle warranties.
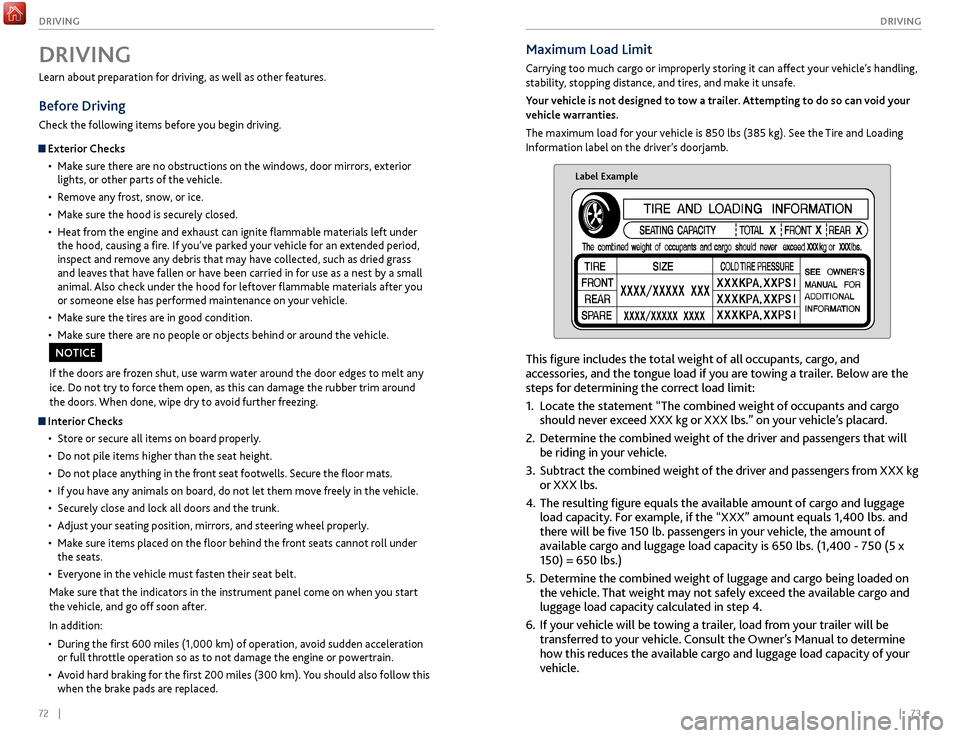
The maximum load for your vehicle is 850 lbs (385 kg). See the Tire and Loading
Information label on the driver’s doorjamb.
Label Example
This figure includes the total weight of all occupants, cargo, and
accessories, and the tongue load if you are towing a trailer. Below are the
steps for determining the correct load limit:
1.
Locate
the statement “The combined weight of occupants and cargo
should never exceed XXX kg or XXX lbs.” on your vehicle’s placard.
2.
Determine the
combined weight of the driver and passengers that will
be riding in your vehicle.
3.
Subtract the
combined weight of the driver and passengers from XXX kg
or XXX lbs.
4.
The r
esulting figure equals the available amount of cargo and luggage
load capacity. For example, if the “XXX” amount equals 1,400 lbs. and
there will be five 150 lb. passengers in your vehicle, the amount of
available cargo and luggage load capacity is 650 lbs. (1,400 - 750 (5 x
150) = 650 lbs.)
5.
Determine
the combined weight of luggage and cargo being loaded on
the vehicle. That weight may not safely exceed the available cargo and
luggage load capacity calculated in step 4.
6.
If y
our vehicle will be towing a trailer, load from your trailer will be
transferred to your vehicle. Consult the Owner’s Manual to determine
how this reduces the available cargo and luggage load capacity of your
vehicle.
Learn about preparation for driving, as well as other features.
Before Driving
Check the following items before you begin driving.
Exterior Checks
•
Mak
e sure there are no obstructions on the windows, door mirrors, exterior
lights, or other parts of the vehicle.
•
R
emove any frost, snow, or ice.
•
Mak
e sure the hood is securely closed.
•
Heat
from the engine and exhaust can ignite flammable materials left under
the hood, causing a fire. If you’ve parked your vehicle for an extended period,
inspect and remove any debris that may have collected, such as dried grass
and leaves that have fallen or have been carried in for use as a nest by a small
animal. Also check under the hood for leftover flammable materials after you
or someone else has performed maintenance on your vehicle.
•
Mak
e sure the tires are in good condition.
•
Mak
e sure there are no people or objects behind or around the vehicle.
DRIVING
If the doors are frozen shut, use warm water around the door edges to melt any
ice. Do not try to force them open, as this can damage the rubber trim around
the doors. When done, wipe dry to avoid further freezing.
NOTICE
Interior Checks•
Stor
e or secure all items on board properly.
•
Do not pile items higher
than the seat height.
•
Do not place an
ything in the front seat footwells. Secure the floor mats.
•
If
you have any animals on board, do not let them move freely in the vehicle.
•
Secur
ely close and lock all doors and the trunk.
•
A
djust your seating position, mirrors, and steering wheel properly.
•
Mak
e sure items placed on the floor behind the front seats cannot roll under
the seats.
•
Ev
eryone in the vehicle must fasten their seat belt.
Make sure that the indicators in the instrument panel come on when you start
the vehicle, and go off soon after.
In addition:
•
During
the first 600 miles (1,000 km) of operation, avoid sudden acceleration
or full throttle operation so as to not damage the engine or powertrain.
•
A
void hard braking for the first 200 miles (300 km). You should also follow this
when the brake pads are replaced.