ECO mode Acura TLX 2019 Navigation Manual
[x] Cancel search | Manufacturer: ACURA, Model Year: 2019, Model line: TLX, Model: Acura TLX 2019Pages: 399, PDF Size: 41.86 MB
Page 109 of 399
107
uuCustomized Features u
Continued
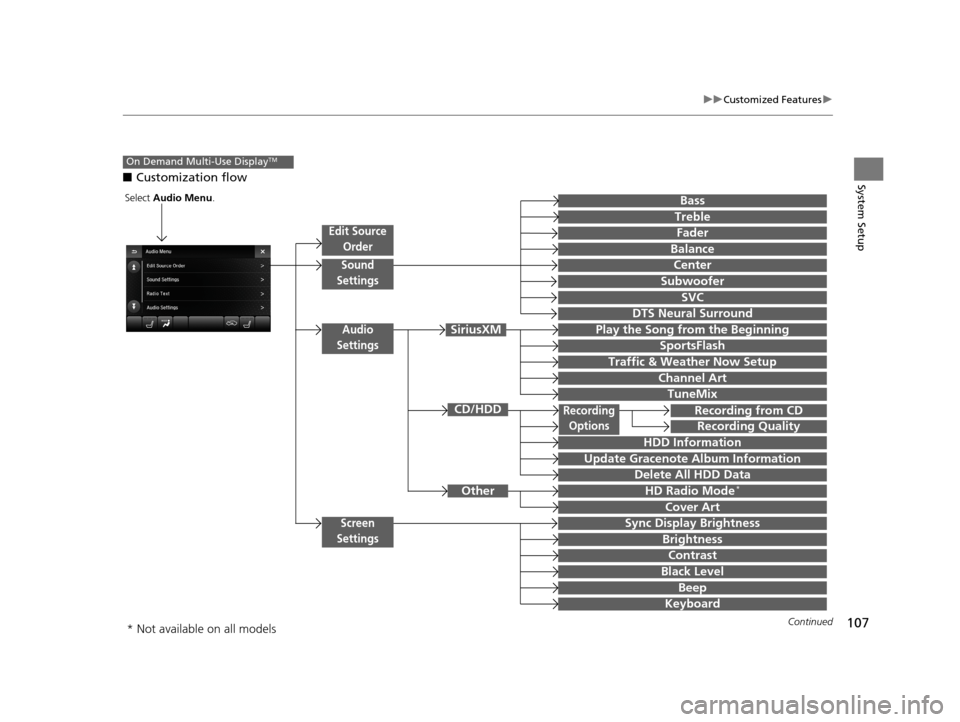
System Setup■Customization flow
On Demand Multi-Use DisplayTM
Recording from CD
Recording Quality
HDD Information
Recording
Options
Update Gracenote Album Information
Cover Art
Treble
Fader
Balance
Center
SVC
Subwoofer
Edit Source
Order
Sync Display Brightness
BassSelect Audio Menu .
Sound
Settings
Audio
Settings
DTS Neural Surround
Play the Song from the Beginning
SportsFlash
Traffic & Weather Now Setup
Channel Art
TuneMix
HD Radio Mode*
Brightness
Contrast
Black Level
Beep
Keyboard
Delete All HDD Data
SiriusXM
Screen
Settings
Other
CD/HDD
TuneMix
* Not available on all models
19 ACURA TLX NAVI-31TZ38400.book 107 ページ 2018年3月7日 水曜日 午後4時23分
Page 111 of 399
109
uuCustomized Features u
Continued
System Setup
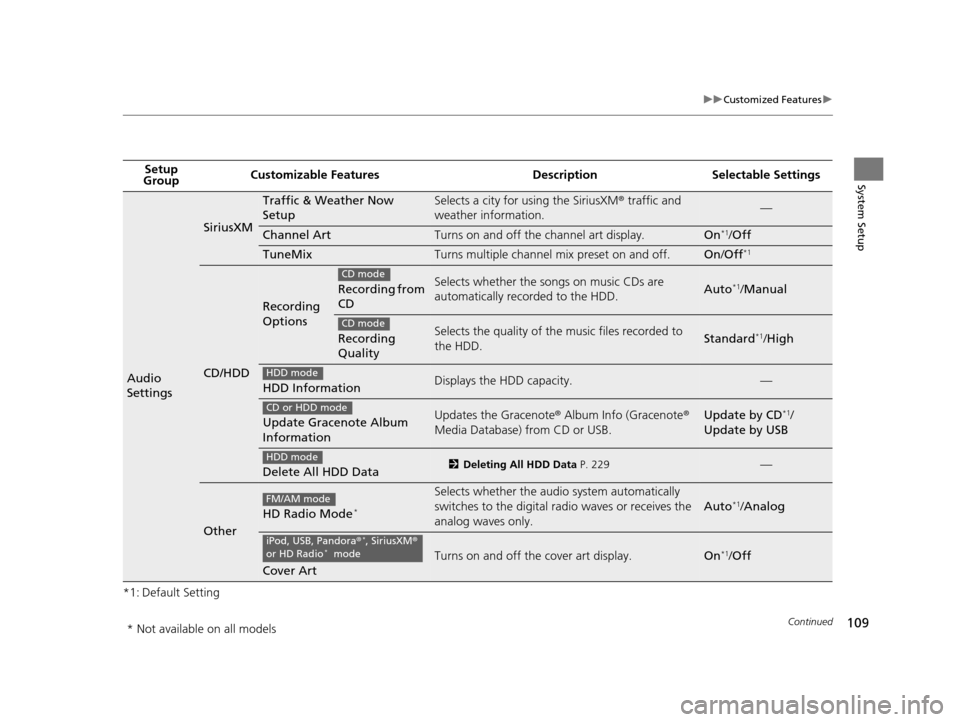
*1: Default SettingSetup
Group Customizable Features Desc
ription Selectable Settings
Audio
Settings
SiriusXM
Traffic & Weather Now
SetupSelects a city for using the SiriusXM® traffic and
weather information.—
Channel ArtTurns on and off the channel art display.On*1/ Off
TuneMixTurns multiple channel mix preset on and off.On /Off*1
CD/HDD
Recording
Options
Recording from
CDSelects whether the so ngs on music CDs are
automatically recorded to the HDD.Auto*1/ Manual
Recording
QualitySelects the quality of the music files recorded to
the HDD.Standard*1/ High
HDD InformationDisplays the HDD capacity.—
Update Gracenote Album
InformationUpdates the Gracenote ® Album Info (Gracenote ®
Media Database) from CD or USB.Update by CD*1/
Update by USB
Delete All HDD Data2 Deleting All HDD Data P. 229—
Other
HD Radio Mode*
Selects whether the audi o system automatically
switches to the digital ra dio waves or receives the
analog waves only.
Auto*1/ Analog
Cover Art
Turns on and off the cover art display.On*1/ Off
CD mode
CD mode
HDD mode
CD or HDD mode
HDD mode
FM/AM mode
iPod, USB, Pandora ®*, SiriusXM®
or HD Radio* mode
* Not available on all models
19 ACURA TLX NAVI-31TZ38400.book 109 ページ 2018年3月7日 水曜日 午後4時23分
Page 143 of 399

141
uuCalculating the Route uViewing the Routes
Navigation
Viewing the Routes
View three different routes to your destination.
Rotate to select a route. Press .
u The travel distance and estimated
travel time is displayed for each
route.
u The system calculates and displays
the route line on the map screen.
2 Route Line P. 144
■Using the Server Route
The following items are available:
• Quick : Displays the route with the shortest travel time.
• Direct : Displays the route with the shortest travel distance.
• Eco : Displays the route with the best fuel efficiency.
1Viewing the Routes
It is not unusual for some ca lculated route options to
be identical.
Server Routes is a subscription service. For more
information, contact an Acura dealer or visit
www.acura.ca/owners/acuralink .
Canadian models
19 ACURA TLX NAVI-31TZ38400.book 141 ページ 2018年3月7日 水曜日 午後4時23分
Page 183 of 399
181
Audio
This section describes how to operate the audio system. You can play music from a wide
array of media sources, and control the audio system using the audio buttons, the
Interface Dial, or voice control.
Audio System.................................................. 182
About Your Audio System .............................. 182
USB Port ........................................................ 183
Auxiliary Input Jack ......... .......................... ..... 184
Audio System Theft Protection ....................... 184
Customizing Audio Source ............................. 185
Audio Remote Controls .................................. 186
Steering Wheel Controls ................................ 186
Audio Settings ................................................. 188
Adjusting the Sound ...................................... 190
Playing FM/AM Radio ..................................... 191
Selecting FM/AM Mode.................................. 191
Audio Screen Control ..................................... 192
Audio Menu .................................................. 195
Playing SiriusXM ® Radio ................................. 196
Selecting SiriusXM ® Mode .............................. 196
Audio Screen Control ..................................... 197
Audio Menu .................................................. 207 SiriusXM
® Radio Service.................................. 208
Playing a Disc ................................................... 210
Selecting Disc Mode ....................................... 210
Audio Screen Control ..................................... 211
Audio Menu ................................................... 214
Recommended CDs ........................................ 215
Playing Hard Disk Drive (HDD) Audio ............ 217
Selecting HDD Mode ...................................... 217
Recording a Music CD to HDD........................ 218
Audio Screen Control ..................................... 219
Audio Menu ................................................... 222
Playing an iPod ................................................ 230
Selecting iPod Mode....................................... 231
Audio Screen Control ..................................... 232
Audio Menu ................................................... 235
Song By Voice
TM (SBV) .................................... 236 Playing Pandora
®
*........................................... 240
Selecting Pandora ® Mode .............................. 240
Audio Screen Control
*................................... 241
Playing a USB Flash Drive ............................... 243
Selecting USB Mode....................................... 244
Audio Screen Control..................................... 245
Audio Menu .................................................. 248
Playing Bluetooth ® Audio .............................. 249
Selecting Bluetooth ® Audio Mode.................. 249
Audio Screen Control..................................... 250
Playing Apple CarPlay® /Android Auto
TM....... 252
Apple CarPlay ®.............................................. 252
Android Auto
TM.............................................. 256
Legal Information on Apple CarPlay ®/Android
Auto
TM......................................................... 261
* Not available on all models
19 ACURA TLX NAVI-31TZ38400.book 181 ページ 2018年3月7日 水曜日 午後4時23分
Page 185 of 399
183
uuAudio System uUSB Port
Audio
USB Port
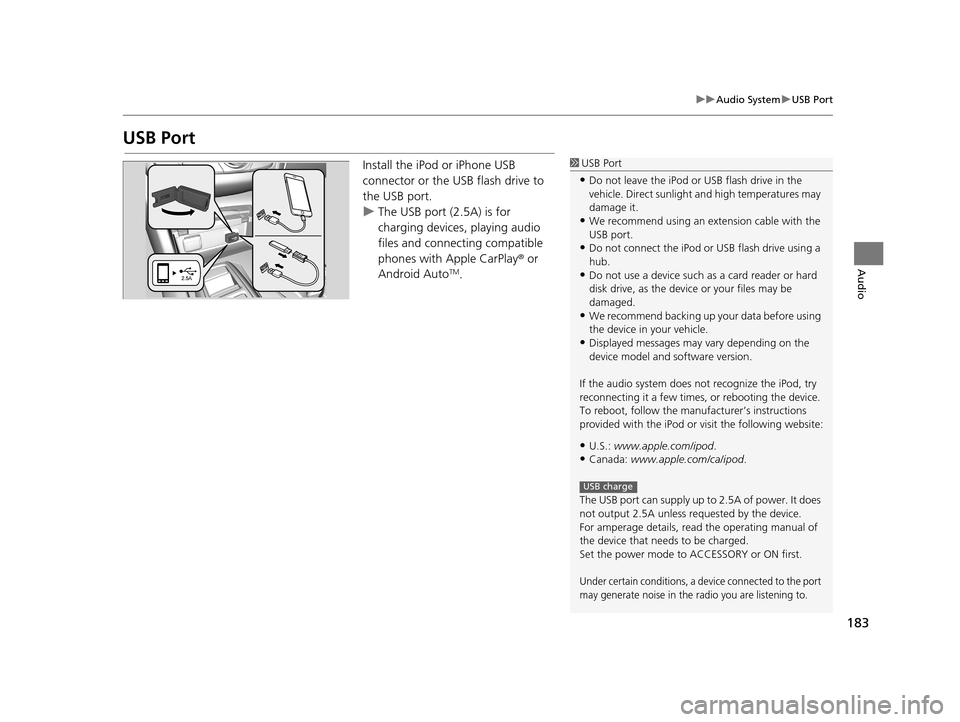
Install the iPod or iPhone USB
connector or the USB flash drive to
the USB port.
u The USB port (2.5A) is for
charging devices, playing audio
files and connecting compatible
phones with Apple CarPlay ® or
Android Auto
TM.
1 USB Port
•Do not leave the iPod or USB flash drive in the
vehicle. Direct sunlight and high temperatures may
damage it.
•We recommend using an ex tension cable with the
USB port.
•Do not connect the iPod or USB flash drive using a
hub.
•Do not use a device such as a card reader or hard
disk drive, as the device or your files may be
damaged.
•We recommend backing up yo ur data before using
the device in your vehicle.
•Displayed messages may vary depending on the
device model and software version.
If the audio system does not recognize the iPod, try
reconnecting it a few times, or rebooting the device.
To reboot, follow the manuf acturer’s instructions
provided with the iPod or visit the following website:
•U.S.: www.apple.com/ipod .
•Canada: www.apple.com/ca/ipod.
The USB port can supply up to 2.5A of power. It does
not output 2.5A unless requested by the device.
For amperage details, read the operating manual of
the device that ne eds to be charged.
Set the power mode to ACCESSORY or ON first.
Under certain conditions, a device connected to the port
may generate noise in the radio you are listening to.
USB charge
19 ACURA TLX NAVI-31TZ38400.book 183 ページ 2018年3月7日 水曜日 午後4時23分
Page 186 of 399
184
uuAudio System uAuxiliary Input Jack
Audio
Auxiliary Input Jack
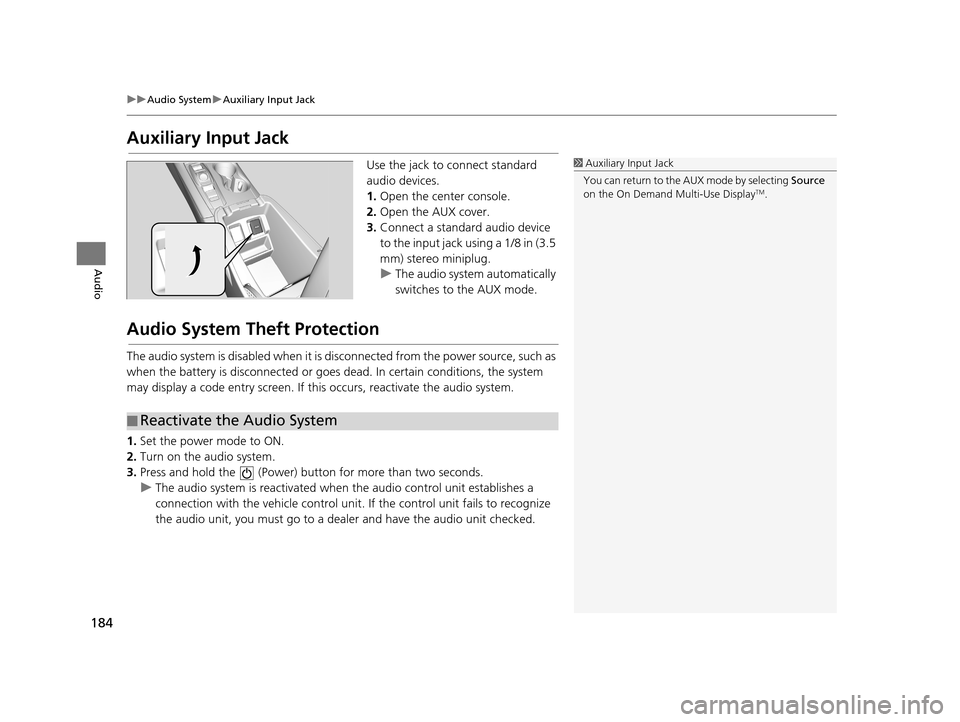
Use the jack to connect standard
audio devices.
1. Open the center console.
2. Open the AUX cover.
3. Connect a standard audio device
to the input jack using a 1/8 in (3.5
mm) stereo miniplug.
u The audio system automatically
switches to the AUX mode.
Audio System Theft Protection
The audio system is disabled when it is di sconnected from the power source, such as
when the battery is disconnected or goes dead. In certain conditions, the system
may display a code entry screen. If this occurs, reactivate the audio system.
1. Set the power mode to ON.
2. Turn on the audio system.
3. Press and hold the (Power) bu tton for more than two seconds.
u The audio system is reactivated when the audio control unit establishes a
connection with the vehicle control unit . If the control unit fails to recognize
the audio unit, you must go to a deal er and have the audio unit checked.
1Auxiliary Input Jack
You can return to the AUX mode by selecting Source
on the On Demand Multi-Use Display
TM.
■ Reactivate the Audio System
19 ACURA TLX NAVI-31TZ38400.book 184 ページ 2018年3月7日 水曜日 午後4時23分
Page 191 of 399
189
uuAudio Settings u
Audio
CD/HDD
•Recording Options : Displays the recording method and sound quality screen.
• Recording from CD (CD mode): Selects whether the songs on music CDs are
automatically recorded to the HDD.
• Recording Quality (CD mode): Selects the quality of the music files recorded to
the HDD.
• HDD Information (HDD mode): Displays the HDD capacity.
• Update Gracenote Album Information (CD or HDD mode): Updates the
Gracenote® Album Info (Gracenote ® Media Database) from CD or USB.
2Updating Gracenote ® Album Info P. 228
•Delete All HDD Data (HDD mode): Resets all the menu and customized
settings, and delete all music data on the HDD.
Other
• HD Radio Mode
* (FM/AM mode): Selects wh ether the audio system
automatically switches to the digital radio waves or receives the analog waves
only.
• Cover Art (CD (MP3/WMA/AAC), iPod, USB, Pandora ®
*, SiriusXM® or HD Radio*
mode): Turns on and off the cover art display.
1 Audio Settings
*: This function is availa ble on U.S. models only.
* Not available on all models
19 ACURA TLX NAVI-31TZ38400.book 189 ページ 2018年3月7日 水曜日 午後4時23分
Page 194 of 399
192
uuPlaying FM/AM Radio uAudio Screen Control
Audio
Audio Screen Control
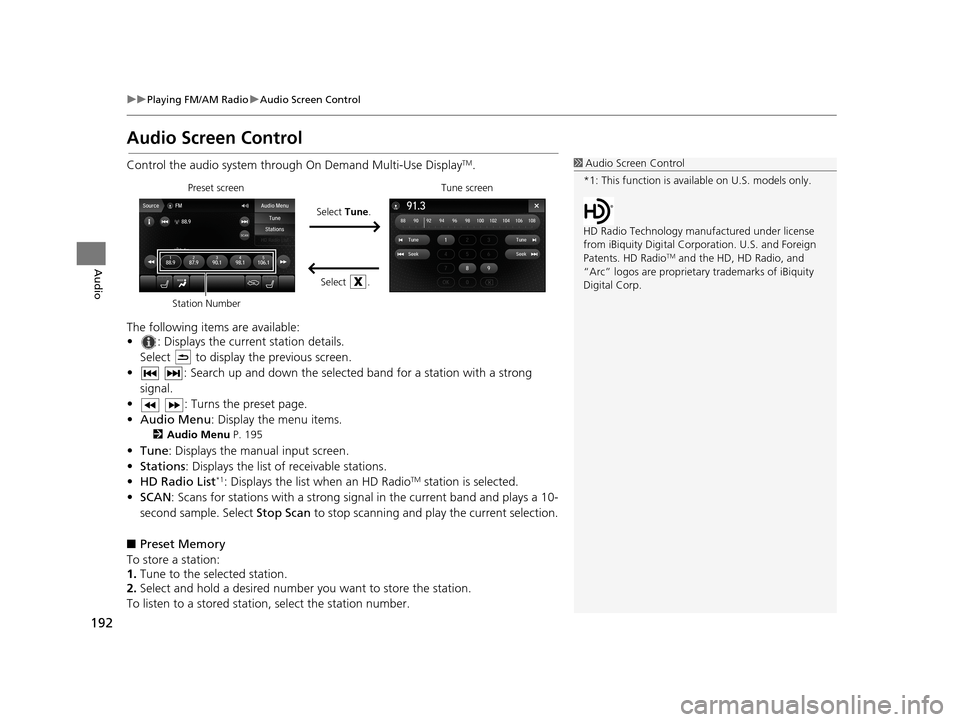
Control the audio system throu gh On Demand Multi-Use DisplayTM.
The following items are available:
• : Displays the current station details. Select to display the previous screen.
• : Search up and down the selected band for a station with a strong signal.
• : Turns the preset page.
• Audio Menu : Display the menu items.
2Audio Menu P. 195
•Tune : Displays the manual input screen.
• Stations : Displays the list of receivable stations.
• HD Radio List
*1: Displays the list when an HD RadioTM station is selected.
• SCAN: Scans for stations with a strong signal in the current band and plays a 10-
second sample. Select Stop Scan to stop scanning and play the current selection.
■ Preset Memory
To store a station:
1. Tune to the selected station.
2. Select and hold a desired number you want to store the station.
To listen to a stored station, select the station number.
1Audio Screen Control
*1: This function is available on U.S. models only.
HD Radio Technology manufactured under license
from iBiquity Digi tal Corporation. U.S. and Foreign
Patents. HD Radio
TM and the HD, HD Radio, and
“Arc” logos are proprietary trademarks of iBiquity
Digital Corp.
Preset screen
Select Tune.
Select .Tune screen
Station Number
19 ACURA TLX NAVI-31TZ38400.book 192 ページ 2018年3月7日 水曜日 午後4時23分
Page 203 of 399
Continued201
uuPlaying SiriusXM ® Radio uAudio Screen Control
Audio
The system constantly records up to the last 60 minutes of your currently tuned
channel and all the preset channel broadc ast, starting from the moment you turn
the power mode to ON. You can rewind and replay the last 60 minutes of each
broadcast.
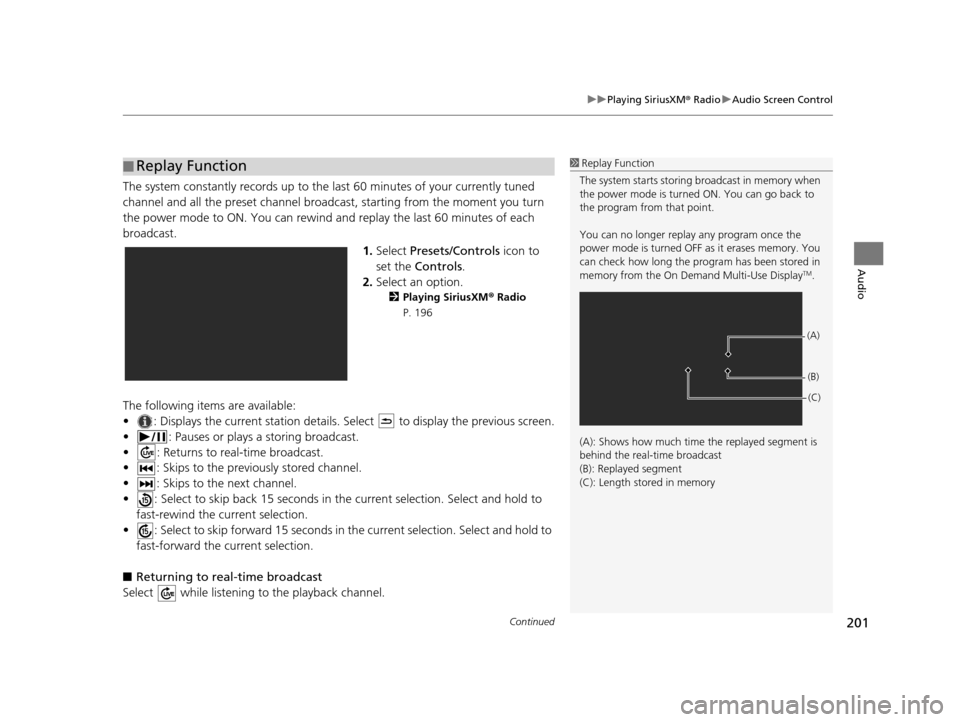
1.Select Presets/Controls icon to
set the Controls .
2. Select an option.
2 Playing SiriusXM ® Radio
P. 196
The following items are available:
• : Displays the current station details. Select to display the previous screen.
• : Pauses or plays a storing broadcast.
• : Returns to real-time broadcast.
• : Skips to the previously stored channel.
• : Skips to the next channel.
• : Select to skip back 15 seconds in th e current selection. Select and hold to
fast-rewind the current selection.
• : Select to skip forward 15 seconds in th e current selection. Select and hold to
fast-forward the current selection.
■ Returning to real-time broadcast
Select while listening to the playback channel.
■ Replay Function1
Replay Function
The system starts storing broadcast in memory when
the power mode is turned ON. You can go back to
the program from that point.
You can no longer repl ay any program once the
power mode is turned OFF as it erases memory. You
can check how long the progr am has been stored in
memory from the On Demand Multi-Use Display
TM.
(A): Shows how much time the replayed segment is
behind the real-time broadcast
(B): Replayed segment
(C): Length stored in memory
(A) (B)(C)
19 ACURA TLX NAVI-31TZ38400.book 201 ページ 2018年3月7日 水曜日 午後4時23分
Page 208 of 399
uuPlaying SiriusXM ® Radio uAudio Screen Control
206
Audio
Sample each channel on the selected mode for 10 seconds.
1. Select Presets/Controls to set the Controls.
2. Select SCAN.
3. Select Scan Channels or Scan Songs in Presets .
To turn off scan, select Stop Scan.
■Scan1
Scan
You can select desired channel by songs using Scan
Songs in Presets .
The “Scan Songs in Preset s” function is based on
TuneScan
TM technology of SiriusXM ®.
The “Featured Channels ” function is based on
Featured Favorites
TM technology of SiriusXM ®.
TuneScan
TM and Featured FavoritesTM are registered
trademarks of SiriusXM ® Radio, Inc.
Scan Mode Menu Items
Scan Channels: Scans for channels with a strong
signal in the selected mode.
Scan Songs in Presets: Scans for desired preset
channel by songs. Select (skip up) or (skip
down) to skip to the next /previous stored selection.
19 ACURA TLX NAVI-31TZ38400.book 206 ページ 2018年3月7日 水曜日 午後4時23分