ACURA TLX 2022 Owners Manual
Manufacturer: ACURA, Model Year: 2022, Model line: TLX, Model: ACURA TLX 2022Pages: 656, PDF Size: 26.43 MB
Page 111 of 656
109
uuGauges and Multi-Information Display uMulti-Information Display
Continued
Instrument Panel
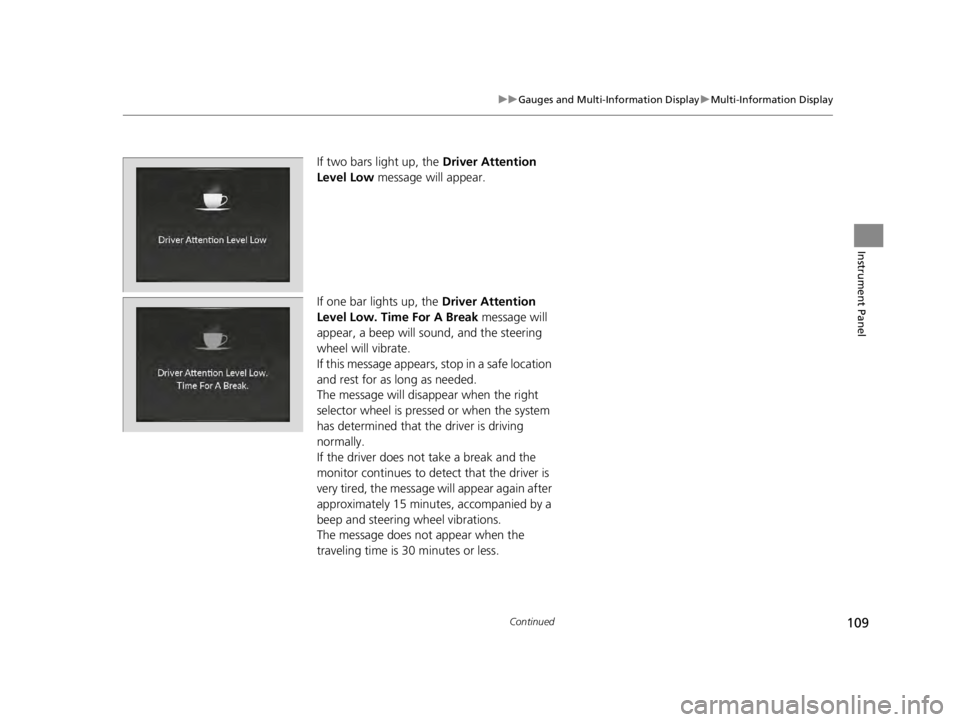
If two bars light up, the Driver Attention
Level Low message will appear.
If one bar lights up, the Driver Attention
Level Low. Time For A Break message will
appear, a beep will sound, and the steering
wheel will vibrate.
If this message appears, stop in a safe location
and rest for as long as needed.
The message will disappear when the right
selector wheel is presse d or when the system
has determined that the driver is driving
normally.
If the driver does not take a break and the
monitor continues to detect that the driver is
very tired, the message will appear again after
approximately 15 minutes, accompanied by a
beep and steering wheel vibrations.
The message does not appear when the
traveling time is 30 minutes or less.
22 ACURA TLX-31TGV6100.book 109 \b
Page 112 of 656
uuGauges and Multi-Information Display uMulti-Information Display
110
Instrument Panel
■The Driver Attention Monitor resets when:
• The power mode is set to VEHICLE OFF.
• The driver unfastens the seat belt and op ens the door while the vehicle is stopped.
■For the Driver Attention Monitor to function:
• The vehicle must be traveling above 25 mph (40 km/h).
• The electric power steering (EPS) system indicator must be off.
■Depending on driving conditions or other factors, the Driver Attention
Monitor may not function in the following circumstances:
• The steering assist function of the Lane Keeping Assist System (LKAS) is active.
2Lane Keeping Assist System (LKAS) P. 450
•The condition of the road is poor, e.g. the surface is unpaved or bumpy.
• It is windy.
• The driver is frequently op erating the vehicle in an assertive manner such as
changing lanes or accelerating.
■Customizing
You can change the Driver Attention Monitor settings. Select Tactile/Audible
Alert, Tactile Alert , or OFF.
2Customized Features P. 302
1For the Driver Attention Monitor to function:
The bars on the multi-info rmation display remain
grayed out unless the Driv er Attention Monitor is
functioning.
22 ACURA TLX-31TGV6100.book 110 \b
Page 113 of 656
111
uuGauges and Multi-Information Display uMulti-Information Display
Instrument Panel
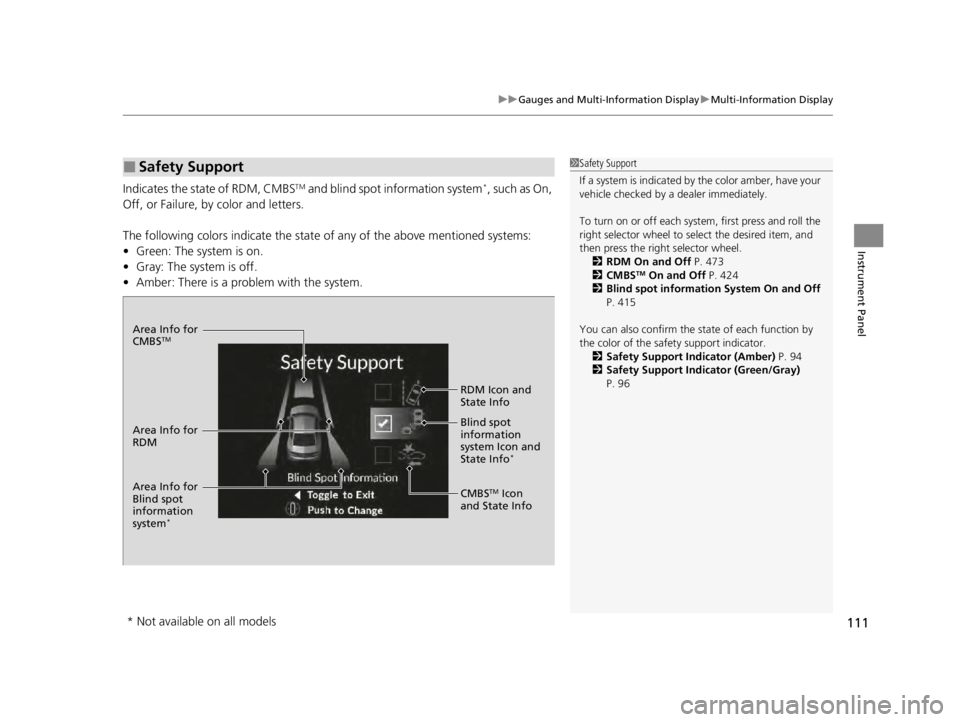
Indicates the state of RDM, CMBSTM and blind spot information system*, such as On,
Off, or Failure, by color and letters.
The following colors indica te the state of any of the above mentioned systems:
• Green: The system is on.
• Gray: The system is off.
• Amber: There is a problem with the system.
■Safety Support1Safety Support
If a system is indicated by the color amber, have your
vehicle checked by a dealer immediately.
To turn on or off each system, first press and roll the
right selector wheel to select the desired item, and
then press the right selector wheel.
2 RDM On and Off P. 473
2 CMBS
TM On and Off P. 424
2 Blind spot information System On and Off
P. 415
You can also confirm the st ate of each function by
the color of the safe ty support indicator.
2 Safety Support Indicator (Amber) P. 94
2 Safety Support Indicator (Green/Gray)
P. 96
Area Info for
CMBSTM
CMBSTM Icon
and State Info RDM Icon and
State Info
Area Info for
RDM Blind spot
information
sy
stem Icon and
State In fo
*
Area Info for
Blind spot
information
system
*
* Not available on all models
22 ACURA TLX-31TGV6100.book 111 \b
Page 114 of 656
112
uuGauges and Multi-Information Display uHead-Up Display*
Instrument Panel
Head-Up Display*
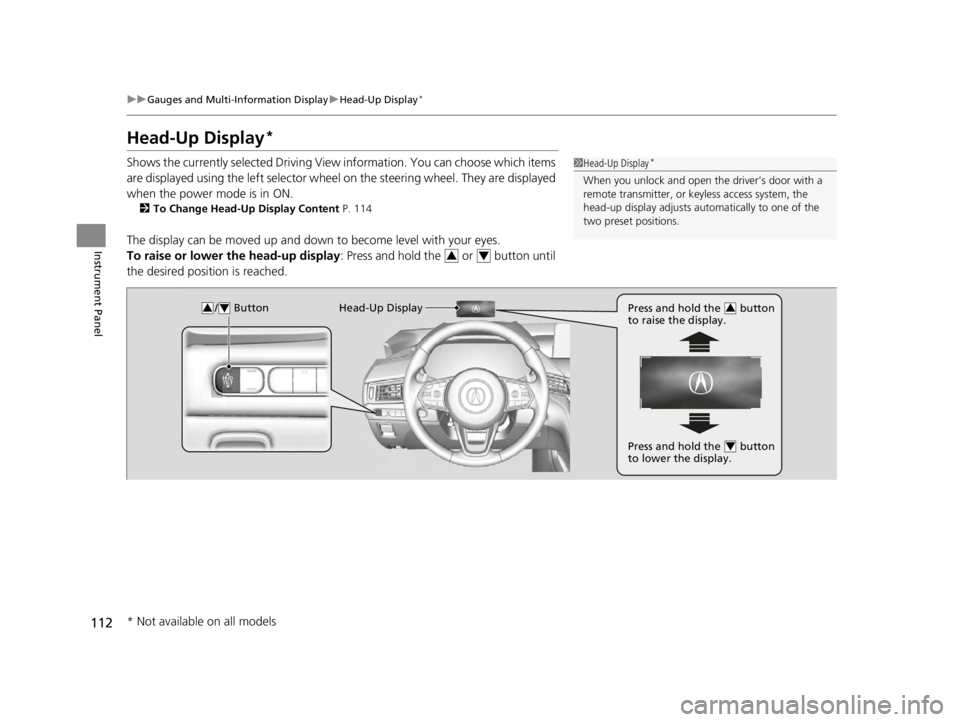
Shows the currently selected Driving View information. You can choose which items
are displayed using the left selector wheel on the steering wheel. They are displayed
when the power mode is in ON.
2 To Change Head-Up Display Content P. 114
The display can be moved up and down to become level with your eyes.
To raise or lower the head-up display : Press and hold the or button until
the desired position is reached.
1 Head-Up Display*
When you unlock and open the driver’s door with a
remote transmitter, or keyless access system, the
head-up display adjusts auto matically to one of the
two preset positions.
34
/ Button34Head-Up Display Press and hold the button
to raise the display.3
Press and hold the button
to lower the display.4
* Not available on all models
22 ACURA TLX-31TGV6100.book 112 \b
Page 115 of 656
113
uuGauges and Multi-Information Display uHead-Up Display*
Continued
Instrument Panel
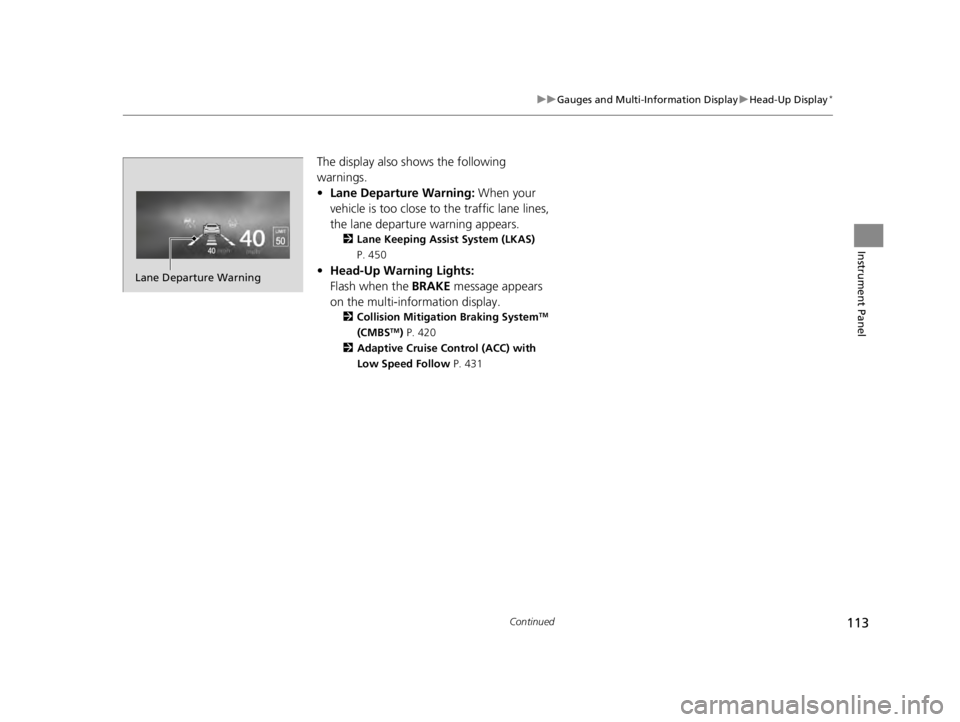
The display also shows the following
warnings.
• Lane Departure Warning: When your
vehicle is too close to the traffic lane lines,
the lane departure warning appears.
2 Lane Keeping Assist System (LKAS)
P. 450
• Head-Up Warning Lights:
Flash when the BRAKE message appears
on the multi-information display.
2 Collision Mitigation Braking SystemTM
(CMBSTM) P. 420
2 Adaptive Cruise Control (ACC) with
Low Speed Follow P. 431
Lane Departure Warning
22 ACURA TLX-31TGV6100.book 113 \b
Page 116 of 656
114
uuGauges and Multi-Information Display uHead-Up Display*
Instrument Panel
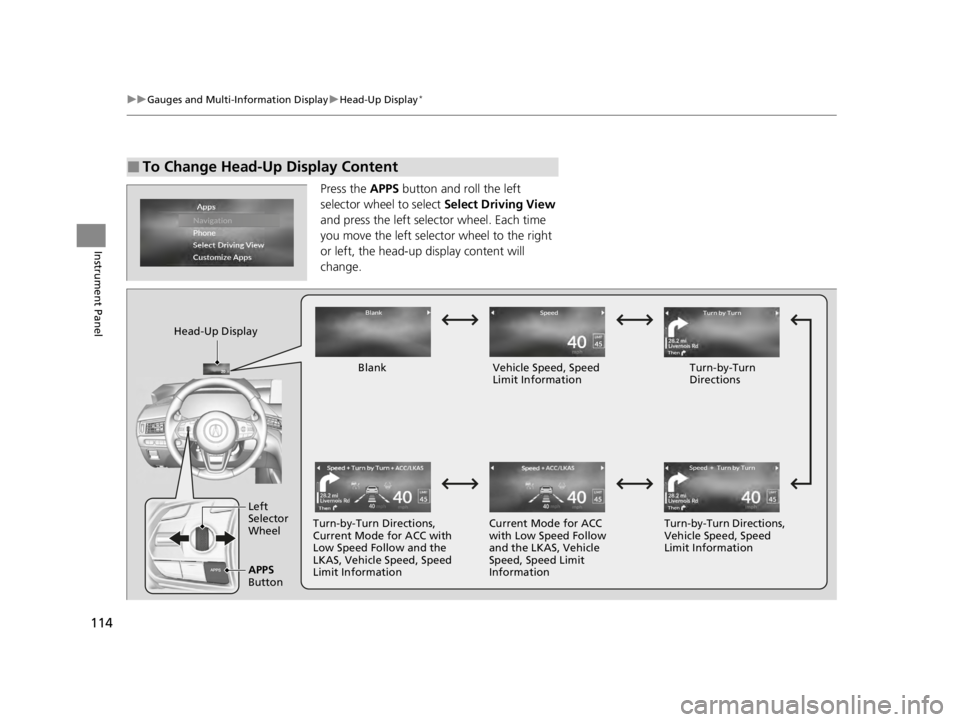
Press the APPS button and roll the left
selector wheel to select Select Driving View
and press the left selector wheel. Each time
you move the left selector wheel to the right
or left, the head-up display content will
change.
■To Change Head-Up Display Content
Head-Up Display
BlankVehicle Speed, Speed
Limit Information Turn-by-Turn
Directions
Turn-by-Turn Directions,
Current Mode for ACC with
Low Speed Follow and the
LKAS, Vehicle Speed, Speed
Limit Information Current Mode for ACC
with Low Speed Follow
and the LKAS, Vehicle
Speed, Speed Limit
InformationTurn-by-Turn Directions,
Vehicle Speed, Speed
Limit Information
Left
Selector
Wheel
APPS
Button
22 ACURA TLX-31TGV6100.book 114 \b
Page 117 of 656
115
uuGauges and Multi-Information Display uHead-Up Display*
Instrument Panel
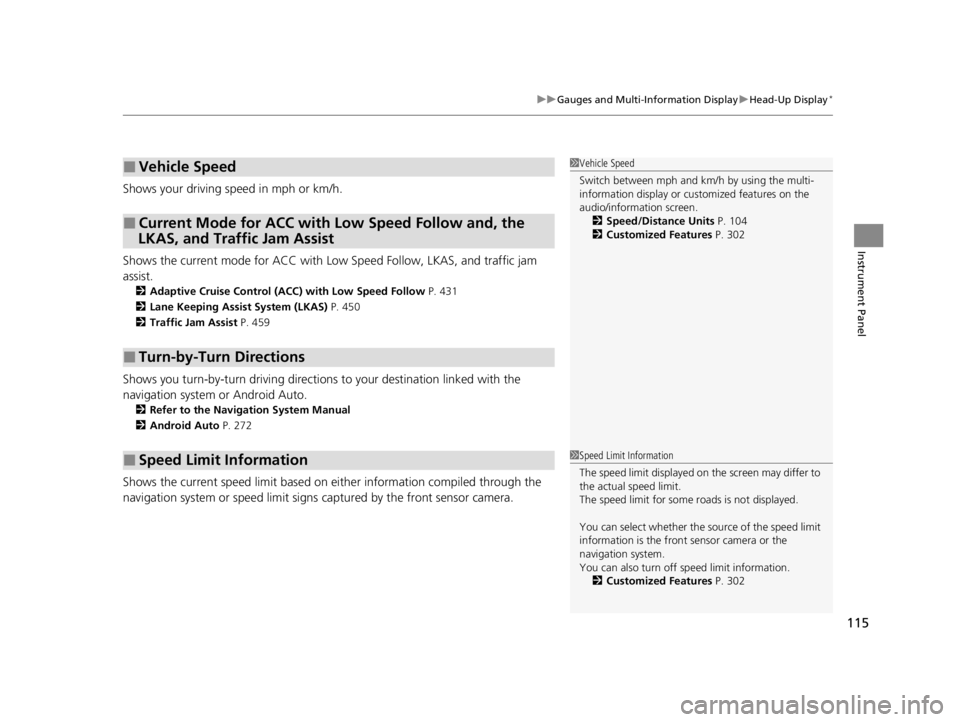
Shows your driving speed in mph or km/h.
Shows the current mode for ACC with Low Speed Follow, LKAS, and traffic jam
assistM
2 Adaptive Cruise Control (ACC) with Low Speed Follow P. 431
2 Lane Keeping Assist System (LKAS) P. 450
2 Traffic Jam Assist P. 459
Shows you turn-by-turn driv ing directions to your destination linked with the
navigation system or Android Auto.
2 Refer to the Navigation System Manual
2 Android Auto P. 272
Shows the current speed limit based on either information compiled through the
navigation system or speed limit signs captured by the front sensor camera.
■Vehicle Speed
■Current Mode for ACC with Low Speed Follow and, the
LKAS, and Traffic Jam Assist
■Turn-by-Turn Directions
■Speed Limit Information
1 Vehicle Speed
Switch between mph and km/h by using the multi-
information display or customized features on the
audio/information screen.
2 Speed/Distance Units P. 104
2 Customized Features P. 302
1Speed Limit Information
The speed limit disp layed on the screen may differ to
the actual speed limit.
The speed limit for some roads is not displayed.
You can select whether the source of the speed limit
information is the front sensor camera or the
navigation system.
You can also turn off speed limit information. 2 Customized Features P. 302
22 ACURA TLX-31TGV6100.book 115 \b
Page 118 of 656

116
22 ACURA TLX-31TGV6100.book 116 \b
Page 119 of 656
117
Controls
This chapter explains how to operate the various controls necessary for driving.
Clock.................................................. 118
Locking and Unlocking the Doors
Key .................................................. 120
Low Keyless Remote Signal Strength ... 122
Locking/Unlocking the Doors from the Outside .......................................... 123
Locking/Unlocking the Doors from the Inside ............................................. 132
Childproof Door Locks ..................... 134
Auto Door Locking/Unlocking .......... 135
Opening and Closing the Trunk ....... 136
Security System ................................ 139
Immobilizer System .......................... 139
Security System Alarm ...................... 139 Windows
........................................... 142
Moonroof .......................................... 145
Operating the Switches Around the Steering Wheel ENGINE START/STOP Button............. 146
Turn Signals ..................................... 149
Light Switches.................................. 150
Fog Lights
*...................................... 153
Daytime Running Lights ................... 153
Auto High-Beam .............................. 154
Wipers and Washers ........................ 157
Brightness Control ........................... 159
Rear Defogger/Heated Door Mirror Button .. 161Driving Position Memory System ...... 162 Adjusting the Steering Wheel .......... 164
Mirrors ............................................... 165
Interior Rearview Mirror ................... 165
Power Door Mirrors ......................... 166
Seats .................................................. 168
Front Seats ...................................... 168
Interior Convenience Items .............. 180
Interior Lights .................................. 180
Storage Items .................................. 182
Climate Control System Using Automatic Climate Control .... 197
Automatic Climate Control Sensors ... 201
* Not available on all models
22 ACURA TLX-31TGV6100.book 117 \b
Page 120 of 656
118
Controls
Clock
Adjusting the Clock
You can adjust the time manually in the audio/information screen with the power
mode in ON.
You can adjust the time using the A-zone touchpad.
2 True Touchpad Interface P. 211
1.Press the (home) button.
2. Select Settings .
3. Select System.
4. Select Date & Time .
5. Select Set Date & Time .
6. Select Automatic Date & Time .
7. Select Off.
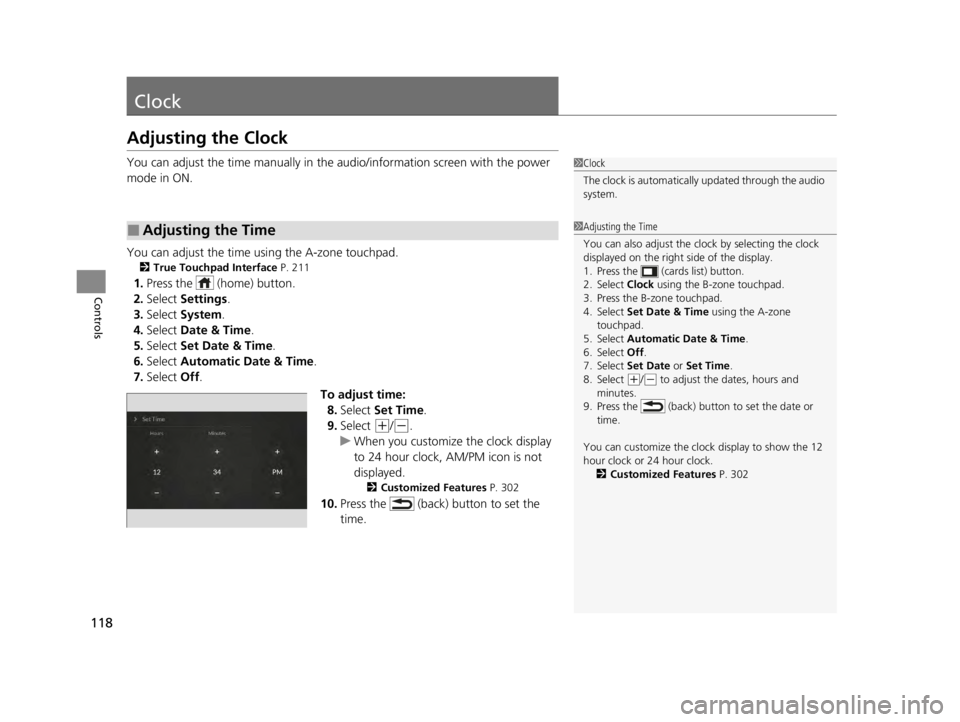
To adjust time:8. Select Set Time .
9. Select
(+/(-.
u When you customize the clock display
to 24 hour clock, AM/PM icon is not
displayed.
2 Customized Features P. 302
10.Press the (back) button to set the
time.
■Adjusting the Time
1Clock
The clock is automatically updated through the audio
system.
1Adjusting the Time
You can also adjust the clock by selecting the clock
displayed on the right side of the display.
1. Press the (cards list) button.
2. Select Clock using the B-zone touchpad.
3. Press the B-zone touchpad.
4. Select Set Date & Time using the A-zone
touchpad.
5. Select Automatic Date & Time .
6. Select Off .
7. Select Set Date or Set Time.
8. Select
( +/(- to adjust the dates, hours and
minutes.
9. Press the (back) button to set the date or
time.
You can customize the clock display to show the 12
hour clock or 24 hour clock. 2 Customized Features P. 302
22 ACURA TLX-31TGV6100.book 118 \b