check engine Acura ZDX 2012 Owner's Guide
[x] Cancel search | Manufacturer: ACURA, Model Year: 2012, Model line: ZDX, Model: Acura ZDX 2012Pages: 370, PDF Size: 10.06 MB
Page 228 of 370
226
uuWhen Driving uPrecautions While Driving
Driving
Precautions While Driving
Utility vehicles have a significantly higher rollover rate than other types of vehicles.
To prevent rollovers or loss of control:
• Take corners at slower speeds than you would with a passenger vehicle.
• Avoid sharp turns and abrupt maneuvers whenever possible.
• Do not modify your vehicle in any way th at you would raise the center of gravity.
• Do not carry heavy cargo on the roof.
Avoid driving in deep water and on flooded roads. This can damage the engine or
cause electrical component failure.
If there is a strong impact with something under the vehicl e, stop in a safe location.
Check the underside of the vehicl e for damage or any fluid leaks.
■Driving Guidelines for Your Utility Vehicle
■In Rain
■Other Precautions
1Precautions While Driving
NOTICEDo not operate the shift lever while pressing the
accelerator pedal. You could damage the
transmission.
If the ignition switch is turned to ACCESSORY
(q or
LOCK (0*1 while driving, the engine will shut down
and all steering and brake power assist functions will
stop, making it difficult to control the vehicle.
Do not put the shift lever in
( N, as you will lose
engine braking (and acce leration) performance.
During the first 600 mile s (1,000 km) of operation,
avoid sudden acceleration or full throttle operation so
as not to damage the engine or powertrain.
Avoid hard braking for the first 200 miles (300 km).
You should also follow this when the brake pads are
replaced.
1 Driving Guidelines for Your Utility Vehicle
Failure to operate your vehi cle correctly might result
in a crash or a roll over.
2 Important Handling Information P. 24
2 Off-Highway Driving Guidelines P. 220
*1: Models with the keyles s access system have an
ENGINE START/STOP button instead of an ignition
switch.
Page 231 of 370
Continued229
uuWhen Driving uShifting
Driving
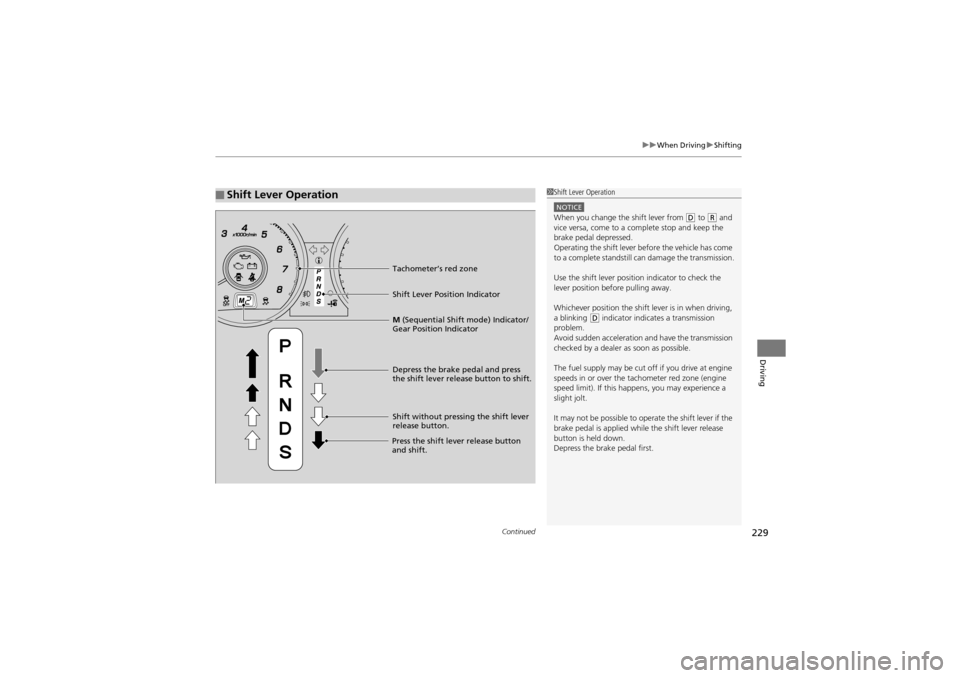
■Shift Lever Operation1Shift Lever Operation
NOTICEWhen you change the shift lever from (D to (R and
vice versa, come to a co mplete stop and keep the
brake pedal depressed.
Operating the shift lever before the vehicle has come
to a complete standstill ca n damage the transmission.
Use the shift lever position indicator to check the
lever position before pulling away.
Whichever position the shift lever is in when driving,
a blinking
( D indicator indicates a transmission
problem.
Avoid sudden acceleration and have the transmission
checked by a dealer as soon as possible.
The fuel supply may be cut off if you drive at engine
speeds in or over the ta chometer red zone (engine
speed limit). If this happen s, you may experience a
slight jolt.
It may not be possible to operate the shift lever if the
brake pedal is applied while the shift lever release
button is held down.
Depress the brake pedal first.
Tachometer’s red zone
Shift Lever Position Indicator
Depress the brake pedal and press
the shift lever release button to shift.
Shift without pressing the shift lever
release button.
Press the shift lever release button
and shift. M
(Sequential Shift mode) Indicator/
Gear Position Indicator
Page 245 of 370
243
uuWhen Driving uVSA ® (Vehicle Stability Assist), aka ESC (Electronic Stability Control), System
Continued
Driving
VSA ® (Vehicle Stability Assist), aka ESC (Electronic
Stability Control), System
VSA ® helps to stabilize the vehicle during corn ering if the vehicle turns more or less
than what was intended. It also assists in maintaining traction on slippery surfaces.
It does so by regulating engine ou tput and selectively applying the brakes.
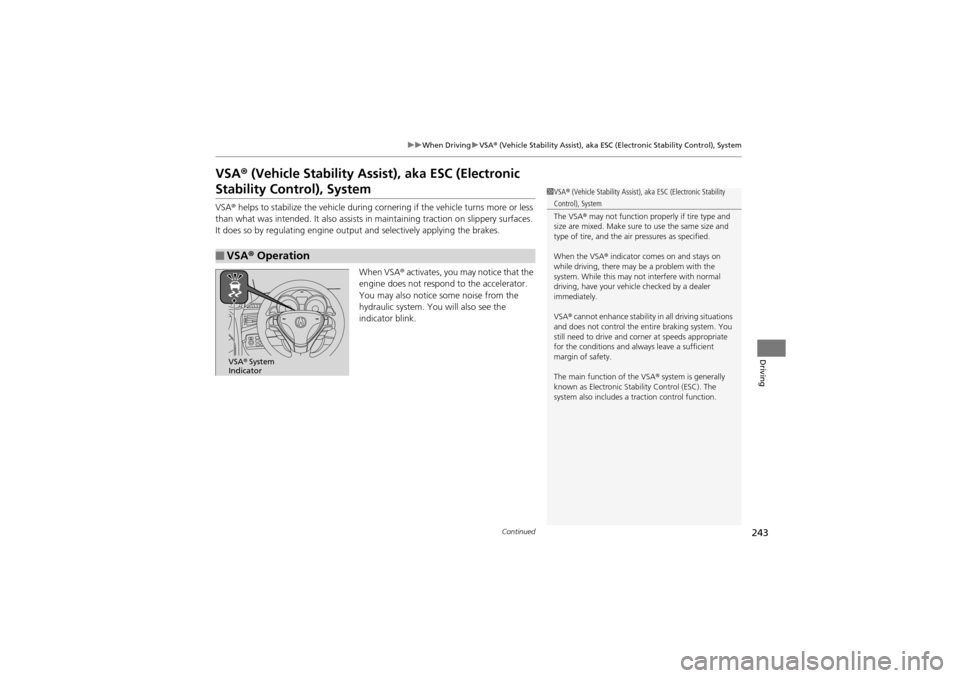
When VSA ® activates, you may notice that the
engine does not respon d to the accelerator.
You may also notice some noise from the
hydraulic system. You will also see the
indicator blink.
■VSA ® Operation
1 VSA ® (Vehicle Stability Assist), aka ESC (Electronic Stability
Control), System
The VSA ® may not function properly if tire type and
size are mixed. Make sure to use the same size and
type of tire, and the air pressures as specified.
When the VSA ® indicator comes on and stays on
while driving, there may be a problem with the
system. While this may no t interfere with normal
driving, have your vehi cle checked by a dealer
immediately.
VSA ® cannot enhance stability in all driving situations
and does not control the entire braking system. You
still need to drive and corner at speeds appropriate
for the conditions and always leave a sufficient
margin of safety.
The main function of the VSA ® system is generally
known as Electronic Stability Control (ESC). The
system also includes a traction control function.
VSA ® System
Indicator
Page 246 of 370
uuWhen Driving uVSA ® (Vehicle Stability Assist), aka ESC (Electronic Stability Control), System
244
Driving
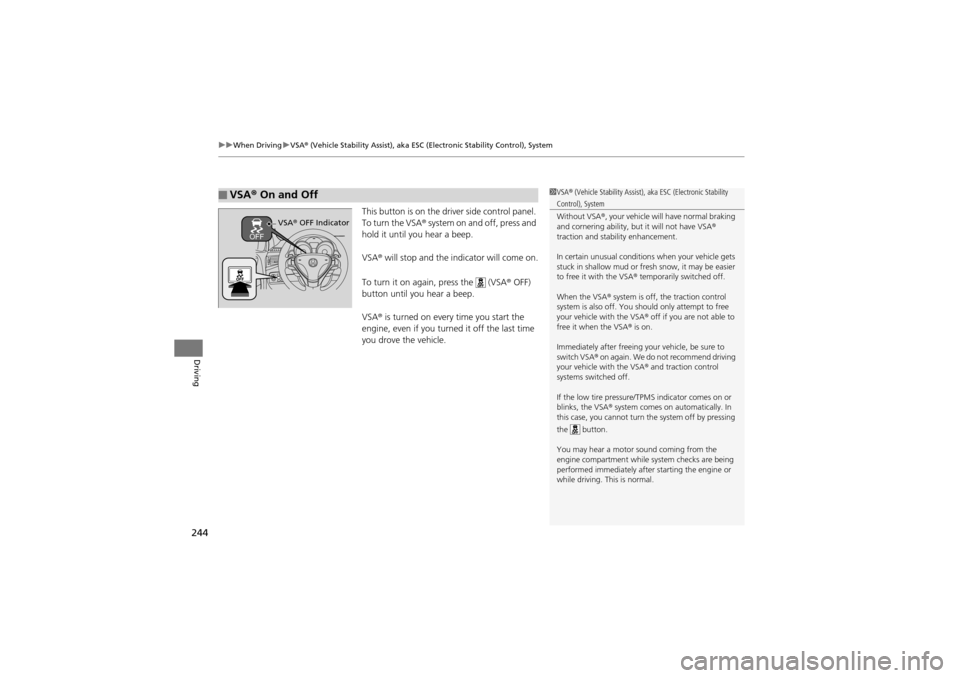
This button is on the driver side control panel.
To turn the VSA® system on and off, press and
hold it until you hear a beep.
VSA ® will stop and the indicator will come on.
To turn it on agai n, press the (VSA ® OFF)
button until you hear a beep.
VSA ® is turned on every time you start the
engine, even if you turned it off the last time
you drove the vehicle.
■VSA ® On and Off1 VSA ® (Vehicle Stability Assist), aka ESC (Electronic Stability
Control), System
Without VSA ®, your vehicle will have normal braking
and cornering ability, but it will not have VSA ®
traction and stability enhancement.
In certain unusual condition s when your vehicle gets
stuck in shallow mud or fresh snow, it may be easier
to free it with the VSA ® temporarily switched off.
When the VSA ® system is off, the traction control
system is also off. You sh ould only attempt to free
your vehicle with the VSA ® off if you are not able to
free it when the VSA ® is on.
Immediately after freeing yo ur vehicle, be sure to
switch VSA ® on again. We do not recommend driving
your vehicle with the VSA ® and traction control
systems switched off.
If the low tire pressure/T PMS indicator comes on or
blinks, the VSA ® system comes on automatically. In
this case, you cannot turn the system off by pressing
the button.
You may hear a motor sound coming from the
engine compartmen t while system checks are being
performed immediately after starting the engine or
while driving. This is normal.
VSA ® OFF Indicator
Page 250 of 370
248
uuWhen Driving uTPMS (Tire Pressure Monitoring System)
Driving
TPMS (Tire Pressure Monitoring System)
Monitors the tire pressure while you are driving. If your vehicle’s tire pressure
becomes significantly low, the low tire pressure/TPMS indicator comes on and a
message appears on the mu lti-information display.
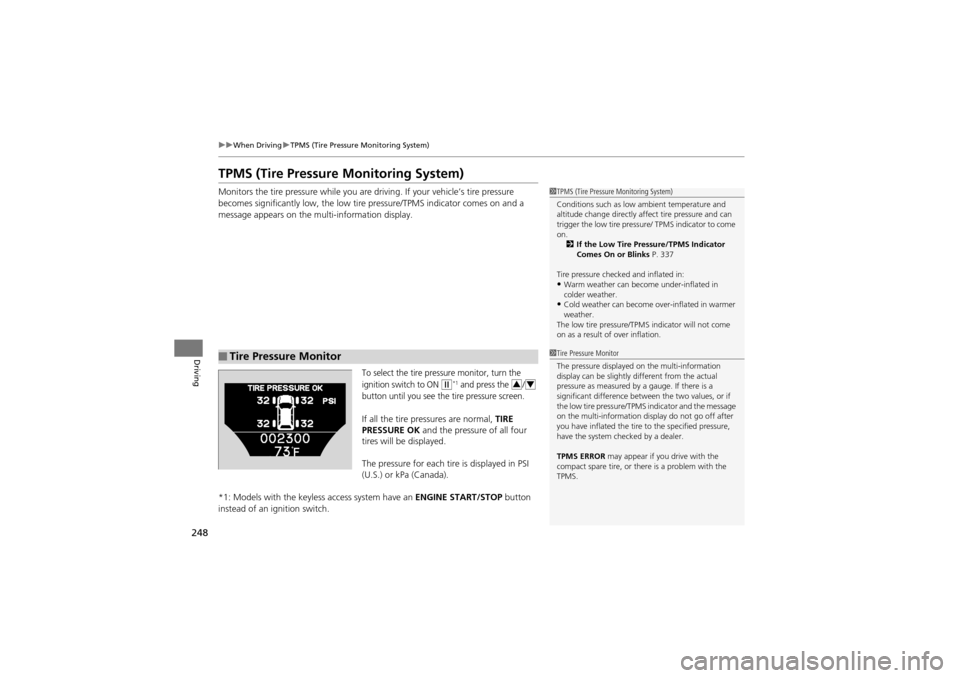
To select the tire pressure monitor, turn the
ignition switch to ON
w*1 and press the /
button until you see the tire pressure screen.
If all the tire pressures are normal, TIRE
PRESSURE OK and the pressure of all four
tires will be displayed.
The pressure for each tire is displayed in PSI
(U.S.) or kPa (Canada).
*1: Models with the keyless access system have an ENGINE START/STOP button
instead of an ignition switch.
■Tire Pressure Monitor
1 TPMS (Tire Pressure Monitoring System)
Conditions such as low ambient temperature and
altitude change directly affect tire pressure and can
trigger the low tire pressure / TPMS indicator to come
on. 2 If the Low Tire Pressure/TPMS Indicator
Comes On or Blinks P. 337
Tire pressure checked and inflated in:
•Warm weather can beco me under-inflated in
colder weather.
•Cold weather can become over-inflated in warmer
weather.
The low tire pressure/TPM S indicator will not come
on as a result of over inflation.
1 Tire Pressure Monitor
The pressure displayed on the multi-information
display can be slightly different from the actual
pressure as measured by a gauge. If there is a
significant difference between the two values, or if
the low tire pressure/TPMS indicator and the message
on the multi-information display do not go off after
you have inflated the tire to the specified pressure,
have the system checked by a dealer.
TPMS ERROR may appear if you drive with the
compact spare tire, or ther e is a problem with the
TPMS.
34
Page 256 of 370
uuBraking uBrake System
254
Driving
Your vehicle is equipped with disc brakes at all four wheels. A power assist helps
reduce the effort needed on the brake pedal. The brake assist system increases the
stopping force when you depress the brake pe dal hard in an emergency situation.
The anti-lock brake system (ABS) helps you re tain steering control when braking very
hard.
2 Brake Assist System P. 256
2 ABS (Anti-lock Brake System) P. 255
■Foot Brake1Foot Brake
Check the brakes after driv ing through deep water,
or if there is a buildup of road surface water. If
necessary, dry the brakes by lightly depressing the
pedal several times.
If you hear a continuous metallic friction sound when
applying the brakes, the brake pads need to be
replaced. Have the vehicl e checked by a dealer.
Constantly using the brak e pedal while going down a
long hill builds up heat, which reduces the brake
effectiveness. Apply engine braking by taking your
foot off the accelerator pedal and downshifting to a
lower gear.
Do not rest your foot on the brake pedal while
driving, as it will lightly apply the brakes and cause
them to lose effectiveness over time and reduce pad
life. It will also confuse drivers behind you.
Page 257 of 370
255
uuBraking uABS (Anti-lock Brake System)
Driving
ABS (Anti-lock Brake System)
Helps prevent the wheels from locking up, an d helps you retain steering control by
pumping the brakes rapidly, much faster than you.
The electronic brake distribution (EBD) sy stem, which is part of the ABS, also
balances the front-to-rear braking distri bution according to vehicle loading.
You should never pump th e brake pedal. Let the ABS work for you by always
keeping firm, steady pressure on the brake pedal. This is sometimes referred to as
“stomp and steer.”
■ABS operation
The brake pedal may pulsate slightly when the ABS is working. Keep holding the
pedal firmly down. On dry pavement, you will need to press on the brake pedal very
hard before the ABS activates. However, you may feel the ABS activate immediately
if you are trying to stop on snow or ice.
When the vehicle speed goes under 6 mph (10 km/h), the ABS stops.
■ABS1 ABS (Anti-lock Brake System)
NOTICEThe ABS may not function correctly if you use an
incorrect tire type and size.
When the ABS indicator comes on while driving,
there may be a problem with the system.
While normal braking is no t affected, there is a
possibility of the ABS not operating. Have the vehicle
checked by a dealer immediately.
The ABS does not reduce the ti me or distance it takes
to stop the vehicle. It only helps with steering control
during hard braking.
In the following cases, your vehicle may need more
stopping distance than a vehicle without the ABS:
•When driving on rough road surfaces, including
when driving on uneven surfaces, such as gravel or
snow.
•When tire chains are installed.
You may hear a motor sound coming from the
engine compartmen t while system checks are being
performed immediately after starting the engine or
while driving. This is normal.
Page 271 of 370
269
Maintenance
This chapter discusses basic maintenance.
Before Performing MaintenanceInspection and Mainte nance ............ 270
Safety When Performing Maintenance..... 271Parts and Fluids Used in Maintenance
Service ........................................... 272
Maintenance Minder
TM..................... 273
Maintenance Under the Hood
Maintenance Items Under the Hood ..... 277Opening the Hood ........................... 278
Engine Compartment Covers ........... 279
Recommended Engine Oi l ................ 280
Oil Check ......................................... 281
Adding Engine Oil ............................ 282
Changing the Engine Oil and Oil Filter ..... 283Engine Coolant ................................ 285
Transmission Fluid ............................ 287
Brake Fluid ....................................... 288
Power Steering Fluid Check.............. 289
Refilling Window Washer Fluid......... 290
Replacing Light Bulbs ....................... 291
Checking and Maintaining Wiper
Blades .......................................... 298
Checking and Maintaining Tires
Checking Tires ................................. 300
Tire and Loading Information Label ...... 301Tire Labeling .................................... 301
DOT Tire Quality Grading (U.S. Vehicles) ...... 303Wear Indicators ............................... 305
Tire Service Life ................................ 305
Tire and Wheel Replacement ........... 306
Tire Rotation .................................... 307
Winter Tires ..................................... 308
Battery ............................................... 309
Remote Transmitter Care ................. 310
Climate Control System Maintenance..... 312Cleaning
Interior Care .................................... 313
Exterior Care.................................... 315
Page 277 of 370
275
uuMaintenance MinderTMuTo Use Maintenance MinderTM
Continued
Maintenance
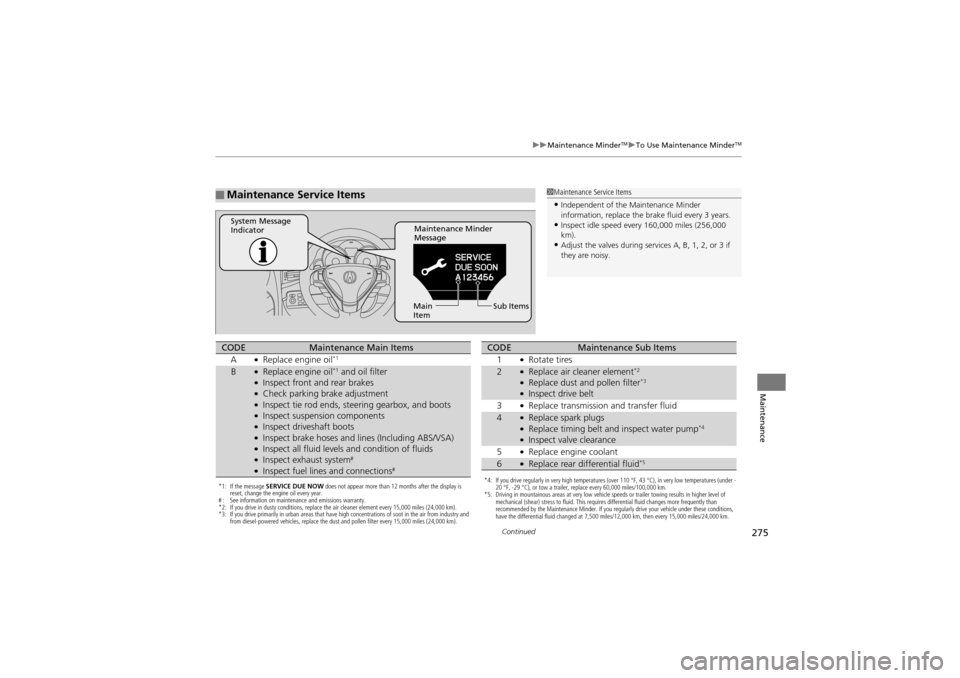
■Maintenance Service Items1Maintenance Service Items
•Independent of the Maintenance Minder
information, replace the brake fluid every 3 years.
•Inspect idle speed every 160,000 miles (256,000
km).
•Adjust the valves during services A, B, 1, 2, or 3 if
they are noisy.
Maintenance Minder
Message
System Message
Indicator
Sub Items
Main
Item
*1: If the message SERVICE DUE NOW does not appear more than 12 months after the display is
reset, change the engine oil every year.
# : See information on maintenance and emissions warranty.
*2: If you drive in dusty conditions, replace the air cleaner element every 15,000 miles (24,000 km).
*3: If you drive primarily in urban areas that have high concentrations of soot in the air from industry and
from diesel-powered vehicles, replace the dust and pollen filter every 15,000 miles (24,000 km).
CODEMaintenance Main Items
A●Replace engine oil*1
B●Replace engine oil*1 and oil filter●Inspect front and rear brakes●Check parking brake adjustment●Inspect tie rod ends, steering gearbox, and boots●Inspect suspension components●Inspect driveshaft boots●Inspect brake hoses and li nes (Including ABS/VSA)●Inspect all fluid levels and condition of fluids●Inspect exhaust system#
●Inspect fuel lines and connections#*4: If you drive regularly in very high temperatures (over 110 °F, 43 °C), in very low temperatures (under -
20 °F, -29 °C), or tow a trailer, replace every 60,000 miles/100,000 km.
*5: Driving in mountainous areas at very low vehicle speeds or trailer towing results in higher level of
mechanical (shear) stress to fluid. This requires differential fluid changes more frequently than
recommended by the Maintenance Minder. If you regularly drive your vehicle under these conditions,
have the differential fluid changed at 7,500 miles/12,000 km, then every 15,000 miles/24,000 km.
CODEMaintenance Sub Items
1●Rotate tires
2●Replace air cleaner element*2
●Replace dust and pollen filter*3
●Inspect drive belt
3●Replace transmission and transfer fluid
4●Replace spark plugs●Replace timing belt an d inspect water pump*4
●Inspect valve clearance
5●Replace engine coolant
6●Replace rear differential fluid*5
Page 283 of 370
281
uuMaintenance Under the Hood uOil Check
Maintenance
Oil Check
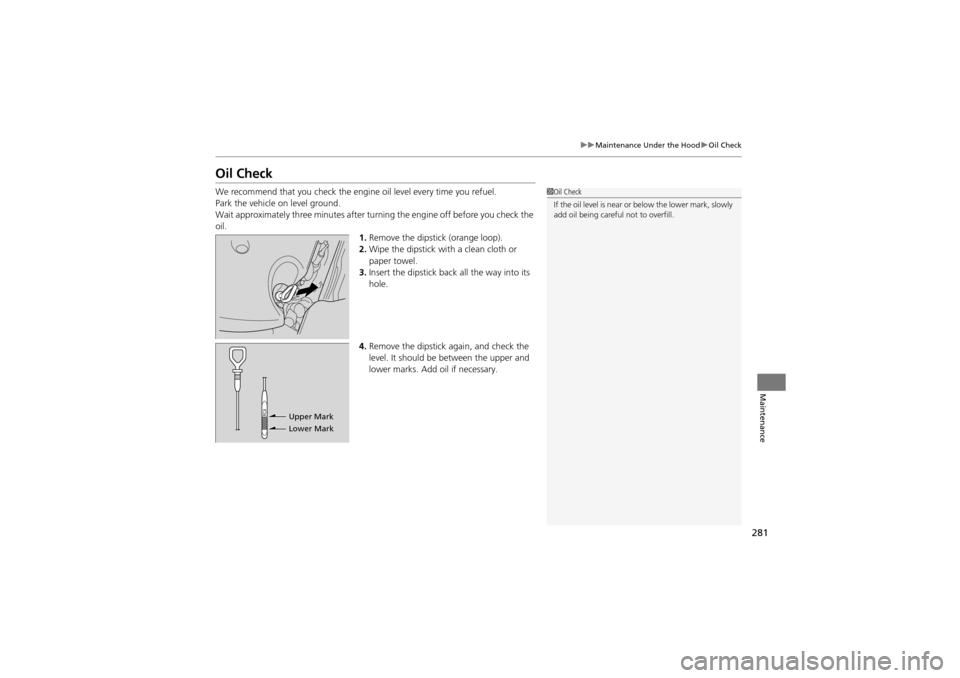
We recommend that you check the engine oil level every time you refuel.
Park the vehicle on level ground.
Wait approximately three minutes after turn ing the engine off before you check the
oil. 1.Remove the dipstick (orange loop).
2. Wipe the dipstick with a clean cloth or
paper towel.
3. Insert the dipstick back all the way into its
hole.
4. Remove the dipstick again, and check the
level. It should be between the upper and
lower marks. Add oil if necessary.1 Oil Check
If the oil level is near or below the lower mark, slowly
add oil being careful not to overfill.
Upper Mark
Lower Mark