Acura ZDX 2012 Owner's Manual
Manufacturer: ACURA, Model Year: 2012,
Model line: ZDX,
Model: Acura ZDX 2012
Pages: 370, PDF Size: 10.06 MB
Acura ZDX 2012 Owner's Manual
ZDX 2012
Acura
Acura
https://www.carmanualsonline.info/img/32/11157/w960_11157-0.png
Acura ZDX 2012 Owner's Manual
Trending: child lock, charging, sport mode, spare tire, fuel filter, spare tire location, light
Page 291 of 370
289
uuMaintenance Under the Hood uPower Steering Fluid Check
Maintenance
Power Steering Fluid Check
We recommend that you check the power steer ing fluid level every time you refuel.
Check when the engi ne is not running.
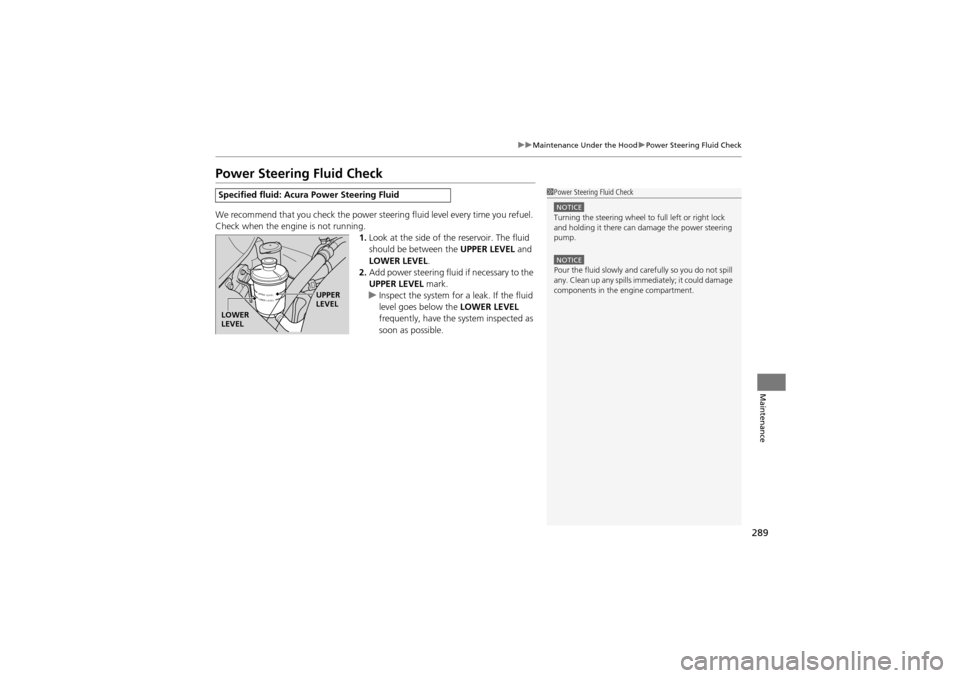
1.Look at the side of the reservoir. The fluid
should be between the UPPER LEVEL and
LOWER LEVEL .
2. Add power steering fluid if necessary to the
UPPER LEVEL mark.
u Inspect the system for a leak. If the fluid
level goes below the LOWER LEVEL
frequently, have the system inspected as
soon as possible.
Specified fluid: Acura Power Steering Fluid1 Power Steering Fluid Check
NOTICETurning the steering wheel to full left or right lock
and holding it there can damage the power steering
pump.
NOTICEPour the fluid slowly and carefully so you do not spill
any. Clean up any spills immediately; it could damage
components in the engine compartment.
UPPER
LEVEL
LOWER
LEVEL
Page 292 of 370
290
uuMaintenance Under the Hood uRefilling Window Washer Fluid
Maintenance
Refilling Window Washer Fluid
If the washer fluid is low, a message appears on the multi-information display.
Pour the washer fluid carefully. Do not overflow the reservoir.1Refilling Window Washer Fluid
NOTICEDo not use engine antifr eeze or a vinegar/water
solution in the windshield washer reservoir.
Antifreeze can damage your vehicle’s paint. A
vinegar/water solution ca n damage the windshield
washer pump.
Page 293 of 370
291
Maintenance
Replacing Light Bulbs
Headlight Bulbs
When replacing, use the following bulbs.
High voltage can remain in th e circuit for a long period of time after the light is
switched off. Do not attempt to inspect or replace the high voltage discharge type
bulbs yourself. Ask a dealer to inspect and replace high/low beam headlights.
High/Low beam headlight:35W (D2S for high voltage discharge type)
■High/Low Beam Headlights
1 Headlight Bulbs
NOTICEThe headlight aim is set by the factory, and does not
need to be adjusted. However, if you regularly carry
heavy items in the cargo ar ea or tow a trailer, have
the aiming readjusted at a dealer or by a qualified
technician.
The exterior lights’ inside lenses (headlights, brake
lamps, etc.) may fog temporarily after a vehicle wash
or while driving in the rain. This does not impact the
exterior light function.
However, if you see a large amount of water or ice
accumulated inside the le nses, have your vehicle
inspected by a dealer.
Page 294 of 370
292
uuReplacing Light Bulbs uFog Light Bulbs
Maintenance
Fog Light Bulbs
When replacing, use the following bulbs.
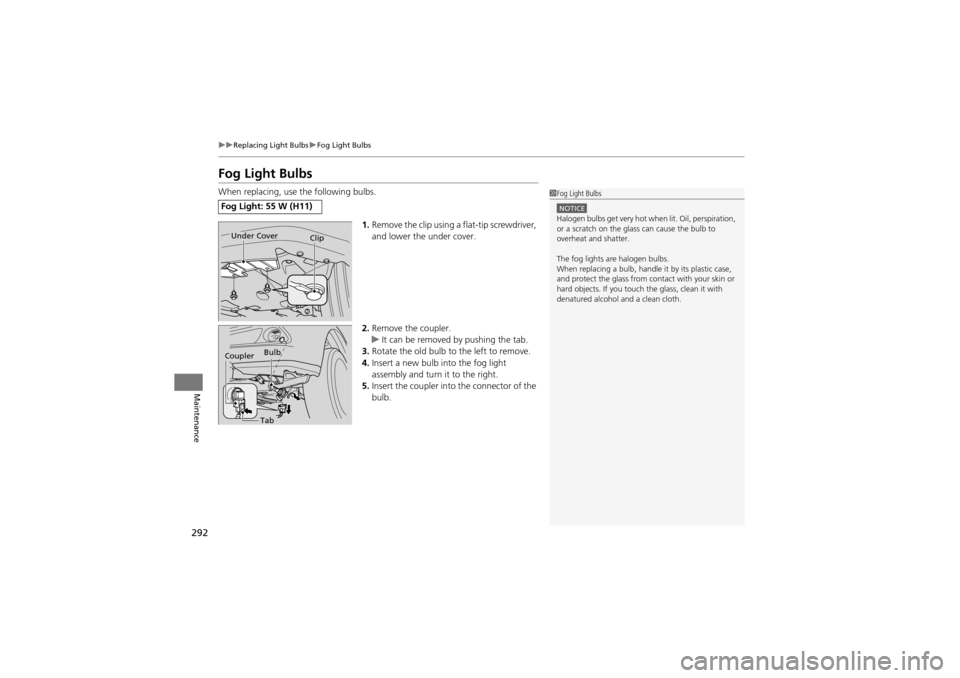
1.Remove the clip using a flat-tip screwdriver,
and lower the under cover.
2. Remove the coupler.
u It can be removed by pushing the tab.
3. Rotate the old bulb to the left to remove.
4. Insert a new bulb into the fog light
assembly and turn it to the right.
5. Insert the coupler into the connector of the
bulb.
Fog Light: 55 W (H11)
1Fog Light Bulbs
NOTICEHalogen bulbs get very hot when lit. Oil, perspiration,
or a scratch on the glass can cause the bulb to
overheat and shatter.
The fog lights are halogen bulbs.
When replacing a bulb, handle it by its plastic case,
and protect the glass from contact with your skin or
hard objects. If you touch the glass, clean it with
denatured alcohol and a clean cloth.
Under Cover Clip
Bulb
Coupler
Tab
Page 295 of 370
293
uuReplacing Light Bulbs uFront Turn Signal/Parking Light and Front Side Marker Light Bulbs
Maintenance
Front Turn Signal/Parking Light and Front Side
Marker Light Bulbs
When replacing, use the following bulbs.
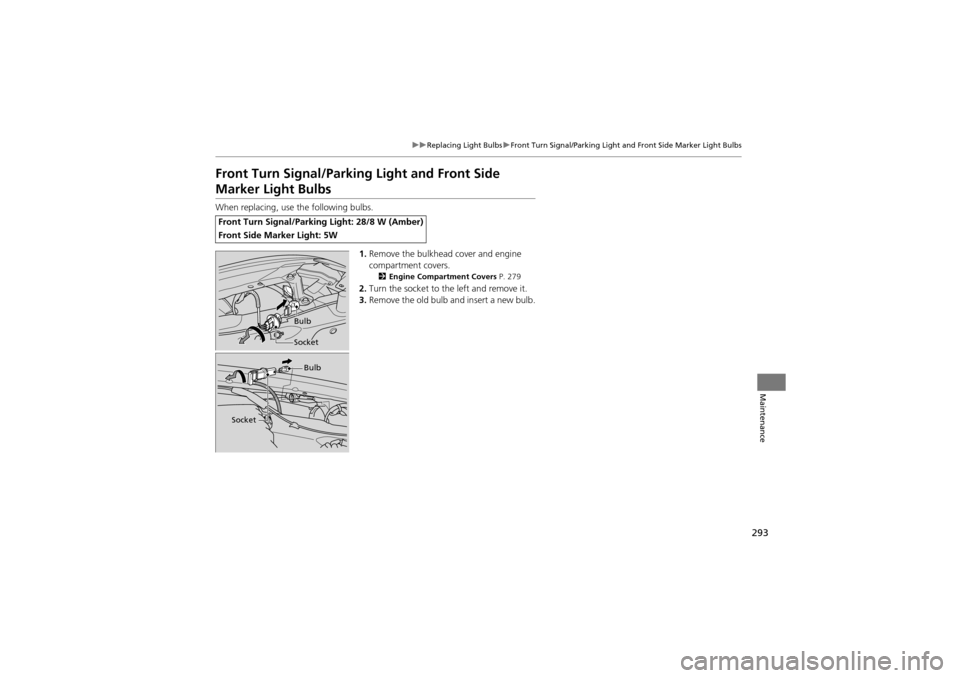
1.Remove the bulkhead cover and engine
compartment covers.
2 Engine Compar tment Covers P. 279
2.Turn the socket to the left and remove it.
3. Remove the old bulb and insert a new bulb.
Front Turn Signal/Parking Light: 28/8 W (Amber)
Front Side Marker Light: 5W
Bulb
Socket
Socket Bulb
Page 296 of 370
294
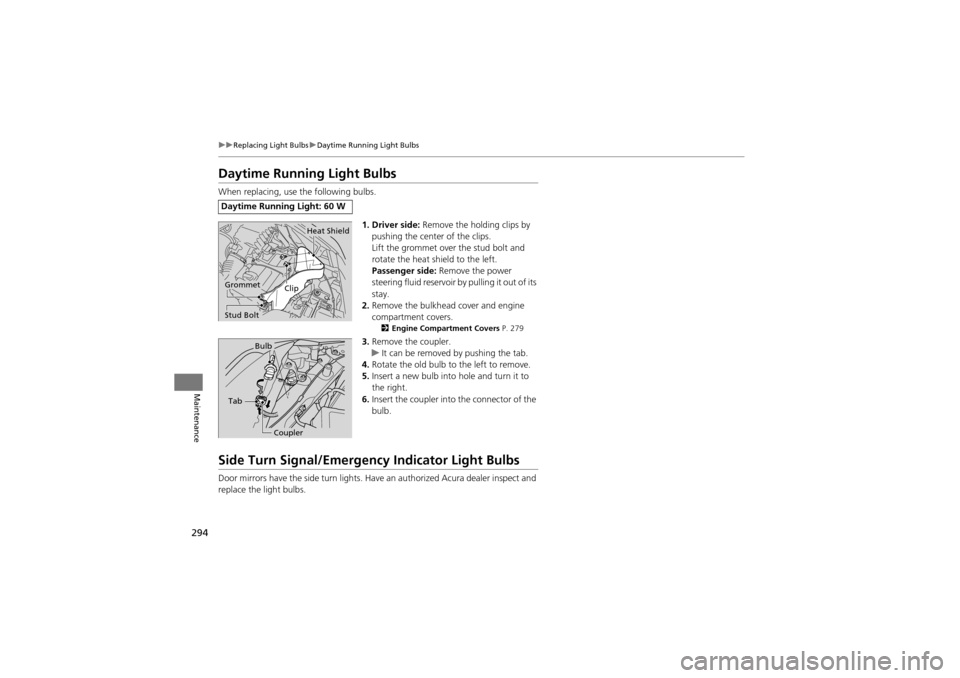
uuReplacing Light Bulbs uDaytime Running Light Bulbs
Maintenance
Daytime Running Light Bulbs
When replacing, use the following bulbs.
1. Driver side: Remove the holding clips by
pushing the center of the clips.
Lift the grommet over the stud bolt and
rotate the heat shield to the left.
Passenger side: Remove the power
steering fluid reservoir by pulling it out of its
stay.
2. Remove the bulkhead cover and engine
compartment covers.
2 Engine Compartment Covers P. 279
3.Remove the coupler.
u It can be removed by pushing the tab.
4. Rotate the old bulb to the left to remove.
5. Insert a new bulb into hole and turn it to
the right.
6. Insert the coupler into the connector of the
bulb.
Side Turn Signal/Emergen cy Indicator Light Bulbs
Door mirrors have the side turn lights. Ha ve an authorized Acura dealer inspect and
replace the light bulbs.
Daytime Running Light: 60 W
Clip
Heat Shield
Grommet
Stud Bolt
Bulb
Tab Coupler
Page 297 of 370
295
uuReplacing Light Bulbs uStop/Taillight, Rear Turn Signal Light and Rear Side Marker Light Bulbs
Maintenance
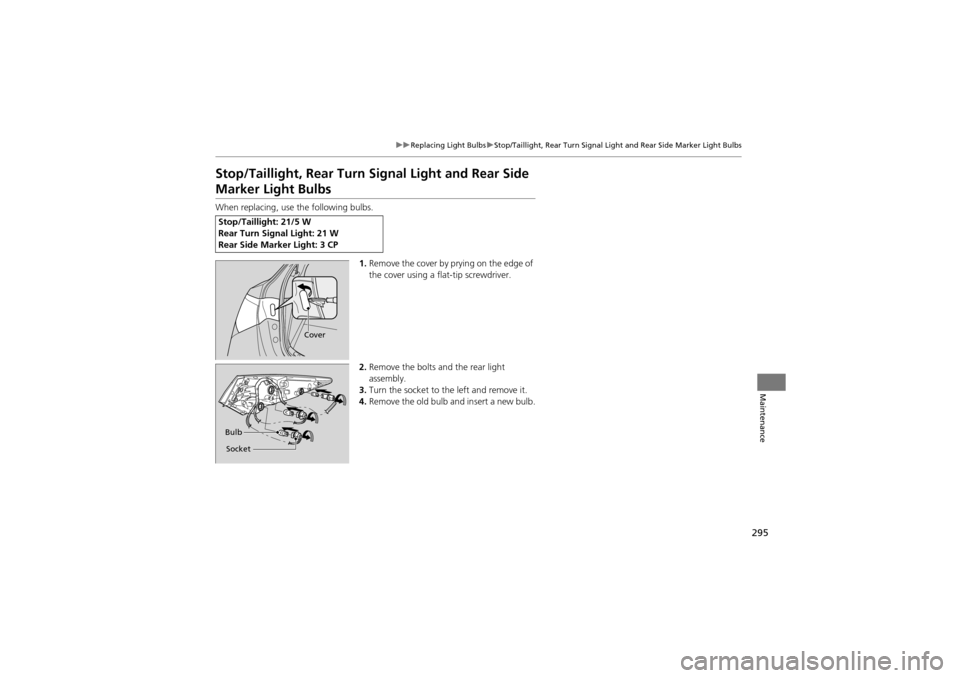
Stop/Taillight, Rear Turn Signal Light and Rear Side
Marker Light Bulbs
When replacing, use the following bulbs.
1.Remove the cover by pr ying on the edge of
the cover using a flat-tip screwdriver.
2. Remove the bolts and the rear light
assembly.
3. Turn the socket to the left and remove it.
4. Remove the old bulb and insert a new bulb.
Stop/Taillight: 21/5 W
Rear Turn Signal Light: 21 W
Rear Side Marker Light: 3 CP
Cover
Bulb
Socket
Page 298 of 370
296
uuReplacing Light Bulbs uBack-Up Light Bulbs
Maintenance
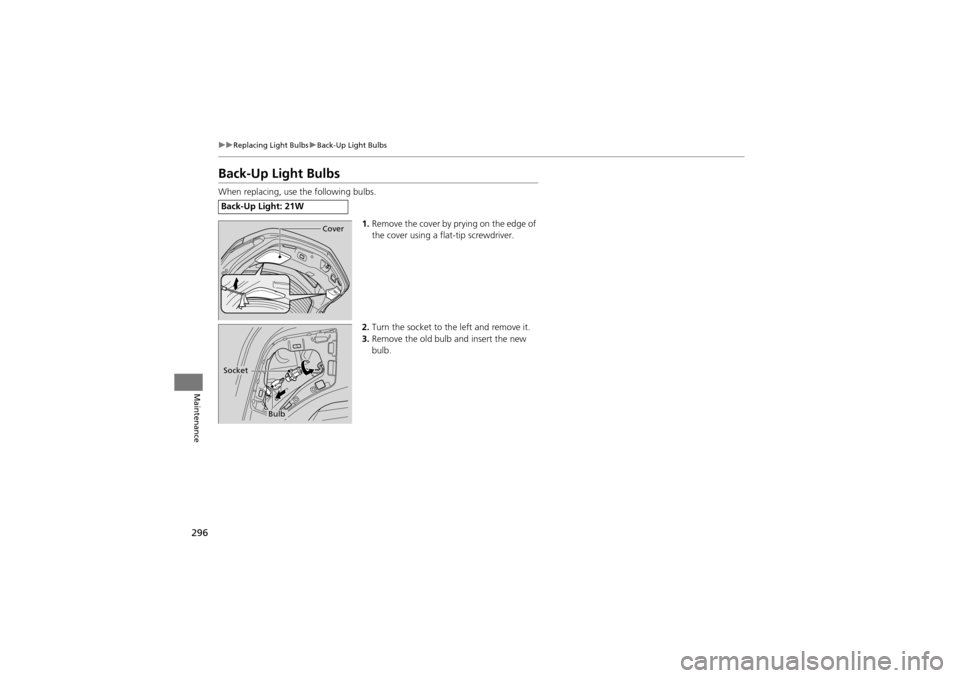
Back-Up Light Bulbs
When replacing, use the following bulbs.
1.Remove the cover by prying on the edge of
the cover using a flat-tip screwdriver.
2. Turn the socket to the left and remove it.
3. Remove the old bulb and insert the new
bulb.
Back-Up Light: 21W
Cover
Bulb
Socket
Page 299 of 370
297
uuReplacing Light Bulbs uRear License Plate Light Bulb
Maintenance
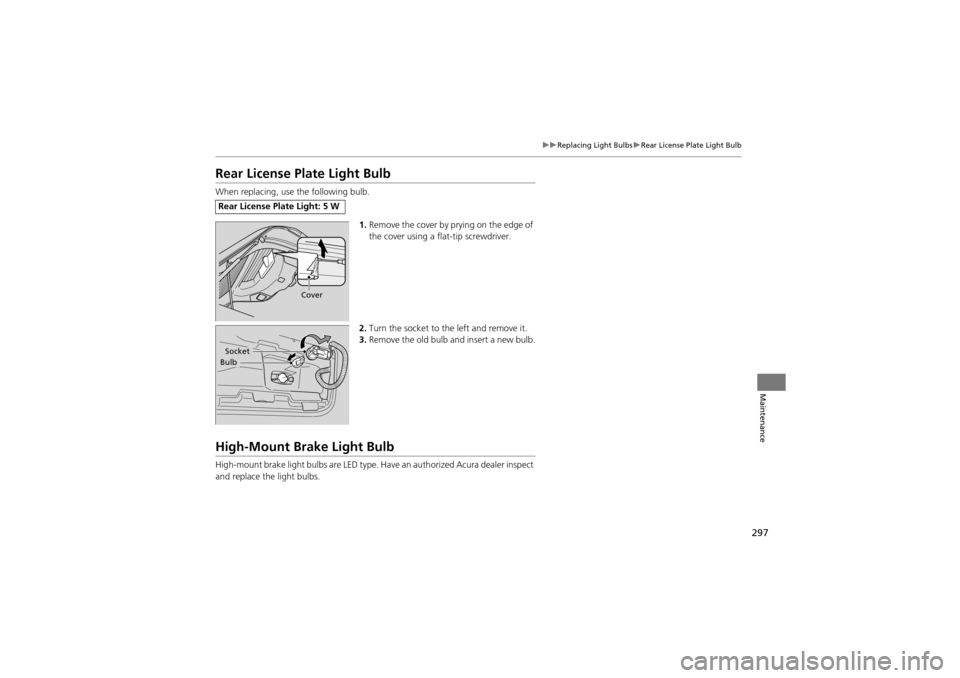
Rear License Plate Light Bulb
When replacing, use the following bulb.
1.Remove the cover by pr ying on the edge of
the cover using a flat-tip screwdriver.
2. Turn the socket to the left and remove it.
3. Remove the old bulb and insert a new bulb.
High-Mount Brake Light Bulb
High-mount brake light bulbs are LED type. Ha ve an authorized Acura dealer inspect
and replace the light bulbs.
Rear License Plate Light: 5 W
Cover
BulbSocket
Page 300 of 370
298
Maintenance
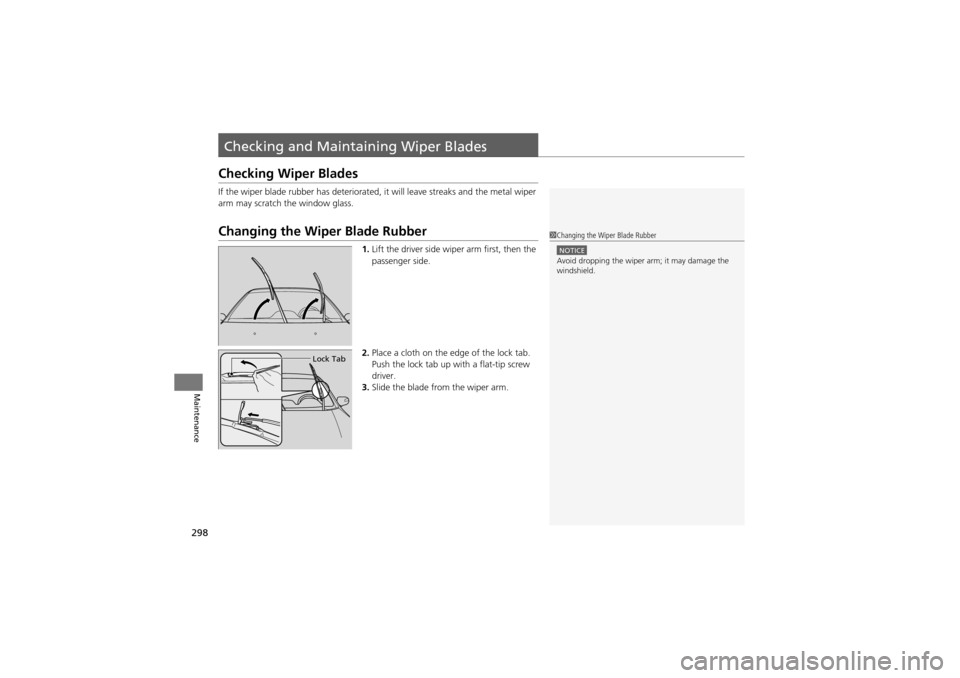
Checking and Maintaining Wiper Blades
Checking Wiper Blades
If the wiper blade rubber has deteriorated, it will leave streaks and the metal wiper
arm may scratch the window glass.
Changing the Wiper Blade Rubber
1.Lift the driver side wiper arm first, then the
passenger side.
2. Place a cloth on the ed ge of the lock tab.
Push the lock tab up with a flat-tip screw
driver.
3. Slide the blade from the wiper arm.
1Changing the Wiper Blade Rubber
NOTICEAvoid dropping the wiper arm; it may damage the
windshield.
Lock Tab
Trending: horn, ESP, differential, turn signal, gas type, audio, check oil
