window Alfa Romeo 147 2005 Owner handbook (in English)
[x] Cancel search | Manufacturer: ALFA ROMEO, Model Year: 2005, Model line: 147, Model: Alfa Romeo 147 2005Pages: 291, PDF Size: 5.52 MB
Page 93 of 291
GETTING TO KNOW YOUR CAR
91
AUTOMATIC TWO-ZONE CLIMATE CONTROL SYSTEM
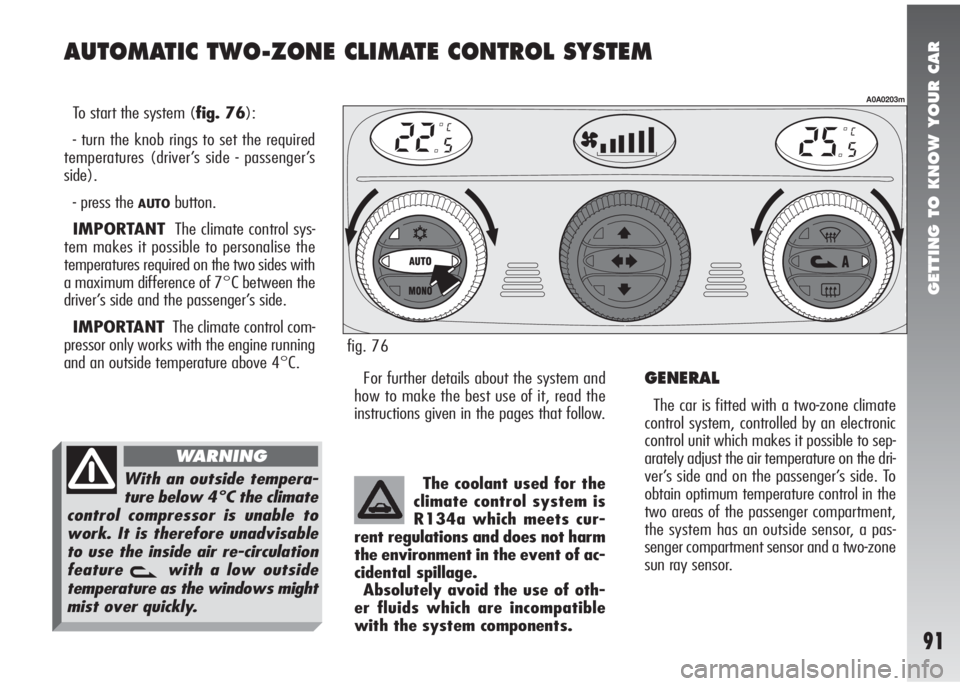
To start the system (fig. 76):
- turn the knob rings to set the required
temperatures (driver’s side - passenger’s
side).
- press the
AUTObutton.
IMPORTANTThe climate control sys-
tem makes it possible to personalise the
temperatures required on the two sides with
a maximum difference of 7°C between the
driver’s side and the passenger’s side.
IMPORTANTThe climate control com-
pressor only works with the engine running
and an outside temperature above 4°C.
For further details about the system and
how to make the best use of it, read the
instructions given in the pages that follow.
A0A0203m
fig. 76
The coolant used for the
climate control system is
R134a which meets cur-
rent regulations and does not harm
the environment in the event of ac-
cidental spillage.
Absolutely avoid the use of oth-
er fluids which are incompatible
with the system components.
GENERAL
The car is fitted with a two-zone climate
control system, controlled by an electronic
control unit which makes it possible to sep-
arately adjust the air temperature on the dri-
ver’s side and on the passenger’s side. To
obtain optimum temperature control in the
two areas of the passenger compartment,
the system has an outside sensor, a pas-
senger compartment sensor and a two-zone
sun ray sensor.
With an outside tempera-
ture below 4°C the climate
control compressor is unable to
work. It is therefore unadvisable
to use the inside air re-circulation
feature
vwith a low outside
temperature as the windows might
mist over quickly.
WARNING
Page 95 of 291
GETTING TO KNOW YOUR CAR
93
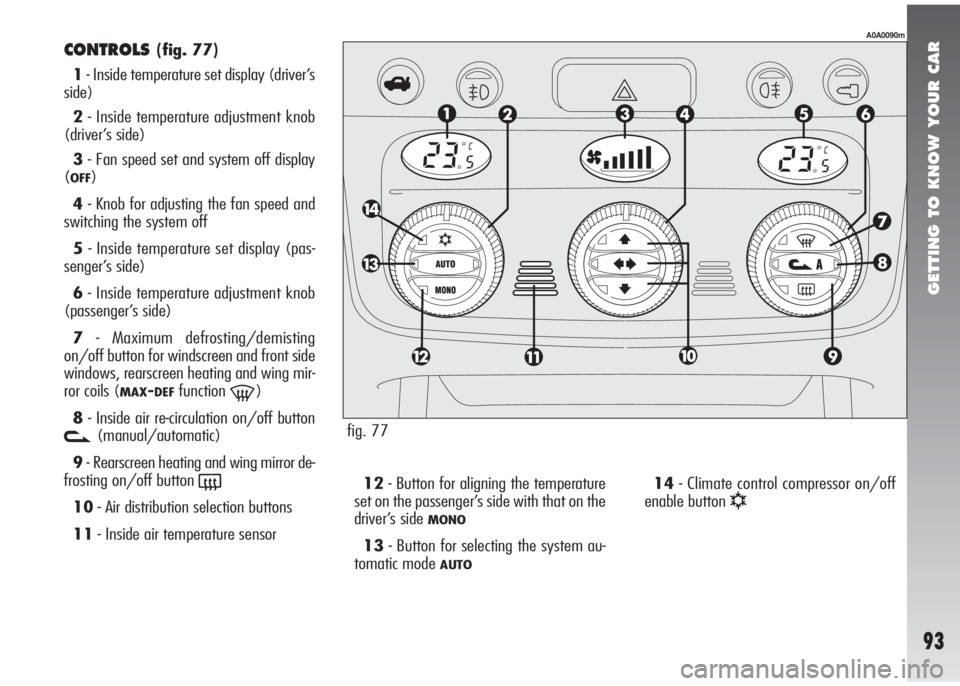
CONTROLS(fig. 77)
1- Inside temperature set display (driver’s
side)
2- Inside temperature adjustment knob
(driver’s side)
3- Fan speed set and system off display
(
OFF)
4- Knob for adjusting the fan speed and
switching the system off
5- Inside temperature set display (pas-
senger’s side)
6- Inside temperature adjustment knob
(passenger’s side)
7- Maximum defrosting/demisting
on/off button for windscreen and front side
windows, rearscreen heating and wing mir-
ror coils (
MAX-DEFfunction-)
8- Inside air re-circulation on/off button
v(manual/automatic)
9- Rearscreen heating and wing mirror de-
frosting on/off button
(
10- Air distribution selection buttons
11- Inside air temperature sensor12- Button for aligning the temperature
set on the passenger’s side with that on the
driver’s side MONO
13- Button for selecting the system au-
tomatic mode
AUTO
14- Climate control compressor on/off
enable button
√
fig. 77
A0A0090m
Page 102 of 291
GETTING TO KNOW YOUR CAR
100
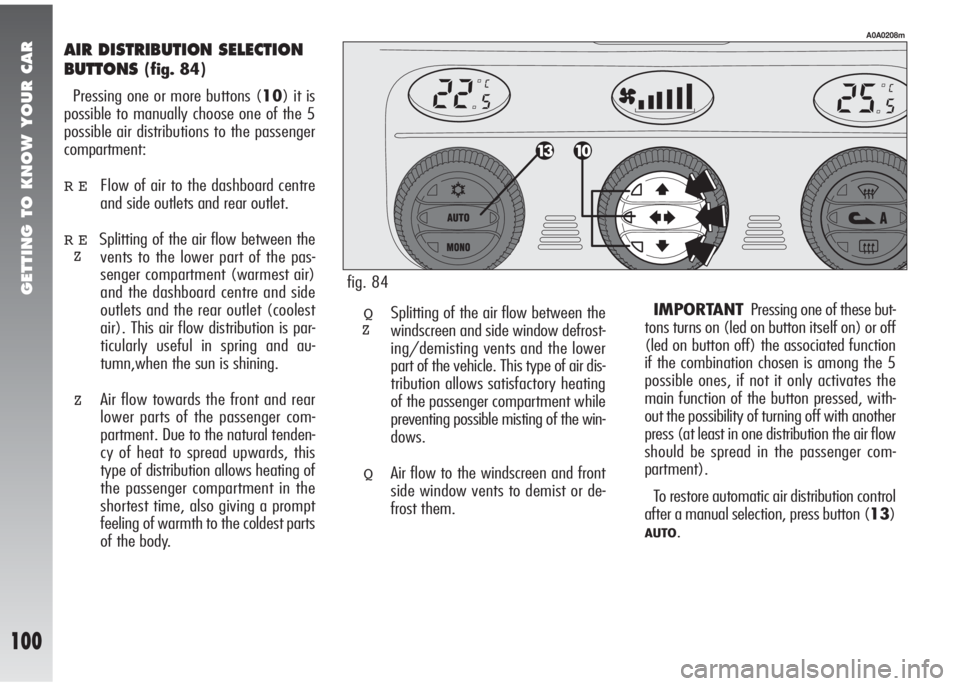
AIR DISTRIBUTION SELECTION
BUTTONS
(fig. 84)
Pressing one or more buttons (10) it is
possible to manually choose one of the 5
possible air distributions to the passenger
compartment:
REFlow of air to the dashboard centre
and side outlets and rear outlet.
RESplitting of the air flow between the
vents to the lower part of the pas-
senger compartment (warmest air)
and the dashboard centre and side
outlets and the rear outlet (coolest
air). This air flow distribution is par-
ticularly useful in spring and au-
tumn,when the sun is shining.
ZAir flow towards the front and rear
lower parts of the passenger com-
partment. Due to the natural tenden-
cy of heat to spread upwards, this
type of distribution allows heating of
the passenger compartment in the
shortest time, also giving a prompt
feeling of warmth to the coldest parts
of the body.
A0A0208m
QSplitting of the air flow between the
windscreen and side window defrost-
ing/demisting vents and the lower
part of the vehicle. This type of air dis-
tribution allows satisfactory heating
of the passenger compartment while
preventing possible misting of the win-
dows.
QAir flow to the windscreen and front
side window vents to demist or de-
frost them.IMPORTANTPressing one of these but-
tons turns on (led on button itself on) or off
(led on button off) the associated function
if the combination chosen is among the 5
possible ones, if not it only activates the
main function of the button pressed, with-
out the possibility of turning off with another
press (at least in one distribution the air flow
should be spread in the passenger com-
partment).
To restore automatic air distribution control
after a manual selection, press button (13)
AUTO.
Z
Z
fig. 84
Page 103 of 291
GETTING TO KNOW YOUR CAR
101
press button (13)AUTO; in which case,
however, the other manual settings set will
be cancelled.
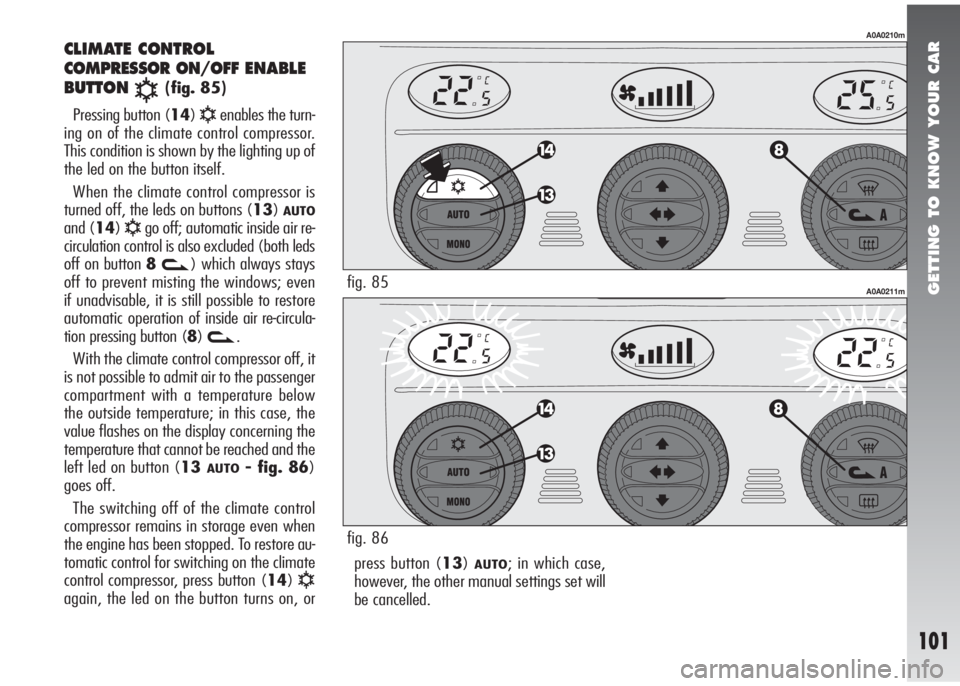
CLIMATE CONTROL
COMPRESSOR ON/OFF ENABLE
BUTTON
√(fig. 85)
Pressing button (14)
√enables the turn-
ing on of the climate control compressor.
This condition is shown by the lighting up of
the led on the button itself.
When the climate control compressor is
turned off, the leds on buttons (13)
AUTO
and (14)√go off; automatic inside air re-
circulation control is also excluded (both leds
off on button 8
v) which always stays
off to prevent misting the windows; even
if unadvisable, it is still possible to restore
automatic operation of inside air re-circula-
tion pressing button (8)
v.
With the climate control compressor off, it
is not possible to admit air to the passenger
compartment with a temperature below
the outside temperature; in this case, the
value flashes on the display concerning the
temperature that cannot be reached and the
left led on button (13
AUTO- fig. 86)
goes off.
The switching off of the climate control
compressor remains in storage even when
the engine has been stopped. To restore au-
tomatic control for switching on the climate
control compressor, press button (14)
√again, the led on the button turns on, or
A0A0210m
A0A0211mfig. 85
fig. 86
Page 104 of 291

GETTING TO KNOW YOUR CAR
102
INSIDE AIR RE-CIRCULATION
ON/OFF BUTTON
v(fig. 87)
Inside air re-circulation is controlled ac-
cording to three operating logics
- automatic control, indicated by the turn-
ing on of the right led on the button;
- forced engagement (inside air re-circula-
tion always on), indicated by the turning on
of the left led on the button (and by the right
led going off at the same time);
- forced switching off (inside air re-circula-
tion always off with air inlet from outside),
indicated by the turning off of both leds.
These operating conditions are obtained
pressing in sequence the inside air re-circu-
lation button (8)
v.
When inside air re-circulation is controlled
automatically by the system, the right ledon the air re-circulation button (8)
v
stays on all the time and the left led shows
the air re-circulation condition:
on= air re-circulation operating;
off= air re-circulation off.
If inside air re-circulation has been turned
on or off manually, the led on button (13)
AUTOturns off.
In automatic operation, inside air re-circu-
lation is turned on automatically when the an-
tipollution sensor detects the presence of pol-
luted air, for example in cities, queues, tun-
nels and operation of the windscreen wash-
er (with the characteristic smell of spirit).
A0A0212m
fig. 87
With the outside temper-
ature below 4°C the cli-
mate control compressor is unable
to work. It is therefore unadvis-
able to use the inside air re-circu-
lation feature
vwith low out-
side temperature as the windows
may quickly mist over.
WARNING
Operation of the climate con-
trol compressor is necessary
for cooling and dehumidifying the air;
it is advisable to keep this function
always on, to prevent window mist-
ing problems.
WARNING
Page 105 of 291
GETTING TO KNOW YOUR CAR
103
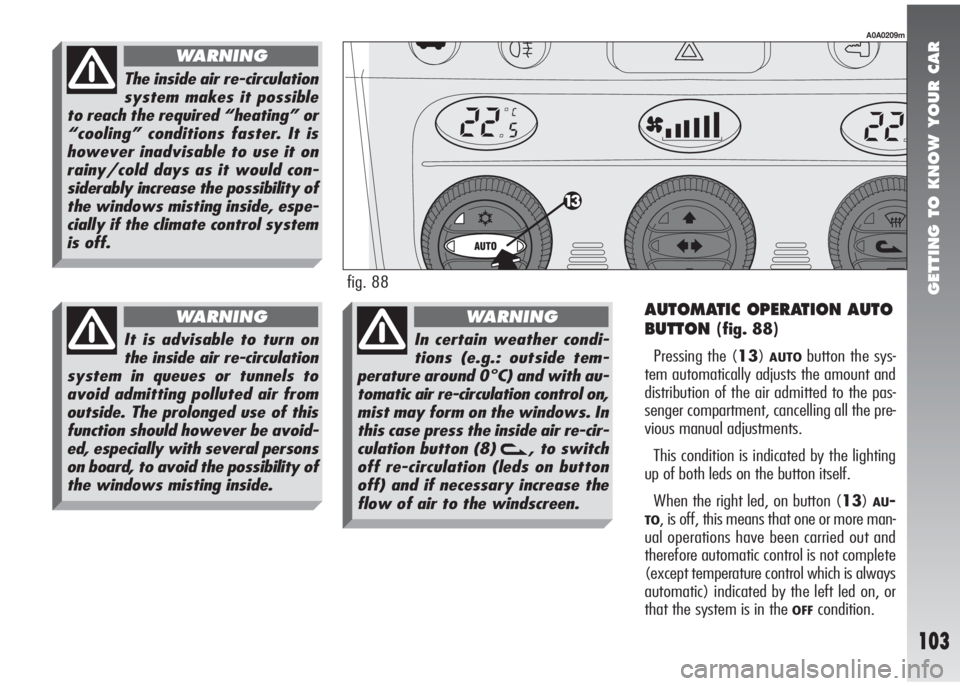
AUTOMATIC OPERATION AUTO
BUTTON
(fig. 88)
Pressing the (13)
AUTObutton the sys-
tem automatically adjusts the amount and
distribution of the air admitted to the pas-
senger compartment, cancelling all the pre-
vious manual adjustments.
This condition is indicated by the lighting
up of both leds on the button itself.
When the right led, on button (13)
AU-
TO, is off, this means that one or more man-
ual operations have been carried out and
therefore automatic control is not complete
(except temperature control which is always
automatic) indicated by the left led on, or
that the system is in the
OFFcondition.
A0A0209m
fig. 88
The inside air re-circulation
system makes it possible
to reach the required “heating” or
“cooling” conditions faster. It is
however inadvisable to use it on
rainy/cold days as it would con-
siderably increase the possibility of
the windows misting inside, espe-
cially if the climate control system
is off.
WARNING
In certain weather condi-
tions (e.g.: outside tem-
perature around 0°C) and with au-
tomatic air re-circulation control on,
mist may form on the windows. In
this case press the inside air re-cir-
culation button (8)
v, to switch
off re-circulation (leds on button
off) and if necessary increase the
flow of air to the windscreen.
WARNING
It is advisable to turn on
the inside air re-circulation
system in queues or tunnels to
avoid admitting polluted air from
outside. The prolonged use of this
function should however be avoid-
ed, especially with several persons
on board, to avoid the possibility of
the windows misting inside.
WARNING
Page 106 of 291
GETTING TO KNOW YOUR CAR
104
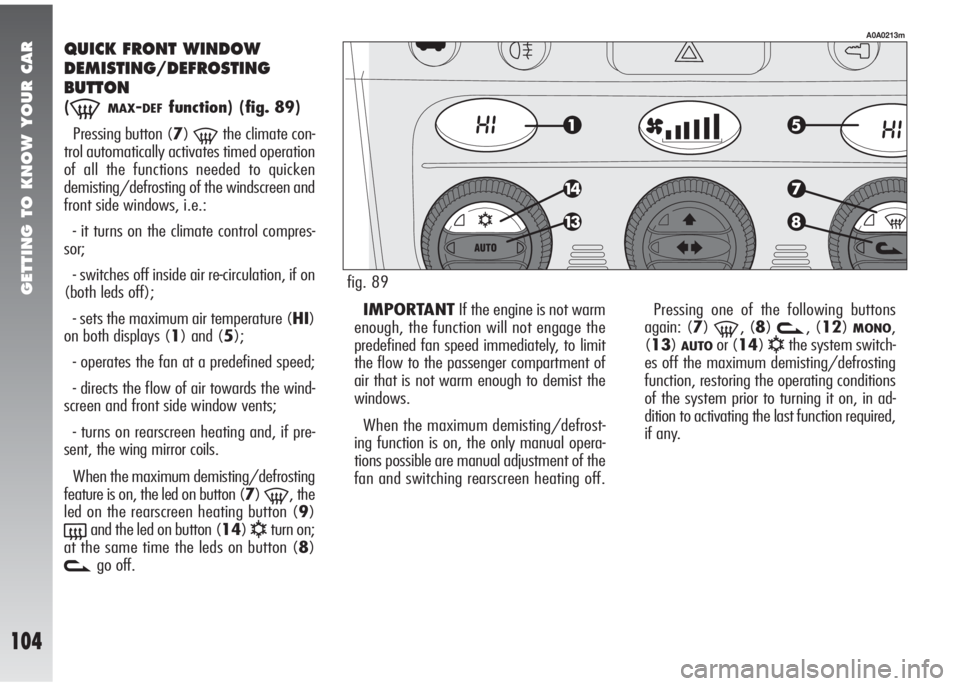
QUICK FRONT WINDOW
DEMISTING/DEFROSTING
BUTTON
(-MAX-DEFfunction)(fig. 89)
Pressing button (7)
-the climate con-
trol automatically activates timed operation
of all the functions needed to quicken
demisting/defrosting of the windscreen and
front side windows, i.e.:
- it turns on the climate control compres-
sor;
- switches off inside air re-circulation, if on
(both leds off);
- sets the maximum air temperature (HI)
on both displays (1) and (5);
- operates the fan at a predefined speed;
- directs the flow of air towards the wind-
screen and front side window vents;
- turns on rearscreen heating and, if pre-
sent, the wing mirror coils.
When the maximum demisting/defrosting
feature is on, the led on button (7)
-, the
led on the rearscreen heating button (9)
(and the led on button (14)√turn on;
at the same time the leds on button (8)
vgo off.IMPORTANTIf the engine is not warm
enough, the function will not engage the
predefined fan speed immediately, to limit
the flow to the passenger compartment of
air that is not warm enough to demist the
windows.
When the maximum demisting/defrost-
ing function is on, the only manual opera-
tions possible are manual adjustment of the
fan and switching rearscreen heating off.Pressing one of the following buttons
again: (7)
-, (8)v, (12)MONO,
(13)
AUTOor (14)√the system switch-
es off the maximum demisting/defrosting
function, restoring the operating conditions
of the system prior to turning it on, in ad-
dition to activating the last function required,
if any.
A0A0213m
fig. 89
Page 107 of 291
GETTING TO KNOW YOUR CAR
105
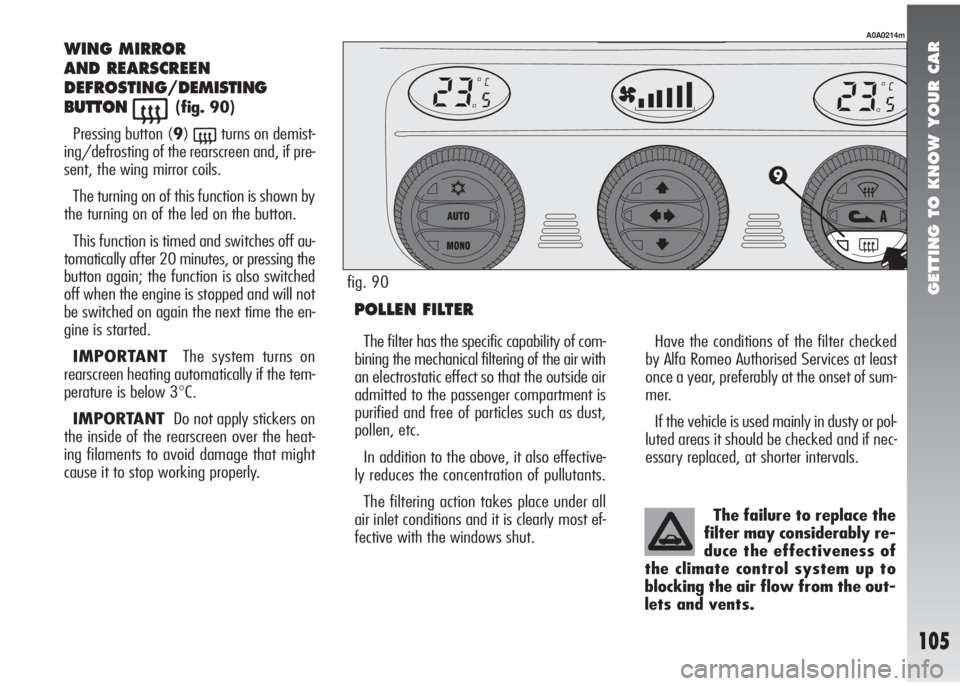
WING MIRROR
AND REARSCREEN
DEFROSTING/DEMISTING
BUTTON
((fig. 90)
Pressing button (9)
(turns on demist-
ing/defrosting of the rearscreen and, if pre-
sent, the wing mirror coils.
The turning on of this function is shown by
the turning on of the led on the button.
This function is timed and switches off au-
tomatically after 20 minutes, or pressing the
button again; the function is also switched
off when the engine is stopped and will not
be switched on again the next time the en-
gine is started.
IMPORTANTThe system turns on
rearscreen heating automatically if the tem-
perature is below 3
°C.
IMPORTANTDo not apply stickers on
the inside of the rearscreen over the heat-
ing filaments to avoid damage that might
cause it to stop working properly.
POLLEN FILTER
Have the conditions of the filter checked
by Alfa Romeo Authorised Services at least
once a year, preferably at the onset of sum-
mer.
If the vehicle is used mainly in dusty or pol-
luted areas it should be checked and if nec-
essary replaced, at shorter intervals.
A0A0214m
The filter has the specific capability of com-
bining the mechanical filtering of the air with
an electrostatic effect so that the outside air
admitted to the passenger compartment is
purified and free of particles such as dust,
pollen, etc.
In addition to the above, it also effective-
ly reduces the concentration of pullutants.
The filtering action takes place under all
air inlet conditions and it is clearly most ef-
fective with the windows shut.The failure to replace the
filter may considerably re-
duce the effectiveness of
the climate control system up to
blocking the air flow from the out-
lets and vents.
fig. 90
Page 121 of 291
GETTING TO KNOW YOUR CAR
119
INTERIOR FITTINGS
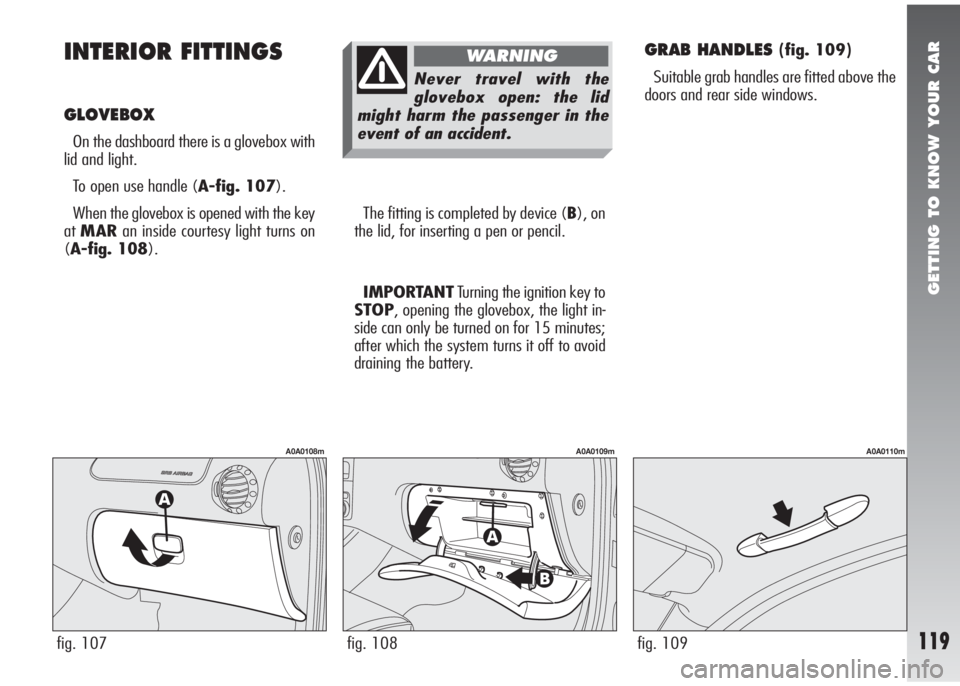
GLOVEBOX
On the dashboard there is a glovebox with
lid and light.
To open use handle (A-fig. 107).
When the glovebox is opened with the key
atMARan inside courtesy light turns on
(A-fig. 108).
IMPORTANTTurning the ignition key to
STOP, opening the glovebox, the light in-
side can only be turned on for 15 minutes;
after which the system turns it off to avoid
draining the battery.
GRAB HANDLES (fig. 109)
Suitable grab handles are fitted above the
doors and rear side windows.
fig. 107
A0A0108m
fig. 108
A0A0109m
fig. 109
A0A0110m
The fitting is completed by device (B), on
the lid, for inserting a pen or pencil.
Never travel with the
glovebox open: the lid
might harm the passenger in the
event of an accident.
WARNING
Page 129 of 291
GETTING TO KNOW YOUR CAR
127fig. 123
A0A0125m
IMPORTANTIf the car is fitted with a
safety anti-crushing system, after locking the
doors, keeping the corresponding remote
control button pressed for about 2 seconds,
triggers automatic closing of the roof and
windows. The button should be pressed un-
til the roof and windows have completed
their stroke; releasing the button sooner, the
windows and roof will stop in the position
they are in at that moment.
When leaving the vehicle
the ignition key should be
removed to prevent the sunroof
from being operated inadvertently
and harming anyone remaining in
the vehicle.
WARNINGOn all versions, after releasing the doors,
keeping the corresponding remote control
button pressed for about 2 seconds, obtains
opening of the roof and windows.
RAISING AT THE REAR
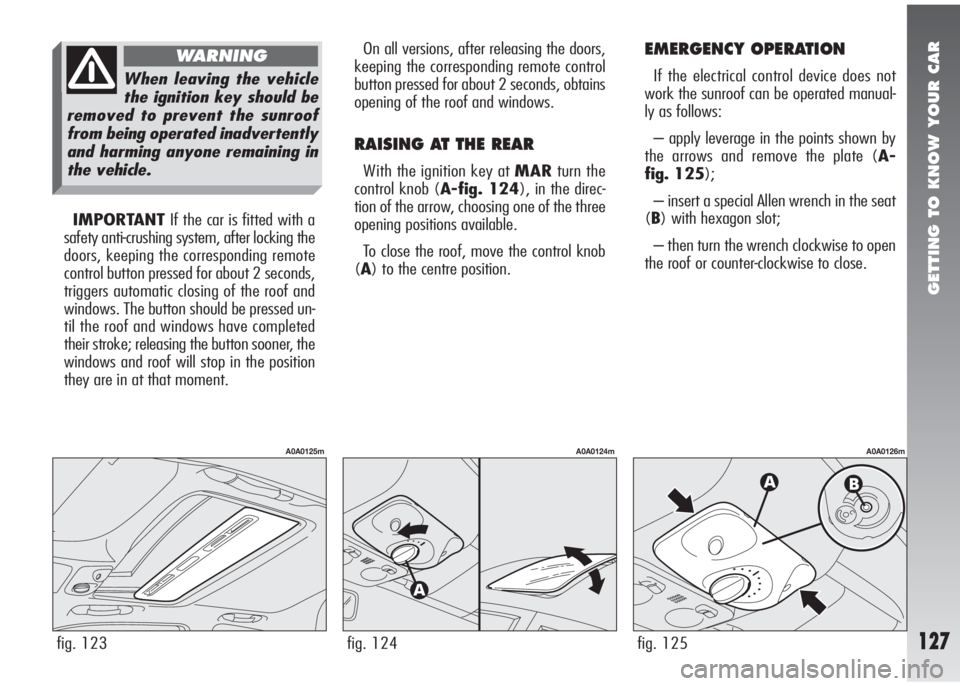
With the ignition key at MARturn the
control knob (A-fig. 124), in the direc-
tion of the arrow, choosing one of the three
opening positions available.
To close the roof, move the control knob
(A) to the centre position.
EMERGENCY OPERATION
If the electrical control device does not
work the sunroof can be operated manual-
ly as follows:
– apply leverage in the points shown by
the arrows and remove the plate (A-
fig. 125);
– insert a special Allen wrench in the seat
(B) with hexagon slot;
– then turn the wrench clockwise to open
the roof or counter-clockwise to close.
fig. 124
A0A0124m
fig. 125
A0A0126m