check engine Alfa Romeo 147 2010 Owner handbook (in English)
[x] Cancel search | Manufacturer: ALFA ROMEO, Model Year: 2010, Model line: 147, Model: Alfa Romeo 147 2010Pages: 291, PDF Size: 5.52 MB
Page 195 of 291
IN AN EMERGENCY
193
INFLATING PROCEDURE
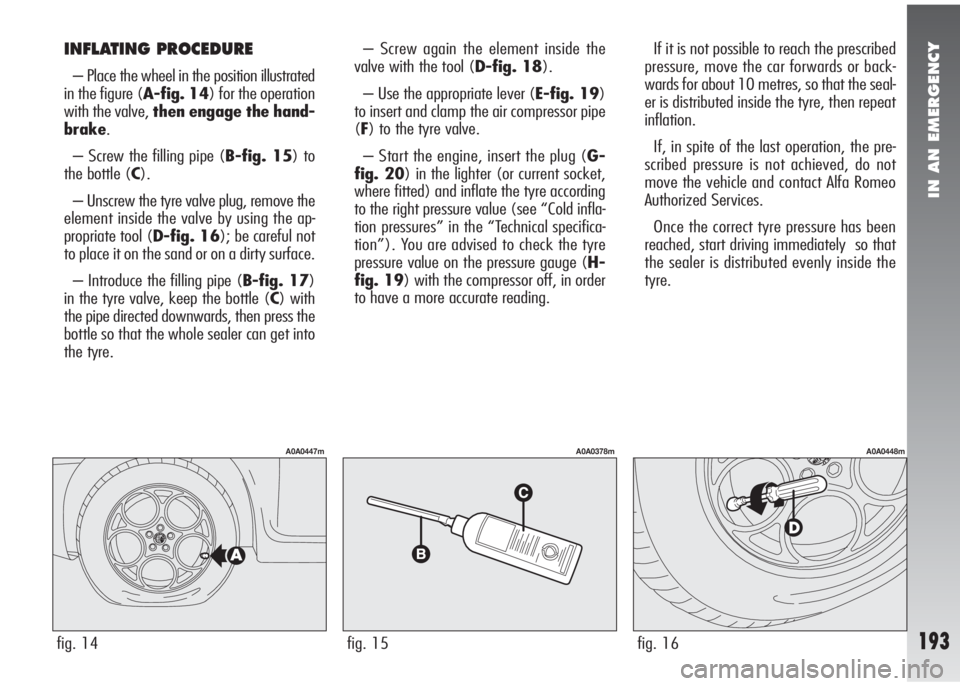
– Place the wheel in the position illustrated
in the figure (A-fig. 14) for the operation
with the valve, then engage the hand-
brake.
– Screw the filling pipe (B-fig. 15) to
the bottle (C).
– Unscrew the tyre valve plug, remove the
element inside the valve by using the ap-
propriate tool (D-fig. 16); be careful not
to place it on the sand or on a dirty surface.
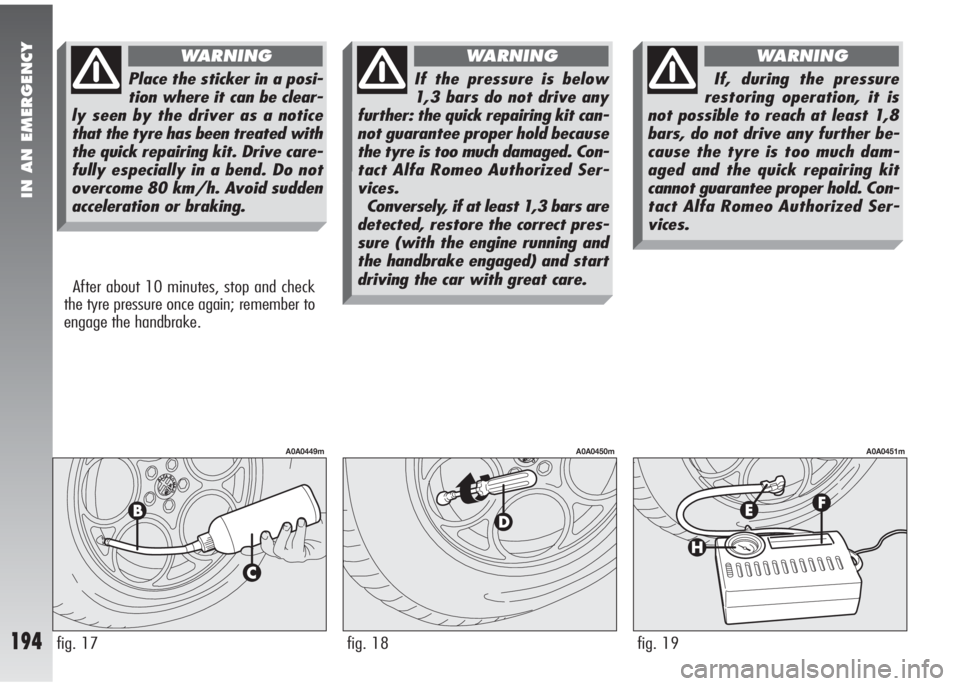
– Introduce the filling pipe (B-fig. 17)
in the tyre valve, keep the bottle (C) with
the pipe directed downwards, then press the
bottle so that the whole sealer can get into
the tyre.– Screw again the element inside the
valve with the tool (D-fig. 18).
– Use the appropriate lever (E-fig. 19)
to insert and clamp the air compressor pipe
(F) to the tyre valve.
– Start the engine, insert the plug (G-
fig. 20) in the lighter (or current socket,
where fitted) and inflate the tyre according
to the right pressure value (see “Cold infla-
tion pressures” in the “Technical specifica-
tion”). You are advised to check the tyre
pressure value on the pressure gauge (H-
fig. 19) with the compressor off, in order
to have a more accurate reading.If it is not possible to reach the prescribed
pressure, move the car forwards or back-
wards for about 10 metres, so that the seal-
er is distributed inside the tyre, then repeat
inflation.
If, in spite of the last operation, the pre-
scribed pressure is not achieved, do not
move the vehicle and contact Alfa Romeo
Authorized Services.
Once the correct tyre pressure has been
reached, start driving immediately so that
the sealer is distributed evenly inside the
tyre.
fig. 14
A0A0447m
fig. 15
A0A0378m
fig. 16
A0A0448m
Page 196 of 291
IN AN EMERGENCY
194fig. 17
A0A0449m
fig. 18
A0A0450m
fig. 19
A0A0451m
After about 10 minutes, stop and check
the tyre pressure once again; remember to
engage the handbrake.
Place the sticker in a posi-
tion where it can be clear-
ly seen by the driver as a notice
that the tyre has been treated with
the quick repairing kit. Drive care-
fully especially in a bend. Do not
overcome 80 km/h. Avoid sudden
acceleration or braking.
WARNING
If the pressure is below
1,3 bars do not drive any
further: the quick repairing kit can-
not guarantee proper hold because
the tyre is too much damaged. Con-
tact Alfa Romeo Authorized Ser-
vices.
Conversely, if at least 1,3 bars are
detected, restore the correct pres-
sure (with the engine running and
the handbrake engaged) and start
driving the car with great care.
WARNING
If, during the pressure
restoring operation, it is
not possible to reach at least 1,8
bars, do not drive any further be-
cause the tyre is too much dam-
aged and the quick repairing kit
cannot guarantee proper hold. Con-
tact Alfa Romeo Authorized Ser-
vices.
WARNING
Page 201 of 291

IN AN EMERGENCY
199
Front fog lights(fig. 23a)
IMPORTANT When needing to change
the left bulb, the side trim next to the light
itself needs to be removed to facilitate ac-
cess to the engine compartment.
To change the bulb, proceed as follows:
– Remove the protective cover turning it
counter-clockwise.
– Disconnect the electric connector (A).
– Release the bulb catch (B).
– Remove the bulb and replace it.
– Fit a new bulb, making the tab of the
metal part coincide with the one on the
lamp unit, then hook the bulb holder catch
(B).
– Reconnect the electric connector (A).
– Refit the protective cover correctly.Xenon dipped beam
headlights
(fig. 23b)
To change the bulb, proceed as follows:
– Remove the protective cover releasing
the locking screws.
– Disconnect the electric connector (A)
turning it slightly counter-clockwise.
– Remove ring nut (B) turning it slightly
counter-clockwise
– Remove the bulb and replace it.
– Fit a new bulb correctly observing the
grooves on the lamp lens, then refit the ring
nut (B).
– Reconnect the electric connector (A).
– Refit the protective cover correctly.
Front sidelights(fig. 24a)
To change the bulb, proceed as follows:
– Remove the protective cover releasing
the locking screws.
– Using the extension (A), integral with
the bulb holder (B), withdraw the bulb hold-
er itself which is snap-fitted.
– Remove the bulb (C), pushing it gen-
tly and turning it counter-clockwise.
– Change the bulb and refit the bulb hold-
er making sure that it clicks into place; al-
so check that the bulb is in the correct po-
sition looking at the lamp from outside.
– Refit the protective cover correctly.
fig. 23a
A0A0499m
fig. 23b
A0A0500m
fig. 24a
A0A0501m
Page 203 of 291
IN AN EMERGENCY
201
After replacement, refit
the covers correctly check-
ing that they are properly
secured.
IMPORTANTOn the inside surface of
the headlight there could appear a slight
coat of fogging; this does not show a de-
fect, since it is a natural occurrence due to
low temperature and to the degree of hu-
midity in the air; it will soon disappear as
soon as the lights are turned on. The pres-
ence of drops inside the headlight shows
water seepage, refer to the Alfa Romeo
Dealership.
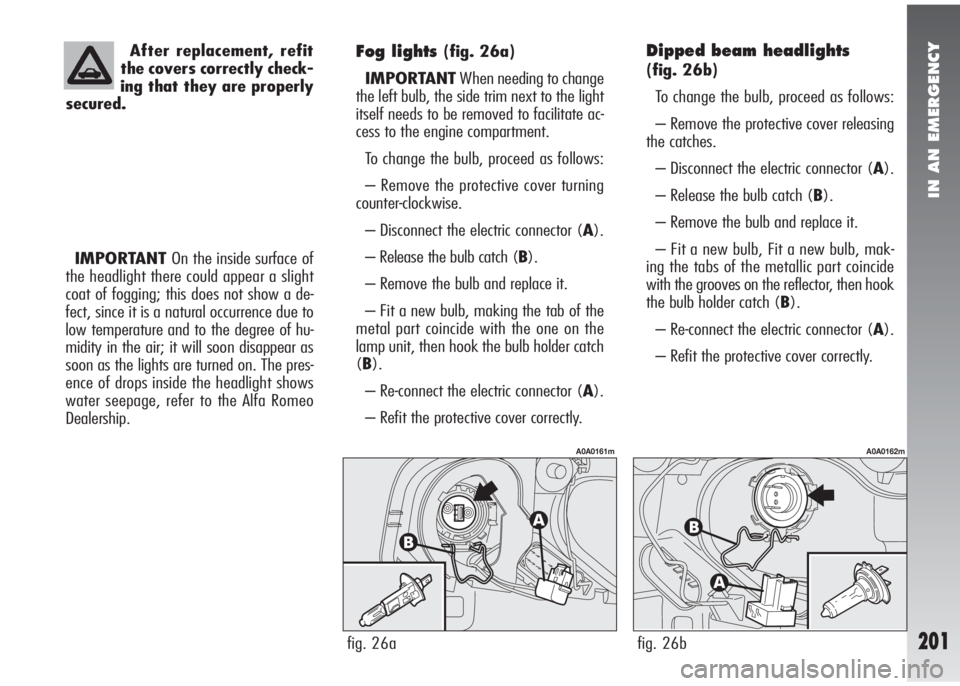
Fog lights(fig. 26a)
IMPORTANTWhen needing to change
the left bulb, the side trim next to the light
itself needs to be removed to facilitate ac-
cess to the engine compartment.
To change the bulb, proceed as follows:
– Remove the protective cover turning
counter-clockwise.
– Disconnect the electric connector (A).
– Release the bulb catch (B).
– Remove the bulb and replace it.
– Fit a new bulb, making the tab of the
metal part coincide with the one on the
lamp unit, then hook the bulb holder catch
(B).
– Re-connect the electric connector (A).
– Refit the protective cover correctly.Dipped beam headlights
(fig. 26b)
To change the bulb, proceed as follows:
– Remove the protective cover releasing
the catches.
– Disconnect the electric connector (A).
– Release the bulb catch (B).
– Remove the bulb and replace it.
– Fit a new bulb, Fit a new bulb, mak-
ing the tabs of the metallic part coincide
with the grooves on the reflector, then hook
the bulb holder catch (B).
– Re-connect the electric connector (A).
– Refit the protective cover correctly.
fig. 26a
A0A0161m
fig. 26b
A0A0162m
Page 218 of 291
IN AN EMERGENCY
216
IN THE EVENT OF A FLAT BATTERY
Before anything else, you are advised to
read the precautions for preventing the bat-
tery from draining and for ensuring long life
in the “Vehicle maintenance” chapter.
CHARGING THE BATTERY
IMPORTANTThe battery charging pro-
cedure is described only for information pur-
poses. This operation should be carried out
by Alfa Romeo Authorised Services.
Charging should be slow at a low amp rat-
ing for 24 hours. Charging for a longer time
may damage the battery.Charge the battery as follows:
– Disconnect the battery negative termi-
nal (–).
– Connect the charger cables to the bat-
tery terminals ensuring that the bias is cor-
rect.
– Turn on the charger.
– After charging, turn off the charger be-
fore disconnecting it from the battery.
– Re-connect the battery negative termi-
nal (–).
STARTING WITH AN
AUXILIARY BATTERY
See “Starting with an auxiliary battery” in
this chapter.
Strictly avoid using a bat-
tery charger to start the
engine: you may damage
the electronic systems, in particu-
lar the ignition and fuel supply con-
trol units.
The liquid contained in the
battery is poisonous and
corrosive. Avoid contact with the
skin or eyes. The battery should be
charged in a well ventilated place,
away from naked flames or pos-
sible sources of sparks: danger of
explosion and fire.
WARNING
Do not attempt to charge a
frozen battery: it must
firstly be thawed, otherwise it
may burst. If freezing has occurred,
the battery should be checked by
skilled personnel to make sure that
the internal elements are not dam-
aged and that the body is not
cracked, with the risk of leaking
poisonous and corrosive acid.
WARNING
Page 224 of 291
●●●●●●●●●
●●●●●●●●●
●●●●●●●●●
●●●●●●●●●
●●●●●●●●●
●●●●
●●●●●●●●●
●●●●●●●●●
●●
●●●●
●●
●●●●
●●●●●●●●●
●●●●●●●●●
●●
VEHICLE MAINTENANCE
222
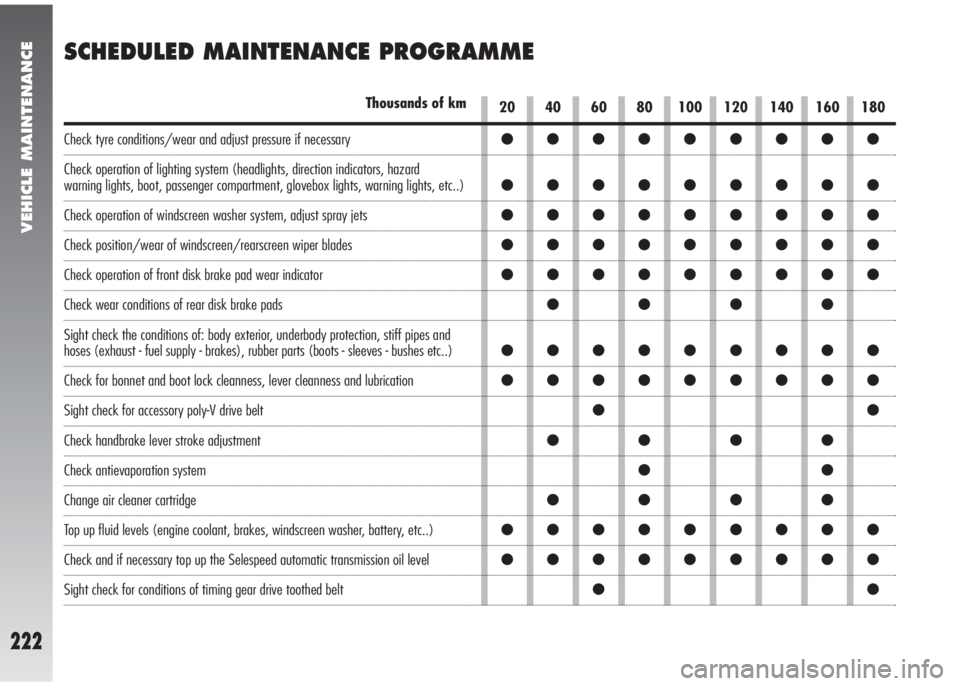
SCHEDULED MAINTENANCE PROGRAMME
20 40 60 80 100 120 140 160 180Thousands of km
Check tyre conditions/wear and adjust pressure if necessary
Check operation of lighting system (headlights, direction indicators, hazard
warning lights, boot, passenger compartment, glovebox lights, warning lights, etc..)
Check operation of windscreen washer system, adjust spray jets
Check position/wear of windscreen/rearscreen wiper blades
Check operation of front disk brake pad wear indicator
Check wear conditions of rear disk brake pads
Sight check the conditions of: body exterior, underbody protection, stiff pipes and
hoses (exhaust - fuel supply - brakes), rubber parts (boots - sleeves - bushes etc..)
Check for bonnet and boot lock cleanness, lever cleanness and lubrication
Sight check for accessory poly-V drive belt
Check handbrake lever stroke adjustment
Check antievaporation system
Change air cleaner cartridge
Top up fluid levels (engine coolant, brakes, windscreen washer, battery, etc..)
Check and if necessary top up the Selespeed automatic transmission oil level
Sight check for conditions of timing gear drive toothed belt
Page 225 of 291
VEHICLE MAINTENANCE
223
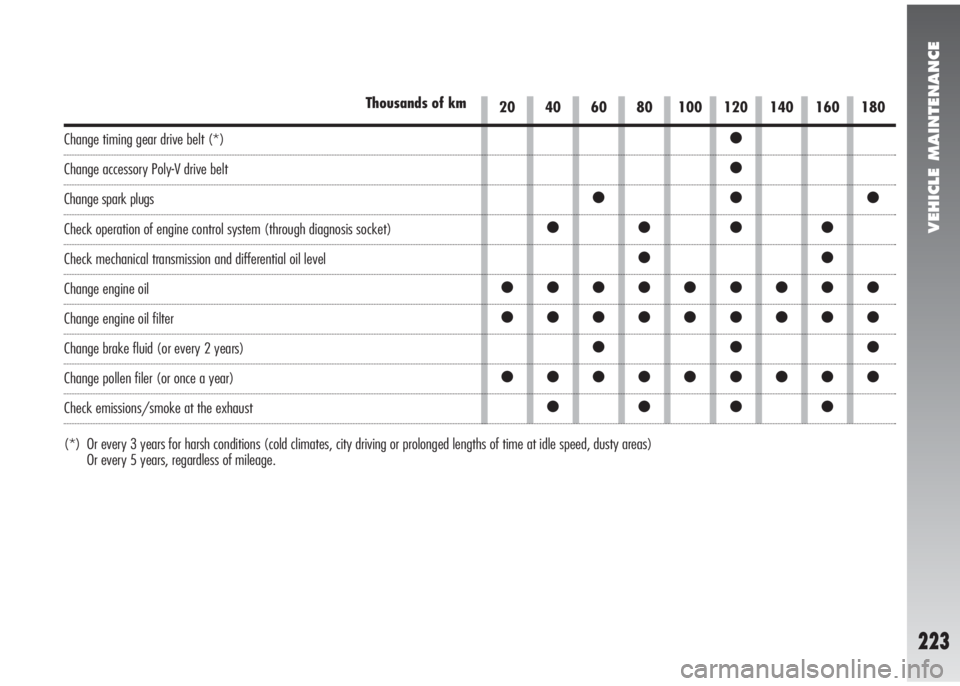
20 40 60 80 100 120 140 160 180Thousands of km
Change timing gear drive belt (*)
Change accessory Poly-V drive belt
Change spark plugs
Check operation of engine control system (through diagnosis socket)
Check mechanical transmission and differential oil level
Change engine oil
Change engine oil filter
Change brake fluid (or every 2 years)
Change pollen filer (or once a year)
Check emissions/smoke at the exhaust
●
●
●●●
●●●●
●●
●●●●●●●●●
●●●●●●●●●
●●●
●●●●●●●●●
●●●●
(*) Or every 3 years for harsh conditions (cold climates, city driving or prolonged lengths of time at idle speed, dusty areas)
Or every 5 years, regardless of mileage.
Page 226 of 291
VEHICLE MAINTENANCE
224
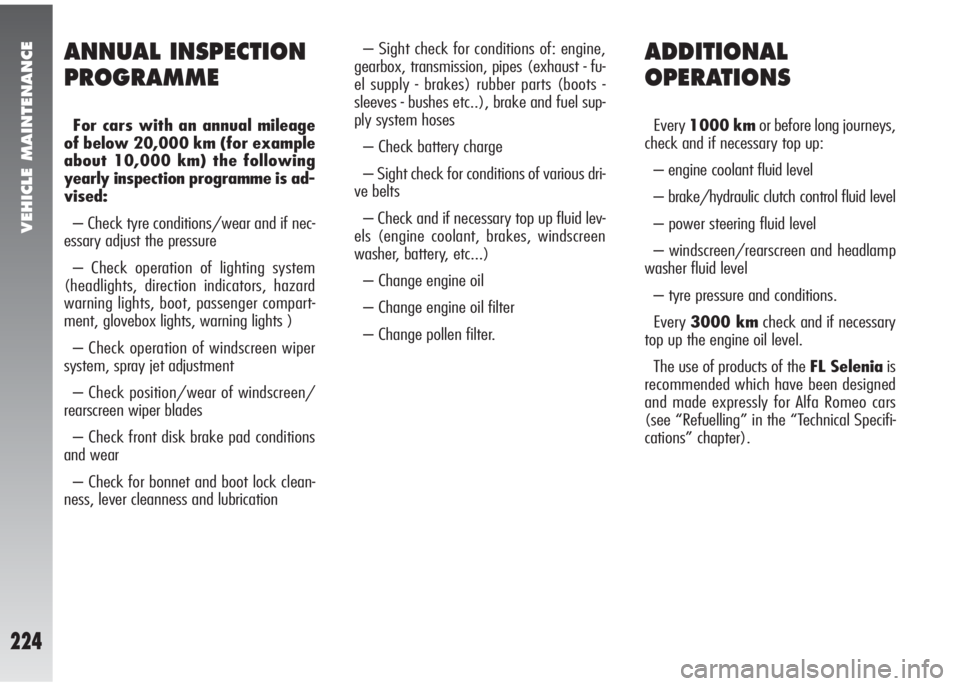
ADDITIONAL
OPERATIONS
Every 1000 kmor before long journeys,
check and if necessary top up:
– engine coolant fluid level
– brake/hydraulic clutch control fluid level
– power steering fluid level
– windscreen/rearscreen and headlamp
washer fluid level
– tyre pressure and conditions.
Every 3000 kmcheck and if necessary
top up the engine oil level.
The use of products of the FL Seleniais
recommended which have been designed
and made expressly for Alfa Romeo cars
(see “Refuelling” in the “Technical Specifi-
cations” chapter).
ANNUAL INSPECTION
PROGRAMME
For cars with an annual mileage
of below 20,000 km (for example
about 10,000 km) the following
yearly inspection programme is ad-
vised:
– Check tyre conditions/wear and if nec-
essary adjust the pressure
– Check operation of lighting system
(headlights, direction indicators, hazard
warning lights, boot, passenger compart-
ment, glovebox lights, warning lights )
– Check operation of windscreen wiper
system, spray jet adjustment
– Check position/wear of windscreen/
rearscreen wiper blades
– Check front disk brake pad conditions
and wear
– Check for bonnet and boot lock clean-
ness, lever cleanness and lubrication– Sight check for conditions of: engine,
gearbox, transmission, pipes (exhaust - fu-
el supply - brakes) rubber parts (boots -
sleeves - bushes etc..), brake and fuel sup-
ply system hoses
– Check battery charge
– Sight check for conditions of various dri-
ve belts
– Check and if necessary top up fluid lev-
els (engine coolant, brakes, windscreen
washer, battery, etc...)
– Change engine oil
– Change engine oil filter
– Change pollen filter.
Page 227 of 291
VEHICLE MAINTENANCE
225
IMPORTANT
Engine oil
Should prevailing use of the car be under
one of the following specially heavy condi-
tions:
– trailer or caravan towing
– dusty roads
– frequently idling engines or long distance
low speed driving or in case of a long term
inactivity
– short distances (less than 7-8 km) re-
peated and with external temperatures be-
low zero replace engine oil more frequent-
ly than required on Service Schedule.
IMPORTANT
Air cleaner
Using the car on dusty roads change the
air cleaner more frequently than specified in
the Scheduled Maintenance Programme.
For any doubts concerning the intervals be-
tween engine oil and air cleaner replacement
in relation to how the vehicle is used, con-
tact Alfa Romeo Authorised Services.IMPORTANT
Battery
It is advisable to check the battery charge,
preferably at the onset of winter, to prevent
the possibility of the electrolyte freezing.
This check should be carried out more fre-
quently if the car is used mainly for short
trips, or if it is fitted with accessories that
permanently absorb electricity even with the
ignition key removed, especially in the case
of after market accessories.
If the vehicle is used in hot climates or par-
ticularly harsh conditions it is wise to check
the level of the battery fluid (electrolyte)
more frequently than specified in the Sched-
uled Maintenance Programme.Vehicle maintenance should
be entrusted to Alfa Romeo
Authorised Services. For
routine and minor maintenance op-
erations you wish to carry out your-
self, always make sure you have the
proper equipment, genuine Alfa
Romeo spares and the necessary flu-
ids;do not however carry out these
operations if you have no experi-
ence.IMPORTANT
Pollen filter
If the vehicle is used frequently in dusty or
heavily polluted environments it is advisable
to replace the filtering element more fre-
quently; in particular it should be replaced
if a reduction of the amount of air admitted
to the passenger compartment is noted.
Page 228 of 291
VEHICLE MAINTENANCE
226
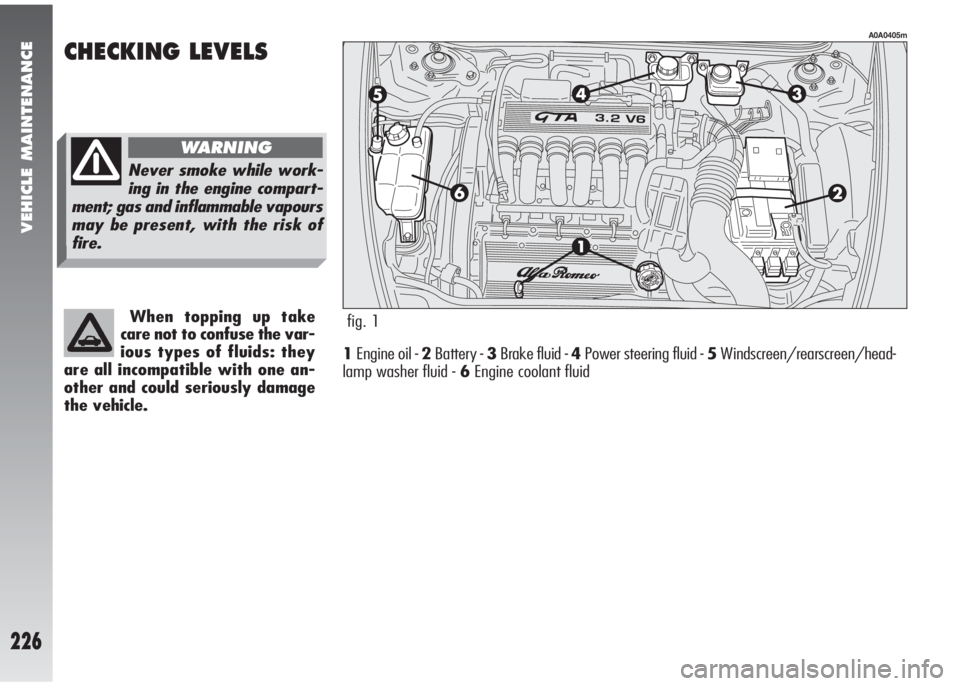
A0A0405m
fig. 1
CHECKING LEVELS
1Engine oil - 2Battery - 3Brake fluid - 4Power steering fluid - 5Windscreen/rearscreen/head-
lamp washer fluid - 6Engine coolant fluid When topping up take
care not to confuse the var-
ious types of fluids: they
are all incompatible with one an-
other and could seriously damage
the vehicle.
Never smoke while work-
ing in the engine compart-
ment; gas and inflammable vapours
may be present, with the risk of
fire.
WARNING