start stop button Alfa Romeo 147 2010 Owner handbook (in English)
[x] Cancel search | Manufacturer: ALFA ROMEO, Model Year: 2010, Model line: 147, Model: Alfa Romeo 147 2010Pages: 291, PDF Size: 5.52 MB
Page 16 of 291
GETTING TO KNOW YOUR CAR
14
HOW TO CUT OFF
THE ALARM SYSTEM
To deactivate the alarm system complete-
ly (for instance during prolonged inactivity
of the vehicle) simply lock the car turning
the key in the lock.
MINISTERIAL CERTIFICATION
In accordance with the law in force in each
country, on the subject of radio frequency,
we wish to point out that for the markets in
which the transmitter needs to be marked,
the certification number is given on the com-
ponent.
Depending on the versions/markets, the
code may also be given on the transmitter
and/or on the receiver.
IGNITION DEVICE
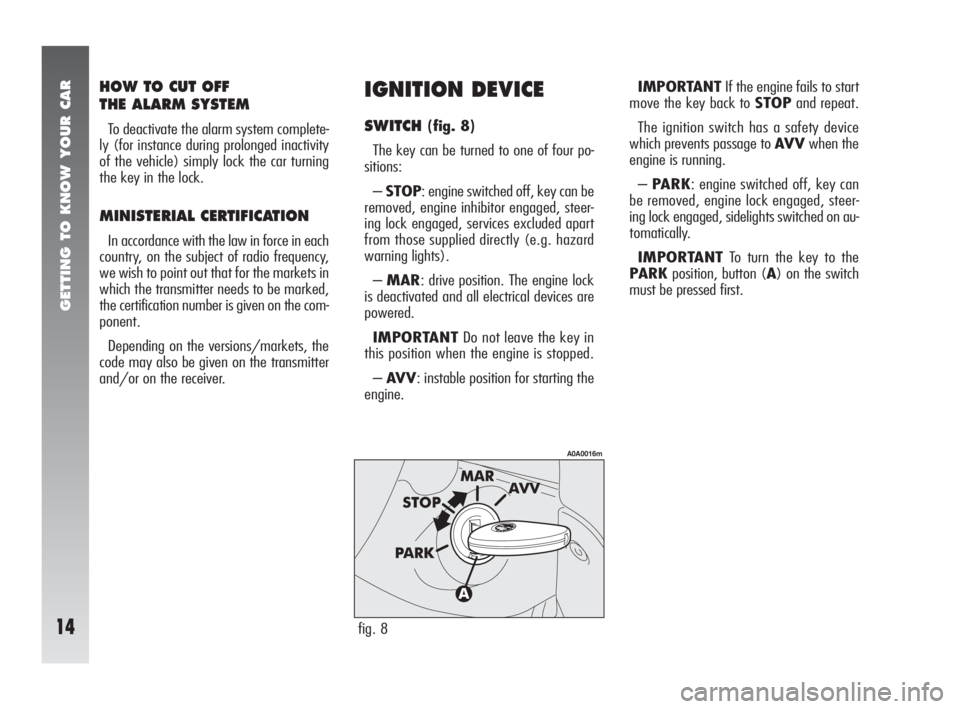
SWITCH(fig. 8)
The key can be turned to one of four po-
sitions:
–STOP: engine switched off, key can be
removed, engine inhibitor engaged, steer-
ing lock engaged, services excluded apart
from those supplied directly (e.g. hazard
warning lights).
–MAR: drive position. The engine lock
is deactivated and all electrical devices are
powered.
IMPORTANTDo not leave the key in
this position when the engine is stopped.
–AV V: instable position for starting the
engine.IMPORTANTIf the engine fails to start
move the key back to STOPand repeat.
The ignition switch has a safety device
which prevents passage to AV Vwhen the
engine is running.
–PARK: engine switched off, key can
be removed, engine lock engaged, steer-
ing lock engaged, sidelights switched on au-
tomatically.
IMPORTANTTo turn the key to the
PARKposition, button (A) on the switch
must be pressed first.
fig. 8
A0A0016m
Page 26 of 291
GETTING TO KNOW YOUR CAR
24
POWER WINDOWS
The power windows are fitted with a safe-
ty system with crush-prevention seals. The
electronic control unit that operates the sys-
tem is capable of detecting the presence of
an obstacle during the window closing mo-
tion through the special seals. Should this
occur, the system stops the movement of
the window and reverses it immediately.
IMPORTANTIf the crush-prevention
function is operated for 3 times in 1 minute,
the system automatically sets to the recov-
ery mode (self-protection). To reset the cor-
rect system operating logic, use the control
button. The window will rise in predefined
steps until closing completely. The logic is
reset and if there are no faults, the window
winder automatically resumes normal op-
eration; if not, contact Alfa Romeo Autho-
rised Services.
IMPORTANTWith the ignition key at
STOPor removed, the power windows re-
main activated for about 3 minutes and are
deactivated immediately the moment a door
is opened.
fig. 33
A0A0043m
fig. 34
A0A0044m
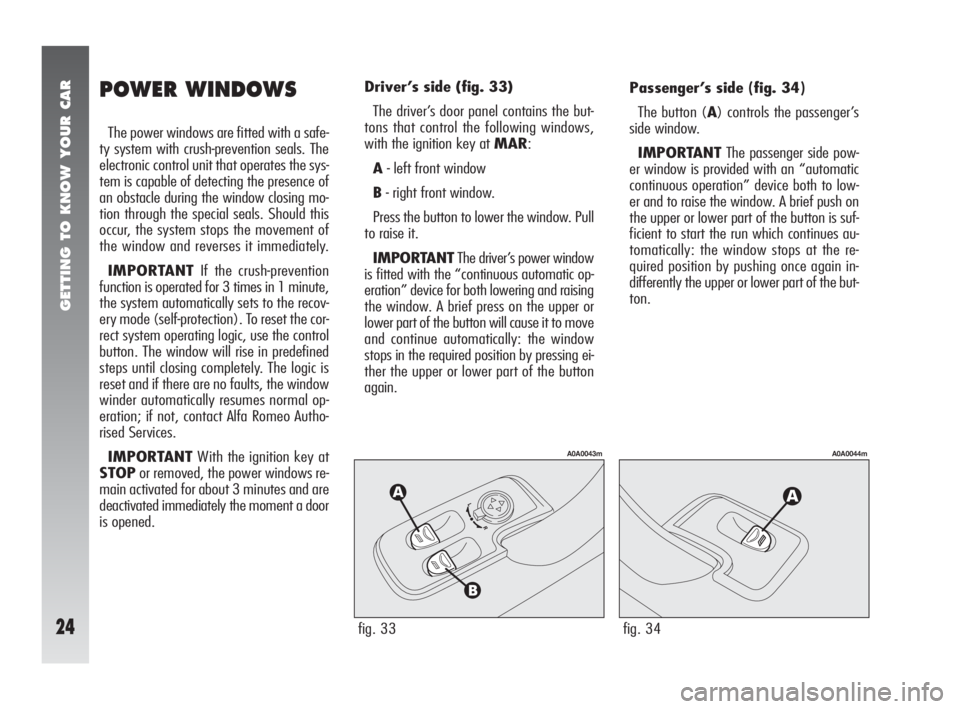
Passenger’s side (fig. 34)
The button (A) controls the passenger’s
side window.
IMPORTANTThe passenger side pow-
er window is provided with an “automatic
continuous operation” device both to low-
er and to raise the window. A brief push on
the upper or lower part of the button is suf-
ficient to start the run which continues au-
tomatically: the window stops at the re-
quired position by pushing once again in-
differently the upper or lower part of the but-
ton. Driver’s side (fig. 33)
The driver’s door panel contains the but-
tons that control the following windows,
with the ignition key at MAR:
A- left front window
B- right front window.
Press the button to lower the window. Pull
to raise it.
IMPORTANTThe driver’s power window
is fitted with the “continuous automatic op-
eration” device for both lowering and raising
the window. A brief press on the upper or
lower part of the button will cause it to move
and continue automatically: the window
stops in the required position by pressing ei-
ther the upper or lower part of the button
again.
Page 74 of 291
GETTING TO KNOW YOUR CAR
72
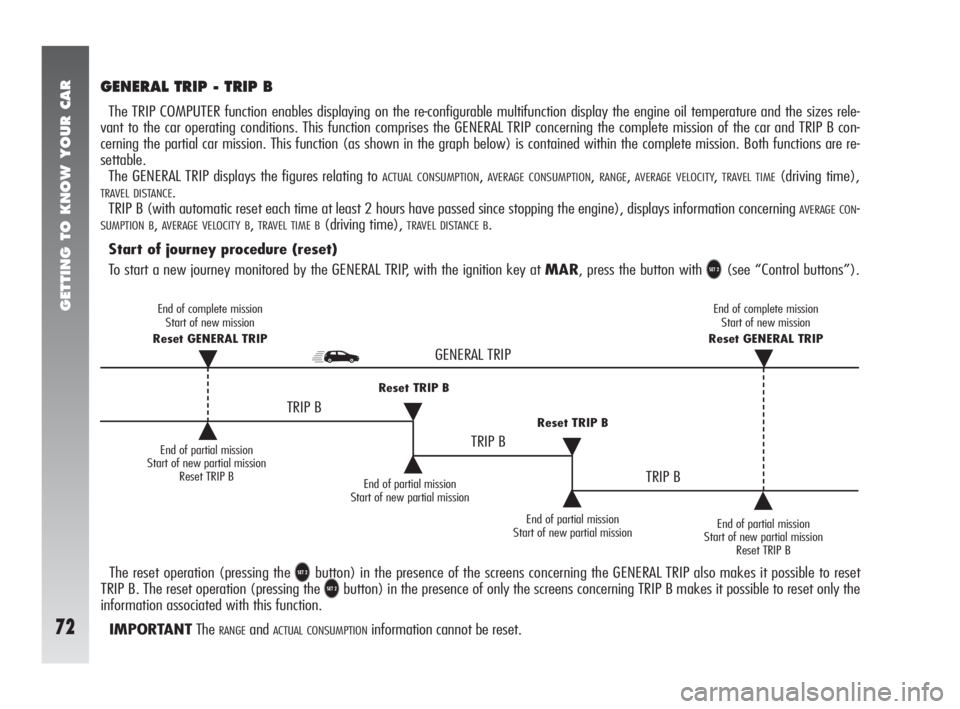
GENERAL TRIP - TRIP B
The TRIP COMPUTER function enables displaying on the re-configurable multifunction display the engine oil temperature and the sizes rele-
vant to the car operating conditions. This function comprises the GENERAL TRIP concerning the complete mission of the car and TRIP B con-
cerning the partial car mission. This function (as shown in the graph below) is contained within the complete mission. Both functions are re-
settable.
The GENERAL TRIP displays the figures relating to
ACTUAL CONSUMPTION,AVERAGE CONSUMPTION,RANGE,AVERAGE VELOCITY,TRAVEL TIME(driving time),
TRAVEL DISTANCE.
TRIP B (with automatic reset each time at least 2 hours have passed since stopping the engine), displays information concerning
AVERAGE CON-
SUMPTION B,AVERAGE VELOCITY B,TRAVEL TIME B(driving time), TRAVEL DISTANCE B.
Start of journey procedure (reset)
To start a new journey monitored by the GENERAL TRIP, with the ignition key at MAR, press the button with
U(see “Control buttons”).
The reset operation (pressing the
Ubutton) in the presence of the screens concerning the GENERAL TRIP also makes it possible to reset
TRIP B. The reset operation (pressing the
Ubutton) in the presence of only the screens concerning TRIP B makes it possible to reset only the
information associated with this function.
IMPORTANTThe
RANGEandACTUAL CONSUMPTIONinformation cannot be reset.
End of partial mission
Start of new partial mission
Reset TRIP B
˙Reset TRIP B
End of partial mission
Start of new partial mission˙
˙Reset TRIP B
˙˙
˙
TRIP B
TRIP B
TRIP B
End of partial mission
Start of new partial missionEnd of partial mission
Start of new partial mission
Reset TRIP B
GENERAL TRIP
End of complete mission
Start of new mission
Reset GENERAL TRIP
˙
End of complete mission
Start of new mission
Reset GENERAL TRIP
˙
Page 96 of 291
GETTING TO KNOW YOUR CAR
94
HOW TO USE THE AUTOMATIC
TWO-ZONECLIMATE CONTROL
SYSTEM
(fig. 77)
IMPORTANTThe knob rings do not
have a mechanical stopper therefore, once
the maximum or minimum value has been
reached, they are free to turn in both direc-
tions.
The system can be started in different
ways, but it is advisable to set the temper-
atures required on the displays, then press
the (13)
AUTObutton.
This way the system will start working
completely automatically to reach the tem-
peratures set as quickly as possible and then
maintain them.
During completely automatic system op-
eration, the temperatures set can be
changed at any time: the system will auto-
matically change its settings to adjust to the
new requirements.IMPORTANTTo be able to be accept-
ed by the system, the difference in tem-
perature between the driver’s and passen-
gers side must be within a range of 7°C.
It is possible to personalise the choices
made automatically by the system inter-
vening manually on the following controls:
– fan speed adjustment knob (4)
– air distribution selection buttons (10)
– inside air re-circulation on/off button
(8)v
– climate control on enable button (14)
√.
Manually selecting one or more of these
functions turns off the right led on the but-
ton (13)
AUTO.With one or more functions engaged man-
ually, the adjustment of the temperature of
the air admitted to the passenger compart-
ment continues to be controlled automati-
cally by the system (left led on button 13
AUTOon) except with the climate control
compressor off.
In fact, in this condition, the air admited
to the passenger compartment cannot have
a lower temperature than the outside air;
this condition is indicated by the turning off
of the two leds on button (13)
AUTOand
flashing on the display (1) and/or (5) re-
lated with the temperature rate that can-
not be obtained.
Page 107 of 291
GETTING TO KNOW YOUR CAR
105
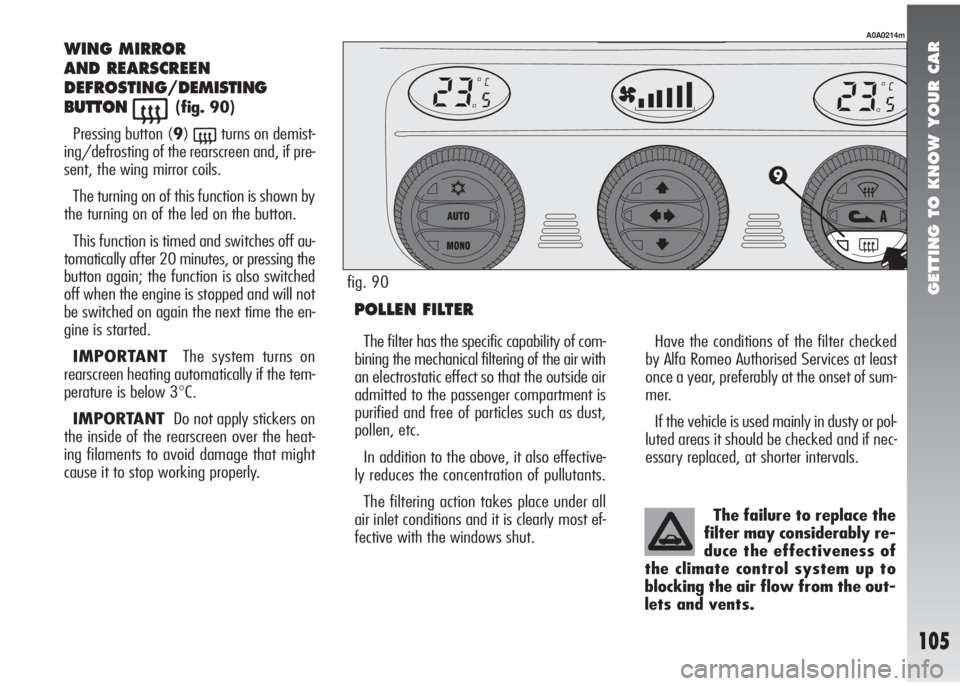
WING MIRROR
AND REARSCREEN
DEFROSTING/DEMISTING
BUTTON
((fig. 90)
Pressing button (9)
(turns on demist-
ing/defrosting of the rearscreen and, if pre-
sent, the wing mirror coils.
The turning on of this function is shown by
the turning on of the led on the button.
This function is timed and switches off au-
tomatically after 20 minutes, or pressing the
button again; the function is also switched
off when the engine is stopped and will not
be switched on again the next time the en-
gine is started.
IMPORTANTThe system turns on
rearscreen heating automatically if the tem-
perature is below 3
°C.
IMPORTANTDo not apply stickers on
the inside of the rearscreen over the heat-
ing filaments to avoid damage that might
cause it to stop working properly.
POLLEN FILTER
Have the conditions of the filter checked
by Alfa Romeo Authorised Services at least
once a year, preferably at the onset of sum-
mer.
If the vehicle is used mainly in dusty or pol-
luted areas it should be checked and if nec-
essary replaced, at shorter intervals.
A0A0214m
The filter has the specific capability of com-
bining the mechanical filtering of the air with
an electrostatic effect so that the outside air
admitted to the passenger compartment is
purified and free of particles such as dust,
pollen, etc.
In addition to the above, it also effective-
ly reduces the concentration of pullutants.
The filtering action takes place under all
air inlet conditions and it is clearly most ef-
fective with the windows shut.The failure to replace the
filter may considerably re-
duce the effectiveness of
the climate control system up to
blocking the air flow from the out-
lets and vents.
fig. 90
Page 108 of 291
GETTING TO KNOW YOUR CAR
106
CONTROLS
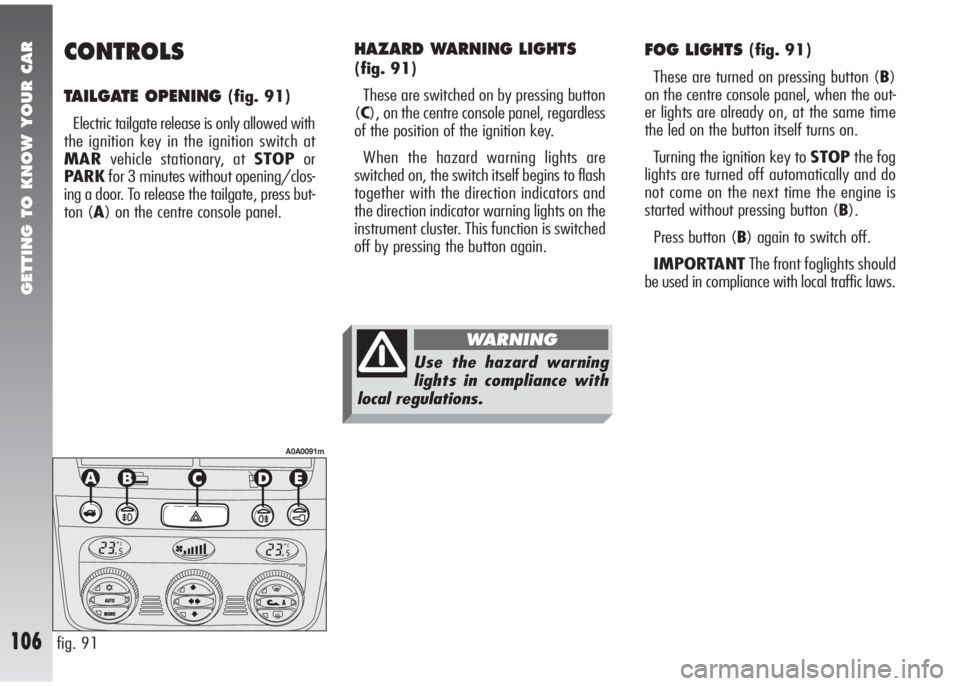
TAILGATE OPENING (fig. 91)
Electric tailgate release is only allowed with
the ignition key in the ignition switch at
MARvehicle stationary, at STOPor
PARKfor 3 minutes without opening/clos-
ing a door. To release the tailgate, press but-
ton (A) on the centre console panel.
FOG LIGHTS (fig. 91)
These are turned on pressing button (B)
on the centre console panel, when the out-
er lights are already on, at the same time
the led on the button itself turns on.
Turning the ignition key to STOPthe fog
lights are turned off automatically and do
not come on the next time the engine is
started without pressing button (B).
Press button (B) again to switch off.
IMPORTANTThe front foglights should
be used in compliance with local traffic laws.
fig. 91
A0A0091m
HAZARD WARNING LIGHTS
(fig. 91)
These are switched on by pressing button
(C), on the centre console panel, regardless
of the position of the ignition key.
When the hazard warning lights are
switched on, the switch itself begins to flash
together with the direction indicators and
the direction indicator warning lights on the
instrument cluster. This function is switched
off by pressing the button again.
Use the hazard warning
lights in compliance with
local regulations.
WARNING
Page 109 of 291
GETTING TO KNOW YOUR CAR
107
If no leaks are found the vehicle can be
restarted. Press button (A) to activate the
fuel supply system again.
fig. 92
A0A0318m
REAR FOG GUARDS (fig. 91)
These are turned on, with the dipped beam
headlights or fog lights on, pressing button
(D) on the centre console panel, at the
same time the warning light on the button
itself turns on.
Turning the ignition key to STOPthe fog
guards are automatically turned off and they
do not come on the next time the engine
is started unless button (D) is pressed. To
turn them off press button (D).
IMPORTANTAlways use the rear fog
guards in compliance with local regulations.
DOOR LOCKING SYSTEM
(fig. 91)
To lock the doors simultaneously, press but-
ton (E) on the centre console panel, re-
gardless of the position of the ignition key.
The deterrent led turns on as follows:
– with the ignition key at MARglowing
steadily with a yellow light.
– with the ignition key at STOPflash-
ing with a red light (deterrence condition).
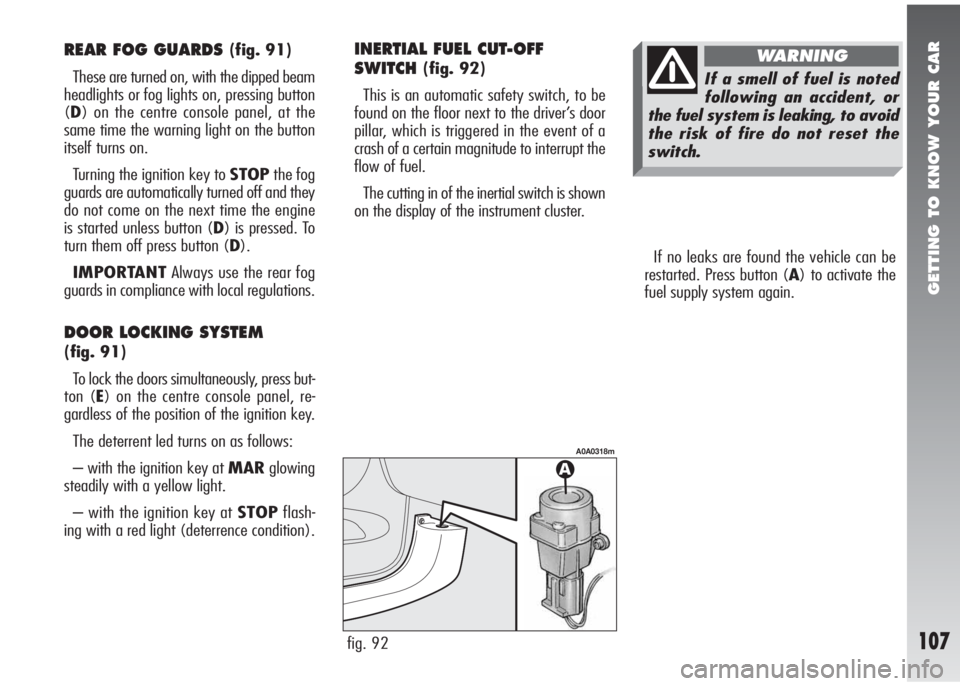
INERTIAL FUEL CUT-OFF
SWITCH
(fig. 92)
This is an automatic safety switch, to be
found on the floor next to the driver’s door
pillar, which is triggered in the event of a
crash of a certain magnitude to interrupt the
flow of fuel.
The cutting in of the inertial switch is shown
on the display of the instrument cluster.If a smell of fuel is noted
following an accident, or
the fuel system is leaking, to avoid
the risk of fire do not reset the
switch.
WARNING
Page 116 of 291
GETTING TO KNOW YOUR CAR
114
MOVING THE CAR
With the engine on and the car stationary,
the gears that can be engaged for moving
off are only first (1), second (2) and/or
reverse (R).
To shift gears, keep the brake pedal
pressed and use only the lever on the cen-
tre console since the stalks on the steering
wheel can be only operated if the car speed
exceeds 10 km/h.IMPORTANTReverse gear (R) can be
engaged from any of the following other ra-
tios: neutral (N), first (1) or second (2).
If the car is moving, the request is not ac-
cepted, it is necessary to wait for the car
to stop completely and request the en-
gagement of reverse again (R).
The driver is informed of the reverse gear
engaged condition by the reconfigurable
multifunction display on the instrument clus-
ter and by the intermittent sound of a
buzzer.
IMPORTANTIf when shifting from re-
verse (R)➞first (1) or neutral (N)➞first
(1) sticking occurs on first gear, the system
automatically engages second gear (2).
This is not to be considered as a fault as it
is part of the operating logic. For the same
reason, in the case of sticking on reverse
gear, the system partially closes the clutch
to allowgear engagement; in this case the
engagement of reverse gear (R) will not be
as smooth as usual.Moving off of the car is obtained:
1) releasing the brake pedal;
2) gradually pressing the accelerator pedal.
The more the accelerator is pressed the
higher the pickup torque.
When the ASR system is off (through the
relevant ASR OFF button) max pickup is ob-
tained (“sprint" starting)
It is absolutely necessary
to turn off the engine and
then turn off the Selespeed system
keeping the brake pedal pressed:
ONLY release the pedal when the
reconfigurable multifunction display
on the cluster has gone out.
WARNING
After a request to shift
gear with the car station-
ary, before pressing the accelera-
tor pedal to make the car move,
the driver must always check the
display to see that the gear en-
gaged is the one required.
WARNING
Page 152 of 291
GETTING TO KNOW YOUR CAR
150
6.Multifunction button:
– Radio: call preset stations (from 6 to
1)
– Compact Disc player: select previous
track.
Volume adjustment and Mute
buttons
The buttons for volume adjustment (1) e
(2) and for turning Mute on/off (3) work
in the same way as the corresponding but-
tons on the radio.
Radio frequency and sound
source select button
To cyclically select the radio frequencies
and sound sources, briefly and repeatedly
press button (4).
The frequencies/sources available are:
FMI, FMII, FMT, MW, LW, CD*, CDC**.
(*) Only if the Compact Disc is inserted
(**) Only if the CD-Changer is connected
Multifunction buttons (5) and (6)
Multifunction buttons (5) and (6) call the
preset radio stations, or select the next/pre-
vious track when listening to a Compact
Disc.
Press button (5) to select stations from
1 to 6 or to listen to the next track on a CD.
Press button (6) to select stations from
6 to 1 or to listen to the previous track on
a CD.
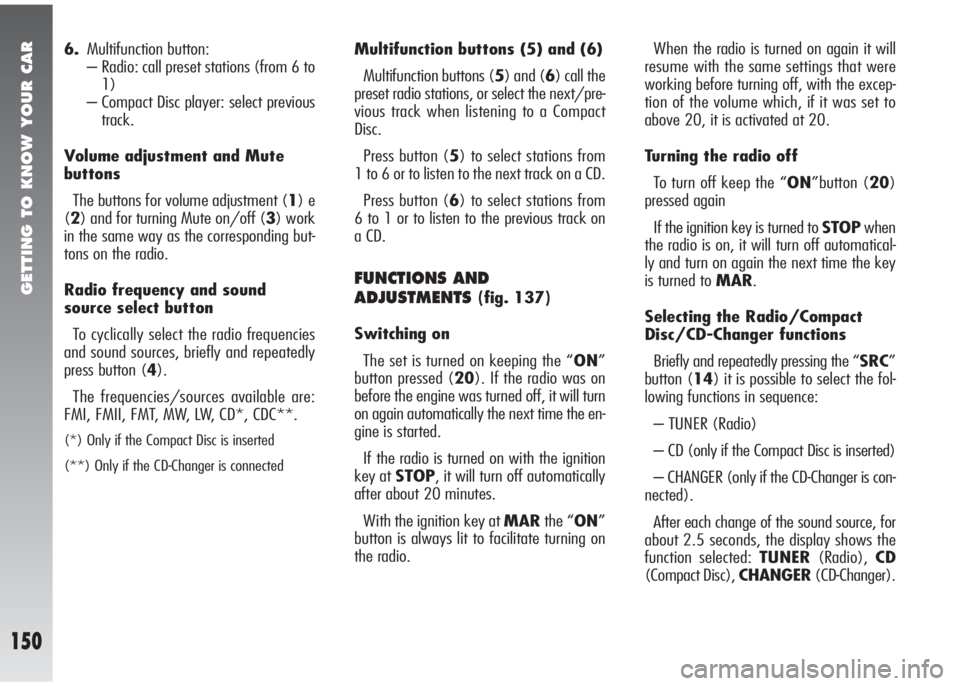
FUNCTIONS AND
ADJUSTMENTS
(fig. 137)
Switching on
The set is turned on keeping the “ON”
button pressed (20). If the radio was on
before the engine was turned off, it will turn
on again automatically the next time the en-
gine is started.
If the radio is turned on with the ignition
key at STOP, it will turn off automatically
after about 20 minutes.
With the ignition key at MARthe “ON”
button is always lit to facilitate turning on
the radio.When the radio is turned on again it will
resume with the same settings that were
working before turning off, with the excep-
tion of the volume which, if it was set to
above 20, it is activated at 20.
Turning the radio off
To turn off keep the “ON”button (20)
pressed again
If the ignition key is turned to STOPwhen
the radio is on, it will turn off automatical-
ly and turn on again the next time the key
is turned to MAR.
Selecting the Radio/Compact
Disc/CD-Changer functions
Briefly and repeatedly pressing the “SRC”
button (14) it is possible to select the fol-
lowing functions in sequence:
– TUNER (Radio)
– CD (only if the Compact Disc is inserted)
– CHANGER (only if the CD-Changer is con-
nected).
After each change of the sound source, for
about 2.5 seconds, the display shows the
function selected: TUNER(Radio),CD
(Compact Disc), CHANGER(CD-Changer).
Page 153 of 291
GETTING TO KNOW YOUR CAR
151
The functions that cannot be selected (e.g.
“CD” when the Compact Disc is not insert-
ed) are disabled automatically. If the Com-
pact Disc is not inserted and the CD-Chang-
er is not connected, pressing the “SRC” but-
ton (14) for about 2.5 seconds the display
will show only “NO CD”.
IMPORTANTWhen listening to the ra-
dio with a Compact Disc inserted and the
CD-Changer connected, pressing the “SRC”
button (14) will select the last function used
between Compact Disc and CD-Changer.
Pause function
If while listening to a Compact Disc another
function is selected (e.g. the radio), playing
is stopped and when the Compact Disc mode
is resumed. it starts again from the point
in which it was stopped.
If while listening to the radio another func-
tion is selected, when the Radio mode is
resumed, it is tuned to the last station se-
lected.Volume adjustment
Press button “VOL+” (21) to higher the
volume or “VOL-” (19) to lower it.
Pressing the button briefly the change is
gradual by steps. Pressing longer, the
change is fast. For a few seconds the dis-
play shows the wording “VOL” and the vol-
ume level (from 0 to 66).
If the volume level is changed during the
broadcast of a traffic bulletin or during use
of the phone (if the voice feature is in-
stalled), the new setting is maintained on-
ly until the end of the bulletin or phone call.
Volume changing with speed
The SVC function makes it possible to au-
tomatically adapt the volume level to the
speed of the car, increasing it as the speed
increases to maintain the ratio with the noise
level inside the passenger compartment.
To activate the SVC function briefly press
(less than 1 second) the “MENU” button
(9), then use buttons “
▲” (6) or “▼” (8)
to scroll the menu functions stopping on the
SVC function and buttons “
˙˙” (7) or
“
¯¯” (4) to turn the function on or off se-
lecting respectively “SVC ON” or “SVC
OFF”.
This function can be turned on or off in all
the operating modes of the device (Ra-
dio/Compact Disc/CD-Changer).Mute function (turning off the
volume completely)
To turn on the Mute function briefly press
(less than 1 second) the “
z” button (20).
The volume will lower gradually (Soft Mute
function) and the display will show
“MUTE”.
To turn the Mute function off, briefly press
the “
z” button again (20). The volume
will increase gradually (Soft Mute function)
returning to the value set before using the
Mute function.
The Mute function is also turned off press-
ing one of the volume adjustment buttons
“VOL+” (21) or “VOL-” (19): in this
case the volume is changed directly.
With the Mute function on, all the other
functions can be used and if a traffic bul-
letin arrives with the TA function on or an
emergency alarm is received, the message
ignores the Mute function.