lights Alfa Romeo 156 2005 Owner handbook (in English)
[x] Cancel search | Manufacturer: ALFA ROMEO, Model Year: 2005, Model line: 156, Model: Alfa Romeo 156 2005Pages: 357, PDF Size: 5.04 MB
Page 231 of 357

IN AN EMERGENCY
229
– Remove and replace the bulb concerned
(spherical with bayonet coupling) pushing
it gently and turning counter-clockwise
(fig. 45).
(C) side light/stop light bulb
(D) direction indicator bulb.
– Refit the bulb holder unit fastening it
correctly in place with the retainer tabs (B-
fig. 44).
– Refit the protective cover (B-fig. 43)
fastening with nuts (A-fig. 43).
NUMBER PLATE LIGHTSTo replace the bulbs proceed as follows:
– Remove the number plate light unit us-
ing a flat screwdriver protected by a soft
cloth on the stopper (A-fig. 46).
– Remove the unit (B-fig. 46).
– remove the bulb holder (C-fig. 47)
turning lightly and replace the bulb (D-
fig. 47) which is pressure-fitted.– Refit the bulb holder (C-fig. 47) turn-
ing gently.
– Refit the complete unit (B-fig. 46)
firstly inserting the catches and then press-
ing in correspondence with the stopper
(A-fig. 46).
fig. 44
A0B0207m
fig. 45
A0B0208m
fig. 47
A0B0210m
fig. 46
A0B0209m
Page 232 of 357

IN AN EMERGENCY
230
ADDITIONAL STOP LIGHT
(3
rdSTOP)
To replace the bulbs proceed as follows:
– Open the boot.
– Turn the fastening buttons (A-fig. 48)
until they release and lower the trim.
– Slacken the knob (B-fig. 49)and with-
draw the complete unit.
– Slacken the screws (C-fig. 50).
– Remove the transparent cover (D-
fig. 51) and replace the bulb concerned.– Refit the transparent cover and install the
unit locking it with the knob (B-fig. 49).
– Re-position the trim correctly and fasten
with its buttons (A-fig. 48).
IF ONE OF THE
INTERNAL LIGHTS
GOES OUTFRONT ROOF LIGHTTo replace the bulbs proceed as follows:
– Remove the roof light (A-fig. 52) lev-
ering in the points shown by the arrows.
– Open the cover (B-fig. 53).
– Replace the bulb concerned (C-
fig. 53) by pulling it outwards and freeing
it from the lateral contacts ensuring that the
new bulb is correctly fitted between the con-
tacts.
fig. 48
A0B0192m
fig. 50
A0B0205m
fig. 49
A0B0204m
fig. 51
A0B0206m
Page 234 of 357

IN AN EMERGENCY
232
COURTESY LIGHTS(where required)
To remove the bulb proceed as follows:
– Remove the roof light (A-fig. 58) lev-
ering in the point shown by the arrow.– Remove the bulb (B-fig. 59) pulling
it outwards and releasing it from the side
contacts.
– Fit the new bulb making sure that it is
positioned correctly and locked between the
contacts.
– Refit the roof light, inserting it in the cor-
rect position firstly on one side and then
pressing on the other until the tab clicks.
GLOVEBOX LIGHTTo remove the bulb proceed as follows:
– Remove the light pushing with a screw-
driver on the tab (A-fig. 60).
– Remove the cover (B-fig. 61).
fig. 57
A0B0197m
fig. 56
A0B0196m
fig. 58
A0B0198m
fig. 60
A0B0195m
fig. 59
A0B0199m
Page 240 of 357
IN AN EMERGENCY
238
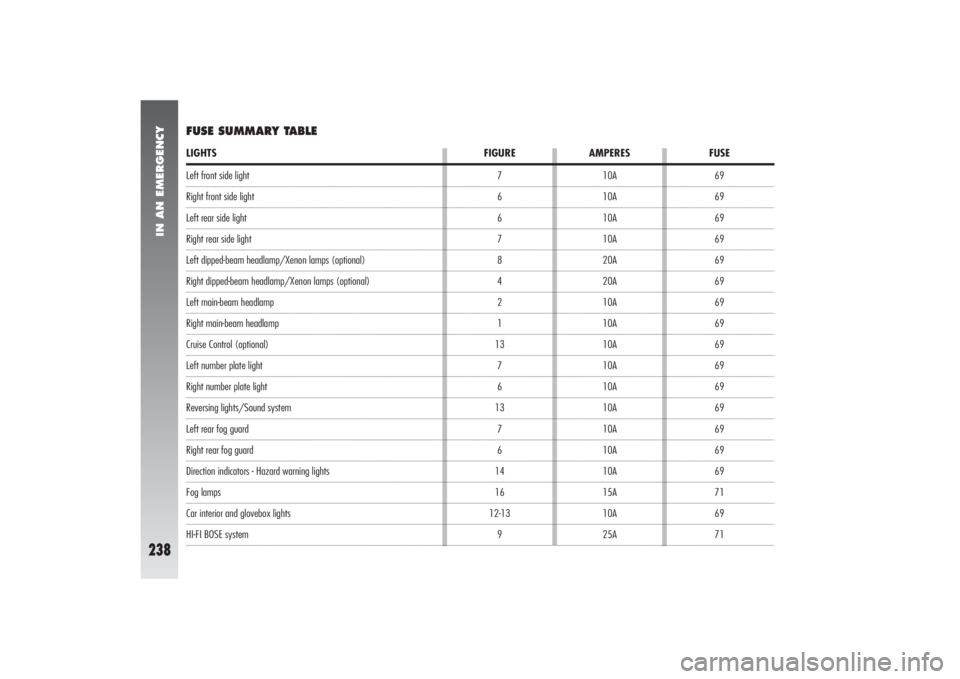
Left front side lightRight front side lightLeft rear side lightRight rear side lightLeft dipped-beam headlamp/Xenon lamps (optional)Right dipped-beam headlamp/Xenon lamps (optional)Left main-beam headlampRight main-beam headlampCruise Control (optional)Left number plate lightRight number plate lightReversing lights/Sound systemLeft rear fog guardRight rear fog guardDirection indicators - Hazard warning lightsFog lampsCar interior and glovebox lightsHI-FI BOSE system10A
10A
10A
10A
20A
20A
10A
10A
10A
10A
10A
10A
10A
10A
10A
15A
10A
25ALIGHTS FIGURE AMPERES FUSEFUSE SUMMARY TABLE
7
6
6
7
8
4
2
1
13
7
6
13
7
6
14
16
12-13
969
69
69
69
69
69
69
69
69
69
69
69
69
69
69
71
69
71
Page 241 of 357
IN AN EMERGENCY
239
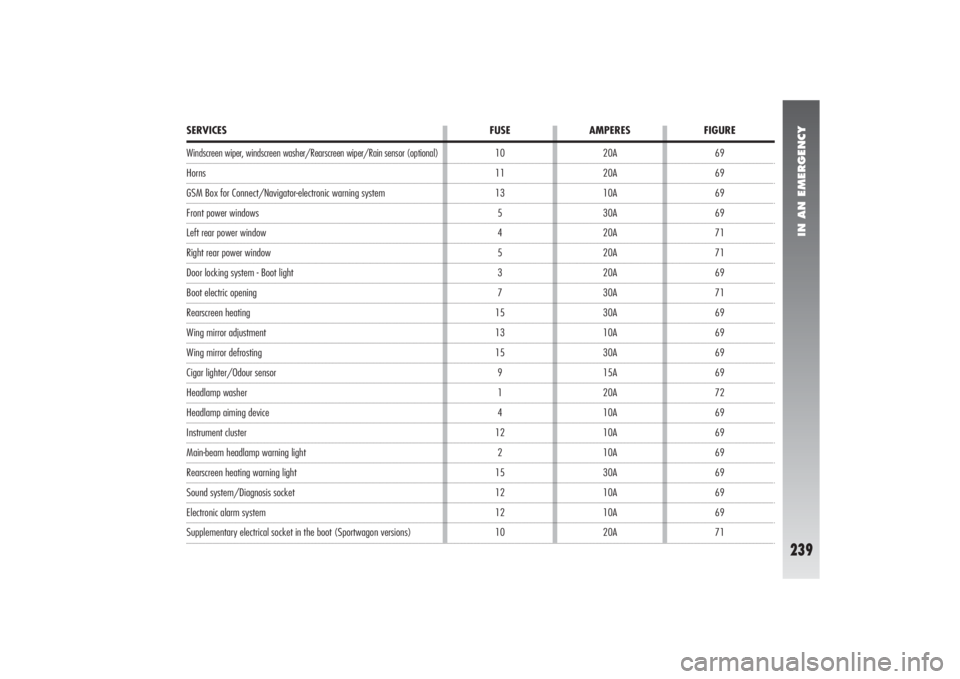
69
69
69
69
71
71
69
71
69
69
69
69
72
69
69
69
69
69
69
71 10
11
13
5
4
5
3
7
15
13
15
9
1
4
12
2
15
12
12
10
SERVICES FUSE AMPERES FIGUREWindscreen wiper, windscreen washer/Rearscreen wiper/Rain sensor (optional)HornsGSM Box for Connect/Navigator-electronic warning systemFront power windowsLeft rear power windowRight rear power windowDoor locking system - Boot lightBoot electric openingRearscreen heatingWing mirror adjustmentWing mirror defrostingCigar lighter/Odour sensorHeadlamp washerHeadlamp aiming deviceInstrument clusterMain-beam headlamp warning lightRearscreen heating warning lightSound system/Diagnosis socketElectronic alarm system Supplementary electrical socket in the boot (Sportwagon versions)20A
20A
10A
30A
20A
20A
20A
30A
30A
10A
30A
15A
20A
10A
10A
10A
30A
10A
10A
20A
Page 242 of 357
IN AN EMERGENCY
240
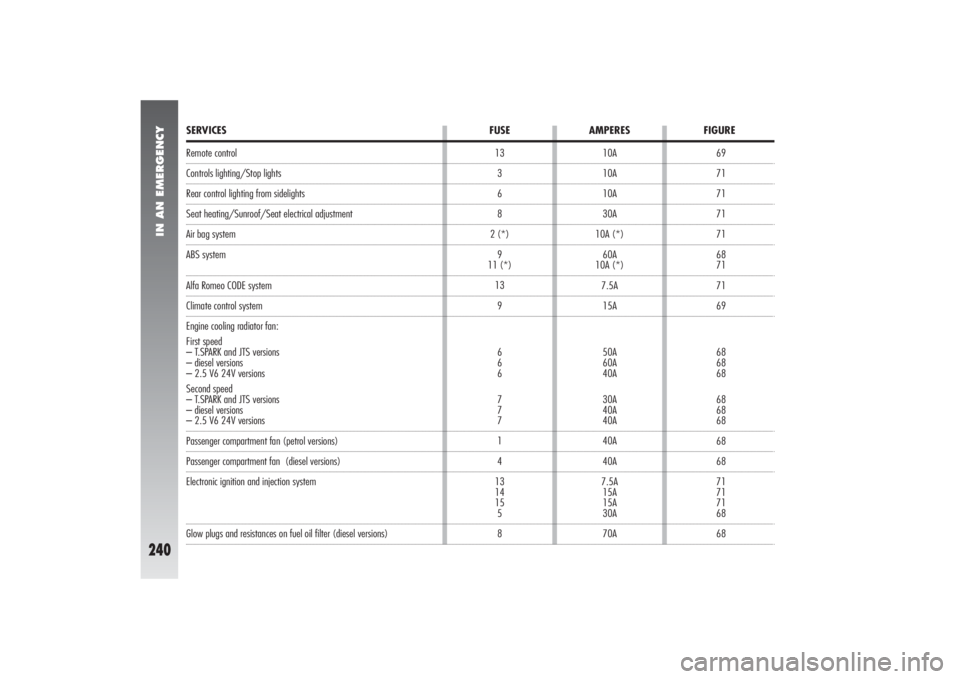
Remote controlControls lighting/Stop lightsRear control lighting from sidelightsSeat heating/Sunroof/Seat electrical adjustmentAir bag system
ABS systemAlfa Romeo CODE systemClimate control system
Engine cooling radiator fan:
First speed
– T.SPARK and JTS versions
– diesel versions
– 2.5 V6 24V versions
Second speed
– T.SPARK and JTS versions
– diesel versions– 2.5 V6 24V versionsPassenger compartment fan (petrol versions)Passenger compartment fan (diesel versions)
Electronic ignition and injection system Glow plugs and resistances on fuel oil filter (diesel versions)69
71
71
71
71
68
71
71
69
68
68
68
68
68
68
68
68
71
71
71
68
68 10A
10A
10A
30A
10A (*)
60A
10A (*)
7.5A
15A
50A
60A
40A
30A
40A
40A
40A
40A
7.5A
15A
15A
30A
70A 13
3
6
8
2 (*)
9
11 (*)
13
9
6
6
6
7
7
7
1
4
13
14
15
5
8SERVICES FUSE AMPERES FIGURE
Page 248 of 357

IN AN EMERGENCY
246
IF AN ACCIDENT
OCCURS– It is important to keep calm.
– If you are not directly involved in the ac-
cident, stop at least ten metres away from
the accident.
– If you are on a motorway do not ob-
struct the emergency lane with your car.
– Turn off the engine and turn on the haz-
ard lights.
– At night, illuminate the scene of the ac-
cident with your headlights.– Act carefully, you must not risk being run
over.
– Mark the accident by putting the red tri-
angle at the regulatory distance from the car
where it can be clearly seen.
– Call the emergency services making the
information you give as accurate as you can.
On the motorway use the special column-
mounted emergency phones.
– In pile-ups on the motorway, particular-
ly when the visibility is bad, there is a high
risk of other vehicles running into those al-
ready immobile. Get out of the vehicle im-
mediately and take refuge behind the guard
rail.
– If the doors are blocked, do not try to
get out of the vehicle by breaking the strat-
ified windscreen. The rear and side windows
are easier to break.
– Remove the ignition keys of the vehi-
cles involved.– If you smell petrol or other chemicals,
do not smoke and make sure all cigarettes
are extinguished.
– Use a fire extinguisher, blanket, sand or
earth to put out fires, no matter how small
they are. Never use water.
– If it is not necessary to use the lighting
system, disconnect the terminal from the
battery negative (–) pole.
Page 251 of 357
CAR MAINTENANCE
249
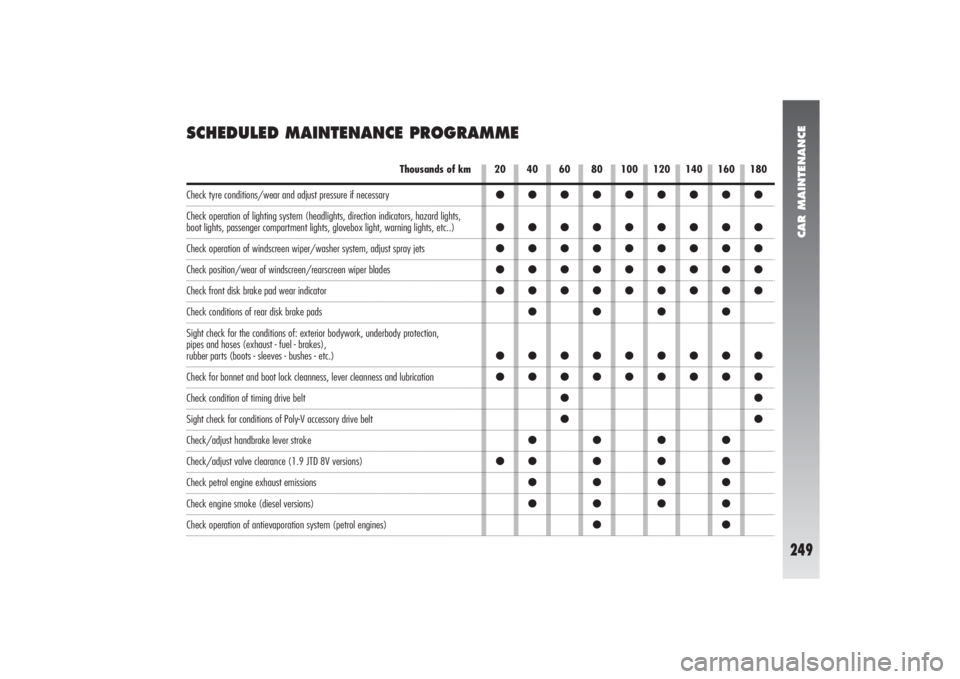
SCHEDULED MAINTENANCE PROGRAMME
20 40 60 80 100 120 140 160 180
Thousands of km
●●●●●●●●●
●●●●●●●●●
●●●●●●●●●
●●●●●●●●●
●●●●●●●●●
●●●●
●●●●●●●●●
●●●●●●●●●
●●
●●
●●●●
●●●●●
●●●●
●●●●
●●
Check tyre conditions/wear and adjust pressure if necessary
Check operation of lighting system (headlights, direction indicators, hazard lights,boot lights, passenger compartment lights, glovebox light, warning lights, etc..)Check operation of windscreen wiper/washer system, adjust spray jetsCheck position/wear of windscreen/rearscreen wiper bladesCheck front disk brake pad wear indicatorCheck conditions of rear disk brake pads
Sight check for the conditions of: exterior bodywork, underbody protection,
pipes and hoses (exhaust - fuel - brakes), rubber parts (boots - sleeves - bushes - etc.)Check for bonnet and boot lock cleanness, lever cleanness and lubricationCheck condition of timing drive beltSight check for conditions of Poly-V accessory drive beltCheck/adjust handbrake lever strokeCheck/adjust valve clearance (1.9 JTD 8V versions)Check petrol engine exhaust emissionsCheck engine smoke (diesel versions)Check operation of antievaporation system (petrol engines)
Page 253 of 357
CAR MAINTENANCE
251
ADDITIONAL
OPERATIONSEvery 1000 kmor before long journeys
check and if necessary top up:
– engine coolant level
– brake fluid/hydraulic clutch control flu-
id level
– power steering fluid level
– windscreen washer and headlamp wash-
er fluid level
– tyre pressure and conditions.
Every 3000 kmcheck the level of the
engine oil and top up if necessary.
You are recommended to use products of
the FL Selenia, designed and developed
expressly for Alfa Romeo cars (see the table
“Specifications of fluids and lubricants” in
the “Technical specifications” chapter).
ANNUAL INSPECTION
PROGRAMMEAn annual inspection programme
has been established for cars thet
cover less than 20,000 km (e.g.
10,000 km). It consists of the fol-
lowing:
– Check tyre conditions/wear and adjust
pressure if required (including the compact
spare wheel)
– Check lighting system operation (head-
lights, direction indicators, hazard lights,
boot lights, passenger compartment lights,
glovebox light, warning lights of instrument
panel, etc.)
– Check windscreen and rear-screen
wiper/washer operation, adjust nozzles
– Check windscreen/rear-screen blade po-
sition/wear
– Check condition and wear of the front
brake pad
– Check for bonnet and boot lock clean-
ness, lever cleanness and lubrication– Visually check the following: engine,
gearbox, transmission, piping (exhaust - fu-
el - brakes) rubber components (casings -
sleeves - bushings, etc..), brake and fuel
hoses
– Check battery charge condition
– Visually check the condition of the belts
and various controls
– Check and top up if necessary, the flu-
id levels (coolant, brake fluid, windscreen
washer fluid, battery, etc.)
– Change engine oil
– Replace engine oil filter
– Change pollen filter.
Page 271 of 357
CAR MAINTENANCE
269
USEFUL HINTS TO EXTEND
THE LIFE OF YOUR BATTERYTo avoid quickly draining the battery and
to preserve its operating conditions over the
course of time, carefully follow the instruc-
tions below:
– The terminals must always be tightened.
– As far as possible, avoid keeping ser-
vices on for a long time with the engine
stopped (radio, hazard lights, parking lights,
etc.).
– When leaving the car parked in a
garage, make sure that the doors, bonnet,
boot and interior lids are properly shut to
prevent lights from staying on.
– Before doing any work on the electric
system, disconnect the battery negative ter-
minal.– If after purchasing the car, you wish to
install electrical accessories which need a
permanent electrical supply (alarm, hands-
free phone, radio-navigator with satellite an-
ti-theft function, etc.) contact Alfa Romeo
Authorized Services whose qualified per-
sonnel, in addition to suggesting the most
suitable devices from Lineaccessori Alfa
Romeo will be able to evaluate the total
electrical absorption, checking whether the
car’s electric system is able to support the
load required or whether a battery with high-
er capacity is necessary. In fact, these de-
vices continue to absorb current with the
ignition key off (car parked, engine off) and
may gradually drain the battery.
REPLACING THE BATTERYIf required, replace the battery with a gen-
uine spare part having the same specifica-
tions. If a battery with different specifica-
tions is fitted, the service intervals given in
the Programmed Maintenance Schedule in
this section will no longer be valid. Refer
to the instructions provided by the battery
manufacturer.