wheel bolts Alfa Romeo 159 2008 Owner handbook (in English)
[x] Cancel search | Manufacturer: ALFA ROMEO, Model Year: 2008, Model line: 159, Model: Alfa Romeo 159 2008Pages: 303, PDF Size: 5.18 MB
Page 186 of 303

184
SAFETY
DEVICES
WARNING
LIGHTS AND
MESSAGES
CAR
MAINTENANCE
TECHNICAL
SPECIFICATIONS
INDEX
CORRECT USE
OF THE CAR
DASHBOARD
AND
CONTROLS
IN AN
EMERGENCY
The space-saver spare
wheel (for versions/
markets where applicable) is
specific to your car; do not use
it on other models, or use the
spare wheel of other models
on your car. The space-saver
spare wheel shall only be used
in an emergency. It shall only
be used for the distance nec-
essary to reach a service point
and the car speed shall not ex-
ceed 80 Km/h. The spare
wheel has a sticker that sum-
marises the main cautions for
use and limitations. The stick-
er should never be removed or
covered!. Never fit a wheel
cap on a space-saver spare
wheel.
WARNING
When driving with a
space-saver spare
wheel fitted, the driving per-
formance of the car changes.
Avoid accelerating or braking
sharply, abrupt turns or fast
cornerings. The life of the
spare wheel is approx. 3000
Km, after this distance it
should be replaced with an-
other of the same type. Nev-
er attempt to fit a conven-
tional tyre on a rim designed
for use as a space-saver spare
wheel. Have the punctured
wheel repaired and refitted as
soon as possible. Two or more
space-saver spare wheels
should never be used togeth-
er. Do not grease the threads
of bolts before installing them:
they might slip out.
WARNING
The jack shall only be
used for changing
wheels on the car with which
it is provided or on cars of the
same model. It must not be used
for other purposes such as for
instance raising cars of other
models. In no case should it be
used for repairs under the car.
Incorrect positioning of the jack
may cause the jacked car to fall.
Do not use the jack for higher
capacities than stated on its la-
bel. Snow chains cannot be fit-
ted to the space-saver spare
wheel. So, if a front (drive)
wheel is punctured and chains
are needed, a rear wheel should
be fitted to the front of the car
and the spare wheel should be
fitted to the rear. This way with
two normal drive wheels, snow
chains can be fitted to them to
solve an emergency.
WARNING
Page 188 of 303

186
SAFETY
DEVICES
WARNING
LIGHTS AND
MESSAGES
CAR
MAINTENANCE
TECHNICAL
SPECIFICATIONS
INDEX
CORRECT USE
OF THE CAR
DASHBOARD
AND
CONTROLS
IN AN
EMERGENCY
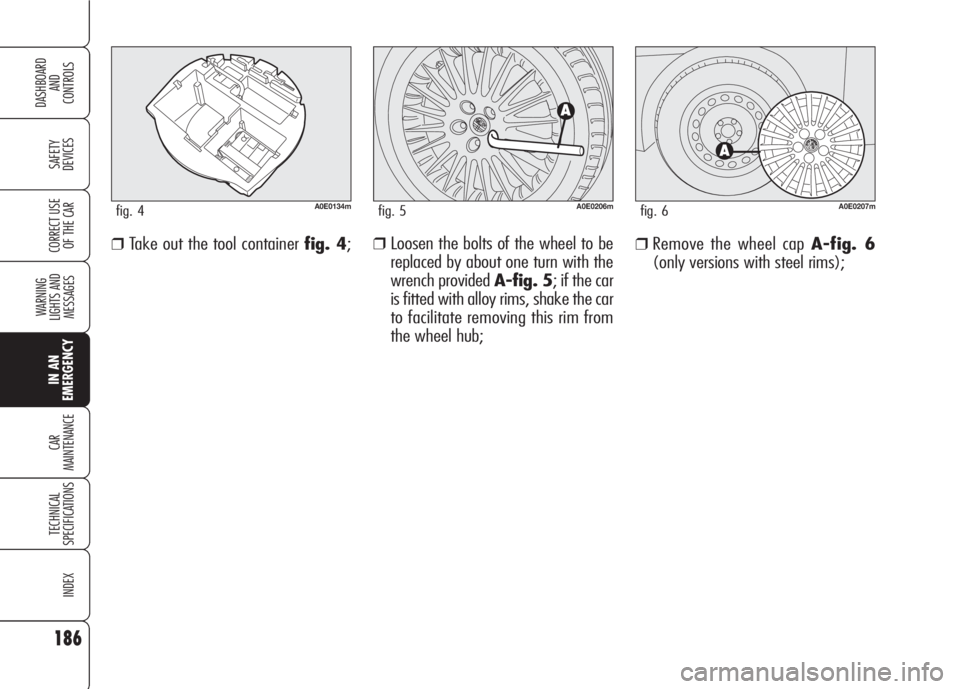
❒Loosen the bolts of the wheel to be
replaced by about one turn with the
wrench provided A-fig. 5; if the car
is fitted with alloy rims, shake the car
to facilitate removing this rim from
the wheel hub;❒Remove the wheel cap A-fig. 6
(only versions with steel rims);❒Take out the tool container fig. 4;
A0E0134mfig. 4A0E0206mfig. 5A0E0207mfig. 6
Page 190 of 303

188
SAFETY
DEVICES
WARNING
LIGHTS AND
MESSAGES
CAR
MAINTENANCE
TECHNICAL
SPECIFICATIONS
INDEX
CORRECT USE
OF THE CAR
DASHBOARD
AND
CONTROLS
IN AN
EMERGENCY
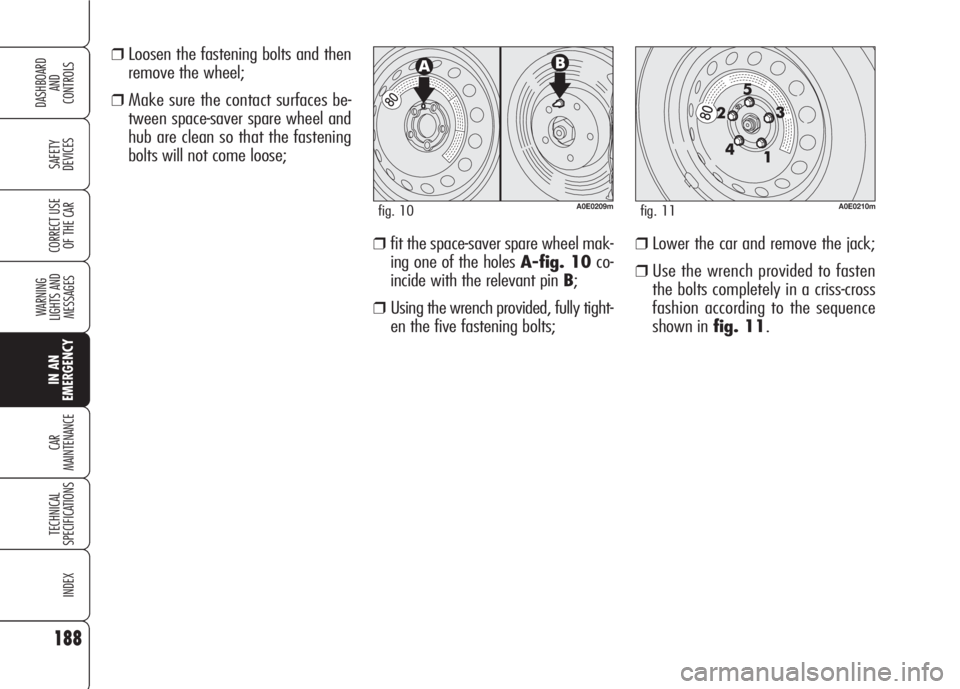
❒fit the space-saver spare wheel mak-
ing one of the holes A-fig. 10co-
incide with the relevant pin B;
❒Using the wrench provided, fully tight-
en the five fastening bolts;
❒Lower the car and remove the jack;
❒Use the wrench provided to fasten
the bolts completely in a criss-cross
fashion according to the sequence
shown in fig. 11.
❒Loosen the fastening bolts and then
remove the wheel;
❒Make sure the contact surfaces be-
tween space-saver spare wheel and
hub are clean so that the fastening
bolts will not come loose;
A0E0210mfig. 11A0E0209mfig. 10
Page 191 of 303

189
SAFETY
DEVICES
WARNING
LIGHTS AND
MESSAGES
CAR
MAINTENANCE
TECHNICAL
SPECIFICATIONS
INDEX
CORRECT USE
OF THE CAR
DASHBOARD
AND
CONTROLS
IN AN
EMERGENCY
REFITTING A
NORMAL WHEEL
Following the procedure described pre-
viously, raise the car and remove the
spare wheel.
Versions with steel rims
Proceed as follows:
❒Make sure the contact surfaces be-
tween standard wheel and hub are
clean so that the fastening bolts will not
come loose;
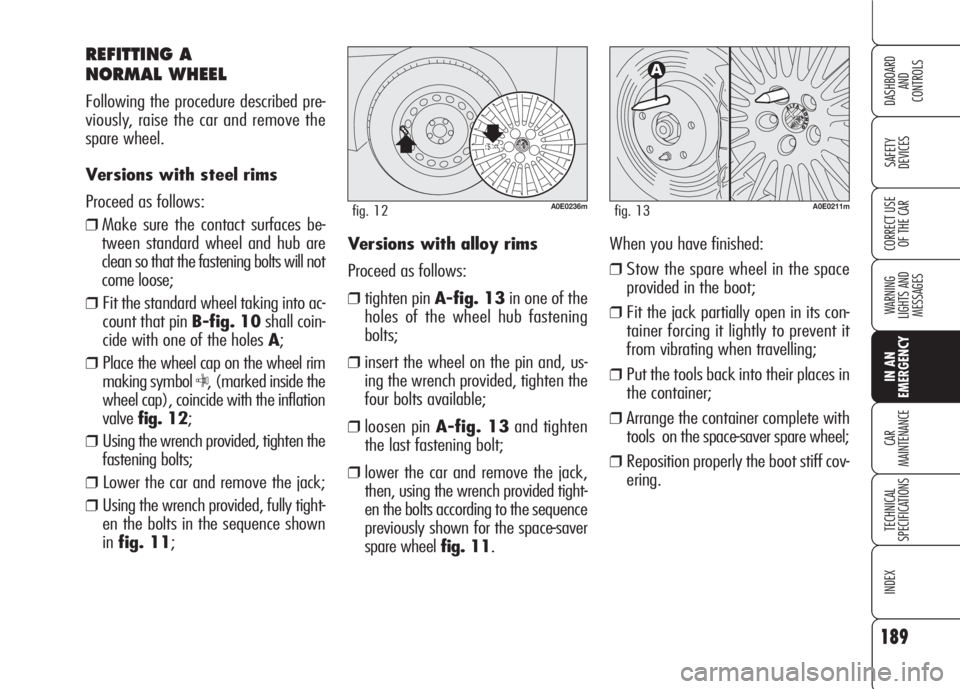
❒Fit the standard wheel taking into ac-
count that pin B-fig. 10shall coin-
cide with one of the holes A;
❒Place the wheel cap on the wheel rim
making symbol
C, (marked inside the
wheel cap), coincide with the inflation
valvefig. 12;
❒Using the wrench provided, tighten the
fastening bolts;
❒ Lower the car and remove the jack;
❒Using the wrench provided, fully tight-
en the bolts in the sequence shown
infig. 11;
A0E0211mfig. 13
Versions with alloy rims
Proceed as follows:
❒tighten pin A-fig. 13in one of the
holes of the wheel hub fastening
bolts;
❒insert the wheel on the pin and, us-
ing the wrench provided, tighten the
four bolts available;
❒loosen pin A-fig. 13and tighten
the last fastening bolt;
❒lower the car and remove the jack,
then, using the wrench provided tight-
en the bolts according to the sequence
previously shown for the space-saver
spare wheel fig. 11.When you have finished:
❒Stow the spare wheel in the space
provided in the boot;
❒Fit the jack partially open in its con-
tainer forcing it lightly to prevent it
from vibrating when travelling;
❒Put the tools back into their places in
the container;
❒Arrange the container complete with
tools on the space-saver spare wheel;
❒Reposition properly the boot stiff cov-
ering.
A0E0236mfig. 12