light Alfa Romeo 4C 2017 Owners Manual
[x] Cancel search | Manufacturer: ALFA ROMEO, Model Year: 2017, Model line: 4C, Model: Alfa Romeo 4C 2017Pages: 289, PDF Size: 2.61 MB
Page 250 of 289
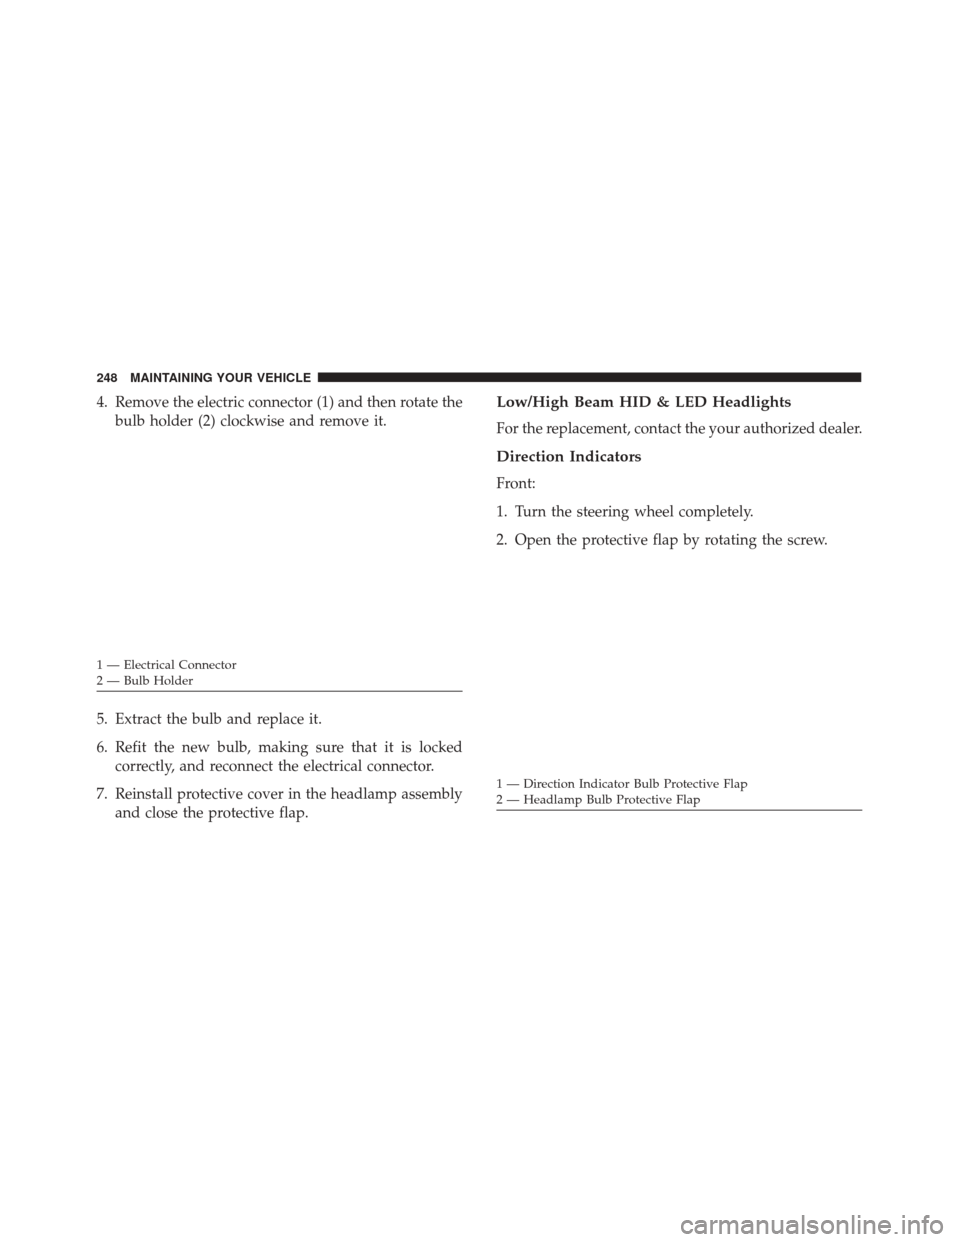
4. Remove the electric connector (1) and then rotate thebulb holder (2) clockwise and remove it.
5. Extract the bulb and replace it.
6. Refit the new bulb, making sure that it is locked correctly, and reconnect the electrical connector.
7. Reinstall protective cover in the headlamp assembly and close the protective flap.Low/High Beam HID & LED Headlights
For the replacement, contact the your authorized dealer.
Direction Indicators
Front:
1. Turn the steering wheel completely.
2. Open the protective flap by rotating the screw.
1 — Electrical Connector
2 — Bulb Holder
1 — Direction Indicator Bulb Protective Flap
2 — Headlamp Bulb Protective Flap
248 MAINTAINING YOUR VEHICLE
Page 253 of 289
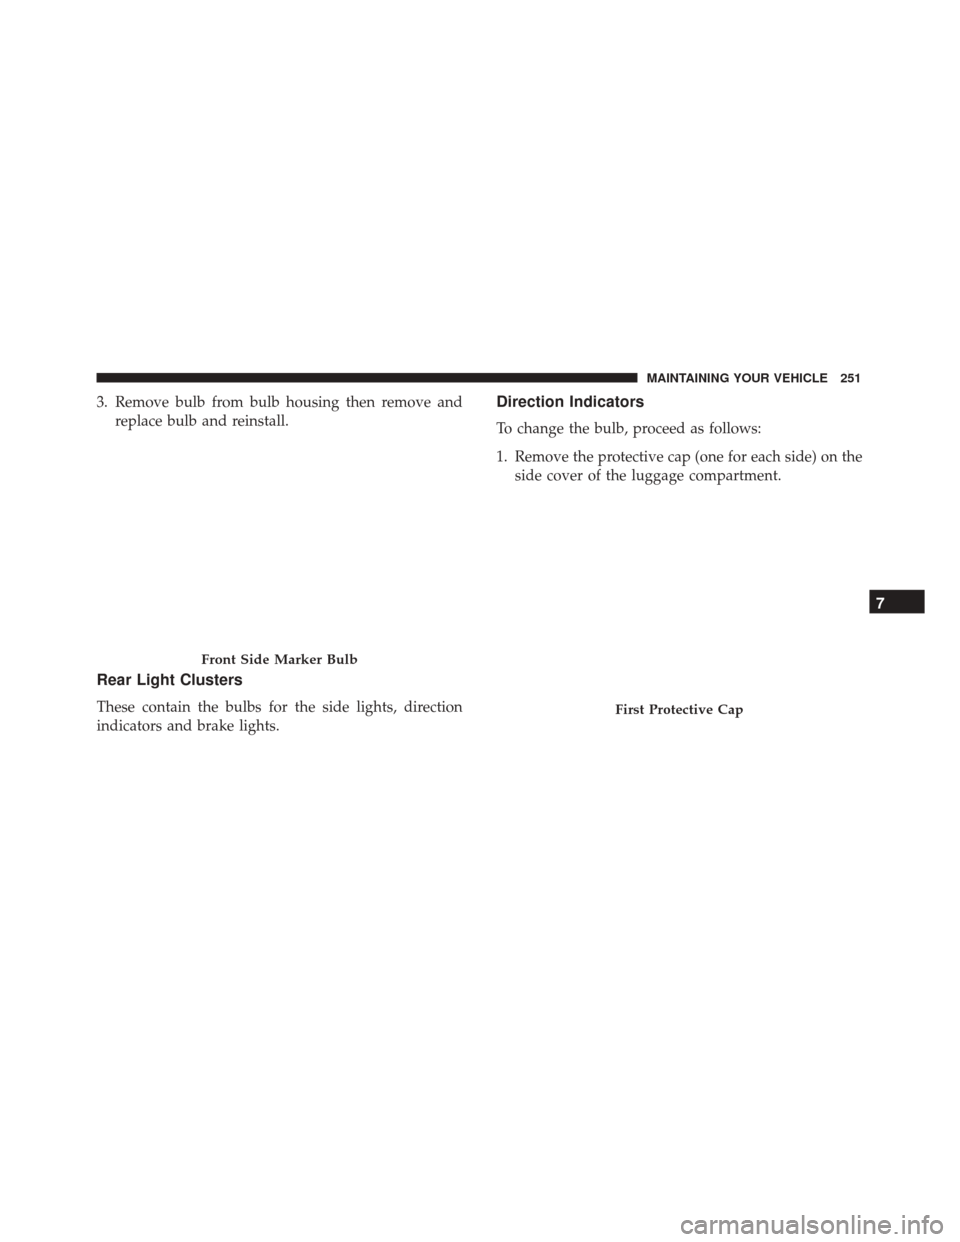
3. Remove bulb from bulb housing then remove andreplace bulb and reinstall.
Rear Light Clusters
These contain the bulbs for the side lights, direction
indicators and brake lights.
Direction Indicators
To change the bulb, proceed as follows:
1. Remove the protective cap (one for each side) on theside cover of the luggage compartment.
Front Side Marker Bulb
First Protective Cap
7
MAINTAINING YOUR VEHICLE 251
Page 254 of 289
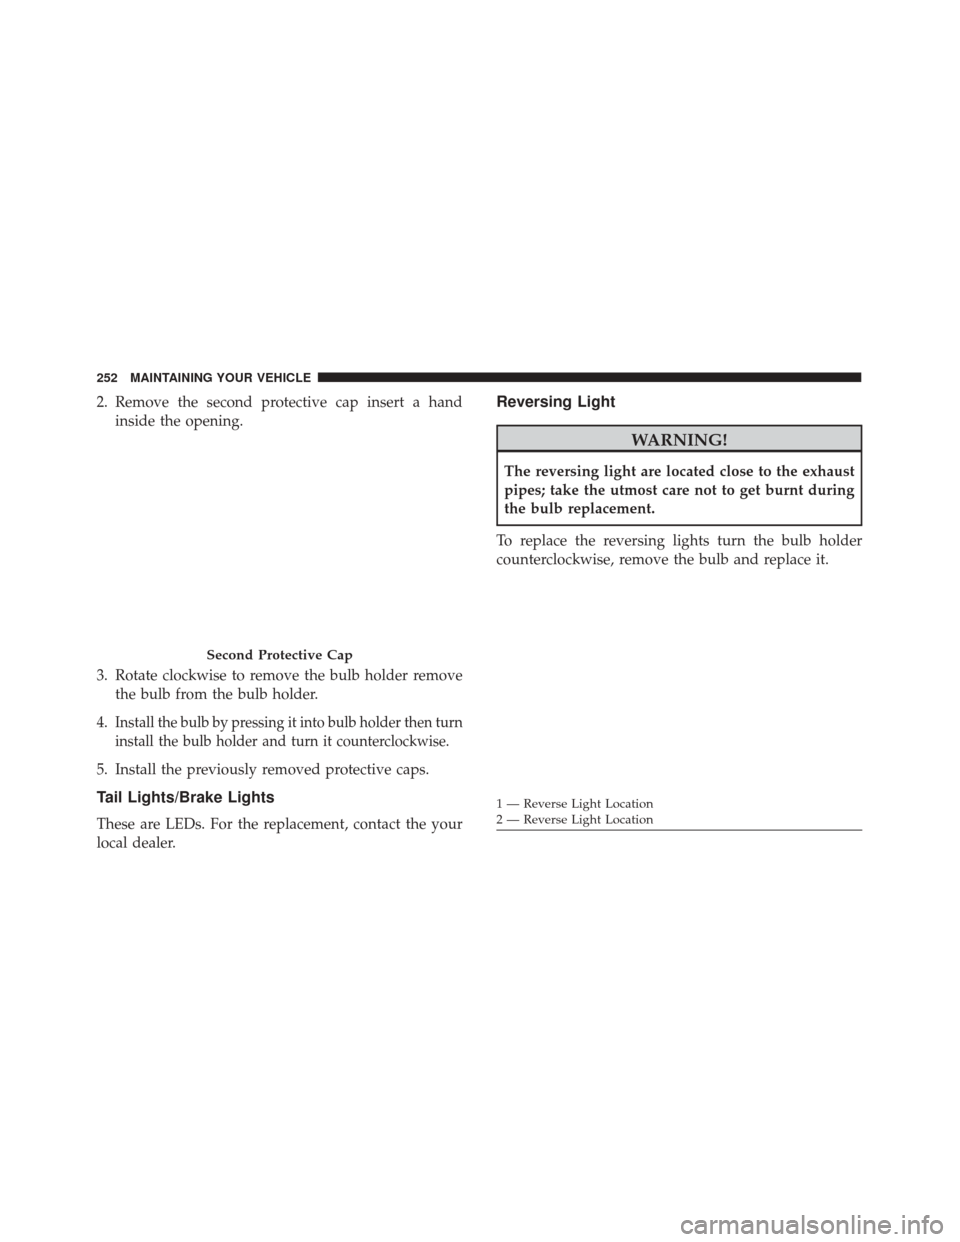
2. Remove the second protective cap insert a handinside the opening.
3. Rotate clockwise to remove the bulb holder remove the bulb from the bulb holder.
4.
Install the bulb by pressing it into bulb holder then turn
install the bulb holder and turn it counterclockwise.
5. Install the previously removed protective caps.
Tail Lights/Brake Lights
These are LEDs. For the replacement, contact the your
local dealer.
Reversing Light
WARNING!
The reversing light are located close to the exhaust
pipes; take the utmost care not to get burnt during
the bulb replacement.
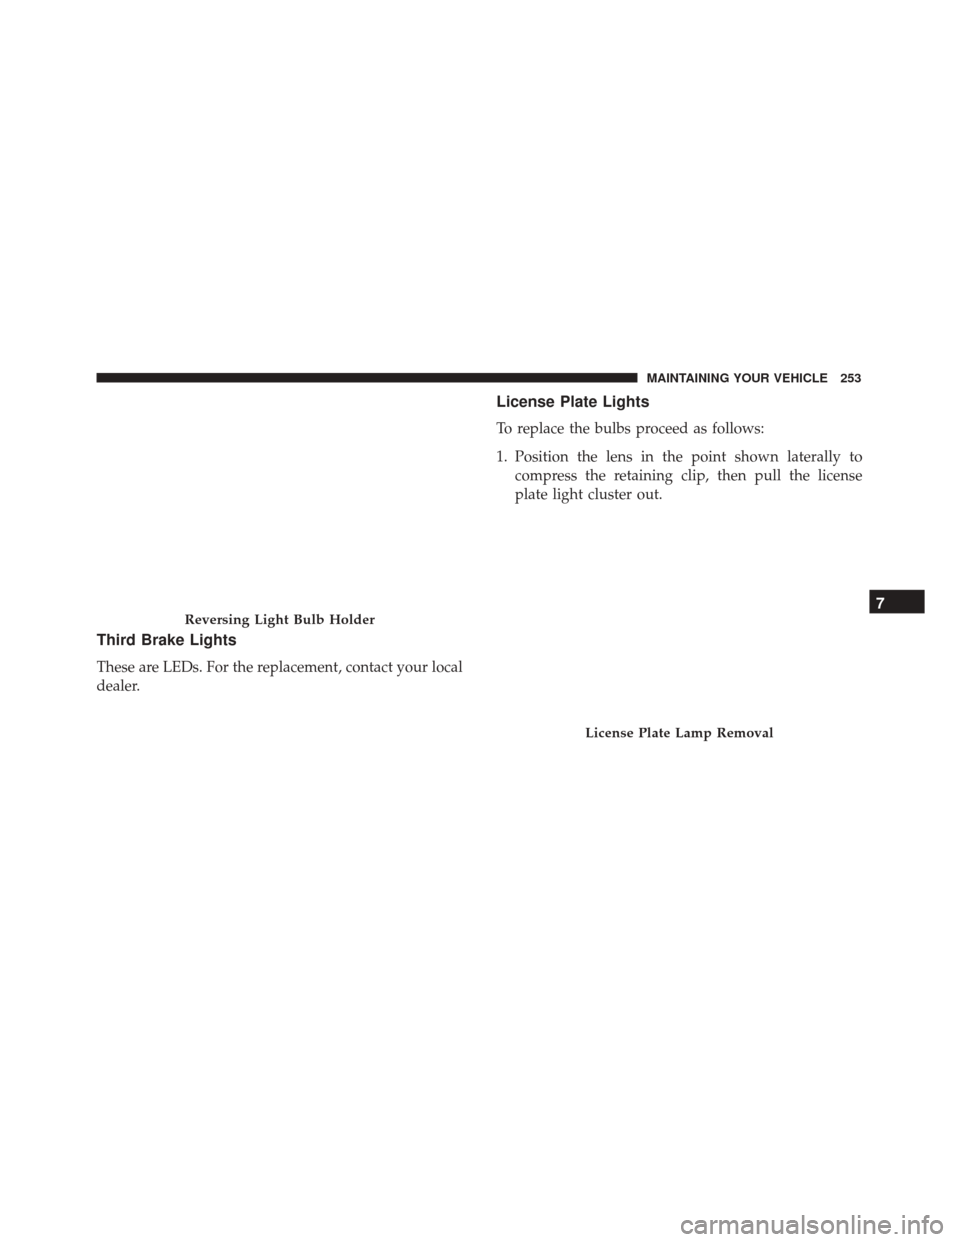
To replace the reversing lights turn the bulb holder
counterclockwise, remove the bulb and replace it.
Second Protective Cap
1 — Reverse Light Location
2 — Reverse Light Location
252 MAINTAINING YOUR VEHICLE
Page 255 of 289
Third Brake Lights
These are LEDs. For the replacement, contact your local
dealer.
License Plate Lights
To replace the bulbs proceed as follows:
1. Position the lens in the point shown laterally tocompress the retaining clip, then pull the license
plate light cluster out.
Reversing Light Bulb Holder
License Plate Lamp Removal
7
MAINTAINING YOUR VEHICLE 253
Page 256 of 289
2. Turn bulb holder (1) counterclockwise, remove bulb(2) and replace it.
Roof Light
To change the bulb, proceed as follows:
1. Remove roof light working at the points indicated bythe arrows. 2. Open protective flap (2) and replace bulb (1), releas-
ing it from the side contacts. Make sure that the new
bulb is correctly secured between the contacts.
1 — Bulb Holder
2 — Bulb
Roof Light
254 MAINTAINING YOUR VEHICLE
Page 257 of 289
3. Close protective flap (2) and install roof light in itshousing, making sure that it is locked in place.
Luggage Compartment Roof Light
To replace the bulb, proceed as follows:
1. Open the luggage compartment and remove luggagecompartment roof light, working in the direction
shown by the arrow. 2. Open light protector (2) and replace the bulb.
3. Close protector on the lens.
4. Install luggage compartment roof light by inserting it
in its correct position, first on one side and then
pressing on the other side until it clicks into place.
1 — Bulb
2 — Protective Flap
1 — Light Cover
2 — Light Protector
7
MAINTAINING YOUR VEHICLE 255
Page 262 of 289
MAINTENANCE SCHEDULE
Your vehicle is equipped with an automatic oil change
indicator system. The oil change indicator system will
remind you that it is time to take your vehicle in for
scheduled maintenance.
Based on engine operation conditions, the oil change
indicator message will illuminate in the instrument
cluster. This means that an engine oil and engine oil
filter change is required for your vehicle. Operating
conditions such as frequent short-trips, trailer tow,
extremely hot or cold ambient temperatures will influ-
ence when the “Change Oil” or “Oil Change Required”
message is displayed. Severe Operating Conditions can
cause the change oil message to illuminate as early as
3,500 miles (5,600 km) since last reset. Have your
vehicle serviced as soon as possible, within the next 500
miles (805 km).
The Wrench Warning Light may appear in the cluster as
a service reminder when vehicle maintenance is re-
quired, according to the scheduled maintenance mile-
age. The maintenance schedule intervals are set by the
manufacturer. Failure to have them carried out may
void your New Vehicle Limited Warranty.NOTE:
The actual interval for changing the oil and
replacing the engine oil filter depends on the vehicle
usage conditions and is signalled by the warning light
or message (if present) on the instrument panel or every
12 months.
Severe Duty All Models
In addition, if your vehicle is used under demanding
conditions, including:
• On the track.
• On dusty roads.
• Short, repeated trips (less than 4-5 miles or 7-8 km) at
sub-zero temperatures.
• Allowing the engine to idle for extended periods of
time.
• Driving for long distances at low speeds.
• Allowing the vehicle to sit for long periods of inac-
tivity.
260 MAINTENANCE SCHEDULES
Page 264 of 289
•Check the tire inflation pressures and look for un-
usual wear or damage.
• Check the fluid levels of the coolant reservoir and
brake master cylinder reservoir, and add as needed.
• Check function of all interior and exterior lights.
• Check screen wash/wipe system and positioning/
wear of windshield.
Every 2,000 miles (3,000 km) check and, if necessary, top
up: engine oil level.Maintenance Chart
Required Maintenance Intervals
Refer to the maintenance schedules on the following
page for the required maintenance intervals.
At Every Oil Change Interval As Indicated By Oil Change Indicator System:
Change oil and filter.
Inspect battery and clean and tighten terminals as required.
Inspect brake pads, shoes, rotors, drums, and hoses. Inspect engine cooling system protection and hoses. Check and adjust hand brake.Inspect exhaust system.
Inspect engine air cleaner filter if using in dusty or off-road conditions.
262 MAINTENANCE SCHEDULES
Page 265 of 289
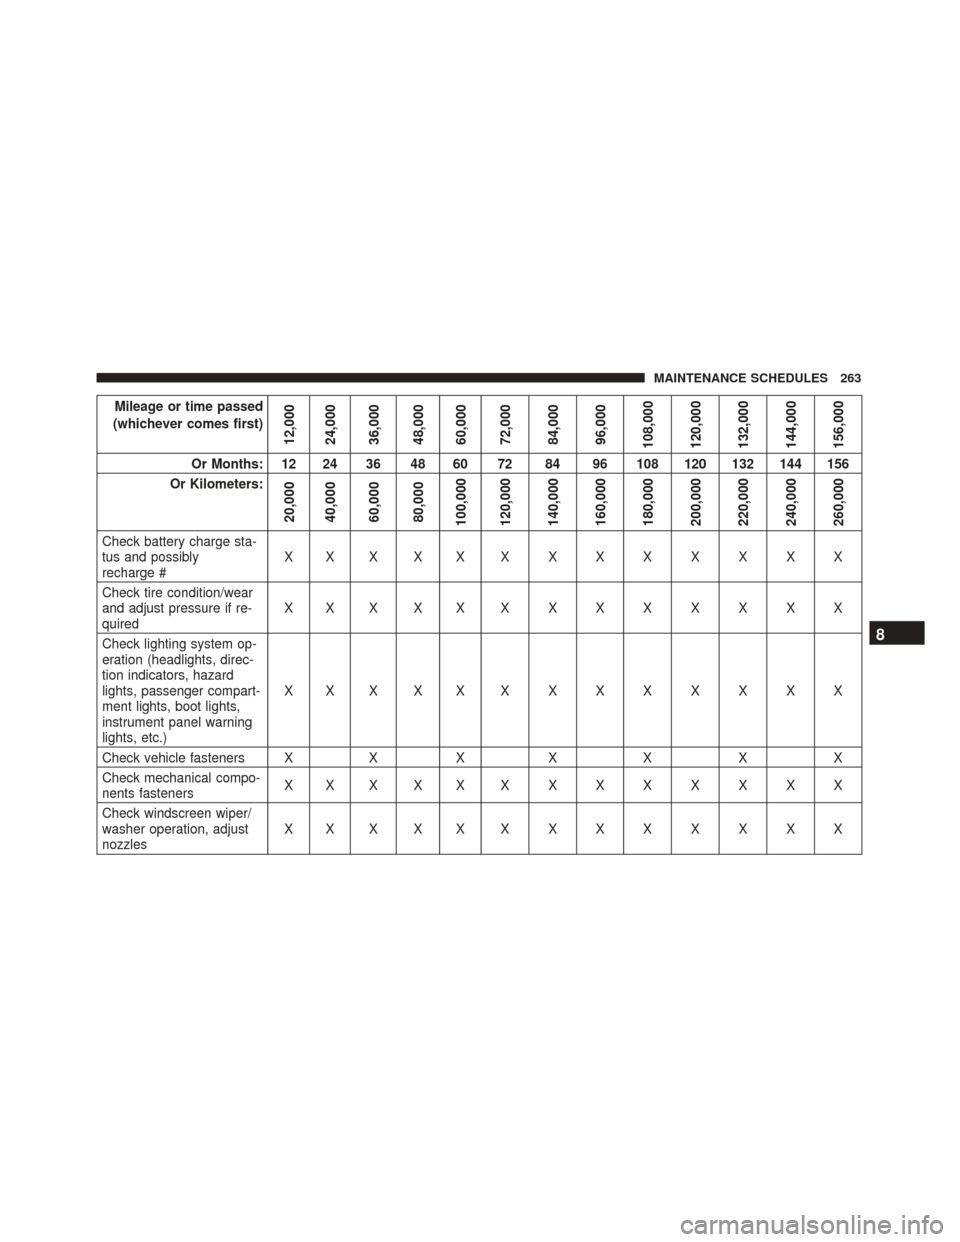
Mileage or time passed
(whichever comes first)
12,000
24,000
36,000
48,000
60,000
72,000
84,000
96,000
108,000
120,000
132,000
144,000
156,000
Or Months: 12 24 36 48 60 72 84 96 108 120 132 144 156
Or Kilometers:
20,000
40,000
60,000
80,000
100,000
120,000
140,000
160,000
180,000
200,000
220,000
240,000
260,000
Check battery charge sta-
tus and possibly
recharge # XXXXXXXXXXXXX
Check tire condition/wear
and adjust pressure if re-
quired XXXXXXXXXXXXX
Check lighting system op-
eration (headlights, direc-
tion indicators, hazard
lights, passenger compart-
ment lights, boot lights,
instrument panel warning
lights, etc.) XXXXXXXXXXXXX
Check vehicle fasteners X X X X X X X
Check mechanical compo-
nents fasteners XXXXXXXXXXXXX
Check windscreen wiper/
washer operation, adjust
nozzles XXXXXXXXXXXXX
8
MAINTENANCE SCHEDULES 263
Page 269 of 289
* The spark plug change interval is mileage based only,
yearly intervals do not apply. The following are essen-
tial to ensure correct operation and prevent serious
damage to the engine:
•Only use spark plugs of the same make and type
which are specially certified for such engines (refer to
“Fluids, Lubricants, and Genuine Parts” in “Main-
taining Your Vehicle” for further information).
• Strictly comply with the spark plug replacement
interval given in the maintenance schedule for spark
plug replacement.
• Contact your Alfa Romeo Dealer if you have ques-
tions.
** Regardless of the distance covered, the timing belt
must be changed every 4 years for particularly demand-
ing use (cold climates, city driving, long periods of
idling) or at least every 5 years.
*** The actual interval for changing the oil and replac-
ing the engine oil filter depends on the vehicle usage
conditions and is signalled by the warning light or
message (if present) on the instrument panel or every
12 months. **** If the vehicle is operated in a dusty or dirty
environment the engine air filter has to be changed
every 6,500 miles (10,000 km).
***** DOT 4 brake fluid must be changed every two
years regardless of mileage.
WARNING!
•
You can be badly injured working on or around a
motor vehicle. Do only service work for which
you have the knowledge and the right equipment.
If you have any doubt about your ability to
perform a service job, take your vehicle to a
competent mechanic.
• Failure to properly inspect and maintain your
vehicle could result in a component malfunction
and effect vehicle handling and performance.
This could cause an accident.
8
MAINTENANCE SCHEDULES 267