Alfa Romeo 4C 2018 Owner's Manual
Manufacturer: ALFA ROMEO, Model Year: 2018, Model line: 4C, Model: Alfa Romeo 4C 2018Pages: 279, PDF Size: 3.08 MB
Page 191 of 279
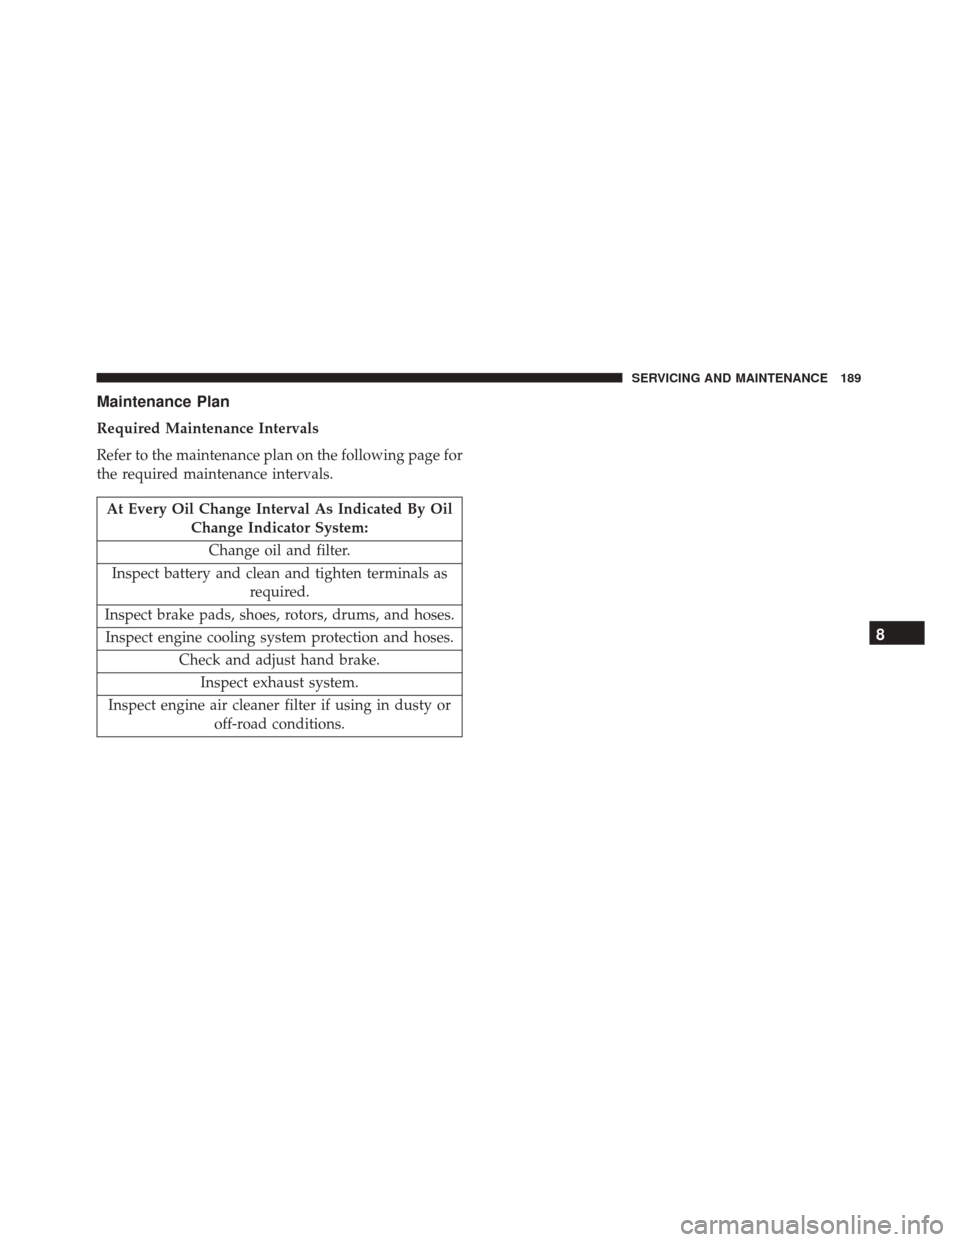
Maintenance Plan
Required Maintenance Intervals
Refer to the maintenance plan on the following page for
the required maintenance intervals.
At Every Oil Change Interval As Indicated By OilChange Indicator System:
Change oil and filter.
Inspect battery and clean and tighten terminals as required.
Inspect brake pads, shoes, rotors, drums, and hoses. Inspect engine cooling system protection and hoses. Check and adjust hand brake.Inspect exhaust system.
Inspect engine air cleaner filter if using in dusty or off-road conditions.
8
SERVICING AND MAINTENANCE 189
Page 192 of 279
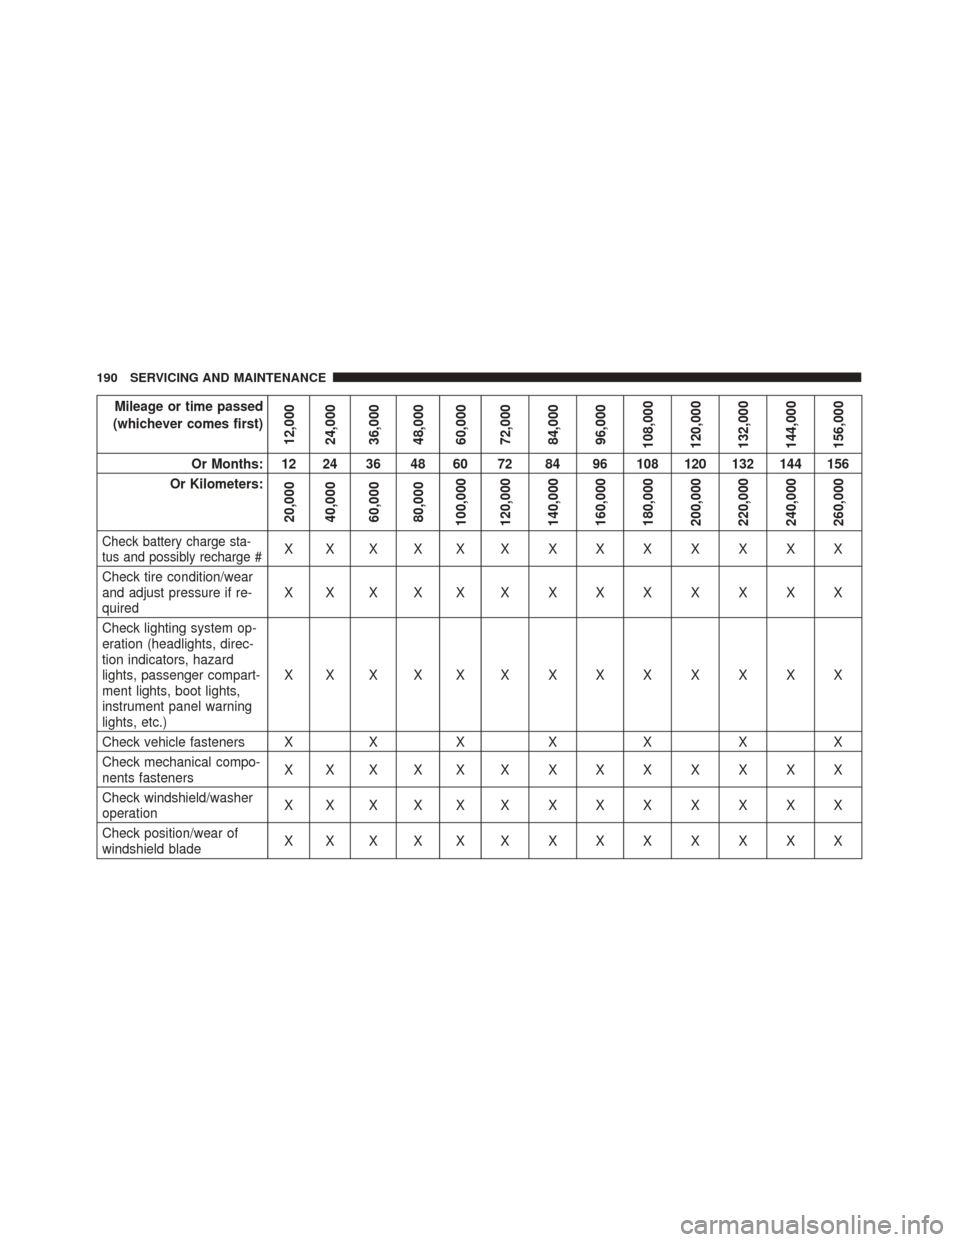
Mileage or time passed
(whichever comes first)
12,000
24,000
36,000
48,000
60,000
72,000
84,000
96,000
108,000
120,000
132,000
144,000
156,000
Or Months: 12 24 36 48 60 72 84 96 108 120 132 144 156
Or Kilometers:
20,000
40,000
60,000
80,000
100,000
120,000
140,000
160,000
180,000
200,000
220,000
240,000
260,000
Check battery charge sta-
tus and possibly recharge #XXXXXXXXXXXXX
Check tire condition/wear
and adjust pressure if re-
quired XXXXXXXXXXXXX
Check lighting system op-
eration (headlights, direc-
tion indicators, hazard
lights, passenger compart-
ment lights, boot lights,
instrument panel warning
lights, etc.) XXXXXXXXXXXXX
Check vehicle fasteners X X X X X X X
Check mechanical compo-
nents fasteners XXXXXXXXXXXXX
Check windshield/washer
operation XXXXXXXXXXXXX
Check position/wear of
windshield blade XXXXXXXXXXXXX
190 SERVICING AND MAINTENANCE
Page 193 of 279
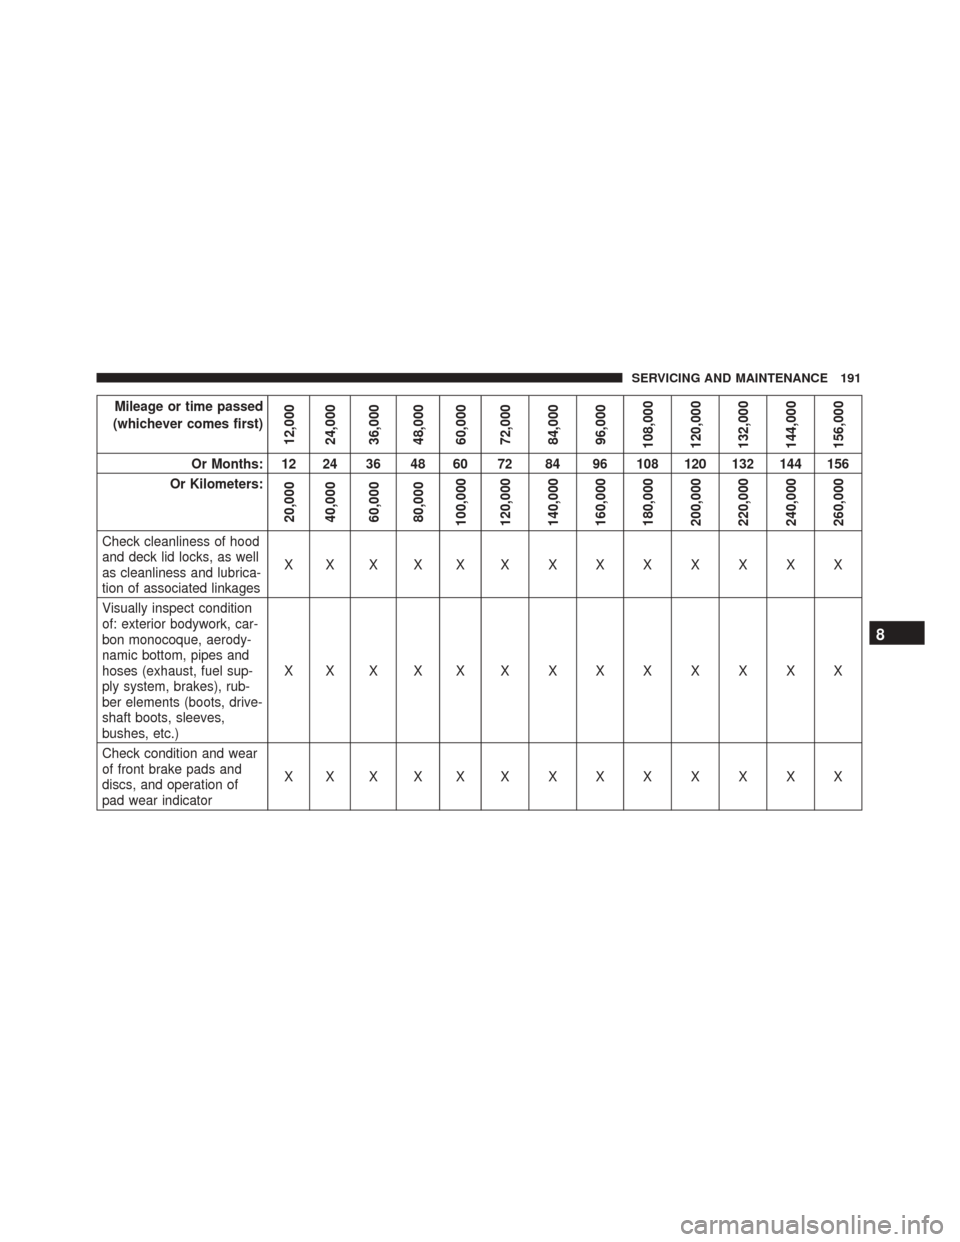
Mileage or time passed
(whichever comes first)
12,000
24,000
36,000
48,000
60,000
72,000
84,000
96,000
108,000
120,000
132,000
144,000
156,000
Or Months: 12 24 36 48 60 72 84 96 108 120 132 144 156
Or Kilometers:
20,000
40,000
60,000
80,000
100,000
120,000
140,000
160,000
180,000
200,000
220,000
240,000
260,000
Check cleanliness of hood
and deck lid locks, as well
as cleanliness and lubrica-
tion of associated linkages XXXXXXXXXXXXX
Visually inspect condition
of: exterior bodywork, car-
bon monocoque, aerody-
namic bottom, pipes and
hoses (exhaust, fuel sup-
ply system, brakes), rub-
ber elements (boots, drive-
shaft boots, sleeves,
bushes, etc.) XXXXXXXXXXXXX
Check condition and wear
of front brake pads and
discs, and operation of
pad wear indicator XXXXXXXXXXXXX
8
SERVICING AND MAINTENANCE 191
Page 194 of 279
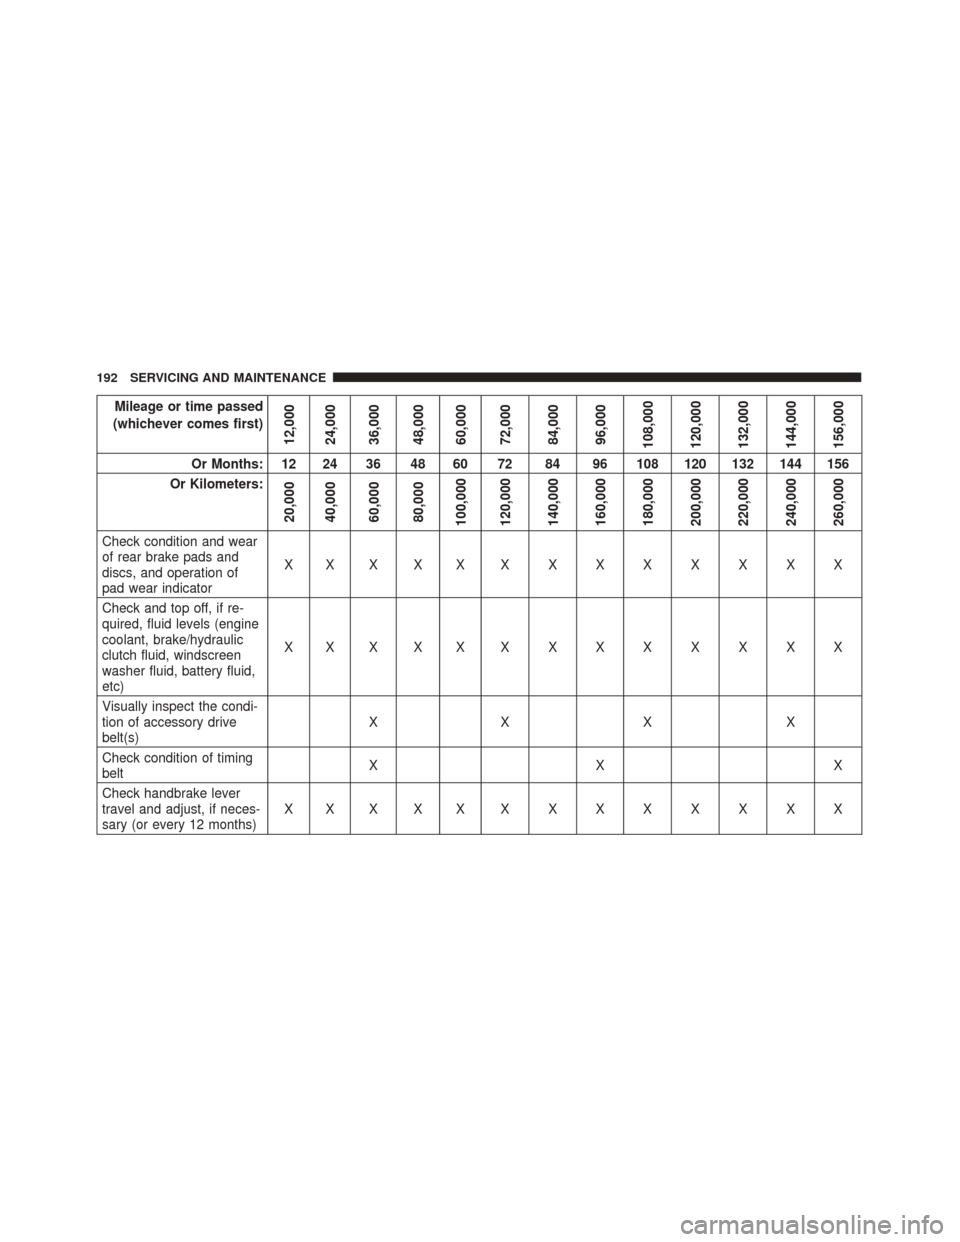
Mileage or time passed
(whichever comes first)
12,000
24,000
36,000
48,000
60,000
72,000
84,000
96,000
108,000
120,000
132,000
144,000
156,000
Or Months: 12 24 36 48 60 72 84 96 108 120 132 144 156
Or Kilometers:
20,000
40,000
60,000
80,000
100,000
120,000
140,000
160,000
180,000
200,000
220,000
240,000
260,000
Check condition and wear
of rear brake pads and
discs, and operation of
pad wear indicator XXXXXXXXXXXXX
Check and top off, if re-
quired, fluid levels (engine
coolant, brake/hydraulic
clutch fluid, windscreen
washer fluid, battery fluid,
etc) XXXXXXXXXXXXX
Visually inspect the condi-
tion of accessory drive
belt(s) XX X X
Check condition of timing
belt XX X
Check handbrake lever
travel and adjust, if neces-
sary (or every 12 months) XXXXXXXXXXXXX
192 SERVICING AND MAINTENANCE
Page 195 of 279
Mileage or time passed
(whichever comes first)
12,000
24,000
36,000
48,000
60,000
72,000
84,000
96,000
108,000
120,000
132,000
144,000
156,000
Or Months: 12 24 36 48 60 72 84 96 108 120 132 144 156
Or Kilometers:
20,000
40,000
60,000
80,000
100,000
120,000
140,000
160,000
180,000
200,000
220,000
240,000
260,000
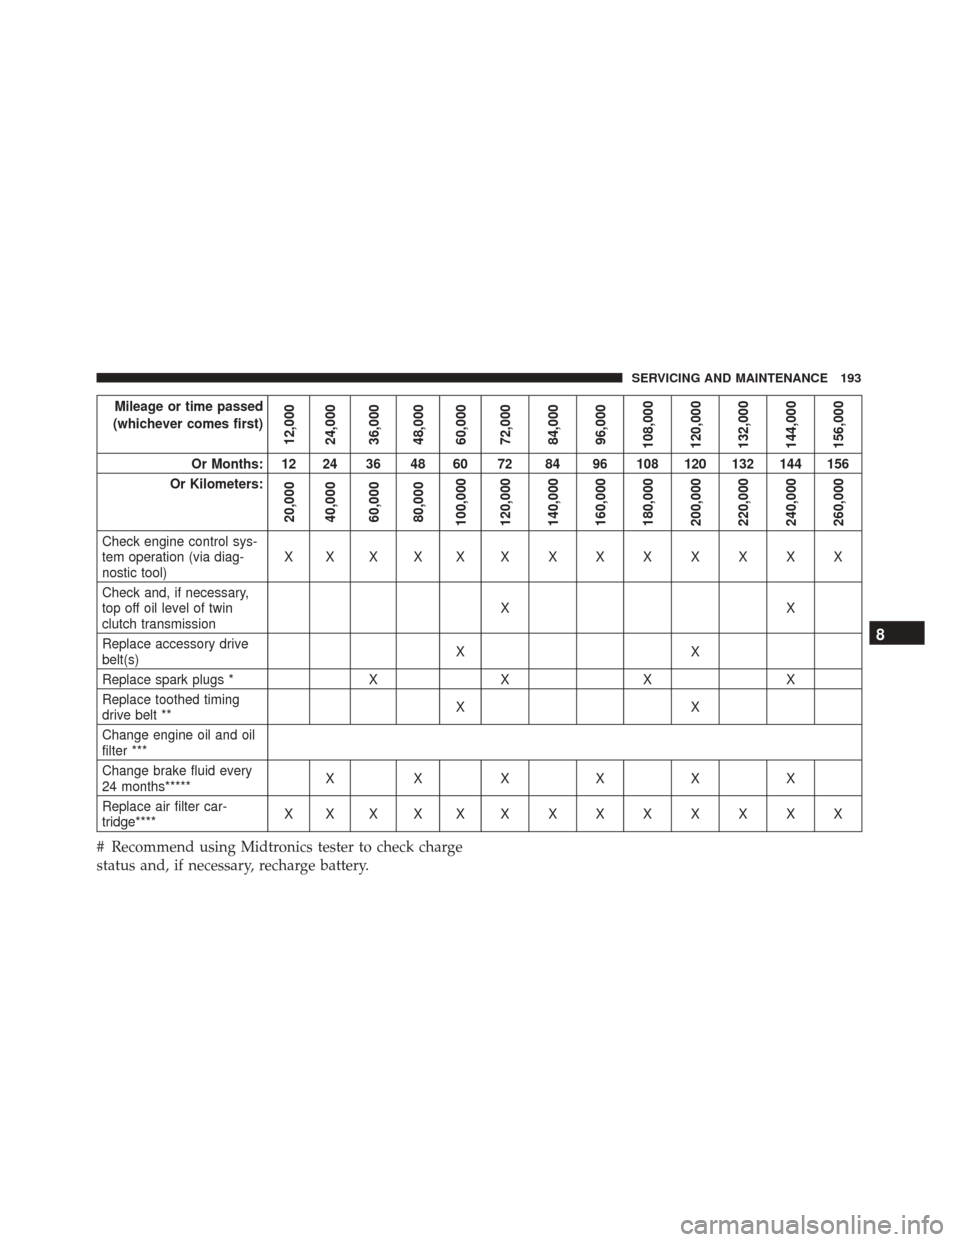
Check engine control sys-
tem operation (via diag-
nostic tool) XXXXXXXXXXXXX
Check and, if necessary,
top off oil level of twin
clutch transmission XX
Replace accessory drive
belt(s) XX
Replace spark plugs * X X X X
Replace toothed timing
drive belt ** XX
Change engine oil and oil
filter ***
Change brake fluid every
24 months***** XXX X X X
Replace air filter car-
tridge**** XXXXXXXXXXXXX
# Recommend using Midtronics tester to check charge
status and, if necessary, recharge battery.
8
SERVICING AND MAINTENANCE 193
Page 196 of 279
* The spark plug change interval is mileage based only,
yearly intervals do not apply. The following are essen-
tial to ensure correct operation and prevent serious
damage to the engine:
•Only use spark plugs of the same make and type
which are specially certified for such engines (refer to
“Fluids And Lubricants” in “Technical Specifica-
tions” for further information).
• Strictly comply with the spark plug replacement
interval given in the maintenance plan for spark plug
replacement.
• Contact your Alfa Romeo Dealer if you have ques-
tions.
** Regardless of the distance covered, the timing belt
must be changed every four years for particularly
demanding use (cold climates, city driving, long peri-
ods of idling) or at least every five years.
*** The actual interval for changing the oil and replac-
ing the engine oil filter depends on the vehicle usage
conditions and is signalled by the warning light or
message (if present) on the instrument panel or every 12
months. **** If the vehicle is operated in a dusty or dirty
environment the engine air filter has to be changed
every 6,500 miles (10,000 km).
***** DOT 4 brake fluid must be changed every two
years regardless of mileage.
WARNING!
•
You can be badly injured working on or around a
motor vehicle. Do only service work for which
you have the knowledge and the right equipment.
If you have any doubt about your ability to
perform a service job, take your vehicle to a
competent mechanic.
• Failure to properly inspect and maintain your
vehicle could result in a component malfunction
and effect vehicle handling and performance.
This could cause an accident.
194 SERVICING AND MAINTENANCE
Page 197 of 279
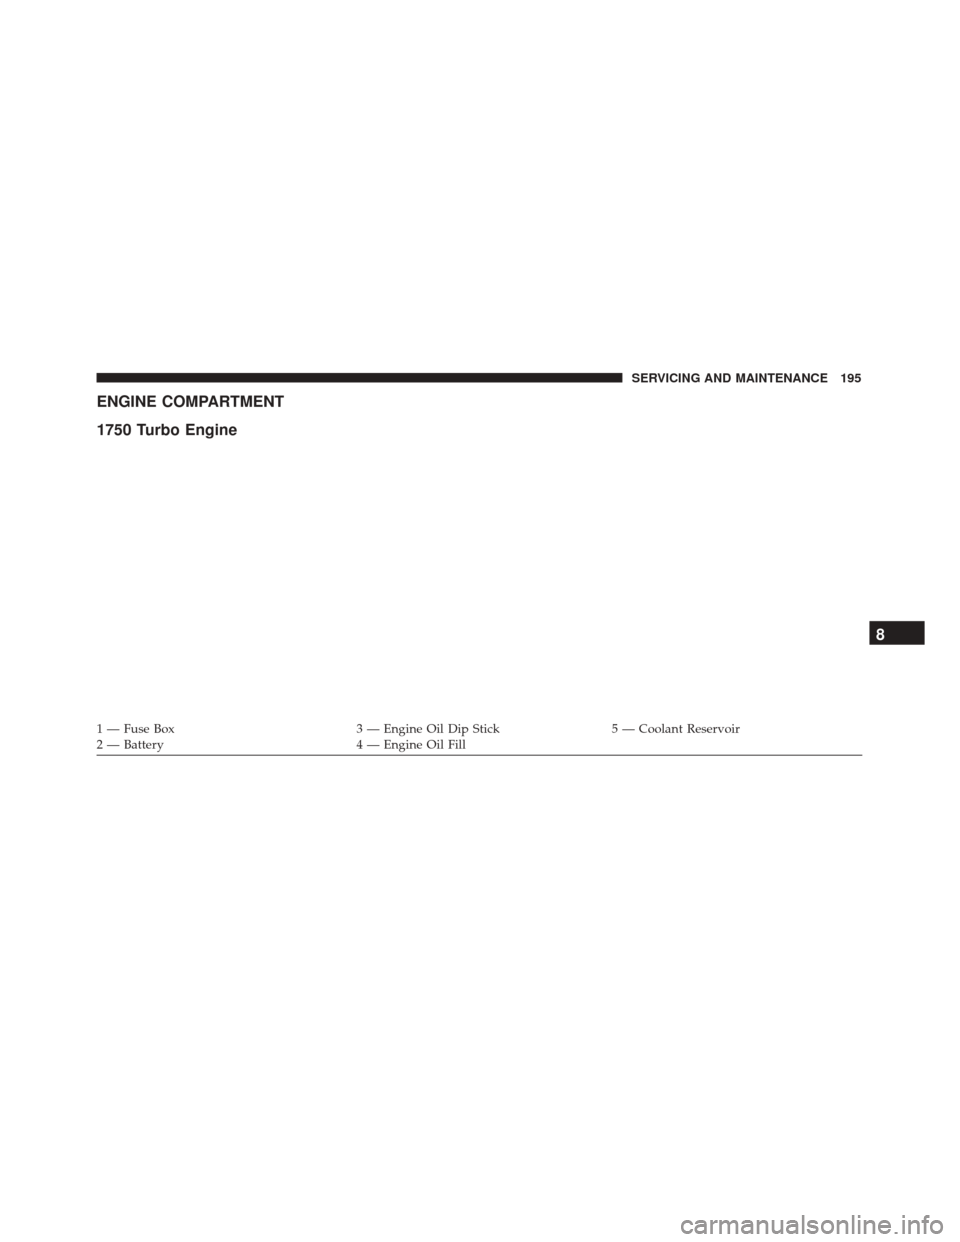
ENGINE COMPARTMENT
1750 Turbo Engine
1 — Fuse Box3 — Engine Oil Dip Stick5 — Coolant Reservoir
2 — Battery 4 — Engine Oil Fill
8
SERVICING AND MAINTENANCE 195
Page 198 of 279
Checking Oil Level
To assure proper engine lubrication, the engine oil must
be maintained at the correct level. Check the oil level at
regular intervals. The best time to check the engine oil
level is before starting the engine after it has sat
overnight.
Do not check oil level when the engine is warm.
Checking engine oil level when the engine is warm will
give you an incorrect reading.
Checking the oil while the vehicle is on level ground, and
has sat overnight, will improve the accuracy of the oil
level readings. Maintain the oil level between the range
markings on the dipstick. The safe range is indicated by a
crosshatch zone. Adding 1 quart of oil when the reading
is at the low end of the indicated range will result in the
oil level at the full end of the indicator range.
CAUTION!
Do not overfill the engine with oil. Overfilling the
engine with oil will cause oil aeration, which can
lead to loss of oil pressure and an increase in oil
temperature. This loss of oil pressure and increased
oil temperature could damage your engine.
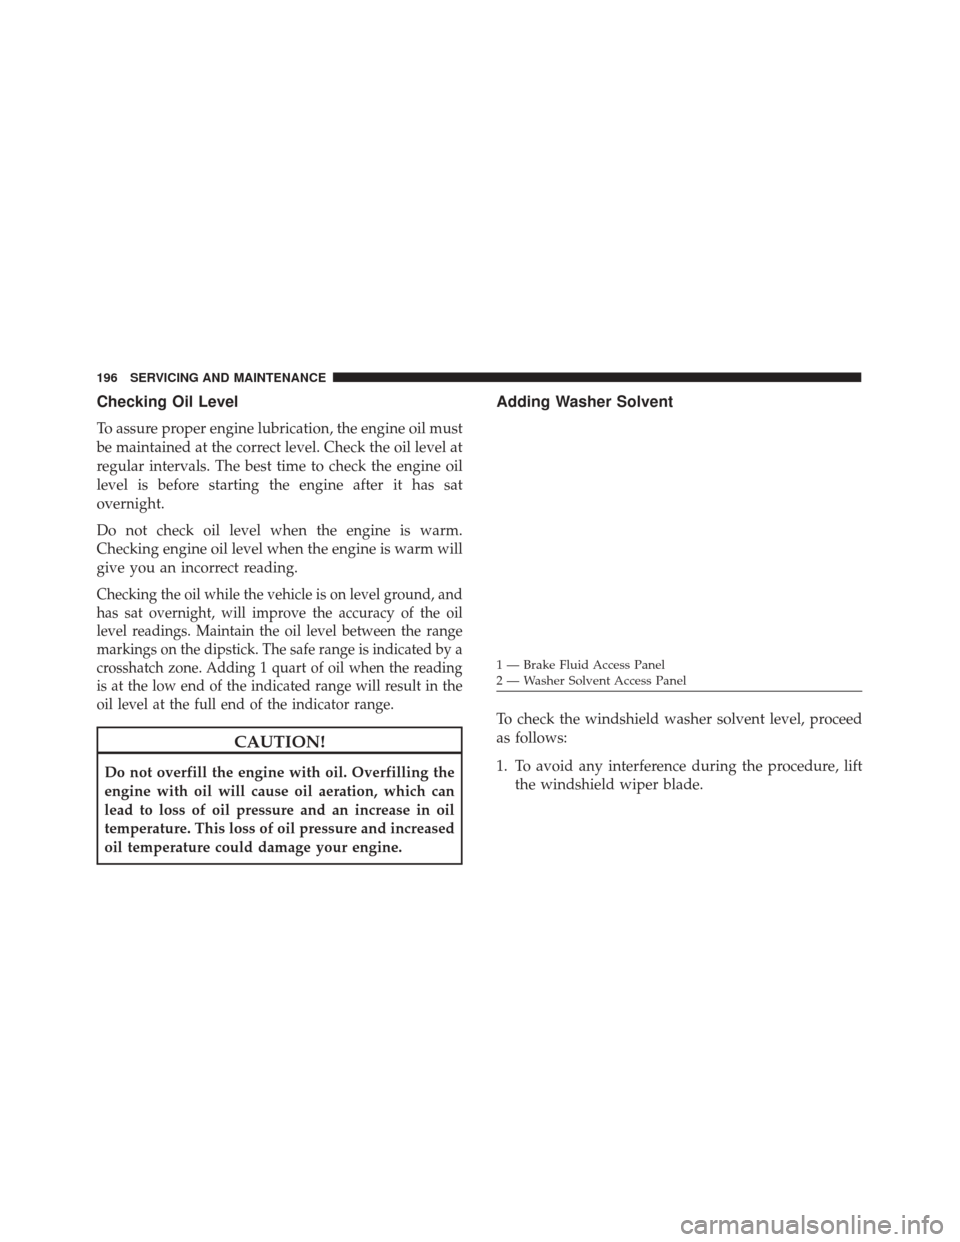
Adding Washer Solvent
To check the windshield washer solvent level, proceed
as follows:
1. To avoid any interference during the procedure, liftthe windshield wiper blade.
1 — Brake Fluid Access Panel
2 — Washer Solvent Access Panel
196 SERVICING AND MAINTENANCE
Page 199 of 279
2. Loosen the four screws using the supplied screw-driver. Remove the washer solvent protection panel.
3. Release the plug from the opening.
4. Leaving the plug close to the opening, put a finger on the central hole in the plug and remove it: the level
can be seen on the control pipe due to capillarity.
1 — Screw Locations
Washer Solvent Plug
Washer Solvent Dip Stick
8
SERVICING AND MAINTENANCE 197
Page 200 of 279
5. After the check, reinsert the plug with the controlpipe in the initial position.
6. Reposition the washer solvent protection panel and tighten the four self-tapping screws.
If the level is not sufficient, namely if there is no washer
solvent inside the pipe, proceed as follows:
1. To avoid any interference during the procedure, lift the windshield wiper blade.
2. Loosen the four screws using the supplied screw- driver. Remove the washer solvent protection panel.
3. Take the black funnel for topping up the windshield washer solvent and its extension pipe from the
service kit in the luggage compartment.
4. Take out the plug with the solvent control pipe through the washer solvent protection panel.
5. Introduce the funnel and its extension pipe in the reservoir neck and top up. 6. After topping up, remove the funnel with the exten-
sion pipe.
7. Refit the plug with the dipstick.
8. Reposition the washer solvent protection panel and tighten the four self-tapping screws.
WARNING!
Commercially available windshield washer sol-
vents are flammable. They could ignite and burn
you. Care must be exercised when filling or work-
ing around the washer solution.
Washer Solvent Fill Funnel
198 SERVICING AND MAINTENANCE