wheel Alfa Romeo 8C 2010 Owner handbook (in English)
[x] Cancel search | Manufacturer: ALFA ROMEO, Model Year: 2010, Model line: 8C, Model: Alfa Romeo 8C 2010Pages: 223, PDF Size: 14.35 MB
Page 60 of 223
58
3
Instantaneous fuel consumptionThis is the actual fuel consumption which is
constantly updated. If the vehicle is stopped with
the engine running, the display will show the
information “----“.Average speedThis is the average vehicle speed in relation
to the total time that has elapsed from the
beginning of a new trip.Travel timeThis is the time that has elapsed from the
beginning of a new trip (trip time) New tripA new trip begins after:
- the user has manually reset the indicator by
holding down the button TRIP;
- an “automatic” reset when the “distance
travelled” reaches 9999.9 km (or mi),
when the “travelling time” reaches 99.59
(99 hours and 59 minutes) or after
disconnection and reconnection of the
battery.
This function is active only for TRIP B.TRIP BUTTON
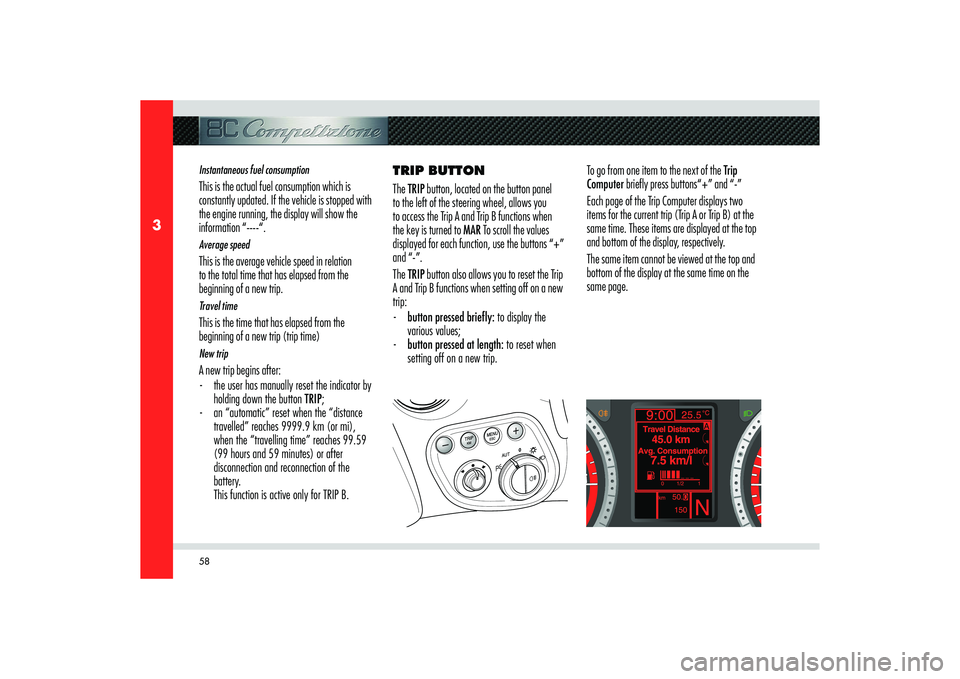
The TRIP button, located on the button panel
to the left of the steering wheel, allows you
to access the Trip A and Trip B functions when
the key is turned to MAR To scroll the values
displayed for each function, use the buttons “+”
and “-”.
The TRIP button also allows you to reset the Trip
A and Trip B functions when setting off on a new
trip:
- button pressed brie� y: to display the
various values;
- button pressed at length: to reset when
setting off on a new trip.To go from one item to the next of the Trip
Computer briefly press buttons“+” and “-”
Each page of the Trip Computer displays two
items for the current trip (Trip A or Trip B) at the
same time. These items are displayed at the top
and bottom of the display, respectively.
The same item cannot be viewed at the top and
bottom of the display at the same time on the
same page.
Page 64 of 223
62
3
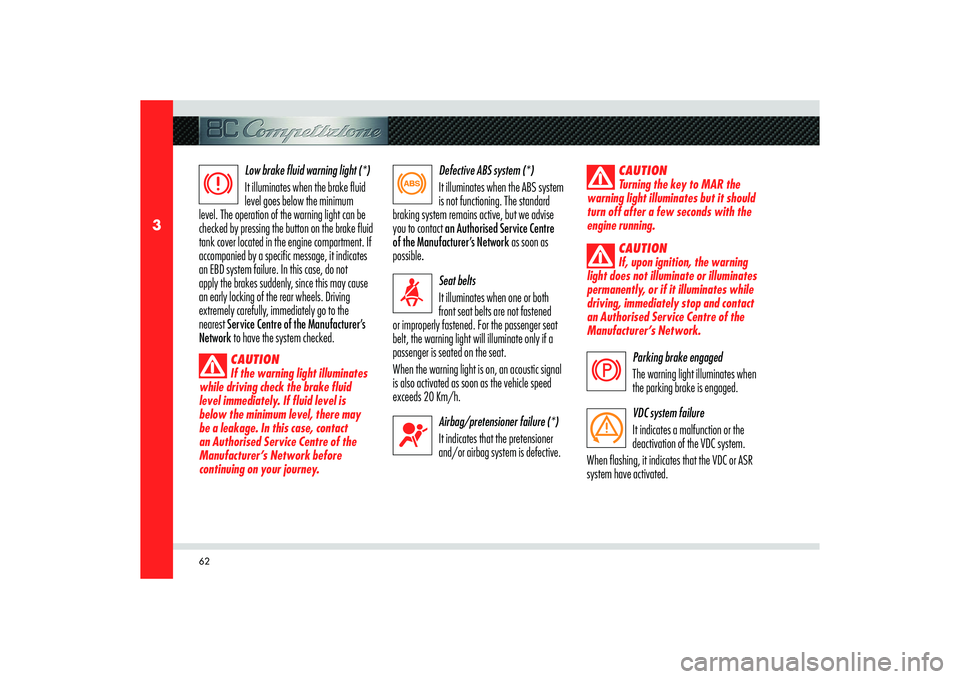
Low brake fluid warning light (*)
It illuminates when the brake fluid
level goes below the minimum
level. The operation of the warning light can be
checked by pressing the button on the brake fluid
tank cover located in the engine compartment. If
accompanied by a specific message, it indicates
an EBD system failure. In this case, do not
apply the brakes suddenly, since this may cause
an early locking of the rear wheels. Driving
extremely carefully, immediately go to the
nearest Service Centre of the Manufacturer’s
Network to have the system checked.
CAUTION
If the warning light illuminates
while driving check the brake fluid
level immediately. If fluid level is
below the minimum level, there may
be a leakage. In this case, contact
an Authorised Service Centre of the
Manufacturer’s Network before
continuing on your journey.
Defective ABS system (*)
It illuminates when the ABS system
is not functioning. The standard
braking system remains active, but we advise
you to contact an Authorised Service Centre
of the Manufacturer’s Network as soon as
possible.
Seat belts
It illuminates when one or both
front seat belts are not fastened
or improperly fastened. For the passenger seat
belt, the warning light will illuminate only if a
passenger is seated on the seat.
When the warning light is on, an acoustic signal
is also activated as soon as the vehicle speed
exceeds 20 Km/h.
Airbag/pretensioner failure (*)
It indicates that the pretensioner
and/or airbag system is defective.
CAUTION
Turning the key to MAR the
warning light illuminates but it should
turn off after a few seconds with the
engine running.
CAUTION
If, upon ignition, the warning
light does not illuminate or illuminates
permanently, or if it illuminates while
driving, immediately stop and contact
an Authorised Service Centre of the
Manufacturer’s Network.
Parking brake engaged
The warning light illuminates when
the parking brake is engaged.
VDC system failure
It indicates a malfunction or the
deactivation of the VDC system.
When flashing, it indicates that the VDC or ASR
system have activated.
Page 71 of 223
69
3
B
C
B
AINSTRUMENTS AND CONTROLS
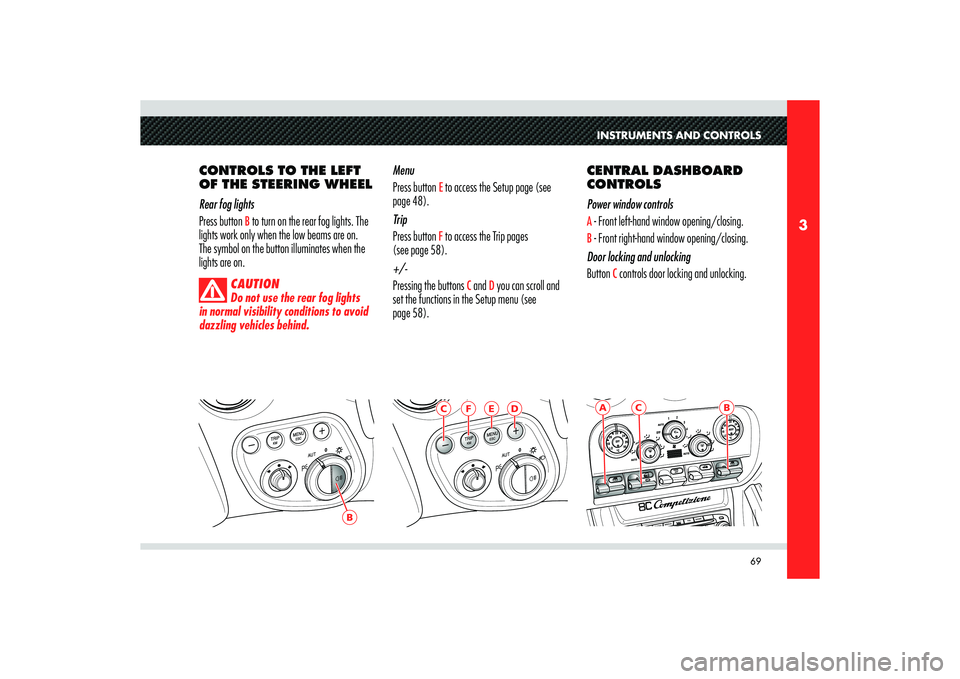
CONTROLS TO THE LEFT
OF THE STEERING WHEEL
Rear fog lights
Press button
B to turn on the rear fog lights. The
lights work only when the low beams are on.
The symbol on the button illuminates when the
lights are on.
CAUTION
Do not use the rear fog lights
in normal visibility conditions to avoid
dazzling vehicles behind.
Menu
Press button
E to access the Setup page (see
page 48).
Trip
Press button F to access the Trip pages
(see page 58).
+/-
Pressing the buttons
C and
D you can scroll and
set the functions in the Setup menu (see
page 58).CENTRAL DASHBOARD
CONTROLS
Power window controls
A - Front left-hand window opening/closing.B - Front right-hand window opening/closing.
Door locking and unlocking
Button
C controls door locking and unlocking.
E
F
C
D
Page 79 of 223
4
BEFORE YOU DRIVE
Doors ................................................................................................................................. 78
Power windows .................................................................................................................. 80Engine compartment lid
......................................................................................................... 81
Rear window ....................................................................................................................... 82
Fuel tank door .................................................................................................................... 83
Keys .................................................................................................................................. 84
Ignition switch ..................................................................................................................... 87
Electronic alarm system ........................................................................................................88
Front seats ......................................................................................................................... 92
Rear-view mirrors ................................................................................................................. 93
Steering wheel .................................................................................................................... 94
External lights and direction indicators ..................................................................................... 95
Windscreen washer/wipers and headlight washer .................................................................... 99
Air conditioning and heating system ...................................................................................... 102
Car stereo system .............................................................................................................. 108
Bose HI-FI system (optional) ............................................................................................... 109
Page 89 of 223
87
4
STOPACC
MAR
A
BEFORE YOU DRIVE
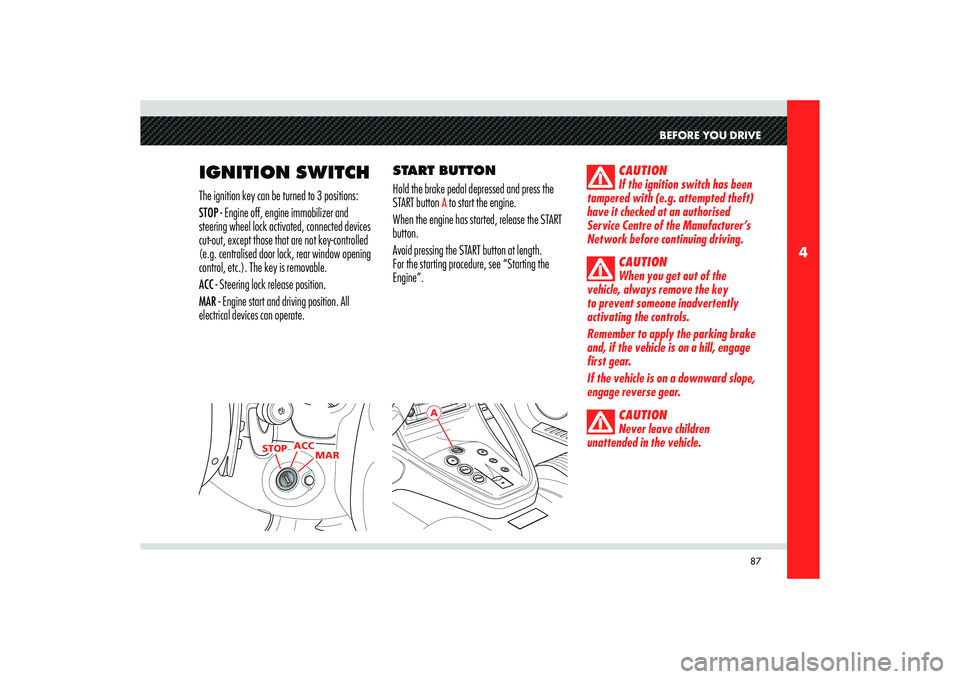
IGNITION SWITCHThe ignition key can be turned to 3 positions:
STOP - Engine off, engine immobilizer and
steering wheel lock activated, connected devices
cut-out, except those that are not key-controlled
(e.g. centralised door lock, rear window opening
control, etc.). The key is removable.
ACC - Steering lock release position.
MAR - Engine start and driving position. All
electrical devices can operate.START BUTTON
Hold the brake pedal depressed and press the
START button
A to start the engine.
When the engine has started, release the START
button.
Avoid pressing the START button at length.
For the starting procedure, see “Starting the
Engine”.
CAUTION
If the ignition switch has been
tampered with (e.g. attempted theft)
have it checked at an authorised
Service Centre of the Manufacturer’s
Network before continuing driving.
CAUTION
When you get out of the
vehicle, always remove the key
to prevent someone inadvertently
activating the controls.
Remember to apply the parking brake
and, if the vehicle is on a hill, engage
first gear.
If the vehicle is on a downward slope,
engage reverse gear.
CAUTION
Never leave children
unattended in the vehicle.
Page 96 of 223
94
4
B
A
2
1
21
INTERNAL REAR-VIEW
MIRROR
Adjustable, with anti-glare position.
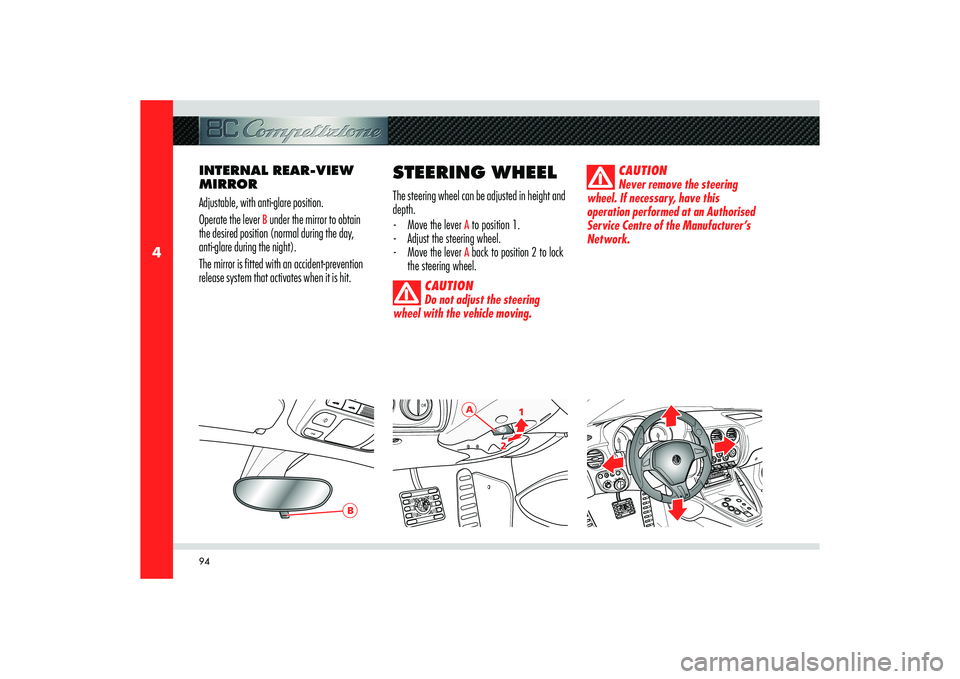
Operate the lever
B under the mirror to obtain
the desired position (normal during the day,
anti-glare during the night).
The mirror is fitted with an accident-prevention
release system that activates when it is hit.
STEERING WHEELThe steering wheel can be adjusted in height and
depth.
- Move the lever
A to position 1.
- Adjust the steering wheel.
- Move the lever A back to position 2 to lock
the steering wheel.
CAUTION
Do not adjust the steering
wheel with the vehicle moving.CAUTION
Never remove the steering
wheel. If necessary, have this
operation performed at an Authorised
Service Centre of the Manufacturer’s
Network.
Page 100 of 223
98
4
HIGH BEAMS
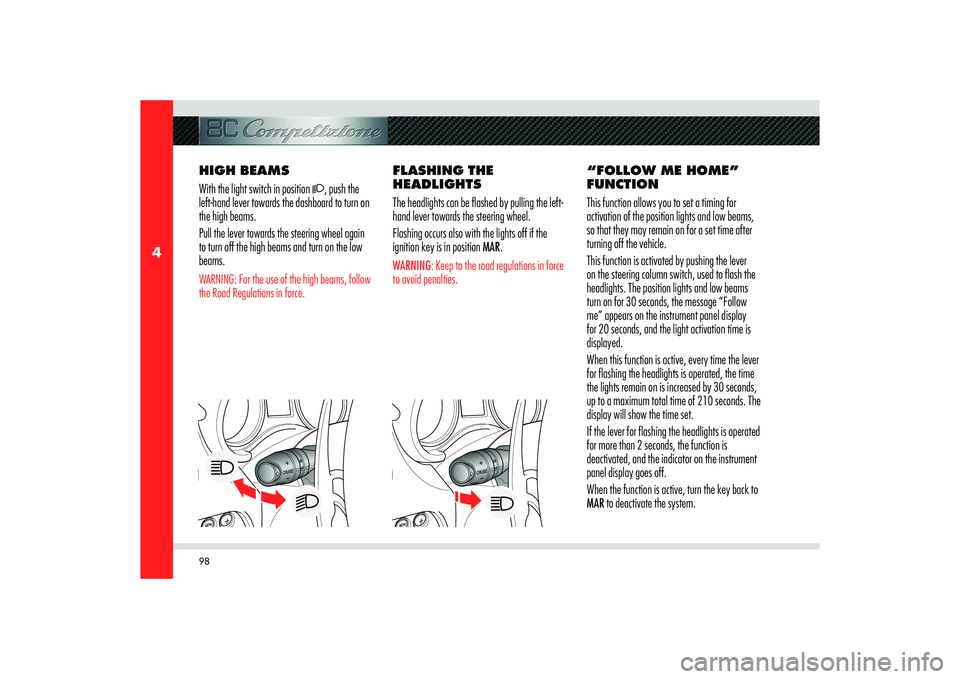
With the light switch in position
, push the
left-hand lever towards the dashboard to turn on
the high beams.
Pull the lever towards the steering wheel again
to turn off the high beams and turn on the low
beams.
WARNING: For the use of the high beams, follow
the Road Regulations in force.
FLASHING THE
HEADLIGHTS
The headlights can be flashed by pulling the left-
hand lever towards the steering wheel.
Flashing occurs also with the lights off if the
ignition key is in position MAR.WARNING: Keep to the road regulations in force
to avoid penalties.
“FOLLOW ME HOME”
FUNCTION
This function allows you to set a timing for
activation of the position lights and low beams,
so that they may remain on for a set time after
turning off the vehicle.
This function is activated by pushing the lever
on the steering column switch, used to flash the
headlights. The position lights and low beams
turn on for 30 seconds, the message “Follow
me” appears on the instrument panel display
for 20 seconds, and the light activation time is
displayed.
When this function is active, every time the lever
for flashing the headlights is operated, the time
the lights remain on is increased by 30 seconds,
up to a maximum total time of 210 seconds. The
display will show the time set.
If the lever for flashing the headlights is operated
for more than 2 seconds, the function is
deactivated, and the indicator on the instrument
panel display goes off.
When the function is active, turn the key back to
MAR to deactivate the system.
Page 101 of 223
99
4
BAECD
BEFORE YOU DRIVE
WINDSCREEN
WASHER/WIPERS
AND HEADLIGHT
WASHERThe windscreen wiper and washer only works
with the ignition key turned to MAR.
WINDSCREEN WIPER
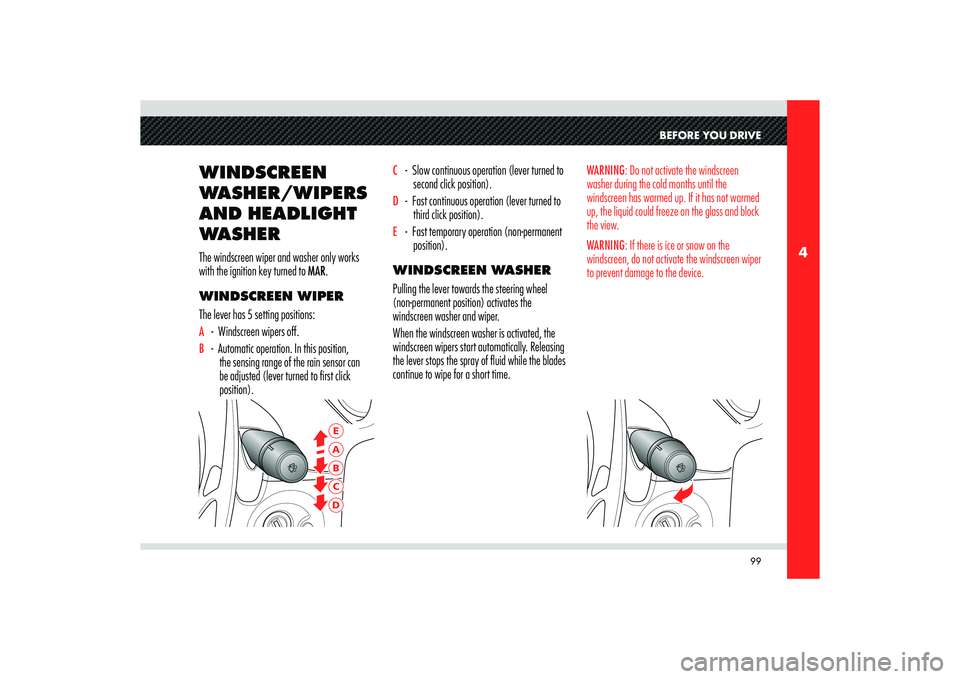
The lever has 5 setting positions:A - Windscreen wipers off.B - Automatic operation. In this position,
the sensing range of the rain sensor can
be adjusted (lever turned to first click
position).
C - Slow continuous operation (lever turned to
second click position).D - Fast continuous operation (lever turned to
third click position).E - Fast temporary operation (non-permanent
position).
WINDSCREEN WASHER
Pulling the lever towards the steering wheel
(non-permanent position) activates the
windscreen washer and wiper.
When the windscreen washer is activated, the
windscreen wipers start automatically. Releasing
the lever stops the spray of fluid while the blades
continue to wipe for a short time.
WARNING: Do not activate the windscreen
washer during the cold months until the
windscreen has warmed up. If it has not warmed
up, the liquid could freeze on the glass and block
the view.
WARNING: If there is ice or snow on the
windscreen, do not activate the windscreen wiper
to prevent damage to the device.
Page 116 of 223
114
5
MAR
STARTING THE
ENGINE
CAUTION
Hold the brake pedal depressed
when starting the engine.
CAUTION
It is dangerous to operate the
engine in an enclosed space. The engine
consumes oxygen and discharges
carbon dioxide, carbon monoxide and
other toxic gases.
WARNING: Before start-up, switch off the
electrical devices with a high power consumption
(air-conditioning and heating system, heated
rear window, headlights, etc.).
WARNING: Do not start the engine if the fuel
level in the tank is low.
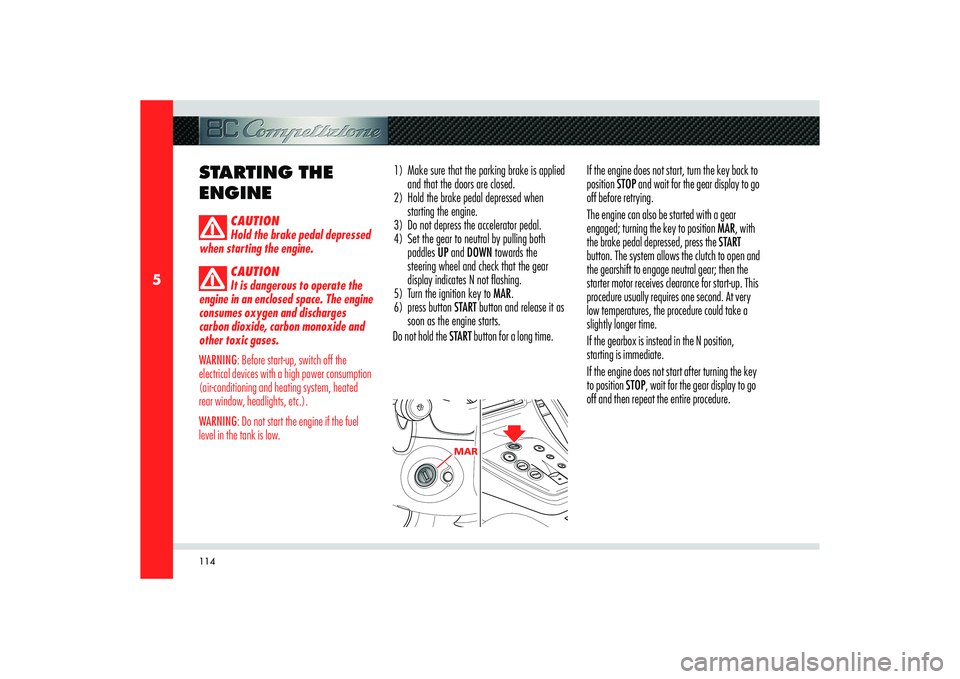
1) Make sure that the parking brake is applied
and that the doors are closed.
2) Hold the brake pedal depressed when
starting the engine.
3) Do not depress the accelerator pedal.
4) Set the gear to neutral by pulling both
paddles UP and DOWN towards the
steering wheel and check that the gear
display indicates N not fl ashing.
5) Turn the ignition key to MAR.
6) press button START button and release it as
soon as the engine starts.
Do not hold the START button for a long time.If the engine does not start, turn the key back to
position STOP and wait for the gear display to go
off before retrying.
The engine can also be started with a gear
engaged; turning the key to position MAR, with
the brake pedal depressed, press the START
button. The system allows the clutch to open and
the gearshift to engage neutral gear; then the
starter motor receives clearance for start-up. This
procedure usually requires one second. At very
low temperatures, the procedure could take a
slightly longer time.
If the gearbox is instead in the N position,
starting is immediate.
If the engine does not start after turning the key
to position STOP, wait for the gear display to go
off and then repeat the entire procedure.
Page 118 of 223
116
5
A
B
WARNING: Do not use a battery-charger for
emergency starting under any circumstances:
you could damage the electronic systems,
particularly the control units that manage the
ignition and fuel supply functions.
CAUTION
Remember that when the
engine is not started, the power
braking and power steering systems
are not activated and so the effort
required on the brake pedal and
steering wheel is much greater.
TURNING OFF THE
ENGINE
With the engine idling, rotate the ignition key to
the STOP position.
A burst on the accelerator pedal before turning
off the engine has no purpose and increases fuel
consumption.
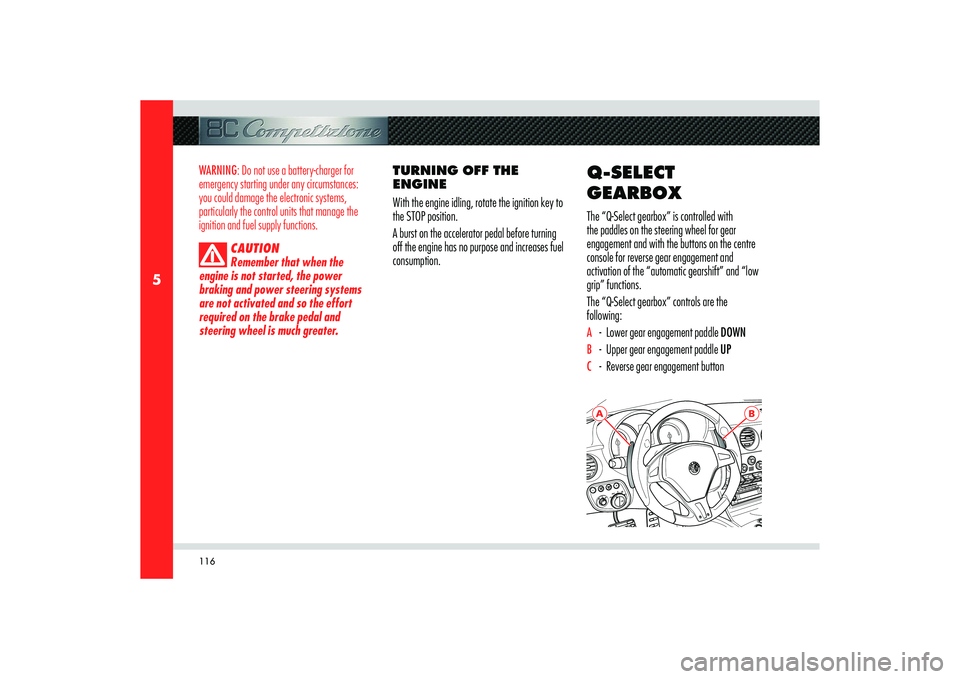
Q-SELECT
GEARBOXThe “Q-Select gearbox” is controlled with
the paddles on the steering wheel for gear
engagement and with the buttons on the centre
console for reverse gear engagement and
activation of the “automatic gearshift” and “low
grip” functions.
The “Q-Select gearbox” controls are the
following:A - Lower gear engagement paddle DOWNB - Upper gear engagement paddle UPC - Reverse gear engagement button