display Alfa Romeo Brera/Spider 2006 Owner handbook (in English)
[x] Cancel search | Manufacturer: ALFA ROMEO, Model Year: 2006, Model line: Brera/Spider, Model: Alfa Romeo Brera/Spider 2006Pages: 267, PDF Size: 7.21 MB
Page 28 of 267
26
SAFETY
DEVICES
WARNING
LIGHTS AND
MESSAGES
IN AN
EMERGENCY
CAR
MAINTENANCE
TECHNICAL
SPECIFICATIONS
INDEX
DASHBOARD
AND
CONTROLS
CORRECT USE
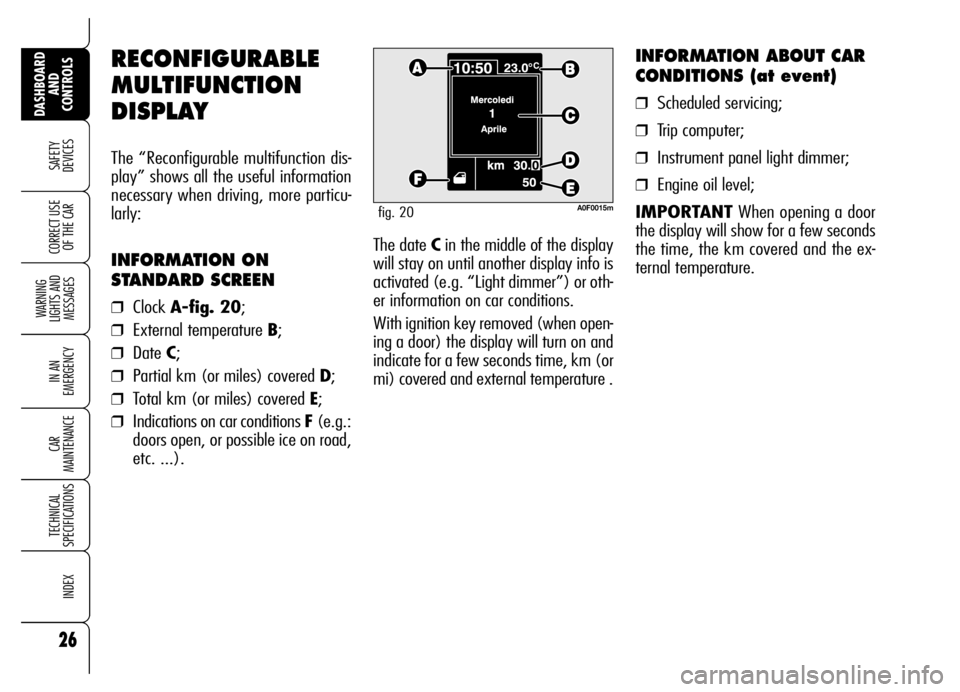
OF THE CARThe date Cin the middle of the display
will stay on until another display info is
activated (e.g. “Light dimmer”) or oth-
er information on car conditions.
With ignition key removed (when open-
ing a door) the display will turn on and
indicate for a few seconds time, km (or
mi) covered and external temperature .
INFORMATION ABOUT CAR
CONDITIONS (at event)
❒Scheduled servicing;
❒Trip computer;
❒Instrument panel light dimmer;
❒Engine oil level;
IMPORTANTWhen opening a door
the display will show for a few seconds
the time, the km covered and the ex-
ternal temperature.
RECONFIGURABLE
MULTIFUNCTION
DISPLAY
The “Reconfigurable multifunction dis-
play” shows all the useful information
necessary when driving, more particu-
larly:
INFORMATION ON
STANDARD SCREEN
❒Clock A-fig. 20;
❒External temperature B;
❒Date C;
❒Partial km (or miles) covered D;
❒Total km (or miles) covered E;
❒Indications on car conditions F (e.g.:
doors open, or possible ice on road,
etc. ...).
A0F0015mfig. 20
Page 29 of 267
27
SAFETY
DEVICES
WARNING
LIGHTS AND
MESSAGES
IN AN
EMERGENCY
CAR
MAINTENANCE
TECHNICAL
SPECIFICATIONS
INDEX
DASHBOARD
AND
CONTROLS
CORRECT USE
OF THE CAR
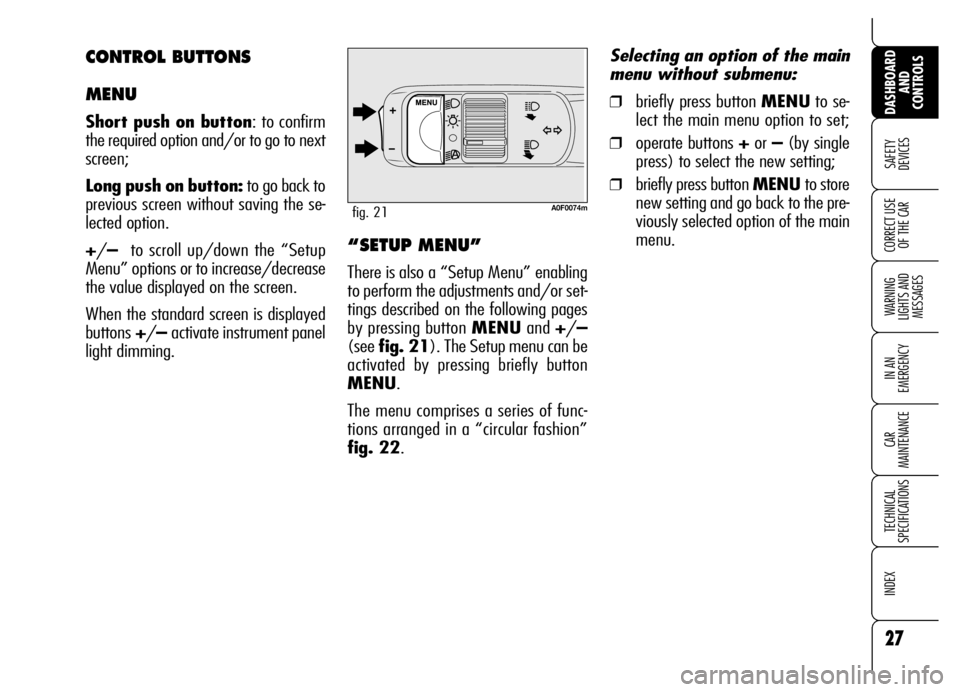
A0F0074mfig. 21
“SETUP MENU”
There is also a “Setup Menu” enabling
to perform the adjustments and/or set-
tings described on the following pages
by pressing button MENUand +/–
(see fig. 21). The Setup menu can be
activated by pressing briefly button
MENU.
The menu comprises a series of func-
tions arranged in a “circular fashion”
fig. 22.Selecting an option of the main
menu without submenu:
❒briefly press button MENUto se-
lect the main menu option to set;
❒operate buttons +or –(by single
press) to select the new setting;
❒briefly press button MENU to store
new setting and go back to the pre-
viously selected option of the main
menu.
CONTROL BUTTONS
MENU
Short push on button: to confirm
the required option and/or to go to next
screen;
Long push on button:to go back to
previous screen without saving the se-
lected option.
+/– to scroll up/down the “Setup
Menu” options or to increase/decrease
the value displayed on the screen.
When the standard screen is displayed
buttons+/– activate instrument panel
light dimming.
Page 30 of 267
28
SAFETY
DEVICES
WARNING
LIGHTS AND
MESSAGES
IN AN
EMERGENCY
CAR
MAINTENANCE
TECHNICAL
SPECIFICATIONS
INDEX
DASHBOARD
AND
CONTROLS
CORRECT USE
OF THE CAR
Selecting “Date” and “Clock”:
❒briefly press button MENUto select
the first value to change (e.g. hours
/minutes or year /month /day);
❒operate buttons +or –(by single
press) to select the new setting;
❒briefly press button MENUto store
new setting and go back to the pre-
viously selected option of the main
menu, if this is the last one you will
go back to the previously selected
option of the main menu.
ENGINE OIL
LEVEL INDICATION
Fitting the electronic key into the igni-
tion device, the display will show for a
few seconds the engine oil level. At this
stage, to clear this indication and to go
to next screen, press button MENU.
Low/excessive oil level will be indicat-
ed by a dedicated warning message on
the display.
IMPORTANT Check the proper en-
gine oil level on the dipstick (see para-
graph “Checking levels” in section “Car
maintenance”).
IMPORTANTProper engine oil level
shall be checked with the car on level
ground.
IMPORTANTFor proper oil level in-
dication, after fitting the key, wait for
about 2 seconds before starting the en-
gine.
IMPORTANTEngine oil level could in-
crease after a long stop. Selecting an option of the main
menu with submenu:❒briefly press button MENUto dis-
play the first submenu option;
❒operate buttons +or –(by single
press) to scroll all submenu options;
❒briefly press button MENUto select
the displayed submenu option and
to enter the corresponding setup
menu;
❒ operate buttons +or –(by single
press) to select the new setting of this
submenu option;
❒ briefly press button MENUto store
the new setting and go back to the
previously selected submenu option.
Page 31 of 267

29
SAFETY
DEVICES
WARNING
LIGHTS AND
MESSAGES
IN AN
EMERGENCY
CAR
MAINTENANCE
TECHNICAL
SPECIFICATIONS
INDEX
DASHBOARD
AND
CONTROLS
CORRECT USE
OF THE CAR
Briefly press button MENUto access navigation from the standard screen. To surf the menu press buttons +or –. For safety rea-
sons, when the car is running, it is possible to access only the reduced menu (for setting “Speed limit”). When the car is stationary
access to the whole menu is enabled. On cars fitted with radionavigation system, only the following functions can be set: “Speed
limit”, “Daylight sensor” (where provided) e “S.B.R. buzzer reactivation”. The other functions are displayed and can be set/adjust-
ed on the radionavigation system display.
fig. 22
BEEP VOL.SERVICEQUIT SETUPLIGHT SENS.RESET TRIP B
CLOCK
MODE 12/24
DATE
AUDIO RPT.
INDEP. BOOT
UNLOCK FDA
DOOR LOCK
UNITS KEYS VOL.
LANGUAGESPEED LIMIT
A0F0218g
Page 32 of 267

30
SAFETY
DEVICES
WARNING
LIGHTS AND
MESSAGES
IN AN
EMERGENCY
CAR
MAINTENANCE
TECHNICAL
SPECIFICATIONS
INDEX
DASHBOARD
AND
CONTROLS
CORRECT USE
OF THE CAR
Automatic headlight daylight
sensor (where provided)
(Light Sens.)
With this function it is possible to adjust
the light sensor sensitivity according to
3 levels.
To adjust the volume proceed as follows:
❒briefly press button MENU: the pre-
viously set level will be displayed;
❒press button +or –for setting as re-
quired;
❒briefly press buttonMENUto go
back to the menu screen or press the
button for long to go back to the
standard screen.
Reset Trip B
This function enables to select Trip B re-
set mode (Automatic or Manual).
For further information see paragraph
“Trip computer”. Speed limit (Speed limit)
With this function it is possible to set the
car speed limit (km/h or mph), which,
if exceeded, automatically sounds a
buzzer and displays a special message
(see section “Warning lights and mes-
sages”) to alert the driver.
To set the speed limit, proceed as fol-
lows:
❒briefly press button MENU: OFF
will be displayed;
❒press button +: ONwill be dis-
played;
❒briefly press button MENUthen,
use buttons +/–to set the required
speed (during setting the value will
flash).
❒briefly press button MENU to go
back to the menu screen or press the
button for long to go back to the
standard screen.IMPORTANTThe possible setting is
between 30 and 250 km/h (or be-
tween 20 and 150 mph) depending on
the unit set previously (see paragraph
“Units” described later). Every press
(pulse) of the button +/–increases or
decreases the value by 5 units. Keeping
the button +/–pressed obtains auto-
matic fast increase or decrease. When
you are near the required setting com-
plete adjustment with single presses.
To abort the setting:
❒briefly press button MENU: ON
will be displayed;
❒press button –: OFFwill be dis-
played;
❒briefly press button MENU to go
back to the menu screen or press the
button for long to go back to the
standard screen.
Page 33 of 267
31
SAFETY
DEVICES
WARNING
LIGHTS AND
MESSAGES
IN AN
EMERGENCY
CAR
MAINTENANCE
TECHNICAL
SPECIFICATIONS
INDEX
DASHBOARD
AND
CONTROLS
CORRECT USE
OF THE CAR
IMPORTANT Every press (pulse) on
the button +/–increases/decreases by
one unit. Keeping button +/–pressed
obtains fast increase/decrease. When
you are near the required setting com-
plete adjustment with single presses.
❒briefly press button MENU to go
back to the menu screen or press the
button for long to go back to the
standard screen. Setting the clock (Clock)
This function enables to set the clock.
Proceed as follows:
❒briefly press button MENU: “hours”
will be displayed;
❒press button +or –for setting as re-
quired;
❒briefly press button MENU: “min-
utes” will be displayed;
❒press button +or –for setting as re-
quired;Clock mode (Mode 12/24)
This function is used to set the clock in
the 12h or 24h mode.
To adjust proceed as follows:
❒briefly press button MENU: the dis-
play will show12h or 24h (accord-
ing to previous setting);
❒press button +or –for setting as re-
quired;
❒briefly press button MENU to go
back to the menu screen or press the
button for long to go back to the
standard screen.
Page 34 of 267
32
SAFETY
DEVICES
WARNING
LIGHTS AND
MESSAGES
IN AN
EMERGENCY
CAR
MAINTENANCE
TECHNICAL
SPECIFICATIONS
INDEX
DASHBOARD
AND
CONTROLS
CORRECT USE
OF THE CAR
Setting the date (Date)
This function enables to update the date
(year - month - day).
Proceed as follows:
❒briefly press button MENU: “year”
will flash on the display;
❒press button +or –for setting as re-
quired;
❒briefly press button MENU:
“month” will flash on the display;
❒press button +or –for setting as re-
quired;
❒briefly press button MENU: “day”
will flash on the display;
❒press button +or –for setting as re-
quired;IMPORTANTEvery press (pulse) on
the button +/–increases/decreases by
one unit. Keeping button +/–pressed
obtains fast increase/decrease. When
you are near the required setting com-
plete adjustment with single presses.
❒briefly press button MENUto go
back to the menu screen or press the
button for long to go back to the
standard screen.
Audio Info Repetition
(Audio Rpt.) (where provided)
This function enables to display sound
system information.
❒Radio: selected radio station fre-
quency or RDS message, automatic
tuning activation or AutoSTore;
❒audio CD, MP3 Cd: selected track
number;
❒CD Changer: CD number and track
number;To activate/deactivate (ON/OFF) in-
fo displaying proceed as follows:
❒briefly press button MENU: the dis-
play will show ONor OFF(ac-
cording to previous setting);
❒press button +or –for setting as re-
quired;
❒briefly press button MENUto go
back to the menu screen or press the
button for long to go back to the
standard screen.
According to the audio source selected,
below the time will be displayed the
symbol of the current source.
Page 36 of 267
34
SAFETY
DEVICES
WARNING
LIGHTS AND
MESSAGES
IN AN
EMERGENCY
CAR
MAINTENANCE
TECHNICAL
SPECIFICATIONS
INDEX
DASHBOARD
AND
CONTROLS
CORRECT USE
OF THE CAR
Consumption
If the distance unit set is km (see pre-
vious paragraph) the display will enable
to set the fuel consumption unit in
l/100 km, km/l or mpg.
If the distance unit set is “mi” (see pre-
vious paragraph) fuel consumption will
be displayed in “mpg”.
In this case the option “Cons.Unit” of the
“Setup Menu” can be selected but it is
locked on “mpg”.
To set the required unit proceed as fol-
lows:
❒briefly press button MENU: the dis-
play will show “km/l” or “l/100
km” (according to previous setting);
❒press button +or –for setting as re-
quired;
❒briefly press button MENUto go
back to the menu screen or press the
button for long to go back to the
standard screen.Temperature
This function enables to set the tem-
perature unit (°C or °F).
To set the required unit proceed as fol-
lows:
❒briefly press button MENU: the dis-
play will show °C or °F (according
to previous setting);
❒press button +or –for setting as re-
quired;
❒briefly press button MENUto go
back to the menu screen or press the
button for long to go back to the
standard screen. Units
With this function it is possible to set the
units for distance covered (km or mi),
fuel consumption (l/100 km, km/l or
mpg) and temperature (°C or °F).
Distance
To set the required unit proceed as fol-
lows:
❒briefly press button MENU: the dis-
play will show “km” or “mi” (ac-
cording to previous setting);
❒press button +or –for setting as re-
quired;
❒briefly press button MENUto go
back to the menu screen or press the
button for long to go back to the
standard screen.
Page 37 of 267
35
SAFETY
DEVICES
WARNING
LIGHTS AND
MESSAGES
IN AN
EMERGENCY
CAR
MAINTENANCE
TECHNICAL
SPECIFICATIONS
INDEX
DASHBOARD
AND
CONTROLS
CORRECT USE
OF THE CAR
Selecting the language
(Language)
Display messages can be shown in the
following languages: Italian, English,
German, Portuguese, Spanish, French,
Dutch and Brazilian.
To set the required language proceed as
follows:
❒briefly press button MENU : the dis-
play will show the previously set
“language”;
❒press button +or –for setting as re-
quired;
❒briefly press button MENU to go
back to the menu screen or press the
button for long to go back to the
standard screen.Adjusting the button volume
(Keys Vol.)
With this function the volume of the
roger-beep accompanying the activation
of certain buttons can be adjusted ac-
cording to 8 levels.
To adjust the volume proceed as follows:
❒briefly press button MENU: the dis-
play will show the previously set vol-
ume “level”;
❒press button +or –for setting as re-
quired;
❒briefly press button MENU to go
back to the menu screen or press the
button for long to go back to the
standard screen. Adjusting the failure/warning
buzzer volume (Beep Vol.)
With this function the volume of the
buzzer accompanying any failure/warn-
ing indication can be adjusted according
to 8 levels.
To adjust the volume proceed as follows:
❒briefly press button MENU: the dis-
play will show the previously set vol-
ume “level”;
❒press button +or –for setting as re-
quired;
❒briefly press button MENU to go
back to the menu screen or press the
button for long to go back to the
standard screen.
Page 38 of 267

36
SAFETY
DEVICES
WARNING
LIGHTS AND
MESSAGES
IN AN
EMERGENCY
CAR
MAINTENANCE
TECHNICAL
SPECIFICATIONS
INDEX
DASHBOARD
AND
CONTROLS
CORRECT USE
OF THE CAR
Reactivating the S.B.R.
(Seat Belt Reminder)
buzzer (Beep Seatb.)
This function is displayed only after the
system has been deactivated by Alfa
Romeo Authorized Services.
Exit Menu (Quit setup)
Selecting this option will bring back to
standard screen.ILLUMINATION OF REV
COUNTER/INSTRUMENTS
(NIGHT PANEL)
This function enables to turn on/off
(ON/OFF) the lights of the rev counter
and instruments. This function can be ac-
tivated (only with electronic key fitted in-
to ignition device, external lights on, and
speedometer built-in sensor at poor out-
side light setting), by pressing for long but-
ton –. When this function is on, the dis-
play will show a warning message.
Once on, the NIGHT PANELfunction
can be deactivated as follows:
❒by long press on button +(also with
external lights off);
❒removing the electronic key from the
ignition device.
When function is off the display will show
a warning message.
Messages stay on the display for a few
seconds, then they will go off. To stop
displaying before time, briefly press but-
ton MENU. Scheduled Servicing (Service)
Through this function it is possible to dis-
play information connected to proper car
servicing.
Proceed as follows:
❒briefly press button MENU: service
in km or mi, according to previous
setting, will be displayed (see para-
graph “Units”);
❒briefly press buttonMENUto go
back to the menu screen or press the
button for long to go back to the
standard screen.
IMPORTANTThe Service schedule in-
cludes car maintenance every 30,000 km
(or 18,000 mi); this is shown automat-
ically, with the electronic key into the ig-
nition device starting from 2,000 km (or
1,240 mi) from this deadline and it will
be displayed in km or miles according to
the unit set. When a scheduled service in-
terval (“coupon”) is near to come, fitting
the electronic key into the ignition device
will display a message followed by the
number of km/mi to go before car ser-
vicing. Contact Alfa Romeo Authorized Ser-
vices to carry out any service operation
provided by the Service schedule or by the
Annual inspection plan, and to reset the
display.