recommended oil Alfa Romeo Giulia 2017 Owner's Manual
[x] Cancel search | Manufacturer: ALFA ROMEO, Model Year: 2017, Model line: Giulia, Model: Alfa Romeo Giulia 2017Pages: 268, PDF Size: 18.64 MB
Page 5 of 268
VEHICLE CHANGES / ALTERATIONS
Accessories Purchased By The Owner
Warning!
Any change or alteration of the vehicle might seriously affect its safety and road handling, thus causing accidents, in which the occupants
could even be fatally injured.
If you decide to install electrical accessories that require a permanent electrical supply (e.g. radio, satellite anti-theft system,
etc.) or accessories that in any case drain the electrical supply after purchasing the vehicle, contact your authorized dealer.
Dealer personnel will check whether the vehicles's electrical system is able to withstand the load required or whether it needs
to be integrated with a more powerful battery.
Note:
Take care when adding additional spoilers, alloy wheel rims, or non-standard wheel hubs: they could reduce the ventilation of
the brakes and affect efficiency under sharp and repeated braking, or on long descents. Make sure that nothing obstructs the
pedal stroke (mats, etc.).
FCA US LLC shall not be liable for damage caused by the installation of accessories either not supplied or recommended by
FCA US LLC and/or not installed in compliance with the provided instructions.
Installing Electrical/Electronic Devices
Electrical and electronic devices installed after the car is purchased must carry the following label:
FCA US LLC authorizes the installation of transceivers provided that installation is carried out at a specialized center, in
compliance with manufacturer's specifications.
Note:
Local authorities may not allow the vehicle on the road if devices that modify the features of the vehicle have been installed. This
also may void the warranty in relation to faults caused by the change either directly or indirectly related to it.
FCA US LLC shall not be liable for damage caused by the installation of accessories either not supplied or recommended by
FCA US LLC and/or not installed in compliance with the provided instructions.
Page 87 of 268
SymbolWhat It Means What To Do
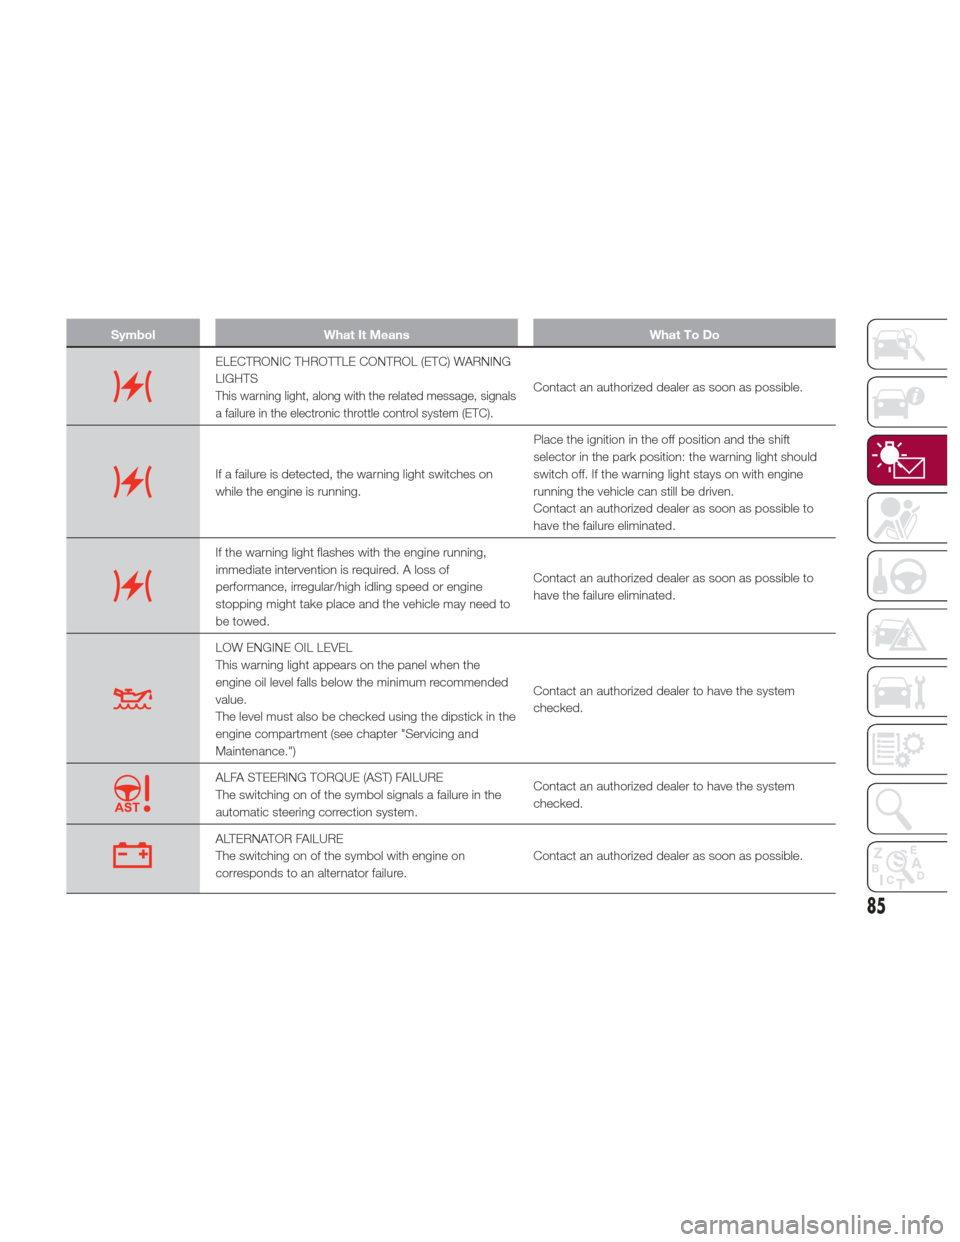
ELECTRONIC THROTTLE CONTROL (ETC) WARNING
LIGHTS
This warning light, along with the related message, signals
a failure in the electronic throttle control system (ETC).Contact an authorized dealer as soon as possible.
If a failure is detected, the warning light switches on
while the engine is running.Place the ignition in the off position and the shift
selector in the park position: the warning light should
switch off. If the warning light stays on with engine
running the vehicle can still be driven.
Contact an authorized dealer as soon as possible to
have the failure eliminated.
If the warning light flashes with the engine running,
immediate intervention is required. A loss of
performance, irregular/high idling speed or engine
stopping might take place and the vehicle may need to
be towed.
Contact an authorized dealer as soon as possible to
have the failure eliminated.
LOW ENGINE OIL LEVEL
This warning light appears on the panel when the
engine oil level falls below the minimum recommended
value.
The level must also be checked using the dipstick in the
engine compartment (see chapter "Servicing and
Maintenance.")Contact an authorized dealer to have the system
checked.
ALFA STEERING TORQUE (AST) FAILURE
The switching on of the symbol signals a failure in the
automatic steering correction system.
Contact an authorized dealer to have the system
checked.
ALTERNATOR FAILURE
The switching on of the symbol with engine on
corresponds to an alternator failure.
Contact an authorized dealer as soon as possible.
85
Page 139 of 268
If the vehicle has a discharged battery,
booster cables may be used to obtain a
start from a booster battery or the battery
in another vehicle. This type of start can be
dangerous if done improperly. Refer to
“Emergency Starting” in “In Case Of
Emergency” for further information.
Caution!
To prevent damage to the starter, do not
continuously crank the engine for more
than 25 seconds at a time. Wait
60 seconds before trying again.
After Starting —
Warming Up The Engine
Proceed as follows:Travel slowly, letting the engine run at
a reduced RPM, without accelerating
suddenly.
It is recommended to wait until the
digital engine coolant temperature
indicator starts to rise for maximum
performance.
Stopping The Engine
To stop the engine, proceed as follows:
1. Park the vehicle in a position that is
not dangerous for oncoming traffic.
2. Engage the PARK (P) mode. 3. With engine idling, press the
START/STOP button on the steering
wheel to STOP the engine.
Note:
Do not leave the ignition in ON
mode when the engine is off.
To shut off the engine with vehicle
speed greater than 5 mph (8 km/h), you
must push and hold the ignition or push
the START/STOP button three times
consecutively within a few seconds.
The engine will shut down, and the
ignition will be placed in the ON mode
With the keyless ignition system, it is
possible to go away from the vehicle
taking the key fob with you, without the
engine switching off. The vehicle will
inform about the absence of the key on
board, only if the doors are closed.
Stopping the engine (cycling from the
ON to the STOP position) the
accessories are still powered for about
three minutes, or until a door is opened.
When the ignition is in the STOP/OFF
mode, the window switches remain
active for three minutes. Opening a
front door will cancel this function.
After severe driving, idle the engine to
allow the temperature inside the engine
compartment to cool before shutting off
the engine.
Turbocharger Cool
Down
Before switching the engine off, keep it
idling for a few minutes so that the
turbocharger can be suitably lubricated.
This procedure is particularly
recommended after severe driving.
After a full load operation, keep the
engine idling for three to five minutes
before switching it off.
This time allows the lubricating oil and
the engine coolant to eliminate the
excessive heat from combustion
chamber, bearings, inner components
and turbocharger.
137
Page 209 of 268
Thousands of miles10
20
30
40
50
60
70
80
90
100
110
120
130
140
150
Years123456789101112131415
Thousands of kilometers16
32
48
64
80
96
112
128
144
160
176
192
208
224
240
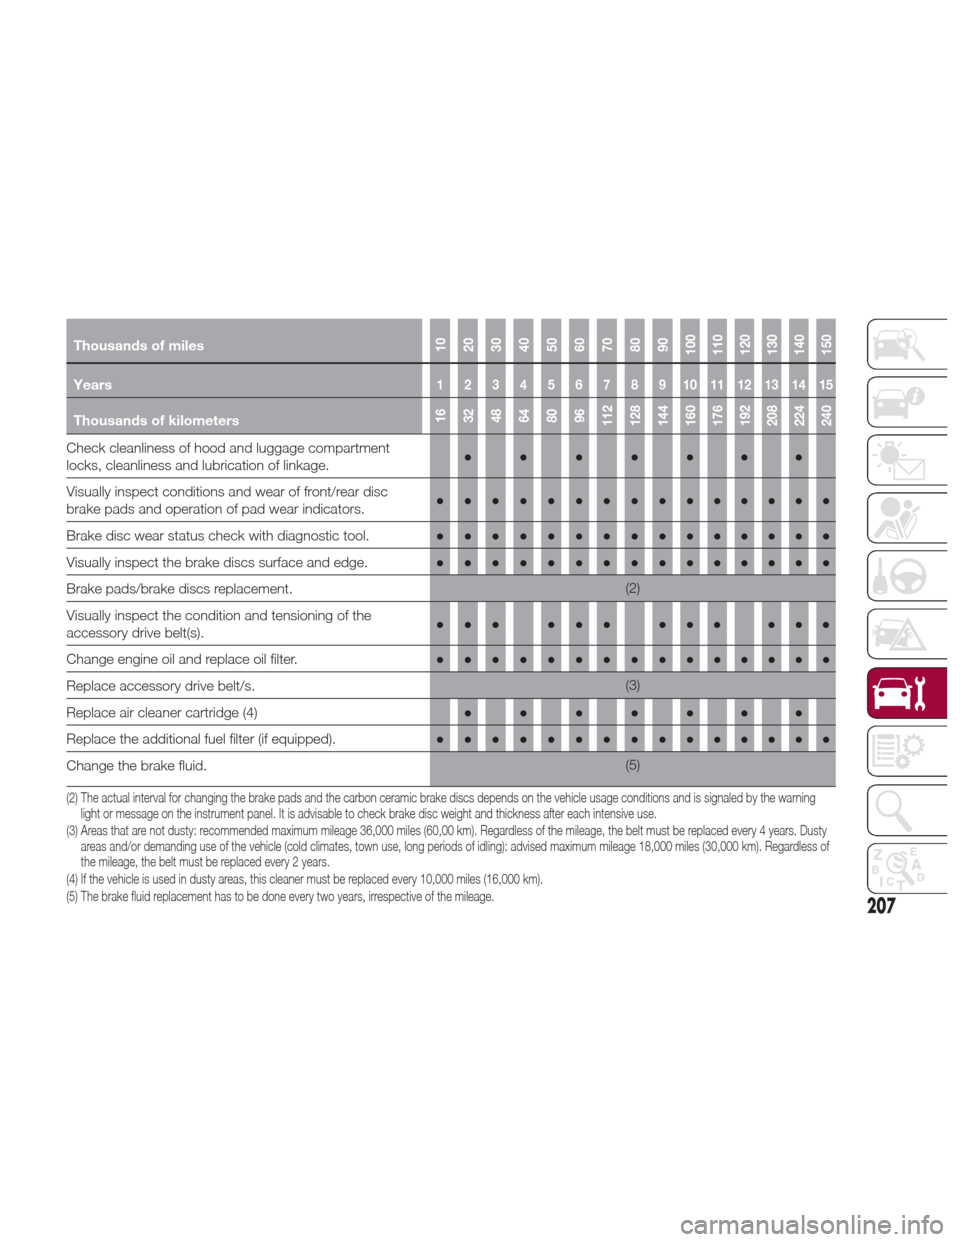
Check cleanliness of hood and luggage compartment
locks, cleanliness and lubrication of linkage. ●●●●●●●
Visually inspect conditions and wear of front/rear disc
brake pads and operation of pad wear indicators. ●●●●●●●●●
●●●●●●
Brake disc wear status check with diagnostic tool. ●●●●●●●●●●●●●●●
Visually inspect the brake discs surface and edge. ●●●●●●●●●●●●●●●
Brake pads/brake discs replacement.
(2)
Visually inspect the condition and tensioning of the
accessory drive belt(s). ●●● ●●● ●●● ●●●
Change engine oil and replace oil filter. ●●●●●●●●●●●●●●●
Replace accessory drive belt/s.
(3)
Replace air cleaner cartridge(4)●●●●●●●
Replace the additional fuel filter (if equipped). ●●●●●●●●●●●●●●●
Change the brake fluid.
(5)
(2) The actual interval for changing the brake pads and the carbon ceramic brake discs depends on the vehicle usage conditions and is signaled by the warning light or message on the instrument panel. It is advisable to check brake disc weight and thickness after each intensive use.
(3) Areas that are not dusty: recommended maximum mileage 36,000 miles (60,00 km). Regardless of the mileage, the belt must be replaced every 4 years. Dusty areas and/or demanding use of the vehicle (cold climates, town use, long periods of idling): advised maximum mileage 18,000 miles (30,000 km). Regardless of
the mileage, the belt must be replaced every 2 years.
(4) If the vehicle is used in dusty areas, this cleaner must be replaced every 10,000 miles (16,000 km).
(5) The brake fluid replacement has to be done every two years, irrespective of the mileage.
207
Page 216 of 268
DEALER SERVICE
The following pages contain
instructions on the required
maintenance from the technical
personnel who designed the vehicle.
In addition to these specific
maintenance instructions specified for
routine scheduled servicing, there are
other components which may require
periodic maintenance or replacement
over the vehicle’s life cycle.
Engine Oil
Engine Oil Level Check
To ensure correct engine lubrication, the
oil must always be kept at the
prescribed level (see "Engine
Compartment" in this chapter).
Check the oil level at regular intervals,
for example every 1864 miles
(3000 km).
It must be checked about five minutes
after stopping the engine, once full
operating temperature is reached. The
vehicle must also be parked on as level
a surface as possible.
Ensure that the oil level is within the
interval on the dipstick between the
minimum and maximum limits.
The engine oil level can be checked
using the Connect system. To access
the function, activate the main menu
(MENU button) and select the following
options in sequence: “Applications”;
“My Car”; “Oil level”.Changing the Engine Oil
See the "Maintenance Plan" for the
correct servicing intervals.
Choice of Engine Oil Type
To ensure optimal performance and
maximum protection in all operating
conditions, it is advisable to use solely
certified engine oils (see description in
"Fluid And Lubricants" in the "Technical
Specifications" chapter).
Additives for Engine Oil
It is strongly recommended not to use
additives (other than leak detection
dyes) with the engine oil.
The engine oil is a product designed
specially for the vehicle and its
performance may be deteriorated
through the use of further additives.
Disposal of Used Engine Oil and
Filters
For the disposal of the engine oil and
filters, contact the appropriate body to
determine local regulations.
Note:
Used engine oil disposed of incorrectly
may seriously harm the environment.
Engine Oil Filter
Replacing the Engine Oil Filter
The engine oil filter must be replaced
each time the engine oil is changed. It is
advised to replace it with a genuine spare
part, specifically designed for this vehicle.
Air Filter
Replacing the Air Cleaner
See the "Maintenance Plan" for the
correct servicing intervals. It is advised
to replace it with a genuine spare part,
specifically designed for this vehicle.
Air Conditioning System
Maintenance
To ensure the best possible
performance, the air conditioning
system must be checked and undergo
maintenance at an authorized dealer at
the beginning of the summer.
Caution!
Do not use chemicals to clean the air
conditioning system, since the internal
components may be damaged. This kind of
damage is not covered by warranty.
Replace The Cabin Air Filter
See the "Maintenance Plan" for the
correct servicing intervals. For cleaner
replacement, contact an authorized
dealer.
214
SERVICING AND MAINTENANCE
Page 217 of 268
Warning!
Use only refrigerants and compressor
lubricants approved by the manufacturer
for your air conditioning system. Some
unapproved refrigerants are flammable and
can explode, injuring you. Other
unapproved refrigerants or lubricants can
cause the system to fail, requiring costly
repairs. Refer to Warranty Information
Book, located in your owner’s information
kit, for further warranty information.
Lubricating Moving
Parts Of The Bodywork
Ensure that the locks and bodywork
junction points, including components
such as the seat guides, door hinges
(and rollers), trunk and hood are
periodically lubricated with
lithium-based grease to ensure correct,
silent operation and to protect them
from rust and wear.
Thoroughly clean the components,
eliminating every trace of dirt and dust.
After lubricating, eliminate excess oil
and grease. Also pay particular
attention to the hood closing devices,
to ensure correct operation. During
operations on the hood, to be carried
out with the engine cold, also
remember to check, clean and lubricate
the locking, release and safety devices.Lubricate the external lock barrels twice
a year. Apply a small amount of
high-quality lubricant directly into the
lock barrel.
If necessary, contact your authorized
dealer as soon as possible.
Windshield Wiper
Periodically clean the windshield and
rear window and rubber profile of the
windshield wiper blades, using a
sponge or a soft cloth and a
non-abrasive detergent. This eliminates
the salt or impurities accumulated when
driving.
Prolonged operation of the windshield
window wipers with dry glass may
cause the deterioration of the blades, in
addition to abrasion of the surface of
the glass. To eliminate the impurities on
the dry glass, always operate the
windshield washers.
In the event of very low outdoor
temperatures, below zero degrees,
ensure that the movement of the rubber
part in contact with the glass is not
obstructed. Use a suitable deicing
product to release it if required.
Avoid using the windshield wipers to
remove frost or ice.
Also avoid contact of the rubber profile
of the blades with petroleum derivatives
such as engine oil, gas, etc.
Warning!
Driving with worn windshield wiper blades
is a serious hazard, because visibility is
reduced in bad weather conditions.
Note:
The life of the windshield wiper blades
varies according to the usage
frequency. In any case, it is advised to
replace the blades approximately once
a year. When the blades are worn,
noise, marks on the glass or streaks of
water may be noticed. In the presence
of these conditions, clean the
windshield wiper blades or, if necessary,
replace them.
Raising The Windshield Wiper
Blades ("Service Position"
Function)
The "service position" function allows
the driver to replace the windshield
wiper blades more easily. It is also
recommended to activate this function
when it is snowing and to make it easier
to remove any dirt deposits in the area
where the blades are normally
positioned, when washing.
Activation Of The Function
To activate this function, disable the
windshield wiper before setting the
ignition device to STOP.
215
Page 221 of 268
With engine and system cold, do
not top up with coolant beyond the
maximum level indicated on the
reservoir in the engine compartment.
Braking System
In order to guarantee the efficiency of
the braking system, periodically check
its components; for this operation,
contact an authorized dealer.
See the "Maintenance Plan" for the
correct servicing intervals.
Note: Driving with your foot resting on
the brake pedal may compromise its
efficiency, increasing the risk of
accidents. When driving, never keep
your foot on the brake pedal and don’t
put unnecessary strain on it to prevent
the brakes from overheating: excess
pad wear may cause damage to the
braking system.
When an insufficient oil level is
detected, contact an authorized dealer
to have the system checked.
Always keep the cap of the brake
fluid reservoir (in the engine
compartment) completely closed.
Warning!
Use only manufacturer's recommended
brake fluid. Refer to “Fluids And Lubricants”
in “Technical Specifications” for further
information. Using the wrong type of brake
fluid can severely damage your brake
system and/or impair its performance. The
proper type of brake fluid for your vehicle is
also identified on the original factory
installed hydraulic master cylinder reservoir.
To avoid contamination from foreign
matter or moisture, use only new brake
fluid or fluid that has been in a tightly
closed container. Keep the master cylinder
reservoir cap secured at all times. Brake
fluid in a open container absorbs moisture
from the air resulting in a lower boiling
point. This may cause it to boil
unexpectedly during hard or prolonged
braking, resulting in sudden brake failure.
This could result in a collision.
Overfilling the brake fluid reservoir can
result in spilling brake fluid on hot engine
parts, causing the brake fluid to catch fire.
Brake fluid can also damage painted and
vinyl surfaces, care should be taken to
avoid its contact with these surfaces.
Do not allow petroleum based fluid to
contaminate the brake fluid. Brake seal
components could be damaged, causing
partial or complete brake failure. This could
result in a collision.
Automatic Transmission
Use only a transmission oil with the
same characteristics as those indicated
in the "Fluids and Lubricants" table (see
"Technical Specifications" chapter).
Special Additives
Do not use any type of additive with the
automatic transmission oil. The
automatic transmission oil is a product
designed specially for this vehicle and
its performance may be compromised
through the use of further additives.
Caution!
Do not use chemical flushes in your
transmission as the chemicals can damage
your transmission components. Such
damage is not covered by the New Vehicle
Limited Warranty.
219
Page 234 of 268
These indicators are molded into the
bottom of the tread grooves. They will
appear as bands when the tread depth
becomes a 1/16 of an inch (1.6 mm).
When the tread is worn to the tread
wear indicators, the tire should be
replaced. Refer to “Replacement Tires”
in this section for further information.
Life Of Tire
The service life of a tire is dependent
upon varying factors including, but not
limited to:
Driving style.
Tire pressure - Improper cold tire
inflation pressures can cause uneven
wear patterns to develop across the tire
tread. These abnormal wear patterns
will reduce tread life, resulting in the
need for earlier tire replacement.
Distance driven.
Performance tires, tires with a speed
rating of V or higher, and Summer tires
typically have a reduced tread life.
Rotation of these tires per the vehicle
maintenance schedule is highly
recommended.
Warning!
Tires and the spare tire should be replaced
after six years, regardless of the remaining
tread. Failure to follow this warning can
result in sudden tire failure. You could lose
control and have a collision resulting in
serious injury or death.
Keep dismounted tires in a cool, dry
place with as little exposure to light as
possible. Protect tires from contact with
oil, grease, and gasoline.
Replacement Tires
The tires on your new vehicle provide a
balance of many characteristics. They
should be inspected regularly for wear
and correct cold tire inflation pressures.
The manufacturer strongly recommends
that you use tires equivalent to the
originals in size, quality and
performance when replacement is
needed. Refer to the paragraph on
“Tread Wear Indicators” in this section.
Refer to the Tire and Loading
Information placard or the Vehicle
Certification Label for the size
designation of your tire. The Load Index
and Speed Symbol for your tire will be
found on the original equipment tire
sidewall. See the Tire Sizing Chart example
found in the “Tire Safety Information”
section of this manual for more
information relating to the Load Index
and Speed Symbol of a tire.
It is recommended to replace the two
front tires or two rear tires as a pair.
Replacing just one tire can seriously
affect your vehicle’s handling. If you
ever replace a wheel, make sure that
the wheel’s specifications match those
of the original wheels.
It is recommended you contact your
authorized tire dealer or original
equipment dealer with any questions
you may have on tire specifications or
capability. Failure to use equivalent
replacement tires may adversely affect
the safety, handling, and ride of your
vehicle.
232
SERVICING AND MAINTENANCE
Page 239 of 268
INTERIORS
Periodically check the cleanliness of the
interior, beneath the mats, which could
cause oxidation of the sheet metal.
Seats And Fabric Parts
Remove dust with a soft brush or a
vacuum cleaner. It is advised to use a
moist brush on velvet upholstery. Rub
the seats with a sponge moistened with
a solution of water and neutral
detergent.
Leather Seats — If
Equipped
Remove the dry dirt with a chamois or
slightly damp cloth, without exerting too
much pressure.
Remove any liquid or grease stains
using an absorbent dry cloth, without
rubbing. Then clean with a soft cloth or
buckskin cloth dampened with water
and mild soap. If the stain persists, use
specific products and observe the
instructions carefully.
Note:Never use alcohol. Make sure
that the cleaning products used contain
no alcohol or alcohol derivatives, even
in small quantities.
Plastic And Coated
Parts
Clean interior plastic parts with a damp
cloth (if possible made from microfiber),
and a solution of water and neutral,
non-abrasive detergent.
To clean oily or persistent stains, use
specific products free from solvents and
designed to maintain the original
appearance and color of the
components.
Remove any dust using a microfiber
cloth, if necessary moistened with
water. The use of paper tissues is not
recommended as these may leave
residues.
Genuine Leather Parts —
If Equipped
Use only water and mild soap to clean
these parts. Never use alcohol or
alcohol-based products.
Before using a specific product for
cleaning interiors, make sure that it
does not contain alcohol and/or alcohol
based substances.
Carbon Fiber Parts
To eliminate small scratches and marks
on the carbon, contact your authorized
dealer. An improperly performed
operation may irreparably damage the
carbon.
237