ALFA ROMEO GIULIA 2021 Owners Manual
Manufacturer: ALFA ROMEO, Model Year: 2021, Model line: GIULIA, Model: ALFA ROMEO GIULIA 2021Pages: 284, PDF Size: 8.87 MB
Page 211 of 284
209
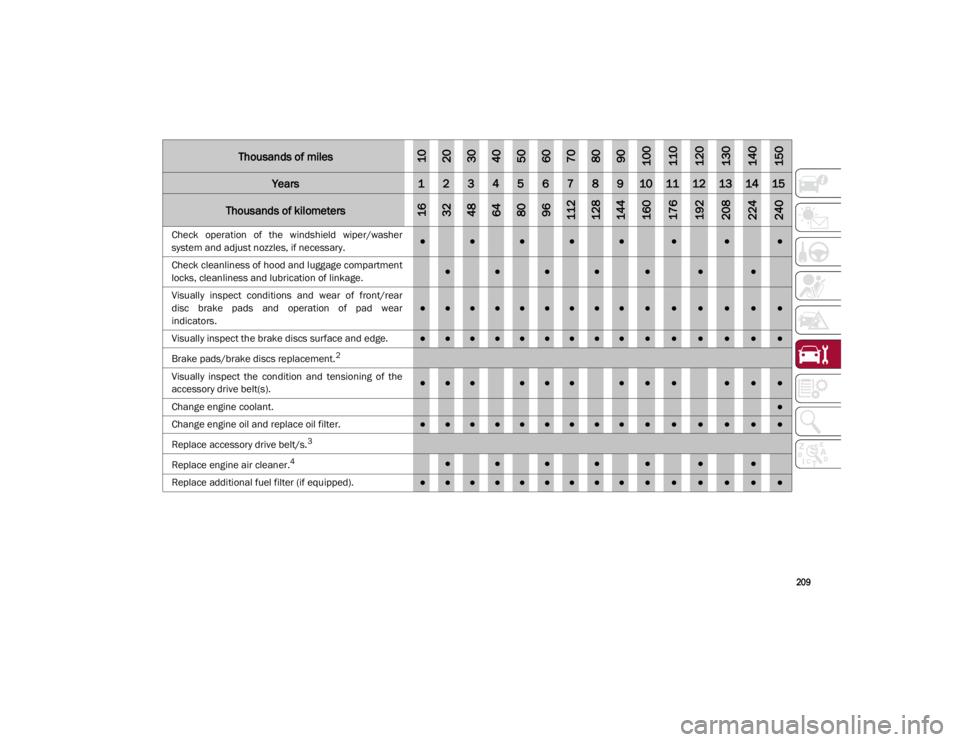
Check operation of the windshield wiper/washer
system and adjust nozzles, if necessary.●●●●●●●●
Check cleanliness of hood and luggage compartment
locks, cleanliness and lubrication of linkage.
●●●●●●●
Visually inspect conditions and wear of front/rear
disc brake pads and operation of pad wear
indicators.
●●●●●●●●●●●●●●●
Visually inspect the brake discs surface and edge.
●●●●●●●●●●●●●●●
Brake pads/brake discs replacement.
2
Visually inspect the condition and tensioning of the
accessory drive belt(s).●●●●●●●●●●●●
Change engine coolant.
●
Change engine oil and replace oil filter.
●●●●●●●●●●●●●●●
Replace accessory drive belt/s.
3
Replace engine air cleaner.4●●●●●●●
Replace additional fuel filter (if equipped).●●●●●●●●●●●●●●●
Thousands of miles102030405060708090100110120130140150
Years123456789101112131415
Thousands of kilometers163248648096112128144160176192208224240
21_GA_OM_EN_USC_t.book Page 209
Page 212 of 284
SERVICING AND MAINTENANCE
210
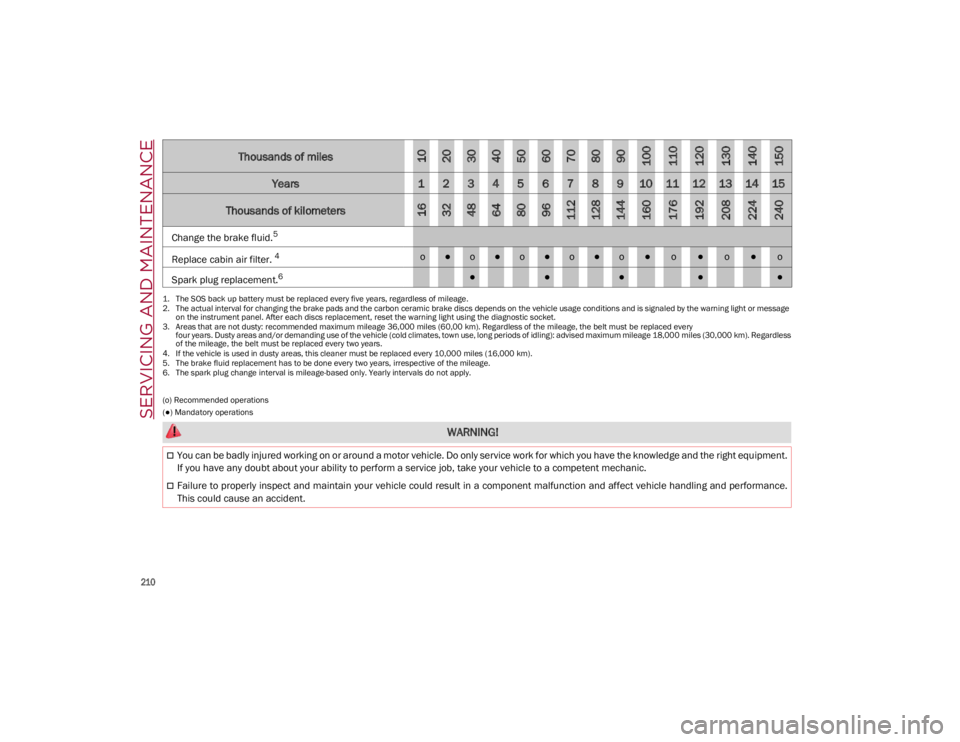
(o) Recommended operations
(●) Mandatory operations
Change the brake fluid.5Replace cabin air filter.
4
o●o●o●o●o●o●o●o Spark plug replacement.
6
●●●●● 1.
The SOS back up battery must be replaced every five years, regardless of mileage.
2. The actual interval for changing the brake pads and the carbon ceramic brake discs depends on the vehicle usage conditions and is signaled by the warning light or message
on the instrument panel. After each discs replacement, reset the warning light using the diagnostic socket.
3. Areas that are not dusty: recommended maximum mileage 36,000 miles (60,00 km). Regardless of the mileage, the belt must be replaced every
four years. Dusty areas and/or demanding use of the vehicle (cold climates, town use, long periods of idling): advised maximum mileage 18,000 miles (30,000 km). Regardless
of the mileage, the belt must be replaced every two years.
4. If the vehicle is used in dusty areas, this cleaner must be replaced every 10,000 miles (16,000 km).
5. The brake fluid replacement has to be done every two years, irrespective of the mileage.
6. The spark plug change interval is mileage-based only. Yearly intervals do not apply.
Thousands of miles102030405060708090100110120130140150
Years123456789101112131415
Thousands of kilometers163248648096112128144160176192208224240
WARNING!
You can be badly injured working on or around a motor vehicle. Do only service work for which you have the knowledge and the right equipment.
If you have any doubt about your ability to perform a service job, take your vehicle to a competent mechanic.
Failure to properly inspect and maintain your vehicle could result in a component malfunction and affect vehicle handling and performance.
This could cause an accident.
21_GA_OM_EN_USC_t.book Page 210
Page 213 of 284
211
ENGINE COMPARTMENT
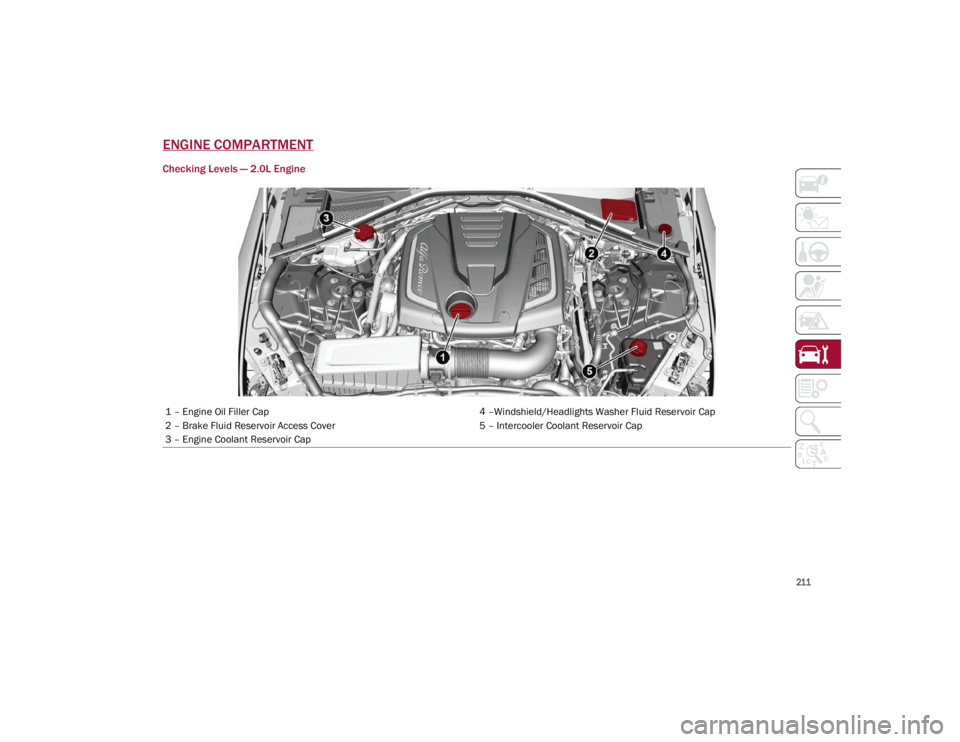
Checking Levels — 2.0L Engine
1 – Engine Oil Filler Cap4 –Windshield/Headlights Washer Fluid Reservoir Cap
2 – Brake Fluid Reservoir Access Cover 5 – Intercooler Coolant Reservoir Cap
3 – Engine Coolant Reservoir Cap
21_GA_OM_EN_USC_t.book Page 211
Page 214 of 284
SERVICING AND MAINTENANCE
212
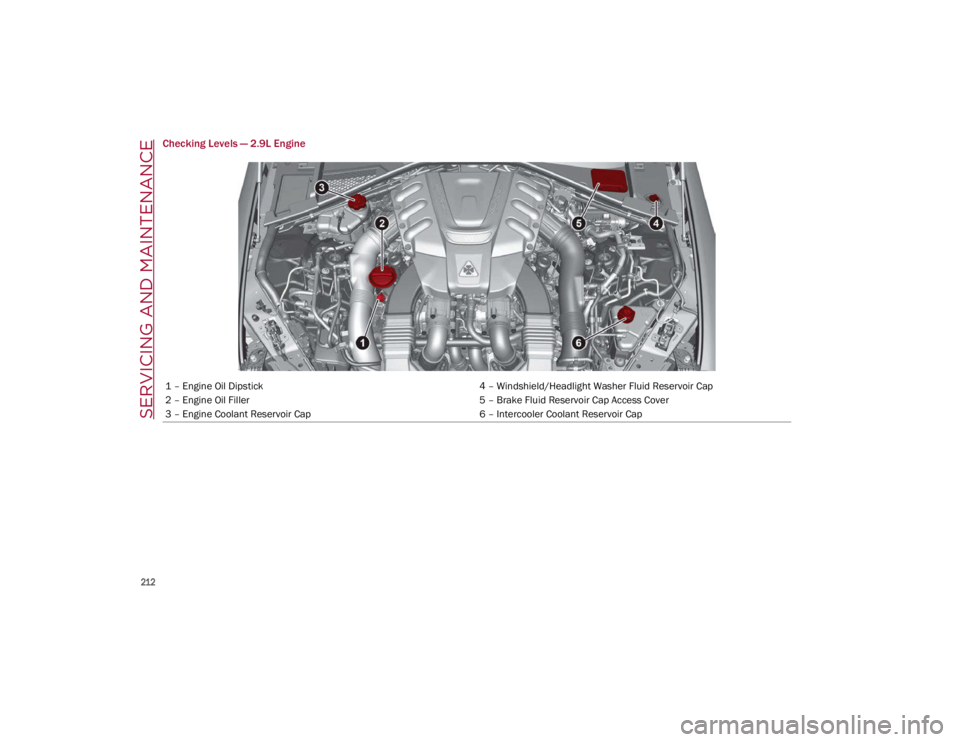
Checking Levels — 2.9L Engine
1 – Engine Oil Dipstick4 – Windshield/Headlight Washer Fluid Reservoir Cap
2 – Engine Oil Filler 5 – Brake Fluid Reservoir Cap Access Cover
3 – Engine Coolant Reservoir Cap 6 – Intercooler Coolant Reservoir Cap
21_GA_OM_EN_USC_t.book Page 212
Page 215 of 284
213
Engine Oil
The engine oil level can be seen on the instru-
ment cluster display every time the engine is
started, or on the Information and Entertain -
ment system display by activating on the main
menu (MENU button) the following functions in
sequence: “Apps”; “My Car” and “Oil Level”.
Check on the display using the 6 notches that
the oil level is between the MIN and MAX level:
1 notch MIN level, 6 notches MAX level.
If the oil level is close to or below the MIN
mark, add oil gradually through the filler, (refer
to “Top-Up And Oil Level Indication Update On
Display” in this section) considering that each
notch shown on the display corresponds to
approximately 8.8 fl oz (250 ml).
The oil level can also be checked manually on
2.9L Engine.
NOTE:
Always reinstall the oil cap and tighten to
proper torque whenever it is removed to add
oil to engine. Never run the engine with cap
removed as this could cause oil to leak from
engine.
Manual Oil Level Checking Procedure — 2.9L
Engine
Check that the oil level is between the MIN and
MAX marks on dipstick, clean it with a lint-free
cloth and reinsert it. Extract the dipstick again
and check that the level is between the MIN
and MAX marks.
Top-Up And Oil Level Indication Update On
Display — 2.9L Engine
If an engine oil top-off is needed, in order to
ensure the correct indication of the oil level on
the display, proceed with the process below:
Leave the car on flat ground with the engine
running for approximately five minutes
(temperature higher than 198°F (90°C)
and shut the engine off.
Wait for five minutes, turn the ignition to the
ON mode without starting the engine and
wait for a few seconds.
NOTE:
If the level indication is not updated after the
previously described procedure, repeat the
engine adjustment, shut the engine off and
wait another five minutes before starting it
again. If the indication is not updated after the
second start, contact an authorized dealer.
Top-Up And Oil Level Indication Update On
Display — 2.0L Engine
If an engine oil top-off is needed, in order to
ensure the correct indication of the oil level on
the display, proceed with the process below:
Leave the car on flat ground with the engine
running for approximately five minutes
(temperature higher than 176°F (80°C)
and shut the engine off.
Start the engine again and idle it for about
two minutes.
NOTE:
If you have added the specified amount of oil
and the indicator is not reading “Full”, please
contact an authorized dealer. CAUTION!
Make sure not to add too much oil when
topping off the engine. Engine oil in excess
may damage the engine. Have the vehicle
checked. Never exceed the MAX level when
topping off engine oil. It is advisable to
check the oil level in intermediate steps
using the oil dipstick (2.9L Engine Only).
CAUTION!
The oil level is not refreshed immediately on
the display after topping off. Consequently,
wait for the oil level to be refreshed on the
display and follow the procedure below.
21_GA_OM_EN_USC_t.book Page 213
Page 216 of 284
SERVICING AND MAINTENANCE
214
Engine Coolant
If the level is too low, remove the cap of reser-
voir and add the fluid described on
Ú
page 267.
Washer Fluid For Windshield/Headlights
The windshield and headlights washer fluid
reservoir has a telescopic filler.
If the level is too low, remove reservoir cap and
lift the filler. Then, add the fluid described on
Ú
page 267.
NOTE:
The headlight washing system will not work if
the liquid level is low (as indicated by the
symbol on the instrument cluster display). On
vehicles equipped with headlight washers,
there is a reference notch on the dipstick:
ONLY the windshield/rear window washer
operates with the level below this reference.
Brake Fluid
Check that the fluid is at the maximum level. If
the fluid level in the tank is low, contact an
authorized dealer to have the system checked.
Automatic Transmission Activation System Oil
The transmission control oil level should only
be checked at an authorized dealer.
Useful Advice For Extending The Life Of
Your Battery
To avoid draining your battery and make it last
longer, observe the following instructions:
When you park the car, ensure that the
doors and trunk are closed properly to
prevent any lights from remaining on inside
the passenger's compartment.
Do not keep accessories (e.g. radio, hazard
warning lights, etc.) switched on for a long
time when the engine is not running.
Before performing any operation on the
electrical system, disconnect the negative
battery cable.
If you wish to install electrical accessories
after purchasing the car that require perma -
nent electrical supply (e.g. alarm, etc.), or
accessories which influence the electrical
supply requirements, contact an authorized
dealer, whose qualified staff will evaluate the
overall electrical consumption.
WARNING!
If the engine oil is being topped up, wait for
the engine to cool down before loosening
the filler cap, particularly for vehicles with
aluminum cap (if equipped). WARNING: risk
of burns!
CAUTION!
The oil level must never exceed the MAX
mark.
If the MAX mark is exceeded (last notch on
the right turns red) after the fill-up, go to an
authorized dealer as soon as possible to
have the oil in excess removed.
Do not add oil with specifications different
from those of the oil already in the engine.
Used engine oil and oil filters contain
substances which are harmful to the
environment. To change the oil and filters,
we advise you to contact an authorized
dealer.
CAUTION!
If the charge level remains under 50% for a
long time, the battery may be damaged by
sulphation, reducing its capacity and
efficiency during a vehicle start. The battery
is also more prone to the risk of freezing (at
temperatures as high as 14°F (-10°C).
21_GA_OM_EN_USC_t.book Page 214
Page 217 of 284
215
(Continued)
NOTE:
After the battery is disconnected, the steering
must be initialized. The warning light on the
instrument panel switches on to indicate this.
To carry out this procedure, simply turn the
steering wheel all the way from one end to the
other, and then turn it back to the central posi-
tion.
Battery
The battery does not require the electrolyte to
be topped up with distilled water. A periodic
check carried out at an authorized dealer,
however, is necessary to check efficiency.
Follow the battery manufacturer's instructions
for maintenance.
Replacing The Battery
If necessary, replace the battery with another
original battery with the same specifications.
Follow the battery manufacturer’s instructions
for maintenance.
NOTE:
It will not be possible to open the trunk with a
key or by pushing the button in the passenger
compartment when the battery is discon
-
nected. So, always position the manual trunk
opening strap on the trunk lock before discon -
necting the battery
Ú
page 250.
Pressure Washing
Cleaning the engine compartment with a high
pressure washer is not recommended.
BATTERY RECHARGING
Important Notes
NOTE:
Before using the charging device, always
make sure that it is appropriate for the
installed battery, with constant voltage
(below 14.8 Volts) and low amperage
(maximum 15 Amps).
Recharge the battery in a well ventilated
environment.
Before using any devices to charge or to
maintain the charge of the battery, carefully
follow the instructions provided with the
device in order to properly and safely
connect it to the car battery.
WARNING!
Battery acid is a corrosive solution and
can burn or even blind you. Do not allow
battery acid to contact your eyes, skin, or
clothing. Do not lean over a battery when
attaching clamps
Ú
page 199. If acid
splashes in eyes or on skin, flush the area
immediately with large amounts of water.
Battery gas is flammable and explosive.
Keep flame or sparks away from the
battery. Do not use a booster battery or
any other booster source with an output
greater than 12 Volts. Do not allow cable
clamps to touch each other.
Battery posts, terminals, and related
accessories contain lead and lead
compounds. Wash hands after handling.
CAUTION!
Precautions have been taken to safeguard
all parts and connections however, the
pressures generated by these machines is
such that complete protection against
water ingress cannot be guaranteed.
WARNING! (Continued)
WARNING!
Never charge or recharge a frozen battery:
it may explode because of the nitrogen
trapped inside the ice crystals.
At all times while charging or recharging
the battery, make sure that any sparks or
open flames are kept sufficiently far away
from the battery.
21_GA_OM_EN_USC_t.book Page 215
Page 218 of 284

SERVICING AND MAINTENANCE
216
You can recharge the battery without discon-
necting the wires of the vehicle's electrical
system.
To reach the battery, remove the access
panel inside the trunk.
Battery Access Panel
Remove the protective cover and connect
the positive cable terminal of the charger
(usually red) to the positive terminal (+) of
the battery.
Connect the negative terminal of the
charger (usually black) to nut next to the
negative terminal (-) of the battery. Battery
The vehicle is equipped with an IBS (Intelligent
Battery Sensor), which is able to measure the
charge and discharge voltage and calculate
the charge level and the general condition of
the battery. The sensor is placed next to the
negative terminal (-) of the battery. For a correct charge/discharge procedure, the
charge voltage must go through the IBS
sensor.
1. Turn the charger on and follow the instruc
-
tions on the user's manual to completely
recharge the battery.
2. When the battery is charged, turn the charger off before disconnecting it from
the battery.
3. Disconnect the black cable terminal of the battery charger and then the red cable
terminal.
4. Refit the protective cover of the positive terminal of the battery and the access
cover to the battery compartment.
NOTE:
If a “quick-type” battery charger is used with
the battery fitted on the vehicle, before
connecting it disconnect both cables of the
battery itself. Do not use a “quick-type” battery
charger to provide the starting voltage.
1 — Protective Cover
2 — Negative Post (Nut)
21_GA_OM_EN_USC_t.book Page 216
Page 219 of 284
217
VEHICLE MAINTENANCE
The following pages contain instructions on
the required maintenance from the technical
personnel who designed the vehicle.
In addition to these specific maintenance
instructions specified for routine scheduled
servicing, there are other components which
may require periodic maintenance or replace-
ment over the vehicle’s life cycle.
Engine Oil
Engine Oil Level Check
To ensure correct engine lubrication, the oil
must always be kept at the appropriate level.
Check the oil level at regular intervals, for
example every 1,864 miles (3,000 km).
It must be checked once full operating
temperature is reached.
The vehicle must also be parked on as level a
surface as possible.
The engine oil level can be checked using the
Information and Entertainment system. To
access the function, activate the main menu
(MENU button) and select the following
options in sequence: “Applications”; “My Car”;
“Oil level”. Changing The Engine Oil
For the correct servicing intervals
Ú
page 204.
Choice Of Engine Oil Type
To ensure optimal performance and maximum
protection in all operating conditions, it is
advisable to only use certified engine oils
Ú
page 267.
Additives For Engine Oil
It is strongly recommended not to use addi -
tives (other than leak detection dyes) with the
engine oil.
The engine oil is a product designed specially
for the vehicle and its performance may be
deteriorated through the use of further addi -
tives.
Disposal Of Used Engine Oil And Filters
For disposal of used engine oil and filters,
consult the appropriate local regulations.
NOTE:
Inappropriate disposal of used engine oil may
seriously harm the environment.
Engine Oil Filter
The engine oil filter should be replaced with a
new filter at every engine oil change.
Engine Oil Filter Selection
A full-flow type disposable oil filter should be
used for replacement. The quality of replace -
ment filters varies considerably. Only high
quality Mopar certified filters should be used.
Engine Air Cleaner
Engine Air Cleaner Filter Selection
The quality of replacement filters varies
considerably. Only high quality Mopar certified
filters should be used.
Air Conditioning System Maintenance
To ensure the best possible performance, the
air conditioning system must be checked and
undergo maintenance at an authorized dealer
at the beginning of the summer.
CAUTION!
Do not use chemicals to clean the air
conditioning system, since the internal
components may be damaged. This kind of
damage is not covered by warranty.
21_GA_OM_EN_USC_t.book Page 217
Page 220 of 284
SERVICING AND MAINTENANCE
218
Replace The Cabin Air Cleaner
For the correct servicing intervals
Ú
page 204. For cabin air cleaner replace -
ment, contact an authorized dealer.
Lubricating Moving Parts Of The Bodywork
Ensure that the locks and bodywork junction
points, including components such as the seat
guides, door hinges (and rollers), trunk and hood
are periodically lubricated with lithium-based
grease to ensure correct, silent operation and to
protect them from rust and wear.
Thoroughly clean the components, eliminating
every trace of dirt and dust. After lubricating,
eliminate excess oil and grease. Also pay
particular attention to the hood closing
devices, to ensure correct operation. During
operations on the hood, to be carried out with
the engine cold, also remember to check,
clean and lubricate the locking, release and
safety devices. Lubricate the external lock barrels twice a
year. Apply a small amount of high-quality
lubricant directly into the lock barrel.
If necessary, contact an authorized dealer as
soon as possible.
Windshield Wiper
Periodically clean the windshield and rear
window and rubber profile of the windshield
wiper blades, using a sponge or a soft cloth
and a non-abrasive detergent. This eliminates
the salt or impurities accumulated when
driving.
Prolonged operation of the windshield window
wipers with dry glass may cause the deteriora
-
tion of the blades, in addition to abrasion of
the surface of the glass. To eliminate the impu -
rities on the dry glass, always operate the
windshield washers.
In the event of very low outdoor temperatures,
below 0°F (-17.8°C) , ensure that the move -
ment of the rubber part in contact with the
glass is not obstructed. Use a suitable deicing
product to release it if required.
Avoid using the windshield wipers to remove
frost or ice.
Also avoid contact of the rubber profile of the
blades with petroleum derivatives such as
engine oil, gas, etc.
NOTE:
The life of the windshield wiper blades varies
according to the usage frequency. In any case,
it is advised to replace the blades approxi
-
mately once a year. When the blades are worn,
noise, marks on the glass or streaks of water
may be noticed. In the presence of these
conditions, clean the windshield wiper blades
or, if necessary, replace them.
Raising The Windshield Wiper Blades
(“Service Position” Function)
The “service position” function allows the
driver to replace the windshield wiper blades
more easily. It is also recommended to acti -
vate this function when it is snowing and to
make it easier to remove any dirt deposits in
the area where the blades are normally posi -
tioned, when washing.
Activation Of The Function
To activate this function, disable the wind -
shield wiper before setting the ignition device
to OFF.
This function can only be activated within two
minutes of placing the ignition in OFF.
WARNING!
Use only refrigerants and compressor lubricants
approved by FCA US LLC for your air conditioning
system. Some unapproved refrigerants are
flammable and can explode, injuring you. Other
unapproved refrigerants or lubricants can cause
the system to fail, requiring costly repairs. Refer
to Warranty Information Book, located in your
owner’s information kit, for further warranty
information.
WARNING!
Driving with worn windshield wiper blades
is a serious hazard, because visibility is
reduced in bad weather conditions.
21_GA_OM_EN_USC_t.book Page 218