fold seats ALFA ROMEO GIULIA 2021 Owners Manual
[x] Cancel search | Manufacturer: ALFA ROMEO, Model Year: 2021, Model line: GIULIA, Model: ALFA ROMEO GIULIA 2021Pages: 284, PDF Size: 8.87 MB
Page 10 of 284
8
DEAR CUSTOMER
READ THIS CAREFULLY
Refueling..................................................... 2
Starting The Engine .................................... 2
Parking On Flammable Material ............... 2
Respecting The Environment .................... 2
Electrical Accessories ................................ 2
Scheduled Servicing .................................. 2
VEHICLE CHANGES / ALTERATIONS
Accessories Purchased By The Owner ...... 3
Installing Electrical/Electronic Devices .... 3
Radio Transmitters And Mobile Phones ... 4
HOW TO USE THIS MANUAL
Operating Instructions ............................... 5
Warnings And Cautions.............................. 5
Symbols Key ............................................... 6
Symbols ...................................................... 6
Symbol Glossary
GETTING TO KNOW YOUR VEHICLE
KEYS..........................................................16
Key Fob .................................................. 16
ENGINE IMMOBILIZER SYSTEM ..............18
IGNITION SWITCH .....................................19
Keyless Push Button Ignition ................ 19
REMOTE START — IF EQUIPPED .............20
How To Use Remote Start ..................... 20
To Exit Remote Start Mode ................... 21 Remote Start Comfort Systems —
If Equipped ............................................. 21
VEHICLE SECURITY SYSTEM —
IF EQUIPPED............................................. 21
To Arm The System................................ 21
To Disarm The System .......................... 21
Volumetric/Anti-Lift Protection —
If Equipped ............................................. 22
DOORS ...................................................... 22
Power Door Locks.................................. 22
Locking The Doors With A Depleted
Battery .................................................... 23 Passive Entry System ........................... 24
Automatic Door Locks —
If Equipped ............................................ 26 Child-Protection Door Lock System —
Rear Doors ............................................. 26
STEERING WHEEL.................................... 26
Manual Tilt/Telescoping Steering
Column ................................................... 26 Heated Steering Wheel —
If Equipped ............................................. 27
DRIVER MEMORY SETTINGS —
IF EQUIPPED ............................................ 28
Programming The Memory Feature ..... 28
Memory Position Recall ........................ 28
SEATS ....................................................... 29
Sparco Racing Seats (Quadrifoglio
Vehicles) — If Equipped ......................... 29 Manual Adjustment (Rear Seats) ......... 30
Power Adjustment (Front Seats)........... 32
Heated Seats — If Equipped ................ 33
Head Restraints .................................... 35
MIRRORS .................................................. 36
Automatic Dimming Mirror.................... 36 Vanity Mirror ...........................................37
Outside Power Mirrors ...........................37
Power Folding Outside Mirrors ..............38
Outside Automatic Dimming Mirrors —
If Equipped .............................................38 Heated Mirrors ......................................38
UNIVERSAL GARAGE DOOR OPENER
(HOMELINK®) ..........................................38
Before You Begin Programming
HomeLink® ............................................39 Erasing All The HomeLink®
Channels ................................................. 39 Identifying Whether You Have A
Rolling Code Or Non-Rolling Code
Device .....................................................39 Programming HomeLink® To A
Garage Door Opener ..............................39 Programming HomeLink® To A
Miscellaneous Device ............................ 40 Reprogramming A Single HomeLink®
Button .....................................................40 Canadian/Gate Operator
Programming .......................................... 41
EXTERIOR LIGHTS ....................................42
Headlight Switch .................................... 42
Daytime Running Lights (DRLs) ............42
High Beam Headlights ...........................42
Automatic Headlights ............................ 42
Flash-To-Pass .........................................43
Automatic High Beam Headlights —
If Equipped .............................................43 Parking Lights .........................................43
Headlight Off Delay ................................43
Rear Fog Light ........................................44
21_GA_OM_EN_USC_t.book Page 8
Page 32 of 284
GETTING TO KNOW YOUR VEHICLE
30
Manual Adjustment (Rear Seats)
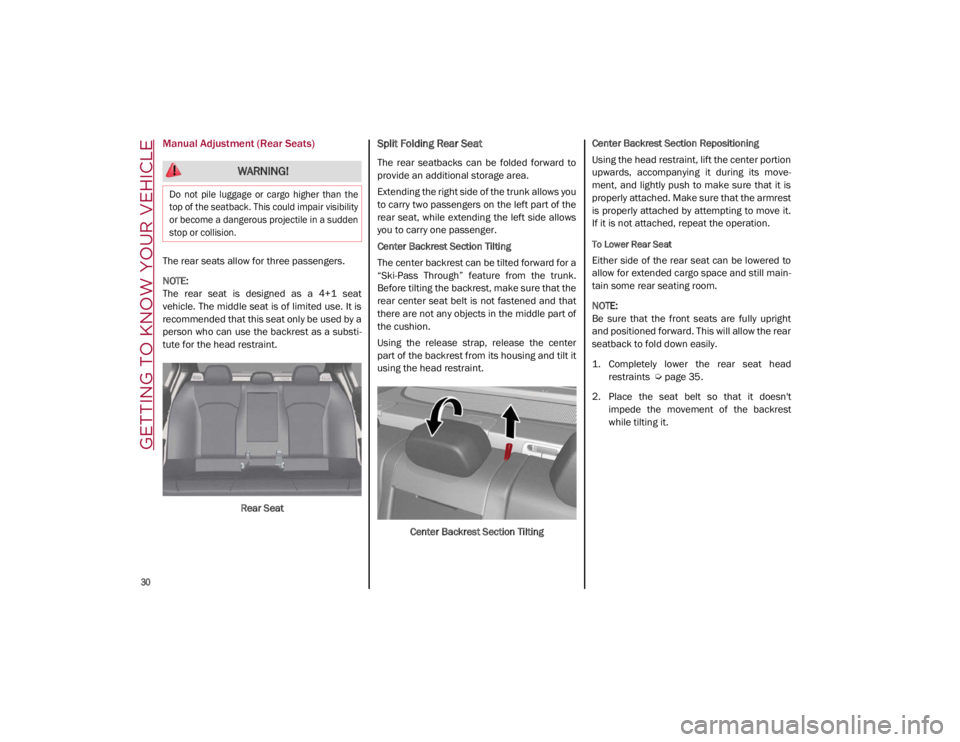
The rear seats allow for three passengers.
NOTE:
The rear seat is designed as a 4+1 seat
vehicle. The middle seat is of limited use. It is
recommended that this seat only be used by a
person who can use the backrest as a substi-
tute for the head restraint.
Rear Seat
Split Folding Rear Seat
The rear seatbacks can be folded forward to
provide an additional storage area.
Extending the right side of the trunk allows you
to carry two passengers on the left part of the
rear seat, while extending the left side allows
you to carry one passenger.
Center Backrest Section Tilting
The center backrest can be tilted forward for a
“Ski-Pass Through” feature from the trunk.
Before tilting the backrest, make sure that the
rear center seat belt is not fastened and that
there are not any objects in the middle part of
the cushion.
Using the release strap, release the center
part of the backrest from its housing and tilt it
using the head restraint.Center Backrest Section Tilting Center Backrest Section Repositioning
Using the head restraint, lift the center portion
upwards, accompanying it during its move
-
ment, and lightly push to make sure that it is
properly attached. Make sure that the armrest
is properly attached by attempting to move it.
If it is not attached, repeat the operation.
To Lower Rear Seat
Either side of the rear seat can be lowered to
allow for extended cargo space and still main -
tain some rear seating room.
NOTE:
Be sure that the front seats are fully upright
and positioned forward. This will allow the rear
seatback to fold down easily.
1. Completely lower the rear seat head restraints
Ú
page 35.
2. Place the seat belt so that it doesn't impede the movement of the backrest
while tilting it.
WARNING!
Do not pile luggage or cargo higher than the
top of the seatback. This could impair visibility
or become a dangerous projectile in a sudden
stop or collision.
21_GA_OM_EN_USC_t.book Page 30
Page 33 of 284
31
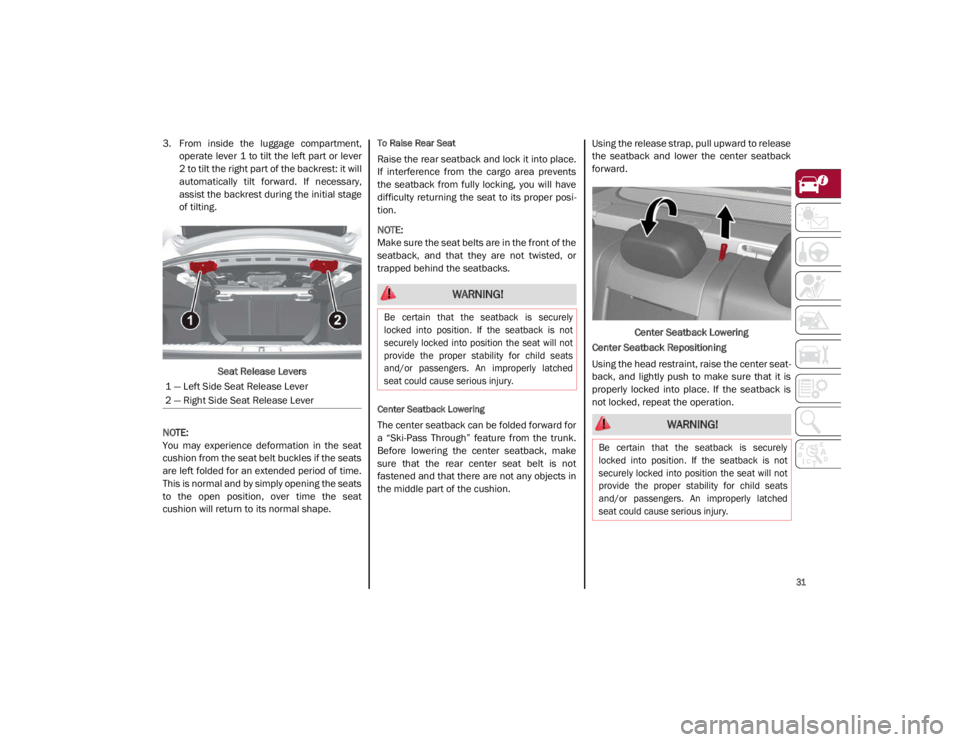
3. From inside the luggage compartment,operate lever 1 to tilt the left part or lever
2 to tilt the right part of the backrest: it will
automatically tilt forward. If necessary,
assist the backrest during the initial stage
of tilting.
Seat Release Levers
NOTE:
You may experience deformation in the seat
cushion from the seat belt buckles if the seats
are left folded for an extended period of time.
This is normal and by simply opening the seats
to the open position, over time the seat
cushion will return to its normal shape.To Raise Rear Seat
Raise the rear seatback and lock it into place.
If interference from the cargo area prevents
the seatback from fully locking, you will have
difficulty returning the seat to its proper posi -
tion.
NOTE:
Make sure the seat belts are in the front of the
seatback, and that they are not twisted, or
trapped behind the seatbacks.
Center Seatback Lowering
The center seatback can be folded forward for
a “Ski-Pass Through” feature from the trunk.
Before lowering the center seatback, make
sure that the rear center seat belt is not
fastened and that there are not any objects in
the middle part of the cushion. Using the release strap, pull upward to release
the seatback and lower the center seatback
forward.
Center Seatback Lowering
Center Seatback Repositioning
Using the head restraint, raise the center seat -
back, and lightly push to make sure that it is
properly locked into place. If the seatback is
not locked, repeat the operation.
1 — Left Side Seat Release Lever
2 — Right Side Seat Release Lever
WARNING!
Be certain that the seatback is securely
locked into position. If the seatback is not
securely locked into position the seat will not
provide the proper stability for child seats
and/or passengers. An improperly latched
seat could cause serious injury.
WARNING!
Be certain that the seatback is securely
locked into position. If the seatback is not
securely locked into position the seat will not
provide the proper stability for child seats
and/or passengers. An improperly latched
seat could cause serious injury.
21_GA_OM_EN_USC_t.book Page 31
Page 165 of 284
163
The second row center seat belt features a
seat belt with a mini-latch plate and buckle,
which allows the seat belt to detach from the
lower anchor when the seat is folded. The
mini-latch plate and regular latch plate can
then be stored out of the way in the parcel tray
for added convenience to open up utilization
of the storage areas behind the front seats
when the seat is not occupied.
1. Remove the mini-latch plate and regularlatch plate from its stowed position in the
right rear side trim panel.
2. Grab the mini-latch plate and pull the seat belt over the seat.
3. Route the shoulder belt to the inside of the right head restraint.
4. When the seat belt is long enough to fit, insert the mini-latch plate into the
mini-buckle until you hear a “click.”
5. Sit back in seat. Slide the regular latch plate up the webbing as far as necessary
to allow the seat belt to go around your lap.
6. When the seat belt is long enough to fit, insert the latch plate into the buckle until
you hear a “click.”
7. Position the lap belt so that it is snug and lies low across your hips, below your
abdomen. To remove slack in the lap belt
portion, pull up on the shoulder belt. To loosen the lap belt if it is too tight, pull on
the lap belt. A snug seat belt reduces the
risk of sliding under the seat belt in a colli
-
sion.
8. Position the shoulder belt on your chest so that it is comfortable and not resting on
your neck. The retractor will withdraw any
slack in the seat belt.
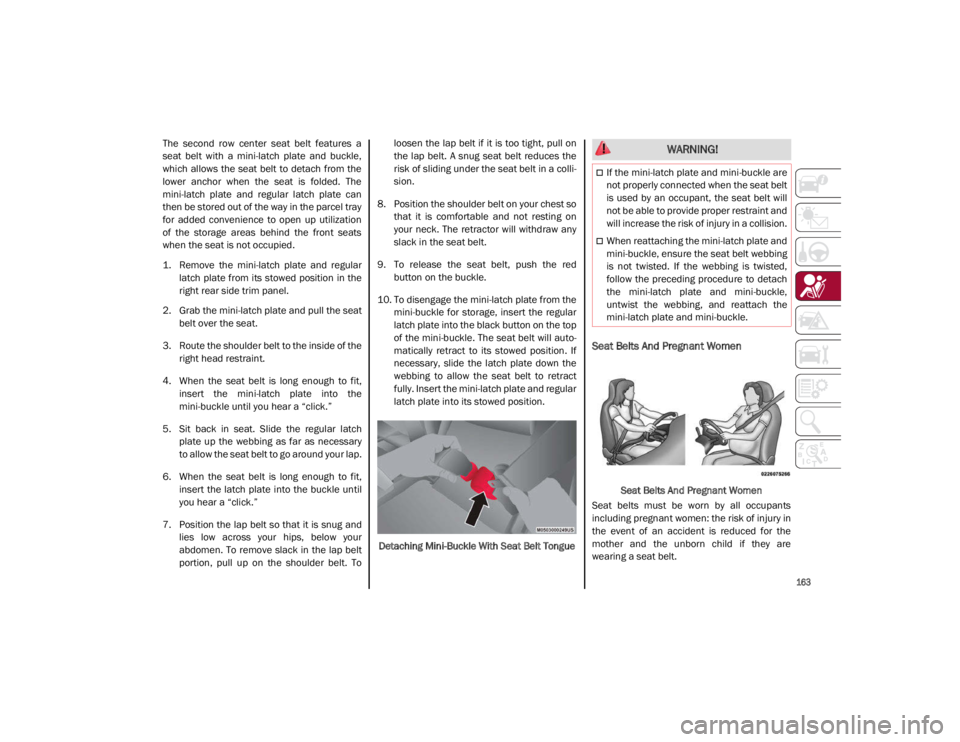
9. To release the seat belt, push the red button on the buckle.
10. To disengage the mini-latch plate from the mini-buckle for storage, insert the regular
latch plate into the black button on the top
of the mini-buckle. The seat belt will auto -
matically retract to its stowed position. If
necessary, slide the latch plate down the
webbing to allow the seat belt to retract
fully. Insert the mini-latch plate and regular
latch plate into its stowed position.
Detaching Mini-Buckle With Seat Belt Tongue
Seat Belts And Pregnant Women
Seat Belts And Pregnant Women
Seat belts must be worn by all occupants
including pregnant women: the risk of injury in
the event of an accident is reduced for the
mother and the unborn child if they are
wearing a seat belt.
WARNING!
If the mini-latch plate and mini-buckle are
not properly connected when the seat belt
is used by an occupant, the seat belt will
not be able to provide proper restraint and
will increase the risk of injury in a collision.
When reattaching the mini-latch plate and
mini-buckle, ensure the seat belt webbing
is not twisted. If the webbing is twisted,
follow the preceding procedure to detach
the mini-latch plate and mini-buckle,
untwist the webbing, and reattach the
mini-latch plate and mini-buckle.
21_GA_OM_EN_USC_t.book Page 163
Page 189 of 284
187
(Continued)
SAFETY TIPS
Transporting Passengers
NEVER TRANSPORT PASSENGERS IN THE
CARGO AREA.
Transporting Pets
Air Bags deploying in the front seat could harm
your pet. An unrestrained pet will be thrown
about and possibly injured, or injure a
passenger during panic braking or in a colli-
sion.
Pets should be restrained in the rear seat (if
equipped) in pet harnesses or pet carriers that
are secured by seat belts.
Safety Checks You Should Make Inside The
Vehicle
Seat Belts
Inspect the seat belt system periodically,
checking for cuts, frays, and loose parts.
Damaged parts must be replaced immedi -
ately. Do not disassemble or modify the
system.
Front seat belt assemblies must be replaced
after a collision. Rear seat belt assemblies
must be replaced after a collision if they have
been damaged (i.e., bent retractor, torn
webbing, etc.). If there is any question
regarding seat belt or retractor condition,
replace the seat belt.
Air Bag Warning Light
The Air Bag warning light will turn on for
four to eight seconds as a bulb check when the
ignition switch is first turned to ON/RUN. If the
light is either not on during starting, stays on,
or turns on while driving, have the system
inspected at an authorized dealer as soon as
possible. After the bulb check, this light will
illuminate with a single chime when a fault
with the Air Bag System has been detected. It
will stay on until the fault is removed. If the
light comes on intermittently or remains on
while driving, have an authorized dealer
service the vehicle immediately
Ú
page 159.
Defroster
Check operation by selecting the defrost mode
and place the blower control on high speed.
You should be able to feel the air directed
against the windshield. See an authorized
dealer for service if your defroster is inoper -
able.
Floor Mat Safety Information
Always use floor mats designed to fit your
vehicle. Only use a floor mat that does not
interfere with the operation of the accelerator,
brake or clutch pedals. Only use a floor mat
that is securely attached using the floor mat
fasteners so it cannot slip out of position and
interfere with the accelerator, brake or clutch
pedals or impair safe operation of your vehicle
in other ways.
WARNING!
Do not leave children or animals inside
parked vehicles in hot weather. Interior
heat build-up may cause serious injury or
death.
It is extremely dangerous to ride in a cargo
area, inside or outside of a vehicle. In a
collision, people riding in these areas are
more likely to be seriously injured or killed.
Do not allow people to ride in any area of
your vehicle that is not equipped with
seats and seat belts.
Be sure everyone in your vehicle is in a
seat and using a seat belt properly. WARNING!
An improperly attached, damaged, folded, or
stacked floor mat, or damaged floor mat
fasteners may cause your floor mat to
interfere with the accelerator, brake, or clutch
pedals and cause a loss of vehicle control. To
prevent SERIOUS INJURY or DEATH:
ALWAYS securely attach your floor mat
using the floor mat fasteners. DO NOT
install your floor mat upside down or turn
your floor mat over. Lightly pull to confirm
mat is secured using the floor mat
fasteners on a regular basis.
21_GA_OM_EN_USC_t.book Page 187
Page 278 of 284

276
INDEX
Instrument PanelFeatures ................................................... 66
Interior And Instrument Lights ............. 45, 46
Interior Lights ...................................... 44, 232
Interiors (Cleaning)..................................... 253
Internal Equipment ...................................... 55
J
Jump Starting ............................................. 198
K
Keyless Enter-N-Go ...................................... 24 Passive Entry ............................................ 24
Keys .............................................................. 16
L
Lane Change And Turn Signals ................... 44
Lane Change Assist...................................... 44
LaneSense ..................................................128
Lap/Shoulder Belts ....................................160
Latches .......................................................188
Leaks, Fluid ................................................188
Life Of Tires.................................................245
Light Bulbs ..................................................188 Types Of Bulbs ....................................... 229
Lights .......................................................... 188 Air Bag ...........................................165, 187
Ambient .................................................... 45
Brake Warning .................................. 73, 74Courtesy/Reading ............................. 45, 46Daytime Running ..................................... 42
Electronic Stability Program(ESP) Indicator ............................................... 78 Exterior ............................................ 42, 188
Fog ............................................................ 44
Hazard Warning Flasher........................ 190
High Beam/Low Beam Select................. 42
Interior ...................................................... 44
Low Fuel ................................................... 79
Malfunction Indicator (Check Engine).... 77
Park ....................................................43, 77
Seat Belt Reminder ................................. 75
Turn Signals ..............................44, 77, 188
Warning Instrument Cluster Descriptions ...................................77, 78
Loading Vehicle .......................................... 136 Tires ........................................................ 237
Locks Automatic Door ........................................ 26
Child Protection ....................................... 26
M
Maintenance ................................................ 61
Malfunction Indicator Light
(Check Engine) ............................................. 77
Manual Service.................................................... 272
Memory Feature (Memory Seats) ............... 28
Memory Seat ................................................ 28
Methanol .................................................... 263
Mirrors Automatic Dimming ................................. 36
Electric Powered ...................................... 37
Exterior Folding ........................................ 37
Heated...................................................... 38
Rearview................................................... 36
Vanity ...................................................... 232 O
Occupant Restraints.................................. 159
Oil Pressure Light .........................................79
Oil, Engine
Pressure Warning Light............................ 79
Onboard Diagnostic System ........................84
Opener, Garage Door (Homelink) ................38
Operator Manual Owner's Manual..................................... 272
P
Paintwork
(Cleaning And Maintenance) .................... 252
Panic Brake Assist (PBA) System ............. 143
ParkSense System .................................... 125
Passive Entry ................................................24
Performance (Top Speed) ......................... 269
Pets ............................................................ 187
Pinch Protection ...........................................61
Placard, Tire And Loading Information .... 237
Power Deck Lid Release .....................................63
Seats .........................................................32
Sunroof .....................................................60
Power Seats Forward .............................................. 29, 32
Rearward ........................................... 29, 32
Recline ............................................... 29, 32
Power Supply ............................................. 257
Pregnant Women And Seat Belts ............. 163
Pretensioners Seat Belts .............................................. 164
Prolonged Vehicle Inactivity ...................... 250
21_GA_OM_EN_USC_t.book Page 276