hood release ALFA ROMEO GIULIA 2023 Owners Manual
[x] Cancel search | Manufacturer: ALFA ROMEO, Model Year: 2023, Model line: GIULIA, Model: ALFA ROMEO GIULIA 2023Pages: 248, PDF Size: 9.62 MB
Page 25 of 248
23
REMOTE START —
IF EQUIPPED
This system uses the key fob to start the
engine conveniently from outside the
vehicle while still maintaining security.
NOTE:
Obstructions between the vehicle and key fob
may reduce this range
Ú
page 239.
HOW TO USE REMOTE START
Push the Remote Start button on the key fob
twice within five seconds. The vehicle doors will
lock, the turn signals will flash twice, and the horn
will chirp twice. Pushing the Remote Start button
a third time shuts the engine off.
NOTE:
With Remote Start, the engine will only run for
15 minutes.
Remote Start can only be used twice.
If an engine fault is present or fuel level is low,
the vehicle will start and then shut down in 10
seconds.
The park lamps will turn on and remain on
during Remote Start mode.
For security, power window operation is
disabled when the vehicle is in the Remote
Start mode.
The ignition must be placed in the ACC position
before the Remote Start sequence can be
repeated for a third cycle.
All of the following conditions must be met before
the engine will remote start:
Gear selector in PARK
Doors closed
Hood closed
Trunk closed
Hazard switch off
Brake switch inactive (brake pedal not
pressed)
Battery at an acceptable charge level
Panic button not pushed
System not disabled from previous Remote
Start event
Vehicle Security system indicator flashing
Ignition in OFF position
Fuel level meets minimum requirement
Vehicle Security system is not signaling an
intrusion
Malfunction Indicator Light (MIL) is not
illuminated
TO EXIT REMOTE START MODE
To drive the vehicle after starting the Remote
Start system, either push and release the unlock
button on the key fob to unlock the doors, or
unlock the vehicle using Passive Entry via the
door handles, and disarm the Vehicle Security
system (if equipped). Then, prior to the end of the
15 minute cycle, push and release the START/
STOP ignition button while pressing the brake
pedal.
The Remote Start system will turn the engine off
with another push and release of the Remote
Start button on the key fob, or if the engine is
allowed to run for the entire 15 minute cycle.
REMOTE START COMFORT SYSTEMS —
I
F EQUIPPED
When Remote Start is activated, the heated
steering wheel and front heated seat features will
automatically activate when ambient
temperature is less than 39°F (4°C). These
features will stay on through the duration of
Remote Start.
NOTE:
This feature can be activated through the radio
system. Refer to the Information and Entertain -
ment System Owner’s Manual Supplement for
further information.
WARNING!
Do not start or run an engine in a closed
garage or confined area. Exhaust gas
contains Carbon Monoxide (CO) which is
odorless and colorless. Carbon Monoxide is
poisonous and can cause serious injury or
death when inhaled.
Keep key fobs away from children. Operation
of the Remote Start system, windows, door
locks or other controls could cause serious
injury or death.
23_GA_OM_EN_USC_t.book Page 23
Page 26 of 248

GETTING TO KNOW YOUR VEHICLE
24
VEHICLE SECURITY
SYSTEM — IF EQUIPPED
The Vehicle Security system monitors the vehicle
doors, hood, trunk, and the keyless push button
ignition for unauthorized operation. It also
monitors movement inside the passenger
compartment (volumetric protection — if
equipped), cutting of battery cables, and
unexpected lifting/tilting of the vehicle (anti-lift
protection — if equipped).
While the Vehicle Security system is armed,
interior switches for door locks and trunk release
are disabled.
If something triggers the alarm, the Vehicle
Security system will provide the following audible
and visible signals:
The horn will pulse
The turn signals will flash
The Vehicle Security Light in the instrument
cluster will flash
NOTE:
The Vehicle Security system is activated by the
Engine Immobilizer system, which is automati-
cally activated when you get out of the vehicle
with the key fob and lock the doors.
TO ARM THE SYSTEM
Follow these steps to arm the Vehicle Security
system:
1. Make sure the vehicle’s ignition is placed in the OFF position.
2. Perform one of the following methods to lock the vehicle:
• Push the lock button on the interior power
door lock switch with the driver and/or passenger door open.
• Push the lock button on the exterior
Passive Entry door handle with a valid keyfob available in the same exterior zone
Ú
page 26.
• Push the lock button on the key fob.
3. If any doors (or trunk lid) are open, close them.
TO DISARM THE SYSTEM
The Vehicle Security system can be disarmed
using any of the following methods:
Push the unlock button on the key fob.
Grab the Passive Entry door handle to unlock
the door
Ú
page 26.
Cycle the ignition out of the OFF position to
disarm the system.
NOTE:
The driver's door key cylinder and trunk button
on the key fob cannot arm or disarm the
Vehicle Security system. Use of the door key
cylinder when the system is armed will sound
the alarm when the door is opened.
When the Vehicle Security system is armed,
the interior power door lock switches will not
unlock the doors.
The Vehicle Security system is designed to
protect your vehicle. However, you can create
conditions where the system will give you a false
alarm. If one of the previously described arming
sequences has occurred, the Vehicle Security
system will arm, regardless of whether you are in
the vehicle or not. If you remain in the vehicle and
open a door, the alarm will sound. If this occurs,
disarm the Vehicle Security system.
If the Vehicle Security system is armed and the
battery becomes disconnected, the Vehicle
Security system will remain armed when the
battery is reconnected; the exterior lights will
flash, and the horn will sound. If this occurs,
disarm the Vehicle Security system.
NOTE:
The alarm does not disarm when the doors are
unlocked by inserting the blade of the emergency
key (found inside the key fob) into the door
handle lock cylinder.
23_GA_OM_EN_USC_t.book Page 24
Page 62 of 248
GETTING TO KNOW YOUR VEHICLE
60
Proceed as follows:
1. With the ignition in the ON/RUN position, make sure the sunroof glass is fully closed
(sunshade open).
2. Open the driver’s side door, and place the ignition in the OFF position.
3. Within five seconds, place the ignition in the ACC or ON/RUN position.
4. Within 10 seconds, push and hold the sunroof close switch (forward). After 8 - 10
seconds of holding the switch, the re-initial -
ization process will begin. Continue to hold
the switch while the sunroof motor cycles,
and the sunshade will fully close.
5. Once the sunroof glass and the power sunshade have stopped motion, release the
sunroof close switch, then push and hold it
again within five seconds. Continue to hold
the switch while the sunshade fully opens,
the sunroof glass fully opens, followed by the
glass fully closing then the sunshade fully
closing.
6. Release the switch once the operations stop. Re-initialization of the sunroof motor is now
complete.
NOTE:
If the switch is released prior to full completion of
the operations described, the entire re-initializa -
tion procedure must be repeated from step 1.
7. Confirm express operations for the sunroof glass and sunshade are functional for
opening and closing operations.
SUNROOF MAINTENANCE
Use only a non-abrasive cleaner and a soft cloth
to clean the glass panel. Periodically check for
and clear out any debris that may have collected
in the tracks.
HOOD
OPENING THE HOOD
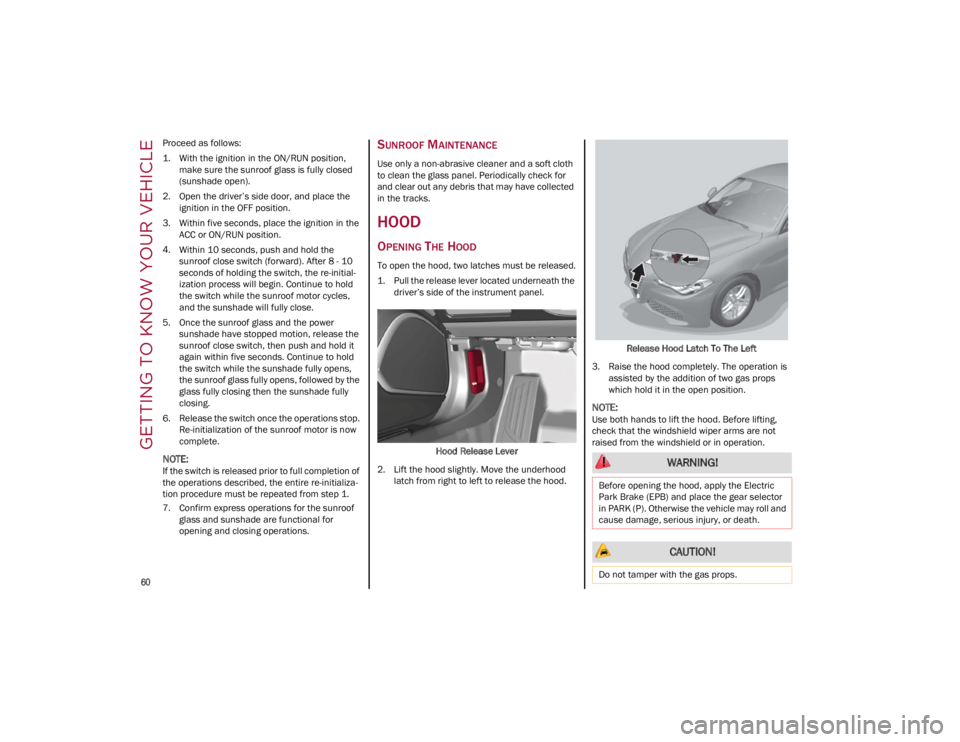
To open the hood, two latches must be released.
1. Pull the release lever located underneath the driver’s side of the instrument panel.
Hood Release Lever
2. Lift the hood slightly. Move the underhood latch from right to left to release the hood. Release Hood Latch To The Left
3. Raise the hood completely. The operation is assisted by the addition of two gas props
which hold it in the open position.
NOTE:
Use both hands to lift the hood. Before lifting,
check that the windshield wiper arms are not
raised from the windshield or in operation.
WARNING!
Before opening the hood, apply the Electric
Park Brake (EPB) and place the gear selector
in PARK (P). Otherwise the vehicle may roll and
cause damage, serious injury, or death.
CAUTION!
Do not tamper with the gas props.
23_GA_OM_EN_USC_t.book Page 60
Page 63 of 248
61
CLOSING THE HOOD
To close, lower the hood to approximately
16 inches (40 cm) from the engine compartment
then let it drop. Make sure that the hood is
completely closed and fully latched.
NOTE:
Since the hood is equipped with a double locking
system, one for each side, check that it is closed
on both its sides.
TRUNK
The trunk unlocking is electrically operated and is
deactivated when the vehicle is in motion.
OPENING
Opening From The Outside
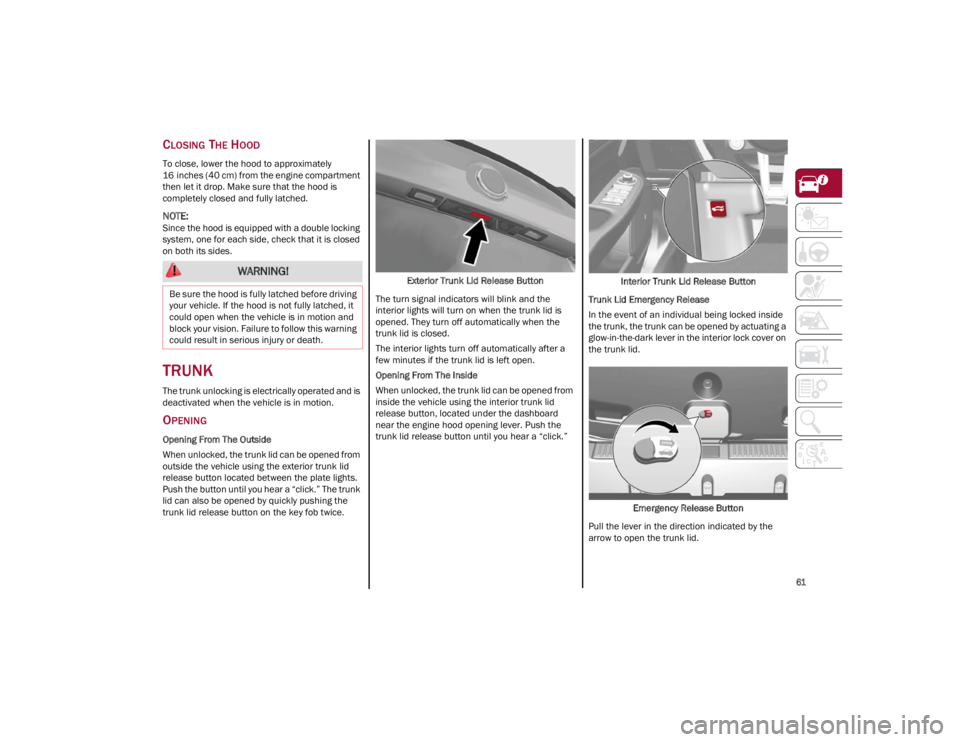
When unlocked, the trunk lid can be opened from
outside the vehicle using the exterior trunk lid
release button located between the plate lights.
Push the button until you hear a “click.” The trunk
lid can also be opened by quickly pushing the
trunk lid release button on the key fob twice.Exterior Trunk Lid Release Button
The turn signal indicators will blink and the
interior lights will turn on when the trunk lid is
opened. They turn off automatically when the
trunk lid is closed.
The interior lights turn off automatically after a
few minutes if the trunk lid is left open.
Opening From The Inside
When unlocked, the trunk lid can be opened from
inside the vehicle using the interior trunk lid
release button, located under the dashboard
near the engine hood opening lever. Push the
trunk lid release button until you hear a “click.” Interior Trunk Lid Release Button
Trunk Lid Emergency Release
In the event of an individual being locked inside
the trunk, the trunk can be opened by actuating a
glow-in-the-dark lever in the interior lock cover on
the trunk lid.
Emergency Release Button
Pull the lever in the direction indicated by the
arrow to open the trunk lid.
WARNING!
Be sure the hood is fully latched before driving
your vehicle. If the hood is not fully latched, it
could open when the vehicle is in motion and
block your vision. Failure to follow this warning
could result in serious injury or death.
23_GA_OM_EN_USC_t.book Page 61
Page 98 of 248
STARTING AND OPERATING
96
ENGINE RESTARTING CONDITIONS
Due to comfort, emission control and safety
reasons, the engine can restart automatically
without any action by the driver, under special
conditions, such as:
Battery not sufficiently charged.
Vehicle moving (e.g. when driving on roads
with a grade).
Engine stopping by the Stop/Start system for
more than approximately three minutes.
With the automatic climate control active, an
adjustment in cabin heating or cooling is made
or with MAX-DEF function active.
SAFETY FUNCTIONS
When the engine is stopped through the Stop/
Start system, if the driver releases their seat belt,
opens the driver's or passenger's door, or opens
the hood from inside the vehicle, the engine can
be restarted only by using the ignition.
This condition is indicated to the driver both
through a buzzer and a message on the
instrument cluster display.
IRREGULAR OPERATION
In the event of malfunction, the Stop/Start
system is deactivated.
For further information on failure indications
Ú
page 70.
VEHICLE INACTIVITY
In the event of vehicle inactivity (or if the battery
is replaced), special attention must be paid to the
disconnection of the battery power supply.
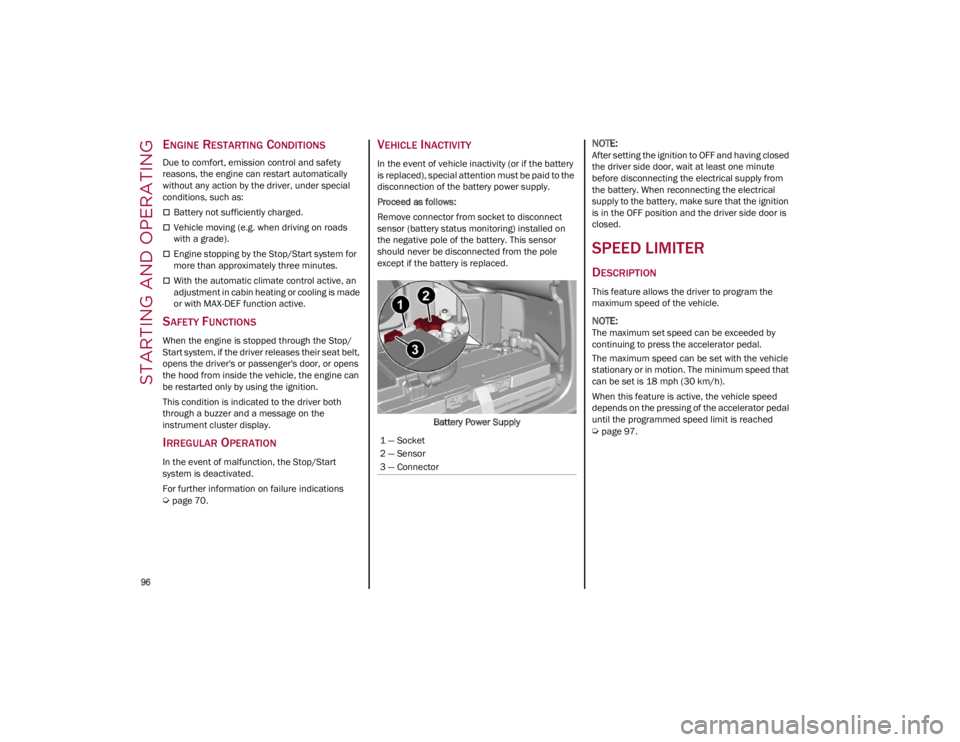
Proceed as follows:
Remove connector from socket to disconnect
sensor (battery status monitoring) installed on
the negative pole of the battery. This sensor
should never be disconnected from the pole
except if the battery is replaced.Battery Power Supply
NOTE:
After setting the ignition to OFF and having closed
the driver side door, wait at least one minute
before disconnecting the electrical supply from
the battery. When reconnecting the electrical
supply to the battery, make sure that the ignition
is in the OFF position and the driver side door is
closed.
SPEED LIMITER
DESCRIPTION
This feature allows the driver to program the
maximum speed of the vehicle.
NOTE:
The maximum set speed can be exceeded by
continuing to press the accelerator pedal.
The maximum speed can be set with the vehicle
stationary or in motion. The minimum speed that
can be set is 18 mph (30 km/h).
When this feature is active, the vehicle speed
depends on the pressing of the accelerator pedal
until the programmed speed limit is reached
Ú
page 97.
1 — Socket
2 — Sensor
3 — Connector
23_GA_OM_EN_USC_t.book Page 96
Page 195 of 248
193
LUBRICATING MOVING PARTS OF THE
B
ODYWORK
Ensure that the locks and bodywork junction
points, including components such as the seat
guides, door hinges (and rollers), trunk and hood
are periodically lubricated with lithium-based
grease to ensure correct, silent operation and to
protect them from rust and wear.
Thoroughly clean the components, eliminating
every trace of dirt and dust. After lubricating,
eliminate excess oil and grease. Also pay
particular attention to the hood closing devices,
to ensure correct operation. During operations on
the hood, to be carried out with the engine cold,
also remember to check, clean and lubricate the
locking, release and safety devices.
Lubricate the external lock barrels twice a year.
Apply a small amount of high-quality lubricant
directly into the lock barrel.
If necessary, contact an authorized dealer as
soon as possible.
WINDSHIELD WIPER
Periodically clean the windshield and rear window
and rubber profile of the windshield wiper blades,
using a sponge or a soft cloth and a non-abrasive
detergent. This eliminates the salt or impurities
accumulated when driving.
Prolonged operation of the windshield window
wipers with dry glass may cause the deterioration
of the blades, in addition to abrasion of the
surface of the glass. To eliminate the impurities
on the dry glass, always operate the windshield
washers. In the event of very low outdoor temperatures,
below 0°F (-17.8°C), ensure that the movement
of the rubber part in contact with the glass is not
obstructed. Use a suitable deicing product to
release it if required.
Avoid using the windshield wipers to remove frost
or ice.
Also avoid contact of the rubber profile of the
blades with petroleum derivatives such as engine
oil, gas, etc.
NOTE:
The life of the windshield wiper blades varies
according to the usage frequency. In any case, it
is advised to replace the blades approximately
once a year. When the blades are worn, noise,
marks on the glass or streaks of water may be
noticed. In the presence of these conditions,
clean the windshield wiper blades or, if neces
-
sary, replace them.
Raising The Windshield Wiper Blades (“Service
Position” Function)
The “service position” function allows the driver
to replace the windshield wiper blades more
easily. It is also recommended to activate this
function when it is snowing and to make it easier
to remove any dirt deposits in the area where the
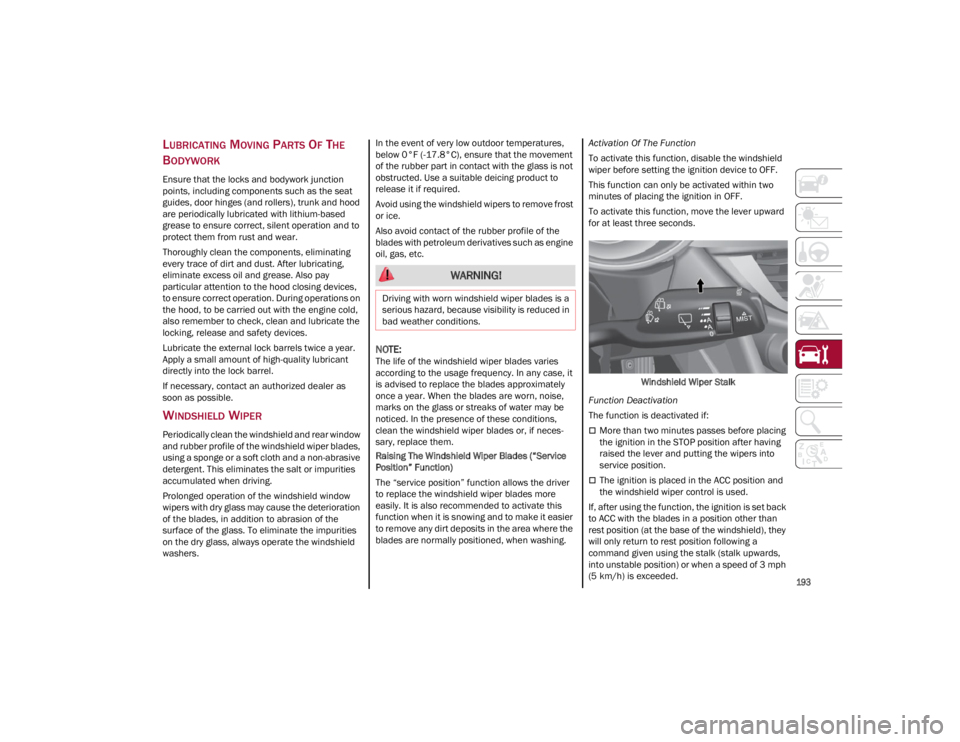
blades are normally positioned, when washing. Activation Of The Function
To activate this function, disable the windshield
wiper before setting the ignition device to OFF.
This function can only be activated within two
minutes of placing the ignition in OFF.
To activate this function, move the lever upward
for at least three seconds.
Windshield Wiper Stalk
Function Deactivation
The function is deactivated if:
More than two minutes passes before placing
the ignition in the STOP position after having
raised the lever and putting the wipers into
service position.
The ignition is placed in the ACC position and
the windshield wiper control is used.
If, after using the function, the ignition is set back
to ACC with the blades in a position other than
rest position (at the base of the windshield), they
will only return to rest position following a
command given using the stalk (stalk upwards,
into unstable position) or when a speed of 3 mph
(5 km/h) is exceeded.
WARNING!
Driving with worn windshield wiper blades is a
serious hazard, because visibility is reduced in
bad weather conditions.
23_GA_OM_EN_USC_t.book Page 193
Page 243 of 248

241
Drive Train Control (DTC) System ..............130
Driving Modes .............................................. 92
Dynamic Steering Torque (DST) System ... 130
E
Electric Park Brake....................................... 84
Electronic Speed Control (Cruise Control) .. 97
Electronic Stability Control (ESC)
System ........................................................130
Electronic Throttle Control Warning Light... 75
Emergency In Case Of ......................................169, 171
SOS Emergency Call .............................. 169
Emergency, In Case Of Jump Starting .........................................175
Overheating ............................................ 178
Tow Hooks ..............................................180
Towing.....................................................179
Emission Control System Maintenance...... 80
Engine ......................................................... 224 Block Heater............................................. 83
Engine Coolant Level .............................189
Exhaust Gas Caution .............................168
Fuel Requirements ................................ 230Jump Starting .........................................177
Overheating ............................................ 178
Engine Compartment .................................187
Engine Compartment (Washing) ...............222
Engine Oil Level Check ............................................ 188
Enhanced Accident Response
Feature...............................................155, 181
Ethanol........................................................230 Exhaust Gas Cautions ............................... 168
Exhaust System ......................................... 168
Exterior Lights .............................42, 168, 203
F
Flashers
Turn Signals .....................................74, 168
Fluid Leaks ................................................. 168
Fog Lights, Rear ............................................44
Forward Collision Warning ........................ 138
Fuel Additives ................................................ 230
Clean Air................................................. 230
Ethanol ................................................... 230
Light ..........................................................76
Materials Added .................................... 230
Methanol................................................ 230
Fuses ................................................. 197, 198
G
Garage Door Opener (HomeLink) ................39
Gasoline, Clean Air .................................... 230
Gasoline, Reformulated ............................ 230
Gauges Engine Oil Temperature ...........................65
Fuel ...........................................................66
Speedometer ............................................66
Tachometer............................................... 65
Glove Compartment Storage .......................55
GVWR ......................................................... 126
H
Hazard Warning Flashers .......................... 169
Head Restraints ............................................36 Head Rests ................................................... 36
Headlights .................................................... 42
Automatic ................................................. 43
Delay......................................................... 44
High Beam ............................................... 43
Switch ....................................................... 42
Headlights (Cleaning) ................................ 222
Heated Mirrors ............................................. 39
Heated Seats ............................................... 35
Heated Steering Wheel ............................... 30
Heater, Engine Block ................................... 83
Highway Assist System .............................. 106
Hill Start Assist (HSA) System ................... 131
HomeLink (Garage Door Opener) ............... 39
Hood Closing ...................................................... 60Opening .................................................... 60
Hood Release ............................................... 60
I
Ignition .......................................................... 22 Switch ....................................................... 22
Immobilizer (Sentry Key) ............................. 21
In Case Of Emergency ............................... 169
Installing Electrical/Electronic Devices ......... 4
Instrument Cluster ....................................... 64 Descriptions ............................................. 74
Display ...................................................... 66
Instrument Panel Features ................................................... 64
Intelligent Speed Control System ............. 114
Interior And Instrument Lights .................... 46
Interior Lights ...................................... 45, 204
Interiors (Cleaning) .................................... 222
Internal Equipment ...................................... 55
23_GA_OM_EN_USC_t.book Page 241