brake light Alfa Romeo Giulietta 2011 Owner handbook (in English)
[x] Cancel search | Manufacturer: ALFA ROMEO, Model Year: 2011, Model line: Giulietta, Model: Alfa Romeo Giulietta 2011Pages: 297, PDF Size: 9.37 MB
Page 155 of 297
151
GETTING
TO KNOW
YOUR CAR
SAFETY
STARTING
AND DRIVING
IN AN
EMERGENCY
SERVICING AND
MAINTENANCE
TECHNICAL
SPECIFICATIONS
CONTENTS
STARTING AND DRIVING
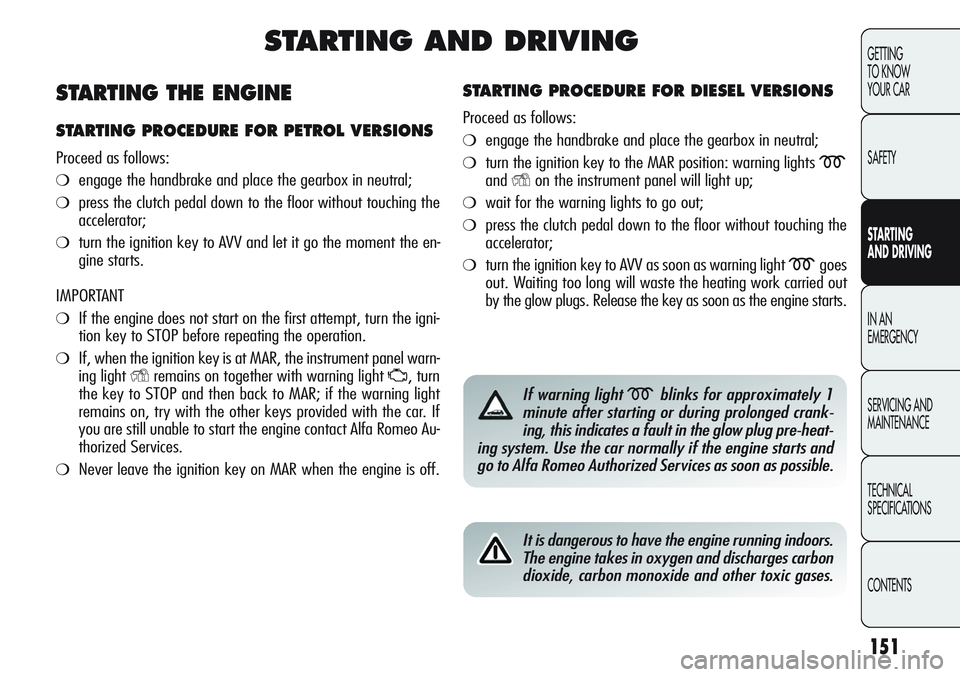
STARTING PROCEDURE FOR DIESEL VERSIONS
Proceed as follows:
❍engage the handbrake and place the gearbox in neutral;
❍turn the ignition key to the MAR position: warning lights m
andYon the instrument panel will light up;
❍wait for the warning lights to go out;
❍press the clutch pedal down to the floor without touching the
accelerator;
❍turn the ignition key to AVV as soon as warning light mgoes
out. Waiting too long will waste the heating work carried out
by the glow plugs. Release the key as soon as the engine starts.
If warning light mblinks for approximately 1
minute after starting or during prolonged crank-
ing, this indicates a fault in the glow plug pre-heat-
ing system. Use the car normally if the engine starts and
go to Alfa Romeo Authorized Services as soon as possible.
It is dangerous to have the engine running indoors.
The engine takes in oxygen and discharges carbon
dioxide, carbon monoxide and other toxic gases.
STARTING THE ENGINE
STARTING PROCEDURE FOR PETROL VERSIONS
Proceed as follows:
❍engage the handbrake and place the gearbox in neutral;
❍press the clutch pedal down to the floor without touching the
accelerator;
❍turn the ignition key to AVV and let it go the moment the en-
gine starts.
IMPORTANT
❍If the engine does not start on the first attempt, turn the igni-
tion key to STOP before repeating the operation.
❍If, when the ignition key is at MAR, the instrument panel warn-
ing light
Yremains on together with warning light U, turn
the key to STOP and then back to MAR; if the warning light
remains on, try with the other keys provided with the car. If
you are still unable to start the engine contact Alfa Romeo Au-
thorized Services.
❍Never leave the ignition key on MAR when the engine is off.
Page 157 of 297
153
GETTING
TO KNOW
YOUR CAR
SAFETY
STARTING
AND DRIVING
IN AN
EMERGENCY
SERVICING AND
MAINTENANCE
TECHNICAL
SPECIFICATIONS
CONTENTS
IMPORTANT Carry out these manoeuvres with the brake pedal pressed.
IMPORTANT For cars equipped with a front armrest, lift this up to
ensure that it does not interfere with the action of the handbrake.
fig. 110A0K0073m
The car should be locked after a few notches: if this
is not so, contact Alfa Romeo Authorized Services to
have the handbrake adjusted.
PARKING THE CAR
Switch off the engine and pull up the handbrake. Engage a gear
(1stif the car is facing uphill or reverse if it is facing downhill) and
leave the wheels steered to one side.
If the car is parked on a steep slope block the wheels with a wedge
or stone. Always remove the ignition key when leaving the car.
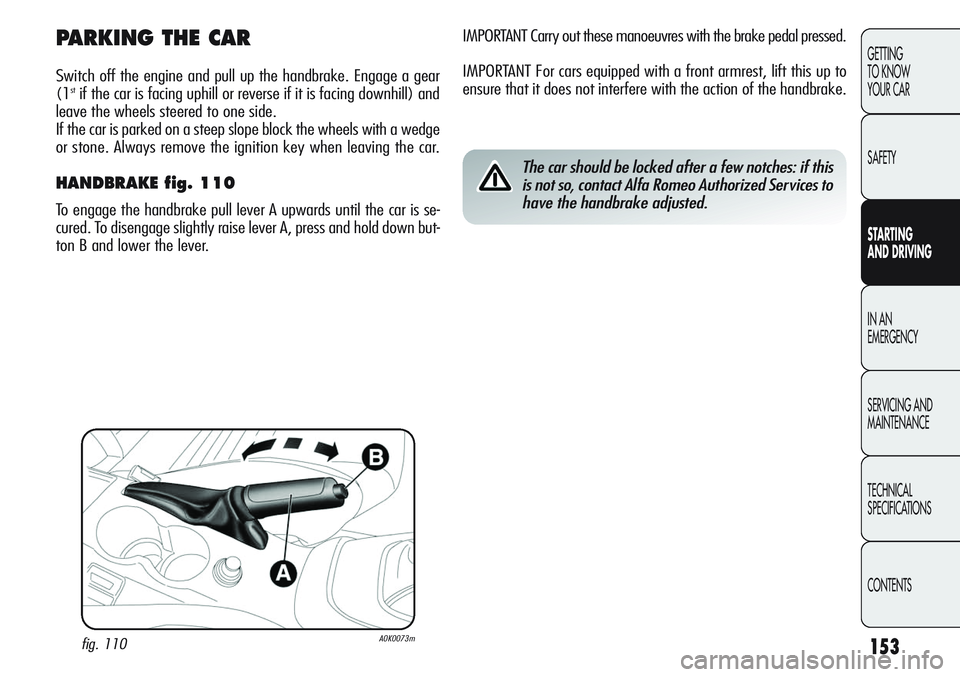
HANDBRAKE fig. 110
To engage the handbrake pull lever A upwards until the car is se-
cured. To disengage slightly raise lever A, press and hold down but-
ton B and lower the lever.
Page 163 of 297
159
GETTING
TO KNOW
YOUR CAR
SAFETY
STARTING
AND DRIVING
IN AN
EMERGENCY
SERVICING AND
MAINTENANCE
TECHNICAL
SPECIFICATIONS
CONTENTS
Keep your speed down when snow chains are fit-
ted - do not exceed 50 km/h. Avoid potholes, steps
and pavements and also avoid driving for long dis-
tances on roads not covered with snow to avoid damag-
ing the car and the road surface.
SNOW CHAINS
The use of snow chains should be in compliance with local regu-
lations. Snow chains may be fitted only to the front wheel tyres
(drive wheels).
Check the tension of the chains after the first few metres have been
driven.
Use reduced bulk snow chains:
– All versions: for 195/55 R16”, 205/55 R16” and 225/45
R17” size tyres use low-clearance snow chains with a maximum
protrusion beyond the tyre profile of 9 mm.
IMPORTANT The space-saver wheel cannot be fitted with snow
chains. If a front (drive) wheel is punctured and snow chains must
be used, you must remove a normal wheel from the rear and re-
place this one with the space-saver wheel. In this way, with two
normal drive wheels, it is possible to use snow chains.
STORING THE CAR
If the car is to be left inactive for longer than a month, the following
precautions should be noted:
❍park the car in a dry, covered and, if possible, ventilated area;
engage a gear and check that the handbrake is not engaged;
❍disconnect the negative battery terminal and check battery
charge. Repeat this check once every three months during stor-
age;
❍clean and protect painted areas using protective wax;
❍clean and protect the shiny metal areas using special com-
mercially-available products;
❍sprinkle talcum powder on the rubber windscreen and rear win-
dow wiper blades and lift them off the glass;
❍slightly open the windows;
❍cover the car with a fabric or perforated plastic sheet. Do not
use compact plastic sheets which do not allow humidity to evap-
orate from the surface of the car.
❍inflate tyres to a pressure of +0.5 bar above the normal spec-
ified pressure and check the pressure at regular intervals;
❍if you have not disconnected the battery, check the battery
charge every thirty days;
❍do not drain the engine cooling system.
Page 175 of 297
171
GETTING
TO KNOW
YOUR CAR
SAFETY
STARTING
AND DRIVING
IN AN
EMERGENCY
SERVICING AND
MAINTENANCE
TECHNICAL
SPECIFICATIONS
CONTENTS
INFLATION PROCEDURE
Wear the gloves included in the kit.
Proceed as follows:
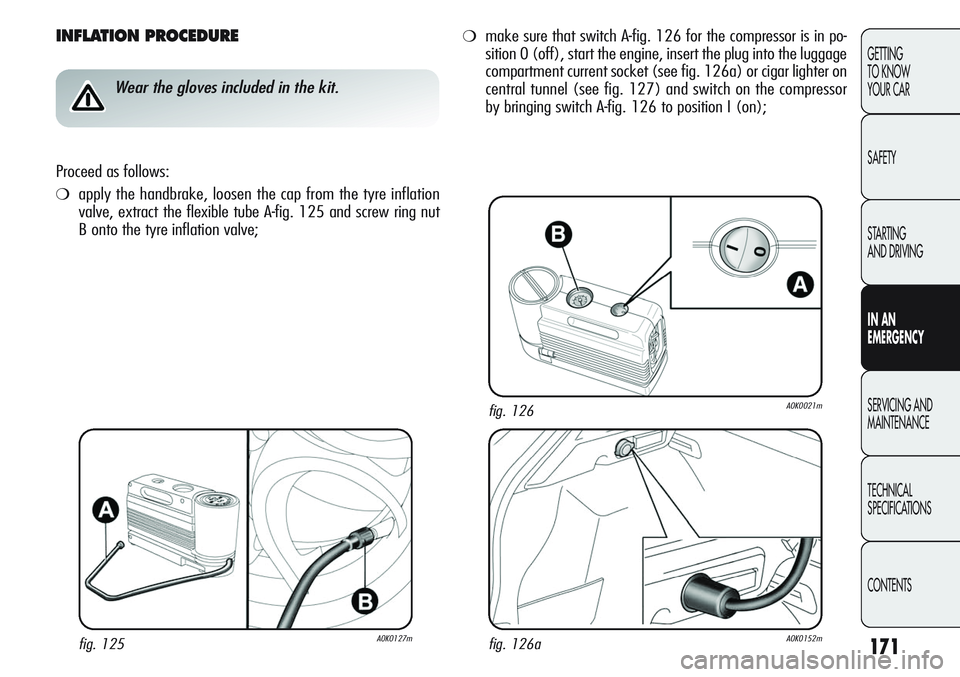
❍apply the handbrake, loosen the cap from the tyre inflation
valve, extract the flexible tube A-fig. 125 and screw ring nut
B onto the tyre inflation valve;
❍make sure that switch A-fig. 126 for the compressor is in po-
sition 0 (off), start the engine, insert the plug into the luggage
compartment current socket (see fig. 126a) or cigar lighter on
central tunnel (see fig. 127) and switch on the compressor
by bringing switch A-fig. 126 to position I (on);
fig. 125A0K0127mfig. 126aA0K0152m
fig. 126A0K0021m
Page 180 of 297
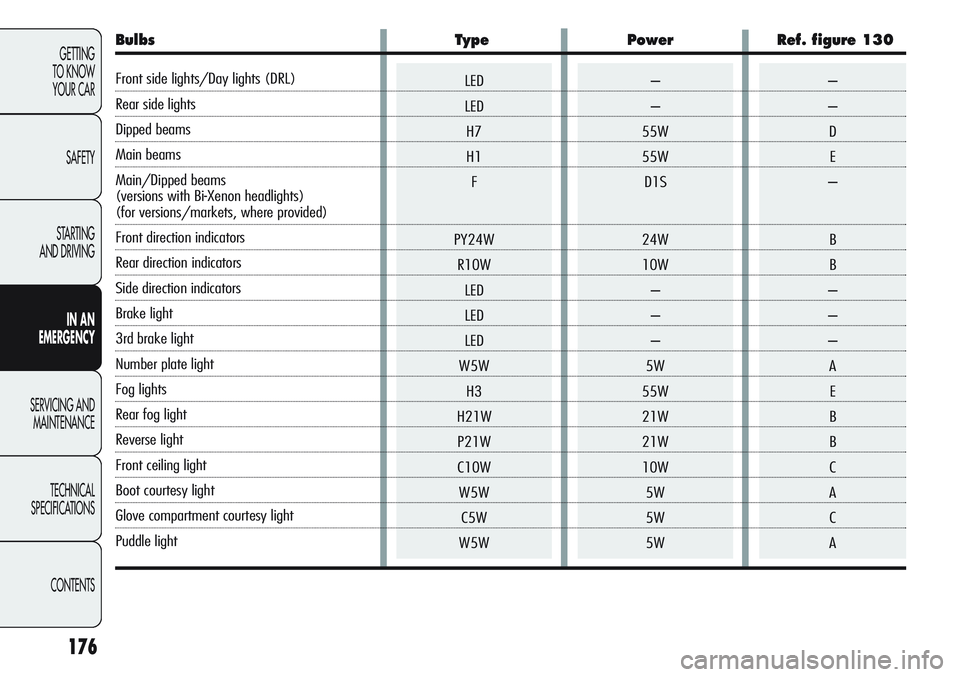
–
–
55W
55W
D1S
24W
10W
–
–
–
5W
55W
21W
21W
10W
5W
5W
5WLED
LED
H7
H1
F
PY24W
R10W
LED
LED
LED
W5W
H3
H21W
P21W
C10W
W5W
C5W
W5W
176
GETTING
TO KNOW
YOUR CAR
SAFETY
STARTING
AND DRIVING
IN AN
EMERGENCY
SERVICING AND
MAINTENANCE
TECHNICAL
SPECIFICATIONS
CONTENTS
–
–
D
E
–
B
B
–
–
–
A
E
B
B
C
A
C
A
Bulbs Type Power Ref. figure 130
Front side lights/Day lights (DRL)
Rear side lights
Dipped beams
Main beams
Main/Dipped beams
(versions with Bi-Xenon headlights)
(for versions/markets, where provided)
Front direction indicators
Rear direction indicators
Side direction indicators
Brake light
3rd brake light
Number plate light
Fog lights
Rear fog light
Reverse light
Front ceiling light
Boot courtesy light
Glove compartment courtesy light
Puddle light
Page 183 of 297
179
GETTING
TO KNOW
YOUR CAR
SAFETY
STARTING
AND DRIVING
IN AN
EMERGENCY
SERVICING AND
MAINTENANCE
TECHNICAL
SPECIFICATIONS
CONTENTS
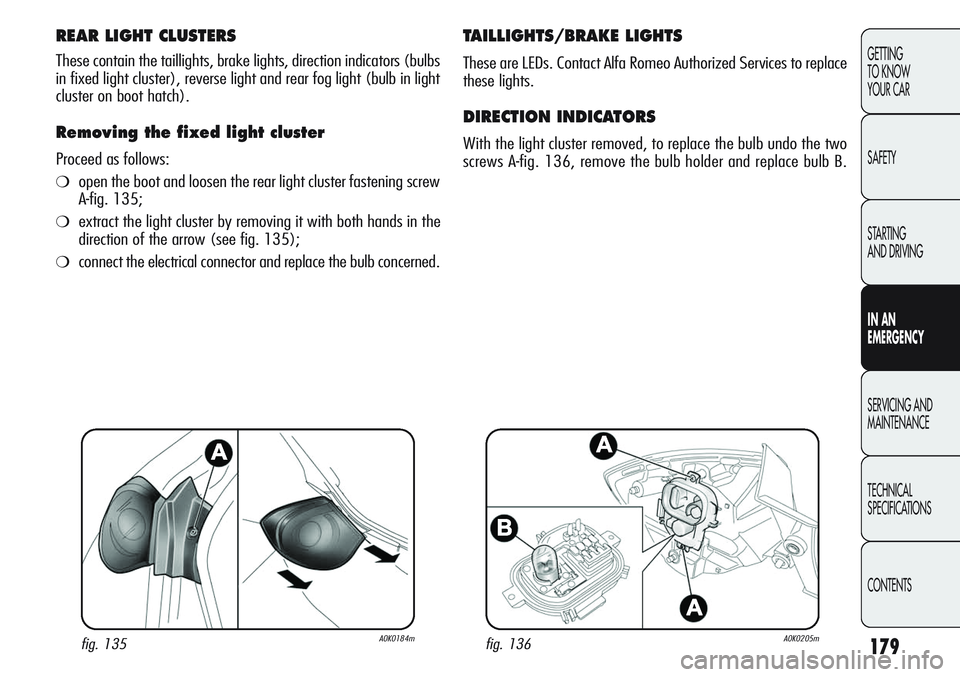
REAR LIGHT CLUSTERS
These contain the taillights, brake lights, direction indicators (bulbs
in fixed light cluster), reverse light and rear fog light (bulb in light
cluster on boot hatch).
Removing the fixed light cluster
Proceed as follows:
❍open the boot and loosen the rear light cluster fastening screw
A-fig. 135;
❍extract the light cluster by removing it with both hands in the
direction of the arrow (see fig. 135);
❍connect the electrical connector and replace the bulb concerned.
TAILLIGHTS/BRAKE LIGHTS
These are LEDs. Contact Alfa Romeo Authorized Services to replace
these lights.
DIRECTION INDICATORS
With the light cluster removed, to replace the bulb undo the two
screws A-fig. 136, remove the bulb holder and replace bulb B.
fig. 135A0K0184mfig. 136A0K0205m
Page 185 of 297
181
GETTING
TO KNOW
YOUR CAR
SAFETY
STARTING
AND DRIVING
IN AN
EMERGENCY
SERVICING AND
MAINTENANCE
TECHNICAL
SPECIFICATIONS
CONTENTS
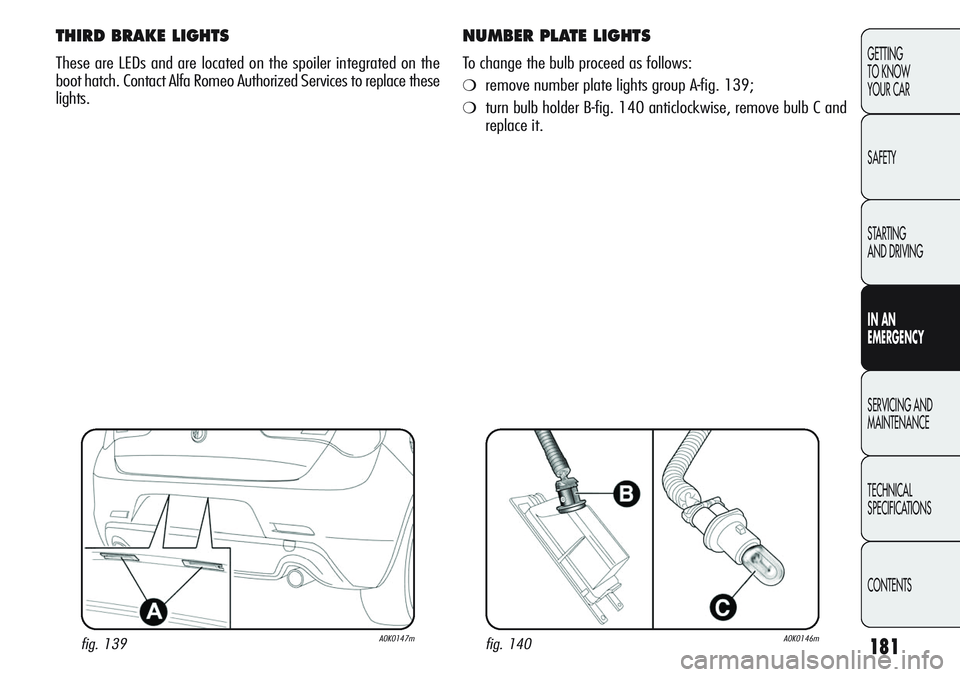
THIRD BRAKE LIGHTS
These are LEDs and are located on the spoiler integrated on the
boot hatch. Contact Alfa Romeo Authorized Services to replace these
lights.
NUMBER PLATE LIGHTS
To change the bulb proceed as follows:
❍remove number plate lights group A-fig. 139;
❍turn bulb holder B-fig. 140 anticlockwise, remove bulb C and
replace it.
fig. 139A0K0147mfig. 140A0K0146m
Page 204 of 297
200
GETTING
TO KNOW
YOUR CAR
SAFETY
STARTING
AND DRIVING
IN AN
EMERGENCY
SERVICING AND
MAINTENANCE
TECHNICAL
SPECIFICATIONS
CONTENTS
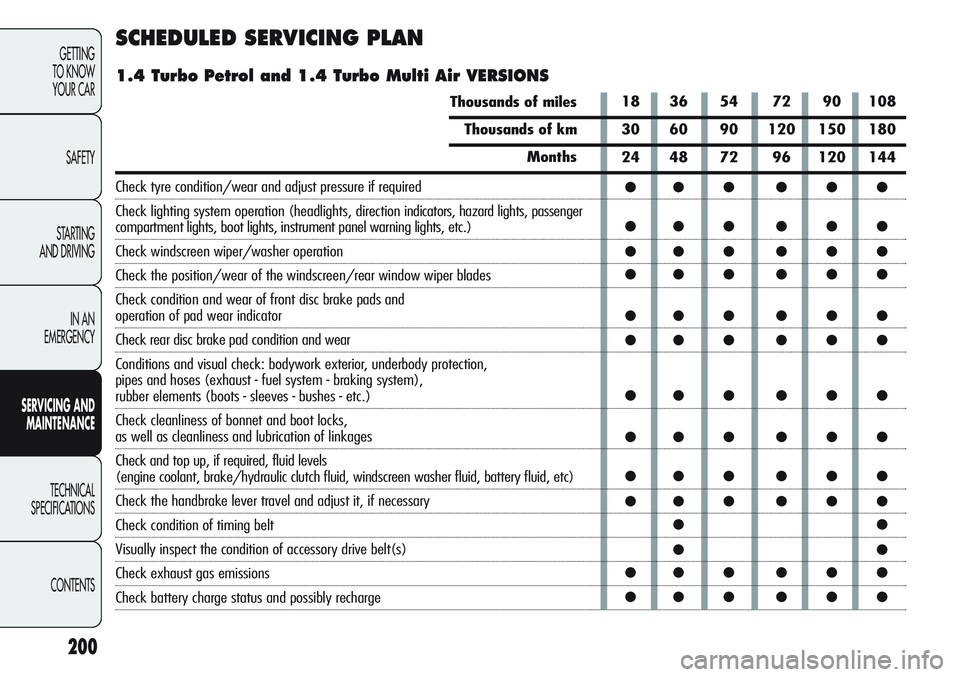
SCHEDULED SERVICING PLAN
1.4 Turbo Petrol and 1.4 Turbo Multi Air VERSIONS
Thousands of miles
Thousands of km
Months
Check tyre condition/wear and adjust pressure if required
Check lighting system operation (headlights, direction indicators, hazard lights, passenger
compartment lights, boot lights, instrument panel warning lights, etc.)
Check windscreen wiper/washer operation
Check the position/wear of the windscreen/rear window wiper blades
Check condition and wear of front disc brake pads and
operation of pad wear indicator
Check rear disc brake pad condition and wear
Conditions and visual check: bodywork exterior, underbody protection,
pipes and hoses (exhaust - fuel system - braking system),
rubber elements (boots - sleeves - bushes - etc.)
Check cleanliness of bonnet and boot locks,
as well as cleanliness and lubrication of linkages
Check and top up, if required, fluid levels
(engine coolant, brake/hydraulic clutch fluid, windscreen washer fluid, battery fluid, etc)
Check the handbrake lever travel and adjust it, if necessary
Check condition of timing belt
Visually inspect the condition of accessory drive belt(s)
Check exhaust gas emissions
Check battery charge status and possibly recharge18 36 54 72 90 108
30 60 90 120 150 180
24 48 72 96 120 144
●●● ●●●
●●● ●●●
●●● ●●●
●●● ●●●
●●● ●●●
●●● ●●●
●●● ●●●
●●● ●●●
●●● ●●●
●●● ●●●
●●
●●
●●● ●●●
●●● ●●●
Page 206 of 297
21 42 63 84 105
35 70 105 140 175
24 48 72 96 120
●● ●●●
●● ●●●
●● ●●●
●● ●●●
●● ●●●
●● ●●●
●● ●●●
●● ●●●
●● ●●●
●● ●●●
●●
●●
202
GETTING
TO KNOW
YOUR CAR
SAFETY
STARTING
AND DRIVING
IN AN
EMERGENCY
SERVICING AND
MAINTENANCE
TECHNICAL
SPECIFICATIONS
CONTENTS
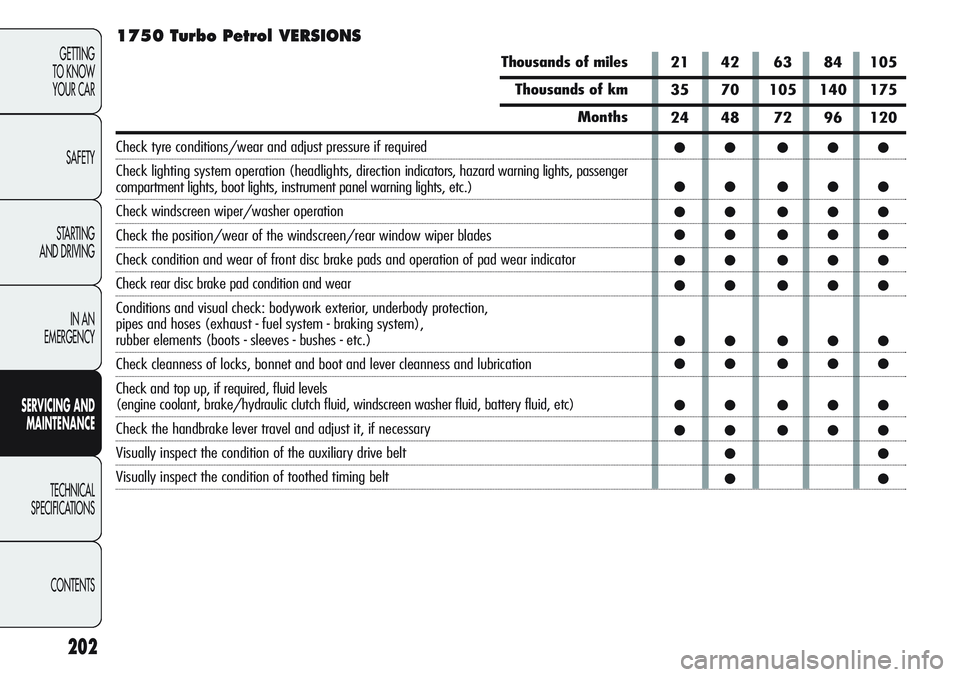
1750 Turbo Petrol VERSIONS
Thousands of miles
Thousands of km
Months
Check tyre conditions/wear and adjust pressure if required
Check lighting system operation (headlights, direction indicators, hazard warning lights, passenger
compartment lights, boot lights, instrument panel warning lights, etc.)
Check windscreen wiper/washer operation
Check the position/wear of the windscreen/rear window wiper blades
Check condition and wear of front disc brake pads and operation of pad wear indicator
Check rear disc brake pad condition and wear
Conditions and visual check: bodywork exterior, underbody protection,
pipes and hoses (exhaust - fuel system - braking system),
rubber elements (boots - sleeves - bushes - etc.)
Check cleanness of locks, bonnet and boot and lever cleanness and lubrication
Check and top up, if required, fluid levels
(engine coolant, brake/hydraulic clutch fluid, windscreen washer fluid, battery fluid, etc)
Check the handbrake lever travel and adjust it, if necessary
Visually inspect the condition of the auxiliary drive belt
Visually inspect the condition of toothed timing belt
Page 207 of 297
203
GETTING
TO KNOW
YOUR CAR
SAFETY
STARTING
AND DRIVING
IN AN
EMERGENCY
SERVICING AND
MAINTENANCE
TECHNICAL
SPECIFICATIONS
CONTENTS
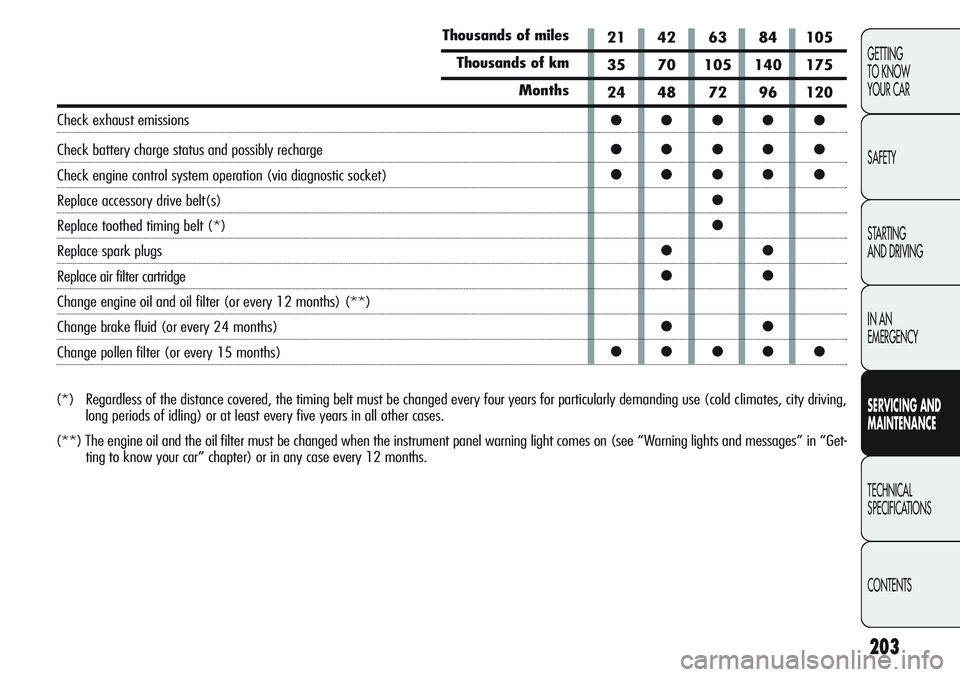
(*) Regardless of the distance covered, the timing belt must be changed every four years for particularly demanding use (cold climates, city driving,
long periods of idling) or at least every five years in all other cases.
(**) The engine oil and the oil filter must be changed when the instrument panel warning light comes on (see “Warning lights and messages” in “Get-
ting to know your car” chapter) or in any case every 12 months.
Thousands of miles
Thousands of km
Months
Check exhaust emissions
Check battery charge status and possibly recharge
Check engine control system operation (via diagnostic socket)
Replace accessory drive belt(s)
Replace toothed timing belt (*)
Replace spark plugs
Replace air filter cartridge
Change engine oil and oil filter (or every 12 months) (**)
Change brake fluid (or every 24 months)
Change pollen filter (or every 15 months)21 42 63 84 105
35 70 105 140 175
24 48 72 96 120
●● ●● ●
●● ●● ●
●● ●● ●
●
●
●●
●●
●●
●● ●● ●