wheel Alfa Romeo Giulietta 2011 Owner handbook (in English)
[x] Cancel search | Manufacturer: ALFA ROMEO, Model Year: 2011, Model line: Giulietta, Model: Alfa Romeo Giulietta 2011Pages: 297, PDF Size: 9.37 MB
Page 156 of 297

152
GETTING
TO KNOW
YOUR CAR
SAFETY
STARTING
AND DRIVING
IN AN
EMERGENCY
SERVICING AND
MAINTENANCE
TECHNICAL
SPECIFICATIONS
CONTENTS
It is advisable not to demand maximum perfor-
mance from your car (e.g. excessive acceleration,
long distances at top rpm, excessively intense brak-
ing, etc.) when it is first used.
Remember that the brake servo and electro-
mechanical power steering are not operational un-
til the engine has been started, therefore much
more effort than usual is required on the brake pedal and
steering wheel.
Never jump start the engine by pushing, towing or
driving downhill. These manoeuvres may damage
the catalytic converter.
When the engine is switched off never leave the
key in the MAR position to prevent useless cur-
rent absorption from draining the battery.
HOW TO WARM UP THE ENGINE
AFTER IT HAS JUST STARTED
Proceed as follows:
❍drive off slowly, letting the engine turn at medium speed. Do
not accelerate abruptly;
❍do not demand maximum performance for the first few kilo-
metres. Wait until the engine coolant temperature indicator
starts moving.
STOPPING THE ENGINE
Turn the ignition key to STOP while the engine is idling.
IMPORTANT After a taxing drive, before turning the engine off you
should allow it to idle to allow the temperature in the engine com-
partment to fall.
A quick burst on the accelerator before turning off
the engine serves absolutely no practical purpose;
it wastes fuel and is especially damaging to tur-
bocharged engines.
Page 157 of 297
153
GETTING
TO KNOW
YOUR CAR
SAFETY
STARTING
AND DRIVING
IN AN
EMERGENCY
SERVICING AND
MAINTENANCE
TECHNICAL
SPECIFICATIONS
CONTENTS
IMPORTANT Carry out these manoeuvres with the brake pedal pressed.
IMPORTANT For cars equipped with a front armrest, lift this up to
ensure that it does not interfere with the action of the handbrake.
fig. 110A0K0073m
The car should be locked after a few notches: if this
is not so, contact Alfa Romeo Authorized Services to
have the handbrake adjusted.
PARKING THE CAR
Switch off the engine and pull up the handbrake. Engage a gear
(1stif the car is facing uphill or reverse if it is facing downhill) and
leave the wheels steered to one side.
If the car is parked on a steep slope block the wheels with a wedge
or stone. Always remove the ignition key when leaving the car.
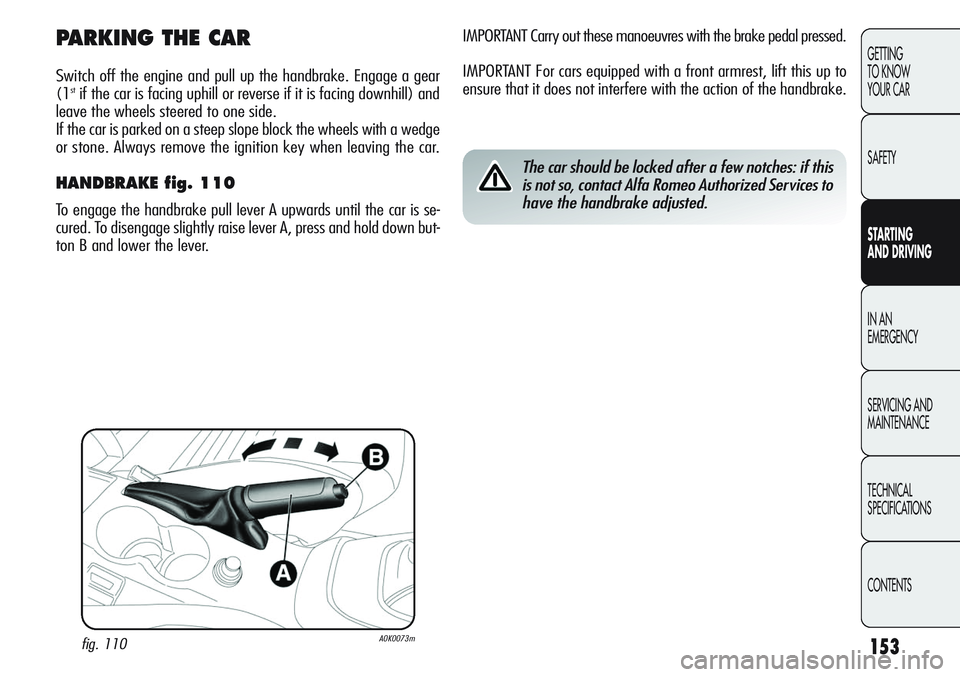
HANDBRAKE fig. 110
To engage the handbrake pull lever A upwards until the car is se-
cured. To disengage slightly raise lever A, press and hold down but-
ton B and lower the lever.
Page 162 of 297

158
GETTING
TO KNOW
YOUR CAR
SAFETY
STARTING
AND DRIVING
IN AN
EMERGENCY
SERVICING AND
MAINTENANCE
TECHNICAL
SPECIFICATIONS
CONTENTS
SNOW TYRES
Use snow tyres of the same size as the normal tyres provided
with the car. Alfa Romeo Authorized Services will advise you on the
most appropriate tyre for use.
Only use these tyres in the event of ice or snow on the roads.
For the type, pressures and specifications of the snow tyre to be
used, follow carefully the instructions given in the “Wheels” para-
graph of the “Technical specifications” chapter.
The performance of these tyres is considerably reduced when the
tread depth is less than 4 mm. If this is the case, replace them.
Due to their specific features, the performance of snow tyres is
much lower than that of standard tyres in normal conditions or on
long motorway stretches. You should therefore use them only in
the conditions for which they were designed. All four tyres should be the same (brand and track) to ensure greater
safety when driving, during braking and better driveability. Re-
member that it is inappropriate to change the direction of rotation
of tyres.
The maximum speed for snow tyres marked “Q”
is 160 km/h, while it is 190 km/h for “T” tyres
and 210 km/h for “H” tyres. You should, howev-
er, always stick to the speed limits of the highway code.
Page 163 of 297
159
GETTING
TO KNOW
YOUR CAR
SAFETY
STARTING
AND DRIVING
IN AN
EMERGENCY
SERVICING AND
MAINTENANCE
TECHNICAL
SPECIFICATIONS
CONTENTS
Keep your speed down when snow chains are fit-
ted - do not exceed 50 km/h. Avoid potholes, steps
and pavements and also avoid driving for long dis-
tances on roads not covered with snow to avoid damag-
ing the car and the road surface.
SNOW CHAINS
The use of snow chains should be in compliance with local regu-
lations. Snow chains may be fitted only to the front wheel tyres
(drive wheels).
Check the tension of the chains after the first few metres have been
driven.
Use reduced bulk snow chains:
– All versions: for 195/55 R16”, 205/55 R16” and 225/45
R17” size tyres use low-clearance snow chains with a maximum
protrusion beyond the tyre profile of 9 mm.
IMPORTANT The space-saver wheel cannot be fitted with snow
chains. If a front (drive) wheel is punctured and snow chains must
be used, you must remove a normal wheel from the rear and re-
place this one with the space-saver wheel. In this way, with two
normal drive wheels, it is possible to use snow chains.
STORING THE CAR
If the car is to be left inactive for longer than a month, the following
precautions should be noted:
❍park the car in a dry, covered and, if possible, ventilated area;
engage a gear and check that the handbrake is not engaged;
❍disconnect the negative battery terminal and check battery
charge. Repeat this check once every three months during stor-
age;
❍clean and protect painted areas using protective wax;
❍clean and protect the shiny metal areas using special com-
mercially-available products;
❍sprinkle talcum powder on the rubber windscreen and rear win-
dow wiper blades and lift them off the glass;
❍slightly open the windows;
❍cover the car with a fabric or perforated plastic sheet. Do not
use compact plastic sheets which do not allow humidity to evap-
orate from the surface of the car.
❍inflate tyres to a pressure of +0.5 bar above the normal spec-
ified pressure and check the pressure at regular intervals;
❍if you have not disconnected the battery, check the battery
charge every thirty days;
❍do not drain the engine cooling system.
Page 166 of 297

162
GETTING
TO KNOW
YOUR CAR
SAFETY
STARTING
AND DRIVING
IN AN
EMERGENCY
SERVICING AND
MAINTENANCE
TECHNICAL
SPECIFICATIONS
CONTENTS
The space-saver spare wheel is vehicle-specific:
do not use it on vehicles of other model and do not
use space-saver spare wheels from other models
on your car. The space-saver spare wheel must only be
used in an emergency. Never use it longer than strictly
necessary and never exceed 80 km/h. On the space-saver
spare wheel there is a label, summarizing the main warn-
ings about the space-saver spare wheel usage restrictions.
Never remove or cover the label. Never apply any hub
cap to the space-saver spare wheel.
CHANGING A TYRE
GENERAL INSTRUCTIONS
The car is equipped with an “Automatic Fix&Go Kit“: see “Auto-
matic Fix&Go Kit” for how to use this device.
Alternatively to the “Automatic Fix&Go Kit” the car may be
equipped with a space-saver spare wheel: see the instructions on
the following pages for changing the tyre.
Use your hazard lights, warning triangle, etc. to
show that your car is stationary in compliance with
regulations. Passengers should get out of the car,
particularly if it is heavily loaded, and wait for the wheel
to be changed away from the traffic. In the event of a
wheel change on a slope or on unsurfaced roads, chock
the wheels.
BUMP STARTING
Never start the engine by pushing, towing or driving downhill.
Never use a fast battery-charger to start the en-
gine as this could damage the electronic systems
of your car, particularly the ignition and fuel sup-
ply control units.
Page 167 of 297

163
GETTING
TO KNOW
YOUR CAR
SAFETY
STARTING
AND DRIVING
IN AN
EMERGENCY
SERVICING AND
MAINTENANCE
TECHNICAL
SPECIFICATIONS
CONTENTS
The jack may be used to replace wheels only on
the car that it comes with or other cars of the same
model. Never use the jack for other purposes, such
as lifting other models. Never use the jack to carry out re-
pairs under the car. Incorrect positioning of the jack may
cause the car to fall. Do not use the jack for loads higher
than the one shown on its label. Never install snow chains
on the space-saver spare wheel; if a front tyre (driving
wheel) is punctured and you need to use snow chains, use
a standard wheel from the rear axle and install the space-
saver spare wheel on the rear axle. In this way, with two
normal drive wheels, it is possible to use snow chains.
If the hub cap is not fitted correctly, it may come
off when the car is travelling. Never tamper with
the inflation valve. Never introduce tools of any
kind between the rim and the tyre. Regularly check the
inflation pressure of the tyres and space-saver wheel (see
chapter “Technical specifications”).Vehicle handling is modified with the space-saver
spare wheel fitted. Avoid violent acceleration and
braking, sharp steering and fast cornering. The
overall duration of the space-saver spare wheel is of about
3000 km, after which the relevant tyre must be replaced
with another one of the same type. Never install a tradi-
tional tyre on a rim designed to be used as a space-saver
spare wheel. Repair and refit the standard wheel as soon
as possible. Using two or more space-saver spare wheels
at the same time is forbidden. Do not apply grease to
the bolt threads before assembly: they might sponta-
neously unscrew.
JACK
Important notes:
❍the jack weight is 1.76 kg;
❍the jack requires no adjustment;
❍the jack cannot be repaired; if it breaks it must be replaced with
a new jack;
❍no tool other than the cranking device may be fitted on the
jack.
Page 168 of 297
164
GETTING
TO KNOW
YOUR CAR
SAFETY
STARTING
AND DRIVING
IN AN
EMERGENCY
SERVICING AND
MAINTENANCE
TECHNICAL
SPECIFICATIONS
CONTENTS
Replace the wheel as follows:
❍stop the car in a position so that it is not a danger for on-com-
ing traffic and where you can replace the wheel safely. The
ground must be flat and solid;
❍switch off the engine, pull up the handbrake and engage 1st
gear or reverse; put on the high visibility jacket (required by
law) before leaving the car;
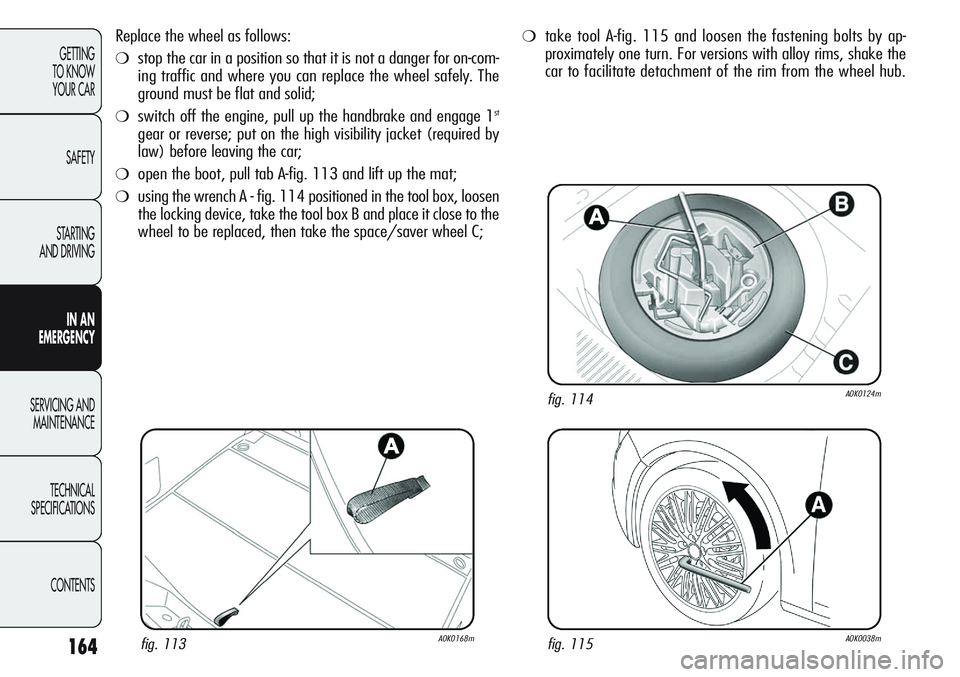
❍open the boot, pull tab A-fig. 113 and lift up the mat;
❍using the wrench A - fig. 114 positioned in the tool box, loosen
the locking device, take the tool box B and place it close to the
wheel to be replaced, then take the space/saver wheel C;
fig. 115A0K0038m
❍take tool A-fig. 115 and loosen the fastening bolts by ap-
proximately one turn. For versions with alloy rims, shake the
car to facilitate detachment of the rim from the wheel hub.
fig. 114A0K0124m
fig. 113A0K0168m
Page 169 of 297

165
GETTING
TO KNOW
YOUR CAR
SAFETY
STARTING
AND DRIVING
IN AN
EMERGENCY
SERVICING AND
MAINTENANCE
TECHNICAL
SPECIFICATIONS
CONTENTS
❍position the jack under the car, near the wheel to be changed.
On versions where this is fitted, be careful not to damage the
plastic aerodynamic guard;
❍operate the device A-fig. 116 so as to extend the jack, until the
upper part B-fig. 117 is inserted correctly inside the device C;
❍warn anybody nearby that the car is about to be lifted. They
must stay clear and not touch the car until it is back on the
ground;
❍fit the handle D-fig. 116 in the seat in device A, operate the
jack and lift the car until the wheel to be changed is several
centimetres off the ground;
❍for versions with wheel cap, remove the wheel cap after loos-
ening the 4 fastening bolts and finally loosen the fifth bolt and
extract the wheel;
❍make sure the contact surfaces between space-saver spare
wheel and hub are clean so that the fastening bolts will not
come loose;
❍fit the space-saver spare wheel by inserting the first bolt for two
threads into the hole closest to the valve;
❍use wrench A-fig. 115 to fully tighten the retaining bolts;
fig. 116A0K0039mfig. 117A0K0083m
❍operate jack handle D-fig. 116 to lower the car. Then extract
the jack;
Visit Alfa Romeo Authorized Services as soon as
possible to check the correct tightening of the main
wheel bolts.
Page 170 of 297
166
GETTING
TO KNOW
YOUR CAR
SAFETY
STARTING
AND DRIVING
IN AN
EMERGENCY
SERVICING AND
MAINTENANCE
TECHNICAL
SPECIFICATIONS
CONTENTS
fig. 118A0K0040mfig. 119A0K0235m
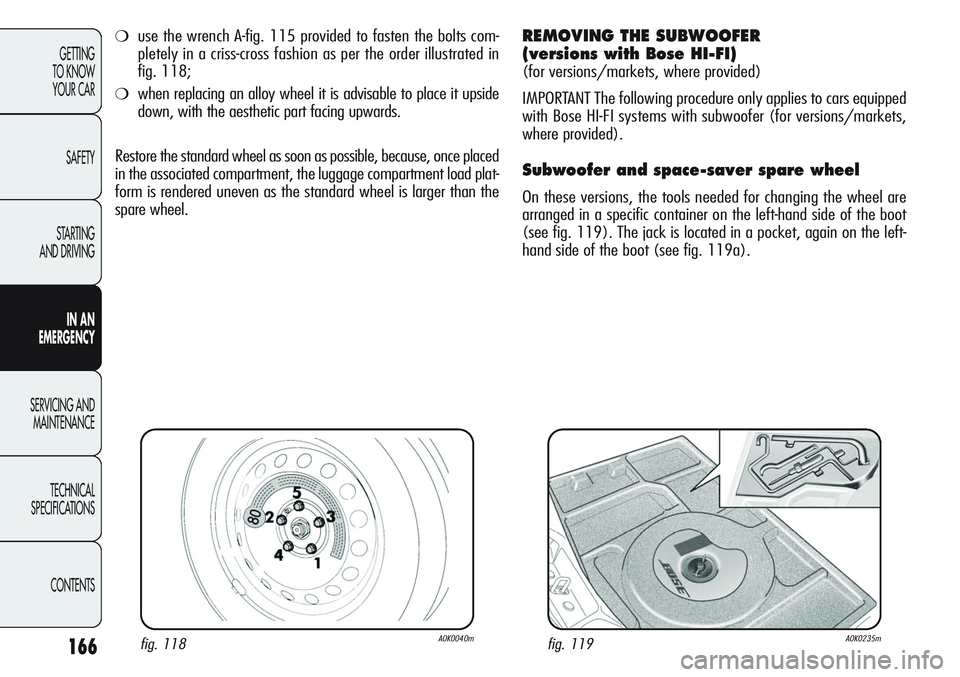
❍use the wrench A-fig. 115 provided to fasten the bolts com-
pletely in a criss-cross fashion as per the order illustrated in
fig. 118;
❍when replacing an alloy wheel it is advisable to place it upside
down, with the aesthetic part facing upwards.
Restore the standard wheel as soon as possible, because, once placed
in the associated compartment, the luggage compartment load plat-
form is rendered uneven as the standard wheel is larger than the
spare wheel.
REMOVING THE SUBWOOFER
(versions with Bose HI-FI)
(for versions/markets, where provided)
IMPORTANT The following procedure only applies to cars equipped
with Bose HI-FI systems with subwoofer (for versions/markets,
where provided).
Subwoofer and space-saver spare wheel
On these versions, the tools needed for changing the wheel are
arranged in a specific container on the left-hand side of the boot
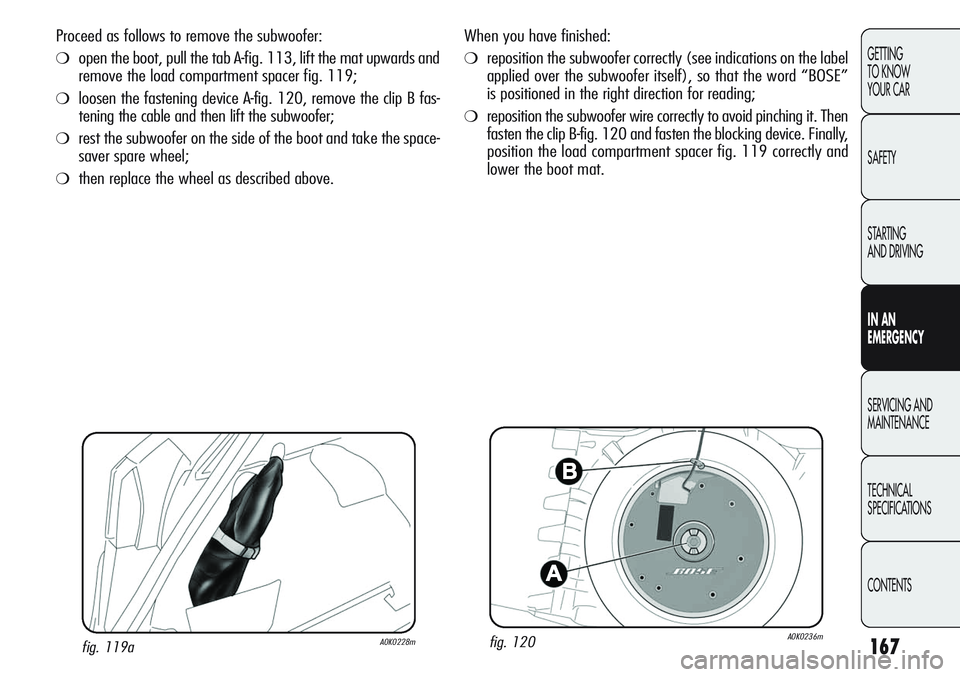
(see fig. 119). The jack is located in a pocket, again on the left-
hand side of the boot (see fig. 119a).
Page 171 of 297
167
GETTING
TO KNOW
YOUR CAR
SAFETY
STARTING
AND DRIVING
IN AN
EMERGENCY
SERVICING AND
MAINTENANCE
TECHNICAL
SPECIFICATIONS
CONTENTS
When you have finished:
❍reposition the subwoofer correctly (see indications on the label
applied over the subwoofer itself), so that the word “BOSE”
is positioned in the right direction for reading;
❍reposition the subwoofer wire correctly to avoid pinching it. Then
fasten the clip B-fig. 120 and fasten the blocking device. Finally,
position the load compartment spacer fig. 119 correctly and
lower the boot mat.
fig. 120A0K0236mfig. 119aA0K0228m
Proceed as follows to remove the subwoofer:
❍open the boot, pull the tab A-fig. 113, lift the mat upwards and
remove the load compartment spacer fig. 119;
❍loosen the fastening device A-fig. 120, remove the clip B fas-
tening the cable and then lift the subwoofer;
❍rest the subwoofer on the side of the boot and take the space-
saver spare wheel;
❍then replace the wheel as described above.