Table Alfa Romeo Giulietta 2014 Owner's Guide
[x] Cancel search | Manufacturer: ALFA ROMEO, Model Year: 2014, Model line: Giulietta, Model: Alfa Romeo Giulietta 2014Pages: 280, PDF Size: 6.65 MB
Page 148 of 280
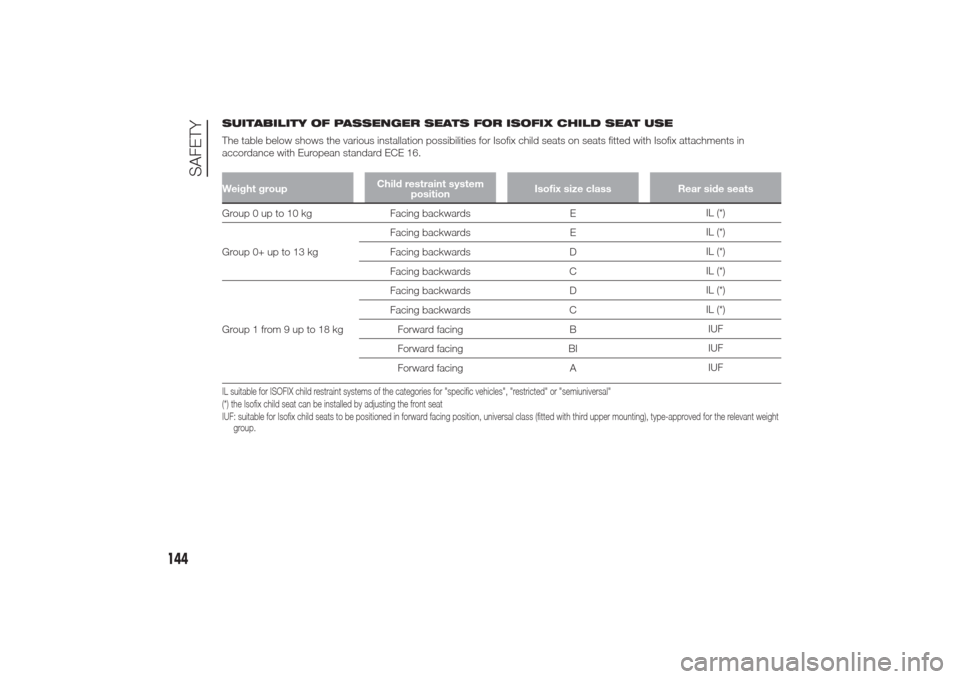
SUITABILITY OF PASSENGER SEATS FOR ISOFIX CHILD SEAT USE
The table below shows the various installation possibilities for Isofix child seats on seats fitted with Isofix attachments in
accordance with European standard ECE 16.Weight groupChild restraint system
positionIsofix size class Rear side seatsGroup 0 up to 10 kg Facing backwards EIL (*)
Group 0+ up to 13 kgFacing backwards EIL (*)
Facing backwards DIL (*)
Facing backwards CIL (*)
Group1from9upto18kgFacing backwards DIL (*)
Facing backwards CIL (*)
Forward facing BIUF
Forward facing BIIUF
Forward facing AIUFIL suitable for ISOFIX child restraint systems of the categories for "specific vehicles", "restricted" or "semiuniversal"
(*) the Isofix child seat can be installed by adjusting the front seat
IUF: suitable for Isofix child seats to be positioned in forward facing position, universal class (fitted with third upper mounting), type-approvedfor the relevant weight
group.
144
SAFETY
Page 161 of 280
WARNING
105) Press the clutch pedal fully to
change gears correctly. It is
therefore essential that there is
nothing under the pedals: make
sure the mats are lying flat and do
not get in the way of the pedals.
IMPORTANT
20) Do not drive with your hand
resting on the gear lever as the
force exerted, even if slight, could
lead over time to premature wear
of the gearbox internal
components.
ALFA TCT(for versions/markets, where provided)
IN BRIEF
The car can be equipped with an
electronically managed Alfa TCT
6-speed automatic transmission
where gearshifting takes place
automatically according to the
instantaneous car usage parameters
(car speed, road gradient and
accelerator pedal position).
The new transmission is an absolute
innovation as it matches the
Start&Stop system with the most
recent alternative to traditional
automatic transmissions with built-in
torque converter.
Manual gearshifting can still occur
thanks to the sequential mode
position of the gear lever.
SELECTOR LEVER
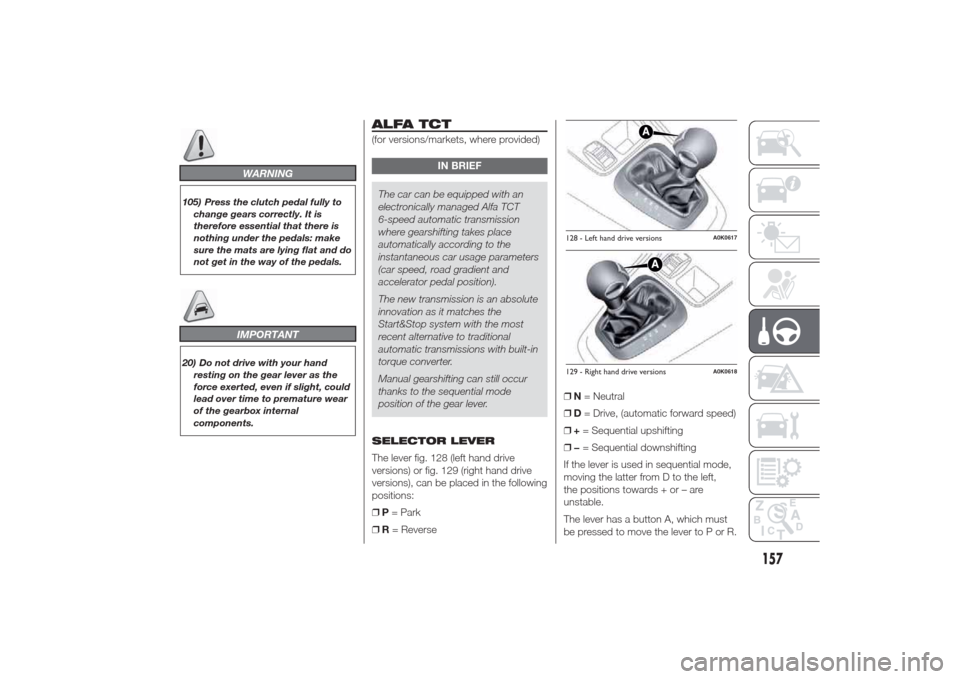
The lever fig. 128 (left hand drive
versions) or fig. 129 (right hand drive
versions), can be placed in the following
positions:
❒P= Park
❒R= Reverse❒N= Neutral
❒D= Drive, (automatic forward speed)
❒+= Sequential upshifting
❒−= Sequential downshifting
If the lever is used in sequential mode,
moving the latter from D to the left,
the positions towards + or – are
unstable.
The lever has a button A, which must
be pressed to move the lever to P or R.
128 - Left hand drive versions
A0K0617
129 - Right hand drive versions
A0K0618
157
Page 162 of 280
DISPLAY
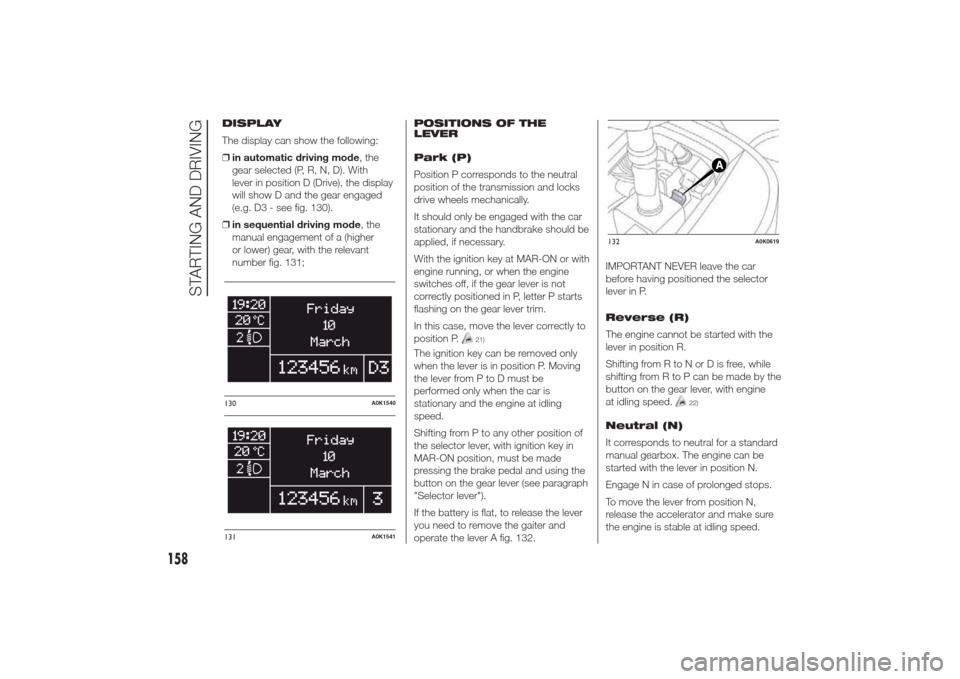
The display can show the following:
❒in automatic driving mode, the
gear selected (P, R, N, D). With
lever in position D (Drive), the display
will show D and the gear engaged
(e.g. D3 - see fig. 130).
❒in sequential driving mode, the
manual engagement of a (higher
or lower) gear, with the relevant
number fig. 131;POSITIONS OF THE
LEVER
Park (P)
Position P corresponds to the neutral
position of the transmission and locks
drive wheels mechanically.
It should only be engaged with the car
stationary and the handbrake should be
applied, if necessary.
With the ignition key at MAR-ON or with
engine running, or when the engine
switches off, if the gear lever is not
correctly positioned in P, letter P starts
flashing on the gear lever trim.
In this case, move the lever correctly to
position P.
21)
The ignition key can be removed only
when the lever is in position P. Moving
the lever from P to D must be
performed only when the car is
stationary and the engine at idling
speed.
Shifting from P to any other position of
the selector lever, with ignition key in
MAR-ON position, must be made
pressing the brake pedal and using the
button on the gear lever (see paragraph
"Selector lever").
If the battery is flat, to release the lever
you need to remove the gaiter and
operate the lever A fig. 132.IMPORTANT NEVER leave the car
before having positioned the selector
lever in P.
Reverse (R)
The engine cannot be started with the
lever in position R.
Shifting from R to N or D is free, while
shifting from R to P can be made by the
button on the gear lever, with engine
at idling speed.
22)
Neutral (N)
It corresponds to neutral for a standard
manual gearbox. The engine can be
started with the lever in position N.
Engage N in case of prolonged stops.
To move the lever from position N,
release the accelerator and make sure
the engine is stable at idling speed.
130
A0K1540
131
A0K1541
132
A0K0619
158
STARTING AND DRIVING
Page 163 of 280
Shifting from N to D is free, while
shifting from N to R or P can only be
made by the button on the gear lever.
Drive (D) - Automatic
forward gear
It is the lever position in standard
running conditions.
Shifting from D to N is free, while
shifting from D to R or P can only be
made by the button on the gear lever.
Sequential mode (+ / –)
Shifting the lever from position D on
side in stable position, the transmission
is used in sequential mode.
Shifting the lever in unstable position (+
or −) gears are changed.
Important information
IMPORTANT All movements of the gear
lever must be performed with car
stationary and engine idling only.
The drive wheels are mechanically
locked in position P.
Shifting from P to R is possible with
brake pedal pressed and button on
gear lever pressed.
Shifting from R to N and from N to D is
free.Shifting from D to "Sequential mode" is
free.
Shifting from "Sequential mode" to D is
free.
Shifting from D to N is free.
Shifting from N to R is possible only
with button on gear lever pressed.
Shifting from R to P is possible only
with button on gear lever pressed.
STARTING THE ENGINE
Starting is only permitted with gear
lever in position P or N (with or without
brake pedal pressed).
On starting, the system is at N or P (the
latter means neutral, but with the car’s
wheels locked mechanically).
Start&Stop system
With car at a standstill and Start&Stop
system activated, the engine switches
off if the gear lever is in a position
other than R.
The Start&Stop system does not
operate when the gear lever is in R, for
making parking manoeuvres easier.
In the event of stops uphill, the engine
switching off is disabled to activate
the "Hill Holder" function (works only
with running engine).The engine restarts automatically if:
❒the brake pedal is released (and the
lever is not at N or P)
❒the lever is shifted to an unstable
position: +, − or R
❒the lever is shifted from D to the left
in "Sequential mode"
❒by the "+" or "–" paddles on the
steering wheel (for versions/markets,
where provided)
During the engine stop and start
sequence, the system passes through
the automatic engagement of neutral:
the display shows N.
IMPORTANT In some conditions (for
example with small gradients and brake
pedal not fully depressed), engine
switching off is not deactivated. In this
case, fully depress the brake pedal
to make the "Hill Holder" function
available and restart the engine, using
the gear lever or the paddles on the
steering wheel (for versions/markets,
where provided) as described
previously.
159
Page 172 of 280
IMPORTANT
23) Keep your speed down when
snow chains are fitted; do not
exceed 50 km/h. Avoid potholes,
steps and pavements and avoid
driving for long distances on
roads not covered with snow to
prevent damaging the car and the
road surface.
STORING THE CARIf the car is to be left inactive for longer
than a month, the following precautions
should be noted:
❒park the car in covered, dry and if
possible well-ventilated premises and
slightly open the windows;
❒check that the handbrake is not
engaged;
❒disconnect the negative battery
terminal and check the battery
charge. Repeat this check once
every three months during storage;
❒if the battery is not disconnected
from the electrical system, checks its
state of charge every thirty days;
❒clean and protect the painted parts
using protective wax;
❒clean and protect the shiny metal
parts using special compounds
available commercially;
❒sprinkle talcum powder on the
windscreen and rear window wiper
rubber blades and lift them off the
glasses;
❒slightly open the windows;❒cover the car with a cloth or
perforated plastic sheet. Do not use
compact plastic sheets which do
not allow humidity to evaporate from
the surface of the car.
❒inflate tyres to +0.5 bar above the
standard prescribed pressure and
check it periodically;
❒do not drain the engine cooling
system;
❒Any time the car is left inactive for
two weeks or more, operate the
air conditioning system with engine
idling for at least 5 minutes, setting
external air and with fan at maximum
speed. This operation will ensure a
suitable lubrication to minimise
possibility of damage to the
compressor when the system is
operated again.
IMPORTANT After turning the ignition
key to STOP, wait at least 1 minute
before disconnecting the electrical
supply to the battery.
168
STARTING AND DRIVING
Page 180 of 280
"Fix&Go Automatic"
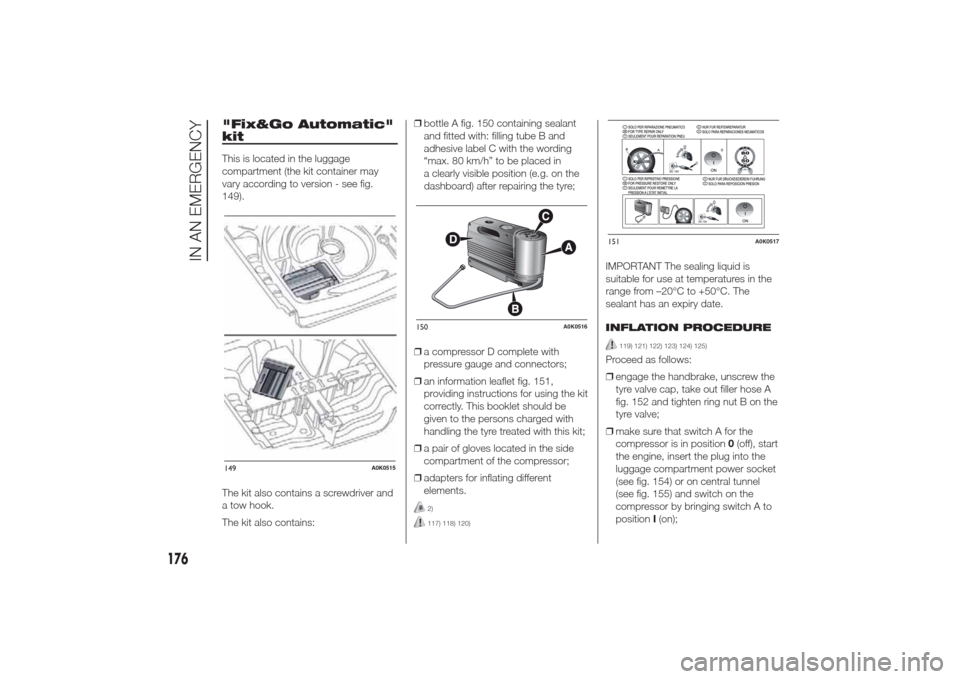
kitThis is located in the luggage
compartment (the kit container may
vary according to version - see fig.
149).
The kit also contains a screwdriver and
a tow hook.
The kit also contains:❒bottle A fig. 150 containing sealant
and fitted with: filling tube B and
adhesive label C with the wording
“max. 80 km/h” to be placed in
a clearly visible position (e.g. on the
dashboard) after repairing the tyre;
❒a compressor D complete with
pressure gauge and connectors;
❒an information leaflet fig. 151,
providing instructions for using the kit
correctly. This booklet should be
given to the persons charged with
handling the tyre treated with this kit;
❒a pair of gloves located in the side
compartment of the compressor;
❒adapters for inflating different
elements.
2)117) 118) 120)
IMPORTANT The sealing liquid is
suitable for use at temperatures in the
range from –20°C to +50°C. The
sealant has an expiry date.
INFLATION PROCEDURE
119) 121) 122) 123) 124) 125)
Proceed as follows:
❒engage the handbrake, unscrew the
tyre valve cap, take out filler hose A
fig. 152 and tighten ring nut B on the
tyre valve;
❒make sure that switch A for the
compressor is in position0(off), start
the engine, insert the plug into the
luggage compartment power socket
(see fig. 154) or on central tunnel
(see fig. 155) and switch on the
compressor by bringing switch A to
positionI(on);
149
A0K0515
150
A0K0516
151
A0K0517
176
IN AN EMERGENCY
Page 183 of 280
122) Always indicate that the tyre
was repaired using the quick
tyre repair kit. Give the booklet to
the technicians who will be
handling the tyre that was treated
using the kit.
123) Repair is not possible if the
wheel rim is damaged (groove
is deformed, causing air to
escape). Do not remove foreign
bodies (screws or nails) from the
tyre.
124) Do not operate the compressor
for longer than 20 minutes
consecutively. Risk of
overheating. The kit is not suitable
for definitive repairs, so the
repaired tyres may only be used
temporarily.125) The bottle contains ethylene
glycol and latex: it may cause
an allergic reaction. It is harmful if
swallowed. It is irritant for the
eyes. It may cause sensitisation if
inhaled or on contact. Avoid
contact with eyes, skin and
clothes. In the event of contact,
rinse immediately with plenty
of water. If ingested, do not
induce vomiting. Rinse out your
mouth, drink large quantities
of water and seek immediate
medical attention. Keep out of the
reach of children. The product
must not be used by asthmatics.
Do not inhale the vapours during
insertion and suction. Call a
doctor immediately if allergic
reactions are noted. Store the
bottle in its proper compartment,
away from sources of heat. The
sealant fluid has an expiry date.
Replace the bottle containing
out-of-date sealant fluid.
CHANGING A BULB
28)126) 127) 128)
GENERAL
INSTRUCTIONS
❒Before changing a bulb check the
contacts for oxidation;
❒replace blown bulbs with others of
the same type and power;
❒after replacing a headlight bulb,
always check its alignment;
❒when a light is not working, check
that the corresponding fuse is intact
before changing the bulb. For the
location of fuses, refer to the
paragraph “If a fuse blows” in this
chapter.
179
Page 216 of 280
ENGINE COOLANT
If the level is too low, unscrew reservoir
cap C and add the fluid described in
the "Technical Specifications" section.
34)
140)
WINDSCREEN/REAR
WINDOW WASHER FLUID
If the level is too low, lift reservoir cap D
and add the fluid described in the
chapter "Technical Specifications".
141) 142)
IMPORTANT The headlight washer
system will not operate when the fluid
level is low, even though the
windscreen/rear window washer
continues to operate. For versions/
markets, where provided, there is
a reference notch E on the dipstick (see
previous pages): ONLY the
windscreen/rear window wiper
operates with the level below this
reference.
BRAKE FLUID
Check that the fluid is at the max. level.
If the fluid level in the reservoir is too
low, undo reservoir cap E and add the
fluid described in the chapter "Technical
Specifications".
35)
143) 144)
ALFA TCT ACTIVATION
SYSTEM OIL
(for versions/markets, where provided)
The transmission control oil level should
only be checked at an Alfa Romeo
Dealership.
4)IMPORTANT
31) Be careful not to confuse the
various types of fluids while
topping up: they are not
compatible with each other!
Topping up with an unsuitable
fluid could severely damage your
car.
32) The oil level should never exceed
the MAX mark.
33) Do not add oil with specifications
other than those of the oil already
in the engine.34) PARAFLU
UP
anti-freeze fluid is
used in the engine cooling
system; use the same fluid type as
that already in the cooling system
when topping up. PARAFLU
UP
may not be mixed with other types
of anti-freeze fluids. In the event
of topping up with an unsuitable
product, under no circumstances
start the engine and contact an
Alfa Romeo Dealership.
35) Avoid allowing brake fluid, which
is extremely corrosive, to come
into contact with painted areas.
Should it happen, wash
immediately with water.
WARNING
137) Never smoke when performing
operations in the engine
compartment. Flammable gases
and fumes may be present and
risk igniting.
138) Be very careful when working in
the engine compartment when
the engine is hot: you may get
burned.
212
SERVICING AND MAINTENANCE
Page 219 of 280
148) When performing any
operation on the battery or near it,
always protect your eyes with
special goggles.
IMPORTANT
36) Incorrect assembly of electrical
and electronic accessories may
cause severe damage to your car.
Go to an Alfa Romeo Dealership
if you want to install accessories
(e.g. anti-theft, radio phone, etc.):
they will suggest the most
suitable devices and advise you
whether a higher capacity battery
needs to be installed.
IMPORTANT
5) Batteries contain substances
which are very dangerous for the
environment. For battery
replacement, contact an Alfa
Romeo Dealership.
WHEELS AND TYRESBefore embarking on a long trip, and
every two weeks, check the tyre
inflation pressure. Check the tyres when
cold.
149) 150) 151) 152)
It is normal for the pressure to increase
when the car is used; for the correct
tyre inflation pressure, see “Wheels” in
the “Technical specifications” chapter.
Incorrect pressure causes abnormal
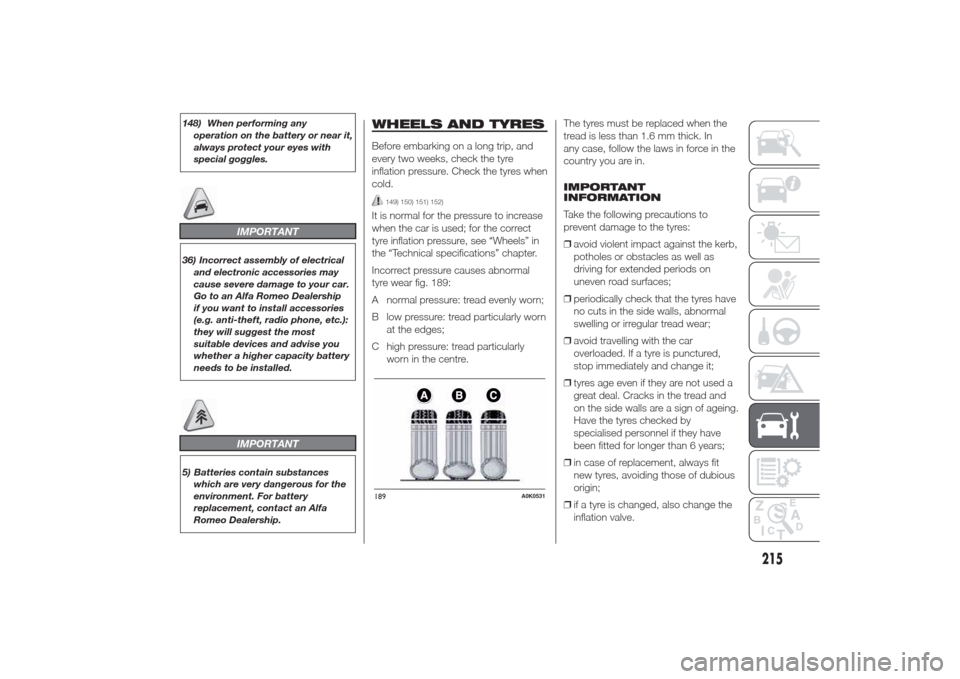
tyre wear fig. 189:
A normal pressure: tread evenly worn;
B low pressure: tread particularly worn
at the edges;
C high pressure: tread particularly
worn in the centre.The tyres must be replaced when the
tread is less than 1.6 mm thick. In
any case, follow the laws in force in the
country you are in.
IMPORTANT
INFORMATION
Take the following precautions to
prevent damage to the tyres:
❒avoid violent impact against the kerb,
potholes or obstacles as well as
driving for extended periods on
uneven road surfaces;
❒periodically check that the tyres have
no cuts in the side walls, abnormal
swelling or irregular tread wear;
❒avoid travelling with the car
overloaded. If a tyre is punctured,
stop immediately and change it;
❒tyres age even if they are not used a
great deal. Cracks in the tread and
on the side walls are a sign of ageing.
Have the tyres checked by
specialised personnel if they have
been fitted for longer than 6 years;
❒in case of replacement, always fit
new tyres, avoiding those of dubious
origin;
❒if a tyre is changed, also change the
inflation valve.189
A0K0531
215
Page 224 of 280
IMPORTANT
38) In order to preserve the aesthetic
appearance of the paint abrasive
products and/or polishes should
not be used for cleaning the car.39) Avoid washing with rollers
and/or brushes in washing
stations. Wash the car only by
hand using neutral pH detergents;
dry it with a wet chamois leather.
Abrasive products and/or polishes
should not be used for cleaning
the car. Bird droppings must
be washed off immediately and
thoroughly as the acid they
contain is particularly aggressive.
Avoid (if at all possible) parking
the car under trees; remove
vegetable resins immediately as,
when dried, it may only be
possible to remove them with
abrasive products and/or polishes,
which is highly inadvisable as
they could alter the typical opacity
of the paint. Do not use pure
windscreen washer fluid for
cleaning the front windscreen and
rear window; dilute it min. 50%
with water. Only use pure screen
washer fluid when strictly
necessary due to outside
temperature conditions.
INTERIORS
154) 155) 156)
Periodically check the cleanliness of the
interior, beneath the mats, which could
cause oxidation of the sheet metal.
SEATS AND FABRIC
PARTS
Remove dust with a soft brush or a
vacuum cleaner. It is advisable to use a
moist brush on velvet upholstery. Rub
the seats with a sponge moistened with
a solution of water and neutral
detergent.
LEATHER SEATS
(for versions/markets, where provided)
Remove the dry dirt with a slightly
damp buckskin or cloth, without
exercising too much pressure. Remove
any liquid or grease stains using an
absorbent dry cloth, without rubbing.
Then clean with a soft cloth or buckskin
cloth dampened with water and mild
soap. If the stain persists, use specific
products and observe the instructions
carefully.
IMPORTANT Never use alcohol. Make
sure that the cleaning products used
contain no alcohol or alcohol
derivatives, even in small quantities.
220
SERVICING AND MAINTENANCE