Alfa Romeo Giulietta 2016 Owner's Manual
Manufacturer: ALFA ROMEO, Model Year: 2016, Model line: Giulietta, Model: Alfa Romeo Giulietta 2016Pages: 288, PDF Size: 7.34 MB
Page 161 of 288
❒the brake pedal is pressed for longer
than 10 minutes;
❒the driver's door is opened with
creeping deactivated (for example
with handbrake engaged) without
pressing brake and/or accelerator
pedals;
❒a fault has been detected in the
transmission.
IMPORTANT Shifting to neutral (N) -
operated by the system - involves
a situation of inconsistency between
gear lever position and gear engaged.
The manoeuvre is accompanied by
an acoustic inconsistency signal. This
acoustic signal continues until the gear
lever is placed in P or N, to restore
the correct transmission operation
conditions.
PARKING THE CAR
To park safely, with the brake pedal
pressed, P must be engaged and, in
case of parking uphills/downhills, the
handbrake must be engaged.
Before releasing the brake pedal, wait
until P appears on the display.
IMPORTANT NEVER leave the car
before having positioned the lever in P.TOWING THE CAR
Make sure that the transmission is in
neutral (N), checking that the car moves
when pushed, and proceed in the
same way as for towing a normal car
with a manual gearbox.
IMPORTANT If the transmission cannot
be put in neutral (N), do not tow the
car and contact an Alfa Romeo
Dealership. Should the lever be in P,
release it before towing (see paragraph
"Positions of the lever").
IMPORTANT
INFORMATION
With car stationary and gear engaged,
always keep the brake pedal pressed
until you decide to set off, then release
the brake and accelerate gradually.
During prolonged stops with the engine
running, it is advisable to keep the
transmission in neutral (N).
To protect the clutch, never use the
accelerator to keep the car stationary
(for example when stopped uphills/
downhills): clutch overheating could
damage it. Use the brake pedal instead
or the handbrake and only press the
accelerator pedal when you wish to set
off.If reverse (R) is engaged, only engage
the 1stgear (or vice versa) when the car
is completely stopped.
Although it is highly inadvisable, if you
are driving downhill and, for unexpected
reasons, you let the car move forward
with the transmission in neutral (N),
when there is a request to engage
a gear, depending on the speed of the
car, the system will automatically
engage the best gear for the correct
transmission of drive torque to the
wheels.
107)
IMPORTANT
21) If the car is on a gradient, always
pull the handbrake BEFORE
placing the gear lever in P.
22) Engage reverse only with the car
stationary, engine at idling speed
and accelerator fully released.
157
Page 162 of 288
WARNING
106) Using the levers incorrectly
(levers pushed towards the
dashboard, see fig. 137) could
break them.
107) Never leave children
unattended in the car. Always
remove the ignition key when
leaving the car and take the key
with you.
108) The Launch control function is
only available in Dynamic mode.
Regardless of what is explicitly
indicated in the description of
these modes, the ESC and ASR
systems are deactivated during
operation of the Launch Control
function. This means that vehicle
dynamic control is the sole
responsibility of the driver.
Therefore pay the utmost
attention when using the Launch
Control. Take into account traffic
and road surface conditions and
during manoeuvres make sure
there is enough room in the area
concerned.
SAVING FUEL
Here are some suggestions which can
help you to save fuel and lower harmful
emissions.
GENERAL
CONSIDERATIONS
Car maintenance
Checks and adjustments should be
carried out in accordance with the
“Scheduled Servicing Plan” (see
chapter “Maintenance and care”).
Tyres
Check the tyre pressures at least once
every four weeks: if the pressure is
too low, consumption levels increase as
resistance to rolling is higher.
Unnecessary loads
Do not travel with an overloaded boot.
The weight of the car and its
arrangement greatly affect fuel
consumption and stability.Roof rack/ski rack
Remove the roof rack or the ski rack
from the roof after use. These
accessories lower aerodynamic
penetration and adversely affect
consumption levels. When transporting
particularly large objects, use a trailer
if possible.
Electrical devices
Use the electrical devices only for the
necessary amount of time. The heated
rear window, additional headlights,
screen wipers and heater fan require a
considerable amount of energy;
increasing the current uptake increases
fuel consumption (by up to +25% in
an urban cycle).
Climate control system
Using the climate control system will
increase consumption: use the air vents
when the temperature outside permits.
Devices for
aerodynamic control
The use of non-certified devices for
aerodynamic control may adversely
affect air drag and fuel consumption.
158
STARTING AND DRIVING
Page 163 of 288
DRIVING STYLE
Starting
Do not warm up the engine at low or
high revs when the car is stationary;
this causes the engine to warm up
more slowly, thereby increasing fuel
consumption and emissions. It is
therefore advisable to move off
immediately, slowly, avoiding high
speeds: in this way the engine will
warm up more quickly.
Unnecessary actions
Avoid accelerating when stopped at
traffic lights or before switching off the
engine. The latter action, as well as
double-declutching, is unnecessary and
causes increased fuel consumption
and pollution.
Gear selection
Use a high gear when traffic and road
conditions allow it. Using a low gear for
faster acceleration will increase fuel
consumption. In the same way
improper use of a high gear increases
consumption, emissions and engine
wear.Maximum speed
Fuel consumption considerably
increases as speed increases. Maintain
a constant speed, avoiding
unnecessary braking and acceleration,
which cost in terms of both fuel
consumption and emissions.
Acceleration
Accelerating violently severely affects
consumption and emissions:
acceleration should be gradual and
should not exceed the maximum
torque.
CONDITIONS OF USE
Cold starting
Short distances and frequent cold
start-ups will prevent the engine from
reaching optimal running temperature.
This results in a significant increase
in consumption levels (from +15 to
+30% on the urban cycle) and
emissions.Traffic and road
conditions
High fuel consumption is caused by
heavy traffic, for instance when
travelling in a queue with frequent use
of low gears or in large towns with
many traffic lights. Winding mountain
roads and rough road surfaces also
adversely affect consumption.
Stops in traffic
During prolonged hold-ups (e.g. level
crossings) switch off the engine.
159
Page 164 of 288
TOWING TRAILERS
IMPORTANT
The vehicle must be provided with a
type-approved tow hook and adequate
electrical system to tow caravans or
trailers. Installation must be carried out
by a specialist.
Fit any specific and/or additional rear
view mirrors as specified by the
Highway Code.
Remember that when towing a trailer,
steep hills are harder to climb, the
braking spaces increase and overtaking
takes longer depending on the overall
weight.
Engage a low gear when driving
downhill, rather than constantly using
the brake.
The weight of the trailer reduces the
load capacity of the car by the same
amount. Consider the weight at full
load, including accessories and
luggage, to make sure you do not
exceed the maximum towable weight
(shown in the registration document).
Do not exceed the speed limits specific
to each country you are driving in, in
the case of vehicles towing trailers.
In any case do not exceed 100 km/h.INSTALLING A TOW
HOOK
Contact an Alfa Romeo Dealership to
install a tow hook.
109) 110)
WARNING
109) The ABS with which the car is
equipped will not control the
braking system of the trailer.
Particular caution is therefore
required when travelling on
slippery roads.
110) Never modify the braking
system of the car to control the
trailer brake. The trailer braking
system must be fully independent
from the hydraulic system of the
car.
SNOW TYRES
Use snow tyres of the same size as the
normal tyres provided with the car:
the Alfa Romeo Dealership will be able
to advise you on the most appropriate
tyre to use.
Only use these tyres in the event of ice
or snow on the roads.
111)
For the type of tyre to be used, inflation
pressures and the specifications of
snow tyres, follow the instructions given
in the "Wheels" paragraph in the
"Technical specifications" chapter.
The winter performance of these tyres
is considerably reduced when the tread
thickness is less than 4 mm. Replace
them in this case.
Due to the specific characteristics of
snow tyres, in normal weather
conditions or on long motorway
journeys, the performance of these
tyres is lower than that of standard
tyres. Their usage should therefore be
restricted in accordance with their
type approval.
All four tyres should be the same (brand
and track) to ensure greater safety
when driving and braking as well as
making the car more responsive. It is
inadvisable to change the rotation
direction of tyres.
160
STARTING AND DRIVING
Page 165 of 288
WARNING
111) The maximum speed for snow
tyres marked “Q” is 160 km/h,
while it is 190 km/h for “T” tyres
and 210 km/h for "H" tyres. The
highway code speed limits must
however always be complied with.
SNOW CHAINS
The use of snow chains should be in
compliance with local regulations.
Snow chains can be fitted to the tyres
of the front wheels (drive wheels) only.
Check the tension of the snow chains
after the first few metres have been
driven.
Use low-clearance snow chains: on all
versions, for 195/55 R16", 205/55 R16"
and 225/45 R17" size tyres use
low-clearance snow chains with a
maximum projection beyond the tyre
profile of 9 mm.
23)
IMPORTANT The space-saver wheel
cannot be fitted with snow chains. If a
front (drive) wheel is punctured and
snow chains must be used, you must
remove a normal wheel from the rear
axle and replace it with the space-saver
wheel. In this way, with two normal
drive wheels, it is possible to use snow
chains.
IMPORTANT
23) Keep your speed down when
snow chains are fitted; do not
exceed 50 km/h. Avoid potholes,
steps and pavements and avoid
driving for long distances on
roads not covered with snow to
prevent damaging the car and the
road surface.
161
Page 166 of 288
STORING THE CAR
If the car is to be left inactive for longer
than a month, the following precautions
should be noted:
❒park the car in covered, dry and if
possible well-ventilated premises and
slightly open the windows;
❒check that the handbrake is not
engaged;
❒disconnect the negative battery
terminal and check the battery
charge. Repeat this check once
every three months during storage;
❒if the battery is not disconnected
from the electrical system, checks its
state of charge every thirty days;
❒clean and protect the painted parts
using protective wax;
❒clean and protect the shiny metal
parts using special compounds
available commercially;
❒sprinkle talcum powder on the
windscreen and rear window wiper
rubber blades and lift them off the
glasses;
❒slightly open the windows;❒cover the car with a cloth or
perforated plastic sheet. Do not use
compact plastic sheets which do
not allow humidity to evaporate from
the surface of the car.
❒inflate tyres to +0.5 bar above the
standard prescribed pressure and
check it periodically;
❒do not drain the engine cooling
system;
❒Any time the car is left inactive for
two weeks or more, operate the
air conditioning system with engine
idling for at least 5 minutes, setting
external air and with fan at maximum
speed. This operation will ensure a
suitable lubrication to minimise
possibility of damage to the
compressor when the system is
operated again.
IMPORTANT After turning the ignition
key to STOP, wait at least 1 minute
before disconnecting the electrical
supply to the battery.
162
STARTING AND DRIVING
Page 167 of 288
IN AN EMERGENCY
A punctured tyre or a burnt-out bulb?
At times, a problem may interfere
with our journey.
The pages on emergencies can help
you to deal with critical situations
independently and with calm.
In an emergency we recommend that
you call the freephone number found in
the Warranty Booklet.
It is also possible to call the 00 800
2532 4200 freephone number to
search the nearest Alfa Romeo
Authorised Network.STARTING THE ENGINE .................164
REPLACING A WHEEL ...................165
"FIX&GO AUTOMATIC" KIT .............170
CHANGING A BULB .......................173
REPLACING EXTERIOR BULBS......177
INTERIOR BULB REPLACEMENT ...180
REPLACING FUSES........................181
BATTERY RECHARGING ................191
RAISING THE CAR..........................192
TOWING THE CAR .........................192
163
Page 168 of 288
STARTING THE
ENGINE
Contact the Alfa Romeo Dealership
immediately if the warning light
stays on constantly on the
instrument panel.
JUMP STARTING
If the battery is flat, start the engine
using an auxiliary battery with the same
capacity or a little higher than the flat
one.
24) 25)112)
Proceed as follows to start the car:
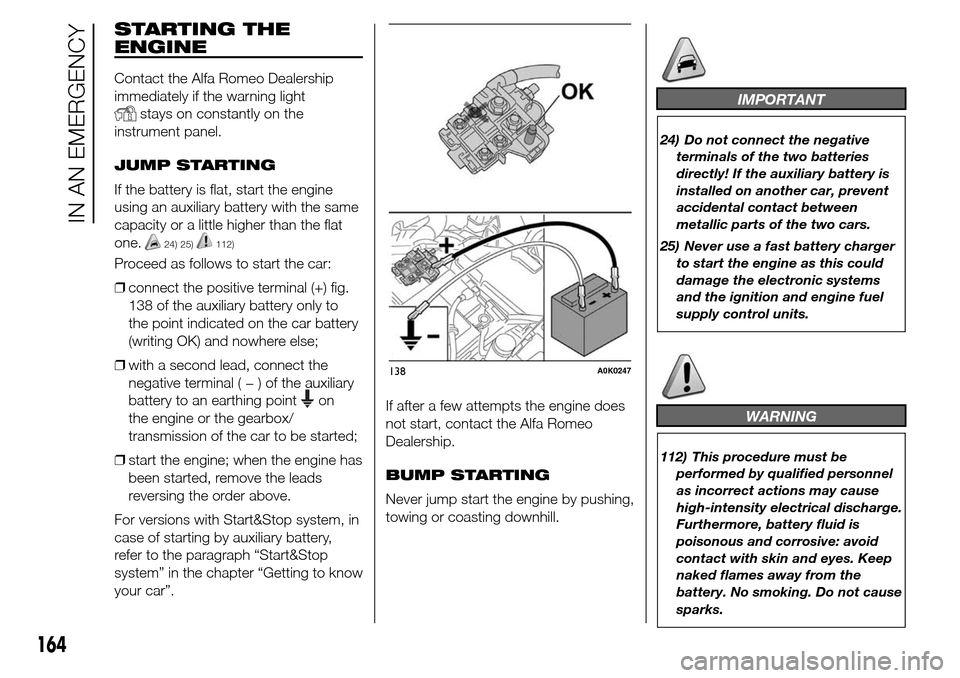
❒connect the positive terminal (+) fig.
138 of the auxiliary battery only to
the point indicated on the car battery
(writing OK) and nowhere else;
❒with a second lead, connect the
negative terminal(−)oftheauxiliary
battery to an earthing point
on
the engine or the gearbox/
transmission of the car to be started;
❒start the engine; when the engine has
been started, remove the leads
reversing the order above.
For versions with Start&Stop system, in
case of starting by auxiliary battery,
refer to the paragraph “Start&Stop
system” in the chapter “Getting to know
your car”.If after a few attempts the engine does
not start, contact the Alfa Romeo
Dealership.
BUMP STARTING
Never jump start the engine by pushing,
towing or coasting downhill.
IMPORTANT
24) Do not connect the negative
terminals of the two batteries
directly! If the auxiliary battery is
installed on another car, prevent
accidental contact between
metallic parts of the two cars.
25) Never use a fast battery charger
to start the engine as this could
damage the electronic systems
and the ignition and engine fuel
supply control units.
WARNING
112) This procedure must be
performed by qualified personnel
as incorrect actions may cause
high-intensity electrical discharge.
Furthermore, battery fluid is
poisonous and corrosive: avoid
contact with skin and eyes. Keep
naked flames away from the
battery. No smoking. Do not cause
sparks.
138A0K0247
164
IN AN EMERGENCY
Page 169 of 288
REPLACING A
WHEEL
GENERAL
INSTRUCTIONS
The car is equipped with the “Fix&Go
Automatic Kit”: see the paragraph
“Fix&Go Automatic Kit” for how to use
this device.
As an alternative to the “Fix&Go
Automatic Kit” the car may be
requested with a space-saver wheel:
see the instructions on the following
pages for changing the wheel.
113) 114) 115) 116) 117)
JACK
Please note that:
❒the jack weight is 1.76 kg;
❒the jack requires no adjustment;
❒the jack cannot be repaired and in
the event of a fault it must be
replaced by another original one;
❒no tool other than its cranking device
may be fitted on the jack.
To change a wheel, proceed as follows:❒stop the car in a position that is not
dangerous for oncoming traffic
where you can change the wheel
safely. The ground should be flat
if possible, and sufficiently firm;
❒switch off the engine, pull up the
handbrake and engage the 1
stgear
or reverse. Wear the reflective safety
jacket (compulsory by law) before
getting out of the car;
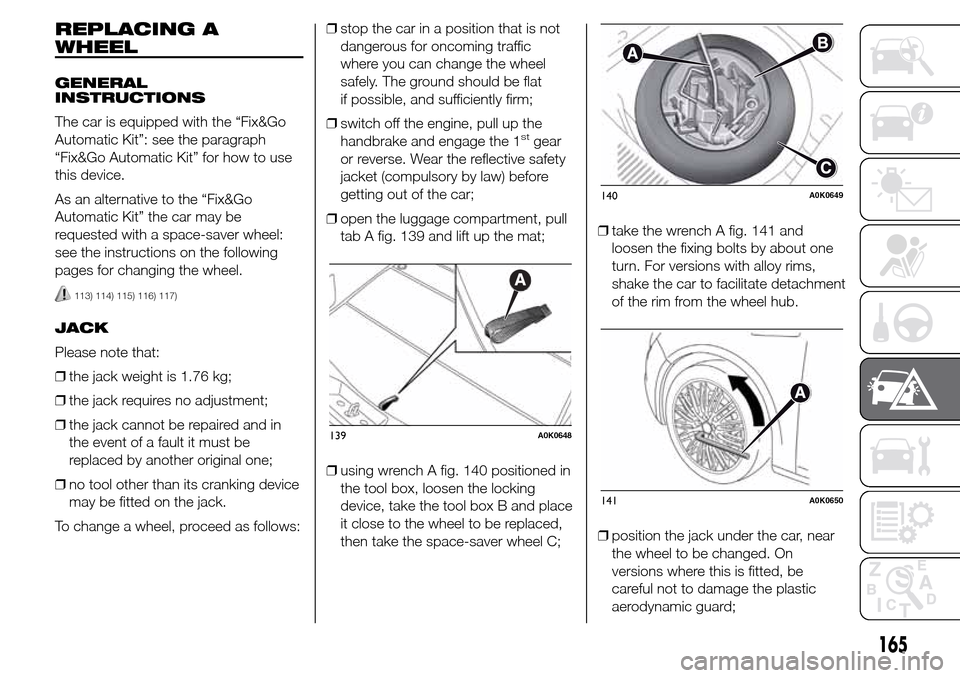
❒open the luggage compartment, pull
tab A fig. 139 and lift up the mat;
❒using wrench A fig. 140 positioned in
the tool box, loosen the locking
device, take the tool box B and place
it close to the wheel to be replaced,
then take the space-saver wheel C;❒take the wrench A fig. 141 and
loosen the fixing bolts by about one
turn. For versions with alloy rims,
shake the car to facilitate detachment
of the rim from the wheel hub.
❒position the jack under the car, near
the wheel to be changed. On
versions where this is fitted, be
careful not to damage the plastic
aerodynamic guard;
139A0K0648
140A0K0649
141A0K0650
165
Page 170 of 288
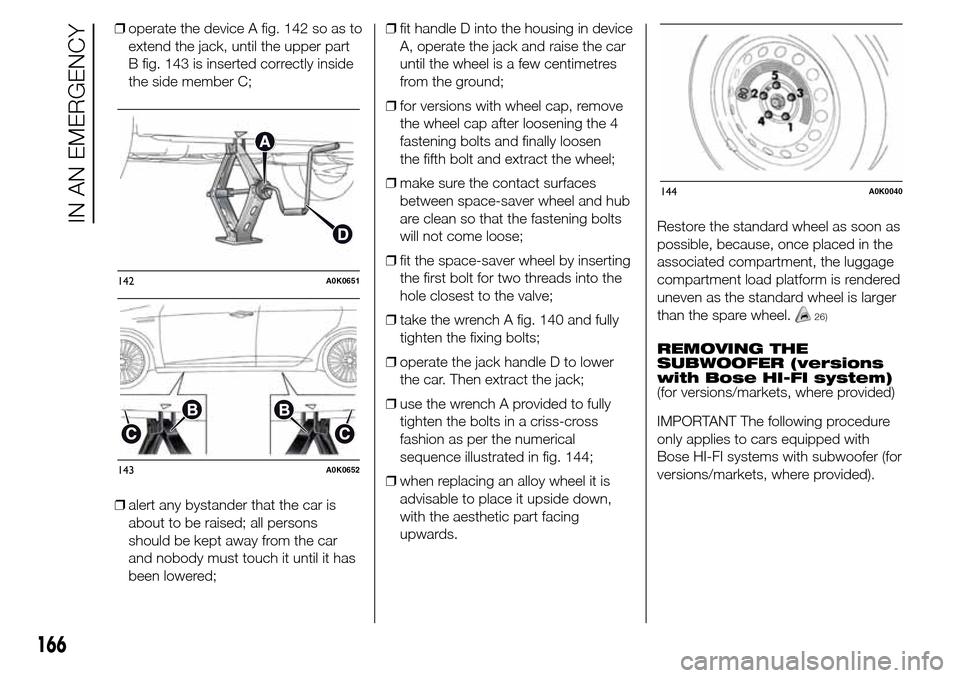
❒operate the device A fig. 142 so as to
extend the jack, until the upper part
B fig. 143 is inserted correctly inside
the side member C;
❒alert any bystander that the car is
about to be raised; all persons
should be kept away from the car
and nobody must touch it until it has
been lowered;❒fit handle D into the housing in device
A, operate the jack and raise the car
until the wheel is a few centimetres
from the ground;
❒for versions with wheel cap, remove
the wheel cap after loosening the 4
fastening bolts and finally loosen
the fifth bolt and extract the wheel;
❒make sure the contact surfaces
between space-saver wheel and hub
are clean so that the fastening bolts
will not come loose;
❒fit the space-saver wheel by inserting
the first bolt for two threads into the
hole closest to the valve;
❒take the wrench A fig. 140 and fully
tighten the fixing bolts;
❒operate the jack handle D to lower
the car. Then extract the jack;
❒use the wrench A provided to fully
tighten the bolts in a criss-cross
fashion as per the numerical
sequence illustrated in fig. 144;
❒when replacing an alloy wheel it is
advisable to place it upside down,
with the aesthetic part facing
upwards.Restore the standard wheel as soon as
possible, because, once placed in the
associated compartment, the luggage
compartment load platform is rendered
uneven as the standard wheel is larger
than the spare wheel.
26)
REMOVING THE
SUBWOOFER (versions
with Bose HI-FI system)
(for versions/markets, where provided)
IMPORTANT The following procedure
only applies to cars equipped with
Bose HI-FI systems with subwoofer (for
versions/markets, where provided).
142A0K0651
143A0K0652
144A0K0040
166
IN AN EMERGENCY