Alfa Romeo Giulietta 2016 Owner's Manual
Manufacturer: ALFA ROMEO, Model Year: 2016, Model line: Giulietta, Model: Alfa Romeo Giulietta 2016Pages: 288, PDF Size: 7.34 MB
Page 171 of 288
Subwoofer and space-
saver spare wheel
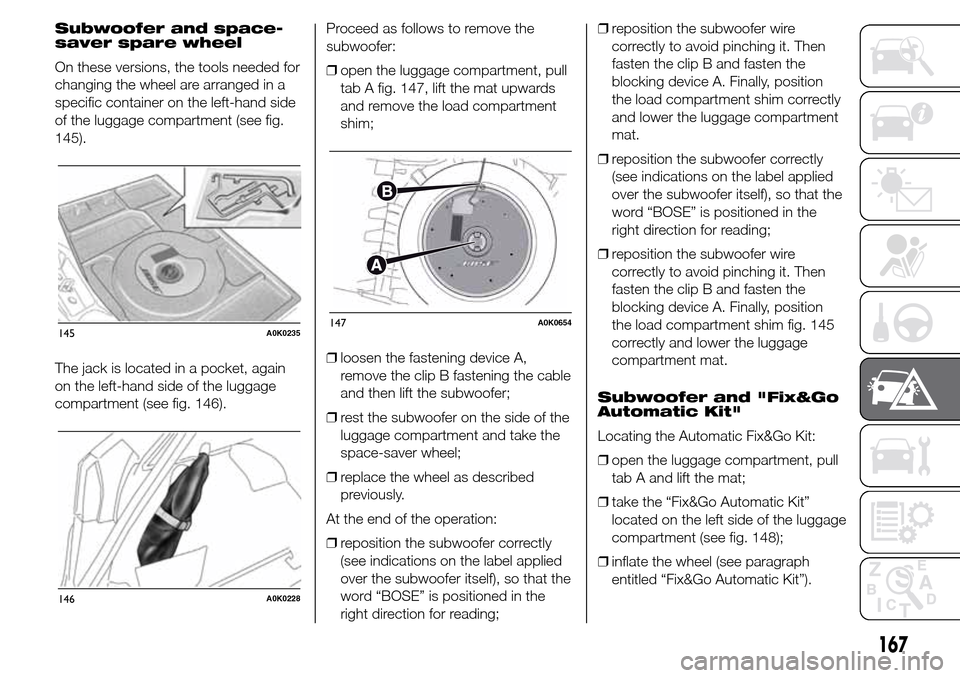
On these versions, the tools needed for
changing the wheel are arranged in a
specific container on the left-hand side
of the luggage compartment (see fig.
145).
The jack is located in a pocket, again
on the left-hand side of the luggage
compartment (see fig. 146).Proceed as follows to remove the
subwoofer:
❒open the luggage compartment, pull
tab A fig. 147, lift the mat upwards
and remove the load compartment
shim;
❒loosen the fastening device A,
remove the clip B fastening the cable
and then lift the subwoofer;
❒rest the subwoofer on the side of the
luggage compartment and take the
space-saver wheel;
❒replace the wheel as described
previously.
At the end of the operation:
❒reposition the subwoofer correctly
(see indications on the label applied
over the subwoofer itself), so that the
word “BOSE” is positioned in the
right direction for reading;❒reposition the subwoofer wire
correctly to avoid pinching it. Then
fasten the clip B and fasten the
blocking device A. Finally, position
the load compartment shim correctly
and lower the luggage compartment
mat.
❒reposition the subwoofer correctly
(see indications on the label applied
over the subwoofer itself), so that the
word “BOSE” is positioned in the
right direction for reading;
❒reposition the subwoofer wire
correctly to avoid pinching it. Then
fasten the clip B and fasten the
blocking device A. Finally, position
the load compartment shim fig. 145
correctly and lower the luggage
compartment mat.
Subwoofer and "Fix&Go
Automatic Kit"
Locating the Automatic Fix&Go Kit:
❒open the luggage compartment, pull
tab A and lift the mat;
❒take the “Fix&Go Automatic Kit”
located on the left side of the luggage
compartment (see fig. 148);
❒inflate the wheel (see paragraph
entitled “Fix&Go Automatic Kit”).
145A0K0235
146A0K0228
147A0K0654
167
Page 172 of 288
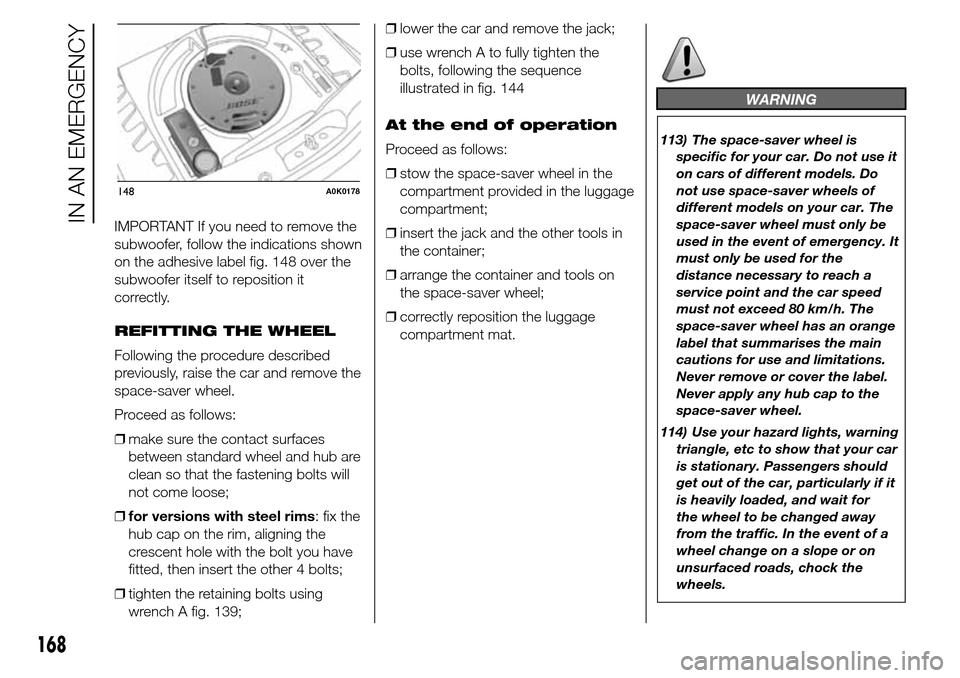
IMPORTANT If you need to remove the
subwoofer, follow the indications shown
on the adhesive label fig. 148 over the
subwoofer itself to reposition it
correctly.
REFITTING THE WHEEL
Following the procedure described
previously, raise the car and remove the
space-saver wheel.
Proceed as follows:
❒make sure the contact surfaces
between standard wheel and hub are
clean so that the fastening bolts will
not come loose;
❒for versions with steel rims: fix the
hub cap on the rim, aligning the
crescent hole with the bolt you have
fitted, then insert the other 4 bolts;
❒tighten the retaining bolts using
wrench A fig. 139;❒lower the car and remove the jack;
❒use wrench A to fully tighten the
bolts, following the sequence
illustrated in fig. 144
At the end of operation
Proceed as follows:
❒stow the space-saver wheel in the
compartment provided in the luggage
compartment;
❒insert the jack and the other tools in
the container;
❒arrange the container and tools on
the space-saver wheel;
❒correctly reposition the luggage
compartment mat.
WARNING
113) The space-saver wheel is
specific for your car. Do not use it
on cars of different models. Do
not use space-saver wheels of
different models on your car. The
space-saver wheel must only be
used in the event of emergency. It
must only be used for the
distance necessary to reach a
service point and the car speed
must not exceed 80 km/h. The
space-saver wheel has an orange
label that summarises the main
cautions for use and limitations.
Never remove or cover the label.
Never apply any hub cap to the
space-saver wheel.
114) Use your hazard lights, warning
triangle, etc to show that your car
is stationary. Passengers should
get out of the car, particularly if it
is heavily loaded, and wait for
the wheel to be changed away
from the traffic. In the event of a
wheel change on a slope or on
unsurfaced roads, chock the
wheels.
148A0K0178
168
IN AN EMERGENCY
Page 173 of 288
115) Car handling is modified with
the space-saver wheel fitted.
Avoid violent acceleration and
braking, abrupt steering and fast
cornering. The overall duration
of the space-saver wheel is of
about 3000 km, after which the
relevant tyre must be replaced
with another one of the same
type. Never install a traditional
tyre on a rim designed to be used
as a space-saver wheel. Have
the wheel repaired and refitted as
soon as possible. Using two or
more space-saver wheels at the
same time is forbidden. Do not
grease the bolt threads before you
fit them, because they could
suddenly come loose.116) Use the jack only to replace
wheels on the car with which it
is supplied or on other cars of the
same model. Never use the jack
for other purposes, such as lifting
other car models. Never use it
for repair operations under the
car. Incorrect positioning of the
jack may cause the car to fall. Do
not use the jack for loads higher
than those shown on the label.
Never install snow chains on the
space-saver wheel; if a front tyre
(driving wheel) is punctured and
you need to use snow chains, use
a standard wheel from the rear
axle and install the space-saver
wheel on the rear axle. In this
way, with two normal front drive
wheels, it is possible to use snow
chains.
117) Incorrect hub cap assembly
may cause it to come off when the
car is moving. Never tamper with
the inflation valve. Never
introduce tools of any kind
between rim and tyre. Regularly
check the inflation pressure of the
tyres and space-saver wheel
(see chapter "Technical
specifications").
IMPORTANT
26) Contact an Alfa Romeo
Dealership as soon as possible to
have the correct tightening of
the wheel bolts checked.
169
Page 174 of 288
"Fix&Go Automatic"
kit
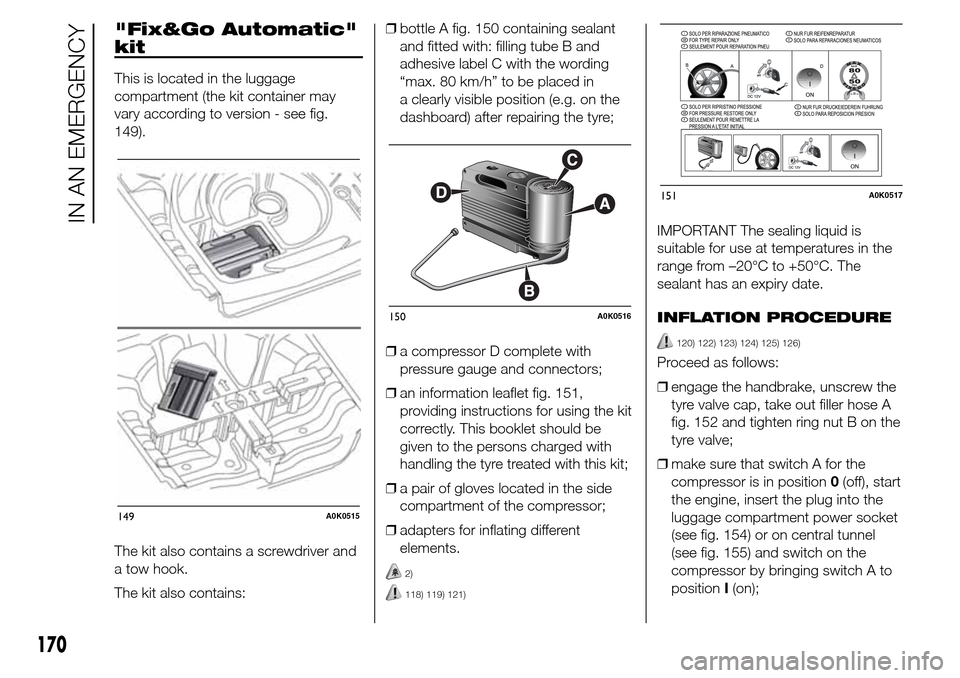
This is located in the luggage
compartment (the kit container may
vary according to version - see fig.
149).
The kit also contains a screwdriver and
a tow hook.
The kit also contains:❒bottle A fig. 150 containing sealant
and fitted with: filling tube B and
adhesive label C with the wording
“max. 80 km/h” to be placed in
a clearly visible position (e.g. on the
dashboard) after repairing the tyre;
❒a compressor D complete with
pressure gauge and connectors;
❒an information leaflet fig. 151,
providing instructions for using the kit
correctly. This booklet should be
given to the persons charged with
handling the tyre treated with this kit;
❒a pair of gloves located in the side
compartment of the compressor;
❒adapters for inflating different
elements.
2)
118) 119) 121)
IMPORTANT The sealing liquid is
suitable for use at temperatures in the
range from –20°C to +50°C. The
sealant has an expiry date.
INFLATION PROCEDURE
120) 122) 123) 124) 125) 126)
Proceed as follows:
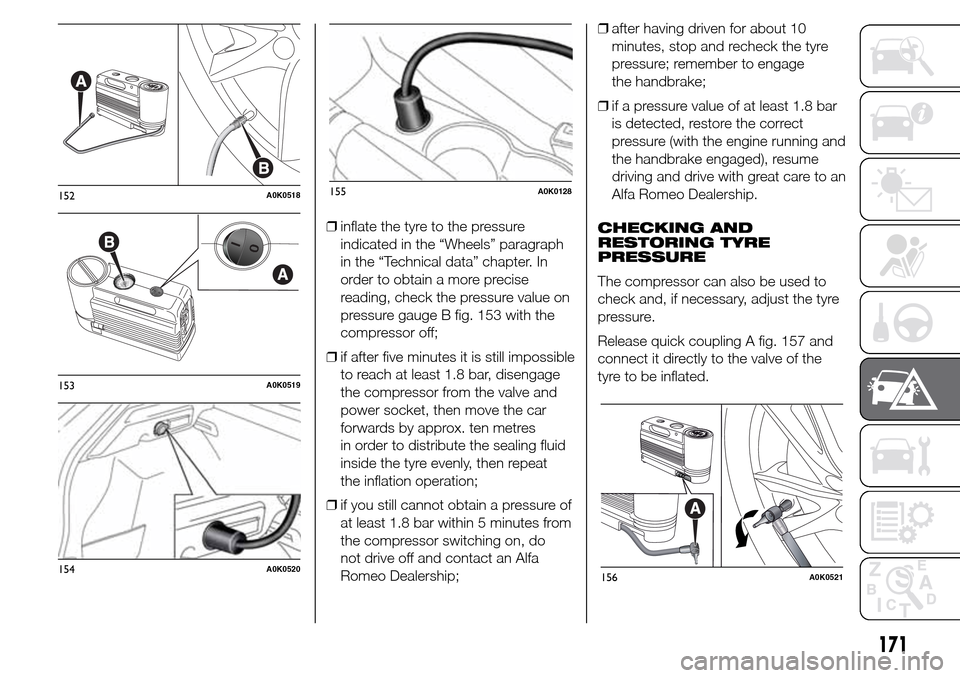
❒engage the handbrake, unscrew the
tyre valve cap, take out filler hose A
fig. 152 and tighten ring nut B on the
tyre valve;
❒make sure that switch A for the
compressor is in position0(off), start
the engine, insert the plug into the
luggage compartment power socket
(see fig. 154) or on central tunnel
(see fig. 155) and switch on the
compressor by bringing switch A to
positionI(on);
149A0K0515
150A0K0516
151A0K0517
170
IN AN EMERGENCY
Page 175 of 288
❒inflate the tyre to the pressure
indicated in the “Wheels” paragraph
in the “Technical data” chapter. In
order to obtain a more precise
reading, check the pressure value on
pressure gauge B fig. 153 with the
compressor off;
❒if after five minutes it is still impossible
to reach at least 1.8 bar, disengage
the compressor from the valve and
power socket, then move the car
forwards by approx. ten metres
in order to distribute the sealing fluid
inside the tyre evenly, then repeat
the inflation operation;
❒if you still cannot obtain a pressure of
at least 1.8 bar within 5 minutes from
the compressor switching on, do
not drive off and contact an Alfa
Romeo Dealership;❒after having driven for about 10
minutes, stop and recheck the tyre
pressure; remember to engage
the handbrake;
❒if a pressure value of at least 1.8 bar
is detected, restore the correct
pressure (with the engine running and
the handbrake engaged), resume
driving and drive with great care to an
Alfa Romeo Dealership.
CHECKING AND
RESTORING TYRE
PRESSURE
The compressor can also be used to
check and, if necessary, adjust the tyre
pressure.
Release quick coupling A fig. 157 and
connect it directly to the valve of the
tyre to be inflated.
152A0K0518
153A0K0519
154A0K0520
155A0K0128
156A0K0521
171
Page 176 of 288
REPLACING THE BOTTLE
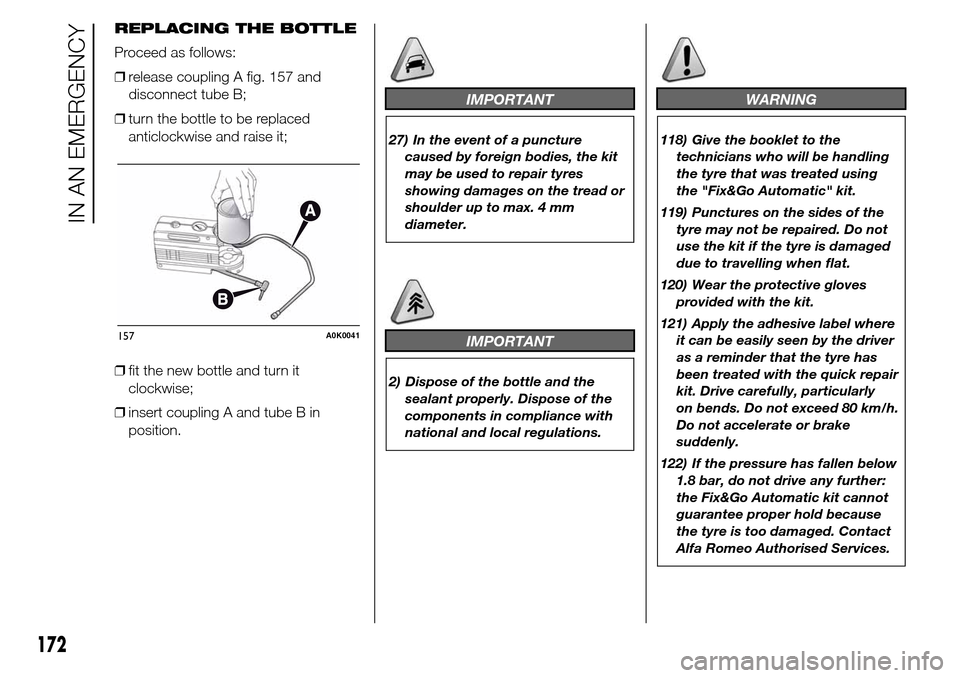
Proceed as follows:
❒release coupling A fig. 157 and
disconnect tube B;
❒turn the bottle to be replaced
anticlockwise and raise it;
❒fit the new bottle and turn it
clockwise;
❒insert coupling A and tube B in
position.
IMPORTANT
27) In the event of a puncture
caused by foreign bodies, the kit
may be used to repair tyres
showing damages on the tread or
shoulder up to max. 4 mm
diameter.
IMPORTANT
2) Dispose of the bottle and the
sealant properly. Dispose of the
components in compliance with
national and local regulations.
WARNING
118) Give the booklet to the
technicians who will be handling
the tyre that was treated using
the "Fix&Go Automatic" kit.
119) Punctures on the sides of the
tyre may not be repaired. Do not
use the kit if the tyre is damaged
due to travelling when flat.
120) Wear the protective gloves
provided with the kit.
121) Apply the adhesive label where
it can be easily seen by the driver
as a reminder that the tyre has
been treated with the quick repair
kit. Drive carefully, particularly
on bends. Do not exceed 80 km/h.
Do not accelerate or brake
suddenly.
122) If the pressure has fallen below
1.8 bar, do not drive any further:
the Fix&Go Automatic kit cannot
guarantee proper hold because
the tyre is too damaged. Contact
Alfa Romeo Authorised Services.
157A0K0041
172
IN AN EMERGENCY
Page 177 of 288
123) Always indicate that the tyre
was repaired using the quick
tyre repair kit. Give the booklet to
the technicians who will be
handling the tyre that was treated
using the kit.
124) Repair is not possible if the
wheel rim is damaged (groove
is deformed, causing air to
escape). Do not remove foreign
bodies (screws or nails) from the
tyre.
125) Do not operate the compressor
for longer than 20 minutes
consecutively. Risk of
overheating. The kit is not suitable
for definitive repairs, so the
repaired tyres may only be used
temporarily.126) The bottle contains ethylene
glycol and latex: it may cause
an allergic reaction. It is harmful if
swallowed. It is irritant for the
eyes. It may cause sensitisation if
inhaled or on contact. Avoid
contact with eyes, skin and
clothes. In the event of contact,
rinse immediately with plenty
of water. If ingested, do not
induce vomiting. Rinse out your
mouth, drink large quantities
of water and seek immediate
medical attention. Keep out of the
reach of children. The product
must not be used by asthmatics.
Do not inhale the vapours during
insertion and suction. Call a
doctor immediately if allergic
reactions are noted. Store the
bottle in its proper compartment,
away from sources of heat. The
sealant fluid has an expiry date.
Replace the bottle containing
out-of-date sealant fluid.CHANGING A BULB
28)
127) 128) 129)
GENERAL
INSTRUCTIONS
❒Before changing a bulb check the
contacts for oxidation;
❒replace blown bulbs with others of
the same type and power;
❒after replacing a headlight bulb,
always check its alignment;
❒when a light is not working, check
that the corresponding fuse is intact
before changing the bulb. For the
location of fuses, refer to the
paragraph “If a fuse blows” in this
chapter.
173
Page 178 of 288
IMPORTANT When the weather is cold
or damp or after heavy rain or washing,
the surface of headlights or rear lights,
may steam up and/or form drops of
condensation on the inside. This is
a natural phenomenon due to the
difference in temperature and humidity
between the inside and the outside
of the glass which does not indicate a
fault and does not compromise the
normal operation of lighting devices.
The mist disappears quickly when the
lights are turned on, starting from
the centre of the diffuser, extending
progressively towards the edges.
IMPORTANT
28) Halogen bulbs must be handled
by holding the metallic part only.
Touching the transparent part
of the bulb with your fingers may
reduce the intensity of the
emitted light and even reduce the
lifespan of the bulb. In the case
of accidental contact, rub the
lamp with a cloth and spirit and
leave to dry.
WARNING
127) Changes or repairs to the
electrical system carried out
incorrectly and without due
consideration for the technical
specifications of the system may
lead to malfunctioning and
generate a fire hazard.
128) Halogen bulbs contain
pressurised gas. If they break,
glass fragments could fly
everywhere.
129) Due to the high supply voltage,
gas discharge bulbs (Bi-Xenon)
should only be replaced by
specialised personnel: danger of
death! Contact an Alfa Romeo
Dealership.
174
IN AN EMERGENCY
Page 179 of 288
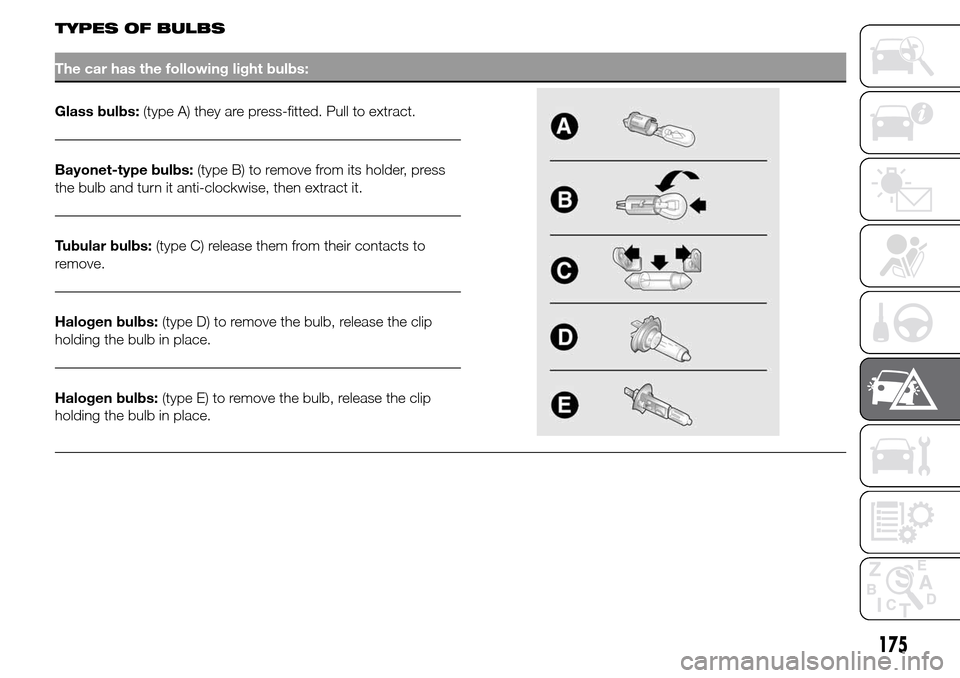
TYPES OF BULBS
The car has the following light bulbs:
Glass bulbs:(type A) they are press-fitted. Pull to extract.
Bayonet-type bulbs:(type B) to remove from its holder, press
the bulb and turn it anti-clockwise, then extract it.
Tubular bulbs:(type C) release them from their contacts to
remove.
Halogen bulbs:(type D) to remove the bulb, release the clip
holding the bulb in place.
Halogen bulbs:(type E) to remove the bulb, release the clip
holding the bulb in place.
175
Page 180 of 288
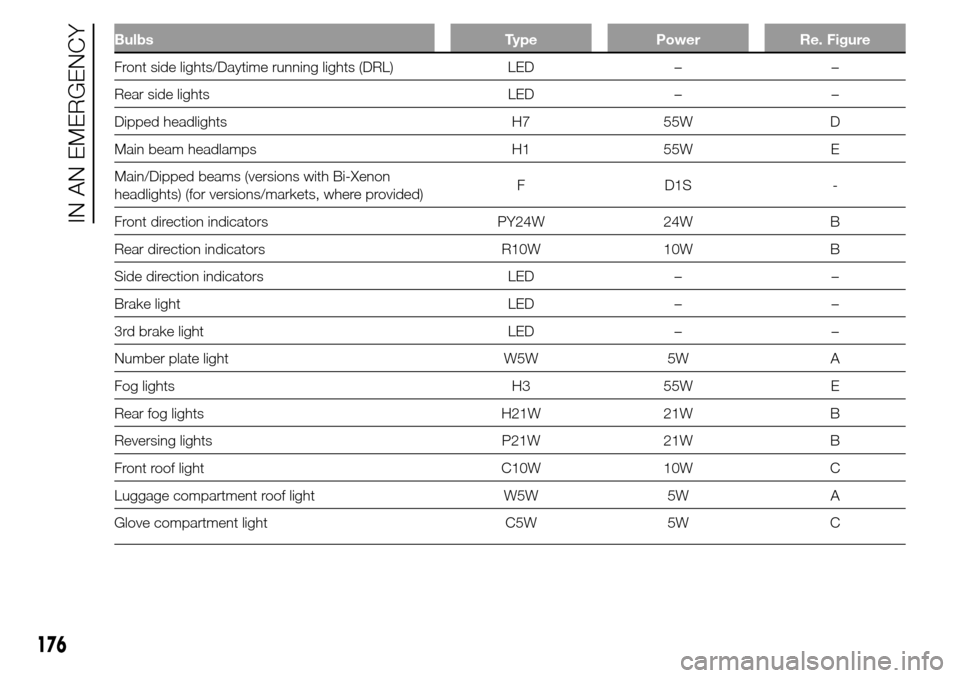
Bulbs Type Power Re. Figure
Front side lights/Daytime running lights (DRL) LED – –
Rear side lights LED – –
Dipped headlights H7 55W D
Main beam headlamps H1 55W E
Main/Dipped beams (versions with Bi-Xenon
headlights) (for versions/markets, where provided)F D1S -
Front direction indicators PY24W 24W B
Rear direction indicators R10W 10W B
Side direction indicators LED – –
Brake light LED – –
3rd brake light LED – –
Number plate light W5W 5W A
Fog lights H3 55W E
Rear fog lights H21W 21W B
Reversing lights P21W 21W B
Front roof light C10W 10W C
Luggage compartment roof light W5W 5W A
Glove compartment light C5W 5W C
176
IN AN EMERGENCY