roof Alfa Romeo Giulietta 2017 Owner's Manual
[x] Cancel search | Manufacturer: ALFA ROMEO, Model Year: 2017, Model line: Giulietta, Model: Alfa Romeo Giulietta 2017Pages: 212, PDF Size: 4.56 MB
Page 9 of 212
In-depth knowledge of your new car starts here.
The booklet that you are reading simply and directly explains how
it is made and how it works.
That’s why we advise you to read it seated comfortably on board,
so that you can see what is described here for yourself.
GETTING TO KNOW YOUR CAR
THEKEYS....................................8
IGNITION DEVICE...............................9
ALFA ROMEO CODE SYSTEM.......................10
ALARM SYSTEM ...............................11
DOORS.....................................11
SEATS.....................................13
HEADRESTS.................................15
STEERING WHEEL..............................15
REAR VIEW MIRRORS...........................16
EXTERNAL LIGHTS .............................17
INTERIOR LIGHTS..............................20
WINDSCREEN/REAR WINDOW WIPER . ................20
CLIMATE CONTROL SYSTEM.......................22
ELECTRIC WINDOWS............................26
ELECTRIC SUNROOF............................27
ENGINE BONNET . .............................29
BOOT......................................30
HEADLIGHTS.................................31
Alfa DNA SYSTEM (Car dynamic control system) . . .........31
VERSION WITH LPG SYSTEM.......................32
Page 10 of 212
THE KEYS
MECHANICAL KEY
Operation
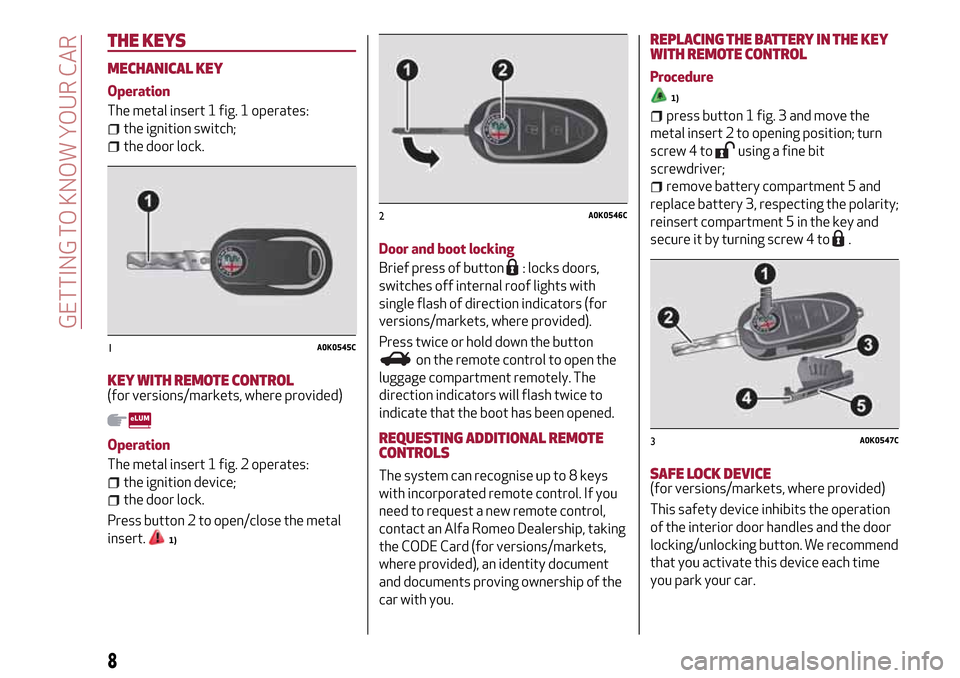
The metal insert 1 fig. 1 operates:
the ignition switch;
the door lock.
KEY WITH REMOTE CONTROL(for versions/markets, where provided)
Operation
The metal insert 1 fig. 2 operates:
the ignition device;
the door lock.
Press button 2 to open/close the metal
insert.
1)
Door and boot locking
Brief press of button
: locks doors,
switches off internal roof lights with
single flash of direction indicators (for
versions/markets, where provided).
Press twice or hold down the button
on the remote control to open the
luggage compartment remotely. The
direction indicators will flash twice to
indicate that the boot has been opened.
REQUESTING ADDITIONAL REMOTE
CONTROLS
The system can recognise up to 8 keys
with incorporated remote control. If you
need to request a new remote control,
contact an Alfa Romeo Dealership, taking
the CODE Card (for versions/markets,
where provided), an identity document
and documents proving ownership of the
car with you.
REPLACING THE BATTERY IN THE KEY
WITH REMOTE CONTROL
Procedure
1)
press button 1 fig. 3 and move the
metal insert 2 to opening position; turn
screw 4 to
using a fine bit
screwdriver;
remove battery compartment 5 and
replace battery 3, respecting the polarity;
reinsert compartment 5 in the key and
secure it by turning screw 4 to
.
SAFE LOCK DEVICE(for versions/markets, where provided)
This safety device inhibits the operation
of the interior door handles and the door
locking/unlocking button. We recommend
that you activate this device each time
you park your car.
1A0K0545C
2A0K0546C
3A0K0547C
8
GETTING TO KNOW YOUR CAR
Page 13 of 212
ALARMSYSTEM
(for versions/markets, where provided)
ALARM ACTIVATION
Activation of the alarm triggers the
acoustic warning and the direction
indicators.
IMPORTANT The alarm is adapted by the
Manufacturer to meet the requirements
of the various countries where the
vehicle is marketed.
SWITCHING ON THE ALARM
With the doors, bonnet and tailgate
closed and the ignition key either turned
to STOP or removed, point the key with
remote control towards the car and press
and release the button
.
Except on some versions for specific
markets, the system produces a visual
and acoustic warning and enables door
locking.
ALARM SELF-ACTIVATION(for versions/markets, where provided)
If the alarm has not been activated using
the remote control, approximately
30 seconds after the key is turned to the
STOP position and the last time one of
the doors or tailgate was opened and
reclosed, the alarm is activated
automatically.This condition is indicated by the
intermittent illumination of the LED on
the alarm deactivation button on the roof
light and by the activation indications
described previously.
To deactivate the alarm, press the button
on the remote control.
Alarm self-activation also occurs when
the doors are closed by turning the metal
insert of the key in the driver door lock. If
the alarm is self-activated, the doors will
not be locked.
TURNING THE ALARM OFF
IMPORTANT Activating the central
opening using the key's metal insert does
not turn the alarm off.
DOORS
DOOR CENTRAL LOCKING/UNLOCKING
Locking from the outside
With the doors closed, press the
button on the key or fit and then turn
the metal insert (located inside the key)
in the driver side door lock.
The door locking function is operated:
with all the doors closed;
with all the doors closed and boot
open.
Door unlocking from the outside
Press the
button on the key or turn the
metal insert (located inside the key) in
the driver side door lock.
Door locking/unlocking from the inside
Press the
button on the dashboard.
IMPORTANT With central locking active,
pulling the internal opening lever of the
passenger side door unlocks the door
itself. Pulling the internal opening lever
of the driver side door activates central
unlocking.
IMPORTANT The rear doors cannot be
opened from the inside when the child
lock device is engaged.
In the absence of electrical power supply
(e.g. blown fuse, battery disconnected,
etc.) it is still possible to lock the doors
manually.
11
Page 22 of 212
INTERIOR LIGHTS
FRONT CEILING LIGHT
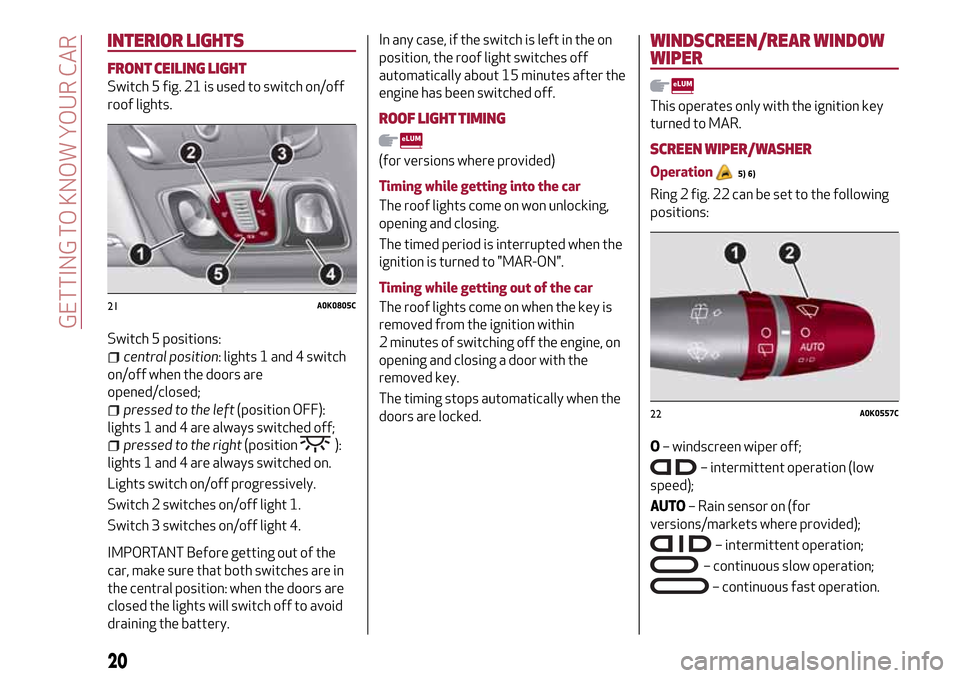
Switch 5 fig. 21 is used to switch on/off
roof lights.
Switch 5 positions:
central position: lights 1 and 4 switch
on/off when the doors are
opened/closed;
pressed to the left(position OFF):
lights 1 and 4 are always switched off;
pressed to the right(position):
lights 1 and 4 are always switched on.
Lights switch on/off progressively.
Switch 2 switches on/off light 1.
Switch 3 switches on/off light 4.
IMPORTANT Before getting out of the
car, make sure that both switches are in
the central position: when the doors are
closed the lights will switch off to avoid
draining the battery.
In any case, if the switch is left in the on
position, the roof light switches off
automatically about 15 minutes after the
engine has been switched off.
ROOF LIGHT TIMING
(for versions where provided)
Timing while getting into the car
The roof lights come on won unlocking,
opening and closing.
The timed period is interrupted when the
ignition is turned to "MAR-ON".
Timing while getting out of the car
The roof lights come on when the key is
removed from the ignition within
2 minutes of switching off the engine, on
opening and closing a door with the
removed key.
The timing stops automatically when the
doors are locked.
WINDSCREEN/REAR WINDOW
WIPER
This operates only with the ignition key
turned to MAR.
SCREEN WIPER/WASHER
Operation5) 6)
Ring 2 fig. 22 can be set to the following
positions:
O– windscreen wiper off;
– intermittent operation (low
speed);
AUTO– Rain sensor on (for
versions/markets where provided);
– intermittent operation;
– continuous slow operation;
– continuous fast operation.
21A0K0805C
22A0K0557C
20
GETTING TO KNOW YOUR CAR
Page 29 of 212
proceed in the same way as described
in points 1 and 2 for the passenger side
door;
make sure that the initialisation is
correct by checking that the windows
work automatically.
IMPORTANT
7)The system conforms to the 2000/4/EC
standard concerning the safety of
passengers leaning out of the passenger
compartment.
WARNING
13)Incorrect use of the electric windows
may be dangerous. Before and during their
operation, ensure that any passengers are
not at risk from the moving glass either by
personal objects getting caught in the
mechanism or by being hit by it directly.
When leaving the car, always remove the key
from the ignition to prevent accidental
operation of the electric windows from being
a hazard for those still on board.
ELECTRIC SUNROOF
(for versions/markets, where provided)
The large electric sun roof comprises two
glass panels; the front one is mobile and
the rear one fixed. These are equipped
with two sun blinds (front and rear) that
can be moved manually.
With the sun roof closed, the blinds can
be placed in any position.
OPERATION
The sun roof can be operated only with
the ignition key turned to MAR.
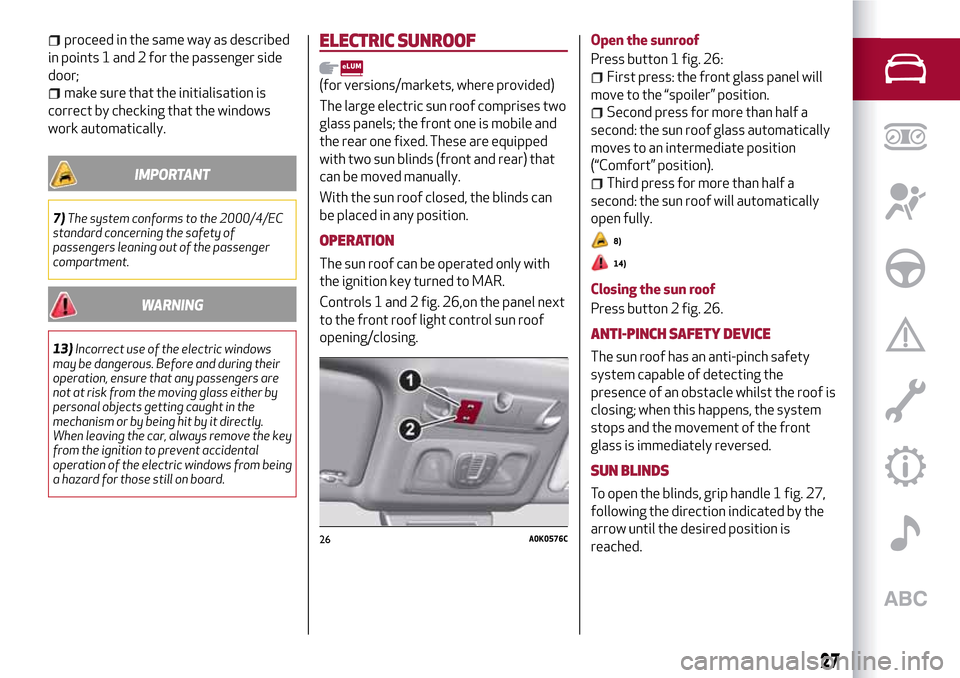
Controls 1 and 2 fig. 26,on the panel next
to the front roof light control sun roof
opening/closing.Open the sunroof
Press button 1 fig. 26:
First press: the front glass panel will
move to the “spoiler” position.
Second press for more than half a
second: the sun roof glass automatically
moves to an intermediate position
(“Comfort” position).
Third press for more than half a
second: the sun roof will automatically
open fully.
8)
14)
Closing the sun roof
Press button 2 fig. 26.
ANTI-PINCH SAFETY DEVICE
The sun roof has an anti-pinch safety
system capable of detecting the
presence of an obstacle whilst the roof is
closing; when this happens, the system
stops and the movement of the front
glass is immediately reversed.
SUN BLINDS
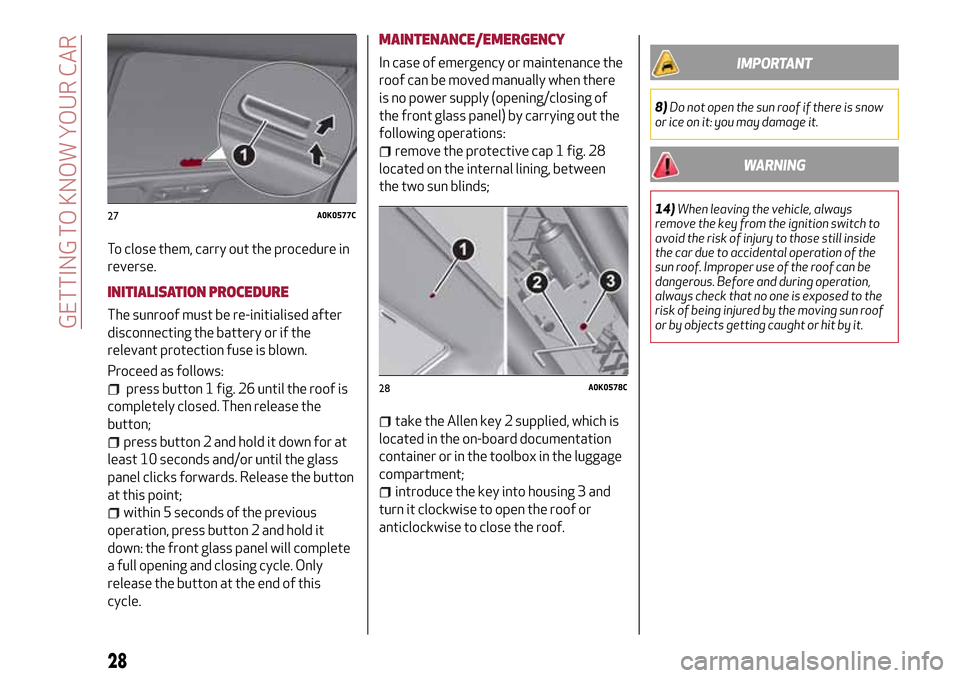
To open the blinds, grip handle 1 fig. 27,
following the direction indicated by the
arrow until the desired position is
reached.
26A0K0576C
27
Page 30 of 212
To close them, carry out the procedure in
reverse.
INITIALISATION PROCEDURE
The sunroof must be re-initialised after
disconnecting the battery or if the
relevant protection fuse is blown.
Proceed as follows:
press button 1 fig. 26 until the roof is
completely closed. Then release the
button;
press button 2 and hold it down for at
least 10 seconds and/or until the glass
panel clicks forwards. Release the button
at this point;
within 5 seconds of the previous
operation, press button 2 and hold it
down: the front glass panel will complete
a full opening and closing cycle. Only
release the button at the end of this
cycle.
MAINTENANCE/EMERGENCY
In case of emergency or maintenance the
roof can be moved manually when there
is no power supply (opening/closing of
the front glass panel) by carrying out the
following operations:
remove the protective cap 1 fig. 28
located on the internal lining, between
the two sun blinds;
take the Allen key 2 supplied, which is
located in the on-board documentation
container or in the toolbox in the luggage
compartment;
introduce the key into housing 3 and
turn it clockwise to open the roof or
anticlockwise to close the roof.
IMPORTANT
8)Do not open the sun roof if there is snow
or ice on it: you may damage it.
WARNING
14)When leaving the vehicle, always
remove the key from the ignition switch to
avoid the risk of injury to those still inside
the car due to accidental operation of the
sun roof. Improper use of the roof can be
dangerous. Before and during operation,
always check that no one is exposed to the
risk of being injured by the moving sun roof
or by objects getting caught or hit by it.27A0K0577C
28A0K0578C
28
GETTING TO KNOW YOUR CAR
Page 80 of 212
WARNING
76)Do not apply stickers or other objects on the steering wheel, on the dashboard in the passenger side airbag area, on side upholstery on the roof
or on the seats. Never put objects (e.g. mobile phones) on the passenger's side dashboard since they could interfere with correct inflation of the
airbag and also cause serious injury to the passengers.
77)Always drive keeping your hands on the steering wheel rim so the airbag can inflate freely if necessary. Do not drive with your body bent
forward. Keep the back of your seat upright and lean back into it.
78)When there is an active passenger airbag, DO NOT install rearward facing child restraint systems on the front seat. Deployment of the airbag
in an accident could cause fatal injuries to the child regardless of the severity of the impact. Therefore, always deactivate the passenger side
airbag when a rearward facing child restraint system is installed on the front passenger seat. The front passenger seat must also be positioned
back as far as possible in order to prevent the child restraint system from coming into contact with the dashboard. Immediately reactivate the
passenger airbag as soon as the child restraint system has been removed.
79)To deactivate the airbags, see the “Knowing your car” section, “Menu items” paragraph.
80)A failure of the
warning light is indicated by thewarning light switching on. In addition, the airbag system automatically disables the
airbag on the passenger's side (for versions/markets where provided). Before proceeding, contact an Alfa Romeo Dealership to have the system
checked immediately.
78
SAFETY
Page 81 of 212
SIDE AIRBAGS (SIDE BAGS -
WINDOW BAGS)
To increase protection of occupants in
case of side collision, the car is equipped
with front side bags for pelvis, chest and
shoulder protection (side bags) for the
driver and the passenger and airbags
protecting the head of front and rear
occupants (window bags).
Non-activation of side bags in other
types of collisions (front collisions, rear
shunts, roll-overs, etc.) is not a system
malfunction.
FRONT SIDE AIRBAGS (SIDE BAGS)
These comprise two types of bags
located in the front seat backrests
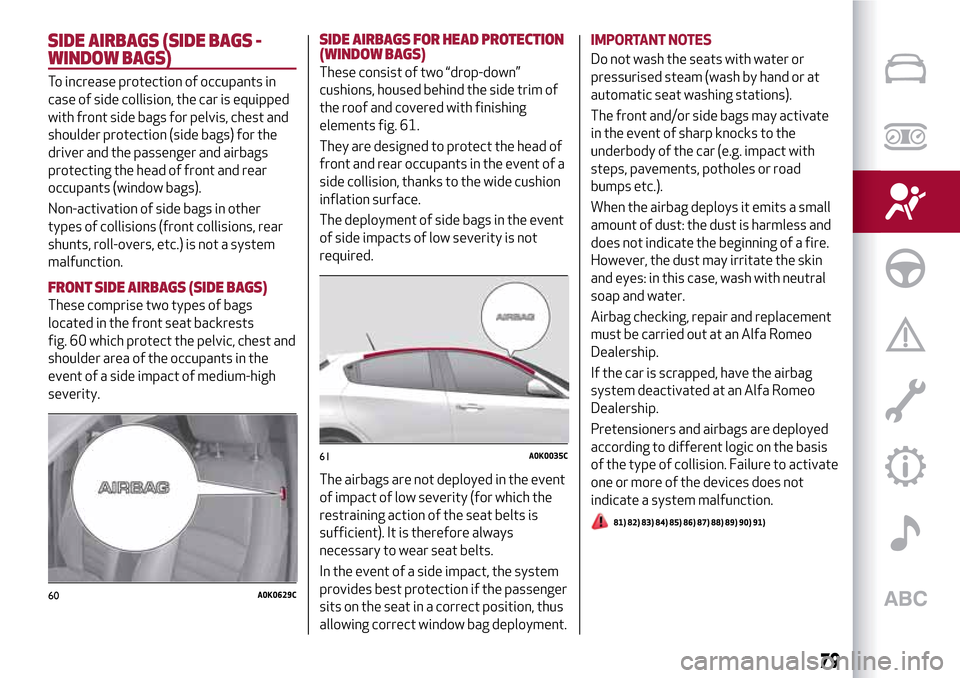
fig. 60 which protect the pelvic, chest and
shoulder area of the occupants in the
event of a side impact of medium-high
severity.
SIDE AIRBAGS FOR HEAD PROTECTION
(WINDOW BAGS)
These consist of two “drop-down”
cushions, housed behind the side trim of
the roof and covered with finishing
elements fig. 61.
They are designed to protect the head of
front and rear occupants in the event of a
side collision, thanks to the wide cushion
inflation surface.
The deployment of side bags in the event
of side impacts of low severity is not
required.
The airbags are not deployed in the event
of impact of low severity (for which the
restraining action of the seat belts is
sufficient). It is therefore always
necessary to wear seat belts.
In the event of a side impact, the system
provides best protection if the passenger
sits on the seat in a correct position, thus
allowing correct window bag deployment.IMPORTANT NOTES
Do not wash the seats with water or
pressurised steam (wash by hand or at
automatic seat washing stations).
The front and/or side bags may activate
in the event of sharp knocks to the
underbody of the car (e.g. impact with
steps, pavements, potholes or road
bumps etc.).
When the airbag deploys it emits a small
amount of dust: the dust is harmless and
does not indicate the beginning of a fire.
However, the dust may irritate the skin
and eyes: in this case, wash with neutral
soap and water.
Airbag checking, repair and replacement
must be carried out at an Alfa Romeo
Dealership.
If the car is scrapped, have the airbag
system deactivated at an Alfa Romeo
Dealership.
Pretensioners and airbags are deployed
according to different logic on the basis
of the type of collision. Failure to activate
one or more of the devices does not
indicate a system malfunction.
81) 82) 83) 84) 85) 86) 87) 88) 89) 90) 91)
60A0K0629C
61A0K0035C
79
Page 108 of 212
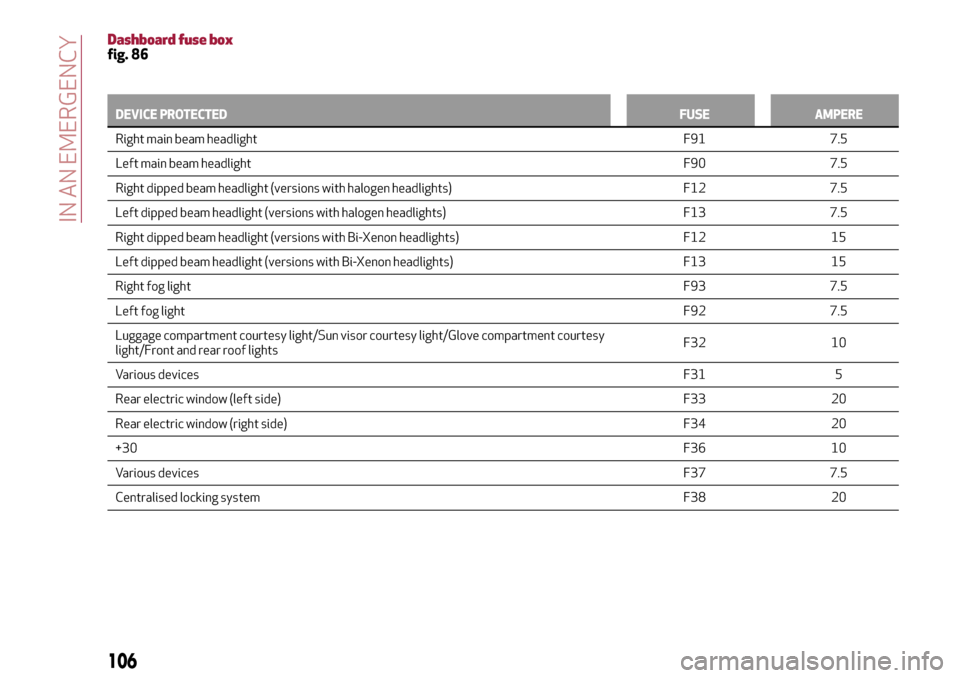
Dashboard fuse boxfig. 86
DEVICE PROTECTEDFUSE AMPERE
Right main beam headlightF91
7.5
Left main beam headlightF90 7.5
Right dipped beam headlight (versions with halogen headlights) F12 7.5
Left dipped beam headlight (versions with halogen headlights) F13 7.5
Right dipped beam headlight (versions with Bi-Xenon headlights) F12 15
Left dipped beam headlight (versions with Bi-Xenon headlights) F13 15
Right fog lightF93 7.5
Left fog lightF92 7.5
Luggage compartment courtesy light/Sun visor courtesy light/Glove compartment courtesy
light/Front and rear roof lightsF32 10
Various devicesF31 5
Rear electric window (left side) F33 20
Rear electric window (right side) F34 20
+30F36 10
Various devicesF37 7.5
Centralised locking systemF38 20
106
IN AN EMERGENCY
Page 111 of 212
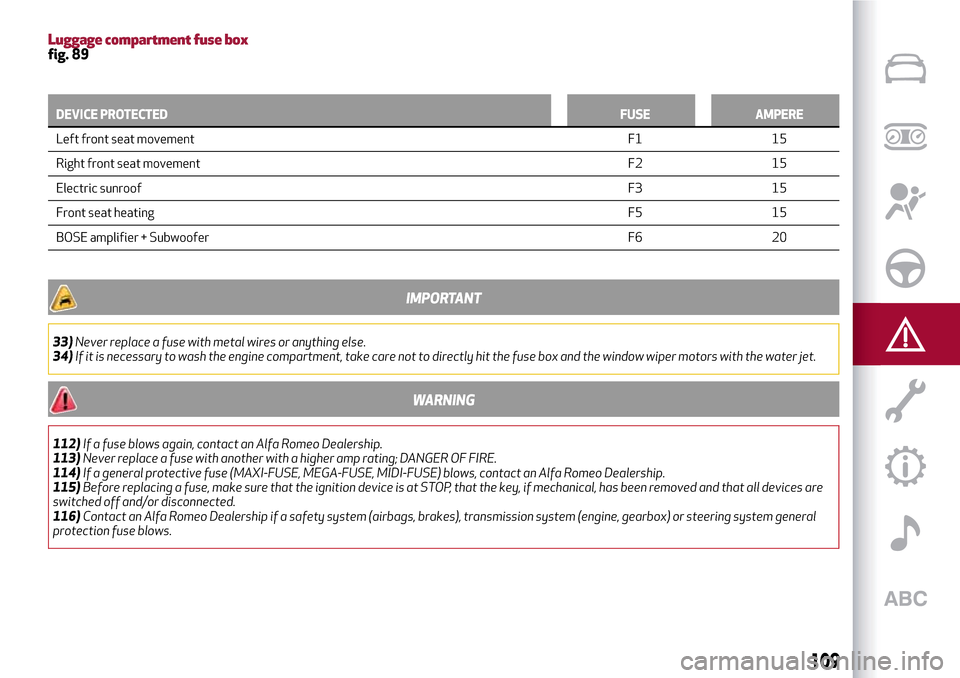
Luggage compartment fuse boxfig. 89
DEVICE PROTECTEDFUSE AMPERE
Left front seat movementF1
15
Right front seat movementF2 15
Electric sunroofF3 15
Front seat heatingF5 15
BOSE amplifier + SubwooferF6 20
IMPORTANT
33)Never replace a fuse with metal wires or anything else.
34)If it is necessary to wash the engine compartment, take care not to directly hit the fuse box and the window wiper motors with the water jet.
WARNING
112)If a fuse blows again, contact an Alfa Romeo Dealership.
113)Never replace a fuse with another with a higher amp rating; DANGER OF FIRE.
114)If a general protective fuse (MAXI-FUSE, MEGA-FUSE, MIDI-FUSE) blows, contact an Alfa Romeo Dealership.
115)Before replacing a fuse, make sure that the ignition device is at STOP, that the key, if mechanical, has been removed and that all devices are
switched off and/or disconnected.
116)Contact an Alfa Romeo Dealership if a safety system (airbags, brakes), transmission system (engine, gearbox) or steering system general
protection fuse blows.
109