tow Alfa Romeo GT 2005 Owner handbook (in English)
[x] Cancel search | Manufacturer: ALFA ROMEO, Model Year: 2005, Model line: GT, Model: Alfa Romeo GT 2005Pages: 307, PDF Size: 6.05 MB
Page 17 of 307
It is absolutely forbidden
to carry out whatever af-
ter-market operation in-
volving steering system or steer-
ing column modifications (e.g.: in-
stallation of anti-theft Device) that
could badly affect performance and
safety, cause the lapse of warran-
ty and also result in non-compli-
ance of the car with homologation
requirements.
GETTING TO KNOW YOUR CAR
15
STEERING LOCK
Engaging:
– move the key to STOPorPARK,
then remove the key and turn the steering
wheel slightly to facilitate the locking
action.
Disengaging:
– turn the key to MARgently rocking
the steering wheel from side to side.
Never remove the ignition
key with the car on the
move. The steering wheel
would lock automatically the first
time the steering wheel is turned.
This also occurs if the car is towed.
DOORS
Before opening a door, al-
ways make sure that it can
be done safely.
OPENING/CLOSING
FROM OUTSIDE
Front doors
– To open the driver's door turn the key
clockwise and to open the passengers' door,
optional for versions/markets where applic-
able, turn the key anti-clockwise, then re-
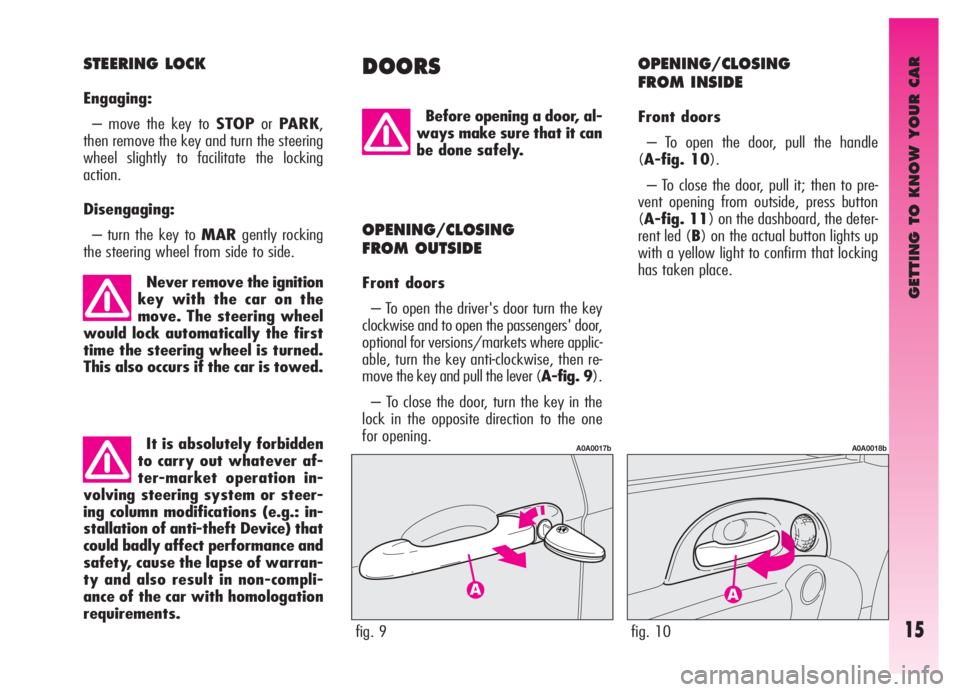
move the key and pull the lever (A-fig. 9).
– To close the door, turn the key in the
lock in the opposite direction to the one
for opening.
fig. 9
A0A0017b
fig. 10
A0A0018b
OPENING/CLOSING
FROM INSIDE
Front doors
– To open the door, pull the handle
(A-fig. 10).
– To close the door, pull it; then to pre-
vent opening from outside, press button
(A-fig. 11) on the dashboard, the deter-
rent led (B) on the actual button lights up
with a yellow light to confirm that locking
has taken place.
Page 24 of 307
GETTING TO KNOW YOUR CAR
22
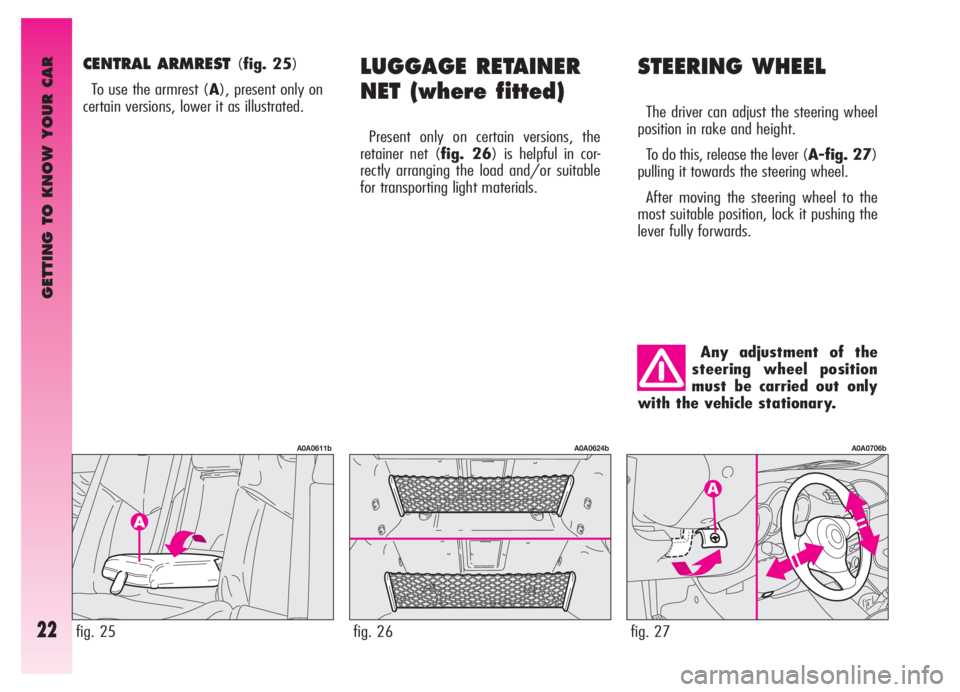
STEERING WHEEL
The driver can adjust the steering wheel
position in rake and height.
To do this, release the lever (A-fig. 27)
pulling it towards the steering wheel.
After moving the steering wheel to the
most suitable position, lock it pushing the
lever fully forwards.
LUGGAGE RETAINER
NET (where fitted)
Present only on certain versions, the
retainer net (fig. 26) is helpful in cor-
rectly arranging the load and/or suitable
for transporting light materials.
fig. 27
A0A0706b
Any adjustment of the
steering wheel position
must be carried out only
with the vehicle stationary.
CENTRAL ARMREST (fig. 25)
To use the armrest (A), present only on
certain versions, lower it as illustrated.
fig. 26
A0A0624b
fig. 25
A0A0611b
Page 47 of 307

GETTING TO KNOW YOUR CAR
45
Sidelights(fig. 56)
The sidelights are switched on by turning
the knurled ring from Oto
6.
The
3warning light on the instrument
cluster will come on at the same time.
Dipped-beam headlights (fig. 57)
These are switched on by turning the
knurled ring from
6to2.
fig. 55
A0A0063b
fig. 56
A0A0064b
Main beams (fig. 58)
To turn the main beams on, set the
knurled ring to position
2and push the
lever towards the dashboard (stable posi-
tion); warning light
1on the instrument
panel will turn on.
To set dipped-beams back pull the lever
towards the steering wheel.
fig. 57
A0A0065b
fig. 58
A0A0066b
When the dipped beam headlights and
the fog lamps are switched on, the outer
light control unit (integrated in the Body
Computer) works according to the follow-
ing logics:
– turning on the main beams, the
dipped beams turn off while the fog lamps
stay on, when restoring the starting con-
dition at dipped beam setting;
or
– turning on the main beams, the fog
lamps turn off and then turn on again
automatically as the main beams are
switched off.
Therefore, in the event of Body
Computer replacement, the outer light
operating logic may be different.
fig. 59
A0A0067b
Page 48 of 307
GETTING TO KNOW YOUR CAR
46
“Follow me home” device
(fig. 61)
This function allows the illumination of
the space in front of the car for the length
of time set, and is activated with the igni-
tion key at STOPor removed, pulling the
left-hand lever towards the steering
wheel.
This function is activated pulling the lever
within 2 minutes from when the engine is
turned off. At each single movement of
the lever, the staying on of the dipped
beams and sidelights is extended by 30
seconds up to a maximum of 3.5 min-
utes; the lights switch off automatically
after the time set.
Each time the lever is operated, the
1
warning light on the cluster turns on. Flashing(fig. 59)
The headlights are flashed pulling the
lever towards the steering wheel (instable
position) regardless of the position of the
knurled ring. The
1warning light on the
cluster will come on at the same time.
IMPORTANTOnly the main-beam
lights are flashed. To avoid penalties follow
local regulations.
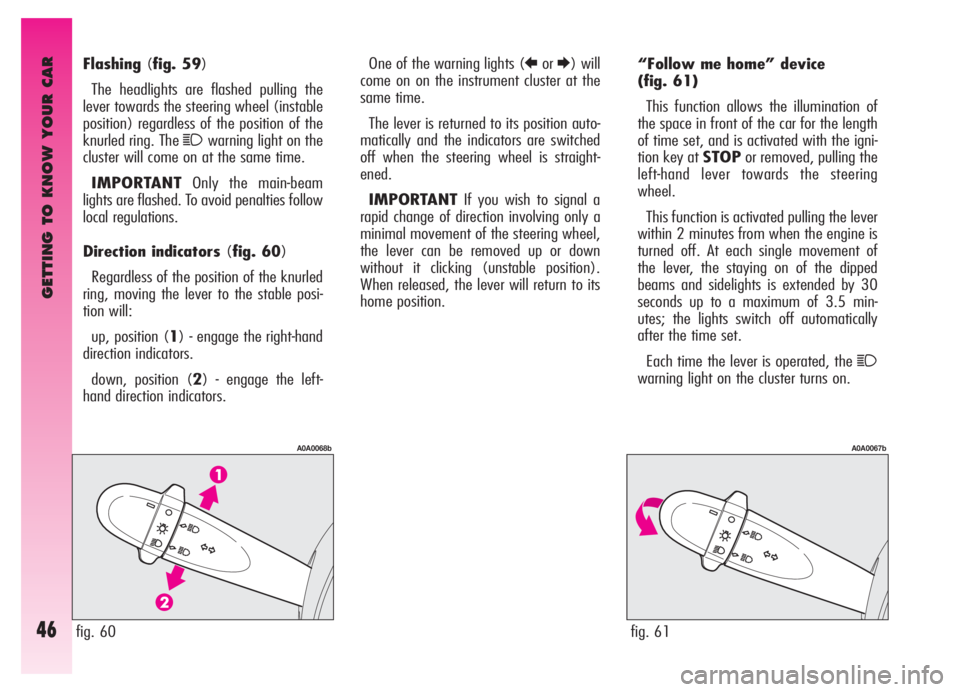
Direction indicators (fig. 60)
Regardless of the position of the knurled
ring, moving the lever to the stable posi-
tion will:
up, position (1) - engage the right-hand
direction indicators.
down, position (2) - engage the left-
hand direction indicators.One of the warning lights (
RorE) will
come on on the instrument cluster at the
same time.
The lever is returned to its position auto-
matically and the indicators are switched
off when the steering wheel is straight-
ened.
IMPORTANTIf you wish to signal a
rapid change of direction involving only a
minimal movement of the steering wheel,
the lever can be removed up or down
without it clicking (unstable position).
When released, the lever will return to its
home position.
fig. 61
A0A0067b
fig. 60
A0A0068b
Page 49 of 307
GETTING TO KNOW YOUR CAR
47
This function can be interrupted by keep-
ing the lever pulled towards the steering
wheel for more than 2 seconds.
RIGHT-HAND LEVER
The right-hand lever is used to operate
the windscreen wiper-washer and
rearscreen wiper-washer. The windscreen
washer also activates the headlamp wash-
ers, if fitted.
fig. 62
A0A0616b
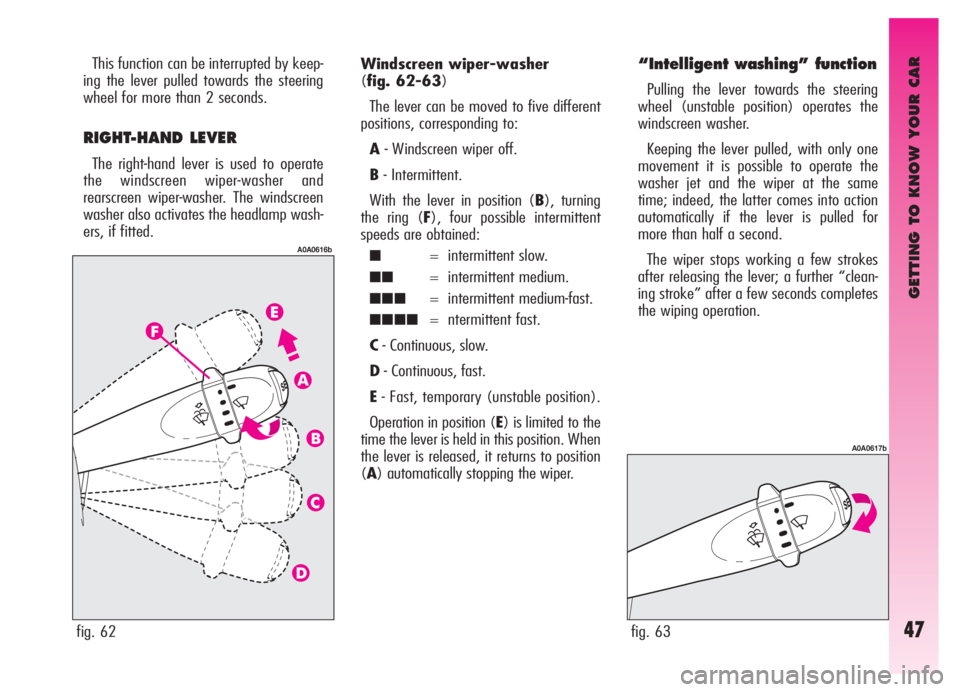
Windscreen wiper-washer
(fig. 62-63)
The lever can be moved to five different
positions, corresponding to:
A- Windscreen wiper off.
B- Intermittent.
With the lever in position (B), turning
the ring (F), four possible intermittent
speeds are obtained:
■= intermittent slow.
■■= intermittent medium.
■■■= intermittent medium-fast.
■■■■= ntermittent fast.
C- Continuous, slow.
D- Continuous, fast.
E- Fast, temporary (unstable position).
Operation in position (E) is limited to the
time the lever is held in this position. When
the lever is released, it returns to position
(A) automatically stopping the wiper.
“Intelligent washing” function
Pulling the lever towards the steering
wheel (unstable position) operates the
windscreen washer.
Keeping the lever pulled, with only one
movement it is possible to operate the
washer jet and the wiper at the same
time; indeed, the latter comes into action
automatically if the lever is pulled for
more than half a second.
The wiper stops working a few strokes
after releasing the lever; a further “clean-
ing stroke” after a few seconds completes
the wiping operation.
fig. 63
A0A0617b
Page 53 of 307
GETTING TO KNOW YOUR CAR
51
TO REDUCE THE
MEMORISED SPEED
The speed memorised can be reduced in
two ways:
1) disengaging the device (for instance
pressing the brake pedal) and then mem-
orising the new speed (turning the ring
(B) to (+) for at least three seconds);
2) keeping the ring pressed (B) at (–)
until reaching the new speed which will be
memorised automatically.The device may only be engaged in in
4th, 5th or 6th gear, depending on the
speed of the car. Travelling downhill with
the device engaged the car speed may
increase more than the memorised one,
due to the change in the engine load.
The ring (A) may be left constantly at
ONwithout damaging the device. You
are, however, advised to switch the device
off when not in use, turning the ring to
OFF, to avoid memorising speeds by
accident. It is advisable to engage the cruise con-
trol only when the conditions of the traffic
or roads so permit under completely safe
conditions, i.e.: straight and dry roads,
dual carriage ways or motorways, flowing
traffic and smooth road surface. Do not
engage the device in town or in heavy
traffic conditions.When travelling with the
cruise control on, do not
move the gearshift lever to
neutral and do not move the Sele-
speed selector to N.
Cruise control may only
be engaged at speeds be-
tween 30 and 190 km/h.
If the device is faulty or
not working, turn the ring
(A) to OFF and contact Al-
fa Romeo Authorised Services af-
ter checking that the protection
fuse is intact.
ESETTING THE MEMORISED
SPEED
The memorised speed is automatically
reset turning off the engine or moving the
ring (A) to OFF.
Page 58 of 307
GETTING TO KNOW YOUR CAR
56
FUEL LEVEL GAUGE WITH
RESERVE INDICATOR
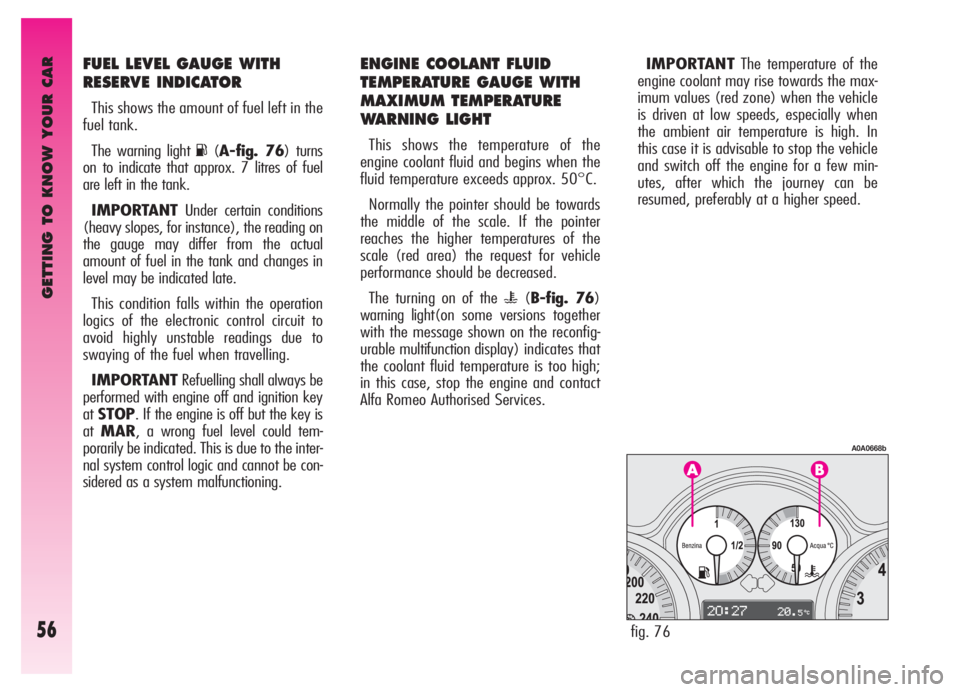
This shows the amount of fuel left in the
fuel tank.
The warning light
K(A-fig. 76) turns
on to indicate that approx. 7 litres of fuel
are left in the tank.
IMPORTANTUnder certain conditions
(heavy slopes, for instance), the reading on
the gauge may differ from the actual
amount of fuel in the tank and changes in
level may be indicated late.
This condition falls within the operation
logics of the electronic control circuit to
avoid highly unstable readings due to
swaying of the fuel when travelling.
IMPORTANTRefuelling shall always be
performed with engine off and ignition key
atSTOP. If the engine is off but the key is
atMAR, a wrong fuel level could tem-
porarily be indicated. This is due to the inter-
nal system control logic and cannot be con-
sidered as a system malfunctioning.
ENGINE COOLANT FLUID
TEMPERATURE GAUGE WITH
MAXIMUM TEMPERATURE
WARNING LIGHT
This shows the temperature of the
engine coolant fluid and begins when the
fluid temperature exceeds approx. 50°C.
Normally the pointer should be towards
the middle of the scale. If the pointer
reaches the higher temperatures of the
scale (red area) the request for vehicle
performance should be decreased.
The turning on of the
u(B-fig. 76)
warning light(on some versions together
with the message shown on the reconfig-
urablemultifunction display) indicates that
the coolant fluid temperature is too high;
in this case, stop the engine and contact
Alfa Romeo Authorised Services.IMPORTANTThe temperature of the
engine coolant may rise towards the max-
imum values (red zone) when the vehicle
is driven at low speeds, especially when
the ambient air temperature is high. In
this case it is advisable to stop the vehicle
and switch off the engine for a few min-
utes, after which the journey can be
resumed, preferably at a higher speed.
fig. 76
A0A0668b
Page 106 of 307
GETTING TO KNOW YOUR CAR
104
AIR TEMPERATURE
ADJUSTMENT KNOB
Turn the ring of knob (1-fig. 95) clock-
wise or counter-clockwise respectively to
higher or lower the temperature of the air
admitted to the passenger compartment.
AIRDISTRIBUTION KNOB
Turning the knob ring (3-fig. 95), the
following positions are selected in sequence:
Air flow towards the upper centre,
front centre vents and from the front
and rear outlets with the possibility of ad-
justment using the controls on the actual
vents.
Splitting of air flow between the pre-
vious vents and the lower part of the
passenger compartment.
Air flow to the lower part of the pas-
senger compartment (front and rear).
Splitting of air flow between the
windscreen/front side windows and
the lower part of the passenger compart-
ment.
Air flow towards the windscreen and
front side windows for demist-
ing/defrosting.
Flow air to allow quick demist-
ing/defrosting of the windscreen
and front side windows, turning on
rearscreen heating for defrosting/demisting
(function called
MAX-DEF).
μ
w
≤
y
-
¥
FAN SPEED ADJUSTMENT
KNOB
Turning the ring of knob (2-fig. 95) it is
possible to select one of the fan speeds to per-
sonalise the amount of air admitted to the pas-
senger compartment.
Position0turns off the fan and automati-
cally engages inside air re-circulation (shown
by the lighting up of the led next to the but-
ton4
v) thereby shutting off the inlet of
outside air to the car.
To switch off inside air re-circulation, press
button (4)
v.
Page 108 of 307
GETTING TO KNOW YOUR CAR
106
DEMISTING
AND/OR DEFROSTING THE
WINDSCREEN AND FRONT SIDE
WINDOWS, REARSCREEN AND
WING MIRRORS
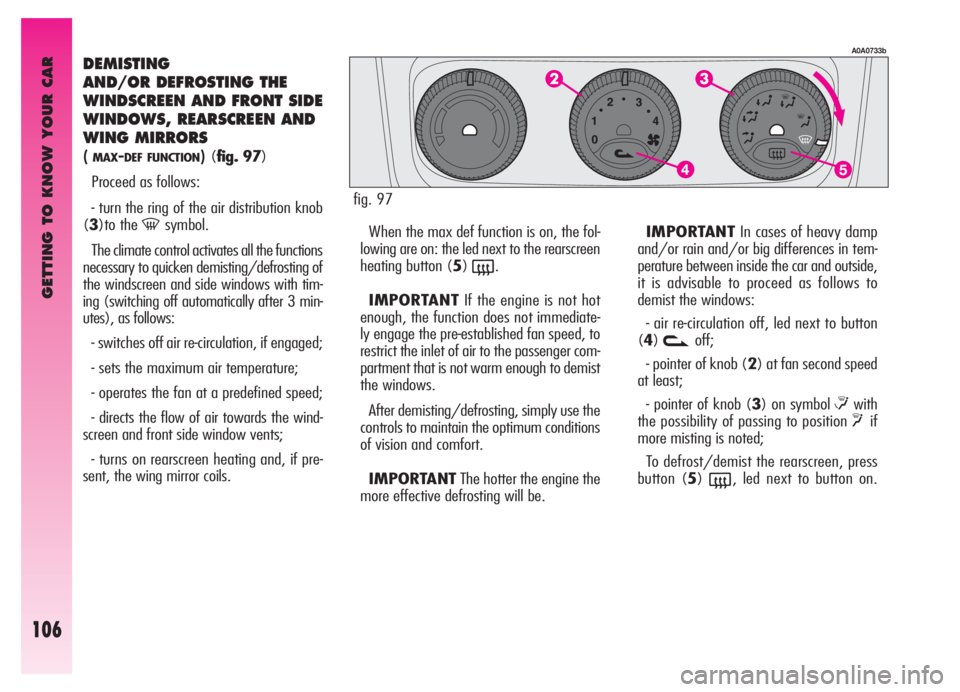
(MAX-DEF FUNCTION)(fig. 97)
Proceed as follows:
- turn the ring of the air distribution knob
(3)to the
-symbol.
The climate control activates all the functions
necessary to quicken demisting/defrosting of
the windscreen and side windows with tim-
ing (switching off automatically after 3 min-
utes), as follows:
- switches off air re-circulation, if engaged;
- sets the maximum air temperature;
- operates the fan at a predefined speed;
- directs the flow of air towards the wind-
screen and front side window vents;
- turns on rearscreen heating and, if pre-
sent, the wing mirror coils.When the max def function is on, the fol-
lowing are on: the led next to the rearscreen
heating button (5)
(.
IMPORTANTIf the engine is not hot
enough, the function does not immediate-
ly engage the pre-established fan speed, to
restrict the inlet of air to the passenger com-
partment that is not warm enough to demist
the windows.
After demisting/defrosting, simply use the
controls to maintain the optimum conditions
of vision and comfort.
IMPORTANTThe hotter the engine the
more effective defrosting will be.IMPORTANTIn cases of heavy damp
and/or rain and/or big differences in tem-
perature between inside the car and outside,
it is advisable to proceed as follows to
demist the windows:
- air re-circulation off, led next to button
(4)
voff;
- pointer of knob (2) at fan second speed
at least;
- pointer of knob (3) on symbol
≤with
the possibility of passing to position
yif
more misting is noted;
To defrost/demist the rearscreen, press
button (5)
(, led next to button on.
A0A0733b
fig. 97
Page 119 of 307
GETTING TO KNOW YOUR CAR
117
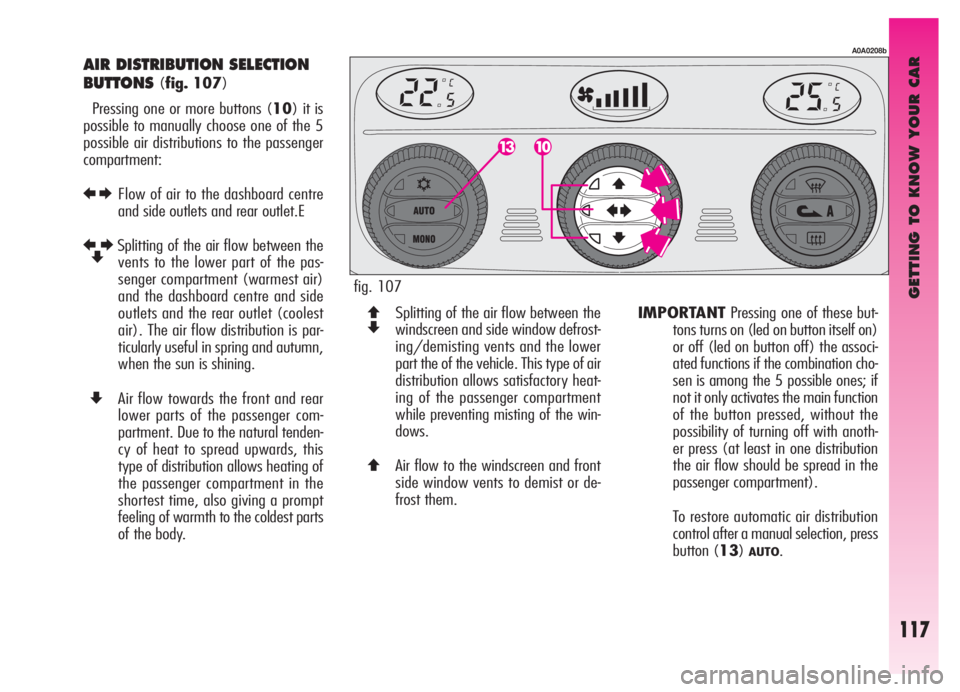
AIR DISTRIBUTION SELECTION
BUTTONS
(fig. 107)
Pressing one or more buttons (10) it is
possible to manually choose one of the 5
possible air distributions to the passenger
compartment:
REFlow of air to the dashboard centre
and side outlets and rear outlet.E
R
ZESplitting of the air flow between the
vents to the lower part of the pas-
senger compartment (warmest air)
and the dashboard centre and side
outlets and the rear outlet (coolest
air). The air flow distribution is par-
ticularly useful in spring and autumn,
when the sun is shining.
ZAir flow towards the front and rear
lower parts of the passenger com-
partment. Due to the natural tenden-
cy of heat to spread upwards, this
type of distribution allows heating of
the passenger compartment in the
shortest time, also giving a prompt
feeling of warmth to the coldest parts
of the body.
A0A0208b
Q
ZSplitting of the air flow between the
windscreen and side window defrost-
ing/demisting vents and the lower
part the of the vehicle. This type of air
distribution allows satisfactory heat-
ing of the passenger compartment
while preventing misting of the win-
dows.
QAir flow to the windscreen and front
side window vents to demist or de-
frost them.IMPORTANTPressing one of these but-
tons turns on (led on button itself on)
or off (led on button off) the associ-
ated functions if the combination cho-
sen is among the 5 possible ones; if
not it only activates the main function
of the button pressed, without the
possibility of turning off with anoth-
er press (at least in one distribution
the air flow should be spread in the
passenger compartment).
To restore automatic air distribution
control after a manual selection, press
button (13)
AUTO. fig. 107