service Alfa Romeo GT 2008 Owner handbook (in English)
[x] Cancel search | Manufacturer: ALFA ROMEO, Model Year: 2008, Model line: GT, Model: Alfa Romeo GT 2008Pages: 271, PDF Size: 5.57 MB
Page 182 of 271

IN AN EMERGENCY
180
STARTING
WITH AN AUXILIARY BATTERY
If the battery is flat (for battery with op-
tical hydrometer: dark colour without green
area in the centre), it is possible to start the
engine using an auxiliary battery with the
same capacity or a little higher than the flat
one.
Proceed as follows (fig. 1):
1) Remove the protective cover on the pos-
itive battery post pressing on the opening
catches (front), then connect the positive
terminals (+sign next to the terminal) of
the two batteries using a special cable.
2) Connect the end of the second jump
lead to the negative terminal (–) of the aux-
iliary battery with an earth point
Eon the
engine or gearbox of the car to be started.IMPORTANTDo not directly connect the
negative terminals of the two batteries: any
sparks may ignite the detonating gas which
could come out of the battery. If the auxil-
iary battery is installed on another car, avoid
metal parts touching accidentally between
this car and the one with the flat battery.
3) Start the engine.
4) When the engine has started, remove
the cables, reversing the sequence followed
for connection.
If after a few attempts the engine does not
start, do not insist but contact the nearest
Alfa Romeo Authorised Service.
fig. 1
A0A0149b
This starting procedure
must be carried out by
qualified personnel because
incorrect operations may cause
electrical discharge of considerable
intensity. The liquid contained in
the battery is poisonous and cor-
rosive. Avoid contact with the skin
and the eyes. Keep naked flames
and lighted cigarettes away from
the battery and do not cause
sparks.
Never use a battery
charger to start the engine
as this could damage the
electronic systems of your car, par-
ticularly the ignition and fuel sup-
ply control units.
Page 183 of 271

IN AN EMERGENCY
181
STARTING BY INERTIA
If the car is equipped with “Kit for tyre re-
pair Fix&Go“, see the instructions contained
in the following chapter.
GENERAL INSTRUCTIONS
As an alternative to the FIX & GO, the car
can be provided (upon request) with space-
saver spare wheel or standard wheel; wheel
changing and correct use of the jack call for
some precautions as listed below.
IN THE EVENT OF A PUNCTURE
Never push, tow or coast
start the car. This could
cause fuel to flow into the
catalyst damaging it irreversibly.
Remember that the en-
gine brake and power
steering are not opera-
tional until the engine is started,
therefore, much greater effort than
usual is needed on the brake ped-
al and steering wheel.
Signal the presence of the
stationary car according to
current regulations: hazard
warning lights, reflecting triangle
etc.. Any passengers should leave
the car and wait for the wheel to be
changed out of harm of the traffic.
If parked on a slope or rough sur-
face, chock the wheels with
wedges or other suitable devices
to prevent the car from rolling.
Never start the engine
with the car jacked.
When driving with a trail-
er, disconnect the trailer before
raising the car. The compact spare
wheel is specific to your car, do not
use it on other models, or use the
spare wheel of other models on
your car.
Should the type of wheels used
be changed (alloy rims instead of
steel), it is also necessary to
change the whole set of fastening
bolts with others of suitable size.
The compact spare wheel is nar-
rower than normal wheels, it
should be used only for the dis-
tance necessary to reach a service
point to have the punctured tyre
repaired and, during its use, the car
speed must not exceed 80 km/h.
Page 191 of 271

IN AN EMERGENCY
189
– make sure the compressor switch A-
fig. 16is set to 0(off), start the engine
and fit plug A-fig. 17into the cigar lighter
outlet and then turn on the compressor by
setting switch A-fig. 16toI(on);
fig. 16
A0A1100b
– inflate the tyre to the correct pressure
value. Check tyre pressure on gauge B-fig.
16with compressor off to obtain precise
reading;
– if after 5 minutes it is still impossible
to reach at least 1.5 bar, disengage com-
pressor from valve and current outlet, then
move the car forth for approx. ten metres in
order to distribute the sealing fluid inside the
tyre evenly, then repeat the inflation oper-
ation;– if after this operation it is still impossi-
ble after 5 minutes to reach at least 1.8 bar,
do not start driving since the tyre is exces-
sively damaged and the quick tyre repair kit
cannot guarantee suitable sealing, contact
Alfa Romeo Authorized Services;
– once the correct tyre pressure has been
reached, start driving immediately;
fig. 17
A0A0647b
Apply the sticker in a vis-
ible position for the driver
to indicate that the tyre
has been treated with the quick
tyre repair kit. Drive carefully es-
pecially when cornering. Do not ex-
ceed 80 km/h. Avoid heavy brak-
ing and accelerating.
Page 192 of 271

IN AN EMERGENCY
190
– after driving for about 10 minutes stop
and check again the tyre pressure; pull up
the handbrake;
fig. 18
A0A1101b
fig. 19
A0A1102b
If the pressure falls below
1.8 bars, do not drive any
further: the quick tyre re-
pair kit Fix & Go automatic cannot
guarantee proper hold because the
tyre is too much damaged. Contact
Alfa Romeo Authorized Services.
– drive with the utmost care to the near-
est Alfa Romeo Authorized Service.
It is of vital importance to
communicate that the tyre
has been repaired using the
quick tyre repair kit. Hand the in-
struction brochure to the personnel
charged with treating the tyre re-
paired with the kit.FOR CHECKING AND
RESTORING PRESSURE ONLY
The compressor can be also used just for
restoring pressure. Disconnect the quick con-
nectionA-fig. 18and connect it directly
to the tyre valve fig. 19; in this way the
cylinder is not connected to compressor and
the sealing fluid will not flow into the tyre.
– if at least 1.8 bar pressure is read, re-
store proper pressure (with engine running
and handbrake on) and restart;
Page 194 of 271

Halogen bulbs must be
handled touching only the
metallic part. If the trans-
parent bulb is touched with the fin-
gers, its lighting intensity is re-
duced and life of the bulb may be
compromised. If touched acciden-
tally, rub the bulb with a cloth
moistened with alcohol and allow
to dry.
IN AN EMERGENCY
192
Halogen bulbs contain
pressurised gas which, if
broken, may cause small
fragments of glass to be project-
ed outwards.WHEN NEEDING TO
CHANGE A BULB
Alterations or repairs to
the electric system not car-
ried out correctly and with-
out taking into account the specifi-
cations of the system may cause
malfunctioning and the risk of fire.
Where possible the bulbs
should be replaced by Alfa
Romeo Authorized Ser-
vices. The correct operation and po-
sitioning of the external lights are
vital to the safety of the car and
its passengers and the subject of
specific laws.
Due to high voltage, the
bulb of (Xenon) gas-dis-
charge headlights must on-
ly be replaced by experts: danger
of death! Contact Alfa Romeo Au-
thorized Services.
Page 197 of 271

IN AN EMERGENCY
195
IF AN EXTERIOR
LIGHT GOES OUT
GAS-DISCHARGE (XENON)
HEADLIGHTS
Due to high voltage, the
bulb of (Xenon) gas-dis-
charge headlights must on-
ly be replaced by experts: danger
of death! Contact Alfa Romeo Au-
thorized Services.
HALOGEN HEADLIGHTSThe bulbs are arranged inside the light unit
as follows (fig. 22):
(A) Fog lights.
(B) Dipped beam headlights.
(C) Sidelights.
(D) Main beam headlights.
To change the bulbs of the sidelights, low
beams and main beams it is necessary to
remove the cover (A-fig. 23) releasing
the catches (B).
To change the fog lights, remove the cov-
er (C) turning counter-clockwise. IMPORTANTFor the type of bulb and
power rating, see previous section “When
needing to change a bulb”.
The front light units contain the sidelight,
dipped beam, main beam and fog light
bulbs.
fig. 22
A0A0159b
fig. 23
A0A0160b
Page 198 of 271

– Fit a new bulb, making the tab of the
metal part coincide with the one on the lamp
unit, then hook the bulb holder catch (B).
– Re-connect the electric connector (A).
– Refit the protective cover correctly.Fog lights(fig. 24)
IMPORTANTWhen needing to change
the left bulb, the side trim next to the light
itself needs to be removed to facilitate ac-
cess to the engine compartment.
To change the bulb, proceed as follows:
– Remove the protective cover turning
counter-clockwise.
– Disconnect the electric connector (A).
– Release the bulb catch (B).
– Remove the bulb and replace it.
fig. 24
A0A0161b
After replacement, refit
the covers correctly check-
ing that they are properly
secured.
IMPORTANTA slight layer of steam
(fogging) can appear on the inside surface
of the beam transparent cover: this is not
a defect. The presence of condensate traces
in beams is a natural phenomenon, due to
a low temperature and to the degree of hu-
midity in the air. These traces will disappear
when the beams are turned on. Drops of wa-
ter inside the headlight indicate instead wa-
ter infiltration: contact Alfa Romeo Autho-
rised Services.
IN AN EMERGENCY
196
Page 201 of 271

IN AN EMERGENCY
199
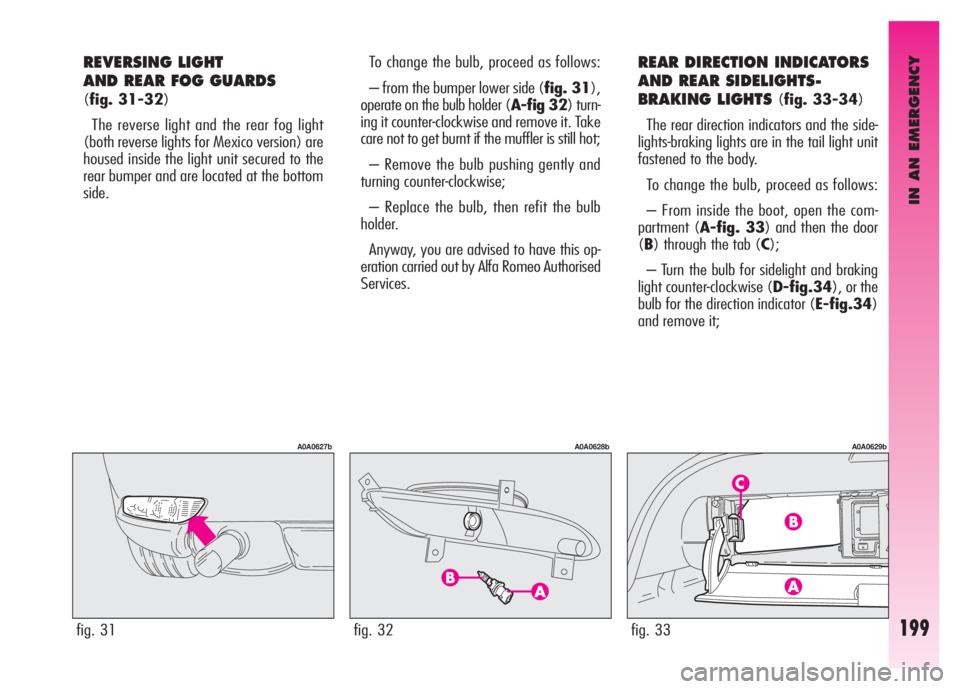
REVERSING LIGHT
AND REAR FOG GUARDS
(fig. 31-32)
The reverse light and the rear fog light
(both reverse lights for Mexico version) are
housed inside the light unit secured to the
rear bumper and are located at the bottom
side.
fig. 31
A0A0627b
fig. 33
A0A0629b
To change the bulb, proceed as follows:
– from the bumper lower side (fig. 31),
operate on the bulb holder (A-fig 32) turn-
ing it counter-clockwise and remove it. Take
care not to get burnt if the muffler is still hot;
– Remove the bulb pushing gently and
turning counter-clockwise;
– Replace the bulb, then refit the bulb
holder.
Anyway, you are advised to have this op-
eration carried out by Alfa Romeo Authorised
Services.REAR DIRECTION INDICATORS
AND REAR SIDELIGHTS-
BRAKING LIGHTS
(fig. 33-34)
The rear direction indicators and the side-
lights-braking lights are in the tail light unit
fastened to the body.
To change the bulb, proceed as follows:
– From inside the boot, open the com-
partment (A-fig. 33) and then the door
(B) through the tab (C);
– Turn the bulb for sidelight and braking
light counter-clockwise (D-fig.34), or the
bulb for the direction indicator (E-fig.34)
and remove it;
fig. 32
A0A0628b
Page 207 of 271

IN AN EMERGENCY
205
IN THE EVENT OF A BLOWN FUSE
GENERAL
The fuse is a protective device for the elec-
tric system: it comes into action (i.e. it cuts
off) mainly due to a fault or improper action
on the system.
When a device does not work, check the
efficiency of its fuse. The conductor ele-
ment(A-fig. 49) must be intact; if not, re-
place the fuse with one of the same amp
rating (same colour).(B) - Undamaged fuse
(C) - Fuse with damaged filament.
Remove the blown fuse using the pincer
provided (D), in the control box.
fig. 49
A0A0185b
Never replace a fuse with
metal wires or anything
else. Always use an intact
fuse of the same colour.
Never replace a fuse with
another with a higher amp
rating; DANGER OF FIRE.
If a general fuse (MAXI-
FUSE or MEGA-FUSE) cuts
in, do not attempt any re-
pair and contact Alfa Romeo Au-
thorised Services.
Before replacing a fuse,
make sure the ignition key
has been removed and that
all the other services are switched
off and/or disengaged.
If a fuse blows again,
contact an Alfa Romeo Au-
thorised Service.
Page 210 of 271

IN AN EMERGENCY
208
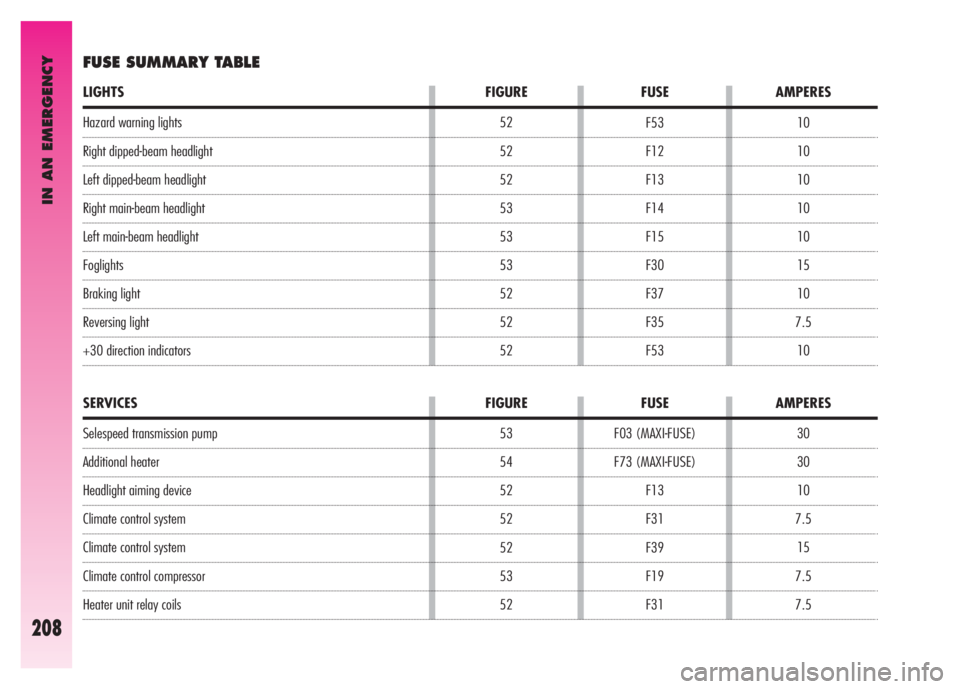
30
30
10
7.5
15
7.5
7.5 F03 (MAXI-FUSE)
F73 (MAXI-FUSE)
F13
F31
F39
F19
F31
SERVICES FIGURE FUSE AMPERES
Hazard warning lights
Right dipped-beam headlight
Left dipped-beam headlight
Right main-beam headlight
Left main-beam headlight
Foglights
Braking light
Reversing light
+30 direction indicators10
10
10
10
10
15
10
7.5
10 F53
F12
F13
F14
F15
F30
F37
F35
F53
LIGHTS FIGURE FUSE AMPERES
FUSE SUMMARY TABLE
Selespeed transmission pump
Additional heater
Headlight aiming device
Climate control system
Climate control system
Climate control compressor
Heater unit relay coils52
52
52
53
53
53
52
52
52
53
54
52
52
52
53
52