Alfa Romeo MiTo 2013 Owner handbook (in English)
Manufacturer: ALFA ROMEO, Model Year: 2013, Model line: MiTo, Model: Alfa Romeo MiTo 2013Pages: 312, PDF Size: 11.5 MB
Page 181 of 312
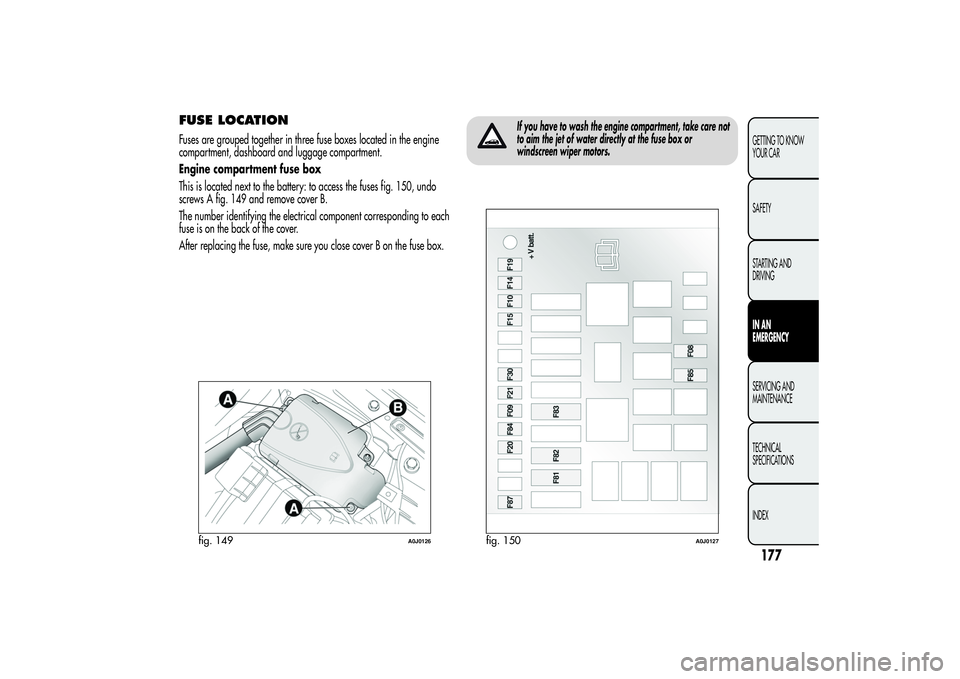
FUSE LOCATIONFuses are grouped together in three fuse boxes located in the engine
compartment, dashboard and luggage compartment.
Engine compartment fuse box
This is located next to the battery: to access the fuses fig. 150, undo
screws A fig. 149 and remove cover B.
The number identifying the electrical component corresponding to each
fuse is on the back of the cover.
After replacing the fuse, make sure you close cover B on the fuse box.
If you have to wash the engine compartment, take care not
to aim the jet of water directly at the fuse box or
windscreen wiper motors.
fig. 149
A0J0126
fig. 150
A0J0127
177GETTING TO KNOW
YOUR CAR
SAFETY
STARTING AND
DRIVINGIN AN
EMERGENCYSERVICING AND
MAINTENANCE
TECHNICAL
SPECIFICATIONS
INDEX
Page 182 of 312
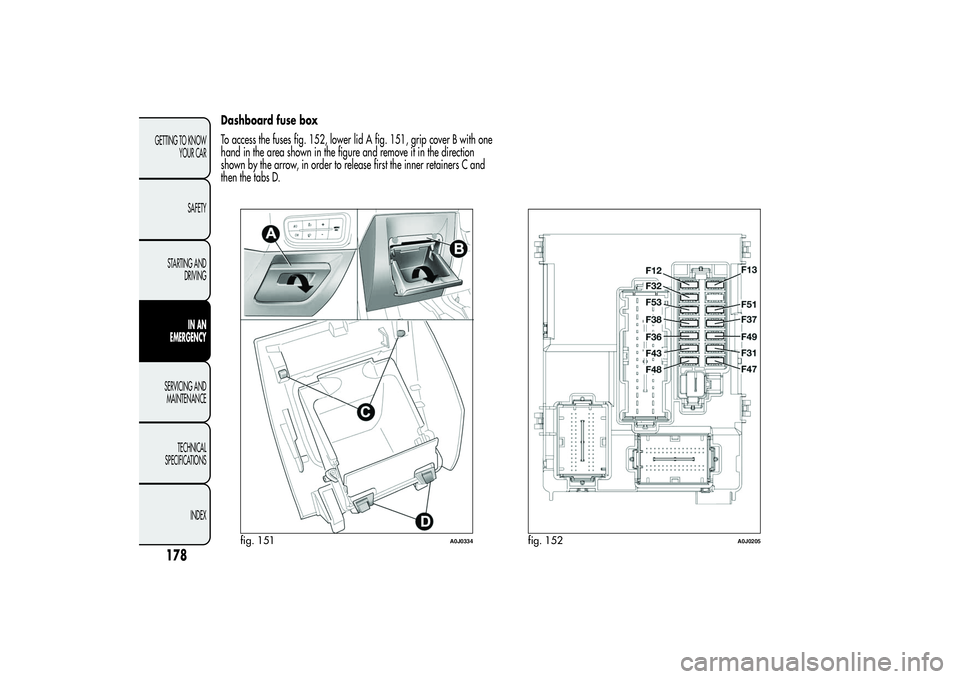
Dashboard fuse box
To access the fuses fig. 152, lower lid A fig. 151, grip cover B with one
hand in the area shown in the figure and remove it in the direction
shown by the arrow, in order to release first the inner retainers C and
then the tabs D.
fig. 151
A0J0334
fig. 152
A0J0205
178GETTING TO KNOW
YOUR CAR
SAFETY
STARTING AND
DRIVING
IN AN
EMERGENCY
SERVICING AND
MAINTENANCE
TECHNICAL
SPECIFICATIONS
INDEX
Page 183 of 312
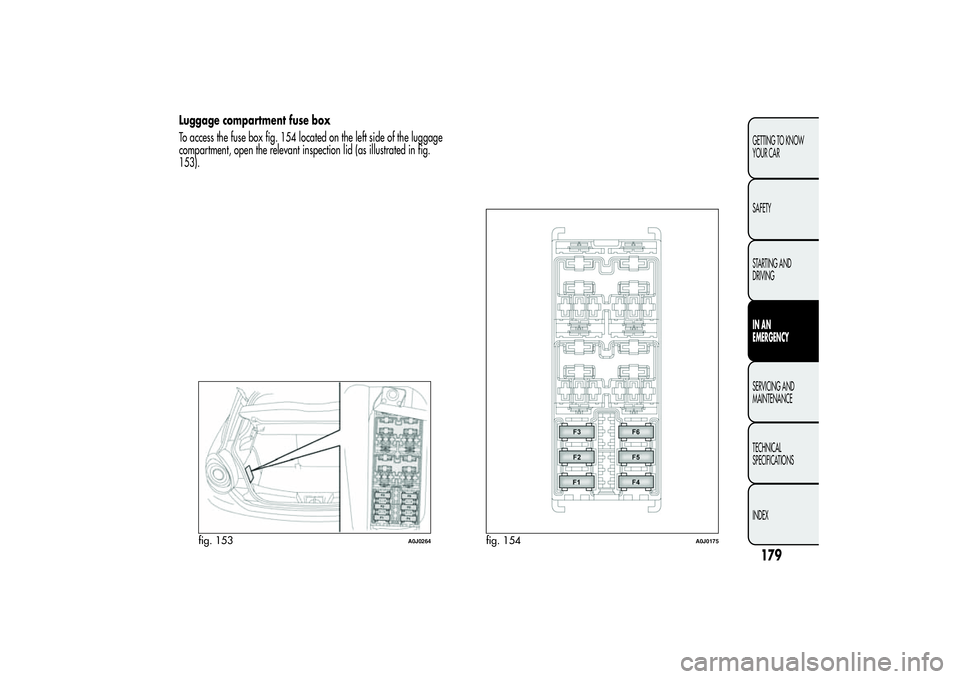
Luggage compartment fuse box
To access the fuse box fig. 154 located on the left side of the luggage
compartment, open the relevant inspection lid (as illustrated in fig.
153).
fig. 153
A0J0264
fig. 154
A0J0175
179GETTING TO KNOW
YOUR CAR
SAFETY
STARTING AND
DRIVINGIN AN
EMERGENCYSERVICING AND
MAINTENANCE
TECHNICAL
SPECIFICATIONS
INDEX
Page 184 of 312
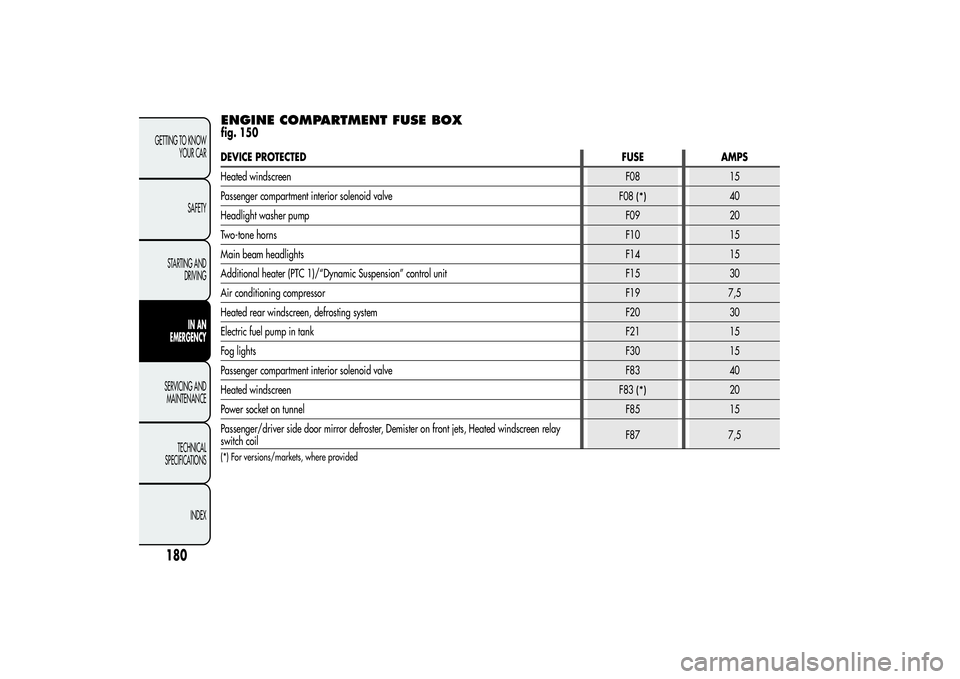
ENGINE COMPARTMENT FUSE BOXfig. 150
180GETTING TO KNOW
YOUR CAR
SAFETY
STARTING AND
DRIVING
IN AN
EMERGENCY
SERVICING AND
MAINTENANCE
TECHNICAL
SPECIFICATIONS
INDEX
DEVICE PROTECTEDFUSE AMPS
Heated windscreenF08 15
Passenger compartment interior solenoid valve
F08
(*)
40
Headlight washer pumpF09 20
Two-tone hornsF10 15
Main beam headlightsF14 15
Additional heater (PTC 1)/“Dynamic Suspension” control unit F15 30
Air conditioning compressorF19 7,5
Heated rear windscreen, defrosting system F20 30
Electric fuel pump in tankF21 15
Fog lightsF30 15
Passenger compartment interior solenoid valve F83 40
Heated windscreen
F83
(*)
20
Power socket on tunnelF85 15
Passenger/driver side door mirror defroster, Demister on front jets, Heated windscreen relay
switch coilF87 7,5
(*) For versions/markets, where provided
Page 185 of 312
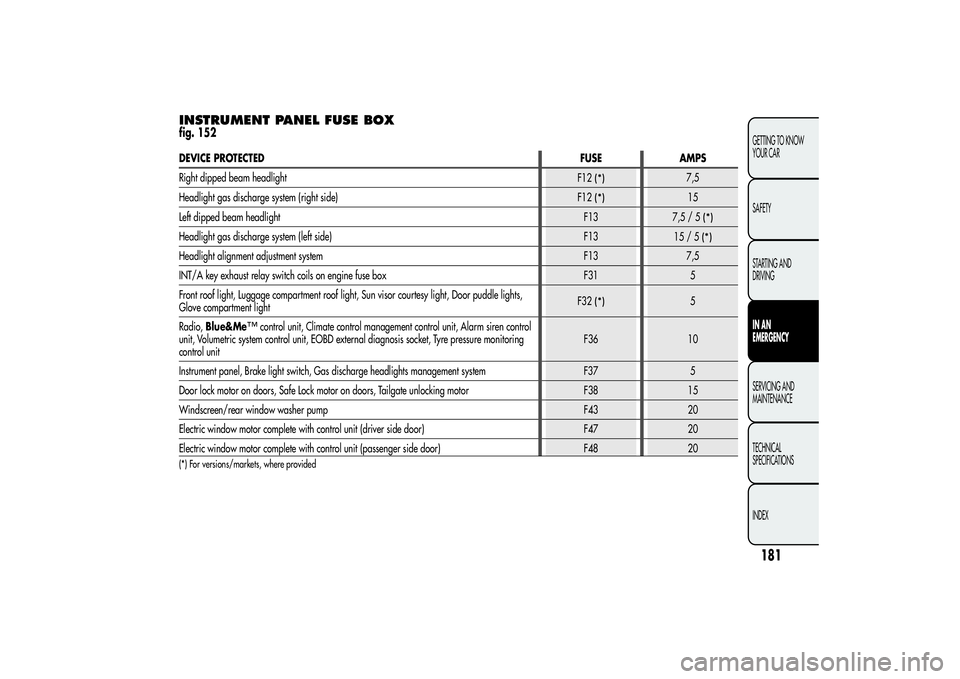
INSTRUMENT PANEL FUSE BOXfig. 152DEVICE PROTECTEDFUSE AMPS
Right dipped beam headlight
F12
(*)
7,5
Headlight gas discharge system (right side)
F12
(*)
15
Left dipped beam headlightF13
7,5/5
(*)
Headlight gas discharge system (left side) F13
15/5
(*)
Headlight alignment adjustment system F13 7,5
INT/A key exhaust relay switch coils on engine fuse box F31 5
Front roof light, Luggage compartment roof light, Sun visor courtesy light, Door puddle lights,
Glove compartment lightF32
(*)
5
Radio,Blue&Me
™
control unit, Climate control management control unit, Alarm siren control
unit, Volumetric system control unit, EOBD external diagnosis socket, Tyre pressure monitoring
control unitF36 10
Instrument panel, Brake light switch, Gas discharge headlights management system F37 5
Door lock motor on doors, Safe Lock motor on doors, Tailgate unlocking motor F38 15
Windscreen/rear window washer pump F43 20
Electric window motor complete with control unit (driver side door) F47 20
Electric window motor complete with control unit (passenger side door) F48 20
(*) For versions/markets, where provided
181GETTING TO KNOW
YOUR CAR
SAFETY
STARTING AND
DRIVINGIN AN
EMERGENCYSERVICING AND
MAINTENANCE
TECHNICAL
SPECIFICATIONS
INDEX
Page 186 of 312

DEVICE PROTECTEDFUSE AMPS
Parking sensor control unit, Tyre pressure monitoring control unit, Rain/dusk sensor on interior
rear view mirror, Electrochromic sensor on interior rear view mirror, Seat belts fastened warning
light display on interior rear view mirror, Control panel lighting (central control panel, driver
side control panel, control panel on steering wheel,Blue&Me
™
control panel), Heater pad
activation switches on front seats, Alarm system volumetric sensor control unit, Electric sun roof
control unit, Navigation system socket on dashboardF49 5
Clutch activation switch, Brake light switch, Relay switch coils on engine fuse box control unit,
Control system on internal climate control/heater unit,Blue&Me™
control unit, Radio setup,
Flow meter, Water in diesel sensorF51 5
Instrument panelF53 5
182GETTING TO KNOW
YOUR CAR
SAFETY
STARTING AND
DRIVING
IN AN
EMERGENCY
SERVICING AND
MAINTENANCE
TECHNICAL
SPECIFICATIONS
INDEX
Page 187 of 312
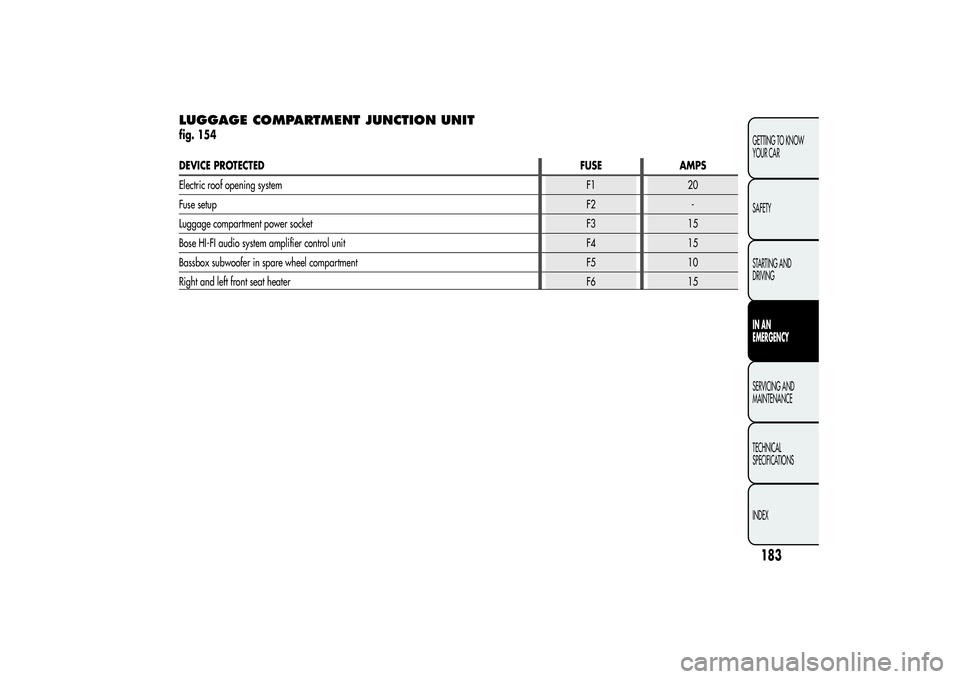
LUGGAGE COMPARTMENT JUNCTION
UNITfig. 154DEVICE PROTECTEDFUSE AMPS
Electric roof opening systemF1 20
Fuse setupF2 -
Luggage compartment power socket F3 15
Bose HI-FI audio system amplifier control unit F4 15
Bassbox subwoofer in spare wheel compartment F5 10
Right and left front seat heaterF6 15
183GETTING TO KNOW
YOUR CAR
SAFETY
STARTING AND
DRIVINGIN AN
EMERGENCYSERVICING AND
MAINTENANCE
TECHNICAL
SPECIFICATIONS
INDEX
Page 188 of 312

BATTERY RECHARGINGIMPORTANT The battery recharging procedure is given as information
only. Contact Alfa Romeo Authorized Services to carry out this
operation.
IMPORTANT After turning the ignition key to STOP, wait at least 1
minute before disconnecting the battery power supply.
We recommend recharging the battery slowly for approximately 24
hours at low amperage. Charging for a longer time may damage the
battery.VERSIONS WITHOUT Start&Stop
SYSTEM(for versions/markets, where provided)
Charge the battery as follows:
❒disconnect the negative battery terminal;
❒connect the charger cables to the battery terminals, observing the
polarity;
❒turn on the battery charger;
❒when it is recharged, turn the charger off before disconnecting it
from the battery;
❒reconnect the negative battery terminal.
VERSIONS WITH Start&Stop SYSTEMCharge the battery as follows:
❒disconnect the connector A fig. 155 (pressing the button B) from the
sensor C monitoring the battery conditions, on the negative pole D
of the battery;
❒connect the positive cable (+) of the battery charger to the battery
positive pole (+);
❒connect the negative cable (+) of the battery charger to the post D of
the battery negative pole (-);
❒turn on the battery charger;
❒when it is recharged, turn the charger off before disconnecting it
from the battery;
❒reconnect the connector A to the sensor C of the battery.
fig. 155
A0J0389
184GETTING TO KNOW
YOUR CAR
SAFETY
STARTING AND
DRIVING
IN AN
EMERGENCY
SERVICING AND
MAINTENANCE
TECHNICAL
SPECIFICATIONS
INDEX
Page 189 of 312
RAISING THE CARIf you need to lift the car contact Alfa Romeo Authorized Services, who
will be equipped with a workshop lift.
IMPORTANT Be careful when positioning the arm of the lift for versions
with side skirts.
TOWING THE CARThe tow ring provided with the car is housed in the tool box in the
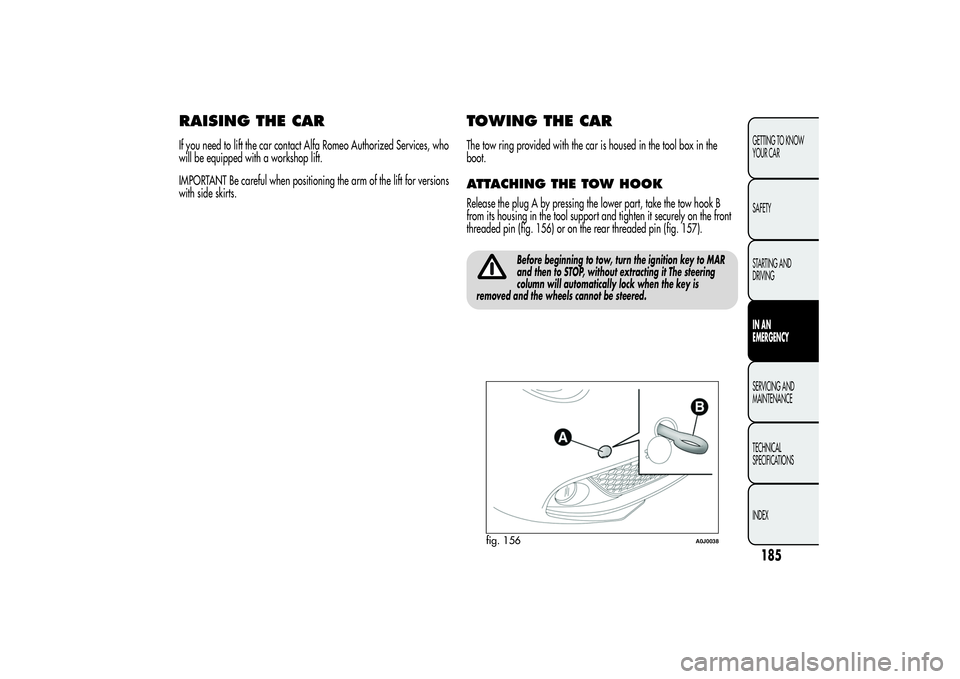
boot.ATTACHING THE TOW HOOKRelease the plug A by pressing the lower part, take the tow hook B
from its housing in the tool support and tighten it securely on the front
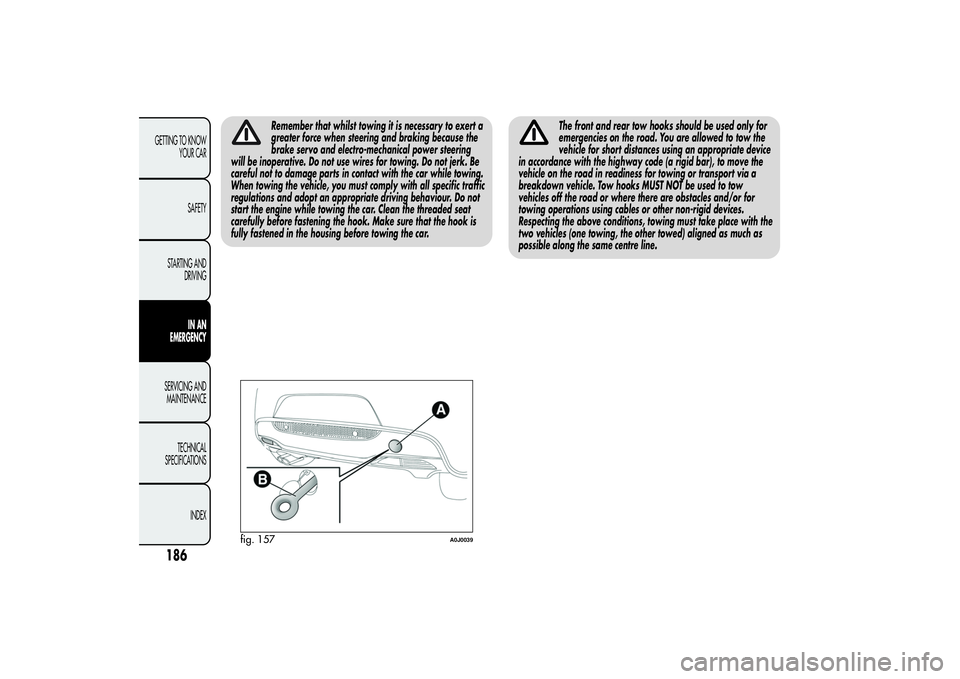
threaded pin (fig. 156) or on the rear threaded pin (fig. 157).
Before beginning to tow, turn the ignition key to MAR
and then to STOP, without extracting it The steering
column will automatically lock when the key is
removed and the wheels cannot be steered.
fig. 156
A0J0038
185GETTING TO KNOW
YOUR CAR
SAFETY
STARTING AND
DRIVINGIN AN
EMERGENCYSERVICING AND
MAINTENANCE
TECHNICAL
SPECIFICATIONS
INDEX
Page 190 of 312
Remember that whilst towing it is necessary to exert a
greater force when steering and braking because the
brake servo and electro-mechanical power steering
will be inoperative. Do not use wires for towing. Do not jerk. Be
careful not to damage parts in contact with the car while towing.
When towing the vehicle, you must comply with all specific traffic
regulations and adopt an appropriate driving behaviour. Do not
start the engine while towing the car. Clean the threaded seat
carefully before fastening the hook. Make sure that the hook is
fully fastened in the housing before towing the car.
The front and rear tow hooks should be used only for
emergencies on the road. You are allowed to tow the
vehicle for short distances using an appropriate device
in accordance with the highway code (a rigid bar), to move the
vehicle on the road in readiness for towing or transport via a
breakdown vehicle. Tow hooks MUST NOT be used to tow
vehicles off the road or where there are obstacles and/or for
towing operations using cables or other non-rigid devices.
Respecting the above conditions, towing must take place with the
two vehicles (one towing, the other towed) aligned as much as
possible along the same centre line.
fig. 157
A0J0039
186GETTING TO KNOW
YOUR CAR
SAFETY
STARTING AND
DRIVING
IN AN
EMERGENCY
SERVICING AND
MAINTENANCE
TECHNICAL
SPECIFICATIONS
INDEX