buttons Alfa Romeo MiTo 2013 Owner handbook (in English)
[x] Cancel search | Manufacturer: ALFA ROMEO, Model Year: 2013, Model line: MiTo, Model: Alfa Romeo MiTo 2013Pages: 312, PDF Size: 11.5 MB
Page 31 of 312

CONTROL BUTTONS"+" or
(versions with Start&Stop system): to scroll upwards
through the screen and the related options or to increase the displayed
value fig. 8.
MENU ESC: brief press to access the menu and/or go to the next
screen or confirm your choice. Long press to return to the standard
screen.
"–" or(versions with Start&Stop system): to scroll downwards
through the screen and the related options or to decrease the displayed
value.
IMPORTANT The "+" and "–" buttons (or
and
for
versions with Start&Stop system) activate different functions according
to the following situations:
❒within the menu, they allow you to scroll up and down through the
options;
❒during settings operations, they increase or decrease values.
SETUP MENUThe menu comprises a series of options which can be selected using
the "+" and "–" buttons (or
and
for versions with
Start&Stop system) to access the different selection and setting
operations (Setup) indicated below.
Some items have a submenu. The menu can be activated by briefly
pressing the MENU ESC button.
The menu comprises the following options:
❒MENU
❒SPEED BEEP
❒LIGHT SENSOR (for versions/markets where provided)
❒RAIN SENSOR (for versions/markets, where provided)
❒TRIP B ACTIVATION/DATA
❒SET TIME
❒SET DATE
❒FIRST PAGE (for versions/markets where provided)
❒SEE RADIO
❒AUTOCLOSE
❒MEASUREMENT UNIT
❒LANGUAGE
❒BUZZER VOLUME
❒BUTTON VOLUME
❒SEAT BELT BEEP/BUZZ
fig. 8
A0J0024
27GETTING TO
KNOW YOUR CARSAFETY
STARTING AND
DRIVING
IN AN EMERGENCY
SERVICING AND
MAINTENANCE
TECHNICAL
SPECIFICATIONS
INDEX
Page 32 of 312
❒SERVICE
❒AIRBAG/PASSENGER BAG
❒DAYTIME RUNNING LIGHTS
❒COURTESY LIGHTS
❒MENU EXIT
NoteOn cars equipped with radio navigator systems (for versions/
markets, where provided), some menu items are shown on the
navigator display.Selecting an option from the main
menu without a submenu:❒briefly press the MENU ESC button to select the main menu option
you wish to modify;
❒press the "+" or "–" buttons (with single presses) to select the new
setting;
❒a short press on button MENU ESC will store the setting and then
return to the same main menu option that was first selected.
Selecting an option from the main
menu with a submenu:❒a short press on MENU ESC button will display the first submenu
option;
❒press the "+" or "–" buttons (with single presses) to scroll through all
the submenu options;
❒a short press on MENU ESC button will select the displayed
submenu option and enter the associated setting menu;
❒press the "+" or "–" buttons (with single presses) to select the new
setting for this submenu option;
❒a short press on button MENU ESC will store the setting and then
return to the same submenu option that was first selected.
28GETTING TO
KNOW YOUR CAR
SAFETY
STARTING AND
DRIVING
IN AN EMERGENCY
SERVICING AND
MAINTENANCE
TECHNICAL
SPECIFICATIONS
INDEX
Page 33 of 312

MENU ITEMSMenuThis option allows you to access the Setup Menu. Press the "+" or "-"
button to select the various Menu options. Hold down the MENU
ESC button to return to the standard screen.Speed Beep (Speed limit)This function may be used to set the car speed limit (km/h or mph);
when this limit is exceeded the driver is alerted.
To set the desired speed limit, proceed as follows:
❒briefly press the MENU ESC button to make the display show the
words (Speed Beep);
❒press the "-" or "+" button to select speed limit activation (On) or
deactivation (Off);
❒when the function is activated (On), press the "+" or "-" buttons to
select the desired speed limit and press MENU ESC to confirm the
choice.
IMPORTANT Setting is possible between 30 and 200 km/h, or 20 and
125 mph, according to the previously set unit. See the "Measurement
unit (Measurement unit adjustment)" paragraph described below.
The setting will increase/decrease by 5 units each time the +/- button
is pressed. Hold down the +/- button for fast automatic increase/
decrease. Complete the setting by with single presses of the button
when you approach the required value.
❒Press the MENU ESC button briefly to return to the menu screen or
hold the button down to return to the standard screen without
storing.To cancel the setting proceed as follows:
❒briefly press MENU ESC: (On) will flash on the display;
❒press the - button to make the display flash (Off);
❒press the MENU ESC button briefly to return to the menu screen or
hold the button down to return to the standard screen without
storing.
Headlight sensor (Automatic
headlight/dusk sensor sensitivity
adjustment)(for versions/markets, where provided)
This function enables the headlights to come on or go off depending on
external lighting conditions.
The dusk sensor sensitivity can be adjusted according to 3 levels (level
1= minimum sensitivity, level 2= average sensitivity, level 3= maximum
sensitivity).
The higher the sensitivity set, the lesser is the external light variation
needed to switch the lights on (e.g. with a setting on level 3 at sunset
the headlights come on in advance in relation to levels 1 and 2).
Proceed as follows to set the desired adjustment:
❒press the MENU ESC button briefly to make the display flash the
previously stored level;
❒press the + or - button to select;
❒briefly press the MENU ESC button to return to the menu screen or
hold it down to return to the standard screen without storing.
29GETTING TO
KNOW YOUR CARSAFETY
STARTING AND
DRIVING
IN AN EMERGENCY
SERVICING AND
MAINTENANCE
TECHNICAL
SPECIFICATIONS
INDEX
Page 34 of 312

Rain sensor (Rain sensor sensitivity
adjustment)This function allows you to adjust the rain sensor sensitivity to 4 levels.
To set the required sensitivity level proceed as follows:
❒briefly press MENU ESC: the previously set sensitivity level will flash
on the display;
❒press the + or - button to adjust;
❒press the MENU ESC button briefly to return to the menu screen or
hold the button down to return to the standard screen without
storing.Activation/Trip B data (Trip B
enablement)This function may be used to activate (On) or deactivate (Off) the Trip B
(partial trip). For further information see “Trip computer”.
Proceed as follows to switch the function on and off:
❒press the MENU ESC button briefly to make the display flash On or
Off according to the previous setting;
❒press the + or - button to select;
❒press the MENU ESC button briefly to return to the menu screen or
hold the button down to return to the standard screen without
storing.
Time adjustment (Clock adjustment)This function enables the clock to be set through two sub-menus:
“Time” and “Format”.
To carry out the adjustment, proceed as follows:
❒briefly press MENU ESC: the display will show the two submenus
“Time” and “Mode”;
❒press the + or - button to move between the two submenus;
❒once the submenu to be modified has been selected, briefly press the
MENU ESC button;
❒when you select the “Time” submenu, pressing MENU ESC briefly
makes the "hours" flash on the display;
❒press the + or - button to adjust;
❒briefly press MENU ESC: the “minutes” will flash on the display;
❒press the + or - button to adjust.
IMPORTANT Each press on the + or - buttons causes an increase or
decrease of one unit. Hold down the button to increase/decrease the
setting rapidly and automatically. Complete the setting by with single
presses of the button when you approach the required value.
❒If you select “Format” submenu, pressing MENU ESC briefly makes
the display mode flash on the display;
❒press + or - to select “24h” or “12h”.
When you have made the required adjustments, briefly press button
MENU ESC to go back to the submenu screen or hold the button down
to go back to the main menu screen without saving.
❒hold the MENU ESC button down again to go back to the standard
screen or to the main menu according to the position in the menu.
30GETTING TO
KNOW YOUR CAR
SAFETY
STARTING AND
DRIVING
IN AN EMERGENCY
SERVICING AND
MAINTENANCE
TECHNICAL
SPECIFICATIONS
INDEX
Page 35 of 312
Set date (Setting the date)Using this function it is possible to change the date (day – month –
year).
Proceed as follows to start the update:
❒briefly press MENU ESC: “year” will flash on the display;
❒press the + or - button to adjust;
❒briefly press MENU ESC: “month” will flash on the display;
❒press the + or - button to adjust;
❒briefly press MENU ESC: “day” will flash on the display;
❒press the + or - button to adjust.
IMPORTANT Each press on the + or - buttons causes an increase or
decrease of one unit. Hold the button down to increase/decrease the
setting rapidly and automatically. Complete the setting by with single
presses of the button when you approach the required value.
❒Briefly press the MENU ESC button to return to the menu screen or
hold it down to return to the standard screen without storing.
First page (Display of information on
the main screen)(for versions/markets, where provided)
This function allows you to choose the information you would like to
see on the main screen. You can view the date or the trip distance.
To make your choice, proceed as follows:
❒briefly press MENU ESC: “First page” will appear on the display;
❒briefly press MENU ESC again to show the display options: “Date”
and “Engine info”;
❒press + or - to select the information you wish to see on the main
screen of the display;
❒press the MENU ESC button briefly to return to the menu screen or
hold the button down to return to the standard screen without
storing.
When the key is turned to MAR-ON and the initial check stage is over,
the display will show the information selected via the “First page”
menu function.
31GETTING TO
KNOW YOUR CARSAFETY
STARTING AND
DRIVING
IN AN EMERGENCY
SERVICING AND
MAINTENANCE
TECHNICAL
SPECIFICATIONS
INDEX
Page 38 of 312
Belt reminder (Reactivation of SBR
buzzer)(for versions/markets, where provided)
This function can only be displayed after Alfa Romeo Authorized
Services have deactivated the SBR system (see "SBR system" in the
"Safety" chapter).Service (Scheduled servicing)With this function it is possible to view information on servicing
deadlines depending on kilometres travelled or daily intervals.
With the Service function it is also possible to view the interval (in
kilometres or miles) before the next engine oil change is due.
To consult this information, proceed as follows:
❒briefly press the MENU ESC button, which makes the display show
the service interval in km or mi according to the previous setting
(see "Distance units of measurement" paragraph);
❒press the MENU ESC button briefly to return to the menu screen or
hold the button down to return to the standard screen.IMPORTANT According to the “Scheduled Servicing Plan”, the car must
be serviced every 30,000 km (petrol versions) or 35,000 km (diesel
versions). This message is displayed automatically when the key is
turned to MAR-ON, starting at 2,000 km (or equivalent value in miles)
from when the next service is due and reappearing every 200 km (or
equivalent value in miles). Below 200 km servicing indications are
more frequent. The display will be in km or mi depending on the
measurement unit settings. When the next scheduled service is
approaching and the key is turned to MAR-ON, the word Service will
appear on the display, followed by the number of kilometres or miles
left. Contact Alfa Romeo Authorized Services where the "Scheduled
Servicing Plan" operations will be performed and the message will be
reset.
Airbag/Passenger bag
(Activation/deactivation front
passenger side bag and Side bag for
chest/pelvis protection)This function is used to activate/deactivate the passenger side air bag.
Proceed as follows:
❒press the MENU ESC button and, after the message Bag pass: Off
(to deactivate) or Bag pass: On (to activate) is displayed by pressing
buttons + or -, press the MENU ESC button again;
❒a confirmation request message will appear on the display;
❒by pressing the + or - buttons select (Yes) (to confirm the activation/
deactivation) or (No) (to cancel);
❒press the MENU ESC button briefly, a message confirming the
selection will be displayed and you will return to the menu screen or
hold the button down to return to the standard screen without
storing.
34GETTING TO
KNOW YOUR CAR
SAFETY
STARTING AND
DRIVING
IN AN EMERGENCY
SERVICING AND
MAINTENANCE
TECHNICAL
SPECIFICATIONS
INDEX
Page 54 of 312
Lumbar adjustment
(for versions/markets, where provided)
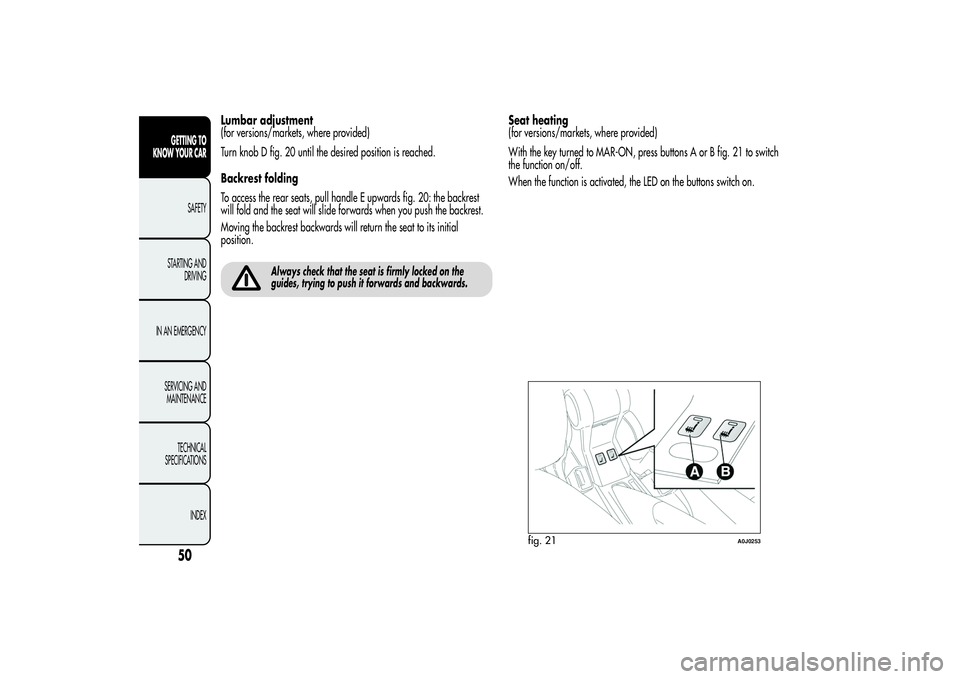
Turn knob D fig. 20 until the desired position is reached.
Backrest folding
To access the rear seats, pull handle E upwards fig. 20: the backrest
will fold and the seat will slide forwards when you push the backrest.
Moving the backrest backwards will return the seat to its initial
position.
Always check that the seat is firmly locked on the
guides, trying to push it forwards and backwards.
Seat heating
(for versions/markets, where provided)
With the key turned to MAR-ON, press buttons A or B fig. 21 to switch
the function on/off.
When the function is activated, the LED on the buttons switch on.
fig. 21
A0J0253
50GETTING TO
KNOW YOUR CAR
SAFETY
STARTING AND
DRIVING
IN AN EMERGENCY
SERVICING AND
MAINTENANCE
TECHNICAL
SPECIFICATIONS
INDEX
Page 56 of 312
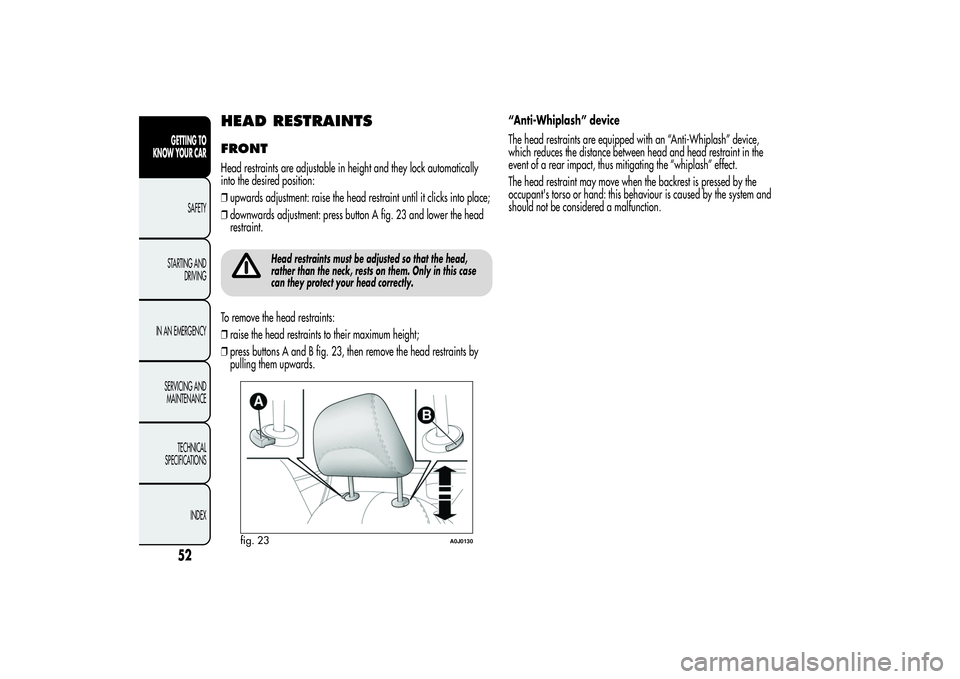
HEAD RESTRAINTSFRONTHead restraints are adjustable in height and they lock automatically
into the desired position:
❒upwards adjustment: raise the head restraint until it clicks into place;
❒downwards adjustment: press button A fig. 23 and lower the head
restraint.
Head restraints must be adjusted so that the head,
rather than the neck, rests on them. Only in this case
can they protect your head correctly.
To remove the head restraints:
❒raise the head restraints to their maximum height;
❒press buttons A and B fig. 23, then remove the head restraints by
pulling them upwards.“Anti-Whiplash” device
The head restraints are equipped with an “Anti-Whiplash” device,
which reduces the distance between head and head restraint in the
event of a rear impact, thus mitigating the “whiplash” effect.
The head restraint may move when the backrest is pressed by the
occupant's torso or hand: this behaviour is caused by the system and
should not be considered a malfunction.
fig. 23
A0J0130
52GETTING TO
KNOW YOUR CAR
SAFETY
STARTING AND
DRIVING
IN AN EMERGENCY
SERVICING AND
MAINTENANCE
TECHNICAL
SPECIFICATIONS
INDEX
Page 57 of 312
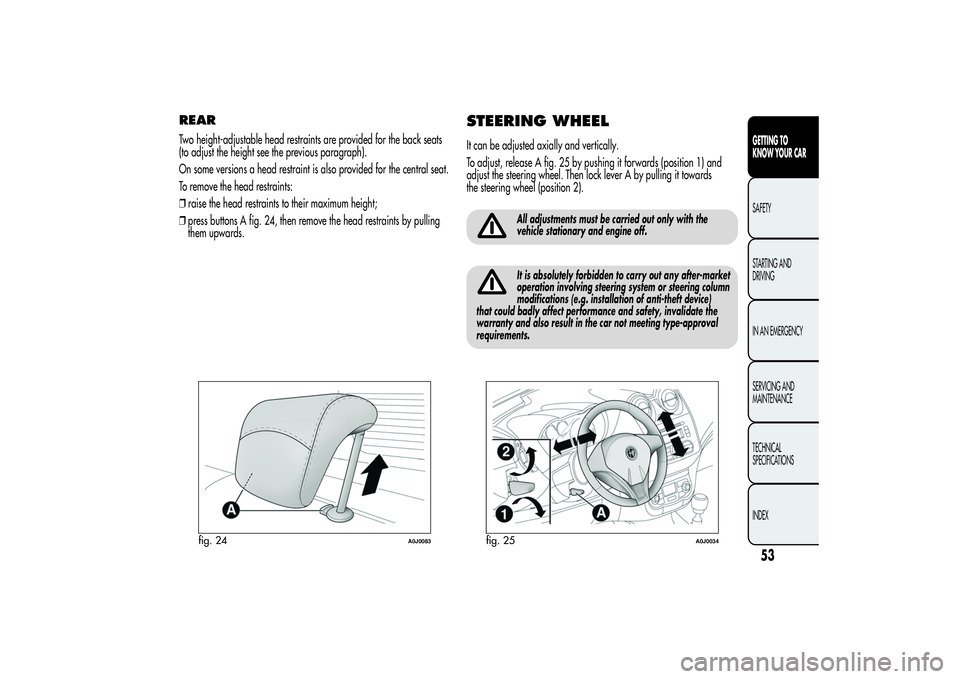
REARTwo height-adjustable head restraints are provided for the back seats
(to adjust the height see the previous paragraph).
On some versions a head restraint is also provided for the central seat.
To remove the head restraints:
❒raise the head restraints to their maximum height;
❒press buttons A fig. 24, then remove the head restraints by pulling
them upwards.
STEERING WHEELIt can be adjusted axially and vertically.
To adjust, release A fig. 25 by pushing it forwards (position 1) and
adjust the steering wheel. Then lock lever A by pulling it towards
the steering wheel (position 2).
All adjustments must be carried out only with the
vehicle stationary and engine off.It is absolutely forbidden to carry out any after-market
operation involving steering system or steering column
modifications (e.g. installation of anti-theft device)
that could badly affect performance and safety, invalidate the
warranty and also result in the car not meeting type-approval
requirements.
fig. 24
A0J0083
fig. 25
A0J0034
53GETTING TO
KNOW YOUR CARSAFETY
STARTING AND
DRIVING
IN AN EMERGENCY
SERVICING AND
MAINTENANCE
TECHNICAL
SPECIFICATIONS
INDEX
Page 68 of 312
SWITCHING ON THE CLIMATE
CONTROL SYSTEMThe climate control system can be switched on in different ways: we
recommend pressing one of the AUTO buttons and turning the knobs
to set the desired temperatures.
It is possible to select different temperatures for the driver and
passenger, with a maximum difference of 7°C.
In this way the system operates completely automatically to adjust the
temperature, quantity and distribution of the air introduced into the
passenger compartment. It also manages the air recirculation system
and the activation of the air conditioning compressor.
During fully automatic operation the only manual intervention is the
possible activation of the following functions:
❒MONO, to align the air temperature and distribution set on the
passenger side with that on the driver side;
❒
air recirculation (keeping the function always either on or
off);
❒to speed up demisting/defrosting of front windows, rear
window and door mirrors;
❒to demist/defrost heated rear window and door mirrors.
During automatic operation, you can change the set temperatures, air
distribution and fan speed at any time by using the relevant buttons
or knobs: the system will automatically change the settings to adjust to
the new requirements.
In this way the climate control system will continue to automatically
manage all functions except for those that have been manually
adjusted. The fan speed is the same in all the zones of the passenger
compartment.
ADJUSTING THE AIR TEMPERATURETurn knob N or H to the right or left to adjust the air temperature: knob
N for the front left area, knob H for the front right area of the
passenger compartment. The set temperatures are shown on the
display.
Press the MONO button to align the air temperature of the two areas:
to set the same temperature, turn knob N.
To return to separate management of air temperature and distribution
between the two areas, turn knob N or H or press the MONO button
again (when the LED on the button is on).
Turn the knobs fully right or left to engage HI (maximum heating) or LO
(maximum cooling) respectively. To deactivate these functions, turn
the temperature knob to the desired temperature.
64GETTING TO
KNOW YOUR CAR
SAFETY
STARTING AND
DRIVING
IN AN EMERGENCY
SERVICING AND
MAINTENANCE
TECHNICAL
SPECIFICATIONS
INDEX