key Alfa Romeo MiTo 2021 Owner handbook (in English)
[x] Cancel search | Manufacturer: ALFA ROMEO, Model Year: 2021, Model line: MiTo, Model: Alfa Romeo MiTo 2021Pages: 212, PDF Size: 5.18 MB
Page 21 of 212
EXTERNAL LIGHTS
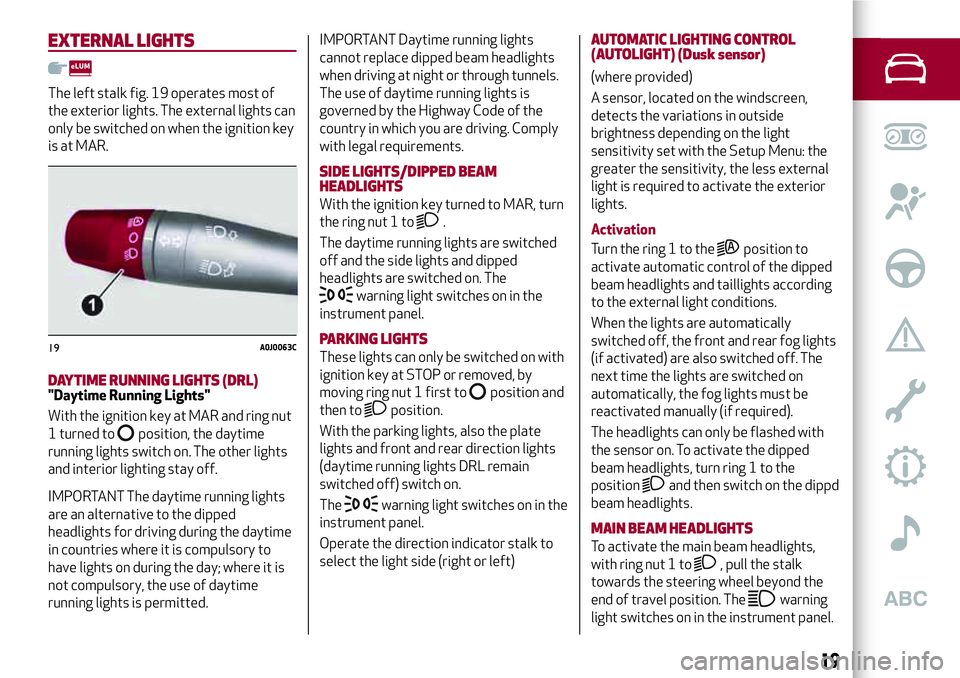
The left stalk fig. 19 operates most of
the exterior lights. The external lights can
only be switched on when the ignition key
is at MAR.
DAYTIME RUNNING LIGHTS (DRL)"Daytime Running Lights"
With the ignition key at MAR and ring nut
1 turned to
position, the daytime
running lights switch on. The other lights
and interior lighting stay off.
IMPORTANT The daytime running lights
are an alternative to the dipped
headlights for driving during the daytime
in countries where it is compulsory to
have lights on during the day; where it is
not compulsory, the use of daytime
running lights is permitted.IMPORTANT Daytime running lights
cannot replace dipped beam headlights
when driving at night or through tunnels.
The use of daytime running lights is
governed by the Highway Code of the
country in which you are driving. Comply
with legal requirements.
SIDE LIGHTS/DIPPED BEAM
HEADLIGHTS
With the ignition key turned to MAR, turn
the ring nut 1 to
.
The daytime running lights are switched
off and the side lights and dipped
headlights are switched on. The
warning light switches on in the
instrument panel.
PARKING LIGHTS
These lights can only be switched on with
ignition key at STOP or removed, by
moving ring nut 1 first to
position and
then to
position.
With the parking lights, also the plate
lights and front and rear direction lights
(daytime running lights DRL remain
switched off) switch on.
The
warning light switches on in the
instrument panel.
Operate the direction indicator stalk to
select the light side (right or left)
AUTOMATIC LIGHTING CONTROL
(AUTOLIGHT) (Dusk sensor)
(where provided)
A sensor, located on the windscreen,
detects the variations in outside
brightness depending on the light
sensitivity set with the Setup Menu: the
greater the sensitivity, the less external
light is required to activate the exterior
lights.
Activation
Turn the ring 1 to the
position to
activate automatic control of the dipped
beam headlights and taillights according
to the external light conditions.
When the lights are automatically
switched off, the front and rear fog lights
(if activated) are also switched off. The
next time the lights are switched on
automatically, the fog lights must be
reactivated manually (if required).
The headlights can only be flashed with
the sensor on. To activate the dipped
beam headlights, turn ring 1 to the
position
and then switch on the dippd
beam headlights.
MAIN BEAM HEADLIGHTS
To activate the main beam headlights,
with ring nut 1 to
, pull the stalk
towards the steering wheel beyond the
end of travel position. The
warning
light switches on in the instrument panel.
19A0J0063C
19
Page 22 of 212
When the stalk is pulled towards the
steering wheel again, beyond the end of
travel position, the main beam headlights
deactivate, the dipped headlights
reactivate and the
warning light
switches off.
It is not possible to switch on the main
beam headlights constantly if automatic
light control is active.
FLASHING
To do this, pull the stalk towards the
steering wheel (unstable position),
regardless of the position of ring nut 1.
The
warning light switches on in the
instrument panel.
HEADLIGHT ALIGNMENT CORRECTOR
This device works with the ignition key in
the MAR position and the dipped
headlights on.
Headlight alignment adjustment
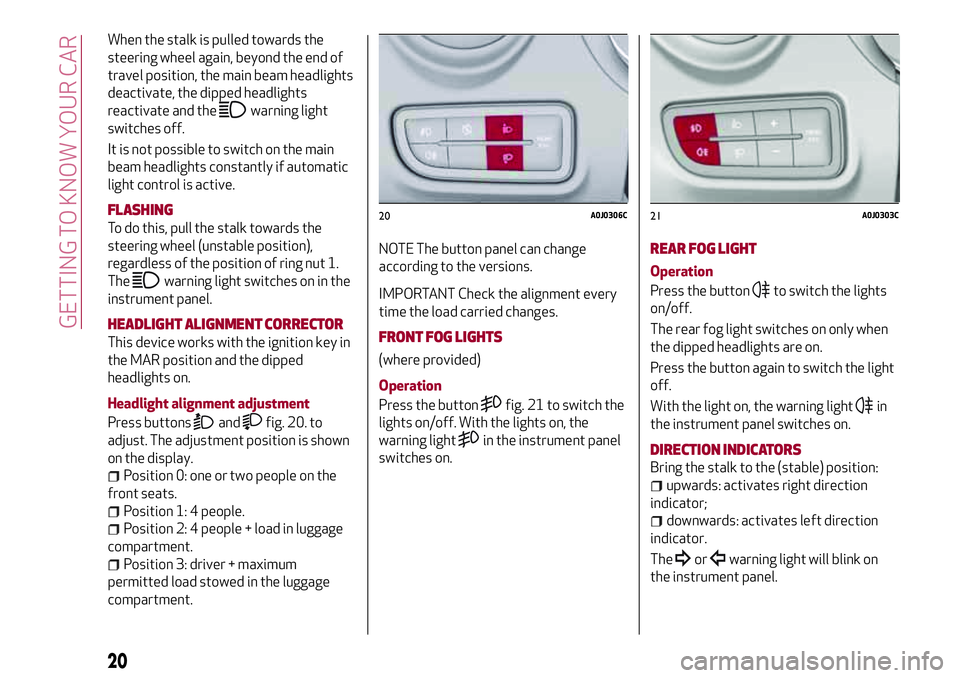
Press buttons
andfig. 20. to
adjust. The adjustment position is shown
on the display.
Position 0: one or two people on the
front seats.
Position 1: 4 people.
Position 2: 4 people + load in luggage
compartment.
Position 3: driver + maximum
permitted load stowed in the luggage
compartment.NOTE The button panel can change
according to the versions.
IMPORTANT Check the alignment every
time the load carried changes.
FRONT FOG LIGHTS
(where provided)
Operation
Press the button
fig. 21 to switch the
lights on/off. With the lights on, the
warning light
in the instrument panel
switches on.
REAR FOG LIGHT
Operation
Press the button
to switch the lights
on/off.
The rear fog light switches on only when
the dipped headlights are on.
Press the button again to switch the light
off.
With the light on, the warning light
in
the instrument panel switches on.
DIRECTION INDICATORS
Bring the stalk to the (stable) position:
upwards: activates right direction
indicator;
downwards: activates left direction
indicator.
The
orwarning light will blink on
the instrument panel.
20A0J0306C21A0J0303C
20
GETTING TO KNOW YOUR CAR
Page 23 of 212
The direction indicators are switched off
automatically when the steering wheel is
straightened.
"Lane change" function
If you wish to signal a lane change, place
the left stalk in the unstable position for
less than half a second. The direction
indicator on the selected side flashes
three times and then switches off
automatically.
"FOLLOW ME HOME" DEVICE
This device allows you to illuminate the
area in front of the car for a certain
amount of time.
Activation
With the key turned to STOP or removed,
pull the left-hand stalk 1 towards the
steering wheel within 2 minutes from
when the engine is turned off.
Each time the stalk is moved, the lights
stay on for an extra 30 seconds up to a
maximum of 210 seconds; then the lights
are switched off automatically.
When the stalk is operated, the warning
light
on the instrument panel
switches on. The display shows a
message and the time set for the
function.
The warning light comes on when the
stalk is operated and stays on until the
function is automatically deactivated.Each movement of the stalk only
increases the amount of time the lights
stay on.
Deactivation
Keep the stalk pulled towards the
steering wheel for more than 2 seconds.
EXTERNAL COURTESY LIGHTS
These light up the car and the space in
front of it when the doors are unlocked.
Activation
When the car is parked and the doors are
unlocked by pressing the
button on the
remote control (or the luggage
compartment is unlocked by pressing
), the dipped beam headlights, rear
side lights and number plate lights are
activated.
The lights stay on for approximately
25 seconds unless the doors and luggage
compartment are locked again with the
remote control or the doors (or luggage
compartment) are opened and reclosed.
In these cases they switch off after
5 seconds.
INTERIOR LIGHTS
FRONT CEILING LIGHT
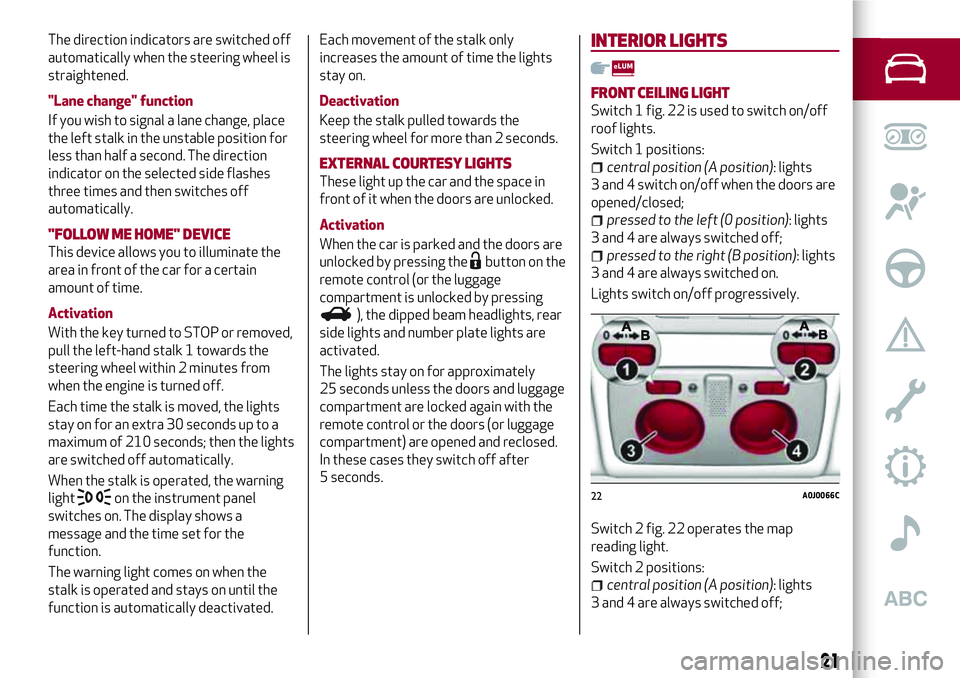
Switch 1 fig. 22 is used to switch on/off
roof lights.
Switch 1 positions:
central position (A position): lights
3 and 4 switch on/off when the doors are
opened/closed;
pressed to the left (0 position): lights
3 and 4 are always switched off;
pressed to the right (B position): lights
3 and 4 are always switched on.
Lights switch on/off progressively.
Switch 2 fig. 22 operates the map
reading light.
Switch 2 positions:
central position (A position): lights
3 and 4 are always switched off;
22A0J0066C
21
Page 24 of 212
pressed to the left (0 position): light
3 switches on;
pressed to the right (B position): light
4 switches on.
IMPORTANT Before getting out of the
car, make sure that both switches are in
the central position: when the doors are
closed the lights will switch off to avoid
draining the battery. In any case, if the
switch is left in the on position, the roof
light switches off automatically about
15 minutes after the engine has been
switched off.
ROOF LIGHT TIMING
Timing while getting into the car
The roof lights come on won unlocking,
opening and closing. The timed period is
interrupted when the ignition is turned to
"MAR-ON".
Timing while getting out of the car
The roof lights come on when the key is
removed from the ignition within
2 minutes of switching off the engine, on
opening and closing a door with the
removed key. The timing stops
automatically when the doors are locked.
WINDSCREEN / REAR WINDOW
WIPERS
This operates only with the ignition key
turned to MAR.
WINDSCREEN WASHER / WIPER
Operation
13) 14)
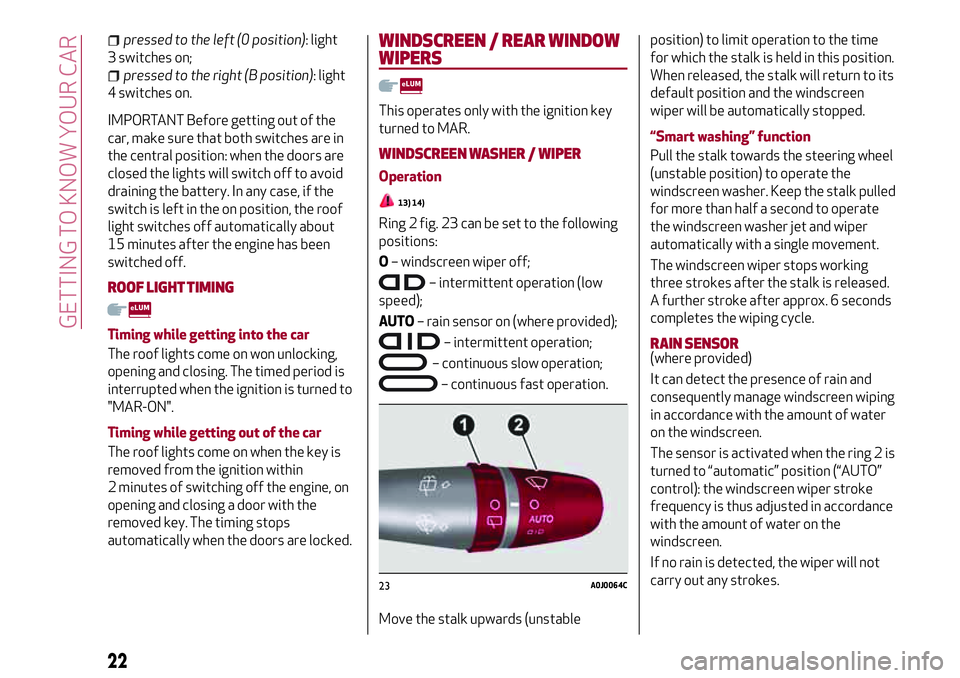
Ring 2 fig. 23 can be set to the following
positions:
O– windscreen wiper off;
– intermittent operation (low
speed);
AUTO– rain sensor on (where provided);
– intermittent operation;
– continuous slow operation;
– continuous fast operation.
Move the stalk upwards (unstableposition) to limit operation to the time
for which the stalk is held in this position.
When released, the stalk will return to its
default position and the windscreen
wiper will be automatically stopped.
“Smart washing” function
Pull the stalk towards the steering wheel
(unstable position) to operate the
windscreen washer. Keep the stalk pulled
for more than half a second to operate
the windscreen washer jet and wiper
automatically with a single movement.
The windscreen wiper stops working
three strokes after the stalk is released.
A further stroke after approx. 6 seconds
completes the wiping cycle.
RAIN SENSOR(where provided)
It can detect the presence of rain and
consequently manage windscreen wiping
in accordance with the amount of water
on the windscreen.
The sensor is activated when the ring 2 is
turned to “automatic” position (“AUTO”
control): the windscreen wiper stroke
frequency is thus adjusted in accordance
with the amount of water on the
windscreen.
If no rain is detected, the wiper will not
carry out any strokes.
23A0J0064C
22
GETTING TO KNOW YOUR CAR
Page 25 of 212
REAR WINDOW WIPER / WASHER
(where provided)
This operates only with the ignition key
turned to MAR.
Turn ring 1 fromOposition to
position to operate the rear window
wiper as follows:
in intermittent mode when the
windscreen wiper is not operating;
in synchronous mode (at half the
speed of the windscreen wiper) when the
windscreen wiper is operating;
in continuous mode with reverse gear
engaged and the control active.
Pushing the stalk towards the dashboard
(rocking position) will activate the rear
window washer jet. Keep the stalk pushed
for more than half a second to activate
the rear window wiper as well. Releasing
the stalk will activate the smart washing
function, as described for the windscreen
wiper.
WARNING
13)Never use the windscreen wipers to
remove layers of snow or ice from the
windscreen. In such conditions, the
windscreen wiper may be subjected to
excessive stress and the motor cut-out
switch, which prevents operation for a few
seconds, may intervene. If operation is not
restored (even after restarting that car with
the key), contact an Alfa Romeo Dealership.14)Do not operate the windscreen wiper
with the blades lifted from the windscreen.
23
Page 31 of 212
ELECTRIC WINDOWS
15)
2)
These operate when the ignition key is
turned to MAR and for about 3 minutes
after turning the key to STOP or
removing it if one of the doors is open.
Anti-crush safety device
An anti-crush device is operated when
the windows are lifted. This safety
system detects the presence of an
obstacle during the window closing travel
and cuts in by stopping and reversing the
window travel, depending on its position.
The anti-crushing feature is active during
window manual and automatic operation.
CONTROLS
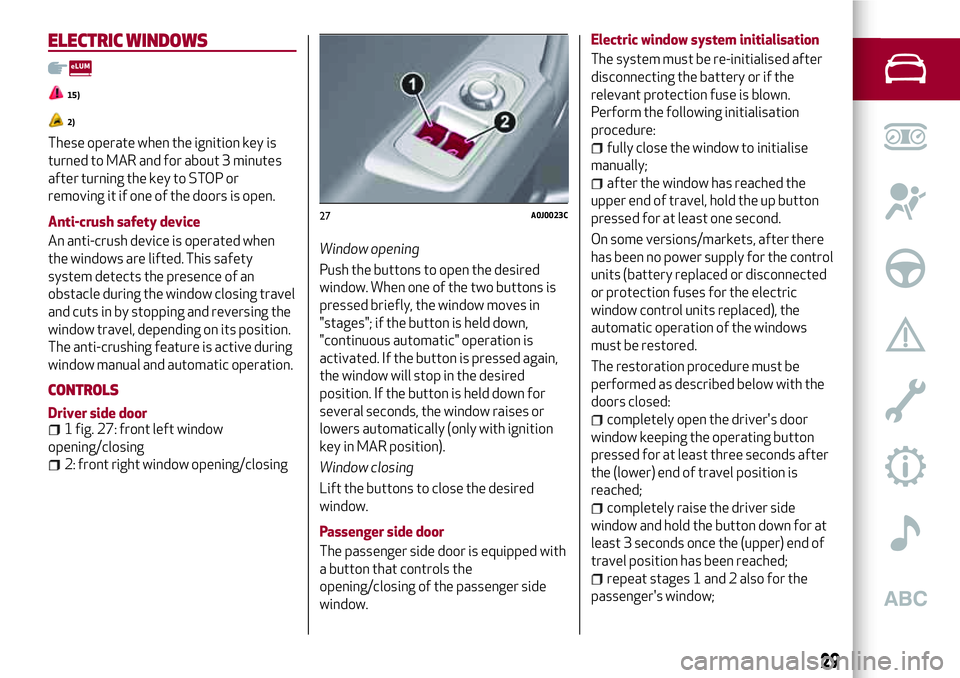
Driver side door1 fig. 27: front left window
opening/closing
2: front right window opening/closingWindow opening
Push the buttons to open the desired
window. When one of the two buttons is
pressed briefly, the window moves in
"stages"; if the button is held down,
"continuous automatic" operation is
activated. If the button is pressed again,
the window will stop in the desired
position. If the button is held down for
several seconds, the window raises or
lowers automatically (only with ignition
key in MAR position).
Window closing
Lift the buttons to close the desired
window.
Passenger side door
The passenger side door is equipped with
a button that controls the
opening/closing of the passenger side
window.Electric window system initialisation
The system must be re-initialised after
disconnecting the battery or if the
relevant protection fuse is blown.
Perform the following initialisation
procedure:
fully close the window to initialise
manually;
after the window has reached the
upper end of travel, hold the up button
pressed for at least one second.
On some versions/markets, after there
has been no power supply for the control
units (battery replaced or disconnected
or protection fuses for the electric
window control units replaced), the
automatic operation of the windows
must be restored.
The restoration procedure must be
performed as described below with the
doors closed:
completely open the driver's door
window keeping the operating button
pressed for at least three seconds after
the (lower) end of travel position is
reached;
completely raise the driver side
window and hold the button down for at
least 3 seconds once the (upper) end of
travel position has been reached;
repeat stages 1 and 2 also for the
passenger's window;
27A0J0023C
29
Page 32 of 212
make sure that the initialisation is
correct by checking that the windows
work automatically.
IMPORTANT
2)The system conforms to the 2000/4/EC
standard concerning the safety of
passengers leaning out of the passenger
compartment.
WARNING
15)Incorrect use of the electric windows
may be dangerous. Before and during their
operation, ensure that any passengers are
not at risk from the moving glass either by
personal objects getting caught in the
mechanism or by being hit by it directly.
When leaving the car, always remove the key
from the ignition to prevent accidental
operation of the electric windows from being
a hazard for those still on board.
ELECTRIC SUNROOF
(where provided)
16)
3)
The extensively glazed sun roof
comprises a moving glass panel and a sun
blind.
When the glazed panel is closed it allows
outside light to enter the passenger
compartment and you can see out of it.
OPERATION
The sun roof can be operated only with
the ignition key turned to MAR. Controls
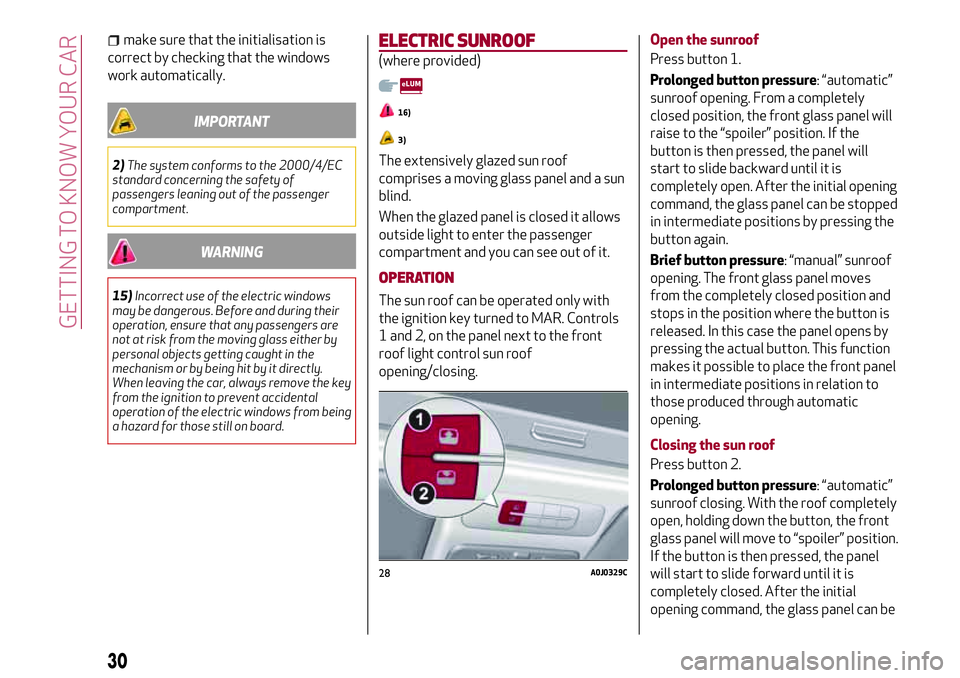
1 and 2, on the panel next to the front
roof light control sun roof
opening/closing.Open the sunroof
Press button 1.
Prolonged button pressure: “automatic”
sunroof opening. From a completely
closed position, the front glass panel will
raise to the “spoiler” position. If the
button is then pressed, the panel will
start to slide backward until it is
completely open. After the initial opening
command, the glass panel can be stopped
in intermediate positions by pressing the
button again.
Brief button pressure: “manual” sunroof
opening. The front glass panel moves
from the completely closed position and
stops in the position where the button is
released. In this case the panel opens by
pressing the actual button. This function
makes it possible to place the front panel
in intermediate positions in relation to
those produced through automatic
opening.
Closing the sun roof
Press button 2.
Prolonged button pressure: “automatic”
sunroof closing. With the roof completely
open, holding down the button, the front
glass panel will move to “spoiler” position.
If the button is then pressed, the panel
will start to slide forward until it is
completely closed. After the initial
opening command, the glass panel can be
28A0J0329C
30
GETTING TO KNOW YOUR CAR
Page 33 of 212
stopped in intermediate positions by
pressing the button again
Brief button pressure: “manual” sunroof
closing. If button is pressed briefly, the
front glass panel moves from the
completely open position and stops in the
position where the button is released. In
this case, the panel closes by pressing it.
This function makes it possible to place
the front glass panel in intermediate
positions in relation to those produced
through automatic closing.
IMPORTANT The sun roof must stay
closed if a transverse roof rack is fitted.
ANTI-PINCH DEVICE
The sun roof has an anti-pinch safety
system capable of detecting the
presence of an obstacle whilst the roof is
closing; when this happens, the system
stops and the movement of the front
glass is immediately reversed.
IMPORTANT The anti-pinch system is
disabled through continuous pressure of
button 2.
INITIALISATION PROCEDURE
The sunroof must be re-initialised after
disconnecting the battery or if the
relevant protection fuse is blown.Perform the following:
press button 2 until the roof is
completely closed. Then release the
button;
press button 2 and hold it down for at
least 10 seconds and/or until the glass
panel clicks forwards. Release the button
at this point;
within 5 seconds of the previous
operation, press button B and hold it
down: the front glass panel will complete
a full opening and closing cycle. Only
release the button at the end of this
cycle.
MAINTENANCE/EMERGENCY
In case of emergency or maintenance the
roof can be moved manually when there
is no power supply (opening/closing of
the front glass panel) by carrying out the
following operations:
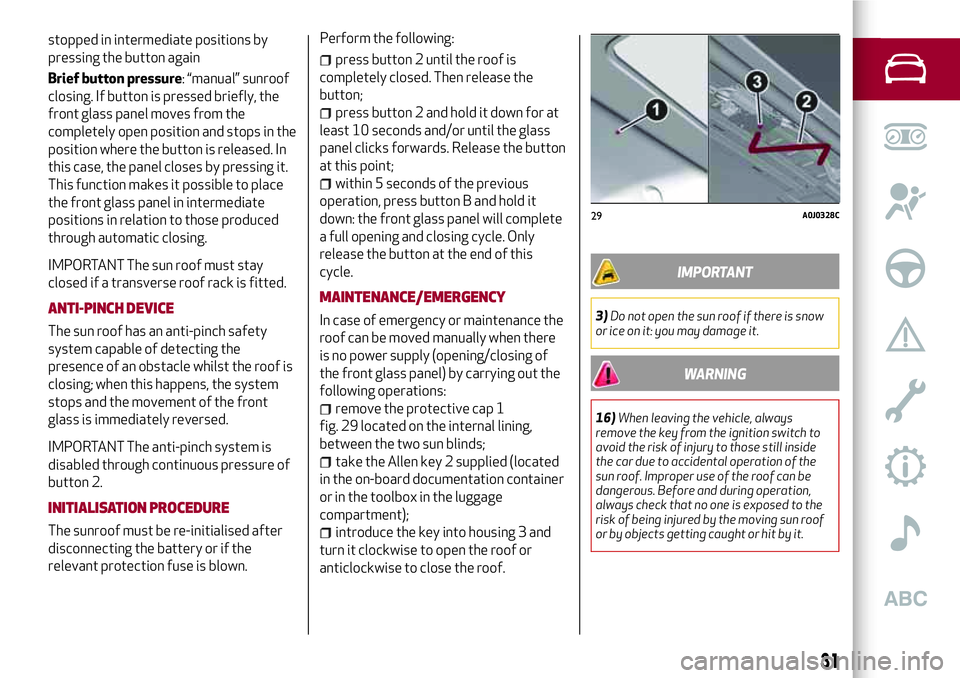
remove the protective cap 1
fig. 29 located on the internal lining,
between the two sun blinds;
take the Allen key 2 supplied (located
in the on-board documentation container
or in the toolbox in the luggage
compartment);
introduce the key into housing 3 and
turn it clockwise to open the roof or
anticlockwise to close the roof.
IMPORTANT
3)Do not open the sun roof if there is snow
or ice on it: you may damage it.
WARNING
16)When leaving the vehicle, always
remove the key from the ignition switch to
avoid the risk of injury to those still inside
the car due to accidental operation of the
sun roof. Improper use of the roof can be
dangerous. Before and during operation,
always check that no one is exposed to the
risk of being injured by the moving sun roof
or by objects getting caught or hit by it.
29A0J0328C
31
Page 35 of 212
19)The bonnet may drop suddenly if the
supporting rod is not positioned correctly.BOOT
The luggage compartment unlocking is
electrically operated and is deactivated
when the car is in motion.
OPENING
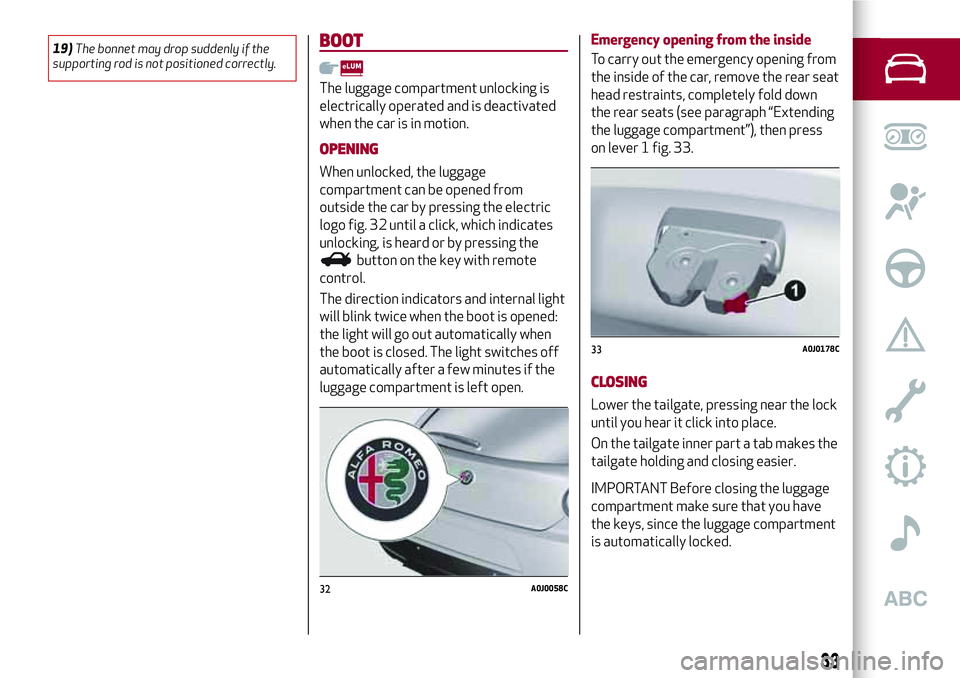
When unlocked, the luggage
compartment can be opened from
outside the car by pressing the electric
logo fig. 32 until a click, which indicates
unlocking, is heard or by pressing the
button on the key with remote
control.
The direction indicators and internal light
will blink twice when the boot is opened:
the light will go out automatically when
the boot is closed. The light switches off
automatically after a few minutes if the
luggage compartment is left open.Emergency opening from the inside
To carry out the emergency opening from
the inside of the car, remove the rear seat
head restraints, completely fold down
the rear seats (see paragraph “Extending
the luggage compartment”), then press
on lever 1 fig. 33.
CLOSING
Lower the tailgate, pressing near the lock
until you hear it click into place.
On the tailgate inner part a tab makes the
tailgate holding and closing easier.
IMPORTANT Before closing the luggage
compartment make sure that you have
the keys, since the luggage compartment
is automatically locked.
32A0J0058C
33A0J0178C
33
Page 36 of 212
LUGGAGE COMPARTMENT
INITIALISATION
IMPORTANT If the battery is
disconnected or the protection fuse
blows, the luggage compartment
opening/closing mechanism must be
initialised as follows:
close all the doors and the luggage
compartment;
press the buttonon the key;
press the buttonon the key;
EXTENDING THE LUGGAGE
COMPARTMENT
The luggage compartment can be
partially (1/3 or 2/3) or totally extended
by splitting the rear seat.
See the descriptions in “Rear seats” for
how to expand the luggage compartment.
HEADLIGHTS
LIGHT BEAM DIRECTION
The correct orientation of the headlights
is important for the driver's comfort and
safety as well as for all other road users.
This is also covered by a specific rule of
the highway code.
The headlights must be correctly
directed to ensure the best visibility
conditions for all drivers. Contact a Alfa
Romeo Dealership to have the headlights
checked and adjusted, if necessary.
FOG LIGHTS ALIGNMENT(where provided)
Contact a Alfa Romeo Dealership to have
the headlights checked and adjusted, if
necessary.
ADJUSTING THE HEADLIGHTS ABROAD
The dipped beam headlights are aligned
to comply with the regulations of the
country of purchase. When driving in
countries with a different traffic
direction, to avoid blinding the drivers
travelling in the opposite direction, it is
necessary to cover the areas of the beam
according to the provisions of the
Highway Code of the country you are
driving in.
Alfa DNASYSTEM (Car dynamic
control system)
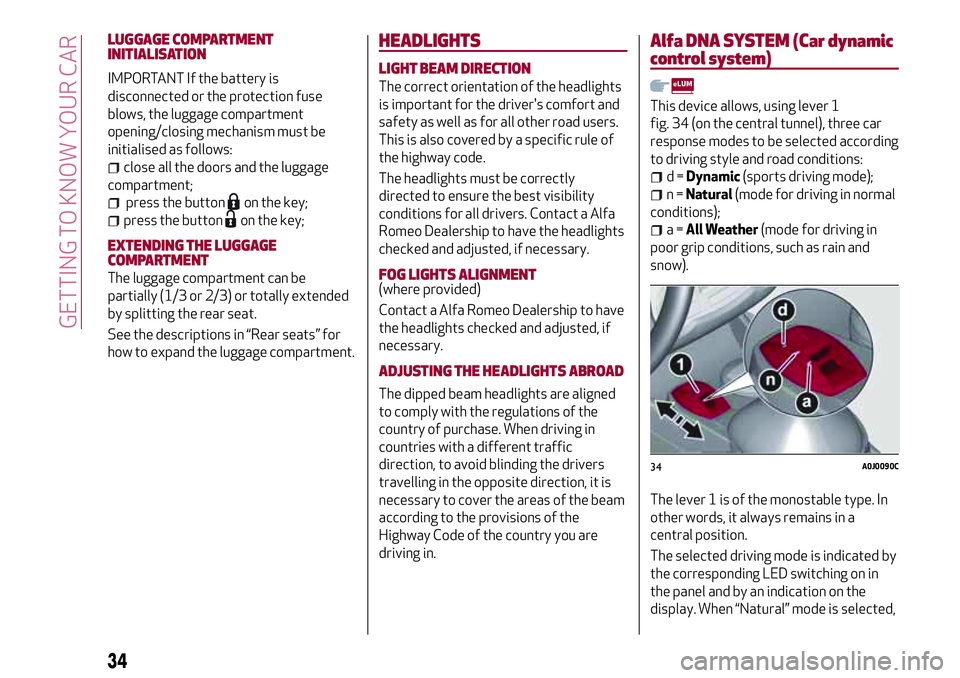
This device allows, using lever 1
fig. 34 (on the central tunnel), three car
response modes to be selected according
to driving style and road conditions:
d=Dynamic(sports driving mode);
n=Natural(mode for driving in normal
conditions);
a=All Weather(mode for driving in
poor grip conditions, such as rain and
snow).
The lever 1 is of the monostable type. In
other words, it always remains in a
central position.
The selected driving mode is indicated by
the corresponding LED switching on in
the panel and by an indication on the
display. When “Natural” mode is selected,
34A0J0090C
34
GETTING TO KNOW YOUR CAR