key Alfa Romeo MiTo 2021 Owner handbook (in English)
[x] Cancel search | Manufacturer: ALFA ROMEO, Model Year: 2021, Model line: MiTo, Model: Alfa Romeo MiTo 2021Pages: 212, PDF Size: 5.18 MB
Page 145 of 212
132)If the engine oil is being topped up, wait
for the engine to cool down before loosening
the filler cap, particularly for vehicles with
aluminium cap (where provided). WARNING:
risk of burns!
133)The cooling system is pressurised. If
necessary, only replace the plug with
another original or the operation of the
system may be adversely affected. Do not
remove the reservoir plug when the engine is
hot: you risk scalding yourself.
134)Do not travel with the windscreen
washer fluid reservoir empty: the
windscreen washer is essential for
improving visibility. Repeated operation of
the system without fluid could damage or
cause rapid deterioration of some system
components.
135)Some commercial additives for
windscreen washer fluid are flammable. The
engine compartment contains hot
components which may start a fire.
136)Brake fluid is poisonous and highly
corrosive. In the event of accidental contact,
immediately wash the affected parts with
water and mild soap. Then rinse thoroughly.
Call a doctor immediately if swallowed.
137)The symbol
, on the brake fluid
container indicates if a brake fluid is
synthetic or mineral-based. Use of mineral
type fluids will damage the special rubber
seals of the braking system beyond repair.
IMPORTANT
2)Used engine oil and oil filters contain
substances which are harmful to the
environment. To change the oil and filters, we
advise you to contact an Alfa Romeo
Dealership.
3)Used transmission fluid contains
substances that are harmful to the
environment. You are advised to contact an
Alfa Romeo Dealership for oil changes.
BATTERY RECHARGING
IMPORTANT The battery recharging
procedure is given as information only. To
carry out this operation contact an Alfa
Romeo Dealership.
IMPORTANT After turning the ignition
key to STOP and having closed the
driver's side door, wait at least one
minute before disconnecting and then
reconnecting the electrical supply to the
battery.
Charging should be slow at a low ampere
rating for approximately 24 hours.
Charging for a longer time may damage
the battery.
IMPORTANT The cables of the electrical
system must be correctly reconnected to
the battery, i.e. the positive cable (+) to
the positive terminal and the negative
cable (–) to the negative terminal. The
battery terminals are marked with the
positive (+) and negative (–) symbols, and
are shown on the battery cover. The
battery terminals must also be
corrosion-free and firmly secured to the
terminals. If a "quick-type" battery
charger is used with the battery fitted on
the vehicle, before connecting it
disconnect both cables of the battery
itself. Do not use a "quick-type" battery
charger to provide the starting voltage.
The cables of the electrical system must
143
Page 146 of 212
be correctly reconnected to the battery,
i.e. the positive cable (+) to the positive
terminal and the negative cable (–) to the
negative terminal. The battery terminals
are marked with the positive (+) and
negative (–) symbols, and are shown on
the battery cover. The battery terminals
must also be corrosion-free and firmly
secured to the terminals.
VERSIONS WITHOUT START&STOP
SYSTEM
(where provided)
To recharge, proceed as follows:
disconnect the terminal from the
negative battery pole;
connect the charger cables to the
battery terminals, observing the polarity;
turn on the charger;
when it is recharged, turn the charger
off before disconnecting it from the
battery;
reconnect the terminal to the negative
battery pole.
VERSIONS WITH START&STOP
SYSTEM
To recharge, proceed as follows:
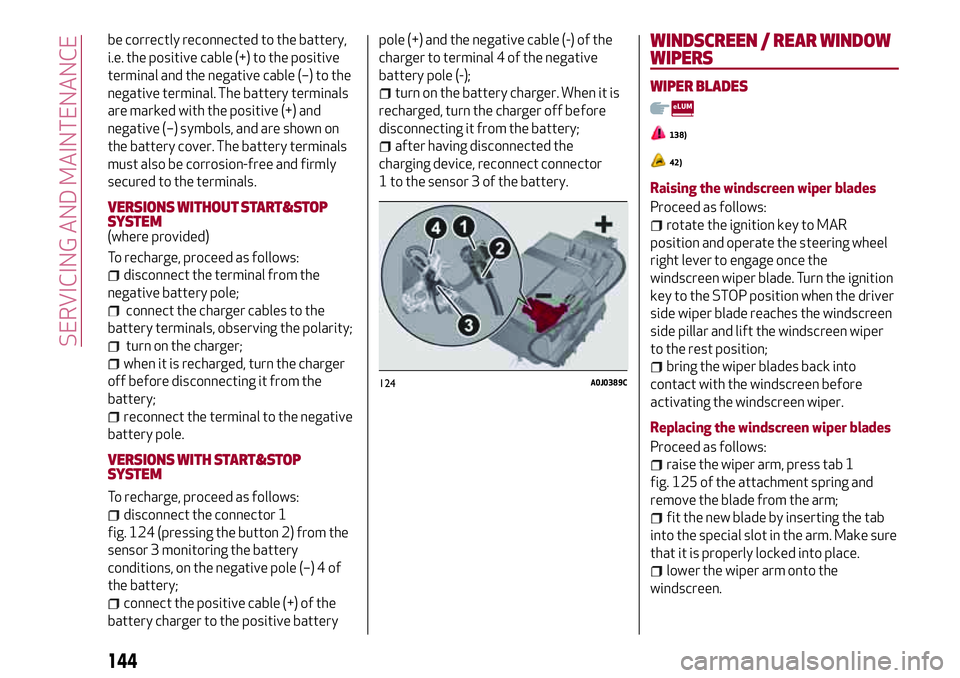
disconnect the connector 1
fig. 124 (pressing the button 2) from the
sensor 3 monitoring the battery
conditions, on the negative pole (–) 4 of
the battery;
connect the positive cable (+) of the
battery charger to the positive batterypole (+) and the negative cable (-) of the
charger to terminal 4 of the negative
battery pole (-);
turn on the battery charger. When it is
recharged, turn the charger off before
disconnecting it from the battery;
after having disconnected the
charging device, reconnect connector
1 to the sensor 3 of the battery.
WINDSCREEN / REAR WINDOW
WIPERS
WIPER BLADES
138)
42)
Raising the windscreen wiper blades
Proceed as follows:
rotate the ignition key to MAR
position and operate the steering wheel
right lever to engage once the
windscreen wiper blade. Turn the ignition
key to the STOP position when the driver
side wiper blade reaches the windscreen
side pillar and lift the windscreen wiper
to the rest position;
bring the wiper blades back into
contact with the windscreen before
activating the windscreen wiper.
Replacing the windscreen wiper blades
Proceed as follows:
raise the wiper arm, press tab 1
fig. 125 of the attachment spring and
remove the blade from the arm;
fit the new blade by inserting the tab
into the special slot in the arm. Make sure
that it is properly locked into place.
lower the wiper arm onto the
windscreen.
124A0J0389C
144
SERVICING AND MAINTENANCE
Page 150 of 212
wash the bodywork using a low
pressure jet of water;
wipe a sponge with a slightly soapy
solution over the bodywork, frequently
rinsing the sponge;
rinse well with water and dry with a jet
of air or a chamois leather.
Dry the less visible parts (e.g. door
frames, bonnet, headlight frames, etc.)
with special care, as water may stagnate
more easily in these areas. Do not wash
the car after it has been left in the sun or
with the bonnet hot: this may alter the
shine of the paintwork.
Exterior plastic parts must be cleaned in
the same way as the rest of the vehicle.
IMPORTANT NOTES
Avoid parking under trees; the resin
dropped by trees makes the paintwork
go opaque and increases the possibility
of corrosion.
Bird droppings must be washed off
immediately and thoroughly as the acid
they contain is particularly aggressive.
Windows
Use specific detergents and clean cloths
to prevent scratching or altering the
transparency.
IMPORTANT Wipe the rear window inside
gently with a cloth following the direction
of the filaments to avoid damaging the
heating device.
Front headlights
Use a soft cloth soaked in water and
detergent for washing cars.
IMPORTANT Never use aromatic
substances (e.g. petrol) or ketones (e.g.
acetone) for cleaning the plastic lenses
of the headlights.
IMPORTANT When cleaning with a
pressure washer, keep the water jet at
least 20 cm away from the headlights.
Engine compartment
At the end of every winter, wash the
engine compartment thoroughly, taking
care not to aim the jet of water directly at
the electronic control units or at the
windscreen wiper motors. Have this
operation performed at a specialised
workshop.
IMPORTANT The washing should take
place with the engine cold and the
ignition key in the STOP position. After
the washing operation, make sure that
the various protections (e.g. rubber caps
and guards) have not been removed or
damaged.
IMPORTANT
5)Detergents pollute the environment. Only
wash your vehicle in areas equipped to
collect and treat wastewater from this type
of activity.
IMPORTANT
44)In order to preserve the aesthetic
appearance of the paint abrasive products
and/or polishes should not be used for
cleaning the vehicle.
45)Avoid washing with rollers and/or
brushes in washing stations. Wash the
vehicle only by hand using neutral pH
detergents; dry it with a wet chamois leather.
Abrasive products and/or polishes should
not be used for cleaning the car. Bird
droppings must be washed off immediately
and thoroughly as the acid they contain is
particularly aggressive. Avoid (if at all
possible) parking the vehicle under trees;
remove vegetable resins immediately as,
when dried, it may only be possible to remove
them with abrasive products and/or polishes,
which is highly inadvisable as they could alter
the typical opaqueness of the paint. Do not
use pure windscreen washer fluid for
cleaning the front windscreen and rear
window; dilute it min. 50% with water. Only
use pure screen washer fluid when strictly
necessary due to outside temperature
conditions.
148
SERVICING AND MAINTENANCE
Page 189 of 212
SWITCHING THESYSTEM ON/OFF
The system is switched on/off by
pressing the
(ON/OFF) button/knob.
Turn the button/knob clockwise to
increase the radio volume or
anticlockwise to decrease it.
RADIO (TUNER) MODE
Press the RADIO button on the front
panel to activate radio mode.
Select the band by pressing the
corresponding button: “AM”, “FM” or
“DAB”.
Selecting a frequency band
Briefly press the "AM/FM" button to
switch from AM to FM and vice versa.
If the DAB tuner is available, briefly press
the "AM/FM", "AM/DAB", "FM/DAB"
buttons to select the desired band.
Indications on display
After the desired radio station is
selected, the following information is
shown on the display:
At the top: the list of radio stations
stored (presets) is displayed; the station
currently playing is highlighted.
In the middle: display of the name of the
current radio station and the buttons for
selecting the previous or next radio
station.
At the bottom:radio station selection,radio band, tuning, track information and
audio settings.
Searching for the previous/next radio
station
To search for the desired radio station,
rotate the BROWSE ENTER button/knob,
press the
orbuttons or use
the steering wheel controls
.
When searching forwards, if the system
reaches the end of the band, it will
automatically stop on the station where
the search has started from.
Previous/next radio station fast search
Hold down buttons
oron the
display: when the button is released, the
first tunable radio station will be
displayed.
Tuning the radio (AM/FM)
Press the "Tune" button on the display
and then enter the frequency of the radio
station using the keypad on the display.
In this mode, use buttons + and – to
fine-tune the frequency.
To delete an incorrect number (and enter
the correct station number) press the
(Delete) button.
After entering the last digit of the
station, the screen is deactivated and the
system tunes automatically to the
station selected (the number of the radio
station is displayed in the "Tune" text
box).The screen disappears automatically
after 5 seconds or manually by pressing
the "OK" or “X” buttons.
Exit the "Direct Tune" screen
Press the "Exit" or "Radio" button on the
display to return to the main system
screen.
DAB Radio
(where provided)
Once DAB radio mode is selected, the
information on the current station is
displayed and the following functions.
Selection of the previous/next radio
station by:
turning the BROWSE ENTER
button/knob;
briefly pressing theor
buttons on the display;
Steering wheel control press.
Hold down the
orbuttons to
fast scroll the station list.
The "Browse" button is used to display:
the list of all DAB stations;
the list of stations filtered by "Genres";
the list of stations filtered by
"Ensembles" (broadcast group).
Setting the presets
Presets are available in all system modes
and are activated by touching one of the
preset buttons located in the upper area
of the display.
If you are tuned to a radio station that
187
Page 190 of 212
you wish to store, hold down the button
on the display which corresponds to the
desired preset or until an acoustic
confirmation signal is emitted.
The system can store up to 12 radio
stations in each mode: 3 radio stations
are displayed in the upper area.
Press the "All" button on the display to
show all the radio stations stored in the
frequency band selected.
Audio
To access the “Audio” menu, press the
APPS button on the front panel, scroll
through the menu, then select and press
the “Audio” option on the display.
The following adjustments can be carried
out using the "Audio" menu:
“Equaliser” (where provided): to adjust
the bass, medium and treble tones;
“Balance/Fader” (left/right and
front/rear audio balance adjustment);
“Volume/Speed” (excluding versions
with Hi-Fi system) speed-dependent
automatic volume adjustment;
“Loudness” (where provided):
improves audio quality at low volumes;
“Auto-On Radio”: provides the options
of radio on, radio off or restore status
when the ignition key was last turned to
STOP;
“Radio Off Delay”: keeps the radio on
for a preset time after the ignition key is
turned to STOP.
MEDIA MODE
Press the "Source" button to select the
desired audio source among those
available: CD,
Bluetooth®, AUX, USB/iPod
Change track (next/previous)
Briefly press the
graphic button or
press
on the steering wheel or,
alternatively, turn the BROWSE ENTER
button/knob clockwise to play the next
track. Briefly press the
graphic
button or press
on the steering wheel
or, alternatively, turn the BROWSE
ENTER button/knob clockwise to return
to the beginning of the track or return to
the beginning of the previous track of the
track has been playing for less than
8 seconds.
Fast forward/rewind through tracks
Press and hold down the
button to
fast forward the selected track or keep
the
button pressed to fast rewind
the track.
Track selection (Browse)
The selection options depend on the
device connected or the CD type
inserted.
Press the "Browse" button to activate
this function on the source being played.
NOTE A few
Bluetooth®devices do not
offer the possibility of scrolling tracks
through all categories.
NOTE Within each list, the “ABC” buttonallows the user to skip to the desired
letter in the list. This button might be
disabled for some
Apple®devices.
Turn the BROWSE ENTER button/knob
to select the desired category and then
press the button/knob to confirm the
selection.
Press the "X" button to cancel the
function.
Track information display
Press the "Info" button to display the
information on the track being listened to
for devices that support the function.
Press the "X" button to exit the screen.
Shuffle
Press the ">" button then the "Shuffle"
button to play the tracks on the CD,
USB/iPod or
Bluetooth®in a random
order.
Press the "Shuffle" button again to
deactivate the function.
Repeat
Press the ">" button then the "Repeat"
button to activate the function.
Press the "Repeat" button again to
deactivate the function.
188
MULTIMEDIA
Page 192 of 212
list” in theUconnect™attachments).
Main functions
Use the buttons on the display to:
dial the phone number (using the
graphic keypad on the display);
display and call the contacts in the
mobile phone phonebook;
display and call contacts from the
registers of previous calls;
pair up to 10 phones/audio devices to
make access and connection easier and
quicker;
transfer calls from the system to the
mobile phone and vice versa and
deactivate the microphone audio for
private conversations.
Pairing a mobile phone
To pair the mobile phone, proceed as
follows:
activate theBluetooth®function on
the mobile phone;
press the PHONE button on the front
panel;
if no phone is paired with the system
yet, the display shows a dedicated
screen;
select “Yes” to start the pairing
procedure, then search for the
Uconnect™device on the mobile phone;
when prompted by the mobile phone,
use its keypad to enter the PIN code
shown on the system display or confirm
on the mobile phone the PIN displayed;
from the “Phone” screen you can
always pair a mobile phone by pressing
the “Settings” button: press the “Add
Device” button and proceed as described
above;
select “Yes” or “No” at the request to
pair the mobile phone as the preferred
device;
NOTE After updating the phone software,
for proper operation, it is recommended
to remove the phone from the list of
devices linked to the radio, delete the
previous system pairing also from the list
of
Bluetooth®devices on the phone and
make a new pairing.
Storing names/numbers in the mobile
phone phonebook
Before pairing your mobile phone, make
sure you have stored the names you want
to contact in the phonebook on your
mobile phone so that you can call them
using the car's hands-free system.
Transferring phone data (phonebook
and recent calls)
If your mobile phone has a function for
sending the phonebook via
Bluetooth®
technology.
Answer “Yes” when asked to copy the
phonebook to the system. Answer “No” to
carry out the operation later on.Making a phone call
The operations described below can only
be accessed if supported by the mobile
phone in use.
A call can be made by:
selecting theicon (mobile phone
phonebook);
selecting “Recent Calls”;
selecting the icon(Keypad);
pressing the “Redial” button.
Handling an incoming call
The buttons on the display allow the
following phone call functions to be
managed:
To answer a call: press the “Answer”
button or the
button on the steering
wheel controls;
To end a call: press the “Ignore” button
or the
button on the steering wheel
controls;
Ignore;
Put on hold/resume;
Deactivate/activate the microphone;
Transfer the call;
Switch from one call to the other;
Conference/merge two active calls.
Text message reader
To use this function the mobile phone
must support the SMS exchange function
through
Bluetooth®.
If this function is not supported by the
190
MULTIMEDIA
Page 193 of 212

phone, the correspondingbutton is
deactivated (grey).
When a text message is received, the
display will show a screen where the
options “Listen”, “Call” or “Ignore” can be
selected.
The list of SMS messages received from
the mobile phone can be accessed by
pressing the
button.
NAVIGATION MODE(Uconnect™5” Radio Nav LIVE versions
only)
Programming a route
IMPORTANT In the interest of safety and
to reduce distractions while you are
driving, you should always plan a route
before you start driving.
To plan a route, do the following:
tap the screen to display the
Navigation Main menu, then tap
“Navigate to”;
select “Address”: you can change the
country or state setting by tapping the
flag before you select a city;
enter the town or city name, or the
postcode. Towns with similar names are
shown in the list while you type;
enter the street name. Streets with
similar names are shown in the list while
you type. When the correct street name
appears in the list, tap the name to select
the destination;
enter the house number, then tap
“Done”;
the location is shown on the map. Tap
“Select” to continue or “Back” to enter
another address. If you want your final
destination to be a car park, tap “Parking”
and select a location from the list of car
parks close to your general destination;
when the new route is shown, tap
"Done". For more information about the
route, tap "Details". To change a route tap
“Change route”.
View Map
To view the map, tap “View map” or “View
route”, then “Show map of route” in the
Main menu.
When the display shows the map, the
following options are available:
Map scale (high left corner);
Traffic: current traffic incidents. Use
the "Options" button to select whether
traffic information is shown on the map.
When traffic information is shown on the
map, “Points of Interest” and “My Places”
are not shown;
“Options” graphic button;
“Find” graphic button: Tap this button
to find specific addresses, “My Places” or
“Points of Interest”;
Zoom bar: (bottom right corner): move
the cursor to enlarge/reduce.Settings Menu
To access the “Settings” Menu tap
“Settings” in the Main Menu. The
following settings are available for the
map:
“2D/3D”: allows to set the default map
view (2D or 3D);
“Advanced Settings”: allows to select
the following advanced settings:
“Car symbol”: allows to select the car
symbol that views the vehicle current
position during drive;
“My Places”: allows to add/rename/
delete “My Places”;
“GPS Status”: allows to see the current
status of GPS reception on your
navigation system;
“Home location”: allows to set/change
your Home location;
“Keyboard”: allows to select keyboards
which need to be available (keyboards is
necessary to enter names and
addresses);
“Make your own menu”: allows to add
up to 6 buttons to your own personalised
menu;
“Manage POIs”: allows to manage your
own Points of Interest (POI) categories
and locations;
“Map colours”: allows to select the
view screen of map colours (day or night);
“Me and my navigation”: allows to view
technical information relating to the
system;
191
Page 196 of 212
for optimum operation, it is advisable
to close the windows and the sun roof
(where provided) to avoid external
interference;
IMPORTANT Voice commands must
always be given in safe driving
conditions, in compliance with the laws in
force in the country where you are driving
and using the mobile phone correctly.
Multiple choice
In a few specific cases the system cannot
unambiguously identify the given voice
command and asks the user to choose
between a maximum of four alternatives.
The system will propose a numbered list
of the available alternatives, asking the
user to say the associated number.
ANTITHEFT PROTECTION
The system is equipped with an anti-theft
protection system based on the
exchange of information with the
electronic control unit (Body Computer)
on the vehicle. This guarantees maximum
safety and prevents the secret code from
being entered after the power supply has
been disconnected. If the check has a
positive outcome, the system will start to
operate.
If the comparison codes are not the same
or if the electronic control unit (Body
Computer) is replaced, the system will
ask the user to enter the secret codeaccording to the procedure described in
the paragraph below.
Entering the secret code
When the system is switched on, if the
code is requested, the display will show
"Please enter Anti-Theft Code" followed
by the screen showing a keypad to enter
the secret code.
The secret code is made up of four digits,
from 1 to 9: to insert the first number of
the code press the corresponding key on
the display. Enter the other code digits in
the same way. After entering the fourth
digit, the system begins operating. If an
incorrect code is entered, the system
displays "Incorrect Code" to notify the
user of the need to enter the correct
code.
After the 3 available attempts to enter
the code, the system displays "Incorrect
Code. Radio locked. Please wait
30 minutes” (the waiting time is
displayed). After the text has
disappeared it is possible to start the
code entering procedure again.
Vehicle radio passport
This document certifies ownership of the
system. The vehicle radio passport shows
the system model, serial number and
secret code.
In the event that the radio passport is
lost, contact an Alfa Romeo Dealership,taking an ID document and the car
ownership documents.
IMPORTANT Keep the vehicle radio
passport in a safe place so that you can
give the information to the relevant
authorities if the system is stolen.
WARNING
150)When inserting a device (USB or iPod)
in the USB port, make sure that it does not
obstruct the operation of the handbrake
lever.
WARNING
151)When inserting a device in the AUX
socket, make sure that it does not obstruct
the operation of the handbrake lever.
194
MULTIMEDIA
Page 197 of 212

IMPORTANT INFORMATION AND RECOMMENDATIONS
WARNING
INTERIOR FITTINGSDo not travel with the storage compartment open: it may injure the front seat occupants in the event of an accident.
The cigar lighter gets extremely hot. Handle it carefully and make sure that children don’t use it: risk of fire and/or burns.
Do not use the ashtray as a waste paper basket: it may catch fire in contact with cigarette stubs.
ROOF RACK/SKI RACKAfter travelling for a few kilometres, check to ensure that the fixing screws for the attachments are well tightened.
Never exceed the maximum permitted loads (see chapter "Technical specifications").
Distribute the load evenly and pay attention to side winds when driving.
ELECTRIC POWER STEERINGBefore starting any servicing operation, stop the engine and remove the key from the ignition switch to operate the steering lock,
particularly when the wheels do not touch the ground. If this is not possible (for example if the key needs to be turned to MAR or the
engine must be running), remove the main fuse that protects the electric power steering.
INTERIORNever use flammable products, such as petrol ether or rectified petrol to clean the inside of the car. The electrostatic charges
which are generated by rubbing during the cleaning operation may cause a fire.
Do not keep aerosol cans in the car: they might explode. Aerosol cans must not be exposed to a temperature exceeding 50°C.
When the vehicle is exposed to sunlight, the internal temperature can greatly exceed this value.
Page 207 of 212
INDEX
"Electronic Q2" system ("E-Q2")....67
“Alfa DNA” system.............34
“Smart Bag” system (multistage
front airbags)..............81
ABS system................66
Active safety systems...........66
Alarm system................13
Alfa Romeo Code system.........12
Alfa TCT ...................93
ALFA TCT transmission (key
removal) ................124
ASR (AntiSlip Regulation) system....66
Automatic dual-zone climate
control system.............26
Battery..................146
Battery (recharging)...........143
Bodywork (maintenance)........147
Boot . . ...................33
Brake Assist system............66
Brakes (fluid level)............142
Carrying children safely.........75
CBC (Cornering Brake Control)
system..................67
Changing a wheel.............116
Checking levels..............137
Cleaning and maintenance
bodywork...............147
leather parts..............149
leather seats..............149seats and fabric parts........149
Climate control...............24
Climate control/heating system.....24
CO2 emissions..............178
Control buttons...............42
Control panel and on-board
instruments...............40
Cruise Control...............97
Daytime running lights (DRL)......19
Dimensions................165
Dipped headlights (bulb
replacement)..............108
Direction indicators............20
Direction indicators (bulb
replacement)..............109
Display....................42
Door central locking/unlocking.....13
Door mirrors................18
Doors.....................13
Driver side knee bag............83
DST system (Dynamic Steering
Torque)..................66
Dusk sensor.................19
Dynamic suspension............35
EBD system................66
Electric sunroof..............30
Electric windows..............29
Engine...................154
marking.................153
Engine bonnet...............32Engine coolant fluid . ..........142
Engine oil (level check)..........142
EOBD system ................64
ESC (Electronic Stability Control)
system . . . ...............66
External courtesy lights . . . . . .....21
External lights . . .............19
Fitting "Universal" child restraint
system..................76
Fix&Go Automatic kit..........120
Flashing . ..................20
Fluids and lubricants . ..........172
Follow Me Home (device) . ........21
Front airbag driver's side . ........82
Front airbags ................81
Front ceiling light . . . . ..........21
Front fog lights . . .............20
bulb replacement . ..........109
Front seats . . . . .............14
Fuel consumption............176
Fuel cut-off system . ..........123
Fuel tank cap . . . . . ..........100
Fuses (replacement) . ..........110
Gear Shift Indicator............42
Handbrake.................91
Hazard warning lights..........104
Head restraints . . .............16
Headlights..................34
Headlight alignment corrector . . . .20