maintenance Alfa Romeo Stelvio 2018 User Guide
[x] Cancel search | Manufacturer: ALFA ROMEO, Model Year: 2018, Model line: Stelvio, Model: Alfa Romeo Stelvio 2018Pages: 276, PDF Size: 5.79 MB
Page 107 of 276
Note:
There may be a brief delay in shifting
to AWD mode after a tire slipping event
occurs.
If the system failure symbol switches
on, after starting the engine or while
driving, it means that the AWD system is
not working properly. If the warning
message activates frequently, it is
recommended to carry out the
maintenance operations.
Electronic Stability Control (ESC)
System
The ESC system improves the directional
control and stability of the vehicle in
various driving conditions.
The ESC system corrects the vehicle’s
understeer and oversteer, distributing
the brake force on the appropriate
wheels. The torque supplied by the
engine can also be reduced in order to
maintain control of the vehicle.
The ESC system uses sensors installed
on the vehicle to determine the path that
the driver intends to follow and
compares it with the vehicle’s effective
path. When the real path deviates from
the desired path, the ESC system
intervenes to counter the vehicle’s
understeer or oversteer.
Oversteer occurs when the vehicle is
turning more than it should according to
the angle of the steering wheel.
Understeer occurs when the vehicle is turning less than it should according to
the angle of the steering wheel.
System Intervention
The intervention of the system is
indicated by the flashing of the ESC
warning light on the instrument panel, to
inform the driver that the vehicle
stability and grip are critical.
Warning!
Electronic Stability Control (ESC) cannot
prevent the natural laws of physics from
acting on the vehicle, nor can it increase the
traction afforded by prevailing road
conditions. ESC cannot prevent accidents,
including those resulting from excessive
speed in turns, driving on very slippery
surfaces, or hydroplaning. ESC also cannot
prevent accidents resulting from loss of
vehicle control due to inappropriate driver
input for the conditions. Only a safe,
attentive, and skillful driver can prevent
accidents. The capabilities of an ESC
equipped vehicle must never be exploited in
a reckless or dangerous manner which could
jeopardize the user’s safety or the safety of
others.
Vehicle modifications, or failure to
properly maintain your vehicle, may change
the handling characteristics of your vehicle,
and may negatively affect the performance
of the ESC system. Changes to the steering
system, suspension, braking system, tire
type and size or wheel size may adversely
affect ESC performance. Improperly inflated and unevenly worn tires may also
degrade ESC performance. Any vehicle
modification or poor vehicle maintenance
that reduces the effectiveness of the ESC
system can increase the risk of loss of
vehicle control, vehicle rollover, personal
injury and death.
Traction Control System (TCS)
The system automatically operates in the
event of slipping, loss of grip on wet
roads (hydroplaning), and acceleration on
one or both drive wheels on roads that
are slippery, snowy, icy, etc. Depending
on the slipping conditions, two different
control systems are activated:
If the slipping involves both drive
wheels, the system intervenes, reducing
the power transmitted by the engine.
If the slipping only involves one of the
drive wheels, the Brake Limited
Differential (BLD) function is activated,
automatically braking the wheel which is
slipping (the behavior of a self-locking
differential is simulated). This will
increase the engine torque transferred to
the wheel which isn't slipping.
System Intervention
The intervention of the system is
indicated by the flashing of the ESC
warning light on the instrument panel, to
inform the driver that the vehicle
stability and grip are critical.
105
Page 116 of 276
The system has been designed for road
use only. If the vehicle is driven on a track,
the system must be deactivated to avoid
unnecessary warnings. Automatic
deactivation is signaled by the dedicated
warning light/symbol switching on in the
instrument panel (refer to the instructions in
the "Warning Lights And Messages On The
Instrument Panel" in "Getting To Know Your
Instrument Panel" for further information).
General Information
This vehicle has systems that operate on
radio frequency that comply with Part
15 of the Federal Communications
Commission (FCC) rules and with
Industry Canada Standards RSS-
GEN/210/220/310.
Operation is subject to the following two
conditions:
1. The device may not cause harmful
interference.
2. The device must accept any
interference received, including
interference that may cause undesired
operation of the device.
Changes or modifications to any of these
systems by other than an authorized
service facility could void authorization
to use this equipment.
Tire Pressure Monitoring System
(TPMS)
The vehicle is equipped with a Tire
Pressure Monitoring System (TPMS) that
sends the inflation pressure information
of each tire to the control unit, and will
signal the driver in the event of
insufficient tire pressure.
Tire pressure will vary with temperature
by approximately 1 psi (7 kPa) for every
12°F (6.5°C). This means that when the
outside temperature decreases, the tire
pressure will also decrease. Tire pressure
should always be set based on cold
inflation tire pressure. This is defined as
the tire pressure after the vehicle has not
been driven for at least three hours, or
driven less than 1 mile (1.6 km) after a
three hour period. The cold tire inflation
pressure must not exceed the maximum
inflation pressure molded into the tire
sidewall. Refer to “Tires” in “Servicing
And Maintenance” for information on
how to properly inflate the vehicle’s tires.
The tire pressure will also increase as the
vehicle is driven. This is normal, and there
should be no adjustment for this
increased pressure.
The TPMS will signal the driver if
pressure falls below the warning limit for
any reason, including the effects of low
temperature and normal loss of pressure
from the tire.
The TPMS will stop indicating insufficient
tire pressure when pressure is equal to or
greater than the prescribed cold inflation level. Therefore, if insufficient tire
pressure is indicated by the (
) warning
light displaying in the instrument cluster,
increase the inflation pressure up to the
prescribed cold inflation value.
The system will automatically update,
and the “Tire Pressure Monitoring
Warning Light” will turn off once the
system receives the updated tire
pressures. The vehicle may need to be
driven for up to 20 minutes above
15 mph (24 km/h) in order for the TPMS
to receive this information.
Operating Example
For example, your vehicle may have a
recommended cold (parked for more than
three hours) placard pressure of 33 psi
(227 kPa). If the ambient temperature is
68°F (20°C), and the measured tire
pressure is 28 psi (193 kPa), a
temperature drop to 20°F (-7°C) will
decrease the tire pressure to
approximately 24 psi (165 kPa). This tire
pressure is low enough to turn on the
“Tire Pressure Monitoring Warning Light.”
Driving the vehicle may cause the tire
pressure to rise to approximately 28 psi
(193 kPa), but the “Tire Pressure
Monitoring Warning Light” will still be on.
In this situation, the “Tire Pressure
Monitoring Warning Light” will turn off
only after the tires are inflated to the
vehicle’s recommended cold placard
pressure value.
114
SAFETY
Page 118 of 276
Beginning with the next ignition switch
cycle, the TPMS will no longer chime or
display the “SERVICE TPM SYSTEM”
message in the instrument cluster.
Instead, dashes (--) will remain in place of
the pressure values.
To reactivate the TPMS, replace all four
wheel and tire assemblies (road tires)
with tires equipped with TPM sensors.
Then, drive the vehicle for up to
20 minutes above 15 mph (24 km/h). The
TPMS will chime, the "TPM Warning
Light" will flash on and off for 75 seconds
and then turn off. The instrument cluster
will display the “SERVICE TPM SYSTEM”
message and then display pressure
values in place of the dashes. On the next
ignition switch cycle the "SERVICE TPM
SYSTEM" message will no longer be
displayed, as long as no system fault
exists.Note:
The TPMS is not intended to replace
normal tire care and maintenance, or to
provide warning of a tire failure or
condition.
The TPMS should not be used as a
tire pressure gauge while adjusting your
tire pressure.
Driving on a significantly
underinflated tire will cause the tire to
overheat, and can lead to tire failure.
Underinflation also reduces fuel
efficiency and tire tread life, and may
affect the vehicle’s handling and
stopping ability.
The TPMS is not a substitute for
proper tire maintenance, and it is the
driver’s responsibility to maintain
correct tire pressure using an accurate
tire pressure gauge, even if
underinflation has not reached the level
to trigger illumination of the “Tire
Pressure Monitoring Warning Light”.
Seasonal temperature changes will
affect tire pressure, and the TPMS will
monitor the actual tire pressure in the
tire.
General Information
The following regulatory statement
applies to all radio frequency (RF)
devices equipped in this vehicle:
This device complies with Part 15 of the
FCC rules and RSS-210 of Industry
Canada. Operation is subject to the
following two conditions:
(1) This device may not cause harmful
interference.
(2) This device must accept any
interference received, including
interference that may cause undesired
operation.
Note: Changes or modifications not
expressly approved by the party
responsible for compliance could void the
user’s authority to operate the
equipment.
116
SAFETY
Page 125 of 276
Air Bag Warning Light
The ORC monitors the readiness of the
electronic parts of the air bag system
whenever the ignition switch is in the
START or ON/RUN position. If the ignition
switch is in the OFF position or in the ACC
position, the air bag system is not on and
the air bags will not inflate.
The ORC contains a backup power supply
system that may deploy the air bag
system even if the battery loses power or
it becomes disconnected prior to
deployment.
The ORC turns on the Air Bag Warning
Light in the instrument panel for
approximately four to eight seconds for a
self-check when the ignition switch is
first in the ON/RUN position. After the
self-check, the Air Bag Warning Light will
turn off. If the ORC detects a malfunction
in any part of the system, it turns on the
Air Bag Warning Light, either
momentarily or continuously. A single
chime will sound to alert you if the light
comes on again after initial startup.
The ORC also includes diagnostics that
will illuminate the instrument panel Air
Bag Warning Light if a malfunction is
detected that could affect the air bag
system. The diagnostics also record the
nature of the malfunction. While the air
bag system is designed to be
maintenance free, if any of the followingoccurs, have an authorized dealer service
the air bag system immediately.
The Air Bag Warning Light does not
come on during the four to eight seconds
when the ignition switch is first in the
ON/RUN position.
The Air Bag Warning Light remains on
after the four to eight-second interval.
The Air Bag Warning Light comes on
intermittently or remains on while
driving.
Note: If the speedometer, tachometer,
or any engine related gauges are not
working, the Occupant Restraint
Controller (ORC) may also be disabled. In
this condition the air bags may not be
ready to inflate for your protection. Have
an authorized dealer service the air bag
system immediately.
Warning!
Ignoring the Air Bag Warning Light in your
instrument panel could mean you won’t have
the air bag system to protect you in a
collision. If the light does not come on as a
bulb check when the ignition is first turned
on, stays on after you start the vehicle, or if
it comes on as you drive, have an authorized
dealer service the air bag system
immediately.
Redundant Air Bag Warning Light
If a fault with the Air Bag Warning Light is
detected, which could affect the
Supplemental Restraint System (SRS),
the Redundant Air Bag Warning Light will
illuminate on the instrument panel. The
Redundant Air Bag Warning Light will
stay on until the fault is cleared. In
addition, a single chime will sound to alert
you that the Redundant Air Bag Warning
Light has come on and a fault has been
detected. If the Redundant Air Bag
Warning Light comes on intermittently or
remains on while driving have an
authorized dealer service the vehicle
immediately. For additional information
regarding the Redundant Air Bag Warning
Light refer to “Getting To Know Your
Instrument Panel” section of this manual.
Front Air Bags
This vehicle has front air bags and
lap/shoulder belts for both the driver and
front passenger. The front air bags are a
supplement to the seat belt restraint
systems. The driver front air bag is
mounted in the center of the steering
wheel. The passenger front air bag is
mounted in the instrument panel, above
the glove compartment. The words “SRS
AIRBAG” or “AIRBAG” are embossed on
the air bag covers.
123
Page 185 of 276
Curb Weight
The curb weight of a vehicle is defined as
the total weight of the vehicle with all
fluids, including vehicle fuel, at full
capacity conditions, and with no
occupants or cargo loaded into the
vehicle. The front and rear curb weight
values are determined by weighing your
vehicle on a commercial scale before any
occupants or cargo are added.
Loading
The actual total weight and the weight of
the front and rear of your vehicle at the
ground can best be determined by
weighing it when it is loaded and ready
for operation.The entire vehicle should first be weighed
on a commercial scale to insure that the
GVWR has not been exceeded. The
weight on the front and rear of the
vehicle should then be determined
separately to be sure that the load is
properly distributed over the front and
rear axle. Weighing the vehicle may show
that the GAWR of either the front or rear
axles has been exceeded but the total
load is within the specified GVWR. If so,
weight must be shifted from front to rear
or rear to front as appropriate until the
specified weight limitations are met.
Store the heavier items down low and be
sure that the weight is distributed
equally. Stow all loose items securely
before driving.
Improper weight distributions can have
an adverse effect on the way your vehicle
steers and handles and the way the
brakes operate.
Caution!
Do not load your vehicle any heavier than the
GVWR or the maximum front and rear
GAWR. If you do, parts on your vehicle can
break, or it can change the way your vehicle
handles. This could cause you to lose control.
Also overloading can shorten the life of your
vehicle.
SUGGESTIONS FOR DRIVING
Saving Fuel
Below are some suggestions which may
help you save fuel and lower the amount
of harmful emissions released into the
atmosphere.
Vehicle Maintenance
Checks and operations should be carried
out in accordance with the Maintenance
Plan. Refer to "Scheduled Servicing" in
"Servicing And Maintenance" for further
information.
Tires
Check the tire pressures at least once
every four weeks: if the pressure is too
low, consumption levels increase as
resistance to rolling is higher.
Note:
Tire pressure that is too high can
cause premature tire wear, reduced
control, etc.
Unnecessary Loads
Do not travel with an overloaded liftgate.
The weight of the vehicle and its
arrangement greatly affect fuel
consumption and stability.
183
Page 187 of 276
Brakes
The car braking system may be available
with four carbon-ceramic material brake
discs, one on each wheel.
In order to guarantee the maximum
braking capacity for the first use, Alfa
Romeo performs a "run-in" procedure for
discs and pads directly at the factory.
The use of carbon-ceramic material
brake discs guarantees braking features
(better deceleration/pedal load ratio,
braking distances, fading resistance)
proportional to the dynamic features of
the car in addition to considerably
decreasing the unsprung component
weight.
The materials used and the structural
features of the system could generate
unusual noises which have absolutely no
adverse effect on correct operation and
reliability of the braking system.
Greater pressure may need to be applied
to the brake pedal the first time to keep
the same braking capacities in presence
of condensation or salt on the braking
surfaces, for example after washing or if
the car is not used for a long time.
Note:Given the high technological level
of this system, any servicing on it must be
performed by your authorized dealer
which exclusively has the skills needed
for the repair operations. In case of intensive, high-performance
use of the car, have the efficiency of the
carbon-ceramic material braking system
inspected as shown on the Maintenance
Plan at your authorized dealer.
Driving On Race Tracks
Before driving on a track using a racing
style, it is necessary to:
Attend a race track driving course.
Check the liquid levels in the engine
compartment. For more information, see
the “Checking Levels” section in the
“Servicing And Maintenance” chapter.
Have the car inspected at an
authorized dealer.
Remember that the car was not designed
to be driven exclusively on the race track
and that this use increases stress and
component wear.
Note: Quadrifoglio front brakes are
equipped with NAO type pads. These
pads are NOT suitable for high termic
loads (vehicle track use). If you want to
use vehicle on a track it is necessary to
use the optional CCM (Carbon Ceramic
Brake disc). Preheating the carbon ceramic material
brake discs
The brake discs must be warmed up to
make them fully efficient. You are
advised to perform the following
procedure:
Brake nine times from 80 mph to
18 mph (130 km/h to 30 km/h) with
deceleration equal to 0.7g (the
longitudinal acceleration value is shown
on the instrument panel display by
setting RACE mode and selecting the
“Performance” page) with 20 second
intervals between brake applications;
keep the car at a speed comprised
between 37 mph and 62 mph (60 km/h
and 100 km/h) and do not brake for
4 minutes to allow the brakes to cool
down;
Then brake three times from 124 mph
to 18 mph (200 km/h to 30 km/h) with
deceleration equal to 1.1g (ABS
operation) with 30 second intervals
between brake applications; keep the car
at a speed comprised between 37 mph
and 62 mph (60 km/h and 100 km/h) and
do not brake for 5 minutes to allow the
brakes to cool down.
185
Page 202 of 276
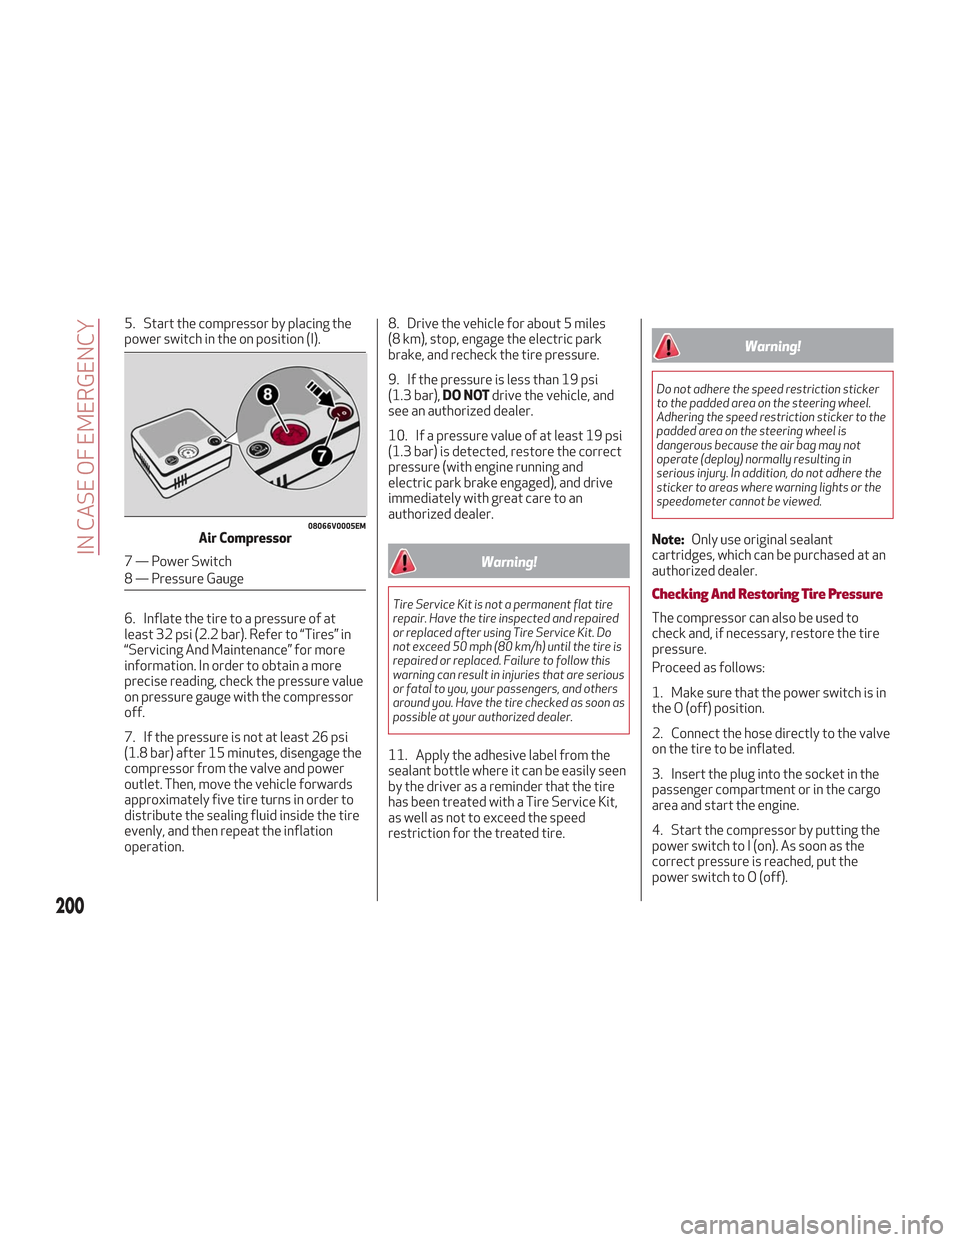
5. Start the compressor by placing the
power switch in the on position (I).
6. Inflate the tire to a pressure of at
least 32 psi (2.2 bar). Refer to “Tires” in
“Servicing And Maintenance” for more
information. In order to obtain a more
precise reading, check the pressure value
on pressure gauge with the compressor
off.
7. If the pressure is not at least 26 psi
(1.8 bar) after 15 minutes, disengage the
compressor from the valve and power
outlet. Then, move the vehicle forwards
approximately five tire turns in order to
distribute the sealing fluid inside the tire
evenly, and then repeat the inflation
operation.8. Drive the vehicle for about 5 miles
(8 km), stop, engage the electric park
brake, and recheck the tire pressure.
9. If the pressure is less than 19 psi
(1.3 bar),
DO NOTdrive the vehicle, and
see an authorized dealer.
10. If a pressure value of at least 19 psi
(1.3 bar) is detected, restore the correct
pressure (with engine running and
electric park brake engaged), and drive
immediately with great care to an
authorized dealer.
Warning!
Tire Service Kit is not a permanent flat tire
repair. Have the tire inspected and repaired
or replaced after using Tire Service Kit. Do
not exceed 50 mph (80 km/h) until the tire is
repaired or replaced. Failure to follow this
warning can result in injuries that are serious
or fatal to you, your passengers, and others
around you. Have the tire checked as soon as
possible at your authorized dealer.
11. Apply the adhesive label from the
sealant bottle where it can be easily seen
by the driver as a reminder that the tire
has been treated with a Tire Service Kit,
as well as not to exceed the speed
restriction for the treated tire.
Warning!
Do not adhere the speed restriction sticker
to the padded area on the steering wheel.
Adhering the speed restriction sticker to the
padded area on the steering wheel is
dangerous because the air bag may not
operate (deploy) normally resulting in
serious injury. In addition, do not adhere the
sticker to areas where warning lights or the
speedometer cannot be viewed.
Note: Only use original sealant
cartridges, which can be purchased at an
authorized dealer.
Checking And Restoring Tire Pressure
The compressor can also be used to
check and, if necessary, restore the tire
pressure.
Proceed as follows:
1. Make sure that the power switch is in
the O (off) position.
2. Connect the hose directly to the valve
on the tire to be inflated.
3. Insert the plug into the socket in the
passenger compartment or in the cargo
area and start the engine.
4. Start the compressor by putting the
power switch to I (on). As soon as the
correct pressure is reached, put the
power switch to O (off).
08066V0005EMAir Compressor
7 — Power Switch
8 — Pressure Gauge
200
IN CASE OF EMERGENCY
Page 211 of 276
SERVICING AND MAINTENANCE
Correct servicing permits the
performance of the vehicle to be
maintained over time, as well as limited
running costs and safeguarding the
efficiency of the safety systems.
This chapter explains how.SCHEDULED SERVICING.......210
ENGINE COMPARTMENT .......215
BATTERY RECHARGING ........218
DEALER SERVICE ............219
RAISING THE VEHICLE .........225
TIRES .................. .226
DEPARTMENT OF TRANSPORTATION
UNIFORM TIRE QUALITY GRADES .241
STORING THE VEHICLE ........242
BODYWORK...............242
INTERIORS ............... .244
209
Page 212 of 276
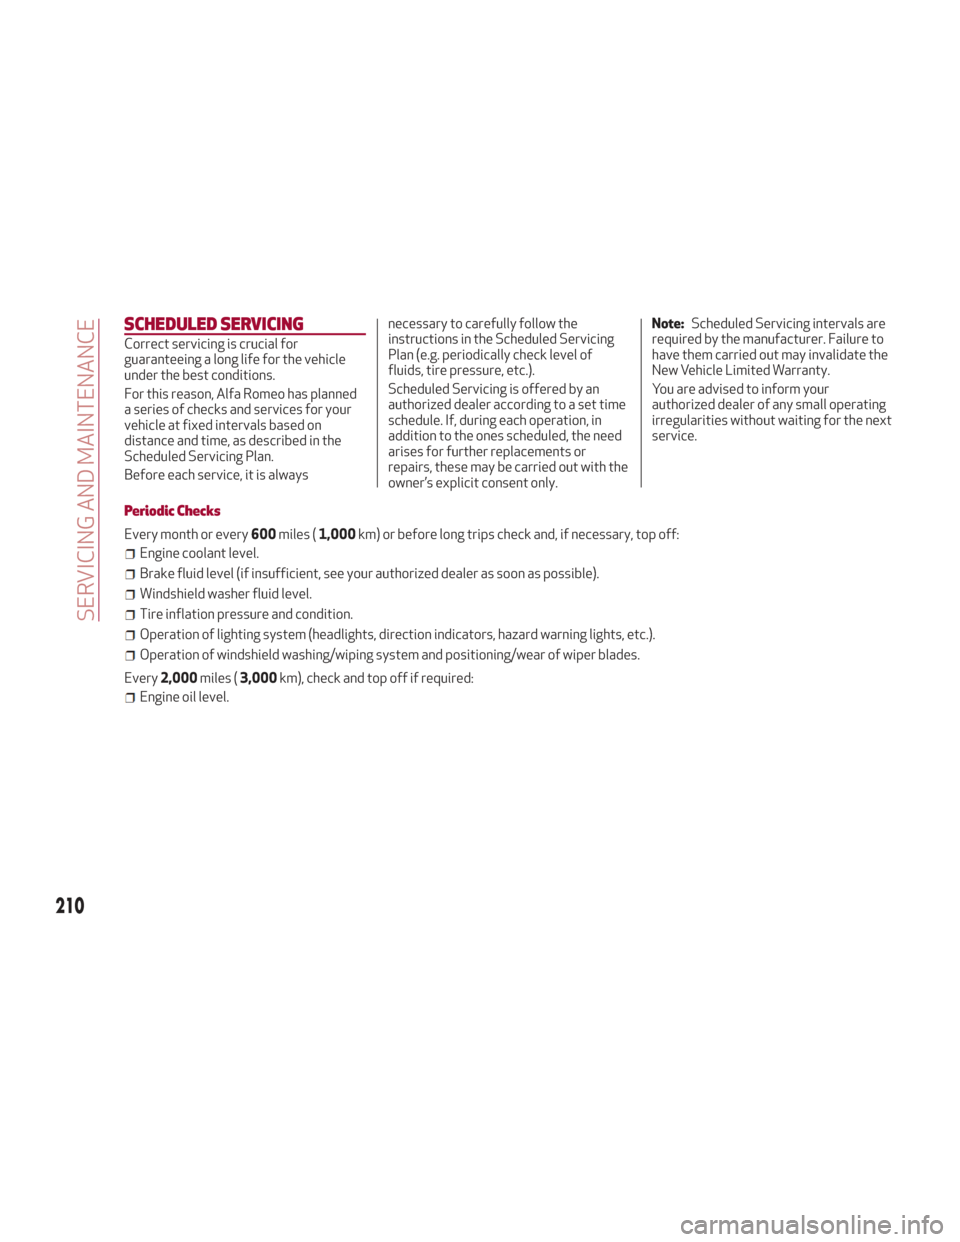
SCHEDULED SERVICING
Correct servicing is crucial for
guaranteeing a long life for the vehicle
under the best conditions.
For this reason, Alfa Romeo has planned
a series of checks and services for your
vehicle at fixed intervals based on
distance and time, as described in the
Scheduled Servicing Plan.
Before each service, it is alwaysnecessary to carefully follow the
instructions in the Scheduled Servicing
Plan (e.g. periodically check level of
fluids, tire pressure, etc.).
Scheduled Servicing is offered by an
authorized dealer according to a set time
schedule. If, during each operation, in
addition to the ones scheduled, the need
arises for further replacements or
repairs, these may be carried out with the
owner’s explicit consent only.Note:
Scheduled Servicing intervals are
required by the manufacturer. Failure to
have them carried out may invalidate the
New Vehicle Limited Warranty.
You are advised to inform your
authorized dealer of any small operating
irregularities without waiting for the next
service.
Periodic Checks
Every month or every 600miles ( 1,000km) or before long trips check and, if necessary, top off:
Engine coolant level.
Brake fluid level (if insufficient, see your authorized dealer as soon as possible).
Windshield washer fluid level.
Tire inflation pressure and condition.
Operation of lighting system (headlights, direction indicators, hazard warning lights, etc.).
Operation of windshield washing/wiping system and positioning/wear of wiper blades.
Every 2,000 miles ( 3,000km), check and top off if required:
Engine oil level.
210
SERVICING AND MAINTENANCE
Page 214 of 276
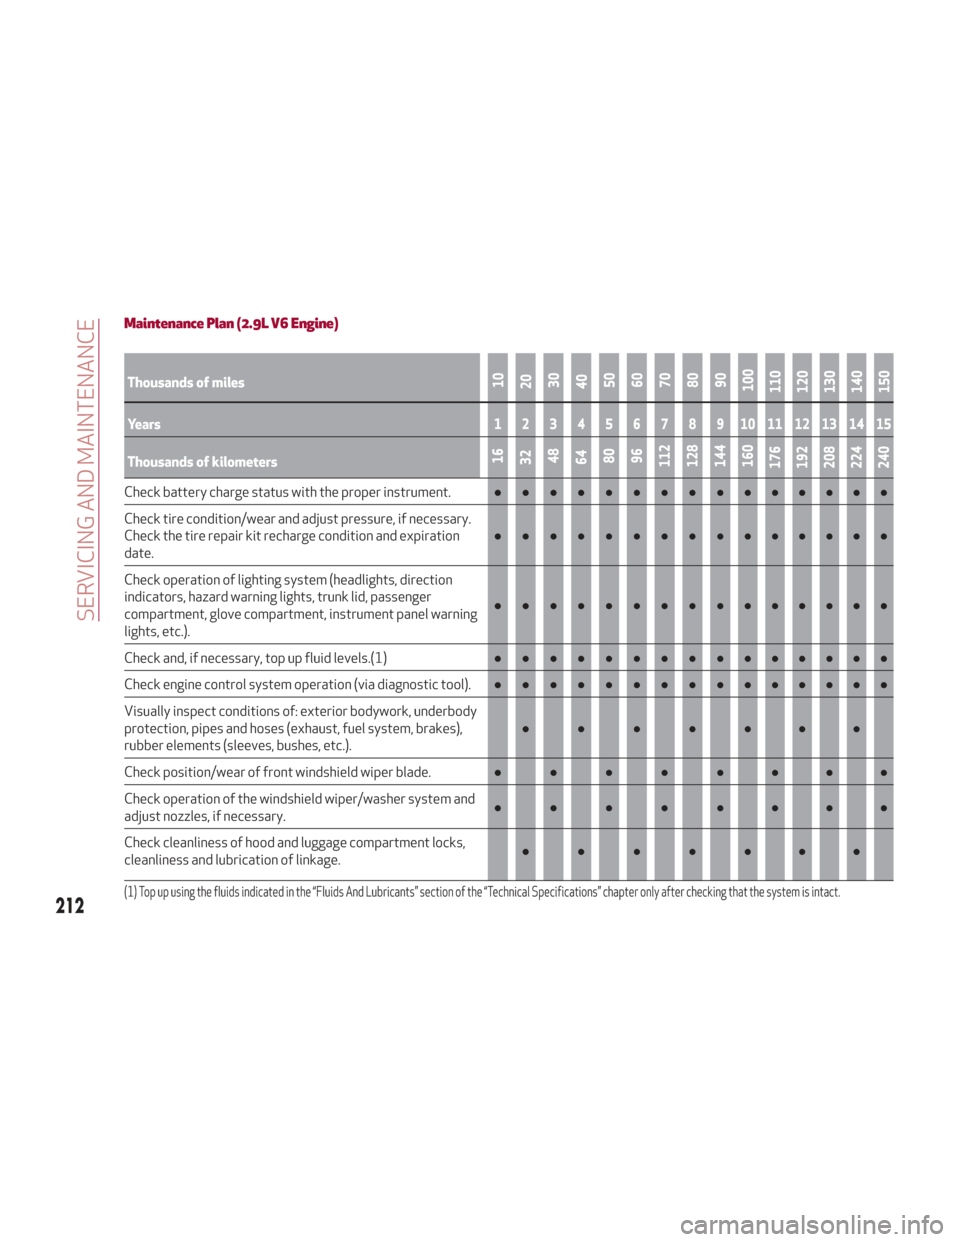
Maintenance Plan (2.9L V6 Engine)
Thousands of miles10
20 30
40 50
60
70
80
90
100
110
120
130
140
150
Years123456789101112131415
Thousands of kilometers16
32 48
64 80
96
112
128
144
160
176
192
208
224
240
Check battery charge status with the proper instrument. ●●●●●●●●●●●●●●●
Check tire condition/wear and adjust pressure, if necessary.
Check the tire repair kit recharge condition and expiration
date. ●●●●●●●●●
●●●●●●
Check operation of lighting system (headlights, direction
indicators, hazard warning lights, trunk lid, passenger
compartment, glove compartment, instrument panel warning
lights, etc.). ●●●●●●●●●
●●●●●●
Check and, if necessary, top up fluid levels.
(1)●●●●●●●●● ●●●●●●
Check engine control system operation (via diagnostic tool). ●●●●●●●●●●●●●●●
Visually inspect conditions of: exterior bodywork, underbody
protection, pipes and hoses (exhaust, fuel system, brakes),
rubber elements (sleeves, bushes, etc.). ●●●●●●●
Check position/wear of front windshield wiper blade. ●●●●●●●●
Check operation of the windshield wiper/washer system and
adjust nozzles, if necessary. ●●●●●●●●
Check cleanliness of hood and luggage compartment locks,
cleanliness and lubrication of linkage. ●●●●●●●
(1) Top up using the fluids indicated in the “Fluids And Lubricants” section of the “Technical Specifications” chapter only after checking that the system is intact.
212
SERVICING AND MAINTENANCE