high beam Alfa Romeo Stelvio 2018 Owner's Manual
[x] Cancel search | Manufacturer: ALFA ROMEO, Model Year: 2018, Model line: Stelvio, Model: Alfa Romeo Stelvio 2018Pages: 276, PDF Size: 5.79 MB
Page 42 of 276
Headlight Off Delay
The “Headlight Off Delay” function delays
the turning off of the headlights after the
vehicle’s engine has been stopped.
The function can be activated from the
Information and Entertainment System
by selecting the following functions in
sequence on the main menu:
1. “Settings.”
2. “Lights.”
3. “Headlight Off Delay.”
The side lights and the headlights stay on
for a time that can be set between 30,
60, and 90 seconds.
Function Activation
With the headlights on, cycle the ignition
to STOP mode and the timer will start.
Note:To activate this function, the
headlights must be deactivated within
two minutes after the ignition has been
cycled to the STOP mode.
Function Deactivation
This function is deactivated by turning on
the headlights, the side lights, or by
cycling the ignition to ON mode.
Adaptive Headlight System (AFS)
This is a system combined with Xenon
headlights (Bi-Xenon 35 W headlamp if
equipped) which directs the headlights
horizontally, and continuously and
automatically adapts them to the driving
conditions around bends or when
cornering.
The system directs the headlights to light
up the road in the best way, taking into
account the speed of the vehicle and the
bend or corner angle, as well as the speed
of steering.
The adaptive lights are automatically
activated when the vehicle is started.
High Beam Headlights
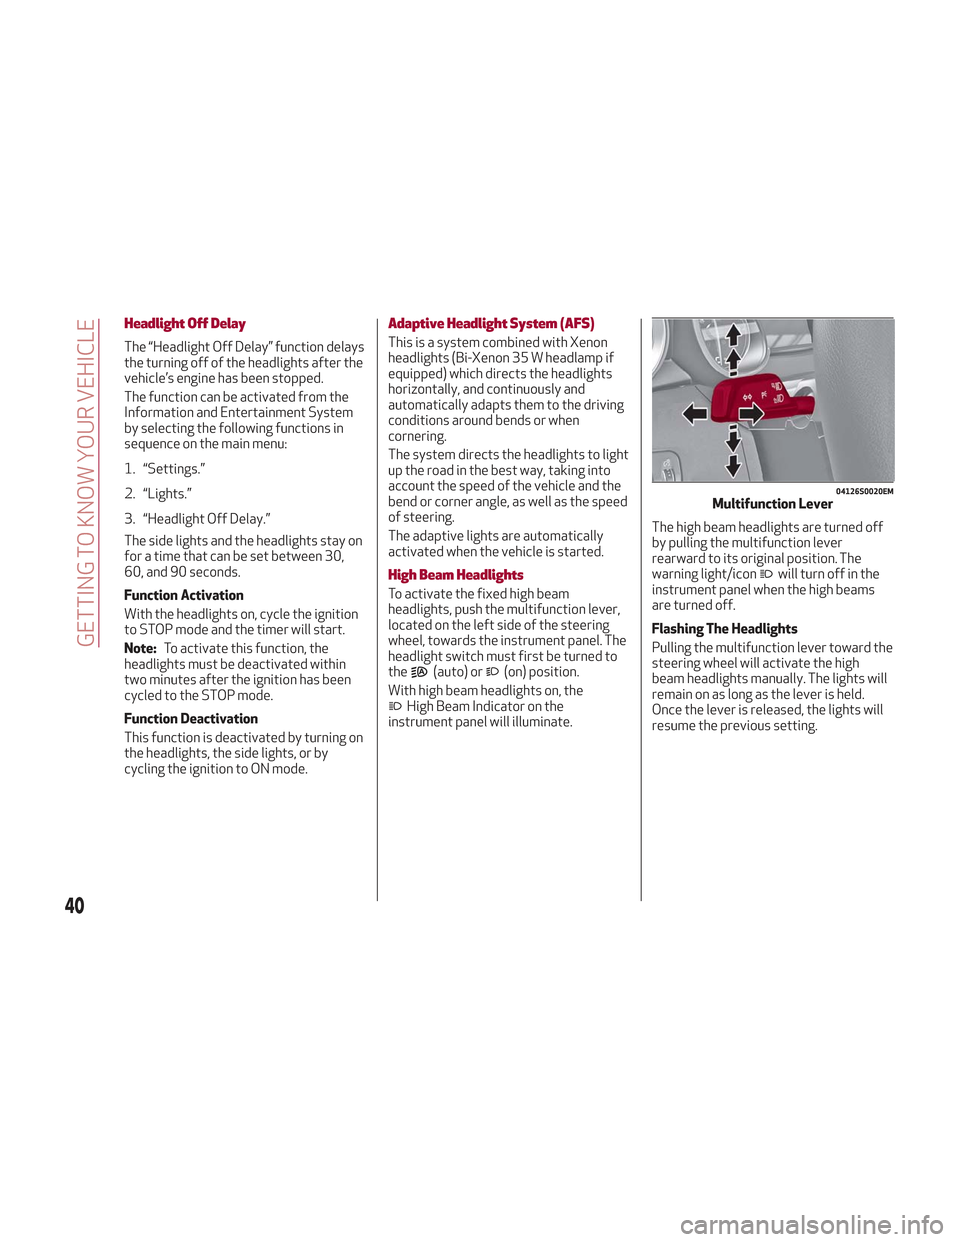
To activate the fixed high beam
headlights, push the multifunction lever,
located on the left side of the steering
wheel, towards the instrument panel. The
headlight switch must first be turned to
the
(auto) or(on) position.
With high beam headlights on, the
High Beam Indicator on the
instrument panel will illuminate. The high beam headlights are turned off
by pulling the multifunction lever
rearward to its original position. The
warning light/icon
will turn off in the
instrument panel when the high beams
are turned off.
Flashing The Headlights
Pulling the multifunction lever toward the
steering wheel will activate the high
beam headlights manually. The lights will
remain on as long as the lever is held.
Once the lever is released, the lights will
resume the previous setting.
04126S0020EMMultifunction Lever
40
GETTING TO KNOW YOUR VEHICLE
Page 43 of 276
Automatic High Beam Headlights — If
Equipped
The Automatic High Beam Headlights
system provides increased forward
lighting at night by automating high beam
control through the use of a digital
camera mounted on the windshield. This
camera detects vehicle specific light and
automatically turns from high beams to
low beams until the approaching vehicle
is out of view.
This function is enabled with the
Information and Entertainment System,
and can only be activated with the light
switch turned to the
(auto) position.
If the high beam headlights are on, the
blue icon/warning light
will illuminate
in the instrument panel.
When the speed is higher than 37 mph
(60 km/h) and the function is active, the
lights will turn off if the multifunction
lever is pushed again.
When the speed is lower than 15 mph
(25 km/h) and the function is active, the
function turns the high beam headlights
off.
If the high beam headlights are operated
again (pushing the multifunction lever
towards the instrument panel), the
warning light/icon
will illuminate in the
instrument panel, and the main beam
headlights only will be on until the speed
exceeds 37 mph (60 km/h).
When the speed of 37 mph (60 km/h) is
exceeded again, the automatic
functioning is reactivated. If the multifunction lever is pushed again
with the Automatic High Beam
Headlights activated, the function
deactivates.
This feature can also be deactivated by
rotating the headlight switch to the
position.
Note: If the system recognizes heavy
traffic areas, the automatic functions
remain disabled independently of the
vehicle’s speed.
Turn Signals
To activate the turn signals, move the
multifunction lever, located on the left
side of the steering wheel, up or down
until it reaches the detent. Moving the
lever upward flashes the right turn signal
and moving the lever downward will flash
the left turn signal.
The
orturn signal will blink on the
instrument panel.
The turn signals turn off automatically
when the vehicle is brought back onto a
straight course.
“Lane Change” Function
Tap the lever up or down once, without
moving beyond the detent, and the turn
signal (right or left) will flash five times.
Then, the turn signal (right or left) will
automatically turn off.
To turn off the flashing before the end of
the cycle, move the lever in the opposite
direction until the first click (about half
way).
INTERIOR LIGHTS
Front Map Reading Lights
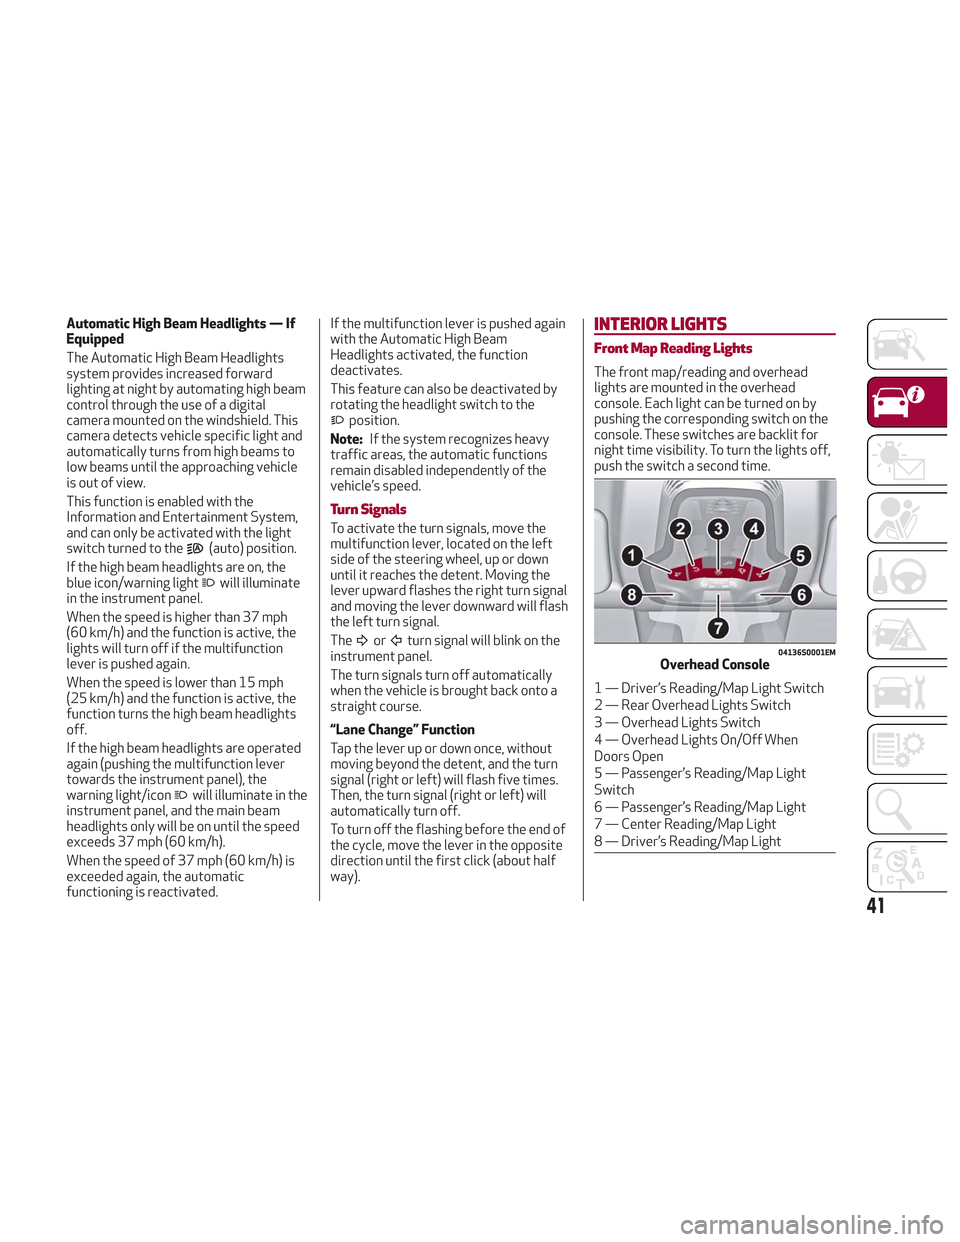
The front map/reading and overhead
lights are mounted in the overhead
console. Each light can be turned on by
pushing the corresponding switch on the
console. These switches are backlit for
night time visibility. To turn the lights off,
push the switch a second time.
04136S0001EMOverhead Console
1 — Driver’s Reading/Map Light Switch
2 — Rear Overhead Lights Switch
3 — Overhead Lights Switch
4 — Overhead Lights On/Off When
Doors Open
5 — Passenger’s Reading/Map Light
Switch
6 — Passenger’s Reading/Map Light
7 — Center Reading/Map Light
8 — Driver’s Reading/Map Light
41
Page 87 of 276
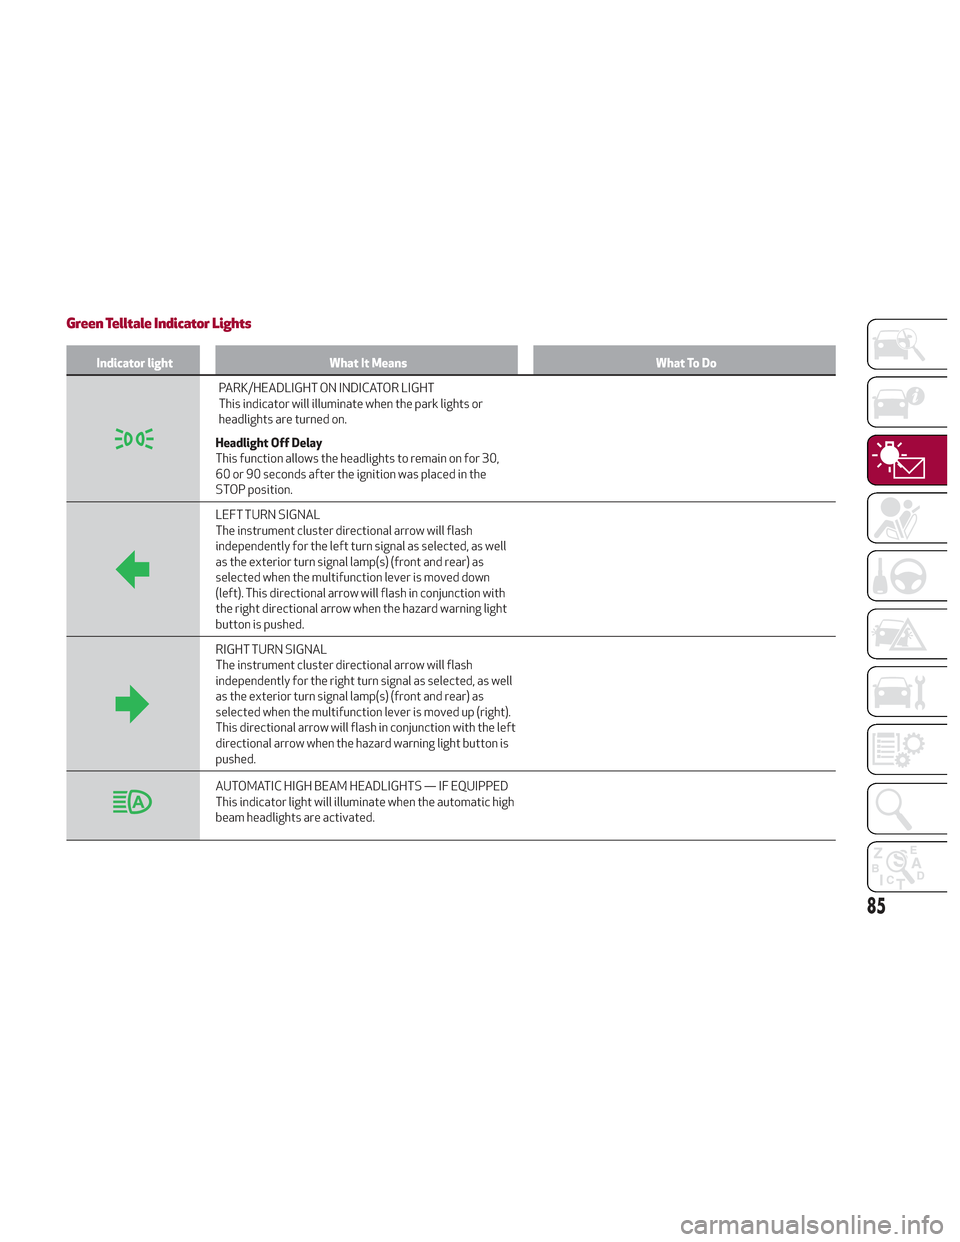
Green Telltale Indicator Lights
Indicator lightWhat It Means What To Do
PARK/HEADLIGHT ON INDICATOR LIGHT
This indicator will illuminate when the park lights or
headlights are turned on.
Headlight Off Delay
This function allows the headlights to remain on for 30,
60 or 90 seconds after the ignition was placed in the
STOP position.
LEFT TURN SIGNAL
The instrument cluster directional arrow will flash
independently for the left turn signal as selected, as well
as the exterior turn signal lamp(s) (front and rear) as
selected when the multifunction lever is moved down
(left). This directional arrow will flash in conjunction with
the right directional arrow when the hazard warning light
button is pushed.
RIGHT TURN SIGNAL
The instrument cluster directional arrow will flash
independently for the right turn signal as selected, as well
as the exterior turn signal lamp(s) (front and rear) as
selected when the multifunction lever is moved up (right).
This directional arrow will flash in conjunction with the left
directional arrow when the hazard warning light button is
pushed.
AUTOMATIC HIGH BEAM HEADLIGHTS — IF EQUIPPED
This indicator light will illuminate when the automatic high
beam headlights are activated.
85
Page 88 of 276
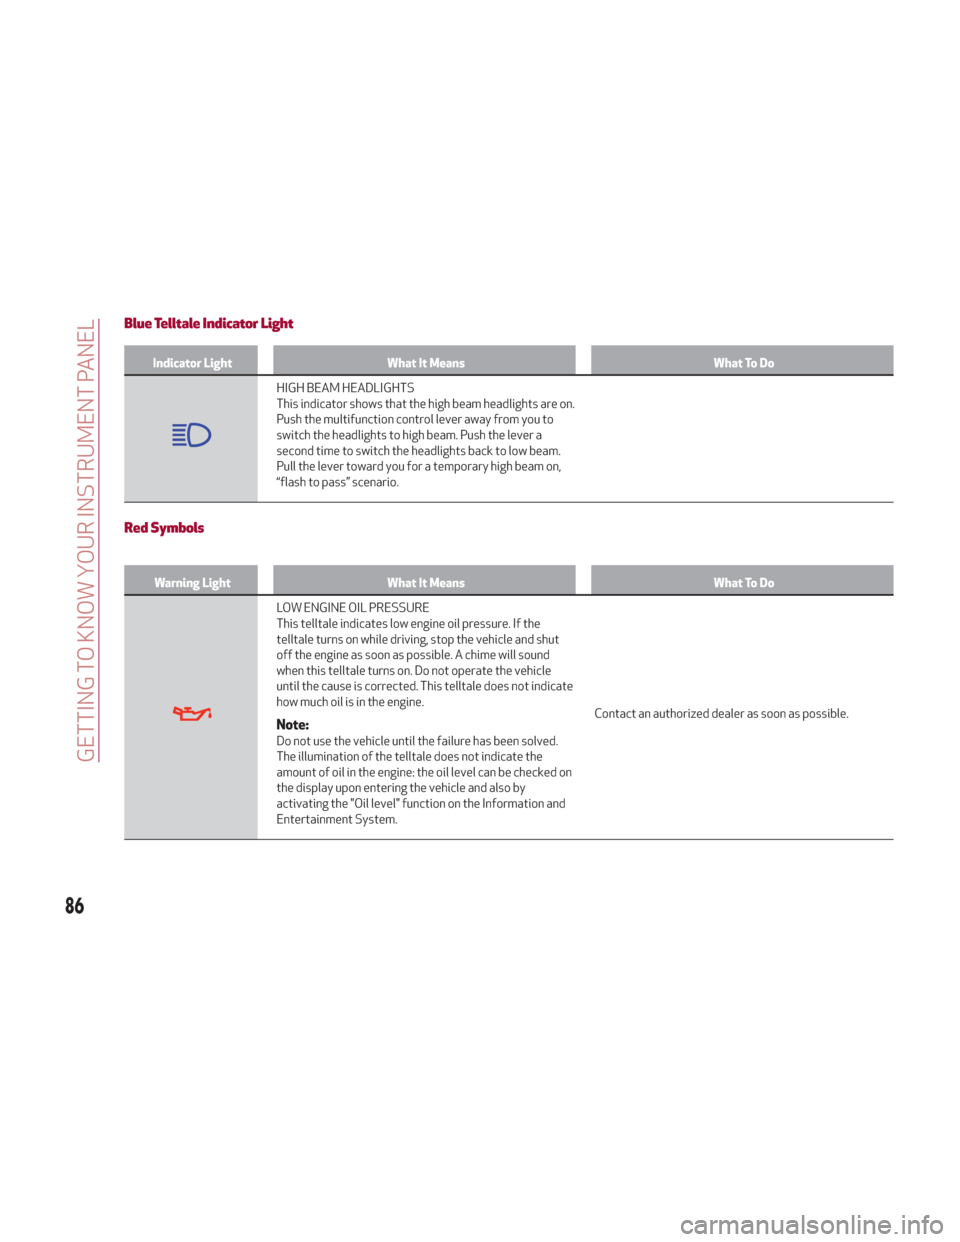
Blue Telltale Indicator Light
Indicator LightWhat It Means What To Do
HIGH BEAM HEADLIGHTS
This indicator shows that the high beam headlights are on.
Push the multifunction control lever away from you to
switch the headlights to high beam. Push the lever a
second time to switch the headlights back to low beam.
Pull the lever toward you for a temporary high beam on,
“flash to pass” scenario.
Red Symbols
Warning LightWhat It Means What To Do
LOW ENGINE OIL PRESSURE
This telltale indicates low engine oil pressure. If the
telltale turns on while driving, stop the vehicle and shut
off the engine as soon as possible. A chime will sound
when this telltale turns on. Do not operate the vehicle
until the cause is corrected. This telltale does not indicate
how much oil is in the engine.
Note:Do not use the vehicle until the failure has been solved.
The illumination of the telltale does not indicate the
amount of oil in the engine: the oil level can be checked on
the display upon entering the vehicle and also by
activating the "Oil level" function on the Information and
Entertainment System.Contact an authorized dealer as soon as possible.
86
GETTING TO KNOW YOUR INSTRUMENT PANEL
Page 96 of 276
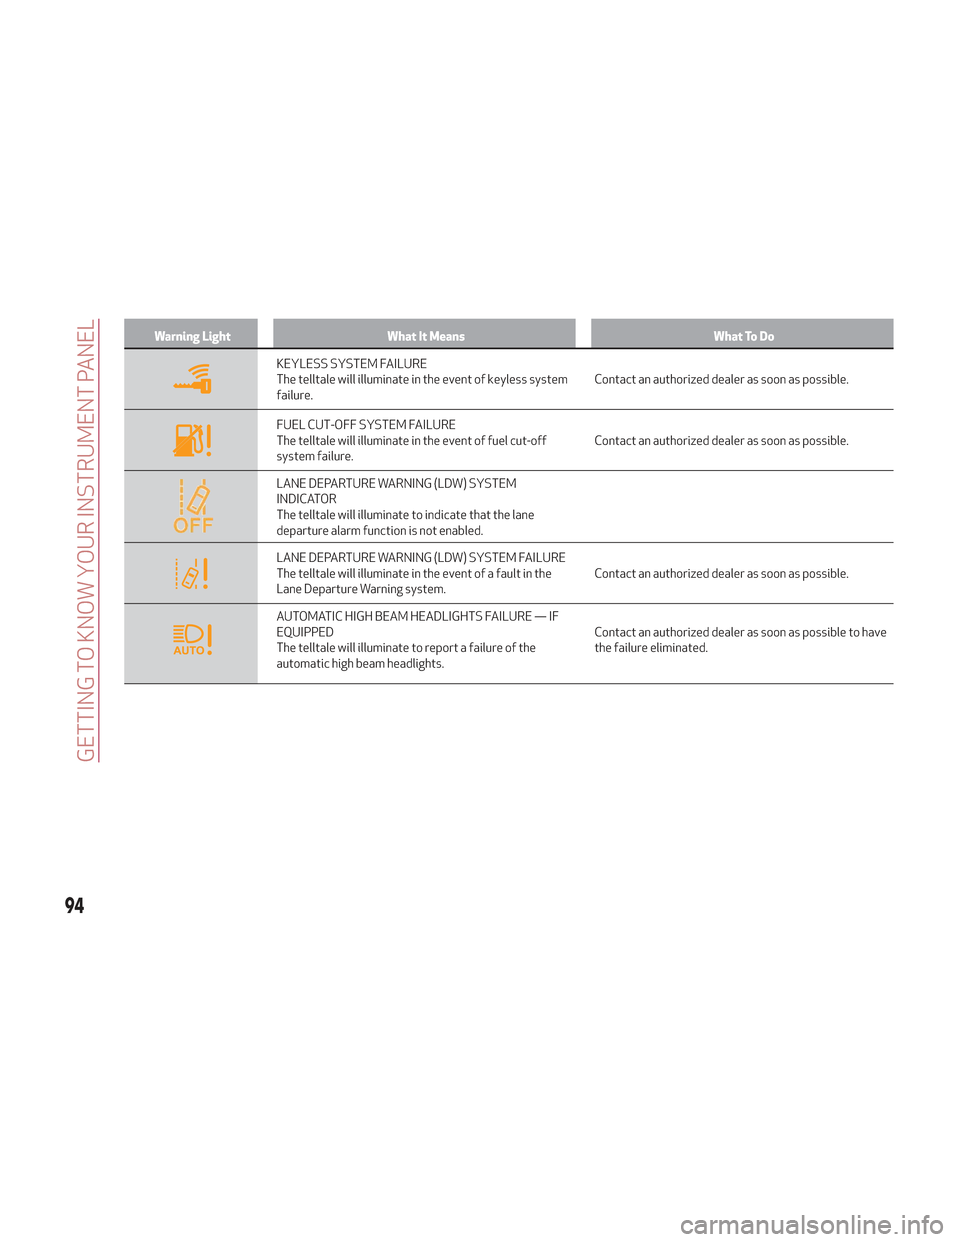
Warning LightWhat It Means What To Do
KEYLESS SYSTEM FAILURE
The telltale will illuminate in the event of keyless system
failure.Contact an authorized dealer as soon as possible.
FUEL CUT-OFF SYSTEM FAILURE
The telltale will illuminate in the event of fuel cut-off
system failure.Contact an authorized dealer as soon as possible.
LANE DEPARTURE WARNING (LDW) SYSTEM
INDICATOR
The telltale will illuminate to indicate that the lane
departure alarm function is not enabled.
LANE DEPARTURE WARNING (LDW) SYSTEM FAILURE
The telltale will illuminate in the event of a fault in the
Lane Departure Warning system.Contact an authorized dealer as soon as possible.
AUTOMATIC HIGH BEAM HEADLIGHTS FAILURE — IF
EQUIPPED
The telltale will illuminate to report a failure of the
automatic high beam headlights.Contact an authorized dealer as soon as possible to have
the failure eliminated.
94
GETTING TO KNOW YOUR INSTRUMENT PANEL
Page 102 of 276
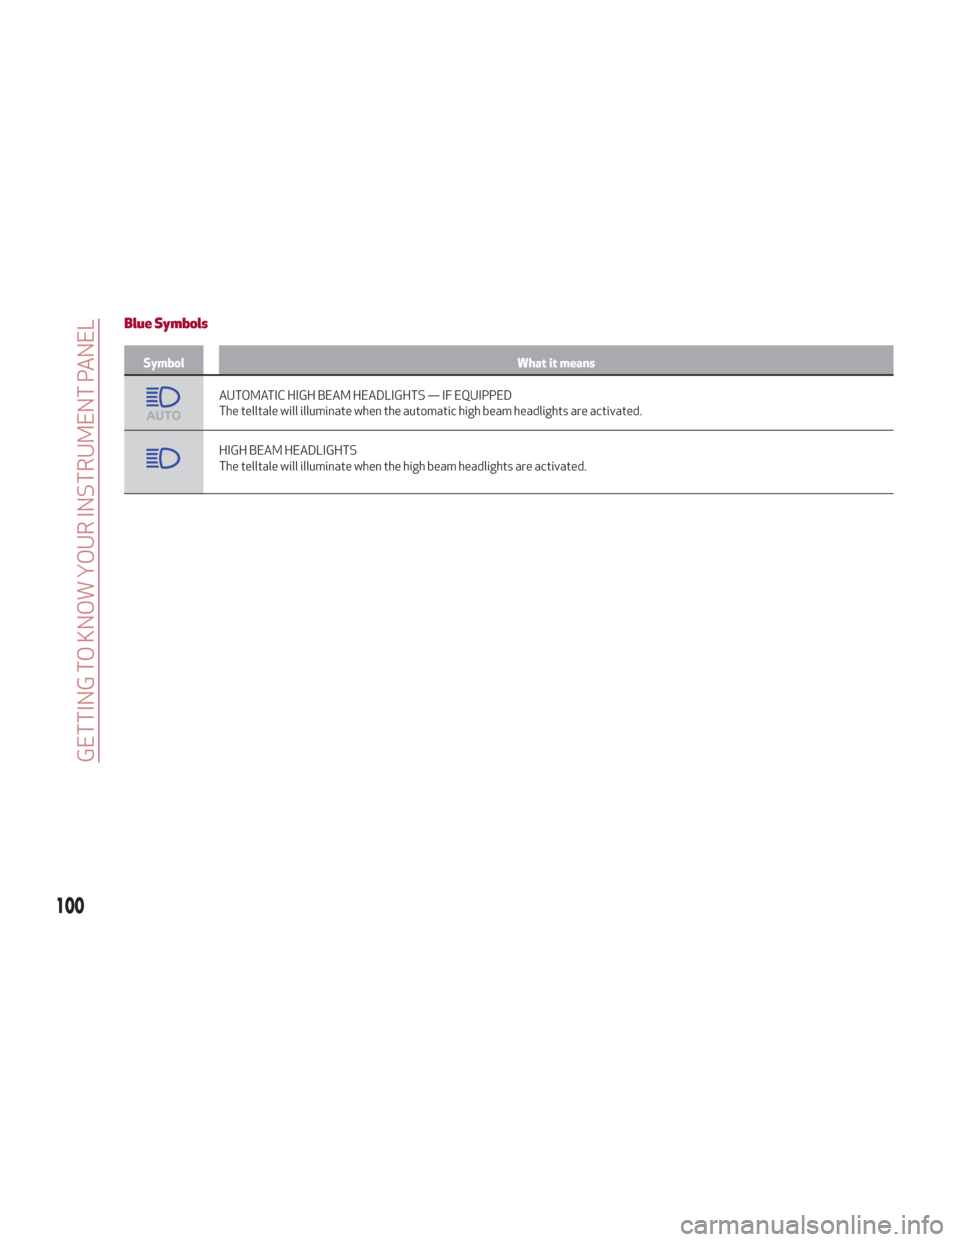
Blue Symbols
SymbolWhat it means
AUTOMATIC HIGH BEAM HEADLIGHTS — IF EQUIPPED
The telltale will illuminate when the automatic high beam headlights are activated.
HIGH BEAM HEADLIGHTS
The telltale will illuminate when the high beam headlights are activated.
100
GETTING TO KNOW YOUR INSTRUMENT PANEL
Page 145 of 276
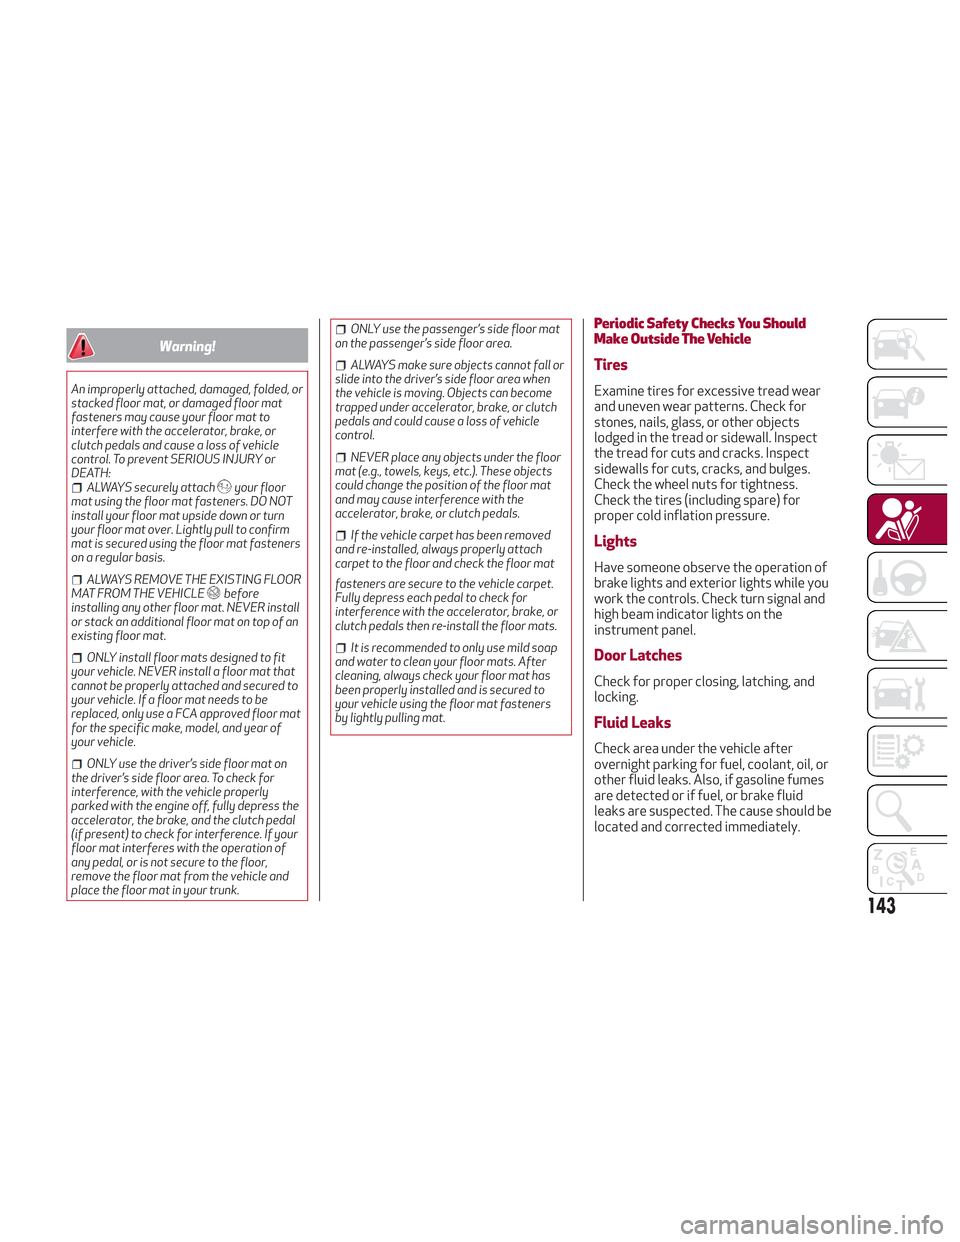
Warning!
An improperly attached, damaged, folded, or
stacked floor mat, or damaged floor mat
fasteners may cause your floor mat to
interfere with the accelerator, brake, or
clutch pedals and cause a loss of vehicle
control. To prevent SERIOUS INJURY or
DEATH:
ALWAYS securely attachyour floor
mat using the floor mat fasteners. DO NOT
install your floor mat upside down or turn
your floor mat over. Lightly pull to confirm
mat is secured using the floor mat fasteners
on a regular basis.
ALWAYS REMOVE THE EXISTING FLOOR
MAT FROM THE VEHICLEbefore
installing any other floor mat. NEVER install
or stack an additional floor mat on top of an
existing floor mat.
ONLY install floor mats designed to fit
your vehicle. NEVER install a floor mat that
cannot be properly attached and secured to
your vehicle. If a floor mat needs to be
replaced, only use a FCA approved floor mat
for the specific make, model, and year of
your vehicle.
ONLY use the driver’s side floor mat on
the driver’s side floor area. To check for
interference, with the vehicle properly
parked with the engine off, fully depress the
accelerator, the brake, and the clutch pedal
(if present) to check for interference. If your
floor mat interferes with the operation of
any pedal, or is not secure to the floor,
remove the floor mat from the vehicle and
place the floor mat in your trunk.
ONLY use the passenger’s side floor mat
on the passenger’s side floor area.
ALWAYS make sure objects cannot fall or
slide into the driver’s side floor area when
the vehicle is moving. Objects can become
trapped under accelerator, brake, or clutch
pedals and could cause a loss of vehicle
control.
NEVER place any objects under the floor
mat (e.g., towels, keys, etc.). These objects
could change the position of the floor mat
and may cause interference with the
accelerator, brake, or clutch pedals.
If the vehicle carpet has been removed
and re-installed, always properly attach
carpet to the floor and check the floor mat
fasteners are secure to the vehicle carpet.
Fully depress each pedal to check for
interference with the accelerator, brake, or
clutch pedals then re-install the floor mats.
It is recommended to only use mild soap
and water to clean your floor mats. After
cleaning, always check your floor mat has
been properly installed and is secured to
your vehicle using the floor mat fasteners
by lightly pulling mat.
Periodic Safety Checks You Should
Make Outside The Vehicle
Tires
Examine tires for excessive tread wear
and uneven wear patterns. Check for
stones, nails, glass, or other objects
lodged in the tread or sidewall. Inspect
the tread for cuts and cracks. Inspect
sidewalls for cuts, cracks, and bulges.
Check the wheel nuts for tightness.
Check the tires (including spare) for
proper cold inflation pressure.
Lights
Have someone observe the operation of
brake lights and exterior lights while you
work the controls. Check turn signal and
high beam indicator lights on the
instrument panel.
Door Latches
Check for proper closing, latching, and
locking.
Fluid Leaks
Check area under the vehicle after
overnight parking for fuel, coolant, oil, or
other fluid leaks. Also, if gasoline fumes
are detected or if fuel, or brake fluid
leaks are suspected. The cause should be
located and corrected immediately.
143
Page 271 of 276
Fuse Boxes............... .195
Fuses (Replacement) ..........193
Garage Door Opener (HomeLink) ....63
Gasoline, Clean Air ............255
Gasoline, Reformulated .........255
General Information ........109,114
Glove Compartment ............63
Glove Compartment Light ........42
Glove Compartment Light (Bulb Replacement) .............192
GVWR .................. .182
Hazard Warning Flasher .........188
Head Restraints ..............34
Head Rests .................34
Headlights Switch ............... .38,40
Headlights (Cleaning) ..........243
Heated Mirrors ...............38
Heater, Engine Block ...........149
High Beam Headlights ...........40
Automatic High Beam Headlights .......................41
Hill Start Assist (HSA) System .....106
Hood .....................57
Hood Release ................57
Identification Data ............246
Ignition ....................19 Installing Electrical/Electronic
Devices ...................4
Instrument Cluster .............70
Instrument Cluster Display Instrument Cluster Display ......71
Reconfigurable Instrument
Cluster Display .............72
Instrument Panel Features Instrument Panel Features ......70
Interior Ambient Lighting .........43
Interior Lights ................41
Interiors (Cleaning) ............244
Internal Equipment ............63
Jack Operation ............. .225
Jump Starting ............201,202
Key Fob Remote Keyless Entry .........16
Key Fob Battery Service (Remote Keyless Entry) ..............17
Key, Replacement .............18
Keyless Enter-N-Go Passive Entry ..............24
K
eyless Entry System/Immobilizer System ..................20
Lane Change ................41
Lane Change And Turn Signals ......41
Lane Departure Warning System . . .176
LaneSense ................ .176Lap/Shoulder Belts
...........118
Latches .................. .143
Leaks, Fluid ............... .143
Life Of Tires ............... .236
Liftgate ...................58
Lifting The Vehicle ............225
Light Bulbs ................ .143
Types Of Bulbs ............189
Light Switch .................38
Lights ................... .143
AirBag ..............123,142
Automatic Headlights .........39
Courtesy/Reading .........41,43
Daytime Running ............39
Exterior ............... .143
Hazard Warning Flasher .......188
Headlight Switch ..........38,40
Headlights .............38,40
High Beam ................40
Instrument Cluster ........38,40
Intensity Control ............44
Interior ..................43
Map Reading ..............41
Park ...................39
Reading .................41
Turn Signal ............41,143
Loading Vehicle ..............182
Tires .................. .230