turn signal Alfa Romeo Stelvio 2018 Owner's Manual
[x] Cancel search | Manufacturer: ALFA ROMEO, Model Year: 2018, Model line: Stelvio, Model: Alfa Romeo Stelvio 2018Pages: 276, PDF Size: 5.79 MB
Page 18 of 276
KEYS
Key Fob
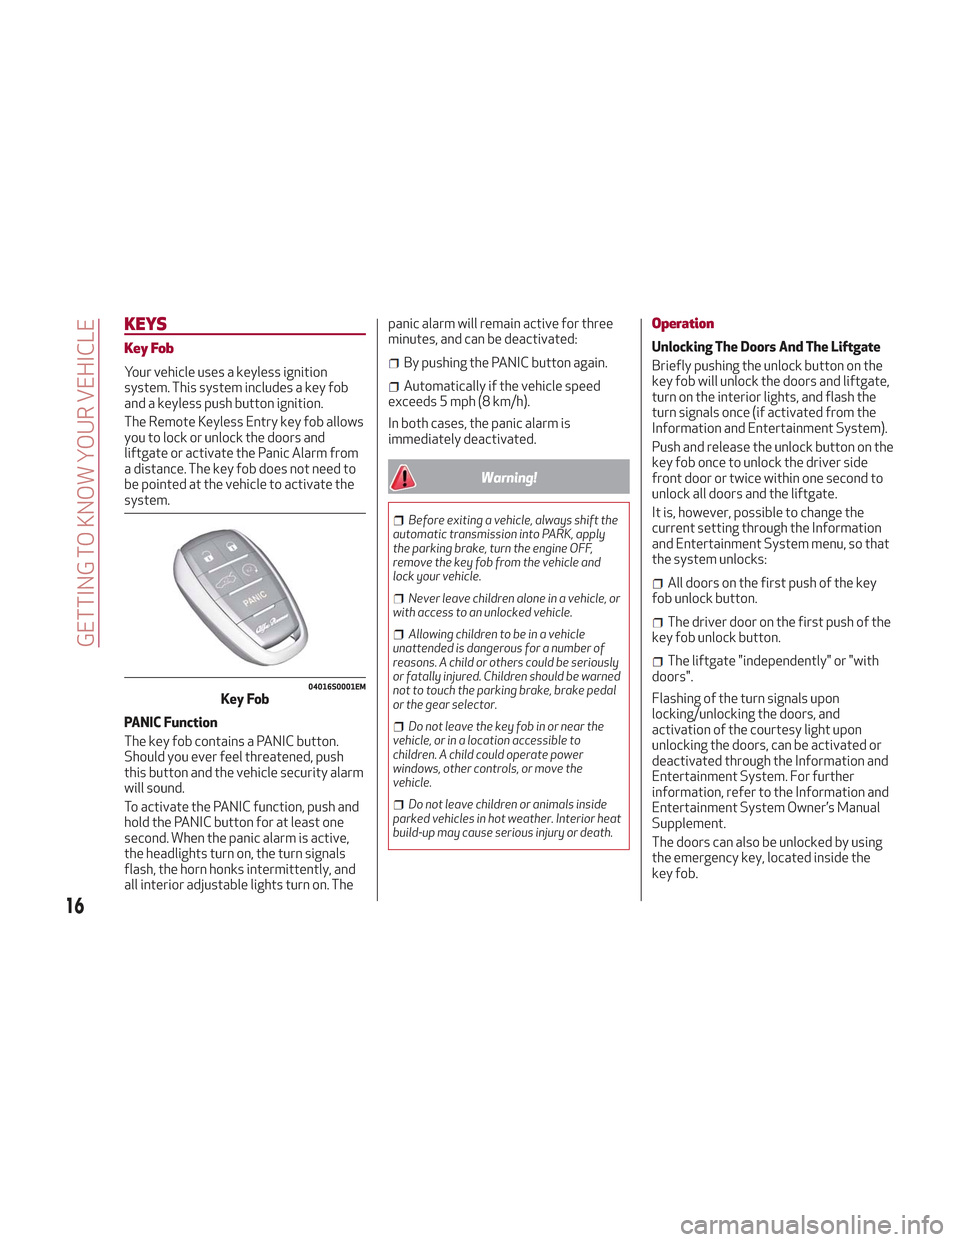
Your vehicle uses a keyless ignition
system. This system includes a key fob
and a keyless push button ignition.
The Remote Keyless Entry key fob allows
you to lock or unlock the doors and
liftgate or activate the Panic Alarm from
a distance. The key fob does not need to
be pointed at the vehicle to activate the
system.
PANIC Function
The key fob contains a PANIC button.
Should you ever feel threatened, push
this button and the vehicle security alarm
will sound.
To activate the PANIC function, push and
hold the PANIC button for at least one
second. When the panic alarm is active,
the headlights turn on, the turn signals
flash, the horn honks intermittently, and
all interior adjustable lights turn on. Thepanic alarm will remain active for three
minutes, and can be deactivated:By pushing the PANIC button again.
Automatically if the vehicle speed
exceeds 5 mph (8 km/h).
In both cases, the panic alarm is
immediately deactivated.
Warning!
Before exiting a vehicle, always shift the
automatic transmission into PARK, apply
the parking brake, turn the engine OFF,
remove the key fob from the vehicle and
lock your vehicle.
Never leave children alone in a vehicle, or
with access to an unlocked vehicle.
Allowing children to be in a vehicle
unattended is dangerous for a number of
reasons. A child or others could be seriously
or fatally injured. Children should be warned
not to touch the parking brake, brake pedal
or the gear selector.
Do not leave the key fob in or near the
vehicle, or in a location accessible to
children. A child could operate power
windows, other controls, or move the
vehicle.
Do not leave children or animals inside
parked vehicles in hot weather. Interior heat
build-up may cause serious injury or death.
Operation
Unlocking The Doors And The Liftgate
Briefly pushing the unlock button on the
key fob will unlock the doors and liftgate,
turn on the interior lights, and flash the
turn signals once (if activated from the
Information and Entertainment System).
Push and release the unlock button on the
key fob once to unlock the driver side
front door or twice within one second to
unlock all doors and the liftgate.
It is, however, possible to change the
current setting through the Information
and Entertainment System menu, so that
the system unlocks:
All doors on the first push of the key
fob unlock button.
The driver door on the first push of the
key fob unlock button.
The liftgate "independently" or "with
doors".
Flashing of the turn signals upon
locking/unlocking the doors, and
activation of the courtesy light upon
unlocking the doors, can be activated or
deactivated through the Information and
Entertainment System. For further
information, refer to the Information and
Entertainment System Owner’s Manual
Supplement.
The doors can also be unlocked by using
the emergency key, located inside the
key fob.
04016S0001EMKey Fob
16
GETTING TO KNOW YOUR VEHICLE
Page 19 of 276
Door And Liftgate Locking
Briefly pushing the lock button on the key
fob will lock the doors and liftgate, switch
off the internal lights, and flash the turn
signals (if activated in the Information
and Entertainment System).
If one or more doors are open, these
doors will also lock, and this is indicated
by a rapid flashing of the turn signals. The
doors will unlock again only if the key fob
is detected inside the passenger
compartment.
The doors can be locked by using the
emergency key in the driver’s side door
lock.
Opening The Liftgate
Rapidly push the button on the key fob
twice to open the liftgate. The turn
signals will flash to indicate that the
liftgate has been opened.
Remote StartThe remote start
button on the key fob
enables engine starting
(push the remote start
button on the key fob
twice to enable engine
starting). Car Finder
The Car Finder feature will temporarily
activate the turn signals and headlights
to assist with locating the vehicle in a
crowded area.
To activate, push the lock or unlock
button to remotely and temporarily
activate the turn signals and headlights.
Pushing the lock or unlock button again
will reactivate the lights switch on timer
(if the parking lights function was already
active, it will remain active).
This function is available only if the doors
are closed.Replacing The Electronic Key Fob
Battery
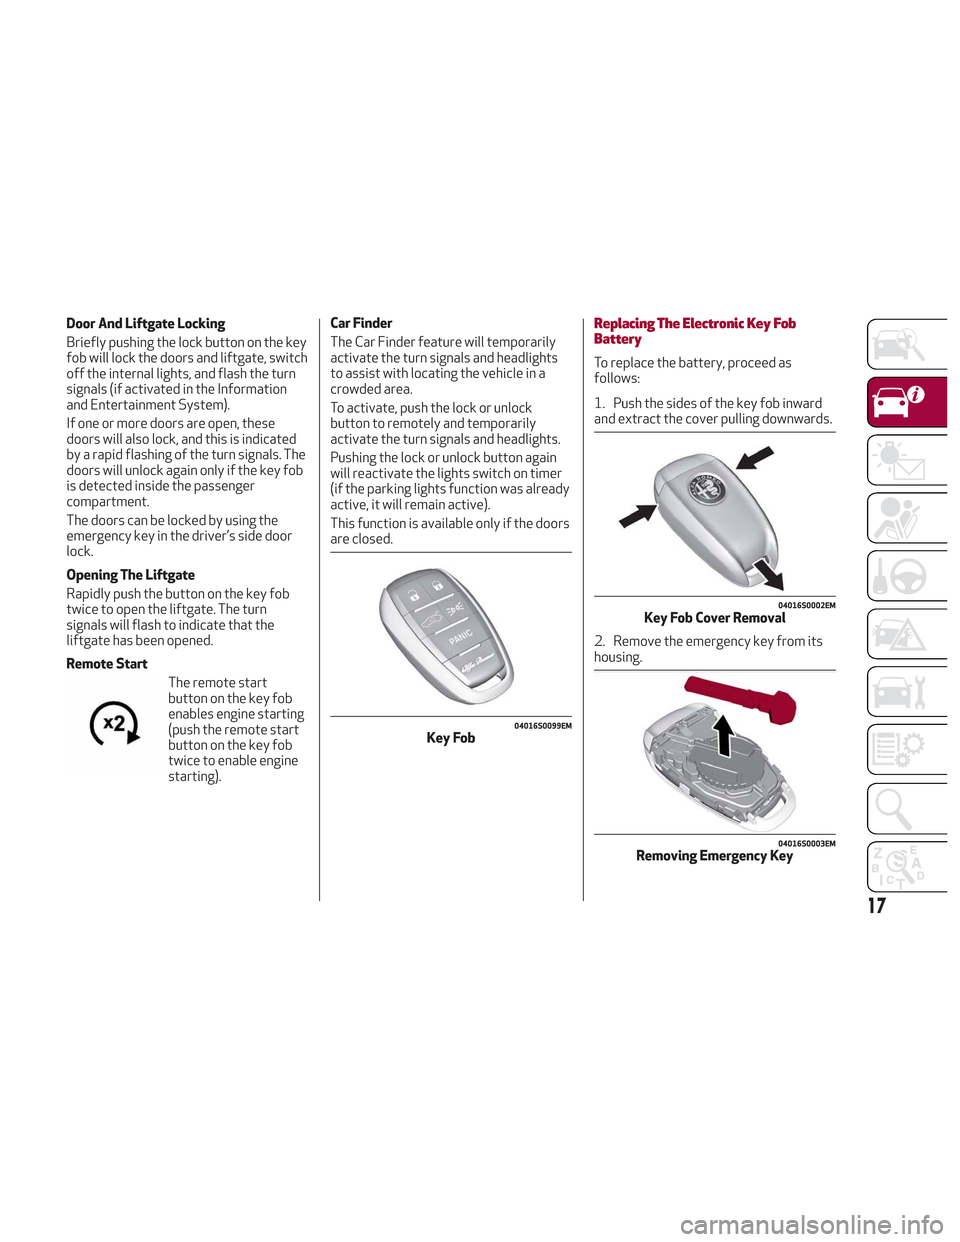
To replace the battery, proceed as
follows:
1. Push the sides of the key fob inward
and extract the cover pulling downwards.
2. Remove the emergency key from its
housing.
04016S0099EMKey Fob
04016S0002EMKey Fob Cover Removal
04016S0003EMRemoving Emergency Key
17
Page 23 of 276
Irregular Operation
If the key code is not recognized during
starting, the Engine Immobilizer
Failure/Break-in Attempt
icon is
displayed on the instrument panel (refer
to "Warning Lights And Messages" in
"Getting To Know Your Instrument
Panel"). This condition leads to the engine
turning off after two seconds. In this
case, switch the ignition to STOP and
then to ON; if it is still blocked, try with
the other keys provided. If it is still not
possible to start the engine, contact an
authorized dealer.
If the Engine Immobilizer Failure/
Break-in Attempt
icon is displayed
while driving, this means that the system
is running a self-diagnosis (e.g. due to a
voltage drop). If the display persists,
contact an authorized dealer. Note:
Do not tamper with the Engine
Immobilizer system. Any modifications
or alterations could cause the protection
function to be deactivated.
The Engine Immobilizer system is not
compatible with certain aftermarket
remote starting systems. The use of
these devices could cause problems
when starting, as well as the
deactivation of the protection function.
All keys provided with the vehicle
have been programmed in accordance
with the electronics on the vehicle itself.
Each key has its own code which must
be stored by the system's control unit.
Contact an authorized dealer to have
new keys (up to eight) stored with a
code.
SECURITY ALARM SYSTEM —
IF EQUIPPED
Alarm Activation
The vehicle security alarm monitors the
vehicle doors and ignition for
unauthorized operation. When the vehicle
security alarm is activated, interior
switches for door locks are disabled. The
system provides both audible and visible
signals.
While armed, the alarm will sound in the
following scenarios:
Opening of doors/hood/liftgate
(perimeter protection)
Operation of ignition with a key which
is not validated
Cutting of the battery cables
Movement inside the passenger
compartment (volumetric protection — if
equipped)
Unexpected lifting/tilting of the
vehicle (anti-lift protection — if
equipped)
Activation of the alarm triggers the
acoustic warning and the turn signals.
Note: The alarm system is activated by
the Engine Immobilizer system, which is
automatically activated when you get out
of the vehicle with the key fob and lock
the doors.
21
Page 24 of 276
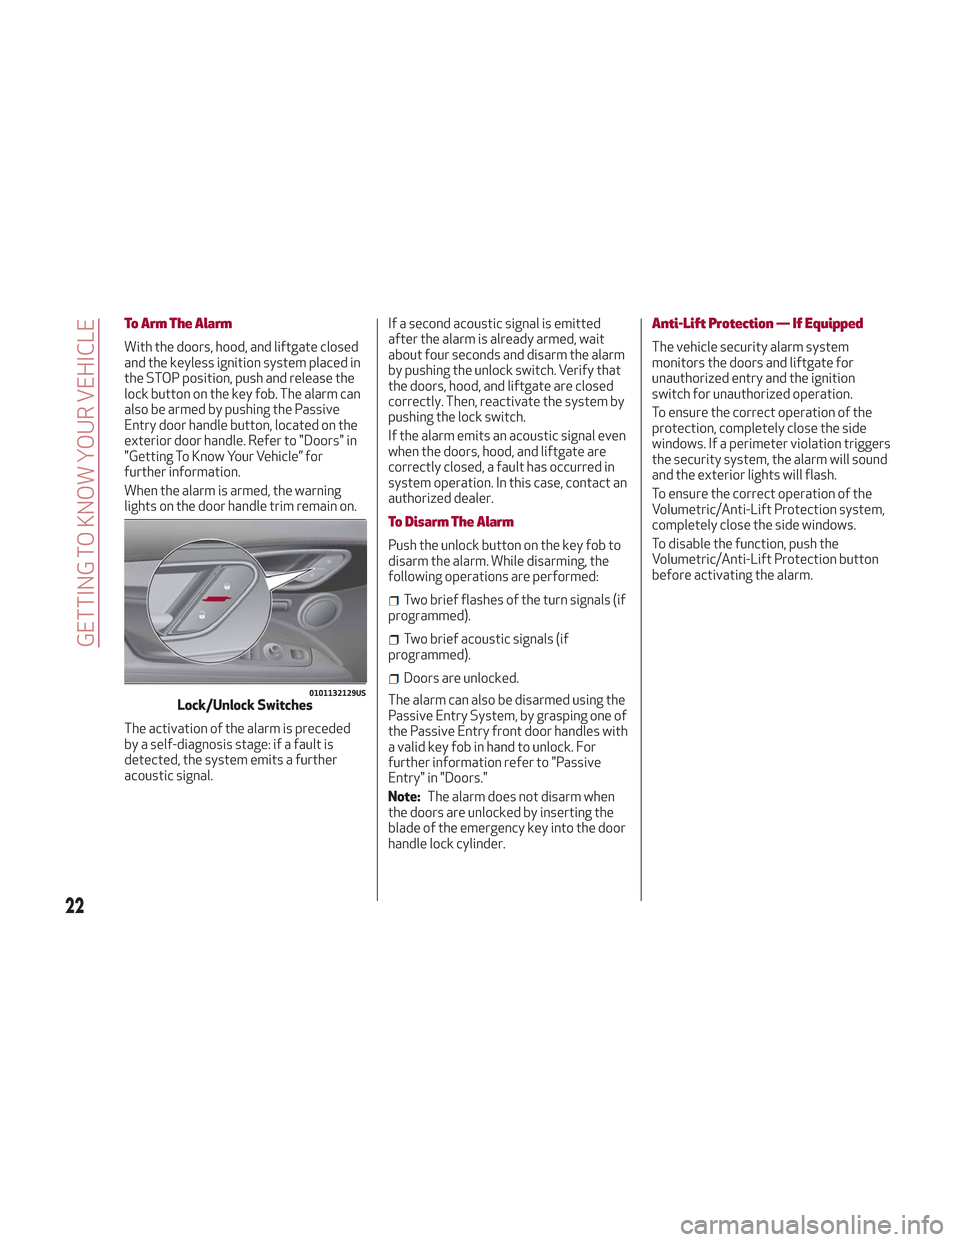
To Arm The Alarm
With the doors, hood, and liftgate closed
and the keyless ignition system placed in
the STOP position, push and release the
lock button on the key fob. The alarm can
also be armed by pushing the Passive
Entry door handle button, located on the
exterior door handle. Refer to "Doors" in
"Getting To Know Your Vehicle” for
further information.
When the alarm is armed, the warning
lights on the door handle trim remain on.
The activation of the alarm is preceded
by a self-diagnosis stage: if a fault is
detected, the system emits a further
acoustic signal.If a second acoustic signal is emitted
after the alarm is already armed, wait
about four seconds and disarm the alarm
by pushing the unlock switch. Verify that
the doors, hood, and liftgate are closed
correctly. Then, reactivate the system by
pushing the lock switch.
If the alarm emits an acoustic signal even
when the doors, hood, and liftgate are
correctly closed, a fault has occurred in
system operation. In this case, contact an
authorized dealer.
To Disarm The Alarm
Push the unlock button on the key fob to
disarm the alarm. While disarming, the
following operations are performed:
Two brief flashes of the turn signals (if
programmed).
Two brief acoustic signals (if
programmed).
Doors are unlocked.
The alarm can also be disarmed using the
Passive Entry System, by grasping one of
the Passive Entry front door handles with
a valid key fob in hand to unlock. For
further information refer to "Passive
Entry" in "Doors."
Note: The alarm does not disarm when
the doors are unlocked by inserting the
blade of the emergency key into the door
handle lock cylinder.
Anti-Lift Protection — If Equipped
The vehicle security alarm system
monitors the doors and liftgate for
unauthorized entry and the ignition
switch for unauthorized operation.
To ensure the correct operation of the
protection, completely close the side
windows. If a perimeter violation triggers
the security system, the alarm will sound
and the exterior lights will flash.
To ensure the correct operation of the
Volumetric/Anti-Lift Protection system,
completely close the side windows.
To disable the function, push the
Volumetric/Anti-Lift Protection button
before activating the alarm.
0101132129USLock/Unlock Switches
22
GETTING TO KNOW YOUR VEHICLE
Page 26 of 276
Caution!
An unlocked vehicle is an invitation. Always
remove the key from the ignition and lock all
of the doors when leaving the vehicle
unattended.
Locking/Unlocking Doors From The
Outside
When locking the doors from the outside
with the doors closed, push the lock
button on the key fob.
The door lock can be activated with all
doors locked and the liftgate open. When
the lock button on the key fob is pushed,
all locks are activated, including the
liftgate if it is open. The liftgate will be
locked when it is closed.
When unlocking the doors from the
outside, push the unlock button on the
key fob.
Locking/Unlocking Doors From The
Outside In An Emergency
If the battery is discharged or the key fob
is inoperable, you can lock or unlock the
doors from the outside by inserting the
blade of the emergency key, found inside
the key fob, into the door handle lock
cylinder and turn the emergency key as
follows.
Lock — Turn the emergency key to the
right (clockwise)
Unlock — Turn the emergency key to
the left (counter clockwise)
Passive Entry
The Passive Entry system can identify
the presence of a key fob near the doors
and liftgate.
The system enables the doors and
liftgate to be locked or unlocked without
pushing any button on the key fob.
The key fob is detected only after the
system recognizes the presence of a
hand on one of the front door handles. If
the detected key fob is valid, the doors
and the liftgate are unlocked (refer to the
Information and Entertainment System
Owner’s Manual Supplement for Passive
Entry Settings).
Note: The key fob may not be able to be
detected by the vehicle keyless-go
system if it is located next to a mobile
phone, laptop, or other electronic device;
these devices may block the key fob’s
wireless signal and prevent the
keyless-go system from starting the
vehicle.
Grasping the handle of the driver's door
unlocks the driver's side door, or all doors
depending on the mode set using the
Information and Entertainment System
(refer to the Information and
Entertainment System Owner’s Manual
Supplement for Passive Entry Settings). Note:
If wearing gloves, or if it has rained
and the door handle is wet, the activation
sensitivity of the Passive Entry function
may be reduced, resulting in a longer
reaction time.
Door Locking
To lock the doors, proceed as follows:
1. Make sure that you have the key fob
and are close to the driver’s or
passenger’s side door handle.
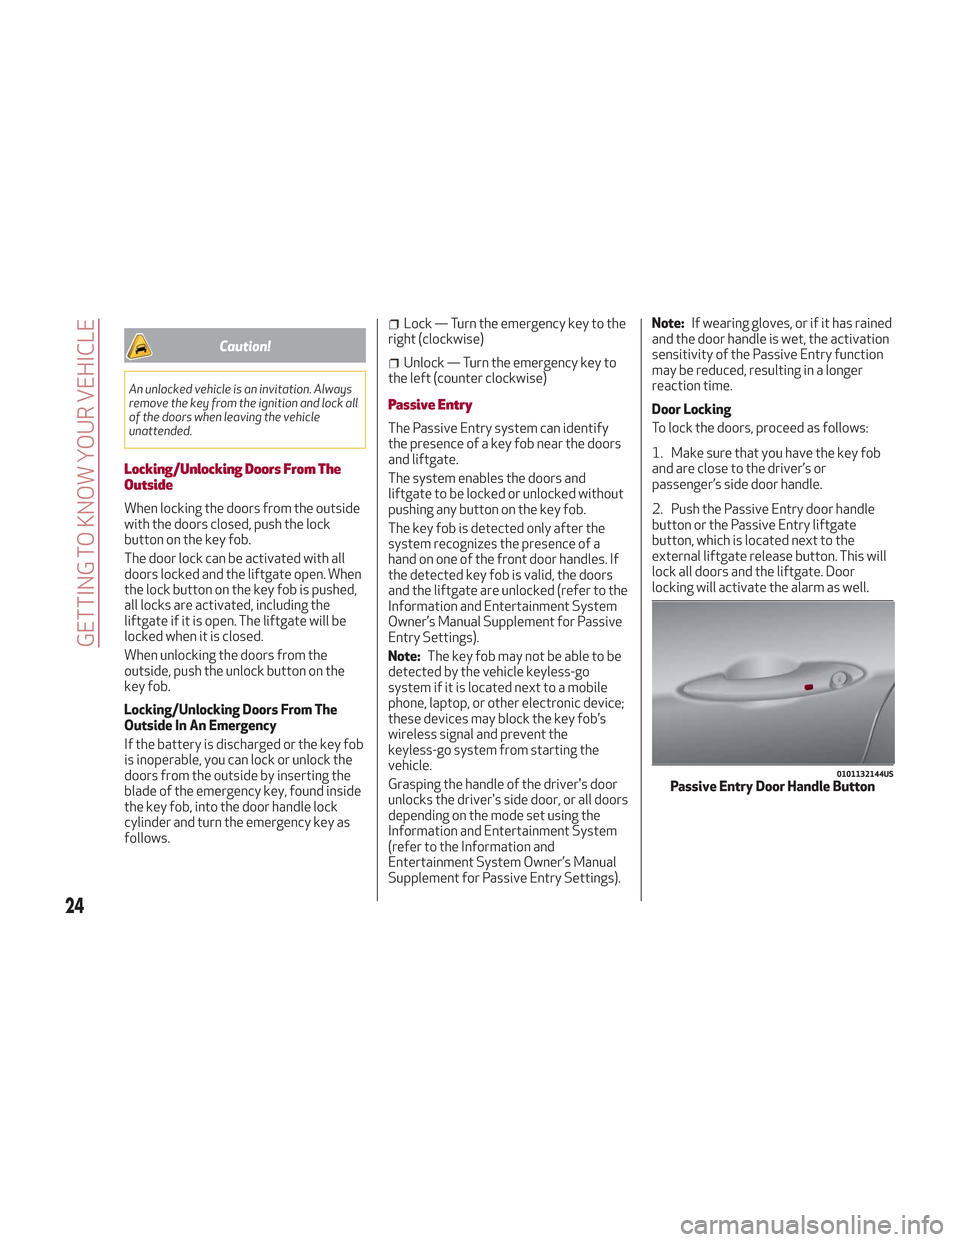
2. Push the Passive Entry door handle
button or the Passive Entry liftgate
button, which is located next to the
external liftgate release button. This will
lock all doors and the liftgate. Door
locking will activate the alarm as well.
0101132144USPassive Entry Door Handle Button
24
GETTING TO KNOW YOUR VEHICLE
Page 28 of 276
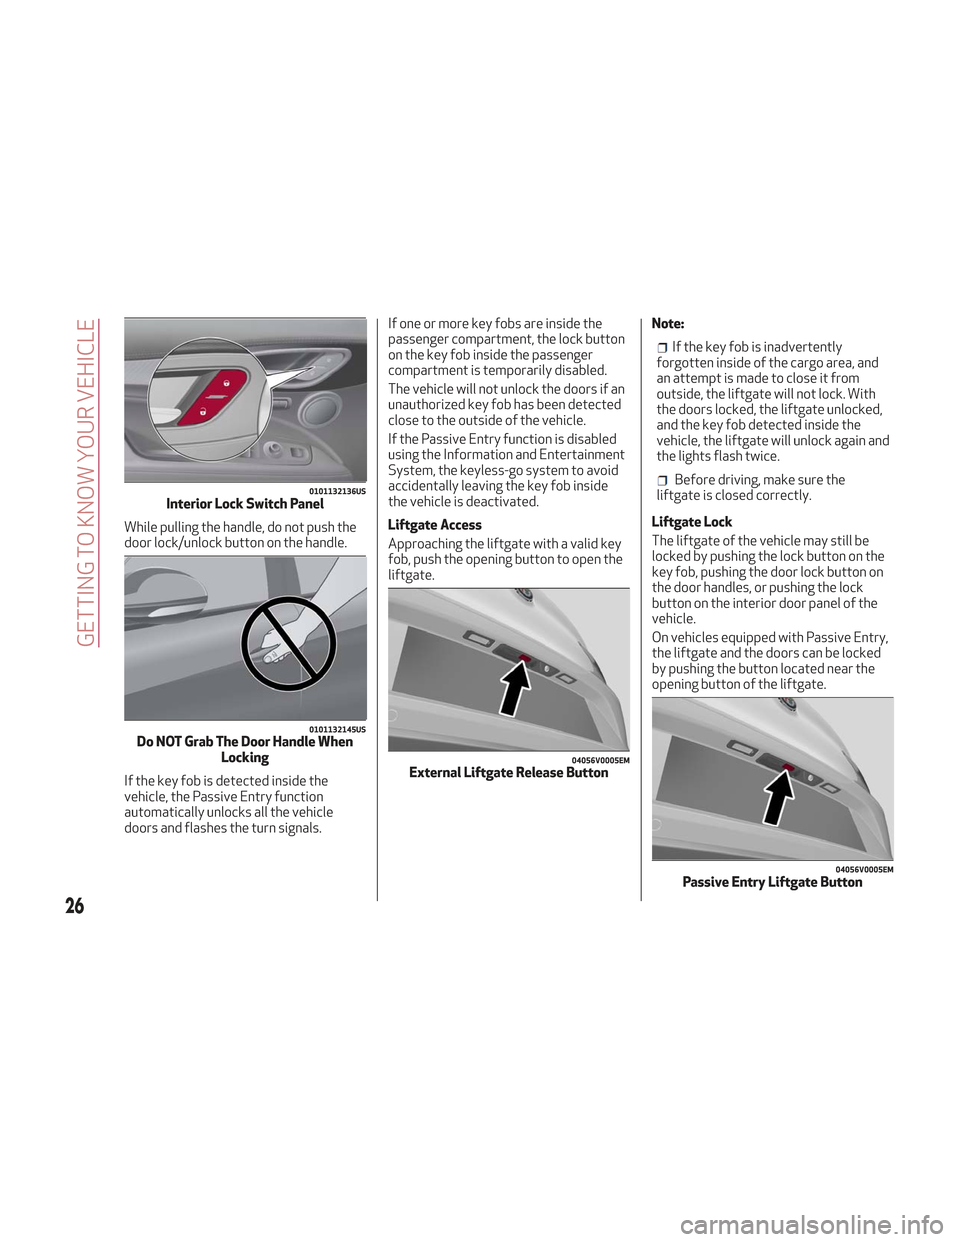
While pulling the handle, do not push the
door lock/unlock button on the handle.
If the key fob is detected inside the
vehicle, the Passive Entry function
automatically unlocks all the vehicle
doors and flashes the turn signals.If one or more key fobs are inside the
passenger compartment, the lock button
on the key fob inside the passenger
compartment is temporarily disabled.
The vehicle will not unlock the doors if an
unauthorized key fob has been detected
close to the outside of the vehicle.
If the Passive Entry function is disabled
using the Information and Entertainment
System, the keyless-go system to avoid
accidentally leaving the key fob inside
the vehicle is deactivated.
Liftgate Access
Approaching the liftgate with a valid key
fob, push the opening button to open the
liftgate.
Note:
If the key fob is inadvertently
forgotten inside of the cargo area, and
an attempt is made to close it from
outside, the liftgate will not lock. With
the doors locked, the liftgate unlocked,
and the key fob detected inside the
vehicle, the liftgate will unlock again and
the lights flash twice.
Before driving, make sure the
liftgate is closed correctly.
Liftgate Lock
The liftgate of the vehicle may still be
locked by pushing the lock button on the
key fob, pushing the door lock button on
the door handles, or pushing the lock
button on the interior door panel of the
vehicle.
On vehicles equipped with Passive Entry,
the liftgate and the doors can be locked
by pushing the button located near the
opening button of the liftgate.0101132136USInterior Lock Switch Panel
0101132145USDo NOT Grab The Door Handle When Locking
04056V0005EMExternal Liftgate Release Button
04056V0005EMPassive Entry Liftgate Button
26
GETTING TO KNOW YOUR VEHICLE
Page 29 of 276
System Activation/Deactivation
The Passive Entry system can be
activated or deactivated using the
Information and Entertainment System.
General Information
The following regulatory statement
applies to all radio frequency (RF)
devices equipped in this vehicle:
This device complies with Part 15 of the
FCC Rules and with Industry Canada
license-exempt RSS standard(s).
Operation is subject to the following two
conditions:
1. This device may not cause harmful
interference, and
2. This device must accept any
interference received, including
interference that may cause undesired
operation.
Note:Changes or modifications not
expressly approved by the party
responsible for compliance could void the
user’s authority to operate the
equipment.
Power Lock
The power lock is a safety device that
prevents the operation of the interior
door handles and the door lock and
unlock buttons. The power lock also
prevent opening of the doors from inside
the passenger compartment.
It is recommended to lock the vehicle
doors each time the vehicle is parked.
Activating The Power Lock
The power lock is enabled on all the doors
by quickly pushing the lock button on the
key fob twice.
The turn signals will flash to let you know
that the power lock is active.
If one or more of the doors are not closed
correctly, the power lock will not activate,
preventing a person from getting stuck
inside the passenger compartment by
entering the vehicle, and then closing, the
open door.
Deactivating The Power Lock
The power lock disengages
automatically:
When the doors are unlocked, pushing
the unlock button on the key fob.
When the keyless ignition is placed in
the ON position.
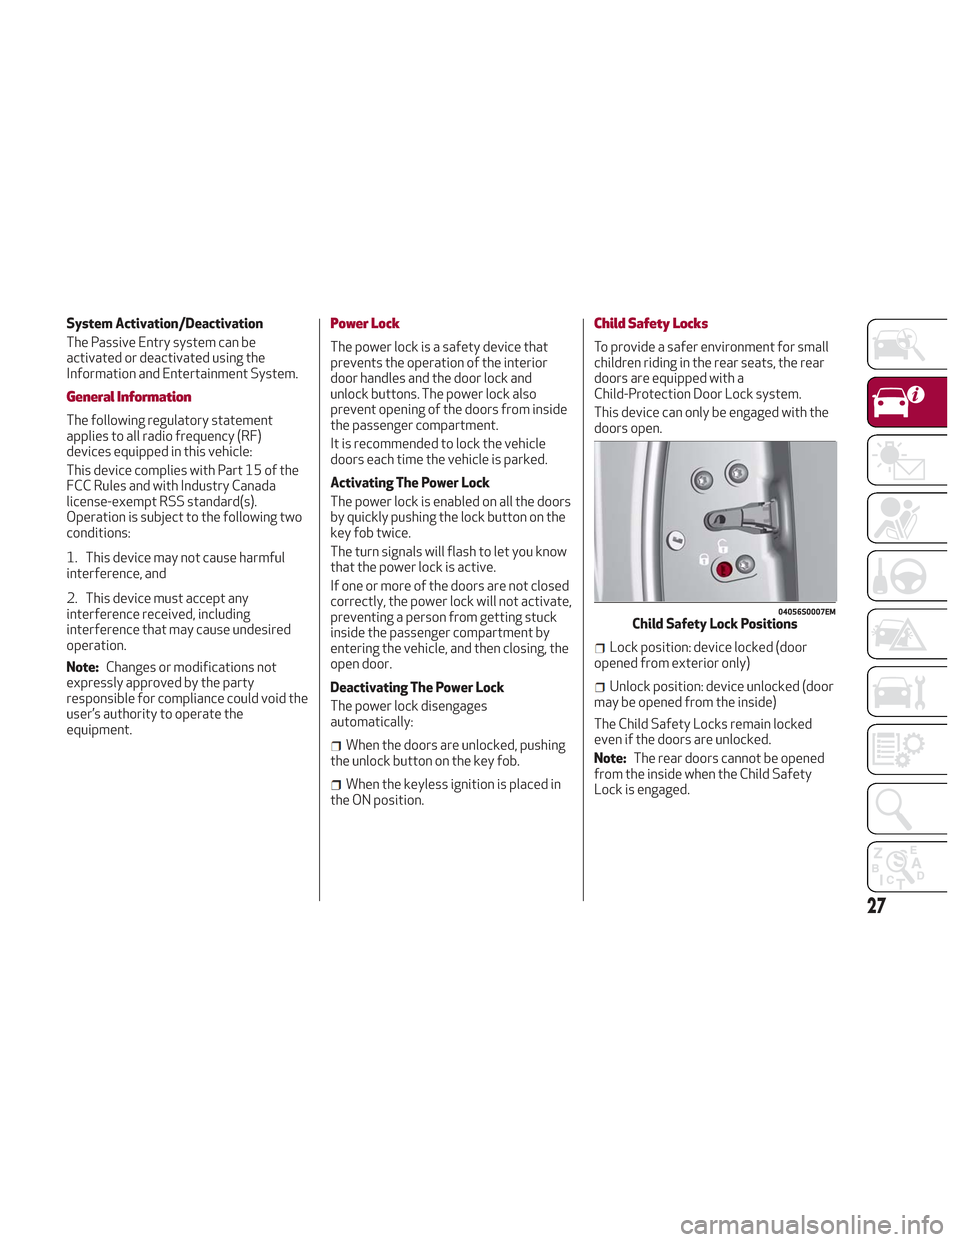
Child Safety Locks
To provide a safer environment for small
children riding in the rear seats, the rear
doors are equipped with a
Child-Protection Door Lock system.
This device can only be engaged with the
doors open.
Lock position: device locked (door
opened from exterior only)
Unlock position: device unlocked (door
may be opened from the inside)
The Child Safety Locks remain locked
even if the doors are unlocked.
Note: The rear doors cannot be opened
from the inside when the Child Safety
Lock is engaged.
04056S0007EMChild Safety Lock Positions
27
Page 41 of 276
The exterior lights can be activated only
when the ignition is in the ON mode,
except for the parking lights. Refer to
"Parking Lights" in this section for more
information.
The instrument panel and the various
controls on the dashboard will be
illuminated when the exterior lights are
turned on.
Automatic Headlights
This system automatically turns the
headlights on or off according to ambient
light levels.
Function Activation
From the O (off) position, rotate the light
switch to the
(auto) position.
Note: The function can only operate with
the ignition position cycled to ON.
Function Deactivation
To deactivate the function, rotate the
light switch to a position other than the
(auto) position.
Daytime Running Lights (DRL)
With the ignition cycled to ON, and the
light switch turned to theposition, if
the dusk sensor detects sufficient
external light, the Daytime Running
Lights will turn on automatically while the
other lights remain off.
If the turn signals are operated, the
brightness of the corresponding Daytime
Running Lights will be decreased for as
long as the turn signals are on.
If equipped, the DRL can be
activated/deactivated from the
Information and Entertainment System,
by selecting the following functions in
sequence on the main MENU:
1. “Settings.”
2. “Lights.”
3. “Daytime Lights.”
Note: The Daytime Running Lights
cannot be deactivated in Canadian
markets.
Rear Fog Lights
The rear fog light switch is located within
the headlight switch.
Push the
button, located in the center
of the headlight switch, to turn the rear
fog lights on/off. The rear fog lights turn on only when the
headlights or parking lights are also
turned on. The lights can be turned off by
pushing the
button again or by turning
the headlight switch to the O (off)
position.
When the engine is stopped with the rear
fog lights on, they will be off the next
time the engine is started.
Parking Lights
With the ignition in STOP mode, rotate
the headlight switch to theposition to
turn the parking lights on. All of the
parking lights will turn on for eight
minutes, and opening the door activates
an audible warning.
To leave only the lights on one side
(right/left) illuminated, you must move
the multifunction lever (located on the
left side of the steering wheel) to the side
that you want to remain on. With the
parking lights on, the
warning light on
the instrument panel will illuminate.
Note: Cycling the ignition to ON mode
turns off the parking lights, which were
only illuminated on one side.
39
Page 43 of 276
Automatic High Beam Headlights — If
Equipped
The Automatic High Beam Headlights
system provides increased forward
lighting at night by automating high beam
control through the use of a digital
camera mounted on the windshield. This
camera detects vehicle specific light and
automatically turns from high beams to
low beams until the approaching vehicle
is out of view.
This function is enabled with the
Information and Entertainment System,
and can only be activated with the light
switch turned to the
(auto) position.
If the high beam headlights are on, the
blue icon/warning light
will illuminate
in the instrument panel.
When the speed is higher than 37 mph
(60 km/h) and the function is active, the
lights will turn off if the multifunction
lever is pushed again.
When the speed is lower than 15 mph
(25 km/h) and the function is active, the
function turns the high beam headlights
off.
If the high beam headlights are operated
again (pushing the multifunction lever
towards the instrument panel), the
warning light/icon
will illuminate in the
instrument panel, and the main beam
headlights only will be on until the speed
exceeds 37 mph (60 km/h).
When the speed of 37 mph (60 km/h) is
exceeded again, the automatic
functioning is reactivated. If the multifunction lever is pushed again
with the Automatic High Beam
Headlights activated, the function
deactivates.
This feature can also be deactivated by
rotating the headlight switch to the
position.
Note: If the system recognizes heavy
traffic areas, the automatic functions
remain disabled independently of the
vehicle’s speed.
Turn Signals
To activate the turn signals, move the
multifunction lever, located on the left
side of the steering wheel, up or down
until it reaches the detent. Moving the
lever upward flashes the right turn signal
and moving the lever downward will flash
the left turn signal.
The
orturn signal will blink on the
instrument panel.
The turn signals turn off automatically
when the vehicle is brought back onto a
straight course.
“Lane Change” Function
Tap the lever up or down once, without
moving beyond the detent, and the turn
signal (right or left) will flash five times.
Then, the turn signal (right or left) will
automatically turn off.
To turn off the flashing before the end of
the cycle, move the lever in the opposite
direction until the first click (about half
way).
INTERIOR LIGHTS
Front Map Reading Lights
The front map/reading and overhead
lights are mounted in the overhead
console. Each light can be turned on by
pushing the corresponding switch on the
console. These switches are backlit for
night time visibility. To turn the lights off,
push the switch a second time.
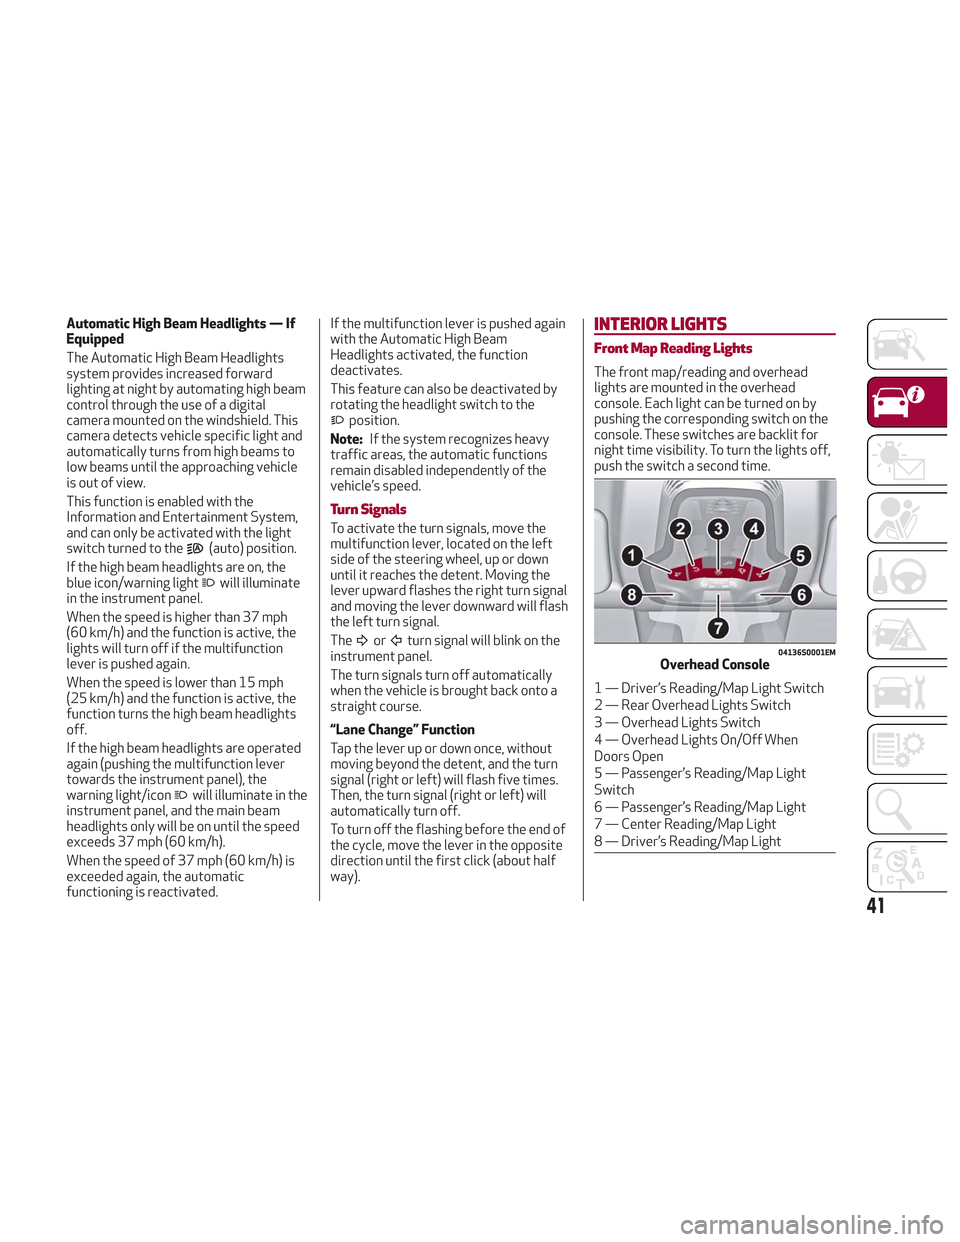
04136S0001EMOverhead Console
1 — Driver’s Reading/Map Light Switch
2 — Rear Overhead Lights Switch
3 — Overhead Lights Switch
4 — Overhead Lights On/Off When
Doors Open
5 — Passenger’s Reading/Map Light
Switch
6 — Passenger’s Reading/Map Light
7 — Center Reading/Map Light
8 — Driver’s Reading/Map Light
41
Page 48 of 276
The sensor has an adjustment range that
varies progressively from wiper still (no
stroke) when the windshield is dry, to
wiper at continuous speed (fast
operation) with intense rain.
Activation
Rotating the wiper switch to position
oractivates the rain sensor.
The activation of the rain sensor system
is done by tapping the wiper stalk
upwards while the switch is in the
orposition.
The variation in sensitivity during rain
sensor operation is also signaled by a
stroke of the wiper (command acquired
and implemented). This stroke is also
executed with the windshield dry.
If the windshield washer is used with the
rain sensor activated, the normal washing
cycle is performed, after which the rain
sensor resumes its normal automatic
operation.
Note: Keep the glass in the sensor area
clean.
Deactivation
Use the wiper switch or cycle the ignition
to STOP mode.
In the event of malfunction of the rain
sensor while it is active, the windshield
wiper operates intermittently at a speed
consistent with the sensitivity setting of
the rain sensor, whether or not there is
rain on the glass for as long as the sensor
failure is indicated on the display. The sensor continues to operate and it is
possible to set the windshield wiper to
continuous mode
or. The failure
indication remains on for as long as the
sensor is active.
The rain sensor is able to recognize and
automatically adjust itself in the
presence of the following conditions:
Presence of dirt on the controlled
surface (e.g. salt, dirt, etc.).
Presence of streaks of water caused
by the worn window wiper blades.
Difference between day and night.
Rear Window Wiper/Washer
Shifting the vehicle into REVERSE with
the windshield wiper operating, activates
a single cycle of the rear window wiper.
Activation of the rear window
wiper/washer can be done by moving the
stalk to one of the following positions:
Pushing the stalk towards the
instrument panel activates the rear
window washer (a brief push activates
one washing cycle, keeping the stalk
pushed washes continuously until the
stalk is released).
Pushing the stalk downward
activates/deactivates continuous rear
wiper operation.
HEADLAMP WASHERS
The windshield wiper stalk operates the
headlight washers when the ignition is in
the ON position and the headlights are
turned on. The windshield wiper stalk is
located on the right side of the steering
column. To use the headlight washers, pull
the stalk toward you and release it. The
headlight washers will spray a timed
high-pressure spray of washer fluid onto
each headlight lens. In addition, the
windshield washers will spray the
windshield and the windshield wipers will
cycle.
46
GETTING TO KNOW YOUR VEHICLE