center console ALFA ROMEO STELVIO 2021 Owners Manual
[x] Cancel search | Manufacturer: ALFA ROMEO, Model Year: 2021, Model line: STELVIO, Model: ALFA ROMEO STELVIO 2021Pages: 280, PDF Size: 10.02 MB
Page 11 of 280
9
Automatic High Beam Headlights —
If Equipped ............................................. 43 Parking Lights ....................................... 44
Headlight Off Delay ................................ 44
Rear Fog Lights ...................................... 44
Adaptive Headlight System (AFS) —
If Equipped ............................................. 44 Turn Signals ........................................ 44
Lane Change Assist ............................... 44
INTERIOR LIGHTS .....................................44
Front Map Reading Lights ..................... 45
Interior Ambient Lighting ...................... 45
Rear Overhead Light ............................. 46
Instrument Panel Dimmer Control ....... 46
WINDSHIELD WIPERS AND WASHERS....46
Windshield Wiper Operation ............... 46
Rain Sensing Wipers.............................. 47
Rear Window Wiper/Washer................. 48
Headlamp Washers — If Equipped ....... 48
CLIMATE CONTROLS ................................48
Automatic Dual-Zone Climate Control
System ................................................. 49
INTERIOR STORAGE AND EQUIPMENT....55
Glove Compartment............................... 55
Center Console ...................................... 56
Rear Armrest .......................................... 56
Power Outlets ...................................... 56
Cigar Lighter And Ash Tray —
If Equipped ............................................. 57 Wireless Charging Pad — If Equipped... 57
POWER WINDOWS ................................... 58
Power Window Controls ........................ 58
Auto-Up Feature With Anti-Pinch
Protection............................................... 59 Power Window System Initialization .... 59
Wind Buffeting ...................................... 59
POWER SUNROOF — IF EQUIPPED.......... 59
Power Sunroof ....................................... 59
Opening And Closing The Sunroof ........ 60
Venting Sunroof ..................................... 60
Sunshade Operation ............................. 60
Pinch Protect Feature ........................... 60
Re-Initialization Procedure.................... 60
Sunroof Maintenance ........................... 61
HOOD ........................................................ 61
Opening The Hood ................................. 61
Closing The Hood................................... 62
POWER LIFTGATE..................................... 62
Opening .................................................. 62
Closing.................................................... 63
Liftgate Initialization .............................. 64
Cargo Area Features ............................. 64
GETTING TO KNOW YOUR INSTRUMENT
PANEL
INSTRUMENT PANEL FEATURES............. 67
Instrument Cluster ............................... 67
Instrument Cluster Descriptions .......... 68
INSTRUMENT CLUSTER DISPLAY ............69
Instrument Cluster Display
Description .............................................69 Reconfigurable Instrument Cluster
Display ....................................................69 Reconfigurable Display Items ............... 69
Customer Programmable Settings........ 72
WARNING LIGHTS AND MESSAGES
ON THE INSTRUMENT PANEL ..................74
Red Warning Lights ................................74
Amber Warning Lights............................ 75
Green Indicator Lights ...........................78
Blue Indicator Lights ..............................78
Red Symbols...........................................78
Amber Symbols ......................................80
Green Symbols .......................................84
Blue Symbols .......................................... 84
ONBOARD DIAGNOSTIC SYSTEM ............84
Onboard Diagnostic System (OBD II)
Cybersecurity .......................................... 84
EMISSIONS INSPECTION AND
MAINTENANCE PROGRAM .......................85
21_GU_OM_EN_USC_t.book Page 9
Page 23 of 280
21
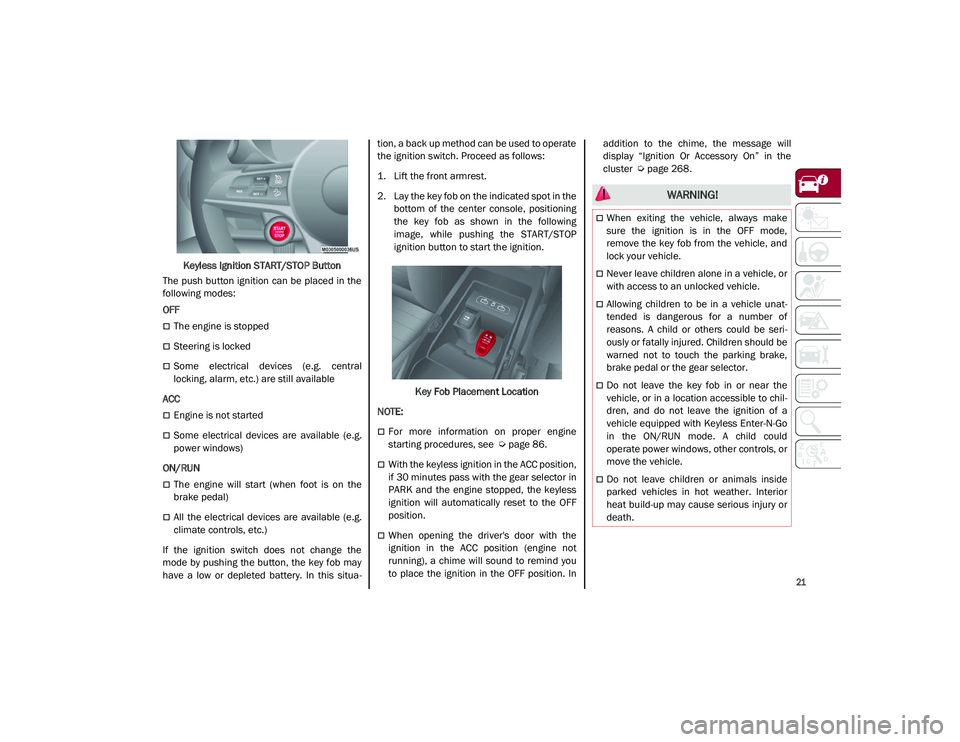
Keyless Ignition START/STOP Button
The push button ignition can be placed in the
following modes:
OFF
The engine is stopped
Steering is locked
Some electrical devices (e.g. central
locking, alarm, etc.) are still available
ACC
Engine is not started
Some electrical devices are available (e.g.
power windows)
ON/RUN
The engine will start (when foot is on the
brake pedal)
All the electrical devices are available (e.g.
climate controls, etc.)
If the ignition switch does not change the
mode by pushing the button, the key fob may
have a low or depleted battery. In this situa -tion, a back up method can be used to operate
the ignition switch. Proceed as follows:
1. Lift the front armrest.
2. Lay the key fob on the indicated spot in the
bottom of the center console, positioning
the key fob as shown in the following
image, while pushing the START/STOP
ignition button to start the ignition.
Key Fob Placement Location
NOTE:
For more information on proper engine
starting procedures, see
Ú
page 86.
With the keyless ignition in the ACC position,
if 30 minutes pass with the gear selector in
PARK and the engine stopped, the keyless
ignition will automatically reset to the OFF
position.
When opening the driver's door with the
ignition in the ACC position (engine not
running), a chime will sound to remind you
to place the ignition in the OFF position. In addition to the chime, the message will
display “Ignition Or Accessory On” in the
cluster
Ú
page 268.
WARNING!
When exiting the vehicle, always make
sure the ignition is in the OFF mode,
remove the key fob from the vehicle, and
lock your vehicle.
Never leave children alone in a vehicle, or
with access to an unlocked vehicle.
Allowing children to be in a vehicle unat -
tended is dangerous for a number of
reasons. A child or others could be seri -
ously or fatally injured. Children should be
warned not to touch the parking brake,
brake pedal or the gear selector.
Do not leave the key fob in or near the
vehicle, or in a location accessible to chil -
dren, and do not leave the ignition of a
vehicle equipped with Keyless Enter-N-Go
in the ON/RUN mode. A child could
operate power windows, other controls, or
move the vehicle.
Do not leave children or animals inside
parked vehicles in hot weather. Interior
heat build-up may cause serious injury or
death.
21_GU_OM_EN_USC_t.book Page 21
Page 37 of 280
35
NOTE:
After selecting a heating level, heat will be
felt within a few minutes.
The engine must be running for the heated
seats to operate.
The “minimum” setting is automatically
deactivated once a certain period of time
has elapsed.
Rear Heated Seats — If Equipped
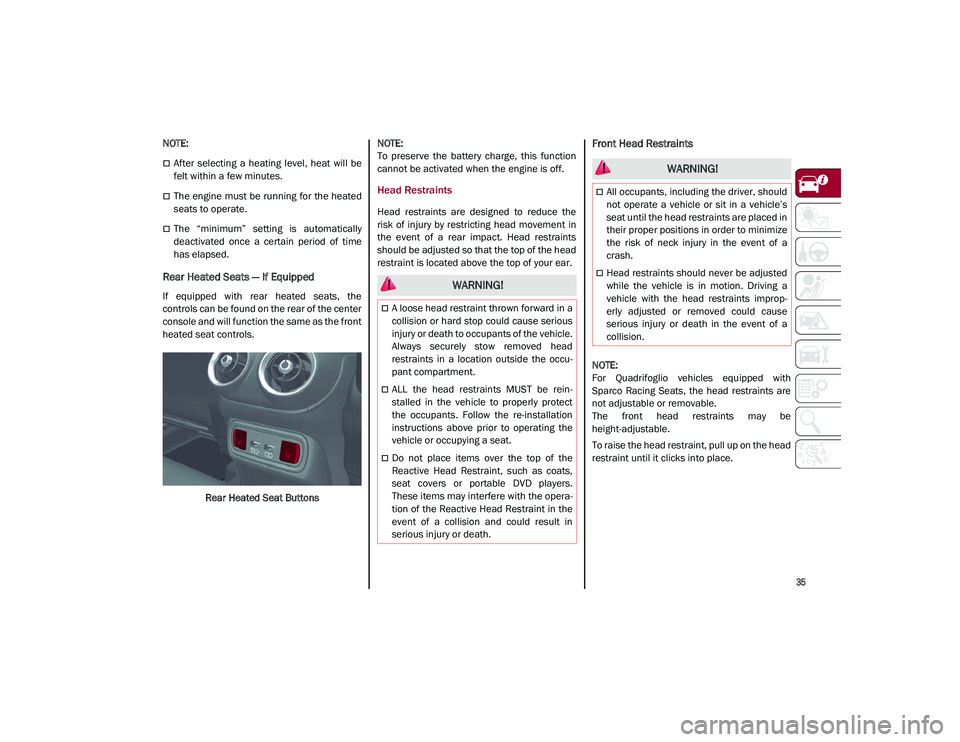
If equipped with rear heated seats, the
controls can be found on the rear of the center
console and will function the same as the front
heated seat controls.Rear Heated Seat Buttons
NOTE:
To preserve the battery charge, this function
cannot be activated when the engine is off.
Head Restraints
Head restraints are designed to reduce the
risk of injury by restricting head movement in
the event of a rear impact. Head restraints
should be adjusted so that the top of the head
restraint is located above the top of your ear.
Front Head Restraints
NOTE:
For Quadrifoglio vehicles equipped with
Sparco Racing Seats, the head restraints are
not adjustable or removable.
The front head restraints may be
height-adjustable.
To raise the head restraint, pull up on the head
restraint until it clicks into place.
WARNING!
A loose head restraint thrown forward in a
collision or hard stop could cause serious
injury or death to occupants of the vehicle.
Always securely stow removed head
restraints in a location outside the occu
-
pant compartment.
ALL the head restraints MUST be rein -
stalled in the vehicle to properly protect
the occupants. Follow the re-installation
instructions above prior to operating the
vehicle or occupying a seat.
Do not place items over the top of the
Reactive Head Restraint, such as coats,
seat covers or portable DVD players.
These items may interfere with the opera -
tion of the Reactive Head Restraint in the
event of a collision and could result in
serious injury or death.
WARNING!
All occupants, including the driver, should
not operate a vehicle or sit in a vehicle’s
seat until the head restraints are placed in
their proper positions in order to minimize
the risk of neck injury in the event of a
crash.
Head restraints should never be adjusted
while the vehicle is in motion. Driving a
vehicle with the head restraints improp -
erly adjusted or removed could cause
serious injury or death in the event of a
collision.
21_GU_OM_EN_USC_t.book Page 35
Page 41 of 280
39
If the door mirrors were folded using the power
mirror control knob, they can only be returned
to the driving position by moving the knob to
the power folding position again.
NOTE:
The power folding operation can be enabled
only when the vehicle speed is lower than
31 mph (50 km/h).
Outside Automatic Dimming Mirrors — If
Equipped
The outside mirrors will automatically dim for
glare from vehicles behind you. This feature is
controlled by the inside automatic dimming
mirror. The mirrors will automatically adjust for
headlight glare when the inside mirror adjusts.
Heated Mirrors
Push the rear defrost button, located within
the climate controls, to activate the heated
mirrors.
UNIVERSAL GARAGE DOOR
OPENER (HOMELINK®)
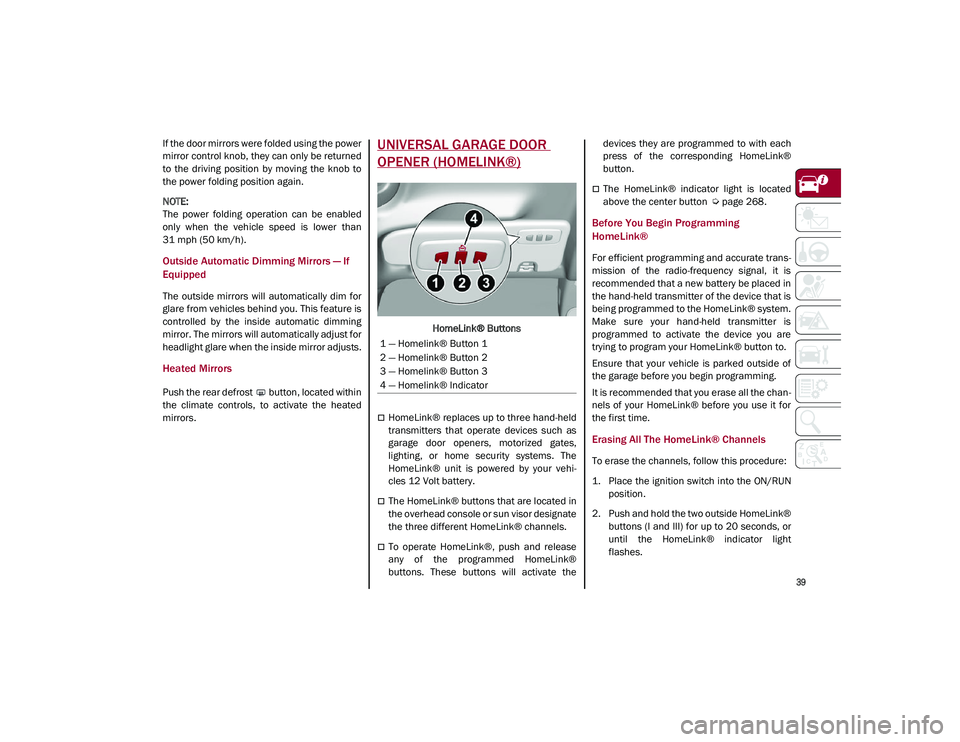
HomeLink® Buttons
HomeLink® replaces up to three hand-held
transmitters that operate devices such as
garage door openers, motorized gates,
lighting, or home security systems. The
HomeLink® unit is powered by your vehi-
cles 12 Volt battery.
The HomeLink® buttons that are located in
the overhead console or sun visor designate
the three different HomeLink® channels.
To operate HomeLink®, push and release
any of the programmed HomeLink®
buttons. These buttons will activate the devices they are programmed to with each
press of the corresponding HomeLink®
button.
The HomeLink® indicator light is located
above the center button
Ú
page 268.
Before You Begin Programming
HomeLink®
For efficient programming and accurate trans -
mission of the radio-frequency signal, it is
recommended that a new battery be placed in
the hand-held transmitter of the device that is
being programmed to the HomeLink® system.
Make sure your hand-held transmitter is
programmed to activate the device you are
trying to program your HomeLink® button to.
Ensure that your vehicle is parked outside of
the garage before you begin programming.
It is recommended that you erase all the chan -
nels of your HomeLink® before you use it for
the first time.
Erasing All The HomeLink® Channels
To erase the channels, follow this procedure:
1. Place the ignition switch into the ON/RUN position.
2. Push and hold the two outside HomeLink® buttons (I and III) for up to 20 seconds, or
until the HomeLink® indicator light
flashes.
1 — Homelink® Button 1
2 — Homelink® Button 2
3 — Homelink® Button 3
4 — Homelink® Indicator
21_GU_OM_EN_USC_t.book Page 39
Page 47 of 280
45
Front Map Reading Lights
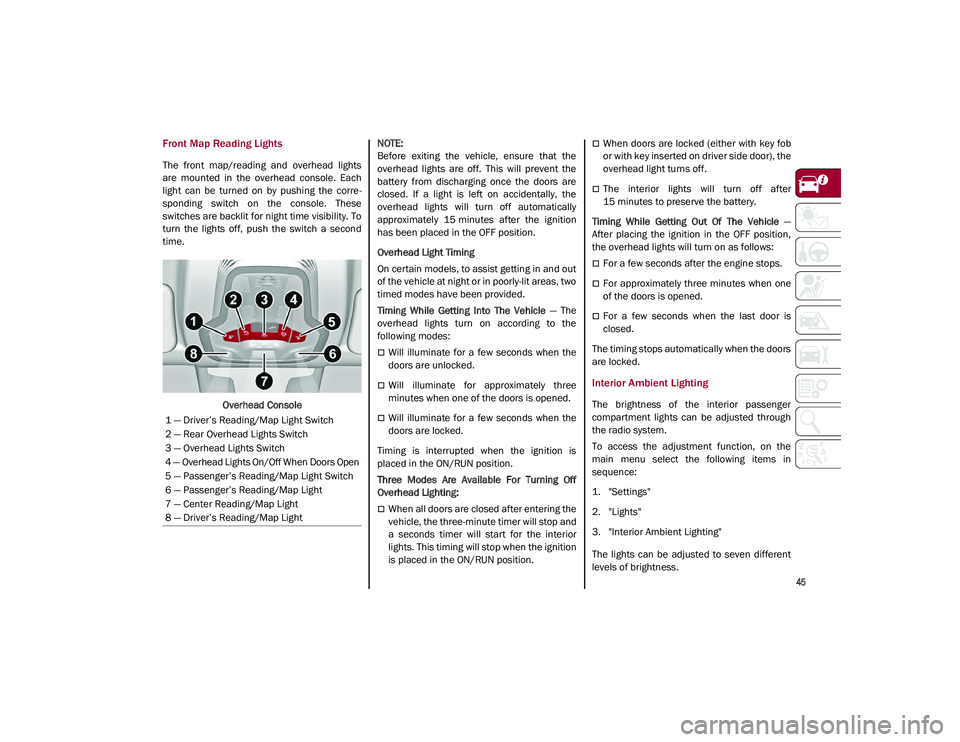
The front map/reading and overhead lights
are mounted in the overhead console. Each
light can be turned on by pushing the corre-
sponding switch on the console. These
switches are backlit for night time visibility. To
turn the lights off, push the switch a second
time.
Overhead Console
NOTE:
Before exiting the vehicle, ensure that the
overhead lights are off. This will prevent the
battery from discharging once the doors are
closed. If a light is left on accidentally, the
overhead lights will turn off automatically
approximately 15 minutes after the ignition
has been placed in the OFF position.
Overhead Light Timing
On certain models, to assist getting in and out
of the vehicle at night or in poorly-lit areas, two
timed modes have been provided.
Timing While Getting Into The Vehicle
— The
overhead lights turn on according to the
following modes:
Will illuminate for a few seconds when the
doors are unlocked.
Will illuminate for approximately three
minutes when one of the doors is opened.
Will illuminate for a few seconds when the
doors are locked.
Timing is interrupted when the ignition is
placed in the ON/RUN position.
Three Modes Are Available For Turning Off
Overhead Lighting:
When all doors are closed after entering the
vehicle, the three-minute timer will stop and
a seconds timer will start for the interior
lights. This timing will stop when the ignition
is placed in the ON/RUN position.
When doors are locked (either with key fob
or with key inserted on driver side door), the
overhead light turns off.
The interior lights will turn off after
15 minutes to preserve the battery.
Timing While Getting Out Of The Vehicle —
After placing the ignition in the OFF position,
the overhead lights will turn on as follows:
For a few seconds after the engine stops.
For approximately three minutes when one
of the doors is opened.
For a few seconds when the last door is
closed.
The timing stops automatically when the doors
are locked.
Interior Ambient Lighting
The brightness of the interior passenger
compartment lights can be adjusted through
the radio system.
To access the adjustment function, on the
main menu select the following items in
sequence:
1. "Settings"
2. "Lights"
3. "Interior Ambient Lighting"
The lights can be adjusted to seven different
levels of brightness.
1 — Driver’s Reading/Map Light Switch
2 — Rear Overhead Lights Switch
3 — Overhead Lights Switch
4 — Overhead Lights On/Off When Doors Open
5 — Passenger’s Reading/Map Light Switch
6 — Passenger’s Reading/Map Light
7 — Center Reading/Map Light
8 — Driver’s Reading/Map Light
21_GU_OM_EN_USC_t.book Page 45
Page 58 of 280
GETTING TO KNOW YOUR VEHICLE
56
Center Console
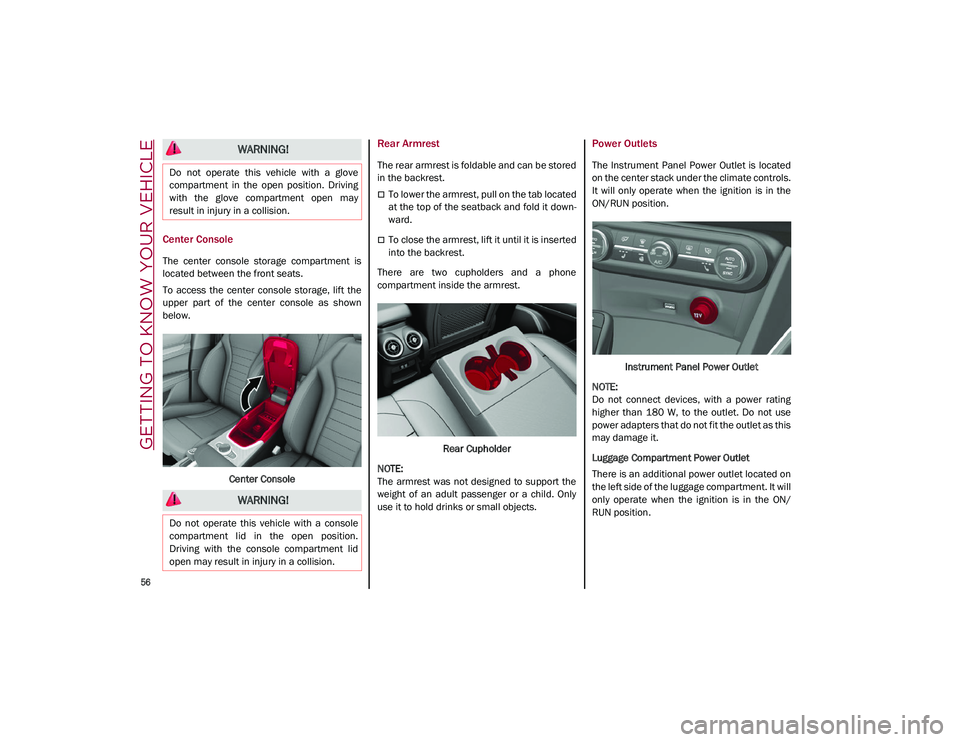
The center console storage compartment is
located between the front seats.
To access the center console storage, lift the
upper part of the center console as shown
below.Center Console
Rear Armrest
The rear armrest is foldable and can be stored
in the backrest.
To lower the armrest, pull on the tab located
at the top of the seatback and fold it down -
ward.
To close the armrest, lift it until it is inserted
into the backrest.
There are two cupholders and a phone
compartment inside the armrest.
Rear Cupholder
NOTE:
The armrest was not designed to support the
weight of an adult passenger or a child. Only
use it to hold drinks or small objects.
Power Outlets
The Instrument Panel Power Outlet is located
on the center stack under the climate controls.
It will only operate when the ignition is in the
ON/RUN position.
Instrument Panel Power Outlet
NOTE:
Do not connect devices, with a power rating
higher than 180 W, to the outlet. Do not use
power adapters that do not fit the outlet as this
may damage it.
Luggage Compartment Power Outlet
There is an additional power outlet located on
the left side of the luggage compartment. It will
only operate when the ignition is in the ON/
RUN position.
WARNING!
Do not operate this vehicle with a glove
compartment in the open position. Driving
with the glove compartment open may
result in injury in a collision.
WARNING!
Do not operate this vehicle with a console
compartment lid in the open position.
Driving with the console compartment lid
open may result in injury in a collision.
21_GU_OM_EN_USC_t.book Page 56
Page 59 of 280
57
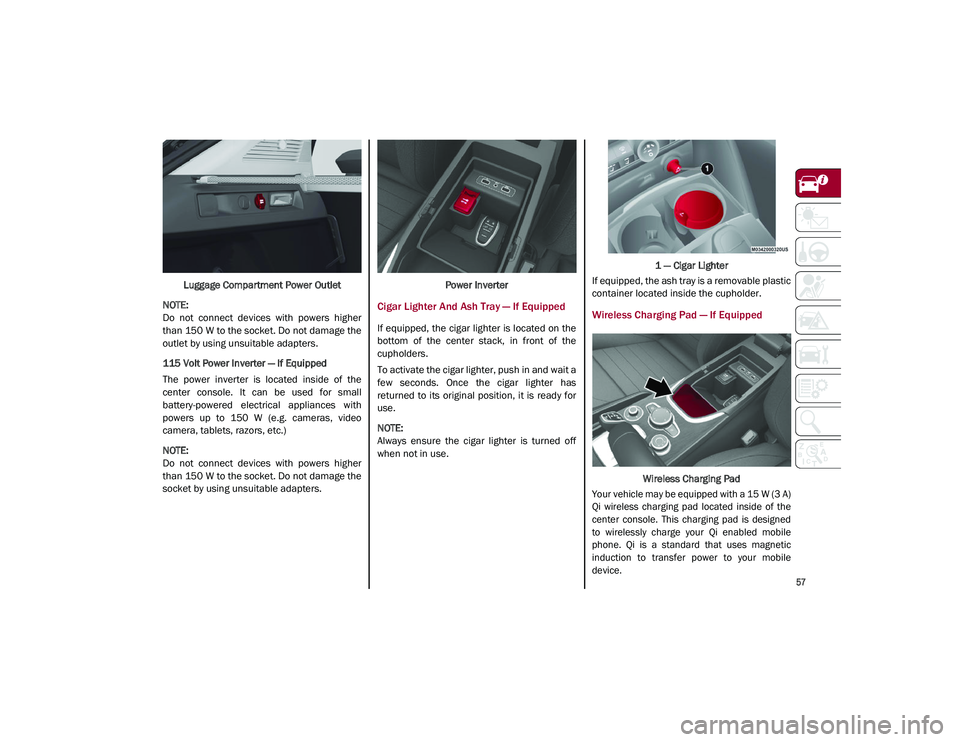
Luggage Compartment Power Outlet
NOTE:
Do not connect devices with powers higher
than 150 W to the socket. Do not damage the
outlet by using unsuitable adapters.
115 Volt Power Inverter — If Equipped
The power inverter is located inside of the
center console. It can be used for small
battery-powered electrical appliances with
powers up to 150 W (e.g. cameras, video
camera, tablets, razors, etc.)
NOTE:
Do not connect devices with powers higher
than 150 W to the socket. Do not damage the
socket by using unsuitable adapters. Power Inverter
Cigar Lighter And Ash Tray — If Equipped
If equipped, the cigar lighter is located on the
bottom of the center stack, in front of the
cupholders.
To activate the cigar lighter, push in and wait a
few seconds. Once the cigar lighter has
returned to its original position, it is ready for
use.
NOTE:
Always ensure the cigar lighter is turned off
when not in use.
1 — Cigar Lighter
If equipped, the ash tray is a removable plastic
container located inside the cupholder.
Wireless Charging Pad — If Equipped
Wireless Charging Pad
Your vehicle may be equipped with a 15 W (3 A)
Qi wireless charging pad located inside of the
center console. This charging pad is designed
to wirelessly charge your Qi enabled mobile
phone. Qi is a standard that uses magnetic
induction to transfer power to your mobile
device.
21_GU_OM_EN_USC_t.book Page 57
Page 92 of 280
STARTING AND OPERATING
90
For the first 1,500 miles (2,414 km):
Do not participate in track events, sport
driving schools, or similar activities during
the first 1,500 miles (2,414 km).
NOTE:
Monitor engine oil with every refueling and add
if necessary. Oil and fuel consumption may be
higher through the first oil change interval.
ELECTRIC PARK BRAKE (EPB)
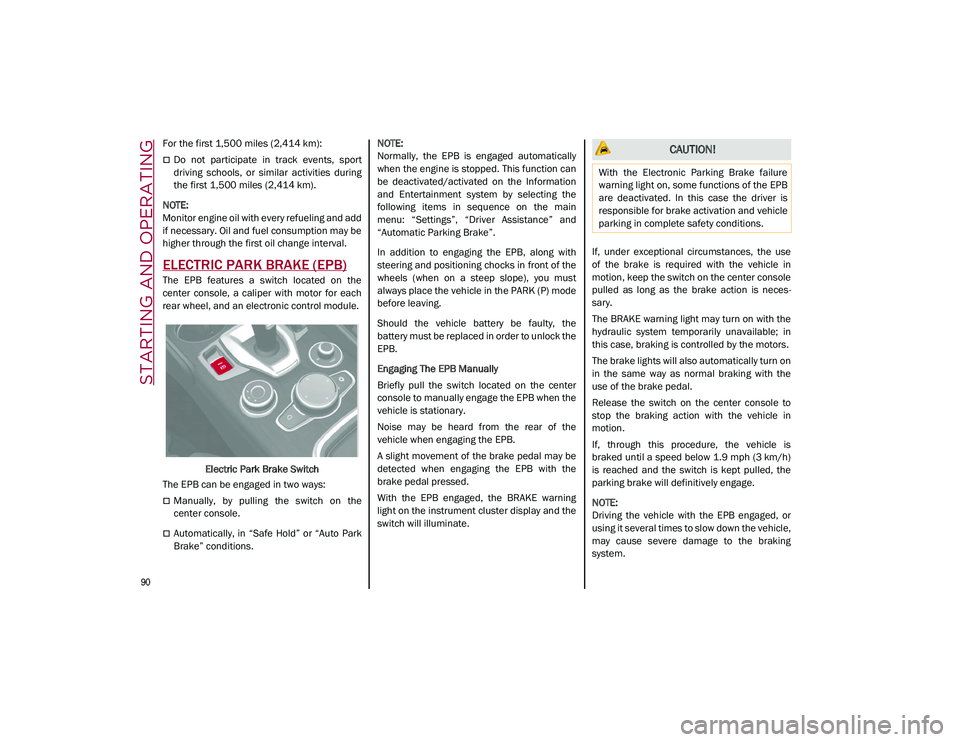
The EPB features a switch located on the
center console, a caliper with motor for each
rear wheel, and an electronic control module.
Electric Park Brake Switch
The EPB can be engaged in two ways:
Manually, by pulling the switch on the
center console.
Automatically, in “Safe Hold” or “Auto Park
Brake” conditions.
NOTE:
Normally, the EPB is engaged automatically
when the engine is stopped. This function can
be deactivated/activated on the Information
and Entertainment system by selecting the
following items in sequence on the main
menu: “Settings”, “Driver Assistance” and
“Automatic Parking Brake”.
In addition to engaging the EPB, along with
steering and positioning chocks in front of the
wheels (when on a steep slope), you must
always place the vehicle in the PARK (P) mode
before leaving.
Should the vehicle battery be faulty, the
battery must be replaced in order to unlock the
EPB.
Engaging The EPB Manually
Briefly pull the switch located on the center
console to manually engage the EPB when the
vehicle is stationary.
Noise may be heard from the rear of the
vehicle when engaging the EPB.
A slight movement of the brake pedal may be
detected when engaging the EPB with the
brake pedal pressed.
With the EPB engaged, the BRAKE warning
light on the instrument cluster display and the
switch will illuminate.
If, under exceptional circumstances, the use
of the brake is required with the vehicle in
motion, keep the switch on the center console
pulled as long as the brake action is neces
-
sary.
The BRAKE warning light may turn on with the
hydraulic system temporarily unavailable; in
this case, braking is controlled by the motors.
The brake lights will also automatically turn on
in the same way as normal braking with the
use of the brake pedal.
Release the switch on the center console to
stop the braking action with the vehicle in
motion.
If, through this procedure, the vehicle is
braked until a speed below 1.9 mph (3 km/h)
is reached and the switch is kept pulled, the
parking brake will definitively engage.
NOTE:
Driving the vehicle with the EPB engaged, or
using it several times to slow down the vehicle,
may cause severe damage to the braking
system.
CAUTION!
With the Electronic Parking Brake failure
warning light on, some functions of the EPB
are deactivated. In this case the driver is
responsible for brake activation and vehicle
parking in complete safety conditions.
21_GU_OM_EN_USC_t.book Page 90
Page 93 of 280
91
(Continued)
Disengaging The EPB Manually
In order to manually release the parking brake,
the ignition should be in the ACC mode. Press
the brake pedal, and then push the switch on
the center console briefly.
Noise may be heard from the rear of the
vehicle, and a slight movement of the brake
pedal may be detected during disengagement.
After disengaging the EPB, the BRAKE warning
light on the instrument cluster display and the
light on the switch will turn off.
If the BRAKE warning light on the instrument
cluster display remains on with the EPB disen-
gaged, this indicates a fault: in this case,
contact an authorized dealer.
NOTE:
Always engage the EPB when parking the
vehicle to prevent injury or damage caused
by the unexpected movement of the vehicle.
Never use gear position PARK (P) instead of
the EPB.
Electric Park Brake (EPB) Operating Modes
The EPB may operate as follows:
“Dynamic Operating Mode”: this mode is
activated by pulling the switch repeatedly
while driving.
“Static Engagement and Release Mode”:
with the vehicle stationary, the EPB can be
activated by pulling the switch on the center
console once. Push the switch and the
brake pedal at the same time to disengage
the brake.
“Drive Away Release” — if equipped: the
EPB will automatically disengage with the
driver side seat belt fastened and the detec
-
tion of an action performed by the driver to move the vehicle (DRIVE [D] or REVERSE
[R]). This feature can be turned on or off in
the Information and Entertainment System.
NOTE:
If the car is equipped with carbon-ceramic
brake discs, it is necessary to fasten the seat
belts or turn off the EPB before starting to
avoid damages to the ceramic brake discs.
“Safe Hold”: if the vehicle speed is lower
than 1.9 mph (3 km/h), the gear selector is
not in PARK (P) position and the driver's
intention of leaving the vehicle is detected,
the EPB will automatically engage to hold
the vehicle in safety conditions.
“Auto Park Brake”: if the vehicle speed is
below 1.9 mph (3 km/h), the EPB will auto -
matically engage when the gear selector is
in PARK (P) position. The light on the switch
located on the center console switches on
together with the BRAKE warning light on
the instrument cluster display when the
parking brake is engaged and applied to the
wheels. Each automatic parking brake
engagement can be canceled by pushing
the switch on the center console and at the
same time moving the gear selector for the
transmission to position PARK (P).
Safe Hold
Safe Hold is a safety function that automati -
cally engages the EPB in the event of a
dangerous condition for the vehicle.
WARNING!
Never leave children alone in a vehicle, or
with access to an unlocked vehicle.
Allowing children to be in a vehicle unat -
tended is dangerous for a number of
reasons. A child or others could be seri -
ously or fatally injured. Children should be
warned not to touch the parking brake,
brake pedal or the gear selector.
Do not leave the key fob in or near the
vehicle or in a location accessible to chil -
dren. A child could operate power
windows, other controls, or move the
vehicle.
Be sure the parking brake is fully disen -
gaged before driving; failure to do so can
lead to brake failure and a collision.
Always fully apply the parking brake when
leaving your vehicle, or it may roll and
cause damage or injury.
WARNING! (Continued)
21_GU_OM_EN_USC_t.book Page 91
Page 94 of 280
STARTING AND OPERATING
92
(Continued)
The EPB engages automatically to prevent
vehicle movement if:
The vehicle speed is below 2 mph (3 km/h).
A transmission operating mode different
from PARK (P) is activated.
The driver's seat belt is not fastened.
The driver side door is open.
No attempts to apply pressure on the brake
pedal have been detected.
The vehicle is parked on roads with a slope
of more than 4%.
The “Safe Hold” function can be temporarily
disabled by pushing the EPB switch located on
the center console and the brake pedal at the
same time, with the vehicle stationary and the
driver side door open.
Once disabled, the function will activate again
when the vehicle speed reaches 12 mph
(20 km/h) or the ignition is cycled to OFF and
then to ACC.
AUTOMATIC TRANSMISSION
The vehicle is equipped with an electronically
controlled 8-speed automatic transmission
where gear shifting automatically takes place,
depending on the vehicle usage instanta -
neous parameters (vehicle speed, grade, and
accelerator pedal position).
Manual gear shifting can still occur thanks to
the “Sequential” mode position for the gear
selector.
WARNING!
It is dangerous to shift out of PARK or
NEUTRAL if the engine speed is higher
than idle speed. If your foot is not firmly
pressing the brake pedal, the vehicle
could accelerate quickly forward or in
reverse. You could lose control of the
vehicle and hit someone or something.
Only shift into gear when the engine is
idling normally and your foot is firmly
pressing the brake pedal.
Unintended movement of a vehicle could
injure those in or near the vehicle. As with
all vehicles, you should never exit a
vehicle while the engine is running. Before
exiting a vehicle, always apply the parking
brake, shift the transmission into PARK,
and turn the ignition OFF. When the igni -
tion is in the OFF mode, the transmission
is locked in PARK, securing the vehicle
against unwanted movement.
When leaving the vehicle, always make
sure the ignition is in the OFF mode,
remove the key fob from the vehicle, and
lock the vehicle.
Never leave children alone in a vehicle, or
with access to an unlocked vehicle.
Allowing children to be in a vehicle unat -
tended is dangerous for a number of
reasons. A child or others could be seri -
ously or fatally injured. Children should be
warned not to touch the parking brake,
brake pedal or the transmission gear
selector.
Do not leave the key fob in or near the
vehicle (or in a location accessible to chil -
dren), and do not leave the ignition in the
ON/RUN or ACC mode. A child could
operate power windows, other controls, or
move the vehicle.
CAUTION!
Damage to the transmission may occur if
the following precautions are not observed:
Shift into or out of PARK or REVERSE only
after the vehicle has come to a complete
stop.
Do not shift between PARK, REVERSE,
NEUTRAL, or DRIVE when the engine is
above idle speed.
Before shifting into any gear, make sure
your foot is firmly pressing the brake
pedal.
WARNING! (Continued)
21_GU_OM_EN_USC_t.book Page 92