manual transmission ALFA ROMEO STELVIO 2022 Owners Manual
[x] Cancel search | Manufacturer: ALFA ROMEO, Model Year: 2022, Model line: STELVIO, Model: ALFA ROMEO STELVIO 2022Pages: 256, PDF Size: 10.17 MB
Page 3 of 256

1
Dear Customer,
We would like to congratulate and thank you for the purchase of your Alfa Romeo.
We have written this Owner’s Manual to help you get to know all of the features of your vehicle and use it in the best possible way. Please take the necessary
time to familiarize yourself with all the dynamic features of your vehicle.
Here you will find important information and warnings regarding the use of your vehicle, and how to achieve the best performance from the technical
features of your Alfa Romeo.
You are advised to read through the Owner’s Manual before taking it on the road for the first time. It is important to become familiar with the controls of
your vehicle, especially with sections concerning the brakes, handling, transmission, and vehicle behavior on different road surfaces.
This Owner’s Manual also provides a description of special features and tips, as well as essential information for the safe driving, care, and maintenance
of your Alfa Romeo over time.
It is supplemented by Warranty Information, and customer-oriented documents. Within this information, you will find a description of the services that Alfa
Romeo offers to its customers, the vehicle's warranty coverage, and the details of the terms and conditions for maintaining its validity.
We are sure that these will help you to get in touch with and appreciate both your new vehicle and the service provided by the people at Alfa Romeo.
For questions or comments pertaining to your vehicle, please contact:
Alfa Romeo Customer Care Center:
P.O. Box 21–8004 Auburn Hills, MI
48321–8004
Phone: 1-844-Alfa-USA
(1-844-253-2872)
Alfa Romeo Customer Care (Canada):
P.O. Box 1621
Windsor, Ontario N9A 4H6
Phone: 1-877-230-0563 (English)
Phone: 1-877-515-9112 (French)
22_GU_OM_EN_USC_t.book Page 1
Page 12 of 256
10
STARTING AND OPERATING
STARTING THE ENGINE ............................81
Starting Procedure................................. 81
Remote Starting System ....................... 81
Cold Weather Operation ........................ 82
Extended Park Starting.......................... 82
If Engine Fails To Start .......................... 82
After Starting — Warming Up The
Engine ..................................................... 83 Stopping The Engine.............................. 83
Turbocharger Cool Down ....................... 83
ENGINE BLOCK HEATER —
IF EQUIPPED ............................................83
ENGINE BREAK-IN
RECOMMENDATIONS ...............................84
Engine Break-In...................................... 84
ELECTRIC PARK BRAKE (EPB) .................84
Electric Park Brake (EPB) Operating
Modes ..................................................... 86 Safe Hold ................................................ 86
AUTOMATIC TRANSMISSION....................86
Display .................................................... 87
Gear Selector ......................................... 87
Transmission Operating Modes ............ 88
Automatic Transmission Limp Home
Mode....................................................... 90 Brake Transmission Shift Interlock
(BTSI) System ......................................... 90 Important Notes ..................................... 91
ALFA DNA SELECTOR ...............................92
Alfa DNA System .................................... 92
Driving Modes ........................................ 92
ALFA ACTIVE SUSPENSION (AAS) —
IF EQUIPPED............................................. 94
STOP/START SYSTEM.............................. 95
Operating Mode ..................................... 95
System Manual Activation/
Deactivation ........................................... 95 Possible Reasons The Engine Does
Not Autostop .......................................... 95 Engine Restarting Conditions ............... 96
Safety Functions .................................... 96
Energy Saving Function......................... 96
Irregular Operation ................................ 96
Vehicle Inactivity .................................... 96
SPEED LIMITER ........................................ 97
Description ............................................. 97
Activation ............................................... 97
Speed Limit Programming .................... 97
Exceeding The Programmed Speed ..... 97
Programmed Speed Icon Flashing ....... 97
Deactivation ........................................... 97
CRUISE CONTROL SYSTEMS —
IF EQUIPPED............................................. 98
Cruise Control ........................................ 98
Adaptive Cruise Control (ACC) ........... 100
HIGHWAY ASSIST SYSTEM (HAS) —
IF EQUIPPED........................................... 106
To Activate/Deactivate........................ 106
Operation ............................................. 107
Indications On The Display ................. 107
System Status...................................... 108
Limited System Availability/
Operation ............................................. 109
TRAFFIC JAM ASSIST (TJA) SYSTEM —
IF EQUIPPED .......................................... 109
To Activate/Deactivate ....................... 109
Operation ............................................. 110
Indications On The Display ................. 110
System Status ..................................... 111
Limited System Availability/
Operation ............................................. 111
TRAFFIC SIGN RECOGNITION (TSR)
SYSTEM — IF EQUIPPED........................ 112
To Activate/Deactivate ....................... 112
Indications On The Display ................. 113
INTELLIGENT SPEED CONTROL (ISC)
SYSTEM — IF EQUIPPED........................ 113
To Activate/Deactivate ....................... 114
Indications On The Display ................. 114
Acceptance/Rejection Of The
Suggested Speed ................................ 114
PARKSENSE FRONT/REAR PARK
ASSIST SYSTEM — IF EQUIPPED .......... 115
ParkSense Sensors............................. 115
ParkSense Display .............................. 115
Enabling And Disabling ParkSense .... 116
ParkSense Warning Display ............... 116
Operation With A Trailer...................... 117
ParkSense System Usage
Precautions ......................................... 117
LANE DEPARTURE WARNING (LDW)
SYSTEM ................................................. 117
Lane Departure Warning Operation... 117
Turning Lane Departure Warning On
Or Off .................................................... 118 Lane Departure Warning Message .... 118
Changing Lane Departure Warning
Status................................................... 119
22_GU_OM_EN_USC_t.book Page 10
Page 14 of 256
12
JUMP STARTING ................................... 184
Remote Battery Connection Posts......184
Jump Starting Procedure.....................186
Bump Starting ..................................... 187
ENGINE OVERHEATING ......................... 187 MANUAL PARK RELEASE ...................... 188TOWING A DISABLED VEHICLE ............ 188
Four-Wheel Drive (AWD) Models .........189
TOW EYES ............................................. 189ENHANCED ACCIDENT RESPONSE
SYSTEM (EARS) .................................... 190EVENT DATA RECORDER (EDR) ............ 190
SERVICING AND MAINTENANCE
SCHEDULED SERVICING ....................... 191
Periodic Checks ...................................191
Heavy Usage Of The Vehicle ...............191
Maintenance Plan — 2.0L Engine .......192
Maintenance Plan — 2.9L Engine .......194
ENGINE COMPARTMENT....................... 196
Checking Levels — 2.0L Engine .......... 196
Checking Levels — 2.9L Engine .......... 197
Engine Oil ............................................. 197
Engine Coolant Fluid............................198
Washer Fluid For Windshield/
Headlights ............................................ 198 Brake Fluid ...........................................199
Automatic Transmission Activation
System Oil ............................................ 199 Useful Advice For Extending The
Life Of Your Battery .............................. 199 Battery ..................................................199
Pressure Washing ................................ 200
BATTERY RECHARGING ......................... 200
Important Notes .................................. 200
VEHICLE MAINTENANCE ........................ 201
Engine Oil ............................................. 201
Engine Oil Filter ................................... 201
Engine Air Cleaner Filter ..................... 201
Air Conditioning System
Maintenance........................................ 201 Lubricating Moving Parts Of The
Bodywork ............................................. 202 Windshield Wiper................................. 202
Exhaust System ................................... 204
Cooling System .................................... 204
Braking System.................................... 205
Automatic Transmission ..................... 206
Replacing The Battery ......................... 206
Fuses .................................................... 206
Bulb Replacement ............................... 212
TIRES ..................................................... 216
Tire Safety Information ....................... 216
Tires — General Information ............... 222
Spare Tires — If Equipped ................... 226
Wheel And Wheel Trim Care ............... 227
Tire Types ............................................. 227
Tire Chains and Traction Devices ....... 228
Tire Rotation Recommendations........ 229
DEPARTMENT OF TRANSPORTATION
UNIFORM TIRE QUALITY GRADES ........ 229
Treadwear ............................................ 229
Traction Grades ................................... 229
Temperature Grades ........................... 230
STORING THE VEHICLE ......................... 230
BODYWORK ........................................... 231
Protection Against Atmospheric
Agents .................................................. 231 Corrosion Warranty ............................. 231
Preserving The Bodywork .................. 231
INTERIORS ............................................. 232
Seats And Fabric Parts ....................... 232
Leather Seats ...................................... 232
Plastic And Coated Parts .................... 232
Alcantara Parts — If Equipped ............ 232
Genuine Leather Parts........................ 232
Carbon Fiber Parts .............................. 232
TECHNICAL SPECIFICATIONS
VEHICLE IDENTIFICATION NUMBER
(VIN) ....................................................... 233
Vehicle Identification Number (VIN)
Plate ..................................................... 233
ENGINE .................................................. 233
POWER SUPPLY ..................................... 234 TRANSMISSION ..................................... 235BRAKES.................................................. 235
SUSPENSION ......................................... 235
STEERING .............................................. 235
DIMENSIONS ......................................... 236
Luggage Compartment Volume ......... 238
WEIGHTS ................................................ 238
22_GU_OM_EN_USC_t.book Page 12
Page 27 of 256
25
(Continued)
When the function is disabled, the light on the
Volumetric/Anti-Lift Protection button flashes for
several seconds.
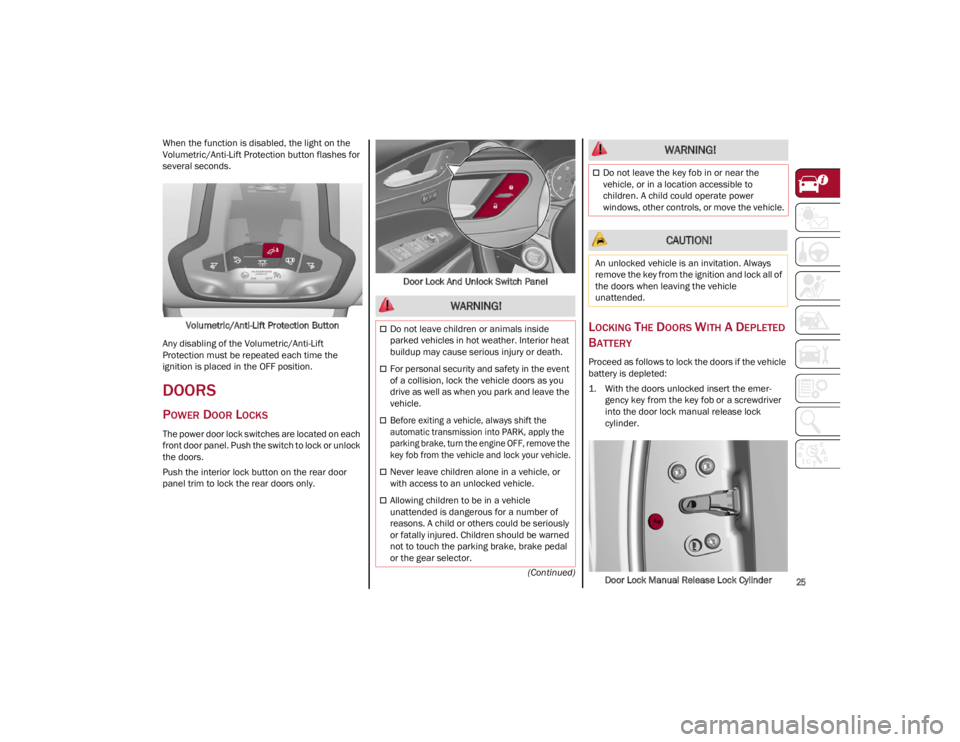
Volumetric/Anti-Lift Protection Button
Any disabling of the Volumetric/Anti-Lift
Protection must be repeated each time the
ignition is placed in the OFF position.
DOORS
POWER DOOR LOCKS
The power door lock switches are located on each
front door panel. Push the switch to lock or unlock
the doors.
Push the interior lock button on the rear door
panel trim to lock the rear doors only. Door Lock And Unlock Switch Panel
LOCKING THE DOORS WITH A DEPLETED
B
ATTERY
Proceed as follows to lock the doors if the vehicle
battery is depleted:
1. With the doors unlocked insert the emer -
gency key from the key fob or a screwdriver
into the door lock manual release lock
cylinder.
Door Lock Manual Release Lock Cylinder
WARNING!
Do not leave children or animals inside
parked vehicles in hot weather. Interior heat
buildup may cause serious injury or death.
For personal security and safety in the event
of a collision, lock the vehicle doors as you
drive as well as when you park and leave the
vehicle.
Before exiting a vehicle, always shift the
automatic transmission into PARK, apply the
parking brake, turn the engine OFF, remove the
key fob from the vehicle and lock your vehicle.
Never leave children alone in a vehicle, or
with access to an unlocked vehicle.
Allowing children to be in a vehicle
unattended is dangerous for a number of
reasons. A child or others could be seriously
or fatally injured. Children should be warned
not to touch the parking brake, brake pedal
or the gear selector.
Do not leave the key fob in or near the
vehicle, or in a location accessible to
children. A child could operate power
windows, other controls, or move the vehicle.
CAUTION!
An unlocked vehicle is an invitation. Always
remove the key from the ignition and lock all of
the doors when leaving the vehicle
unattended.
WARNING!
22_GU_OM_EN_USC_t.book Page 25
Page 88 of 256
STARTING AND OPERATING
86
(Continued)
ELECTRIC PARK BRAKE (EPB)
O
PERATING MODES
The EPB may operate as follows:
“Dynamic Operating Mode”: this mode is
activated by pulling the switch repeatedly
while driving.
“Static Engagement and Release Mode”: with
the vehicle stationary, the EPB can be
activated by pulling the switch on the center
console once. Push the switch and the brake
pedal at the same time to disengage the
brake.
“Drive Away Release” — if equipped: the EPB
will automatically disengage with the driver
side seat belt fastened and the detection of an
action performed by the driver to move the
vehicle (DRIVE [D] or REVERSE [R]). This
feature can be turned on or off in the
Information and Entertainment System.
NOTE:
If the car is equipped with carbon ceramic brake
discs, it is necessary to fasten the seat belts or
turn off the EPB before starting to avoid damages
to the ceramic brake discs.
“Safe Hold”: if the vehicle speed is lower than
1.9 mph (2.0 km/h), the gear selector is not in
PARK (P) position and the driver's intention of
leaving the vehicle is detected, the EPB will
automatically engage to hold the vehicle in
safety conditions.
“Auto Park Brake”: if the vehicle speed is
below 1.9 mph (2.0 km/h), the EPB will
automatically engage when the gear selector
is in PARK (P) position. The light on the switch
located on the center console switches on together with the Brake Warning Light on the
instrument cluster display when the parking
brake is engaged and applied to the wheels.
Each automatic parking brake engagement
can be canceled by pushing the switch on the
center console and at the same time moving
the gear selector for the transmission to
position PARK (P).
SAFE HOLD
Safe Hold is a safety function that automatically
engages the EPB in the event of a dangerous
condition for the vehicle.
The EPB engages automatically to prevent
vehicle movement if:
The vehicle speed is below 1.9 mph
(2.0 km/h).
A transmission operating mode different from
PARK (P) is activated.
The driver's seat belt is not fastened.
The driver side door is open.
No attempts to apply pressure on the brake
pedal have been detected.
The vehicle is parked on roads with a slope of
more than 4%.
The “Safe Hold” function can be temporarily
disabled by pushing the EPB switch located on
the center console and the brake pedal at the
same time, with the vehicle stationary and the
driver side door open.
Once disabled, the function will activate again
when the vehicle speed reaches 12 mph (20 km/h)
or the ignition is cycled to OFF and then to ACC.
AUTOMATIC
TRANSMISSION
The vehicle is equipped with an electronically
controlled 8-speed automatic transmission
where gear shifting automatically takes place,
depending on the vehicle usage instantaneous
parameters (vehicle speed, grade, and
accelerator pedal position).
Manual gear shifting can still occur thanks to the
“Sequential” mode position for the gear selector.
WARNING!
It is dangerous to shift out of PARK or
NEUTRAL if the engine speed is higher than
idle speed. If your foot is not firmly pressing
the brake pedal, the vehicle could accelerate
quickly forward or in reverse. You could lose
control of the vehicle and hit someone or
something. Only shift into gear when the
engine is idling normally and your foot is
firmly pressing the brake pedal.
Unintended movement of a vehicle could
injure those in or near the vehicle. As with all
vehicles, you should never exit a vehicle
while the engine is running. Before exiting a
vehicle, always apply the parking brake, shift
the transmission into PARK, and turn the
ignition OFF. When the ignition is in the OFF
position, the transmission is locked in PARK,
securing the vehicle against unwanted
movement.
22_GU_OM_EN_USC_t.book Page 86
Page 89 of 256
87
DISPLAY
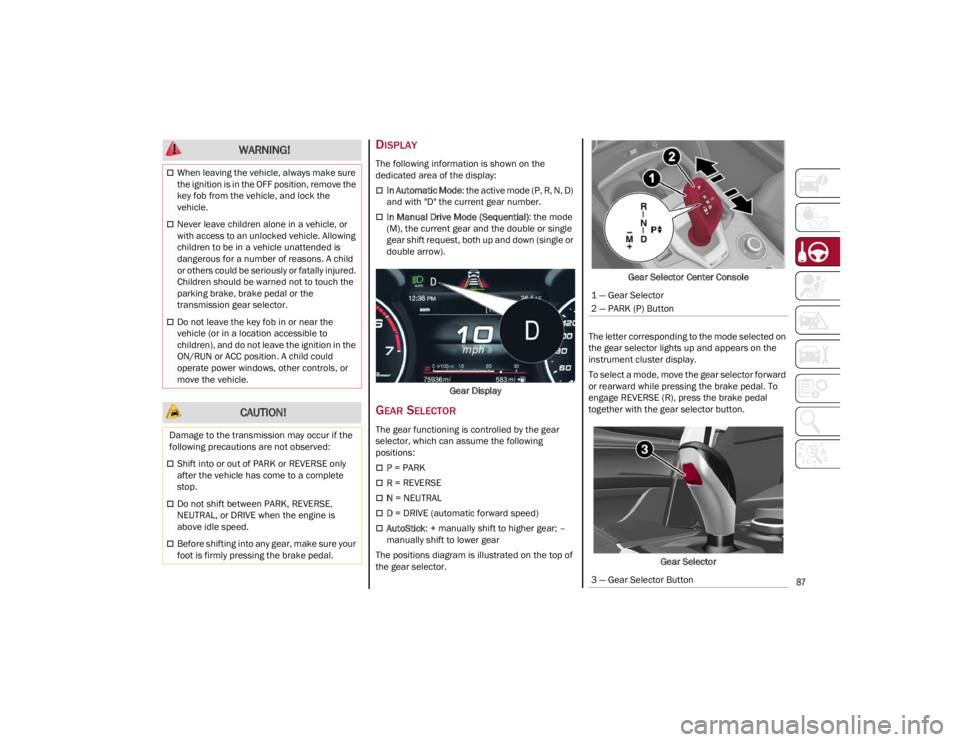
The following information is shown on the
dedicated area of the display:
In Automatic Mode: the active mode (P, R, N, D)
and with "D" the current gear number.
In Manual Drive Mode (Sequential) : the mode
(M), the current gear and the double or single
gear shift request, both up and down (single or
double arrow).
Gear Display
GEAR SELECTOR
The gear functioning is controlled by the gear
selector, which can assume the following
positions:
P = PARK
R = REVERSE
N = NEUTRAL
D = DRIVE (automatic forward speed)
AutoStick : + manually shift to higher gear; –
manually shift to lower gear
The positions diagram is illustrated on the top of
the gear selector. Gear Selector Center Console
The letter corresponding to the mode selected on
the gear selector lights up and appears on the
instrument cluster display.
To select a mode, move the gear selector forward
or rearward while pressing the brake pedal. To
engage REVERSE (R), press the brake pedal
together with the gear selector button.
Gear Selector
When leaving the vehicle, always make sure
the ignition is in the OFF position, remove the
key fob from the vehicle, and lock the
vehicle.
Never leave children alone in a vehicle, or
with access to an unlocked vehicle. Allowing
children to be in a vehicle unattended is
dangerous for a number of reasons. A child
or others could be seriously or fatally injured.
Children should be warned not to touch the
parking brake, brake pedal or the
transmission gear selector.
Do not leave the key fob in or near the
vehicle (or in a location accessible to
children), and do not leave the ignition in the
ON/RUN or ACC position. A child could
operate power windows, other controls, or
move the vehicle.
CAUTION!
Damage to the transmission may occur if the
following precautions are not observed:
Shift into or out of PARK or REVERSE only
after the vehicle has come to a complete
stop.
Do not shift between PARK, REVERSE,
NEUTRAL, or DRIVE when the engine is
above idle speed.
Before shifting into any gear, make sure your
foot is firmly pressing the brake pedal.
WARNING!
1 — Gear Selector
2 — PARK (P) Button
3 — Gear Selector Button
22_GU_OM_EN_USC_t.book Page 87
Page 91 of 256
89
REVERSE (R)
Select this mode only with the vehicle at a
standstill.
NEUTRAL (N)
Use this range when the vehicle is standing for
prolonged periods with the engine running. The
engine may be started in this range. Apply the
EPB and shift the transmission into PARK (P) if
you must leave the vehicle.DRIVE (D)
Use this mode in normal driving conditions.
Shifting from DRIVE (D) to PARK (P) or REVERSE
(R) modes must take place only after releasing
the accelerator pedal, with vehicle at a standstill
and brake pedal pressed.
This mode ensures automatic engagement of the
most suitable gears for driving needs and
maximum fuel economy in terms of consumption.
In this position, the transmission shifts the gears
automatically, selecting the most suitable for
forward driving among those available as you go.
In this way the vehicle's optimal driving character
-
istics are provided for all conditions.
AutoStick
In the case of frequent shifting (e.g. for sport
driving, when the vehicle is driven with a heavy
load, on slopes, when towing heavy trailers), it is
recommended to use the AutoStick (sequential
shifting) mode to select and keep a lower fixed
ratio.
In these conditions, the use of a lower gear
improves vehicle performance and prevents
overheating.
It is possible to shift from DRIVE (D) mode to
AutoStick mode regardless of vehicle speed. Activation
Starting from DRIVE (D) mode, to activate the
sequential drive mode, move the gear selector to
the left (– and + indication of the trim). The gear
engaged will be shown on the display.
Shifting is made by moving the gear selector
forward, toward symbol – or backward, toward
symbol +.
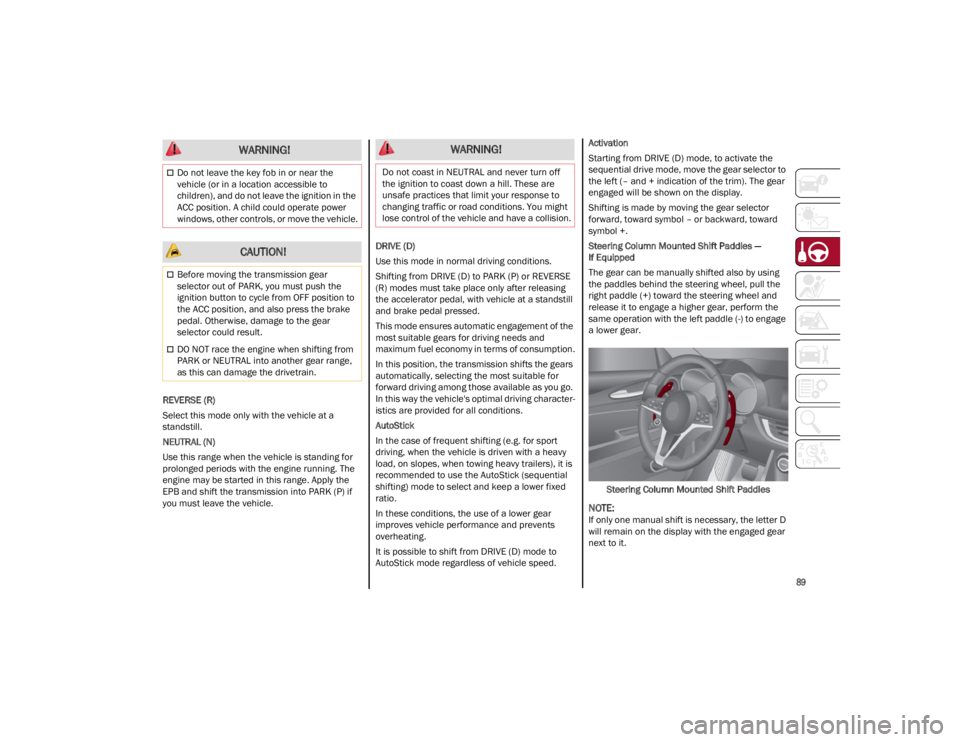
Steering Column Mounted Shift Paddles —
If Equipped
The gear can be manually shifted also by using
the paddles behind the steering wheel, pull the
right paddle (+) toward the steering wheel and
release it to engage a higher gear, perform the
same operation with the left paddle (-) to engage
a lower gear.
Steering Column Mounted Shift Paddles
NOTE:
If only one manual shift is necessary, the letter D
will remain on the display with the engaged gear
next to it.
Do not leave the key fob in or near the
vehicle (or in a location accessible to
children), and do not leave the ignition in the
ACC position. A child could operate power
windows, other controls, or move the vehicle.
CAUTION!
Before moving the transmission gear
selector out of PARK, you must push the
ignition button to cycle from OFF position to
the ACC position, and also press the brake
pedal. Otherwise, damage to the gear
selector could result.
DO NOT race the engine when shifting from
PARK or NEUTRAL into another gear range,
as this can damage the drivetrain.
WARNING! WARNING!
Do not coast in NEUTRAL and never turn off
the ignition to coast down a hill. These are
unsafe practices that limit your response to
changing traffic or road conditions. You might
lose control of the vehicle and have a collision.
22_GU_OM_EN_USC_t.book Page 89
Page 97 of 256
95
STOP/START SYSTEM
The Stop/Start system automatically shuts off the
engine during a vehicle stop if the required
conditions are met. Releasing the brake pedal or
accelerator pedal will automatically restart the
engine.
The function was developed to increase vehicle
efficiency by reducing fuel consumption, gas
emissions, and sound pollution.
NOTE:
When the Stop/Start system stops the engine,
the power steering is also disabled.
OPERATING MODE
Stopping The Engine
With the vehicle at a standstill and brake pedal
pressed, the engine switches off if the gear
selector is in a position other than REVERSE (R).
The system does not operate when the gear
selector is in REVERSE (R), in order to make
parking maneuvers easier.
In the event of stops uphill, engine switching off is
disabled to make the “Hill Start Assist” function
available (works only with running engine).
NOTE:
The engine can only be automatically stopped
after having run at about 6 mph (10 km/h). After
an automatic restart, the vehicle only needs to
exceed a speed of 0.3 mph (0.5 km/h) to stop the
engine.
Engine stopping is signaled by the symbol
lighting up on the instrument cluster display. Restarting The Engine
To restart the engine, release the brake pedal or,
turn the steering wheel slightly (if equipped).
With the brake pressed and the transmission in
automatic mode DRIVE (D), the engine will restart
by shifting to REVERSE (R), to PARK (P) or to
“AutoStick”
Ú
page 88.
With brake pressed if the gear selector is in
“AutoStick” mode, the engine will restart by
shifting to PARK (P) or by moving the selector
to + or -
Ú
page 88.
SYSTEM MANUAL ACTIVATION/
D
EACTIVATION
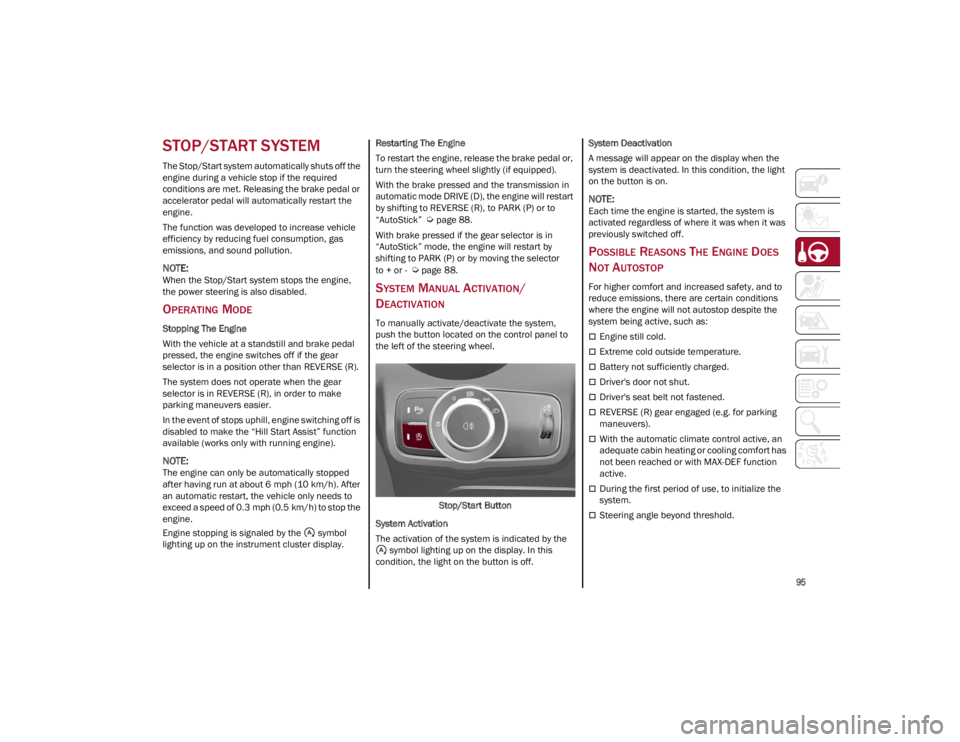
To manually activate/deactivate the system,
push the button located on the control panel to
the left of the steering wheel.
Stop/Start Button
System Activation
The activation of the system is indicated by the symbol lighting up on the display. In this
condition, the light on the button is off. System Deactivation
A message will appear on the display when the
system is deactivated. In this condition, the light
on the button is on.
NOTE:
Each time the engine is started, the system is
activated regardless of where it was when it was
previously switched off.
POSSIBLE REASONS THE ENGINE DOES
N
OT AUTOSTOP
For higher comfort and increased safety, and to
reduce emissions, there are certain conditions
where the engine will not autostop despite the
system being active, such as:
Engine still cold.
Extreme cold outside temperature.
Battery not sufficiently charged.
Driver's door not shut.
Driver's seat belt not fastened.
REVERSE (R) gear engaged (e.g. for parking
maneuvers).
With the automatic climate control active, an
adequate cabin heating or cooling comfort has
not been reached or with MAX-DEF function
active.
During the first period of use, to initialize the
system.
Steering angle beyond threshold.
22_GU_OM_EN_USC_t.book Page 95
Page 101 of 256
99
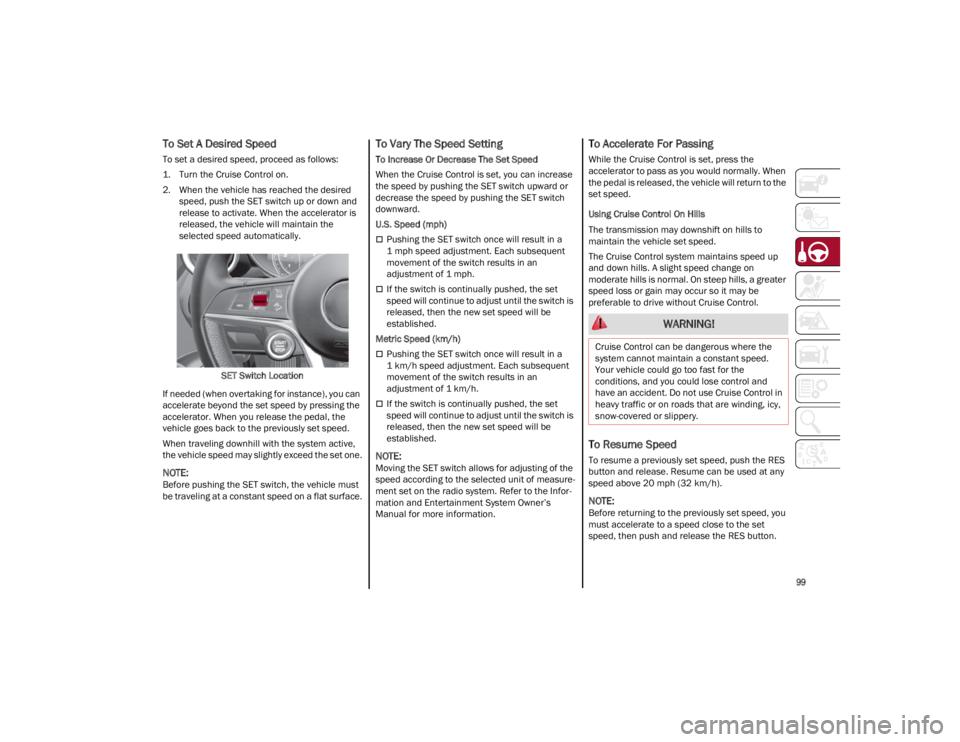
To Set A Desired Speed
To set a desired speed, proceed as follows:
1. Turn the Cruise Control on.
2. When the vehicle has reached the desiredspeed, push the SET switch up or down and
release to activate. When the accelerator is
released, the vehicle will maintain the
selected speed automatically.
SET Switch Location
If needed (when overtaking for instance), you can
accelerate beyond the set speed by pressing the
accelerator. When you release the pedal, the
vehicle goes back to the previously set speed.
When traveling downhill with the system active,
the vehicle speed may slightly exceed the set one.
NOTE:
Before pushing the SET switch, the vehicle must
be traveling at a constant speed on a flat surface.
To Vary The Speed Setting
To Increase Or Decrease The Set Speed
When the Cruise Control is set, you can increase
the speed by pushing the SET switch upward or
decrease the speed by pushing the SET switch
downward.
U.S. Speed (mph)
Pushing the SET switch once will result in a
1 mph speed adjustment. Each subsequent
movement of the switch results in an
adjustment of 1 mph.
If the switch is continually pushed, the set
speed will continue to adjust until the switch is
released, then the new set speed will be
established.
Metric Speed (km/h)
Pushing the SET switch once will result in a
1 km/h speed adjustment. Each subsequent
movement of the switch results in an
adjustment of 1 km/h.
If the switch is continually pushed, the set
speed will continue to adjust until the switch is
released, then the new set speed will be
established.
NOTE:
Moving the SET switch allows for adjusting of the
speed according to the selected unit of measure -
ment set on the radio system. Refer to the Infor -
mation and Entertainment System Owner’s
Manual for more information.
To Accelerate For Passing
While the Cruise Control is set, press the
accelerator to pass as you would normally. When
the pedal is released, the vehicle will return to the
set speed.
Using Cruise Control On Hills
The transmission may downshift on hills to
maintain the vehicle set speed.
The Cruise Control system maintains speed up
and down hills. A slight speed change on
moderate hills is normal. On steep hills, a greater
speed loss or gain may occur so it may be
preferable to drive without Cruise Control.
To Resume Speed
To resume a previously set speed, push the RES
button and release. Resume can be used at any
speed above 20 mph (32 km/h).
NOTE:
Before returning to the previously set speed, you
must accelerate to a speed close to the set
speed, then push and release the RES button.
WARNING!
Cruise Control can be dangerous where the
system cannot maintain a constant speed.
Your vehicle could go too fast for the
conditions, and you could lose control and
have an accident. Do not use Cruise Control in
heavy traffic or on roads that are winding, icy,
snow-covered or slippery.
22_GU_OM_EN_USC_t.book Page 99
Page 133 of 256
131
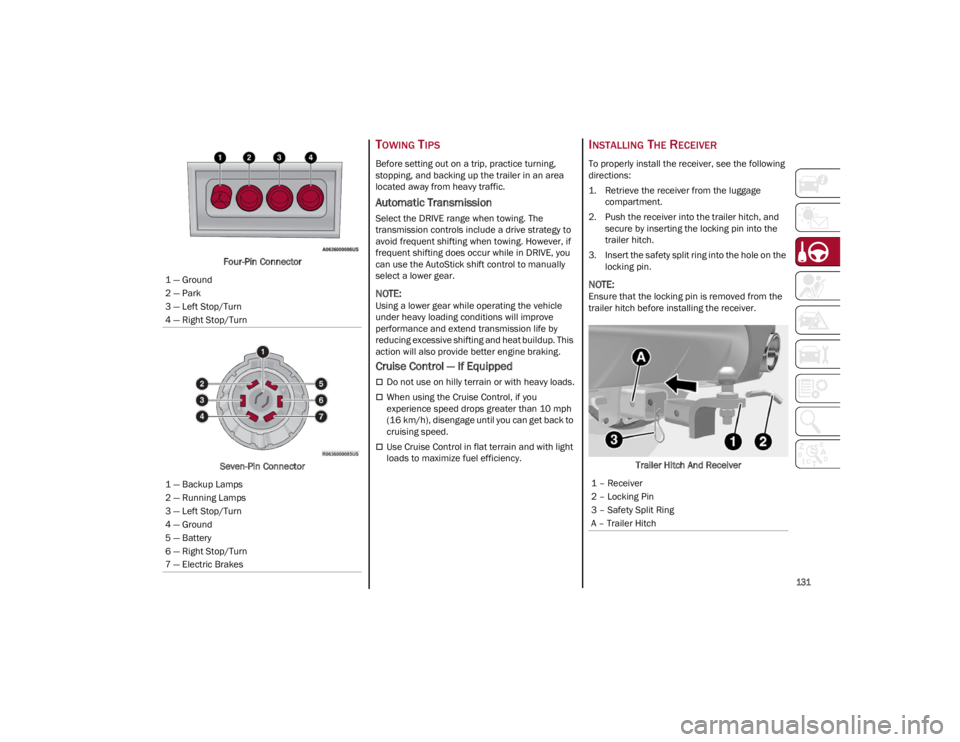
Four-Pin Connector
Seven-Pin Connector
TOWING TIPS
Before setting out on a trip, practice turning,
stopping, and backing up the trailer in an area
located away from heavy traffic.
Automatic Transmission
Select the DRIVE range when towing. The
transmission controls include a drive strategy to
avoid frequent shifting when towing. However, if
frequent shifting does occur while in DRIVE, you
can use the AutoStick shift control to manually
select a lower gear.
NOTE:
Using a lower gear while operating the vehicle
under heavy loading conditions will improve
performance and extend transmission life by
reducing excessive shifting and heat buildup. This
action will also provide better engine braking.
Cruise Control — If Equipped
Do not use on hilly terrain or with heavy loads.
When using the Cruise Control, if you
experience speed drops greater than 10 mph
(16 km/h), disengage until you can get back to
cruising speed.
Use Cruise Control in flat terrain and with light
loads to maximize fuel efficiency.
INSTALLING THE RECEIVER
To properly install the receiver, see the following
directions:
1. Retrieve the receiver from the luggage compartment.
2. Push the receiver into the trailer hitch, and secure by inserting the locking pin into the
trailer hitch.
3. Insert the safety split ring into the hole on the locking pin.
NOTE:
Ensure that the locking pin is removed from the
trailer hitch before installing the receiver.
Trailer Hitch And Receiver
1 — Ground
2 — Park
3 — Left Stop/Turn
4 — Right Stop/Turn
1 — Backup Lamps
2 — Running Lamps
3 — Left Stop/Turn
4 — Ground
5 — Battery
6 — Right Stop/Turn
7 — Electric Brakes
1 – Receiver
2 – Locking Pin
3 – Safety Split Ring
A – Trailer Hitch
22_GU_OM_EN_USC_t.book Page 131