display ASTON MARTIN DB7 1997 Owner's Guide
[x] Cancel search | Manufacturer: ASTON MARTIN, Model Year: 1997, Model line: DB7, Model: ASTON MARTIN DB7 1997Pages: 421, PDF Size: 9.31 MB
Page 414 of 421
^?
The Aston Martin Lagonda Diagnostic System
Users Guide
Datalogger Example
A customer reported intermittent illumination of the
anti-
Lock Brakes (ABS) warning lamp.
TheABScontrolmodulewas interrogated, producing fault
code 33 (95 MY), right-rear wheel speed sensor.
The PDU was used to check the wheel speed sensor
output using the ABS warning lamp as a trigger.
The PDU was setup to the vehicle's configurations and
Datalogger was accessed.
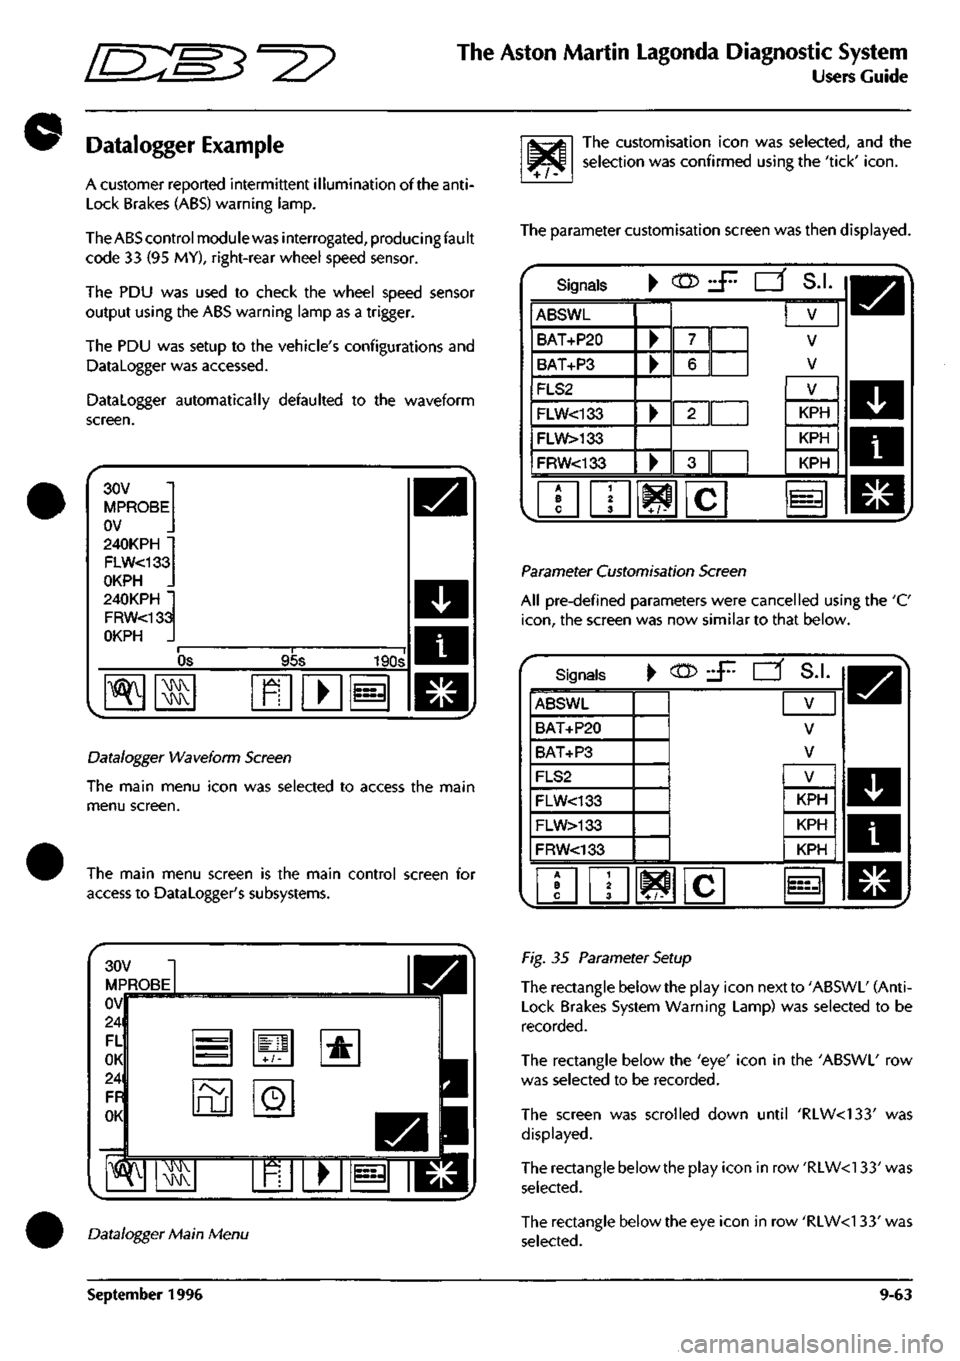
Datalogger automatically defaulted to the waveform
screen.
30V
MPROBE
OV
240KPH •
FLW<133
OKPH .
240KPH •
FRW<133
OKPH .
OS 95s 190s
^ ^ R • i=3
Datalogger Waveform Screen
The main menu icon was selected to access the main
menu screen.
The main menu screen is the main control screen for
access to Datalogger's subsystems.
^/^
The customisation icon was selected, and the
selection was confirmed using the 'tick'
icon.
The parameter customisation screen was then displayed.
Signals • c05 d^ CZf S.I.
ABSWL
BAT+P20
BAT+P3
FLS2
FLW<133
FLW>133
FRW<133
•
•
•
•
7
6
2||
3
V
V
V
1 2 3 W c
V
KPH
KPH
KPH
^=3
Parameter Customisation Screen
All pre-defined parameters were cancelled using the 'C
icon,
the screen was now similar to that below.
Signals ^ (n> •S'- rz^ S.I.
ABSWL
BAT+P20
BAT+P3
FLS2
FLW<133
FLW>133
FRW<133
V
V
V
A B C
1 2 3 ^ ^ i i C
V
KPH
KPH
KPH
Datalogger Main Menu
Fig. 35 Parameter Setup
The rectangle below the play icon next to 'ABSWl' (Anti-
lock Brakes System Warning Lamp) was selected to be
recorded.
The rectangle below the 'eye' icon in the 'ABSWl' row
was selected to be recorded.
The screen was scrolled down until 'RIW<133' was
displayed.
The rectangle below the play icon in row'RLW<133'was
selected.
The rectangle below the eye icon in row 'RLW<1 33' was
selected.
September 1996 9-63
Page 415 of 421
The Aston Martin Lagonda Diagnostic System
Users Guide
ES^"^?
The screen was scrolled down until 'RRW<133' was
displayed.
The rectangle below the play icon on row 'RRW<133' was
selected.
The rectangle below the eye icon in row 'RRW<133' was
selected.
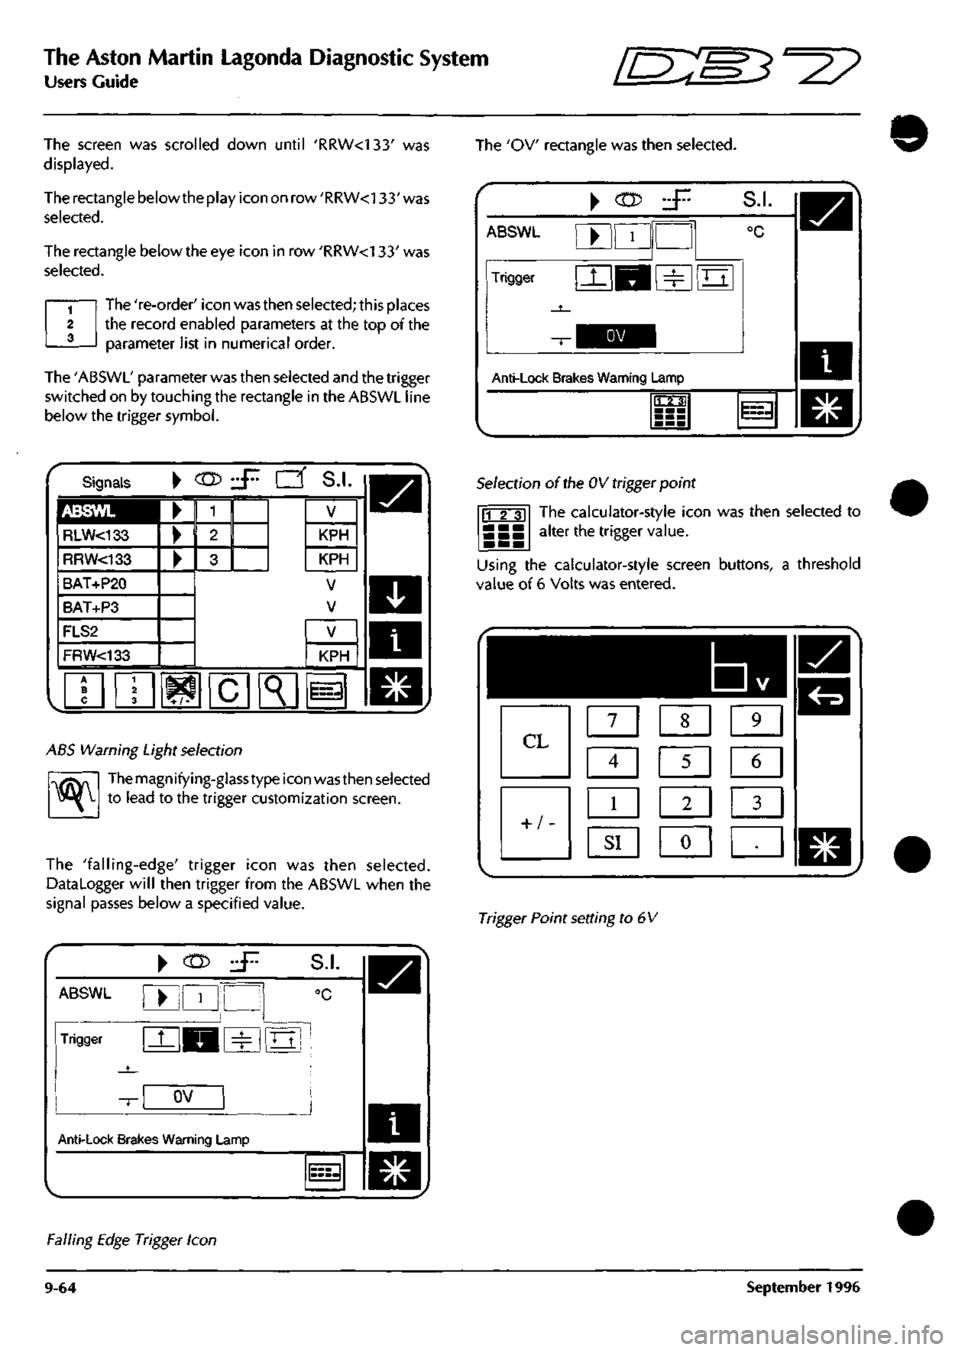
The 're-order' icon was then selected; this places
the record enabled parameters at the top of the
parameter list in numerical order.
The 'ABSWL' parameter was then selected and the trigger
switched on by touching the rectangle in the ABSWL line
below the trigger symbol.
The 'OV rectangle was then selected.
\
(n>
ABSWL
Trigger
S.I.
Anti-Lock Brakes Warning Lamp
1123;
11=3
Signals
ABSWL
RLW<133
RRW<133
BAT+P20
BAT+P3
FLS2
FRW<133
•
KPH
KPH
V
V
^K
KPH
i=
ABS Warning Light selection
^
Themagnifying-glasstype icon wasthen selected
to lead to the trigger customization screen.
The 'falling-edge' trigger icon was then selected.
DataLogger will then trigger from the ABSWL when the
signal passes below a specified value.
Selection of the OV trigger point
The calculator-style icon was then selected to
alter the trigger value. 11 2 31
Using the calculator-style screen buttons, a threshold
value of 6 Volts was entered.
1
7 1 1 8 1 1 9 1
Q
Q
5
1 6 1
LB m
1
^I 1 «J •
Trigger Point setting to 6V
ABSWL
Trigger
Anti-Lock Brak
^
(n>
•
1
'
^H
OV
es Warning L
.jr.
1
S.I.
°C
m
amp
J
l===-l
Falling Edge Trigger Icon
9-64 September 1996
Page 416 of 421

5'=3^
The Aston Martin Lagonda Diagnostic System
Users Guide
The 'tick' icon was selected to return to the trigger screen
which will then be as shown below.
ABSWL
Trigger
Anti-Lock Bra
^ CTD
AJUJ
^B
6V
.J7.
!•
t 1
•
S.I.
fvl
^ t
]
kes Warning Lamp
Z-.Z4
The Trigger Set-Up Screen
The 'tick' icon was then selected to return to the parameter
customisation
screen.
The screen should now look similar
to that below.
Signals • cn> J^ [Z^ S.L
RLW<133
RRW<133
BAT+P20
BAT+P3
FLS2
FLW<133
•
V
KPH
KPH
V
V
^ Kr-
i c
V
KPH
ini
Parameter Customisation - Final Setup
The 'tick' icon was pressed to access the waveform
display.
The PDU was now ready to start recording data.
The 'record' icon was selected to start recording data.
When the fault occurred, the ABS warning lamp
automatically triggered the PDU. This will place a fixed
cursor on the screen and set the time base to zero. The
PDU will stop recording after the preset record time. If no
record time has been entered, the PDU will use its default
record time of 16minutes and 40 seconds. 8m20s pre-
trigger and 8m20s post trigger.
The following figure indicates the typical waveform display
for the wheel speed sensor fault. The dotted vertical line
represents the trigger point.
16V
ABSWL
OV
240KPH "
RLW<133
OKPH .
240KPH •
RRW<133
OKPH
-55.4s
7.29s
^ 39.6s
^ MMV
\!MV
m
wheel Speed Sensor Display
September 1996 9-65
Page 417 of 421
The Aston Martin Lagonda Diagnostic System
Users Guide =2?
Training
The training programme incorporated into the PDU
software is designed to cover the needs of new users and
those who have basic PDU skills but require further
training on the DMM and Datalogger functions.
Select 'Training' from the PDU main menu to bring up the
training menu.
New User Training
The new user training program takes the student through
a structured sequence of activities to learn the meaning
and use of the basic screen icons. The traineemay then
work through programmed exercises to learn the digital
multi-meter and then the datalogger functions.
Existing User Training Menu
in this program the existing user may select training from
the following list:
• User Screen Controls
• Digital Multi-Meter
• Datalogger
OBD II Scan Tool (Not 95 MY)
The OBD II Scan Tool is designed to access the memories
of the engine and transmission control units to monitor
and extract data relative to emissions control.
The following types of data may be accessed:
Current Powertrain Data
Monitor Freeze Frame Data
Request Trouble Codes
Clear Trouble Codes
Request Oxygen Sensor Test Results
Monitor Oxygen Sensors
Display Pending Trouble Codes
Request On-Board Monitoring Test Results
Examine Readiness Tests
Malfunction Lamp Status
The data to be monitored is selected from the OBD
11
main
menu.
For example if Monitor Freeze Frame Data is selected, the
system will display up to 11 parameters which are always
recorded when a fault code is logged. The parameters are
as follows:
0 : SUPP Supported
2 : FCFF Fault Causing Freeze Frame
3 : FSS Fuel System Status
4 : CLV Calculated Load Value
5 : ECT Engine Coolant Temperature
6 : STFT-B1 Short Term Fuel Trim - bank 1 (Cyl
1
-3)
7 : LTFT-B1 Long Term Fuel Trim - bank
1
(Cyl 1-3)
8 : STFT-B2 Short Term Fuel Trim - bank 2 (Cyl 4-6)
9 : LTFT-B2 Long Term Fuel Trim - bank 2 (Cyl 4-6)
12:RPM .Engine Speed
13:VS Vehicle Speed
•'••) ••
Page 418 of 421
in:s3''^
The Aston Martin Lagonda Diagnostic System
Users Guide
#
Accessing Freeze Frame Data
The freeze frame data is vital in analysing unresolved
trouble codes. If an emissions related trouble code occurs,
complete a diagnostic trouble code report form including
the vehicle data, logged trouble codes and the freeze
frame data. Fax a copy of the form to Aston Martin Service
Operations Department who will assist in resolving the
concern.
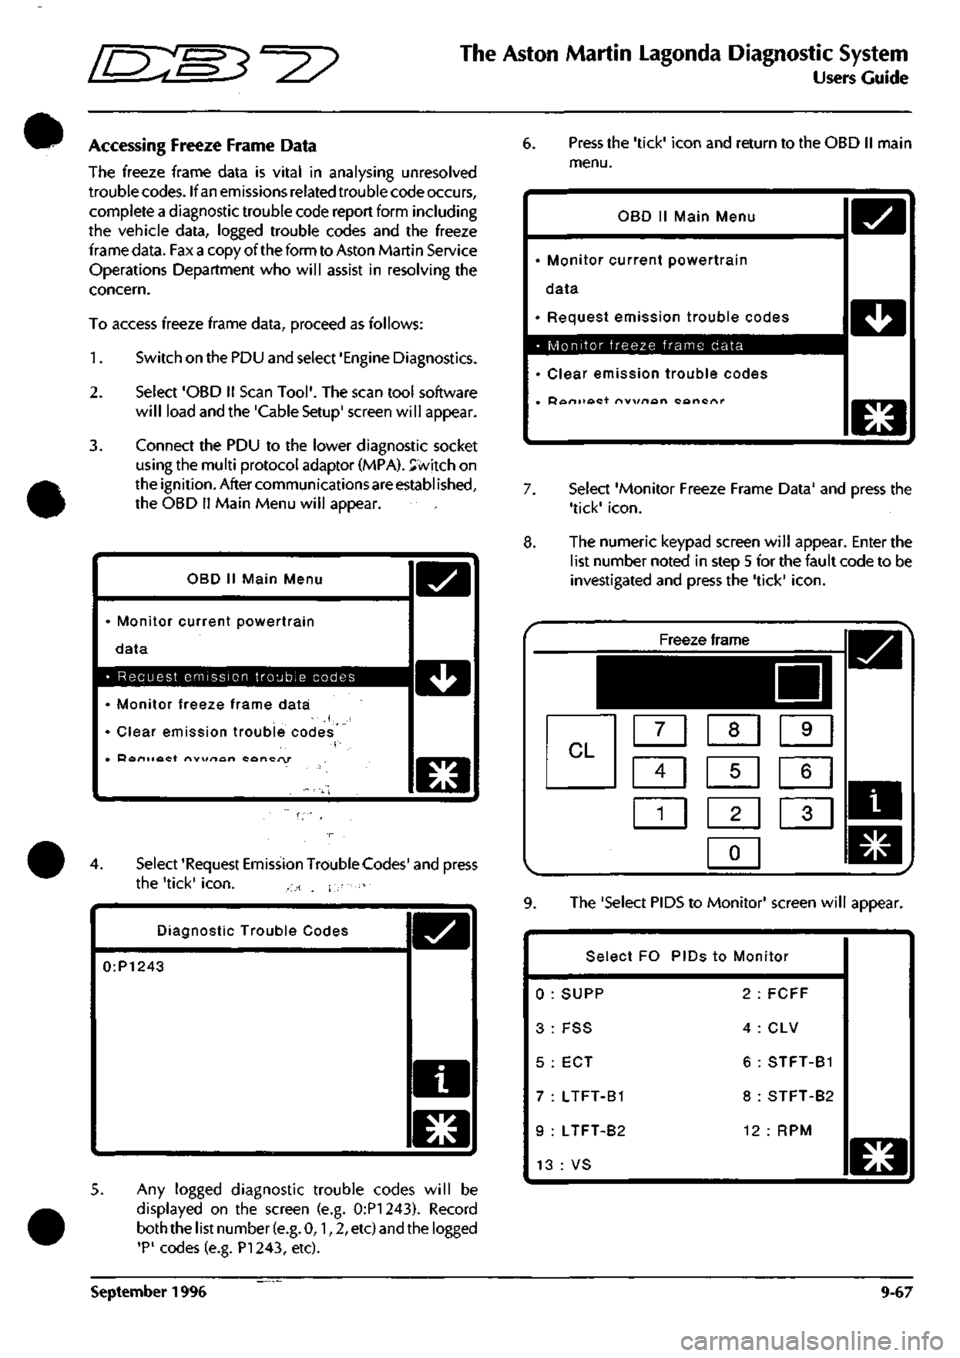
To access freeze frame data, proceed as follows:
1.
Switch on the PDU and select 'Engine Diagnostics.
2.
Select 'OBD II Scan
Tool'.
The scan tool software
will load and the 'Cable Setup' screen will appear.
3. Connect the PDU to the lower diagnostic socket
using the multi protocol adaptor (MPA). Svvitch on
the ignition. After communications are established,
the OBD
11
Main Menu will appear.
OBD
11
Main Menu
• Monitor current powertrain
data
D
• Request emission trouble codes 1 ^^ 1
• Monitor freeze frame data
' Clear emission trouble codes
• Doniiact nw\/rtan concry
O
4.
Select 'Request Emission TroubleCodes' and press
the 'tick'
icon.
, ., - . i-
Diagnostic Trouble Codes
0:P1243
o
5. Any logged diagnostic trouble codes will be
displayed on the screen (e.g. 0:P1243). Record
both the list number
(e.g.
0,1,2, etc) and the logged
'P'
codes (e.g. PI 243, etc).
6. Press the 'tick' icon and return to the OBD II main
menu.
OBD II Main Menu
• Monitor current powertrain
data
• Request emission trouble codes
• Monitor freeze frame data
• Clear emission trouble codes
• Doniioct nvx/nort cancnr
D
D
O
7. Select 'Monitor Freeze Frame Data' and press the
'tick'
icon.
8. The numeric keypad screen will appear. Enter the
list number noted in step 5 for the fault code to be
investigated and press the 'tick'
icon.
Freeze frame
^^HHI
CL m [XI s
ci] s m
1
1 1 2 1 1 3 1
0
1
9. The 'Select PIDS to Monitor' screen will appear.
Select FO PIDs to Monitor
0 : SUPP 2 : FCFF
3: FSS 4:CLV
5 : ECT 6 : STFT-B1
7 : LTFT-B1 8 : STFT-B2
9 : LTFT-B2 12 : RPM
13 : VS
WWWM
o
September 1996 9-67
Page 419 of 421

The Aston Martin lagonda Diagnostic System
Us^rs Guide O" ^?
10.
Selectall PIDS (Parameter Identifications) and press 12. Enter the freeze frame data onto the DTC Report
the 'tick'
icon.
Form together with the vehicle details and 'P'
codes.
13.
Select the 'asterisk' icon and return to the main
PDU menu.
11.
* The freeze frame data for the selected parameters
will appear (Press the down arrow to scroll to the
lower part of the display).
FO
FO
FO
FO
FO
SUPP
FCFF
FSS
CLV
ECT
STPT-P1
$10 : $71980000
$10 : $1243
$10 : (#1) $2
$10 : 28.6%
$10 : 79°C
"tin • -1 Ro/„
DO O
FO
FO -
FO
FO
FO
f 0 ,
STFT-R1
• LTFT-B1
STFT-B2
LTFT-B2
RPM
VS
$10
$10
$10
$10
$10
$10
-1.5%
0.0%
5.4%
0.0%
795r/min
Okm/h
CHO
•al
C9
MM
a
o
9-68 September 1996
Page 420 of 421

ThesAston Martin LagondanDiagriostic System
Users;
Guide-,^
User Self Test
^ -
The self-test function built into
the
PDU software enables
users
to
completely test the system
for
faulty rnodules and,
cables. By following the screen instructions, faulty system
components
can be
identified.
Procedure
Select User Self-Test from
the PDU
main menu.
The
self-
test software will load from
the CD.
The first screen shows
the
cable setup with
the PDU
connected
to the
base station. After confirming that
the
connections
are
correct,
the
self-test sequence begins.
The initial test
is of
the
PDU and
base station electronics
and takes slightly less than
2
minutes.
The user
is
then directed
to
connect
the
various external
elements of the system
in
turn and confirm the cable setup
at each stage.
As
each element
is
connected
and
tested,
the sequence will either direct that
the
next element
is
connected
or
will report
a
fault
in the
last element tested.
Using this procedure, any faulty element in the system will
be identified.
If the
self-test concludes with
no
fault
reported,
any
problem encountered must be in the vehicle
or
as a
result
of
incorrect
use.
The Asterisk
(*)
lcon?'fi ^^
G * s ^
When available, selecting
the
asterisk icon will bring
up
the
following menu
of
general facilities:
ic
•
•
*
•
• ~',"•'.
•
•
,
•., .,
Resume
Abort . ..
Status
• •
Setup ., , ,
Print Screen
Show trace : T'J
Print trace
D
•u
_ ,1
1
l»
.
*-«•
-
-•
,
'
•
Resume
Return
to the
screen from which
you
selected
the
asterisk
icon.
Abort
•
'•'•'"'
• '• "
'"'^''•'
"'-
' Return
to the PDU
Main Menu.
' ' ' ••'""
Self-Test Problems
If
the
self test software will
not
load
or if
unidentified
problems
are
encountered during
the
self-test,
go to the
problem solving procedure
in
the PDU installation guide.
Be prepared
to
record
any
problem codes which
are
reported during problem solving.
The
Genrad Service
Centre will require
the
problem code number
to
identify
the correct remedial action
and
replacement parts.
Status
Show
the
current software level
and the
application
currently loaded.
--«
^
^.« - ...
•
^f;;fc.i.*ir.
....-^i^cw'i*;*^--'. Print Screen
Send
the
current screen display
to the
printer
.iia*M--i^-Vj^W'JStS:'
.
Show Trace
••'- •
'B-T'^TS
o^
•._,
^,„„, ,' J
rbisplay'the current contents
of
the fracelmemorylDri
^
the screen
(Use the
Down
and
Up^ arrows
to
scroll
•,
through
the
display
if
more than
one
screenful). •
Ai..;:
. ; •
,\J-'!-MT.'
0'; I
Print Trace
•-l.---^,^
• ,\.
^,
,./j-,i:,
Q
:;
Send
the
current contents
of
the trace memory
to the
printer.
I
a-.-s.-™.*'.-jc^.'-v*
September 1996? 9-69,
Page 421 of 421
The Aston Martin Lagonda Diagnostic System
Users Guide [E^M^"^?
System Setup
The System Setup Menu may be accessed at any time
from the asterisk (*)
menu.
The menu provides system
configuration options for the following parameters:
Display Mode
Sets the screen to either Black on White or White on
Black display
Trace Mode
Sets
the trace information gathering to All the Time or
Only After a Fault.
Trace Type
Sets
the trace system to gather Everything or Only Test
Information.
Fault Overide
If fault overide is OFF, the trace recording will stop
when
a
fault
occurs.
With fault overide
set
to
ON,
trace
recording will continue after fault occurence
and
show
vehicle performance after the fault.
Language
Permits selection of one of the following languages:
English
German
French
Italian
Japanese
Caution: Check that the correct
language
is
selected.
If
you
accidentaly select
and confirm the
wrong
language,
it may be difficult to
configure
the system back
to a familiar
language.
9-70 September 1996