engine ASTON MARTIN DB7 1997 Repair Manual
[x] Cancel search | Manufacturer: ASTON MARTIN, Model Year: 1997, Model line: DB7, Model: ASTON MARTIN DB7 1997Pages: 421, PDF Size: 9.31 MB
Page 387 of 421
The Aston Martin Lagonda Diagnostic System
Users Guide ffi:S5'=2?
Engine Datalogger
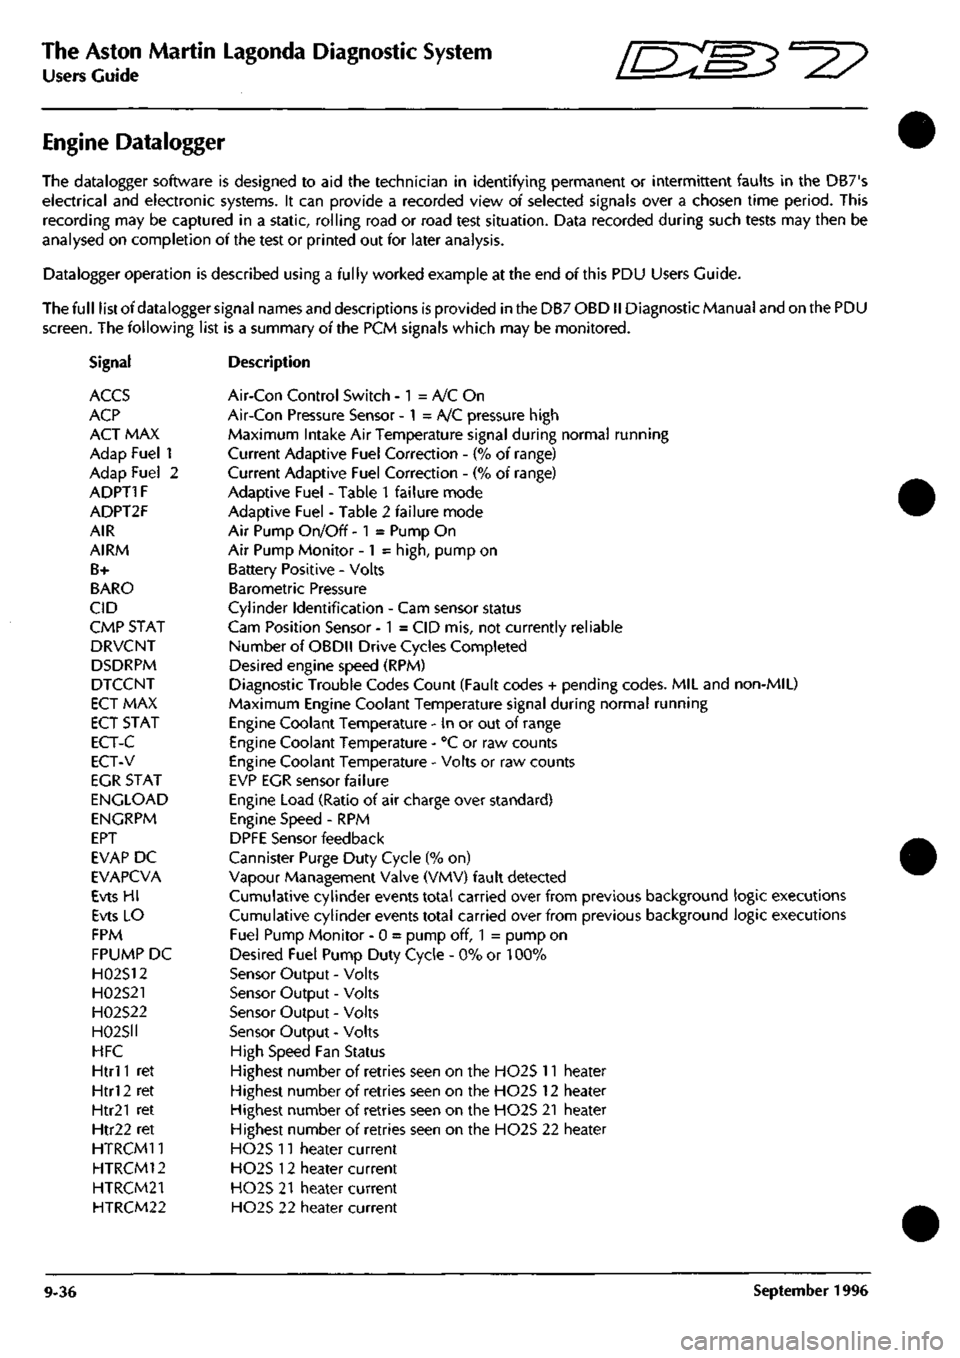
The datalogger software is designed to aid the technician in identifying permanent or intermittent faults in the DB7's
electrical and electronic systems. It can provide a recorded view of selected signals over a chosen time period. This
recording may be captured in a static, rolling road or road test situation. Data recorded during such tests may then be
analysed on completion of the test or printed out for later analysis.
Datalogger operation is described using a fully worked example at the end of this PDU Users Guide.
The full list of datalogger signal names and descriptions is provided in the DB7 OBDII Diagnostic Manual and on the PDU
screen.
The following list is a summary of the PCM signals which may be monitored.
Signal Description
ACCS Air-Con Control Switch - 1 = A/C On
ACP Air-Con Pressure Sensor - 1 = A/C pressure high
ACT MAX Maximum Intake Air Temperature signal during normal running
Adap Fuel 1 Current Adaptive Fuel Correction - (% of range)
Adap Fuel 2 Current Adaptive Fuel Correction - (% of range)
ADPT1F Adaptive Fuel - Table 1 failure mode
ADPT2F Adaptive Fuel - Table 2 failure mode
AIR Air Pump On/Off - 1 = Pump On
AIRM Air Pump Monitor -1 =
high,
pump on
B+ Battery Positive - Volts
BARO Barometric Pressure
CID Cylinder Identification - Cam sensor status
CMP STAT Cam Position Sensor -1 = CID mis, not currently reliable
DRVCNT Number of OBDll Drive Cycles Completed
DSDRPM Desired engine speed (RPM)
DTCCNT Diagnostic Trouiale Codes Count (Fault codes + pending codes. MIL and non-MIL)
ECT MAX Maximum Engine Coolant Temperature signal during normal running
ECT STAT Engine Coolant Temperature - in or out of range
ECT-C Engine Coolant Temperature - "C or raw counts
ECT-V Engine Coolant Temperature - Volts or raw counts
EGR STAT EVP EGR sensor failure
ENGLOAD Engine Load (Ratio of air charge over standard)
ENGRPM Engine Speed - RPM
EPT DPFE Sensor feedback
EVAP DC Cannister Purge Duty Cycle (% on)
EVAPCVA Vapour Management Valve (VMV) fault detected
Evts HI Cumulative cylinder events total carried over from previous background logic executions
Evts LO Cumulative cylinder events total carried over from previous background logic executions
FPM Fuel Pump Monitor - 0 = pump off, 1 = pump on
FPUMP DC Desired Fuel Pump Duty Cycle - 0% or 100%
H02S12 Sensor Output - Volts
H02S21 Sensor Output - Volts
H02S22 Sensor Output - Volts
H02S1I Sensor Output - Volts
HFC High Speed Fan Status
Htrl
1
ret Highest number of retries seen on the H02S 11 heater
Htrl 2 ret Highest number of retries seen on the H02S 12 heater
Htr21 ret Highest number of retries seen on the H02S 21 heater
Htr22 ret Highest number of retries seen on the H02S 22 heater
HTRCM11 H02S n heater current
HTRCM12 H02S 12 heater current
HTRCM21 H02S 21 heater current
HTRCM22 H02S 22 heater current
9-36 September 1996
Page 389 of 421
The Aston Martin Lagonda Diagnostic System
Users Guide ^?
Engine Setup
- 95 MY
Two adjustments
may
beset with the aid of the PDU
on 95
MY vehicles.
• Throttle Potentiometer
• Idle Fuelling Trim
From
the 95 MY
Main Menu, make
and
confirm
the
following sequence
of
selections:
Diagnostics
/
Manual
or
Auto Transmission
/
Engine
/
Engine Setup
/
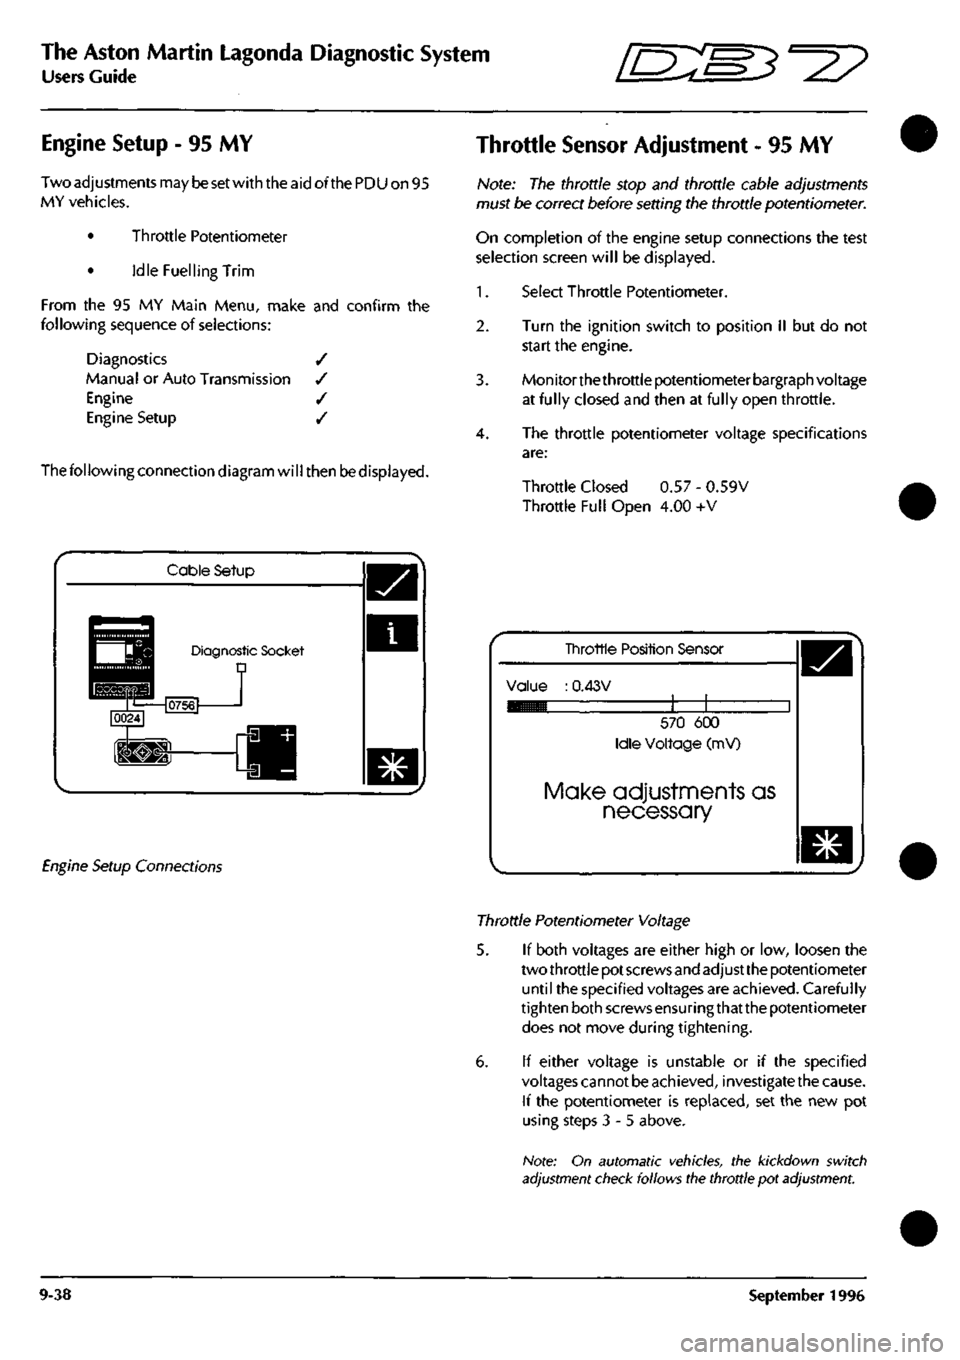
The following connection diagram will then be displayed.
Throttle Sensor Adjustment
- 95 MY
Note:
The
throttle stop
and
throttle cable adjustments
must
be
correct before setting
the
throttle potentiometer.
On completion
of the
engine setup connections
the
test
selection screen will
be
displayed.
1.
Select Throttle Potentiometer.
2.
Turn
the
ignition switch
to
position
II but do not
start
the
engine.
3. Monitorthethrottle potentiometer bargraph voltage
at fully closed
and
then
at
fully open throttle.
4.
The
throttle potentiometer voltage specifications
are:
Throttle Closed
0.57 -
0.59V
Throttle Full Open
4.00 +V
Cable Setup
Diagnostic Socket D
Engine Setup Connections
Tinrottle Position Sensor
Value
:
0.43V
570
600
Idle Voltage
(mV)
Make adjustments as
necessary
Throttle Potentiometer Voltage
5.
If
both voltages
are
either high
or low,
loosen
the
two throttle pot screws and adjust the potentiometer
until
the
specified voltages
are
achieved. Carefully
tighten both screws ensuringthat the potentiometer
does
not
move during tightening.
6.
If
either voltage
is
unstable
or if the
specified
voltages cannot
be
achieved, investigate the cause.
If
the
potentiometer
is
replaced,
set the new pot
using steps
3-5
above.
Note:
On
automatic vehicles,
the
kickdown switch
adjustment check follows the throttle
pot
adjustment.
9-38 September
1996
Page 390 of 421
ffi:
The Aston Martin Lagonda Diagnostic System
Users Guide
Idle Fuelling Trim - 95 MY
This program is used to check and if necessary reset the
fuelling level at idle to ensure that the specified idle speed
and emission levels are attainable. The throttle
potentiometer adjustment sequence must be completed
before the fuel trim sequence can be run.
Note: The throttle setup must be completed before
attempting to set the Idle Fuelling Trim. An error in
throttle
stop,
throttle cable or throttle pot
adjustments can
cause serious
difficulties in setting the Idle Fuelling.
Select Idle Fuelling Trim from the Engine Setup
Menu.
(The PDU connections are
as
fortheThrottle
Potentiometer Adjustment.)
1.
3.
StarttheDB7engineand allow itto warm to normal
operating temperature.
Followthescreeninstructionstorunthe idle fuelling
trim procedure.
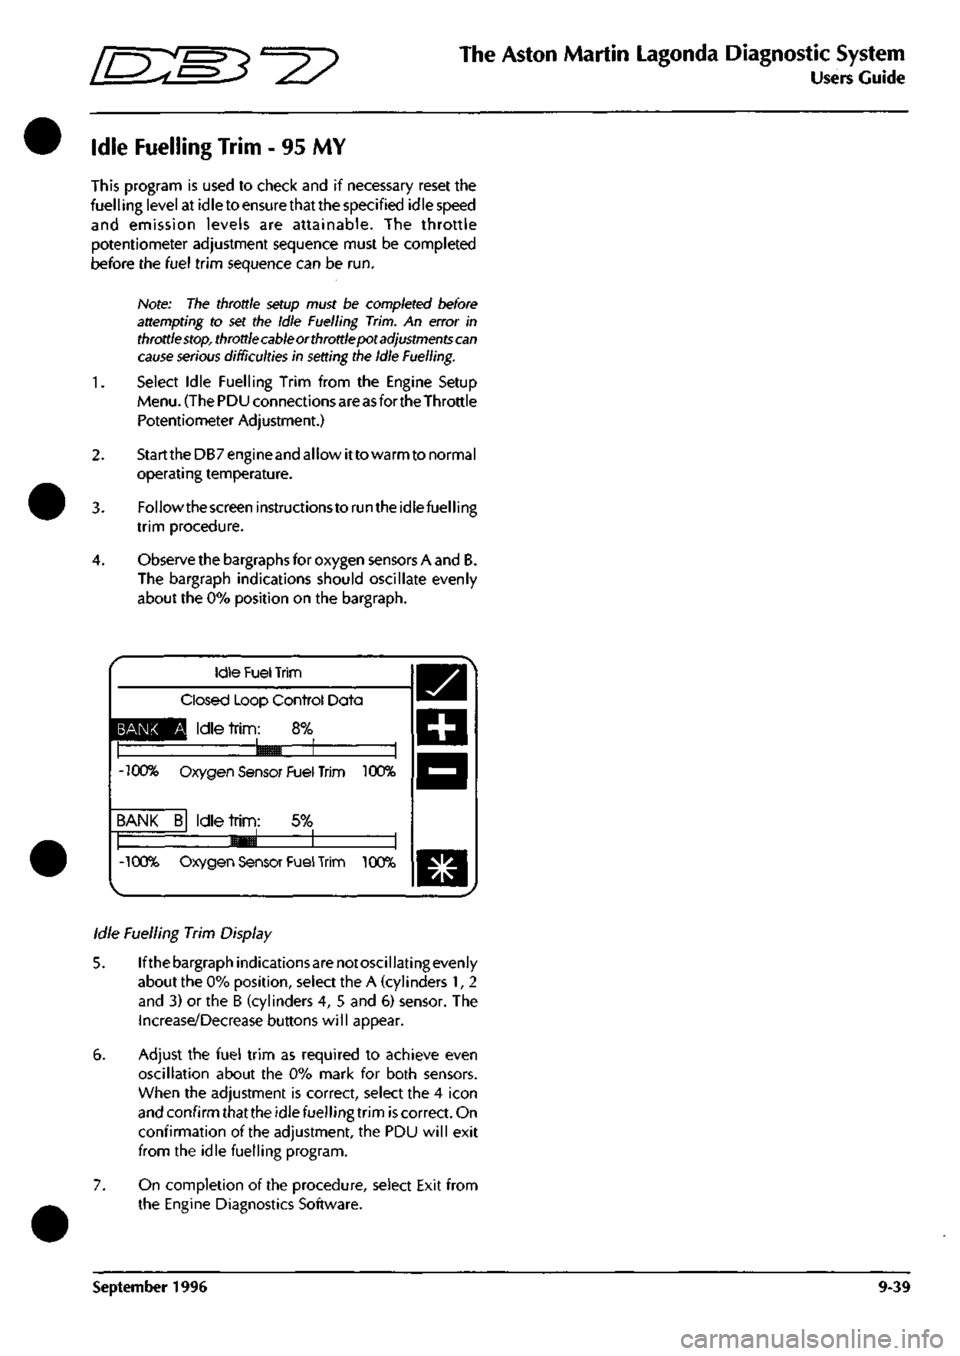
Observe the bargraphs for oxygen sensors A and B.
The bargraph indications should oscillate evenly
about the 0% position on the bargraph.
BANK
-100%
BANK
-100%
Idle
Fuel
Trim
Closed Loop Control Data
Q Idle
trim:
8%
9^B 1 1
Oxygen Sensor Fuel Trim 100%
B Idle
trim:
5% —1 1 1
«^
1 1 Oxygen Sensor Fuel
Trim
100%
Idle Fuelling Trim Display
5. Ifthebargraphindicationsarenotoscillatingevenly
about the 0% position, select the A (cylinders 1, 2
and 3) or the B (cylinders 4, 5 and 5) sensor. The
Increase/Decrease buttons will appear.
6. Adjust the fuel trim as required to achieve even
oscillation about the 0% mark for both sensors.
When the adjustment is correct, select the 4 icon
and confirm that the idle fuelling trim is correct. On
confirmation of the adjustment, the PDU will exit
from the idle fuelling program.
7. On completion of the procedure, select Exit from
the Engine Diagnostics Software.
September 1996 9-39
Page 392 of 421
^^?
The Aston Martin Lagonda Diagnostic System
Users Guide
Transmission Diagnostics
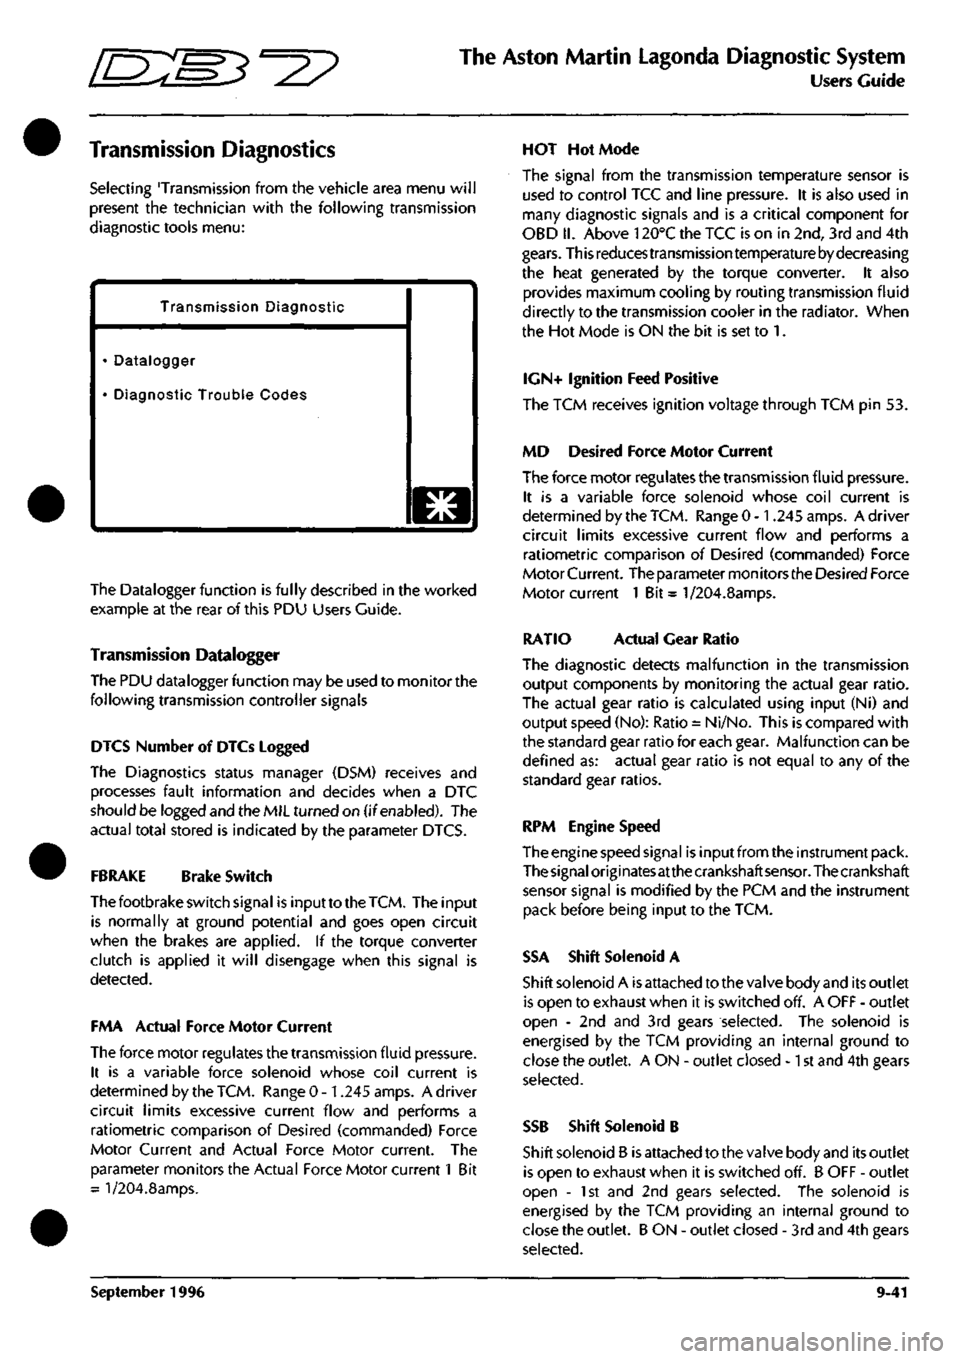
Selecting 'Transmission from the vehicle area menu will
present the technician with the following transmission
diagnostic tools menu:
Transmission Diagnostic
• Datalogger
• Diagnostic Trouble Codes
o
The Datalogger function is fully described in the worked
example at the rear of this PDU Users Guide.
Transmission Datalogger
The PDU datalogger function may be used to monitor the
following transmission controller signals
DIGS Number of DTCs Logged
The Diagnostics status manager (DSM) receives and
processes fault information and decides when a DTC
should be logged and the MIL turned on (if enabled). The
actual total stored is indicated by the parameter DTCS.
FBRAKE Brake Switch
The footbrake switch signal is input to the
TCM.
The input
is normally at ground potential and goes open circuit
when the brakes are applied. If the torque converter
clutch is applied it will disengage when this signal is
detected.
FMA Actual Force Motor Current
The force motor regulates the transmission fluid pressure.
It is a variable force solenoid whose coil current is
determined by the TCM. Range 0 -1.245 amps. A driver
circuit limits excessive current flow and performs a
ratiometric comparison of Desired (commanded) Force
Motor Current and Actual Force Motor current. The
parameter monitors the Actual Force Motor current 1 Bit
= l/204.8amps.
HOT Hot Mode
The signal from the transmission temperature sensor is
used to control TCC and line pressure. It is also used in
many diagnostic signals and is a critical component for
OBD II. Above 120°C the TCC is on in 2nd, 3rd and 4th
gears.
This reduces transmission temperature by decreasing
the heat generated by the torque converter. It also
provides maximum cooling by routing transmission fluid
directly to the transmission cooler in the radiator. When
the Hot Mode is ON the bit is set to 1.
IGN+ Ignition Feed Positive
The TCM receives ignition voltage through TCM pin 53.
MD Desired Force Motor Current
The force motor regulates the transmission fluid pressure.
It is a variable force solenoid whose coil current is
determined by the TCM. Range 0 -1.245 amps. A driver
circuit limits excessive current flow and performs a
ratiometric comparison of Desired (commanded) Force
Motor Current. The parameter mon itors the Desired Force
Motor current 1 Bit = 1/204.8amps.
RATIO Actual Gear Ratio
The diagnostic detects malfunction in the transmission
output components by monitoring the actual gear ratio.
The actual gear ratio is calculated using input (Ni) and
output speed (No): Ratio = Ni/No. This is compared with
the standard gear ratio for each gear. Malfunction can be
defined as: actual gear ratio is not equal to any of the
standard gear ratios.
RPM Engine Speed
The engine speed signal is input from the instrument pack.
The
signal
origi
nates
at the crankshaft
sensor.
The crankshaft
sensor signal is modified by the PCM and the instrument
pack before being input to the TCM.
SSA Shift Solenoid A
Shift solenoid A is attached to the valve body and its outlet
is open to exhaust when it is switched off. A OFF - outlet
open - 2nd and 3rd gears selected. The solenoid is
energised by the TCM providing an internal ground to
close the outlet. A ON - outlet closed -1 st and 4th gears
selected.
SSB Shift Solenoid B
Shift solenoid B is attached to the valve body and its outlet
is open to exhaust when it is switched off. B OFF - outlet
open - 1st and 2nd gears selected. The solenoid is
energised by the TCM providing an internal ground to
close the outlet. B ON - outlet closed - 3rd and 4th gears
selected.
September 1996 9-41
Page 393 of 421
The Aston Martin Lagonda Diagnostic System
Users Guide ^7
TCCS Torque Convertor Clutch Solenoid
The torque converter clutch solenoid is mounted on the
valve body. The signal is Pulse Width Modulated at 32Hz
to provide closed loop control of the pressure across the
converter clutch plates. 1 bit = 0.39% Range 0 to 100%
TP Throttle Position
This is provided by the EECV Engine Management System
as a Pulse Width Modulated signal derived from the
throttle position signal read by that module from the
throttle position sensor.
TCS Torque Convertor Slip
Torque converter slip is defined
as
the difference between
the Input/turbine (ni) speed and the Engine speed (Ne):
Slip = Ne-Ni. The PWM duty cycle may increase from 0
to 100% when TCC is fully applied. In practice a 100%
duty cycle will be achieved only if
a
large slip is detected.
Normal ly only a 50 to 95% duty cycle will be required for
full application of the TCC. Slip is expressed in rpm. 1 Bit
- 1/8 rpm. Range -4096 to +4096 rpm.
TCSW Transmission Control Switch
A three position switch allows the driver to select Sport,
Normal or 1st Gear Inhibit mode. When 'Sport' is selected
gearshifts take place at higher engine revs. When '1st
Gear Inhibit' is selected, the transmission only operates in
the higher forward ratios to prevent wheel slip in icy
conditions.
TISSA Turbine Input Shaft Speed
Turbine speed is the speed of the input shaft of the
transmission measured by the input speed sensor mounted
on the transmission. An alternating waveform is induced
in the sensor by 31 serrations on the forward clutch
housing as it rotates. The waveform frequency and
amplitude is low at low speeds and high at high speeds.
The TCM changes this signal into a digital signal. 1 bit =
1/8 RPM. Range: 0 - 8192 RPM.
TOS+ Transmission Output Speed
The output speed sensor is mounted on the transmission
case and measures the speed of the output shaft. As the
shaft rotates an alternating waveform is induced in the
sensor which varies in frequency and voltage. The wave
form is converted into
a
digital signal by the TCM and used
to control TCC, line pressure, shift timing and torque
management. 1 bit = 1/8 RPM. Range 0-8192 RPM
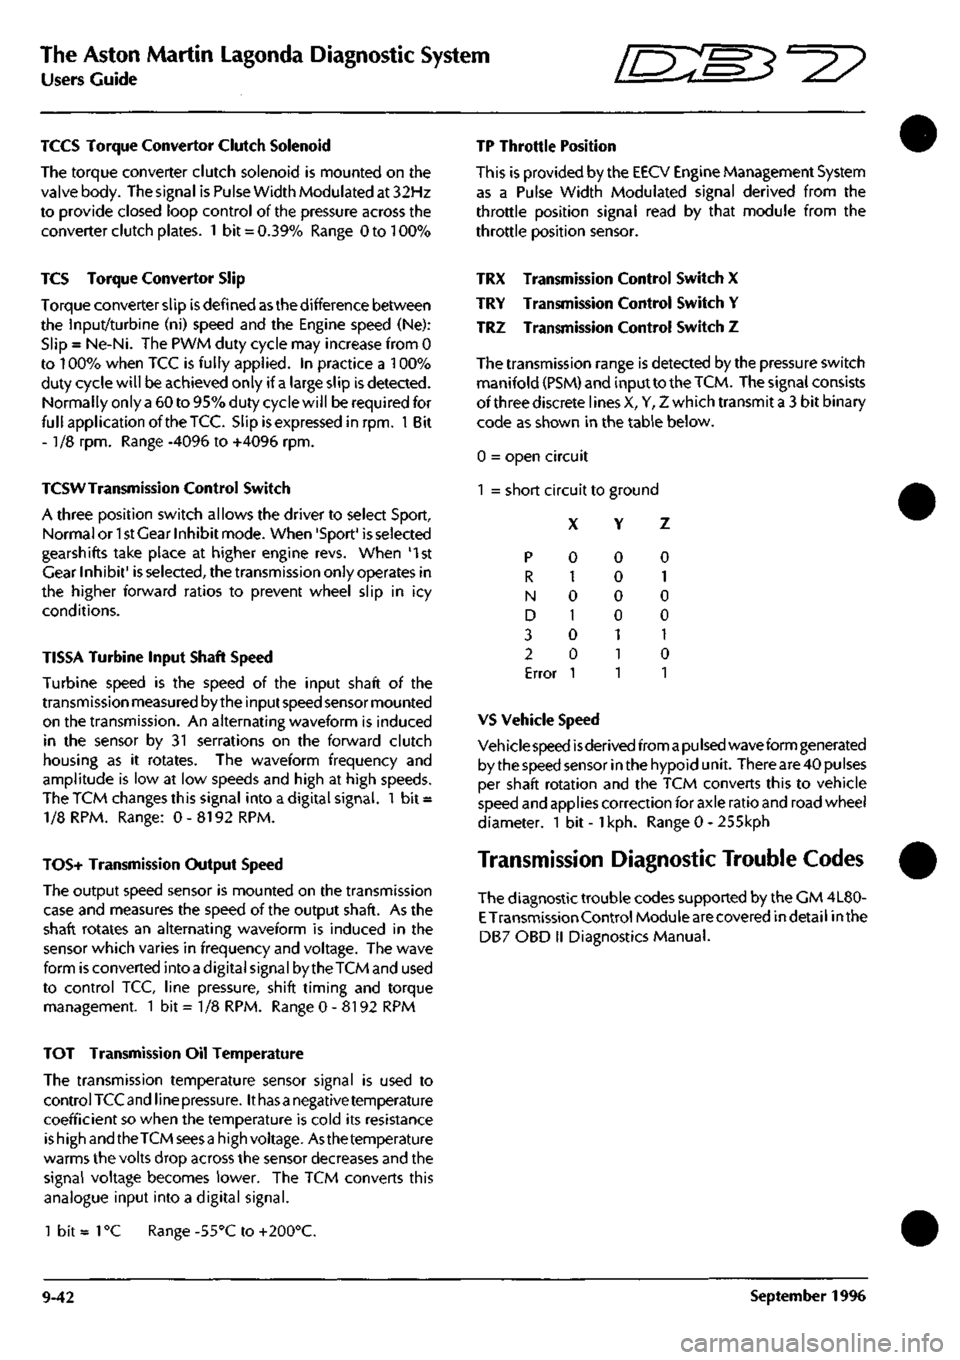
TRX Transmission Control Switch X
TRY Transmission Control Switch Y
TRZ Transmission Control Switch Z
The transmission range is detected by the pressure switch
manifold (PSM) and input to the
TCM.
The signal consists
of three discrete lines X, Y, Z which transmit a 3 bit binary
code as shown in the table below.
0 = open circuit
1 = short circuit to ground
X Y Z
p
R
N
D
3
2
Error
0
1
0
1
0
0
1
0
0
0
0
1
1
1
0
1
0
0
1
0
1
VS Vehicle Speed
Veh icie speed
is
derived from
a pu Ised
wave form generated
by the speed sensor in the hypoid unit. There are 40 pulses
per shaft rotation and the TCM converts this to vehicle
speed and applies correction for axle ratio and road wheel
diameter. 1 bit -
1
kph. Range 0 - 255kph
Transmission Diagnostic Trouble Codes
The diagnostic trouble codes supported by the CM 4L80-
E
Transmission Control Module are covered indetail inthe
DB7 OBD II Diagnostics Manual.
TOT Transmission Oil Temperature
The transmission temperature sensor signal is used to
control TCC and line
pressure.
It
has a
negative temperature
coefficient so when the temperature is cold its resistance
is high and the TCM sees
a
high voltage. Asthe temperature
warms the volts drop across the sensor decreases and the
signal voltage becomes lower. The TCM converts this
analogue input into a digital signal.
1 bit =
1
°C Range -55°C to +200°C.
9-42 September 1996
Page 404 of 421
^7
The Aston Martin Lagonda Diagnostic System
Users Guide
Diagnostic Trouble Codes
Introduction
The 'Diagnostic trouble codes' application enables the
PDU to monitor the trouble codes logged in selected
control module's and provides the following functions:
• Decode and display any trouble codes logged by
the control module(s) being monitored.
• Decode and display enhanced diagnostic
information, together with any count of the number
of occurrences, when supported by the control
module(s).
• Clearsomeorallofallthesetroublecodes selected
by the user on the PDU screen, when supported by
the control module(s).
Diagnostic Trouble Codes are logged by the Engine
Management and by the Automatic Transmission control
units and can be accessed using the PDU. Logged codes
in the 95 MY Teves Mk II ABS controller can only be
accessed using the brake warning light. The Air
Conditioning control unit does not log trouble codes.
Operation
From the Main Menu make the following selections:
Select Diagnostics
Select Engine or Transmission
The system will then load the appropriate
software
Select Diagnostic Trouble Codes
Connect the PDU to the car as shown on the
screen diagram
Select the / icon to confirm connection
The PDU will then interrogate the chosen control
unit and will display any logged trouble codes.
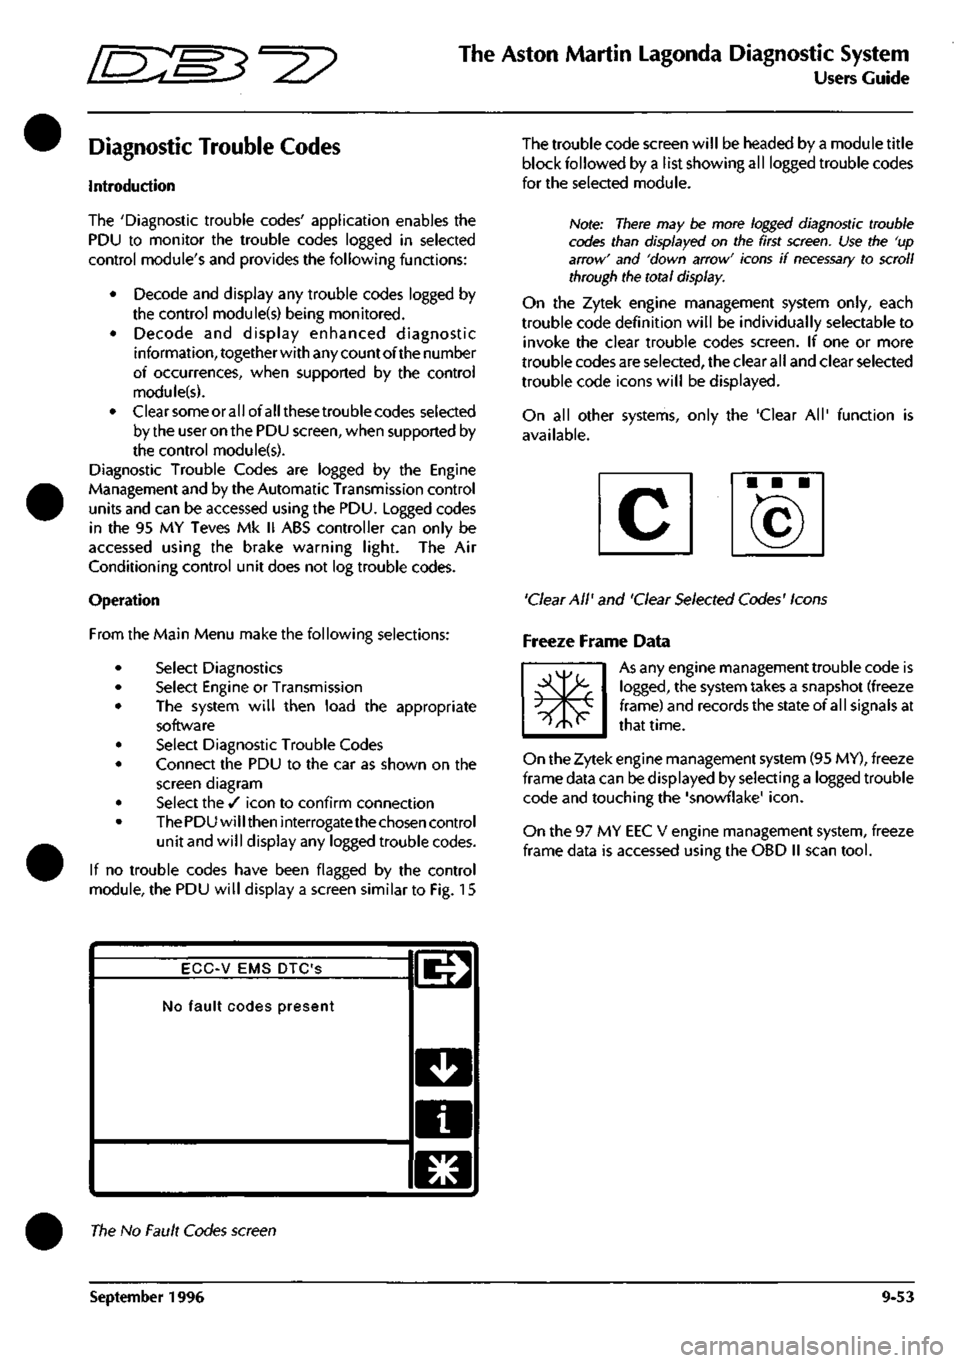
If no trouble codes have been flagged by the control
module, the PDU will display a screen similar to Fig. 15
The trouble code screen will be headed by a module title
block followed by a list showing all logged trouble codes
for the seleaed module.
Note: There may be more logged diagnostic trouble
codes than displayed on the first
screen.
Use the 'up
arrow' and 'down arrow' icons if
necessary
to scroll
through the total display.
On the Zytek engine management system only, each
trouble code definition will be individually selectable to
invoke the clear trouble codes screen. If one or more
trouble codes are selected, the clear all and clear selected
trouble code icons will be displayed.
On all other systems, only the 'Clear All' function is
available.
'Clear All' and 'Clear Selected Codes' Icons
Freeze Frame Data
m*
As any engine management trouble code is
logged,
the system takes a snapshot (freeze
frame) and records the state of all signals at
that time.
On the Zytek engine management system (95 MY), freeze
frame data can be displayed by selecting a logged trouble
code and touching the 'snowflake'
icon.
On the 97 MY EEC V engine management system, freeze
frame data is accessed using the OBD II scan
tool.
ECC-V EMS DTC'S
No fault codes present
l^
D
a
El
The No Fault Codes screen
September 1996 9-53
Page 405 of 421
The Aston Martin Lagonda Diagnostic System
Users Guide
•=2?
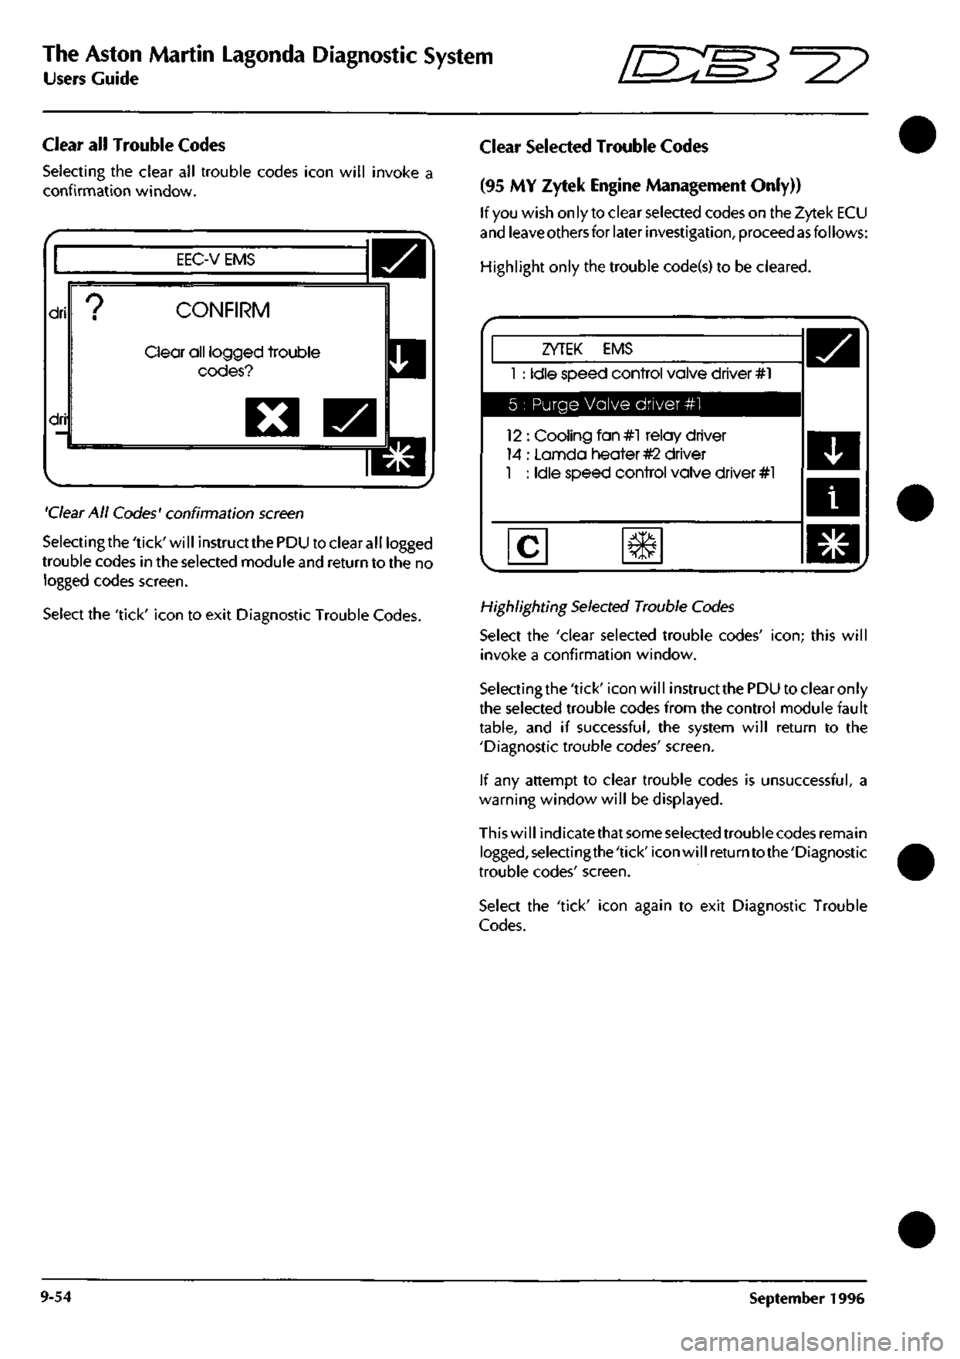
Clear all Trouble Codes
Selecting the clear all trouble codes icon will invoke a
confirmation window.
EEC-V EMS
dri
dri
CONFIRM
Clear all logged trouble
codes?
O
'Clear
All Codes' confirmation
screen
Selectingthe'tick'will instructthePDU to clear all logged
trouble codes in the selected module
and
return to the no
logged codes screen.
Select the 'tick' icon to exit Diagnostic Trouble Codes.
Clear Selected Trouble Codes
(95 MY Zytek Engine Management Only))
If
you
wish only to clear selected codes on the Zytek ECU
and
leave others
for later
investigation,
proceed
as
follows:
Highlight only the trouble code(s) to be cleared.
ZYTEK EMS
1 : Idle speed control valve driver #1
5 : Purge Valve driver #1
12 : Cooling fan#l relay driver
14 : Lannda heater
#2
driver
1 : Idle speed control valve driver #1
Highlighting
Selected
Trouble
Codes
Select the 'clear selected trouble codes'
icon;
this will
invoke a confirmation window.
Selectingthe 'tick' icon will instruct
the
PDU to clear only
the selected trouble codes from the control module fault
table,
and if successful, the system will return to the
'Diagnostic trouble codes' screen.
If any attempt to clear trouble codes is unsuccessful, a
warning window will be displayed.
This will indicatethat
some selected
trouble codes remain
logged,selectingthe'tick'iconwillreturntothe'Diagnostic
trouble codes' screen.
Select the 'tick' icon again to exit Diagnostic Trouble
Codes.
9-54 September 1996
Page 406 of 421
"^I?
The Aston Martin Lagonda Diagnostic System
Users Guide
Datalogger
Introduction
Datalogger is software produced to identify permanent or
intermittent faults on vehicle electronics. The objective of
Datalogger is to provide a view of the vehicle's electrical
behaviour, such that intermittent activity can be recorded
and interpreted quickly and accurately. Running on the
Portable Diagnostic Unit (PDU), the Datalogger
appi ication can captu
re
vehicle information in three ways.
• Serial communications direct from the control unit.
• Parallel communications using the Interface Adaptor.
• Direct signal monitoringusingthemeasurementprobes.
Serial Communication
Serial Communication is a two-wire communication link
between the PDU and most vehicle control modules
providingdigital measurements forconnected components.
The serial communication link allows the tester to
determine the current condition of components connected
to the control module, and to identify any history of faults.
On later vehicles, the PDU is connected to the vehicle
diagnostic sockets via the mu
Iti
Protocol Adaptor (MPA) to
gather serial data from the control modules.
Parallel Communication
The Vehicle Interface Adapter (VIA) provides an interface
between the PDU and the vehicle harnesses for the
acquisition of multiple analogue measurements. The VIA
is
connected between the relevantvehicle control module
and it'sharness connector. Thisallows the PDU to captu re
information from a multitude of channels entering the
control module. This vehicle interface is used with control
modules not equipped with a serial communication link
(Teves Mk II braking system and the air conditioning
system).
Measurement Probes
The measurement probes permit readings to be taken
directly from any connector on the vehicle.
Datalogger Applications
Datalogger may be used to interrogate the following DB7
systems:
• ABS braking system controller
• Engine Management Controller
• Air Conditioning Controller
• Automatic Transmission Controller
• Passive Anti Theft (97 MY)
• Security System (97 MY)
Using the Datalogger
Configure the vehicle to the normal operating conditions
for the system under test.
From the PDU main menu screen:
Highlight 'Diagnostics'.
Press the 'tick' icon to confirm the selection.
Enter the Transmission Type and confirm the selection.
Select the Vehicle Area to be tested and confirm the
selection.
The PDU tools screen should now be displayed.
Highlight 'Datalogger'.
Confirm the selection with the 'tick'
icon.
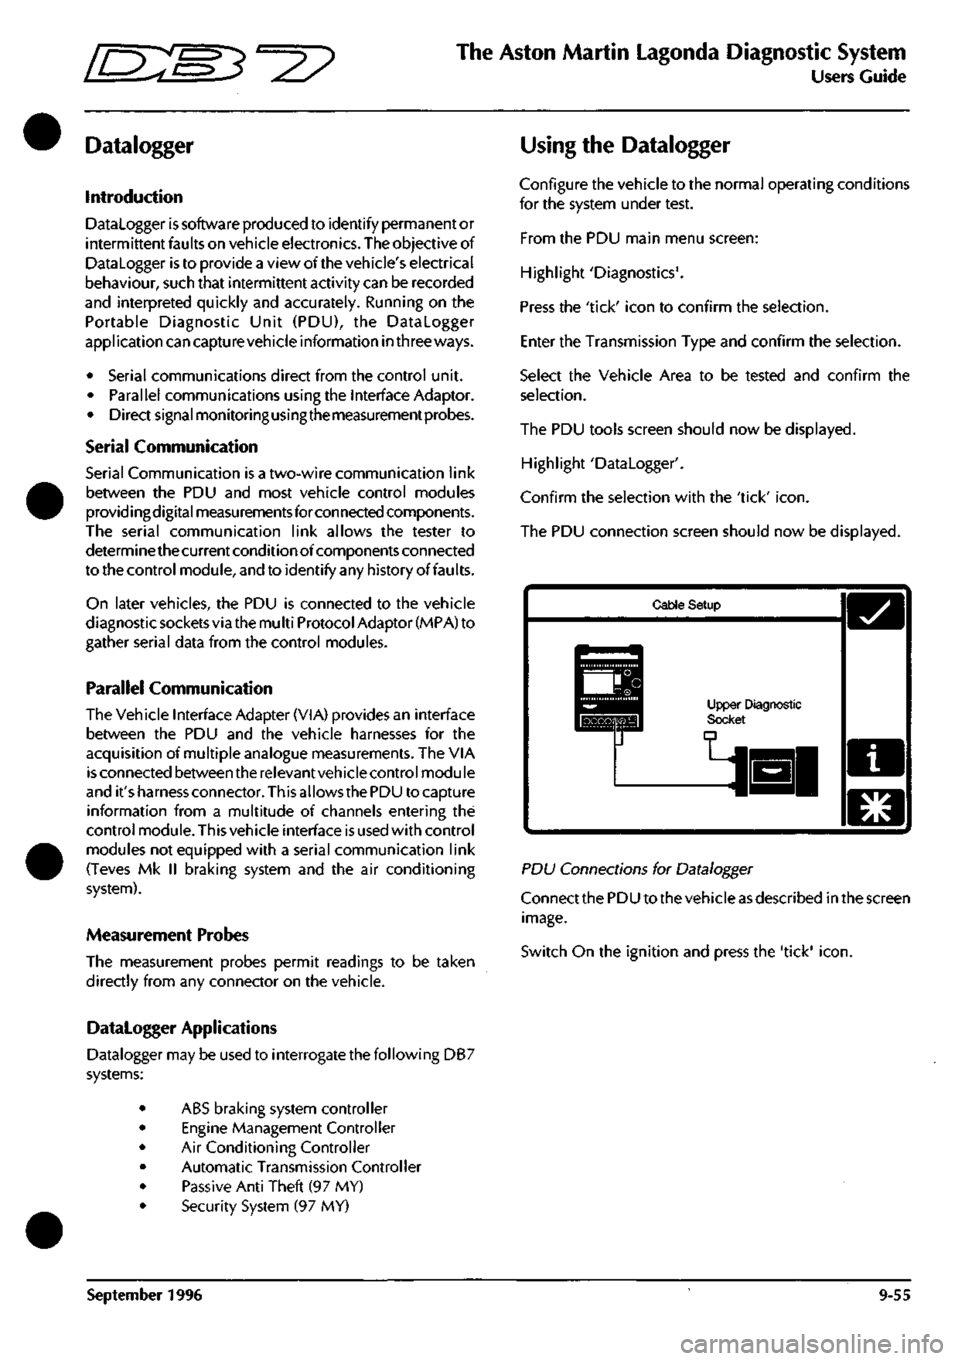
The PDU connection screen should now be displayed.
Cable Setup
Upper Diagnostic Socl
PD\J Connections for Datalogger
Connect the PDU to the vehicle as described in the screen
image.
Switch On the ignition and press the 'tick'
icon.
September 1996 9-55
Page 410 of 421
^^?
The Aston Martin Lagonda Diagnostic System
Users Guide
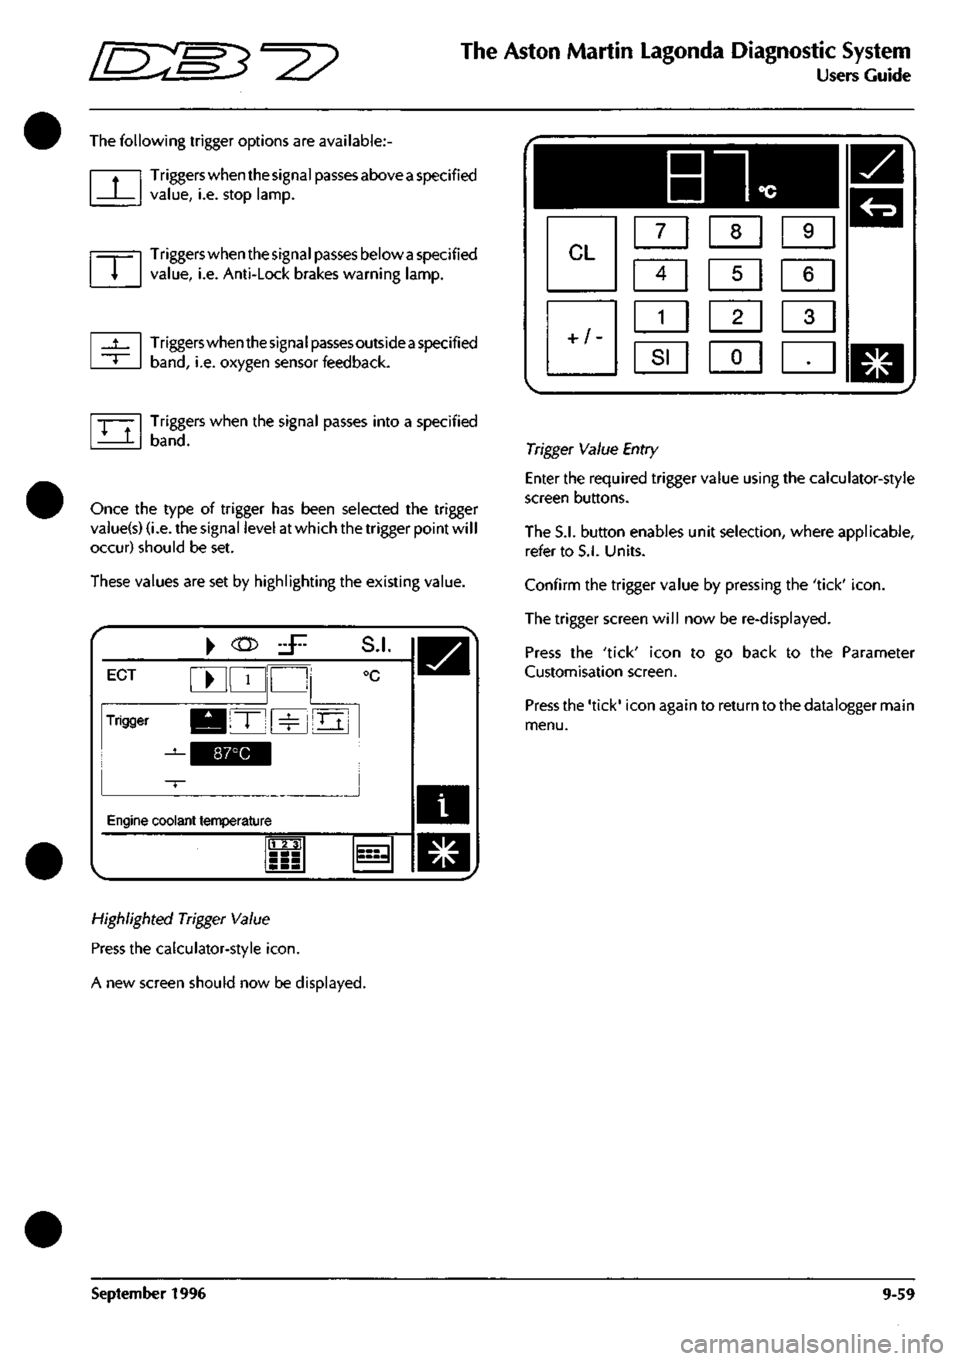
The following trigger options are available:
Triggers when the signal passes above
a
specified
value,
i.e. stop lamp.
Triggers when the signal passes below
a
specified
value,
i.e. Anti-Lock brakes warning lamp.
Triggers when the signa
I
passes outside
a
specified
band,
i.e. oxygen sensor feedback.
Triggers when the signal passes into a specified
band.
Once the type of trigger has been selected the trigger
vaiue(s) (i.e. the signal level at which the trigger point wil
I
occur) should be set.
These values are set by highlighting the existing value.
i
ECT ^ 1
Trigger KBIT" ^
^^^^1
S.I.
°c
Oj
Engine coolant temperature
m
^
Highlighted Trigger Value
Press the calculator-style
icon.
A new screen should now be displayed.
Trigger Value Entry
Enter the required trigger value using the calculator-style
screen buttons.
The S.I. button enables unit selection, where applicable,
refer to S.I. Units.
Confirm the trigger value by pressing the 'tick'
icon.
The trigger screen will now be re-displayed.
Press the 'tick' icon to go back to the Parameter
Customisation screen.
Press the 'tick' icon again to return to the datalogger main
menu.
September 1996 9-59
Page 417 of 421
The Aston Martin Lagonda Diagnostic System
Users Guide =2?
Training
The training programme incorporated into the PDU
software is designed to cover the needs of new users and
those who have basic PDU skills but require further
training on the DMM and Datalogger functions.
Select 'Training' from the PDU main menu to bring up the
training menu.
New User Training
The new user training program takes the student through
a structured sequence of activities to learn the meaning
and use of the basic screen icons. The traineemay then
work through programmed exercises to learn the digital
multi-meter and then the datalogger functions.
Existing User Training Menu
in this program the existing user may select training from
the following list:
• User Screen Controls
• Digital Multi-Meter
• Datalogger
OBD II Scan Tool (Not 95 MY)
The OBD II Scan Tool is designed to access the memories
of the engine and transmission control units to monitor
and extract data relative to emissions control.
The following types of data may be accessed:
Current Powertrain Data
Monitor Freeze Frame Data
Request Trouble Codes
Clear Trouble Codes
Request Oxygen Sensor Test Results
Monitor Oxygen Sensors
Display Pending Trouble Codes
Request On-Board Monitoring Test Results
Examine Readiness Tests
Malfunction Lamp Status
The data to be monitored is selected from the OBD
11
main
menu.
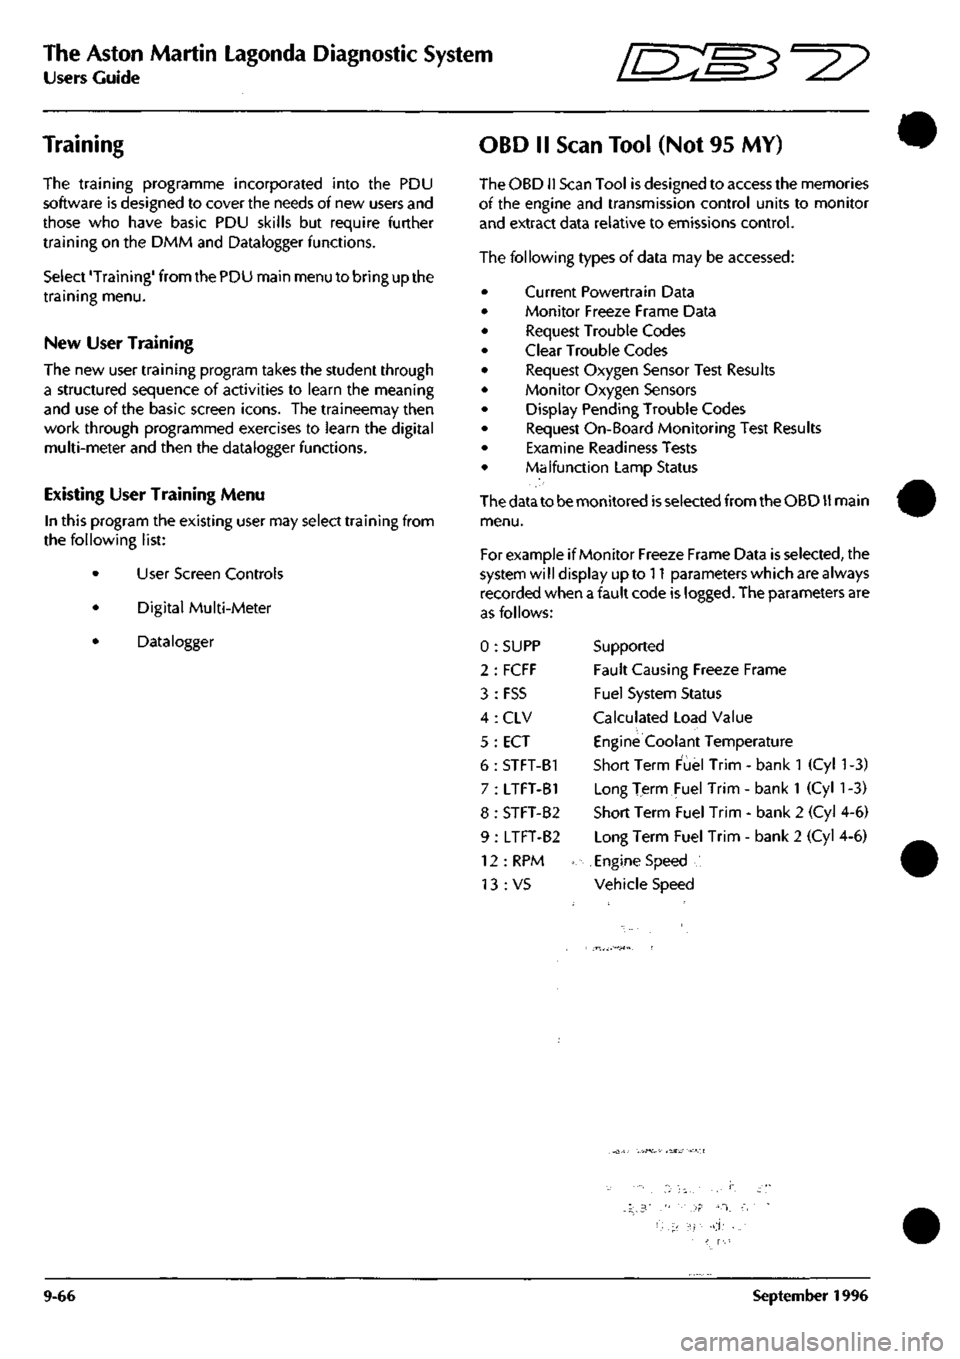
For example if Monitor Freeze Frame Data is selected, the
system will display up to 11 parameters which are always
recorded when a fault code is logged. The parameters are
as follows:
0 : SUPP Supported
2 : FCFF Fault Causing Freeze Frame
3 : FSS Fuel System Status
4 : CLV Calculated Load Value
5 : ECT Engine Coolant Temperature
6 : STFT-B1 Short Term Fuel Trim - bank 1 (Cyl
1
-3)
7 : LTFT-B1 Long Term Fuel Trim - bank
1
(Cyl 1-3)
8 : STFT-B2 Short Term Fuel Trim - bank 2 (Cyl 4-6)
9 : LTFT-B2 Long Term Fuel Trim - bank 2 (Cyl 4-6)
12:RPM .Engine Speed
13:VS Vehicle Speed
•'••) ••