sensor ASTON MARTIN DB7 1997 Repair Manual
[x] Cancel search | Manufacturer: ASTON MARTIN, Model Year: 1997, Model line: DB7, Model: ASTON MARTIN DB7 1997Pages: 421, PDF Size: 9.31 MB
Page 344 of 421
^=2?
Air Conditioning
Portable Diagnostic Unit - Signal Definitions
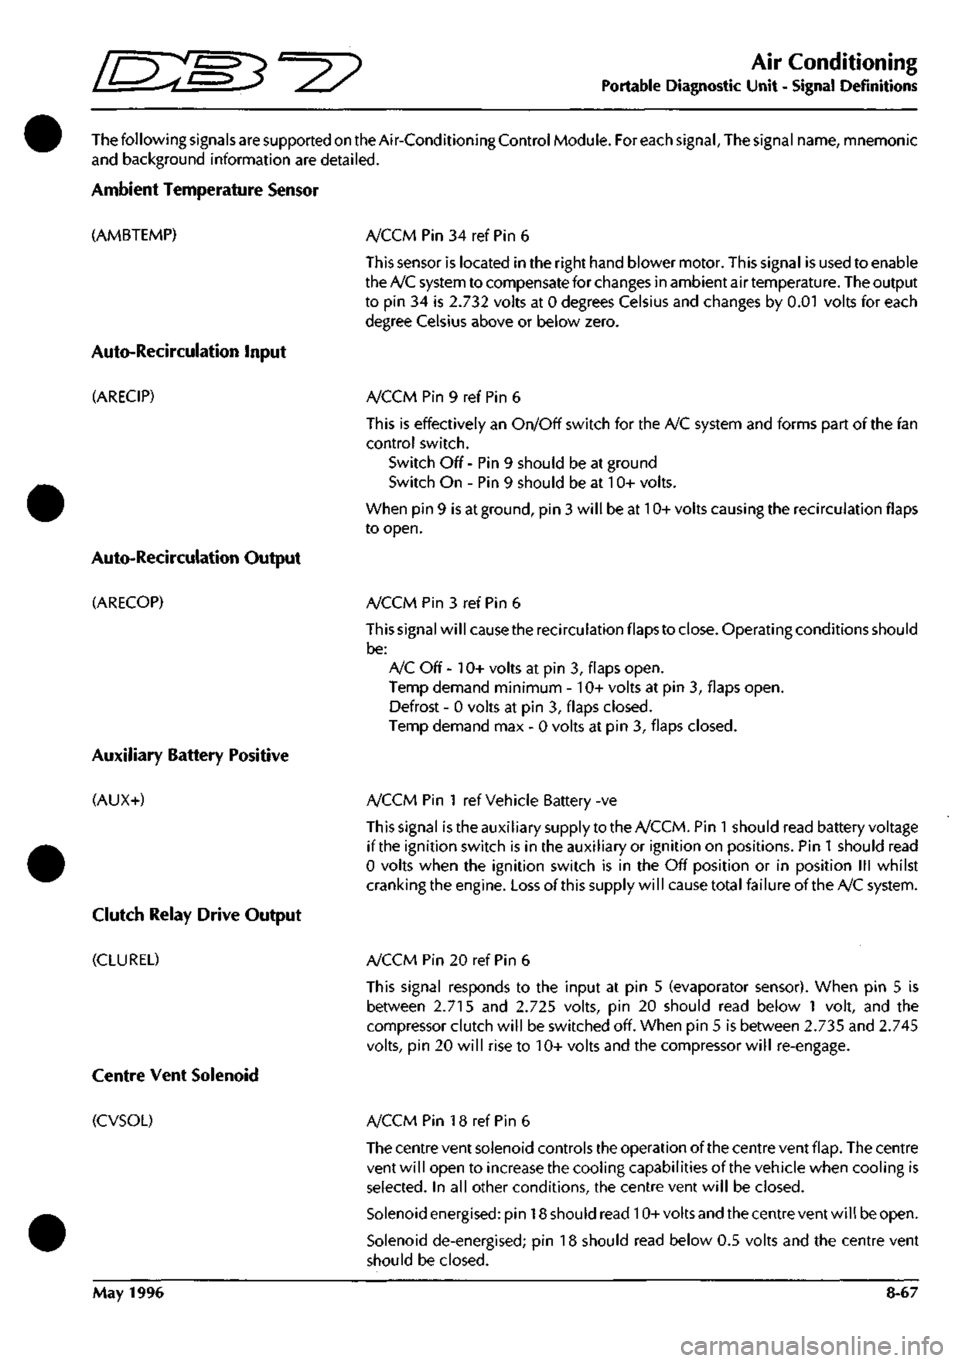
ThefollowingsignalsaresupportedontheAir-ConditioningControlModule. For each signal. The signal name, mnemonic
and background information are detailed.
Ambient Temperature Sensor
(AMBTEMP)
Auto-Recircuiation Input
(ARECIP)
Auto-Recirculation Output
(ARECOP)
Auxiliary Battery Positive
(AUX+)
Clutch Relay Drive Output
(CLUREL)
A/CCM Pin 34 ref Pin 6
This sensor is located in the right hand blower motor. This signal is used to enable
the A/C system to compensate for changes in ambient air temperature. The output
to pin 34 is 2.732 volts at 0 degrees Celsius and changes by 0.01 volts for each
degree Celsius above or below zero.
A/CCM Pin 9 ref Pin 6
This is effectively an On/Off switch for the A/C system and forms part of the fan
control switch.
Switch Off - Pin 9 should be at ground
Switch On - Pin 9 should be at 10+ volts.
When pin 9 is at ground, pin 3 will be at 10+ volts causing the recirculation flaps
to open.
A/CCM Pin 3 ref Pin 6
This signal will cause the recirculation flaps to close. Operating conditions should
be:
A/C Off - 10+ volts at pin 3, flaps open.
Temp demand minimum - 10+ volts at pin 3, flaps open.
Defrost - 0 volts at pin 3, flaps closed.
Temp demand max - 0 volts at pin 3, flaps closed.
A/CCM Pin 1 ref Vehicle Battery -ve
This signal istheauxiliary supply to the A/CCM. Pin
1
should read battery voltage
if the ignition switch is in the auxiliary or ignition on positions. Pin
1
should read
0 volts when the ignition switch is in the Off position or in position III whilst
cranking the engine. Loss of this supply will cause total failureof the A/C system.
A/CCM Pin 20 ref Pin 6
This signal responds to the input at pin 5 (evaporator sensor). When pin 5 is
between 2.715 and 2.725 volts, pin 20 should read below 1 volt, and the
compressor clutch will be switched off. When pin 5 is between 2.735 and 2.745
volts,
pin 20 will rise to 10+ volts and the compressor will re-engage.
Centre Vent Solenoid
(CVSOL) A/CCM Pin 18 ref Pin 6
The centre vent solenoid controls the operation of the centre vent flap. The centre
vent will open to increase the cooling capabilities of the vehicle when cooling is
selected.
In all other conditions, the centre vent will be closed.
Solenoid energised: pin 18 should read 10+volts and the centre vent will be open.
Solenoid de-energised; pin 18 should read below 0.5 volts and the centre vent
should be closed.
May 1996 8-67
Page 345 of 421

Air Conditioning
Portable Diagnostic Unit - Signal Definitions ^27
Defrost Solenoid
(DEFSOL)
Temperature Differential
(DIFF)
Evaporator Sensor
(EVSEN)
Fanspeed Defrost
(FANDEF)
Fanspeed High
(FANHIG)
Fanspeed Low
(FAN LOW)
A/CCM Pin 11 ref Pin 6
The defrost solenoid controls the operation ofthe screen vents. When the solenoid
is energised, the screen vents will be held closed by the vacuum created. To open
the vents the solenoid is de-energised.
The solenoid is energised when a ground supply is provided to pin 11. The
solenoid is de-energised when the ground supply is removed, at which point 10+
volts can be read at pin 11.
A/CCM Pin 28 ref Pin 6
This sets the differential between the position ofthe upper and lower flaps. With
minimum differential selected, pin 28 should read between 0 and 100 millivolts.
The voltage at pin 28 will rise smoothly as the differential is increased, up to a
maximum of 2.885 volts.
A/CCM Pin 5 ref Pin 6
This sensor monitors the temperature of the evaporator matrix, the output is used
to trigger the compressor circuit via the A/CCM pin 20. Operating conditions are
2.732 volts at 0 degrees Celsius ±0.01 volts for every degree Celsius above or
below zero.
A/CCM Pin 27 ref Pin 6
This signal is normal ly held at 3.6 ±0.8 volts by the control module. When Defrost
is selected from the control panel, the line is pulled down to 0.6 volts or below.
This will cause the defrost flaps to open by applying system voltage (approx 11
volts) to pin
11.
In addition, both fans will go to full speed i.e. high speed fan relay
energised .
A/CCM Pin 15 ref Pin 6
This signal is generated from the fan speed control switch.
Switch at High, pin
1
5 should read 0.6 volts.
Switch at Off, L, M or D positions, pin 15 should read 3.6 ±0.8 volts.
A/CCM Pin 13 ref Pin 6
This signal is generated from the fanspeed control switch.
Switch at Low, pin 13 should read 0.6 volts.
Switch at Off, M, H or D positions, pin 13 should read 3.6 ±0.8 volts.
8-68 May 1996
Page 346 of 421
3^7?
Air Conditioning
Portable Diagnostic Unit - Signal Definitions
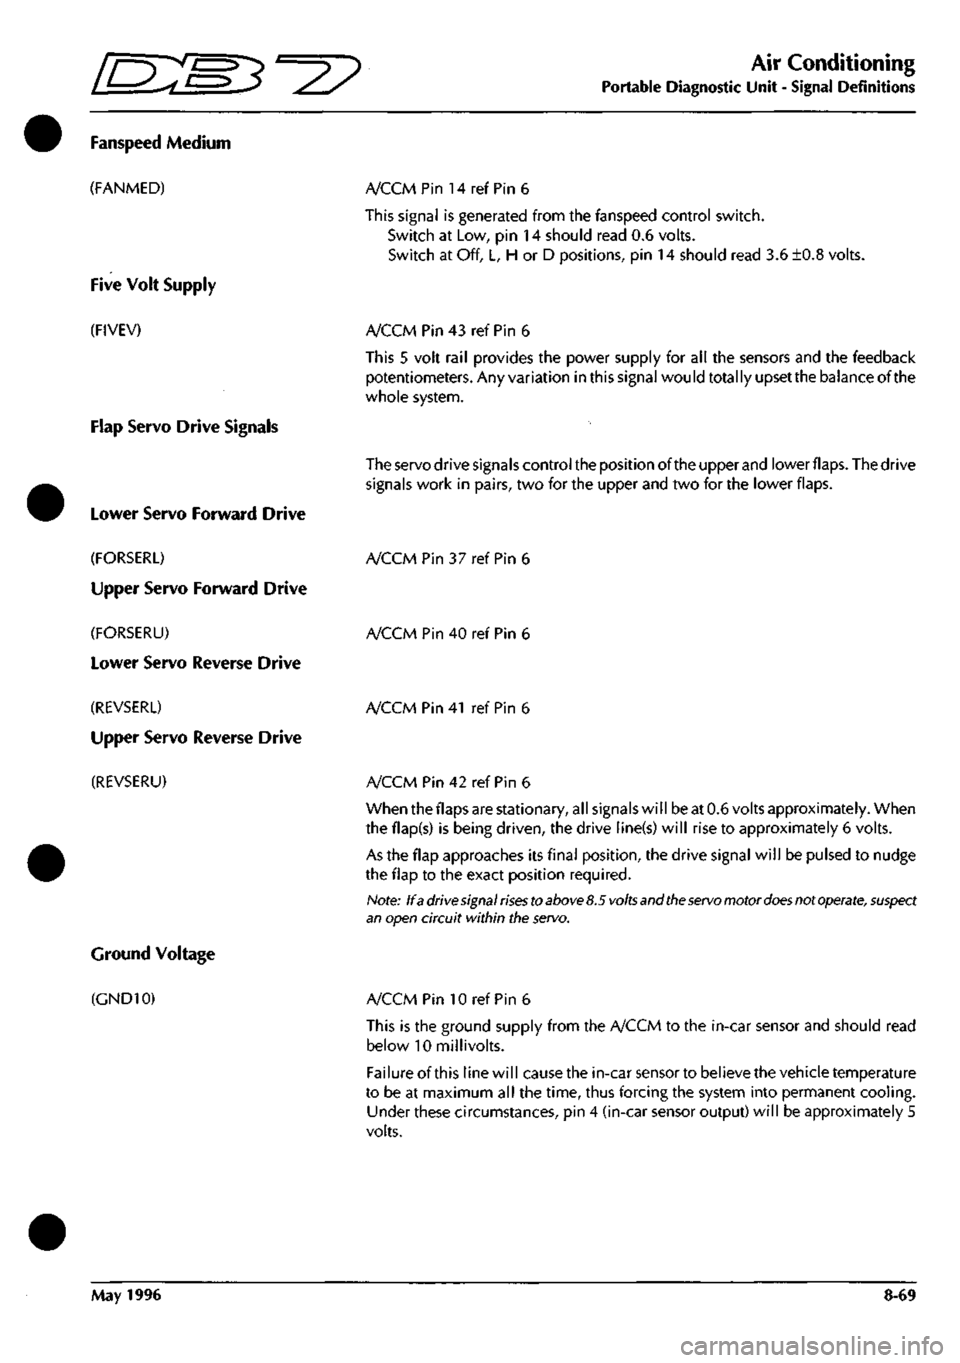
Fanspeed Medium
(FANMED)
Five Volt Supply
(FIVEV)
Flap Servo Drive Signals
Lower Servo Forward Drive
(FORSERL)
Upper Servo Forward Drive
(FORSERU)
Lower Servo Reverse Drive
(REVSERL)
Upper Servo Reverse Drive
(REVSERU)
Ground Voltage
(GND10)
A/CCMPin 14ref Pin6
This signal is generated from the fanspeed control switch.
Switch at Low, pin 14 should read 0.6 volts.
Switch at Off, L, H or D positions, pin 14 should read 3.6 ±0.8 volts.
A/CCM Pin 43 ref Pin 6
This 5 volt rail provides the power supply for all the sensors and the feedback
potentiometers. Any variation in this signal would totally upset the balance of the
whole system.
The servo drive signals control the position of the upper and lower
flaps.
The drive
signals work in pairs, two for the upper and two for the lower flaps.
A/CCM Pin 37 ref Pin 6
A/CCM Pin 40 ref Pin 6
A/CCM Pin 41 ref Pin 6
A/CCM Pin 42 ref Pin 6
When the flaps are stationary, all signals will be at 0.6 volts approximately. When
the flap(s) is being driven, the drive iine(s) will rise to approximately 6 volts.
As the flap approaches its final position, the drive signal will be pulsed to nudge
the flap to the exact position required.
Note: If
a
drive
signal rises to above
8.5
volts
and
the servo
motor
does
not
operate,
suspect
an open circuit within the servo.
A/CCM Pin 10 ref Pin 6
This is the ground supply from the A/CCM to the in-car sensor and should read
below 10 millivolts.
Failure of this line will cause the in-car sensor to believe the vehicle temperature
to be at maximum all the time, thus forcing the system into permanent cooling.
Under these circumstances, pin 4 (in-car sensor output) will be approximately 5
volts.
May 1996 8-69
Page 347 of 421
Air Conditioning
Portable Diagnostic Unit - Signal Definitions ^^P
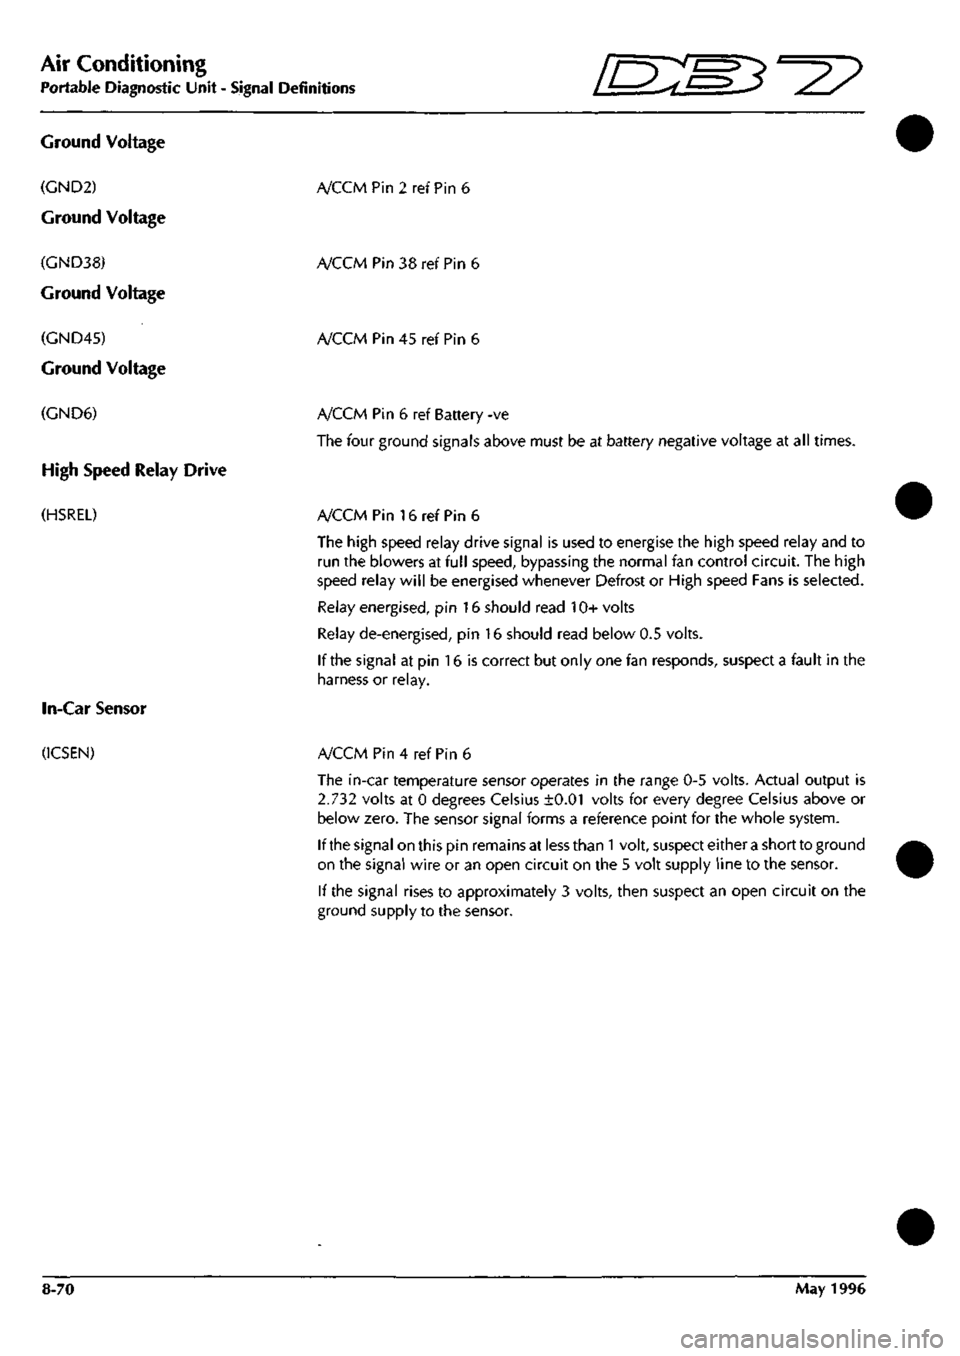
Ground Voltage
(GND2)
Ground Voltage
(GND38)
Ground Voltage
(GND45)
Ground Voltage
(GND6)
High Speed Relay Drive
(HSREL)
In-Car Sensor
(ICSEN)
A/CCMPin2refPin6
A/CCM Pin 38 ref Pin 6
A/CCM Pin 45 ref Pin 6
A/CCM Pin 6 ref Battery -ve
The four ground signals above must be at battery negative voltage at all times.
A/CCM Pin 16 ref Pin 6
The high speed relay drive signal is used to energise the high speed relay and to
run the blowers at full speed, bypassing the normal fan control circuit. The high
speed relay will be energised whenever Defrost or High speed Fans is selected.
Relay energised, pin 16 should read 10+ volts
Relay de-energised, pin 16 should read below 0.5 volts.
If the signal at pin 16 is correct but only one fan responds, suspect a fault in the
harness or relay.
A/CCM Pin 4 ref Pin 6
The in-car temperature sensor operates in the range 0-5 volts. Actual output is
2.732 volts at 0 degrees Celsius ±0.01 volts for every degree Celsius above or
below zero. The sensor signal forms a reference point for the whole system.
If the signal on this pin remains at less than
1
volt, suspect either a short to ground
on the signal wire or an open circuit on the 5 volt supply line to the sensor.
If the signal rises to approximately 3 volts, then suspect an open circuit on the
ground supply to the sensor.
8-70 May 1996
Page 350 of 421
O" D'^?
Air Conditioning
Portable Diagnostic Unit - Signal Definitions
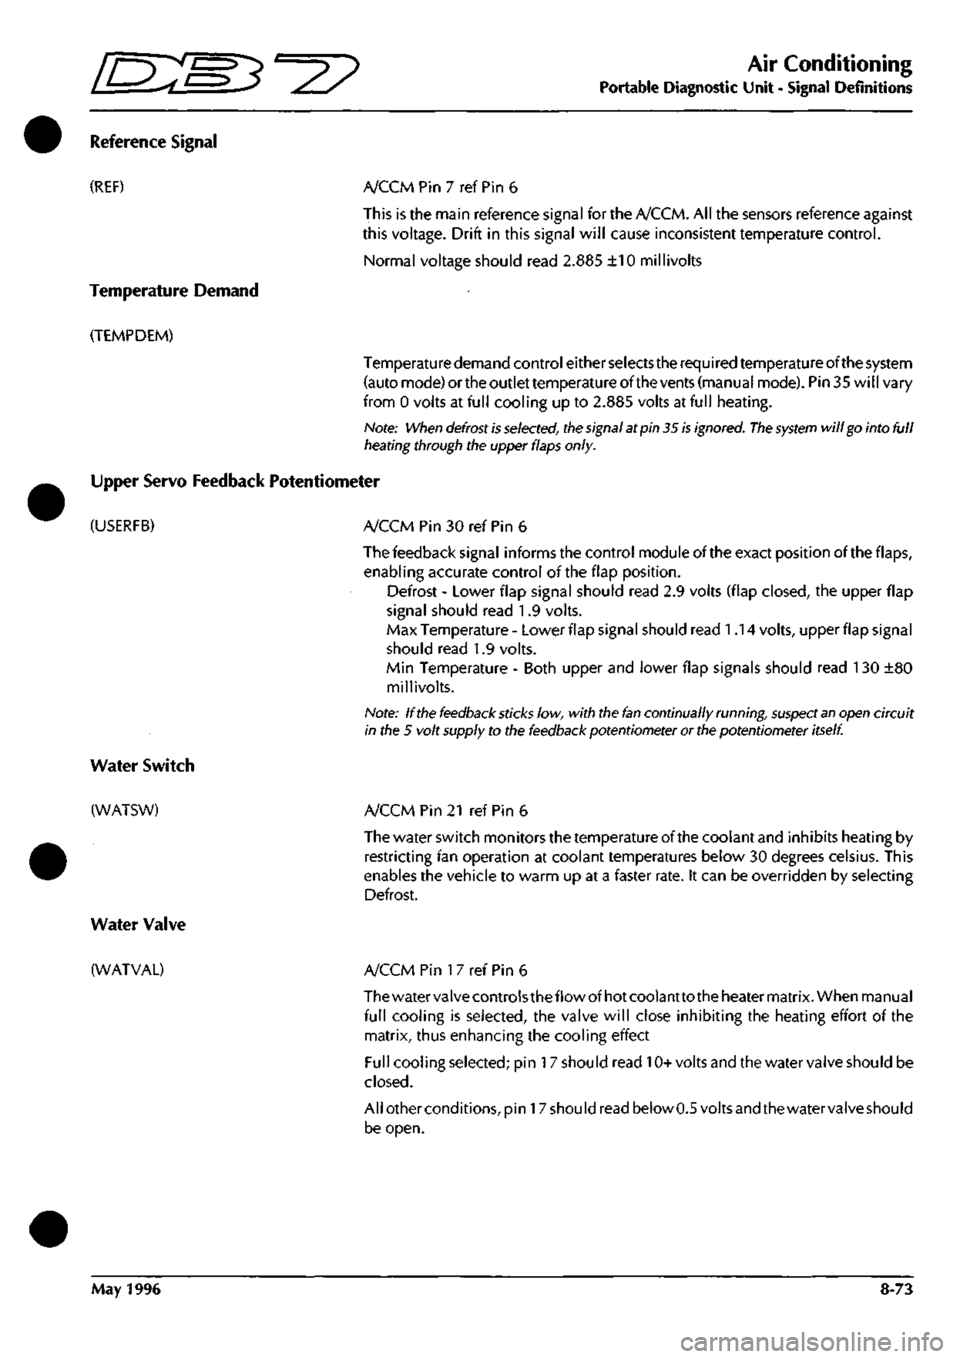
Reference Signal
(REF) A/CCM Pin 7 ref Pin 6
This is the main reference signal for the A/CCM. All the sensors reference against
this voltage. Drift in this signal will cause inconsistent temperature control.
Normal voltage should read 2.885 ±10 millivolts
Temperature Demand
(TEMPDEM)
Temperature demand control either selects the required temperature of the system
(auto mode) or the outlet temperature of the vents (manual mode). Pin 35 will vary
from 0 volts at full cooling up to 2.885 volts at full heating.
Note: When
defrost is
selected,
the
signal at pin 35
is
ignored.
The system
will go into full
heating through the upper flaps
only.
Upper Servo Feedback Potentiometer
(USERFB) A/CCM Pin 30 ref Pin 6
The feedback signal informs the control module ofthe exact position of the flaps,
enabling accurate control ofthe flap position.
Defrost - Lower flap signal should read 2.9 volts (flap closed, the upper flap
signal should read 1.9 volts.
Max Temperature - Lower flap signal should read 1.14 volts, upper flap signal
should read 1.9 volts.
Min Temperature - Both upper and lower flap signals should read
1
30 ±80
millivolts.
Note: If the
feedback sticks
low, with the
fan
continually running,
suspect an
open circuit
in the 5 volt supply to the feedback potentiometer or the potentiometer itself
Water Switch
(WATSW)
Water Valve
(WATVAL)
A/CCM Pin 21 ref Pin 6
The water switch monitors the temperature ofthe coolant and inhibits heating by
restricting fan operation at coolant temperatures below 30 degrees Celsius. This
enables the vehicle to warm up at a faster rate. It can be overridden by selecting
Defrost.
A/CCM Pin
1
7 ref Pin 6
The water valve controls thef low of hot coolant to the heater matrix. When manual
full cooling is selected, the valve will close inhibiting the heating effort ofthe
matrix, thus enhancing the cooling effect
Full cooling selected; pin
1
7 should read 10+volts and the water valve should be
closed.
All other conditions, pin
1
7 should read below 0.5 volts and the water valve should
be open.
May 1996 8-73
Page 385 of 421
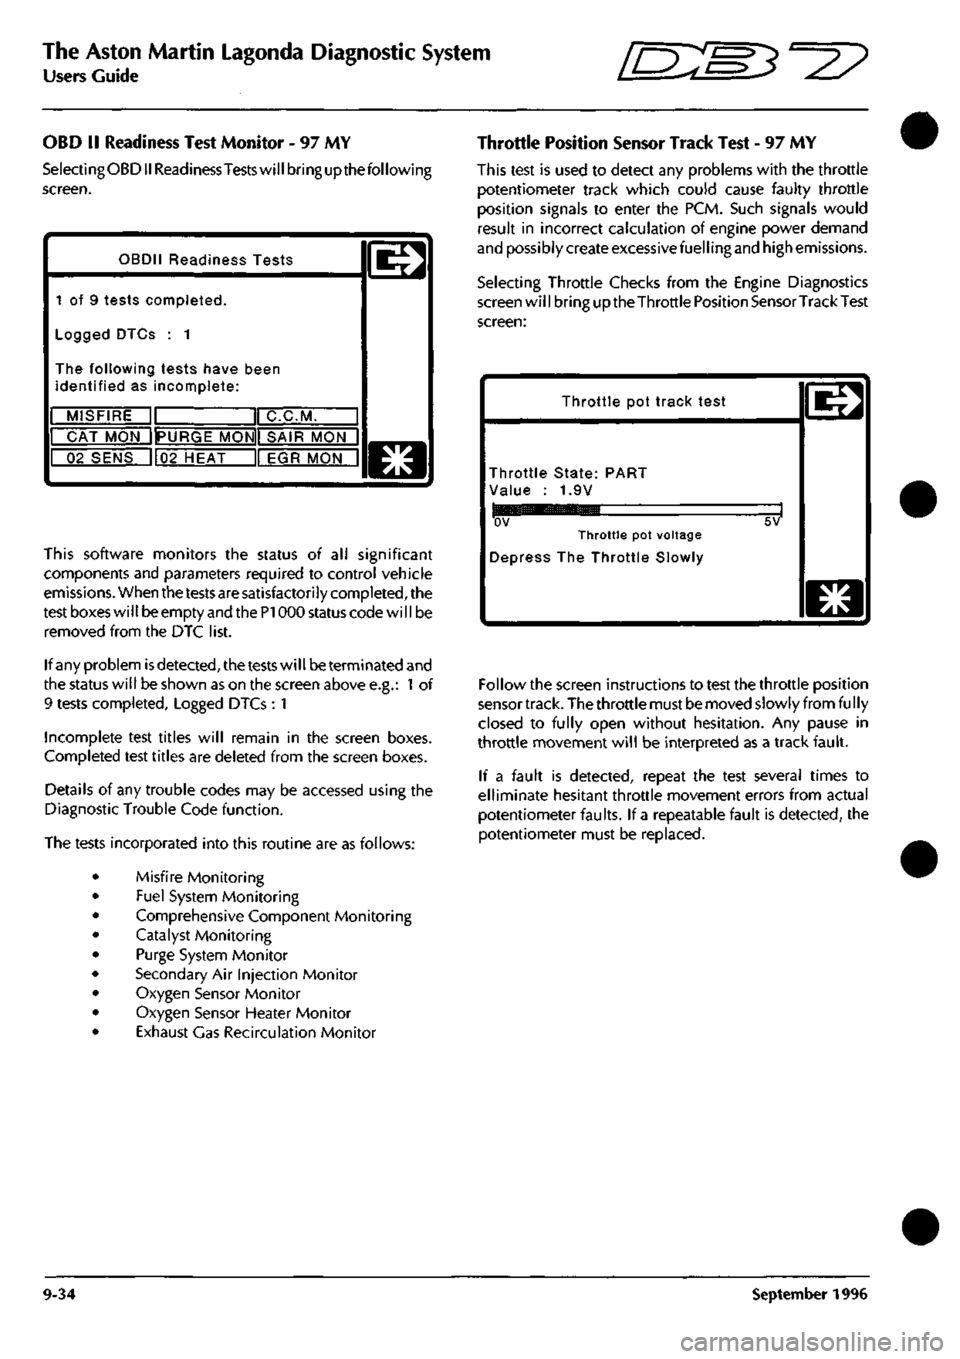
The Aston Martin Lagonda Diagnostic System
Users Guide ^-^z?
OBD
II
Readiness Test Monitor
- 97 MY
SelectingOBD II Readiness
Tests
will bring up the following
screen.
OBDII Readiness Tests
1
of 9
tests completed.
Logged DTCs
: 1
The following tests have been
identified
as
incomplete:
MISFIRE
ir
1 C.C.M.
CAT MON 1IPURGE
MONII SAIR
M"ONn
02 SENS
1l02
HEAT
II EGR
MONTI
@
This software monitors
the
status
of all
significant
components and parameters required
to
control vehicle
emissions. When the tests are satisfactorily completed, the
test boxes wi
11
be empty and the PI 000 status code wi
11
be
removed from
the DTC
list.
If any problem
is
detected,
the tests will be terminated and
the status will be shown as
on
the screen above e.g.:
1 of
9 tests completed. Logged DTCs
: 1
Incomplete test titles will remain
in the
screen boxes.
Completed test titles are deleted from
the
screen boxes.
Details
of any
trouble codes
may be
accessed using
the
Diagnostic Trouble Code function.
The tests incorporated into this routine are as follows:
Misfire Monitoring
Fuel System Monitoring
Comprehensive Component Monitoring
Catalyst Monitoring
Purge System Monitor
Secondary
Air
Injection Monitor
Oxygen Sensor Monitor
Oxygen Sensor Heater Monitor
Exhaust Gas Recirculation Monitor
Throttle Position Sensor Track Test
- 97 MY
This test
is
used
to
detect
any
problems with
the
throttle
potentiometer track which could cause faulty throttle
position signals
to
enter
the
PCM. Such signals would
result
in
incorrect calculation
of
engine power demand
and possibly create excessive fuelling and high emissions.
Selecting Throttle Checks from
the
Engine Diagnostics
screen will bring uptheThrottle Position Sensor Track Test
screen:
Throttle
pot
track test
Throttle State: PART
Value
: 1.9V
ov
Throttle
pot
voltage
Depress
The
Throttle Slowly
5V
o
Follow the screen instructions
to
test the throttle position
sensor track. The throttle must be moved slowly from fu
I
ly
closed
to
fully open without hesitation.
Any
pause
in
throttle movement will
be
interpreted
as a
track fault.
If
a
fault
is
detected, repeat
the
test several times
to
elliminate hesitant throttle movement errors from actual
potentiometer faults.
If
a repeatable fault
is
detected,
the
potentiometer must
be
replaced.
9-34 September
1996
Page 387 of 421
The Aston Martin Lagonda Diagnostic System
Users Guide ffi:S5'=2?
Engine Datalogger
The datalogger software is designed to aid the technician in identifying permanent or intermittent faults in the DB7's
electrical and electronic systems. It can provide a recorded view of selected signals over a chosen time period. This
recording may be captured in a static, rolling road or road test situation. Data recorded during such tests may then be
analysed on completion of the test or printed out for later analysis.
Datalogger operation is described using a fully worked example at the end of this PDU Users Guide.
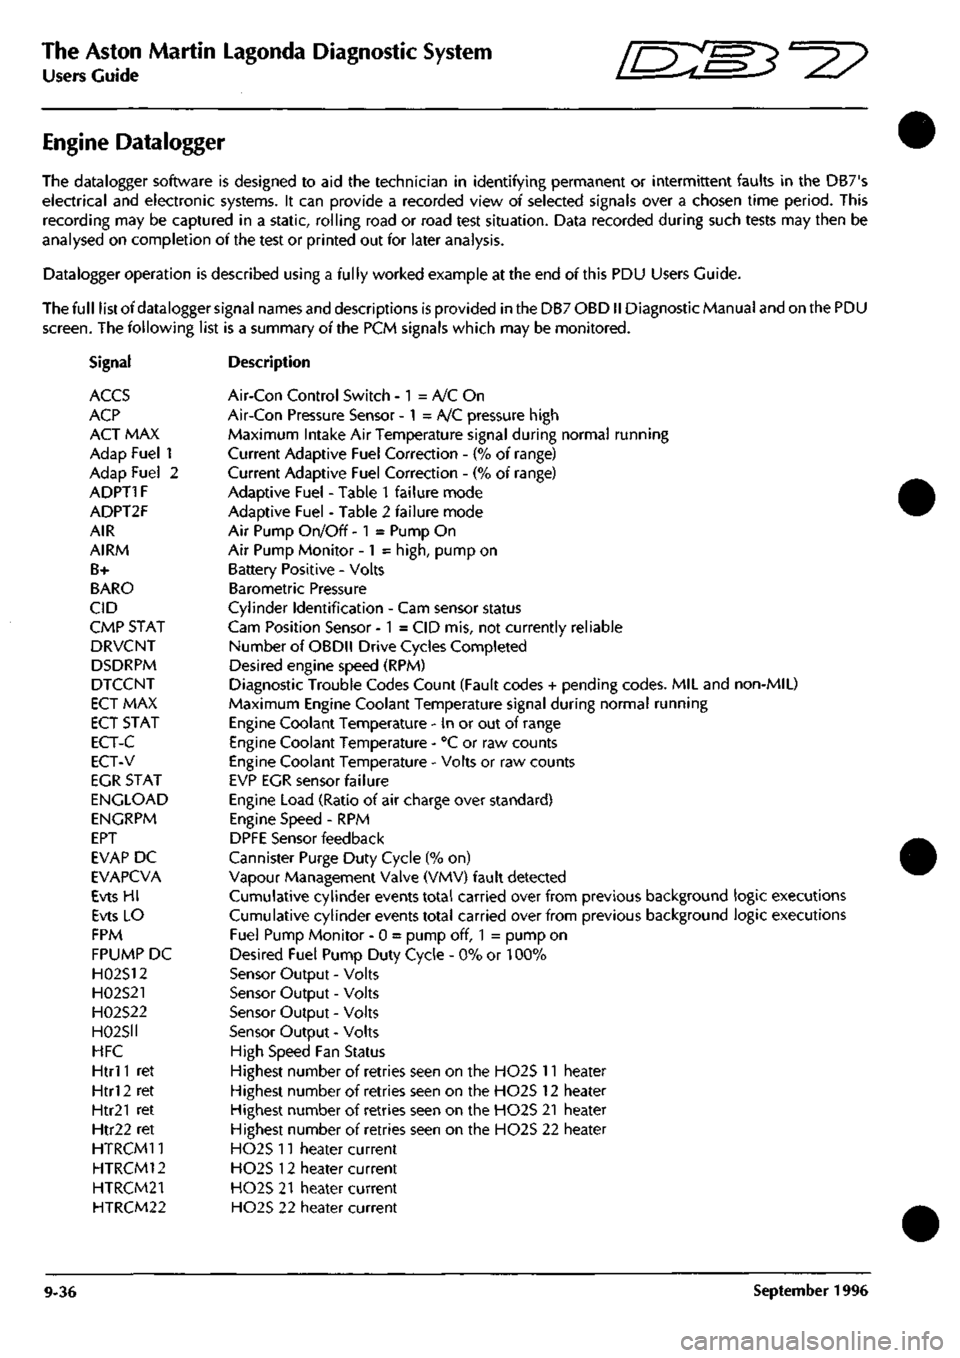
The full list of datalogger signal names and descriptions is provided in the DB7 OBDII Diagnostic Manual and on the PDU
screen.
The following list is a summary of the PCM signals which may be monitored.
Signal Description
ACCS Air-Con Control Switch - 1 = A/C On
ACP Air-Con Pressure Sensor - 1 = A/C pressure high
ACT MAX Maximum Intake Air Temperature signal during normal running
Adap Fuel 1 Current Adaptive Fuel Correction - (% of range)
Adap Fuel 2 Current Adaptive Fuel Correction - (% of range)
ADPT1F Adaptive Fuel - Table 1 failure mode
ADPT2F Adaptive Fuel - Table 2 failure mode
AIR Air Pump On/Off - 1 = Pump On
AIRM Air Pump Monitor -1 =
high,
pump on
B+ Battery Positive - Volts
BARO Barometric Pressure
CID Cylinder Identification - Cam sensor status
CMP STAT Cam Position Sensor -1 = CID mis, not currently reliable
DRVCNT Number of OBDll Drive Cycles Completed
DSDRPM Desired engine speed (RPM)
DTCCNT Diagnostic Trouiale Codes Count (Fault codes + pending codes. MIL and non-MIL)
ECT MAX Maximum Engine Coolant Temperature signal during normal running
ECT STAT Engine Coolant Temperature - in or out of range
ECT-C Engine Coolant Temperature - "C or raw counts
ECT-V Engine Coolant Temperature - Volts or raw counts
EGR STAT EVP EGR sensor failure
ENGLOAD Engine Load (Ratio of air charge over standard)
ENGRPM Engine Speed - RPM
EPT DPFE Sensor feedback
EVAP DC Cannister Purge Duty Cycle (% on)
EVAPCVA Vapour Management Valve (VMV) fault detected
Evts HI Cumulative cylinder events total carried over from previous background logic executions
Evts LO Cumulative cylinder events total carried over from previous background logic executions
FPM Fuel Pump Monitor - 0 = pump off, 1 = pump on
FPUMP DC Desired Fuel Pump Duty Cycle - 0% or 100%
H02S12 Sensor Output - Volts
H02S21 Sensor Output - Volts
H02S22 Sensor Output - Volts
H02S1I Sensor Output - Volts
HFC High Speed Fan Status
Htrl
1
ret Highest number of retries seen on the H02S 11 heater
Htrl 2 ret Highest number of retries seen on the H02S 12 heater
Htr21 ret Highest number of retries seen on the H02S 21 heater
Htr22 ret Highest number of retries seen on the H02S 22 heater
HTRCM11 H02S n heater current
HTRCM12 H02S 12 heater current
HTRCM21 H02S 21 heater current
HTRCM22 H02S 22 heater current
9-36 September 1996
Page 388 of 421

^
The Aston Martin Lagonda Diagnostic System
Users Guide
Signal Description
lACDTCY Idle Air Control Duty Cycle (% open)
lAT Intake Air Temperature - °C or raw input counts
lAT STAT Air Temperature - Temperature sensor failure
lAT-V Intake Air Temperature - Volts or raw counts
IGN Desired Ignition Timing - ° BTDC
INDS Input from manual lever position sensor (counts)
IPWA Injector Pulse Width in mS- Bank A (Cylinders
1
-3)
IPWB Injector Pulse Width in mS- Bank B (Cylinders 4-6)
LAMSE1 Current Short Term Fuel Trim 1, adjustment from stoich - (% of range)
LAMSE2 Current Short Term Fuel Trim 2, adjustment from stoich - (% of range)
LFC Low Speed Fan Status
LOOP Fuel Control -1 = Open Loop, 0 = Closed Loop
MAF MAX Maximum Mass Air Flow signal during normal running
MAF Raw MAF sensor output (A/D counts)
MAF STAT Mass Air Flow Meter - MAF sensor failure
MIL Mali Indicator Lamp Status -1 = Lamp On
Mis HI Cumulative misfires detected by misfire test (Hi bit).
Mis LO Cumulative misfires detected by misfire test (Lo bit).
Mis nc HI Cumulative misfires detected by a misfire test (Hi bit).
Mis nc LO Cumulative misfires detected by a misfire test.
Misi HI Cumulative misfires detected by cylinder
1
misfire test (Hi bit).
Misi LO Cumulative misfires detected by cylinder
1
misfire test (Lo bit).
Mis2 HI Cumulative misfires detected by cylinder 2 misfire test (Hi bit).
Mis2 LO Cumulative misfires detected by cylinder 2 misfire test (Lo bit).
Mis3 HI Cumulative misfires detected by cylinder 3 misfire test (Hi bit).
Mis3 LO Cumulative misfires detected by cylinder 3 misfire test (Lo bit).
Mis4 HI Cumulative misfires detected by cylinder 4 misfire test (Hi bit).
Mis4 LO Cumulative misfires detected by cylinder 4 misfire test (Lo bit).
Mis5 HI Cumulative misfires detected by cylinder 5 misfire test (Hi bit).
Mis5 LO Cumulative misfires detected by cylinder 5 misfire test (Lo bit).
Mis6 HI Cumulative misfires detected by cylinder 6 misfire test (Hi bit).
Mis6 LO Cumulative misfires detected by cylinder 6 misfire test (Lo bit).
MISF Misfire Monitor - 1 = Currently misfiring
ODCODES Total number of on-demand codes currently stored.
PGM CVS DC Purge Management Duty Cycle (% on)
PIP Profile ignition Pick-Up - PIP input level
PNP Park Neutral Position Switch
R-BIAS1 Rear bias trim (Bank 1, cylinders
1
-3)
R-BIAS2 Rear bias trim (Bank 2, cylinders 4-6)
RATCH Lowest TP reading during driving
TP MAX Maximum Throttle Potentiometer signal during normal running
TP STAT Throttle Position Sensor - TP sensor failure
TP Throttle Potentiometer - Volts or counts
TPR-V Raw counts from sensor
TQ-NET Net torque into the torque convertor
TRIP OBDII Drive Cycle Complete (except cat monitor) - 1 = Trip completed
TRIPCNT Number of Completed OBDII Trips
VS MAX Maximum Vehicle Speed signal during normal running
VS STAT Vehicle Speed Sensor mode flag
VS Vehicle Speed - MPH
WAC Wide Open Throttle A/C Cut-Off -1 = High (WOT Relay)
September 1996 9-37
Page 389 of 421
The Aston Martin Lagonda Diagnostic System
Users Guide ^?
Engine Setup
- 95 MY
Two adjustments
may
beset with the aid of the PDU
on 95
MY vehicles.
• Throttle Potentiometer
• Idle Fuelling Trim
From
the 95 MY
Main Menu, make
and
confirm
the
following sequence
of
selections:
Diagnostics
/
Manual
or
Auto Transmission
/
Engine
/
Engine Setup
/
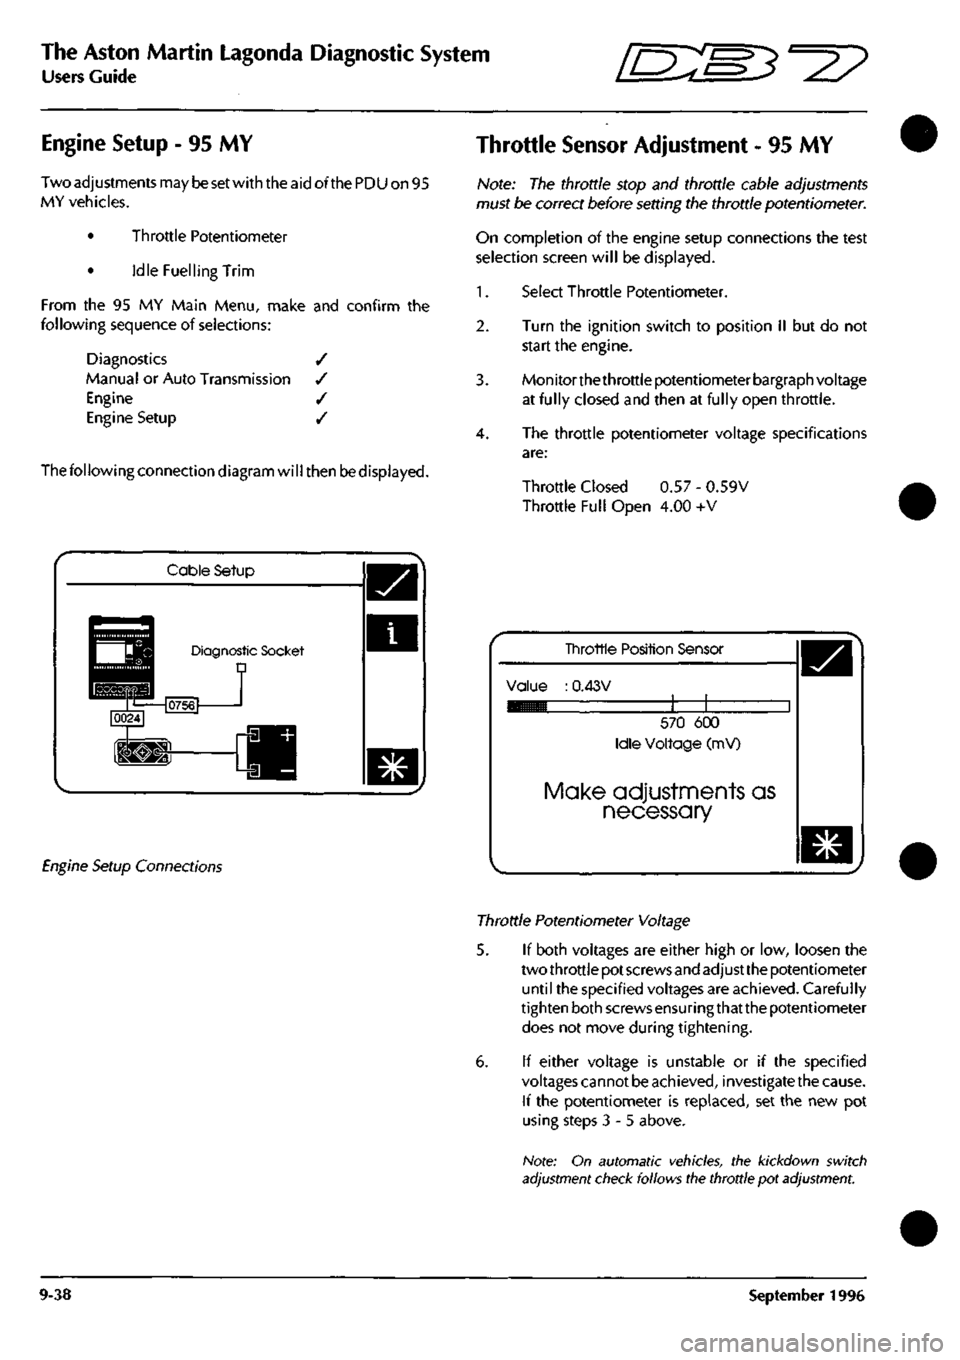
The following connection diagram will then be displayed.
Throttle Sensor Adjustment
- 95 MY
Note:
The
throttle stop
and
throttle cable adjustments
must
be
correct before setting
the
throttle potentiometer.
On completion
of the
engine setup connections
the
test
selection screen will
be
displayed.
1.
Select Throttle Potentiometer.
2.
Turn
the
ignition switch
to
position
II but do not
start
the
engine.
3. Monitorthethrottle potentiometer bargraph voltage
at fully closed
and
then
at
fully open throttle.
4.
The
throttle potentiometer voltage specifications
are:
Throttle Closed
0.57 -
0.59V
Throttle Full Open
4.00 +V
Cable Setup
Diagnostic Socket D
Engine Setup Connections
Tinrottle Position Sensor
Value
:
0.43V
570
600
Idle Voltage
(mV)
Make adjustments as
necessary
Throttle Potentiometer Voltage
5.
If
both voltages
are
either high
or low,
loosen
the
two throttle pot screws and adjust the potentiometer
until
the
specified voltages
are
achieved. Carefully
tighten both screws ensuringthat the potentiometer
does
not
move during tightening.
6.
If
either voltage
is
unstable
or if the
specified
voltages cannot
be
achieved, investigate the cause.
If
the
potentiometer
is
replaced,
set the new pot
using steps
3-5
above.
Note:
On
automatic vehicles,
the
kickdown switch
adjustment check follows the throttle
pot
adjustment.
9-38 September
1996
Page 390 of 421
ffi:
The Aston Martin Lagonda Diagnostic System
Users Guide
Idle Fuelling Trim - 95 MY
This program is used to check and if necessary reset the
fuelling level at idle to ensure that the specified idle speed
and emission levels are attainable. The throttle
potentiometer adjustment sequence must be completed
before the fuel trim sequence can be run.
Note: The throttle setup must be completed before
attempting to set the Idle Fuelling Trim. An error in
throttle
stop,
throttle cable or throttle pot
adjustments can
cause serious
difficulties in setting the Idle Fuelling.
Select Idle Fuelling Trim from the Engine Setup
Menu.
(The PDU connections are
as
fortheThrottle
Potentiometer Adjustment.)
1.
3.
StarttheDB7engineand allow itto warm to normal
operating temperature.
Followthescreeninstructionstorunthe idle fuelling
trim procedure.
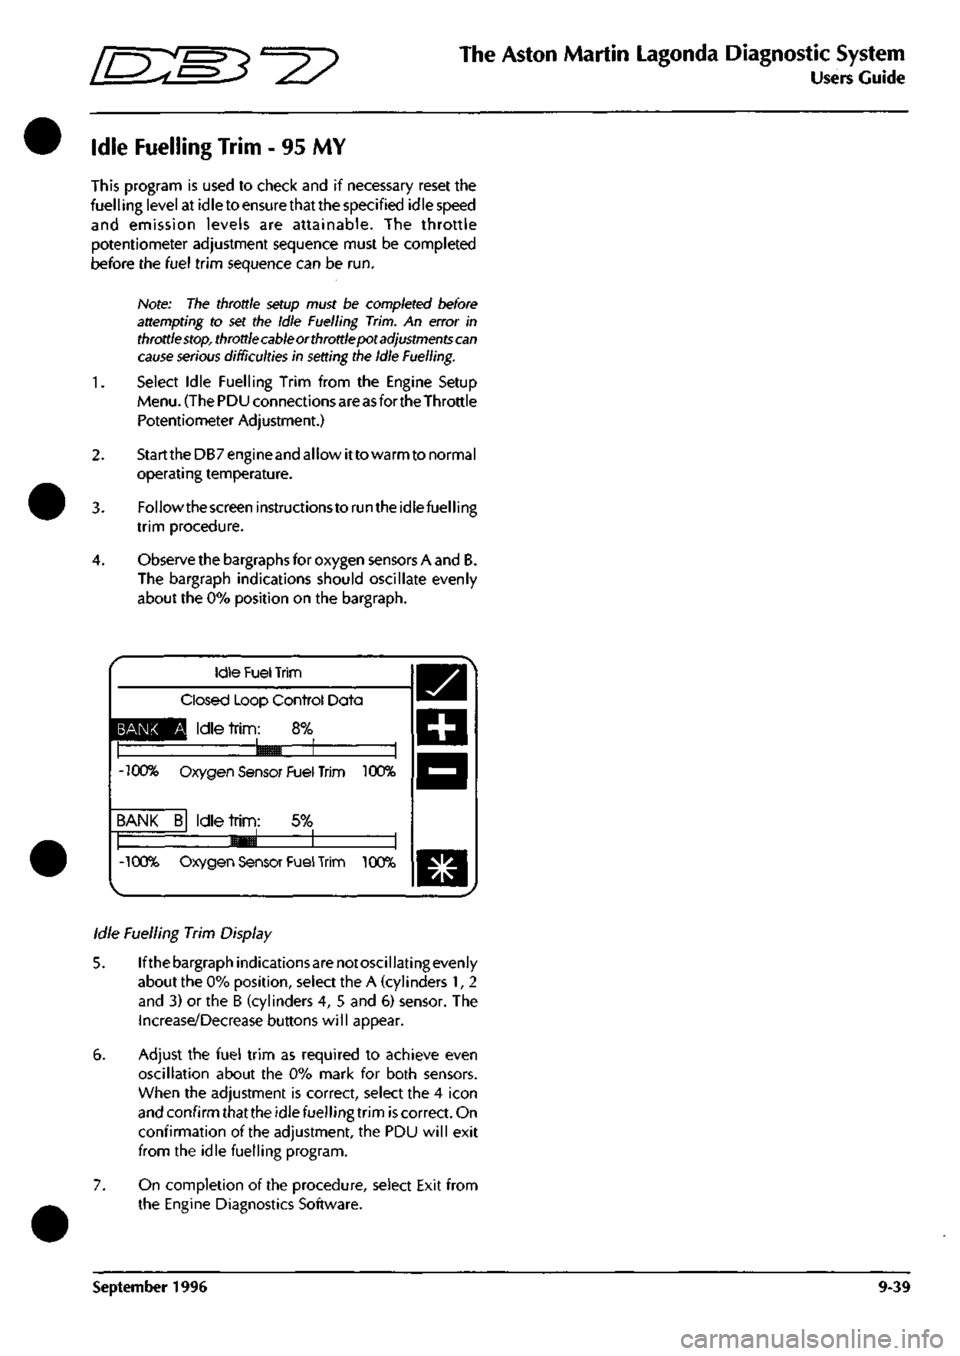
Observe the bargraphs for oxygen sensors A and B.
The bargraph indications should oscillate evenly
about the 0% position on the bargraph.
BANK
-100%
BANK
-100%
Idle
Fuel
Trim
Closed Loop Control Data
Q Idle
trim:
8%
9^B 1 1
Oxygen Sensor Fuel Trim 100%
B Idle
trim:
5% —1 1 1
«^
1 1 Oxygen Sensor Fuel
Trim
100%
Idle Fuelling Trim Display
5. Ifthebargraphindicationsarenotoscillatingevenly
about the 0% position, select the A (cylinders 1, 2
and 3) or the B (cylinders 4, 5 and 5) sensor. The
Increase/Decrease buttons will appear.
6. Adjust the fuel trim as required to achieve even
oscillation about the 0% mark for both sensors.
When the adjustment is correct, select the 4 icon
and confirm that the idle fuelling trim is correct. On
confirmation of the adjustment, the PDU will exit
from the idle fuelling program.
7. On completion of the procedure, select Exit from
the Engine Diagnostics Software.
September 1996 9-39