wiring ASTON MARTIN DB7 1997 Workshop Manual
[x] Cancel search | Manufacturer: ASTON MARTIN, Model Year: 1997, Model line: DB7, Model: ASTON MARTIN DB7 1997Pages: 421, PDF Size: 9.31 MB
Page 10 of 421
Electrics
Electrical Component Location and Wiring Information - Up to 97 MY
Component Index 6-19
Component Location Diagrams 6-23
Electronic Control Unit Location Diagram 6-38
Relay Panel, Fusebox and Earth Point Location Diagram 6-39
Loom Location Diagrams 6-40
Wiring Diagrams and Splice Lists 6-42
Electrical Component Location and Wiring Information - 97 MY
Component Index 6-43
Component Location Diagrams 6-47
Relay Location Diagrams 6-64
Wiring Diagrams and Splice Lists 6-68
Airbag System - Repair and Diagnostic Procedures 6-69
Seat Belt Pretensioner System - Repair and Diagnostic Procedures 6-101
Security System (Restricted Circulation) 6-111
PATS System (Restricted Circulation) 6-121
97.5 Model Year
6.6.03 Seat Removal (97.5 MY)
6.6.08 Seat Control Module (97.5 MY)
6-127
6-128
6-2 April! 997
Page 12 of 421
Electrics
Front Exterior Lamps - Removal Procedures E::M^=2?
6.1.03 Front Indicator/Parking
Lamp
Unit 6.1.05 Side Repeater Lamps
Procedure
1.
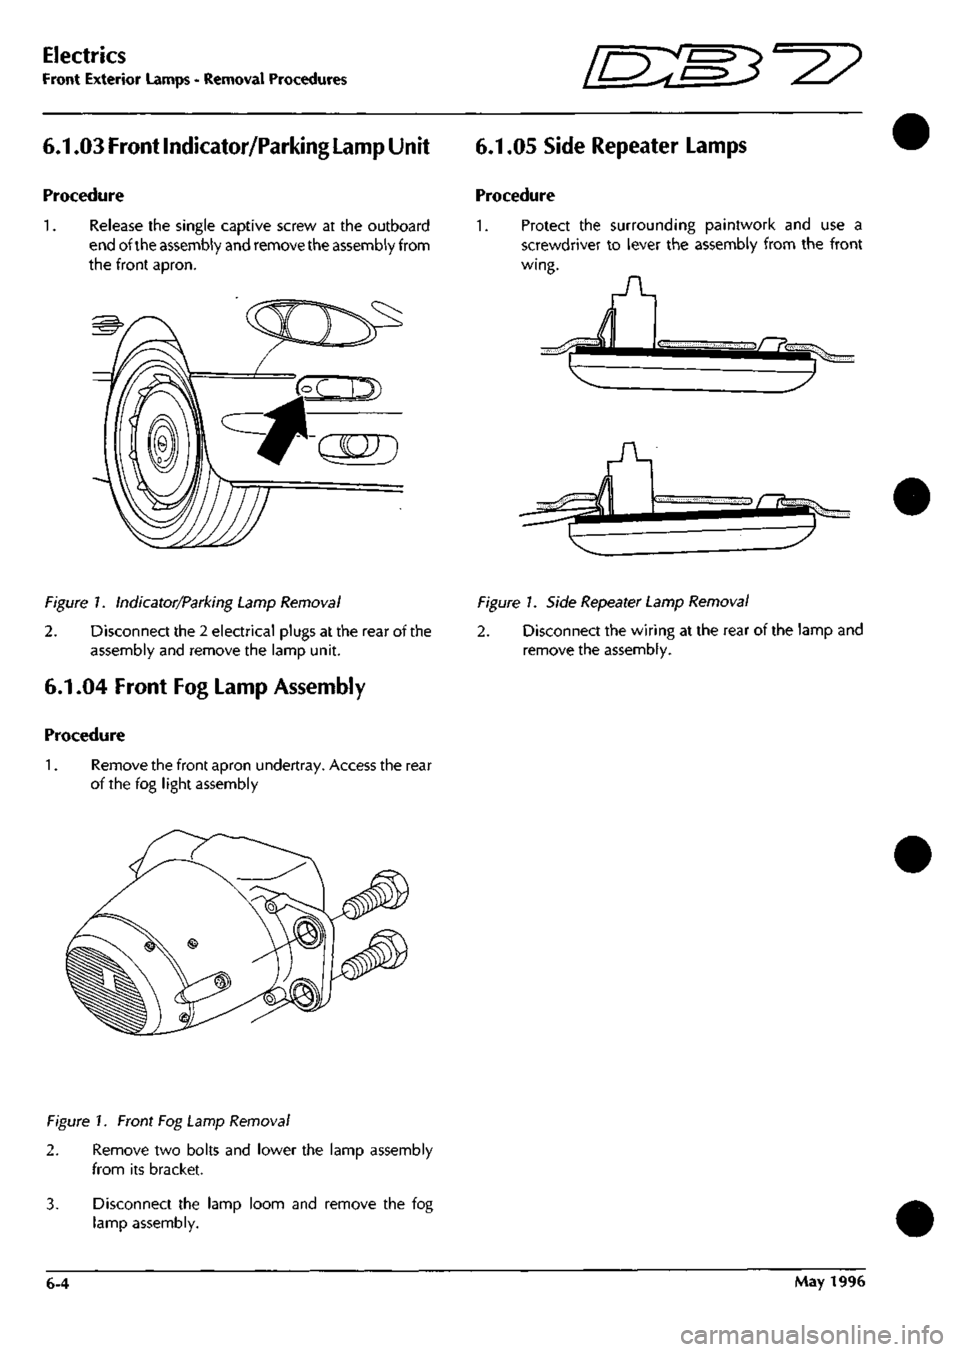
Release the single captive screw at the outboard
end of the assembly and remove the assembly from
the front apron.
Procedure
1.
Protect the surrounding paintwork and use a
screwdriver to lever the assembly from the front
wing.
Figure 7. Indicator/Parking Lamp Removal
2. Disconnect the 2 electrical plugs at the rear of the
assembly and remove the lamp unit.
6.1.04 Front Fog Lamp Assembly
Figure /. Side Repeater Lamp Removal
2.
Disconnect the wiring at the rear of the lamp and
remove the assembly.
Procedure
1.
Remove the front apron undertray. Access the rear
of the fog light assembly
Figure 1. Front Fog Lamp Removal
2.
3.
Remove two bolts and lower the lamp assembly
from its bracket.
Disconnect the lamp loom and remove the fog
lamp assembly.
6-4 May 1996
Page 16 of 421
Electrics
Radio / Air-Con Switch Panel - Removal Procedures [D:m3^^2?
6.5.05 Radio
Procedure
1.
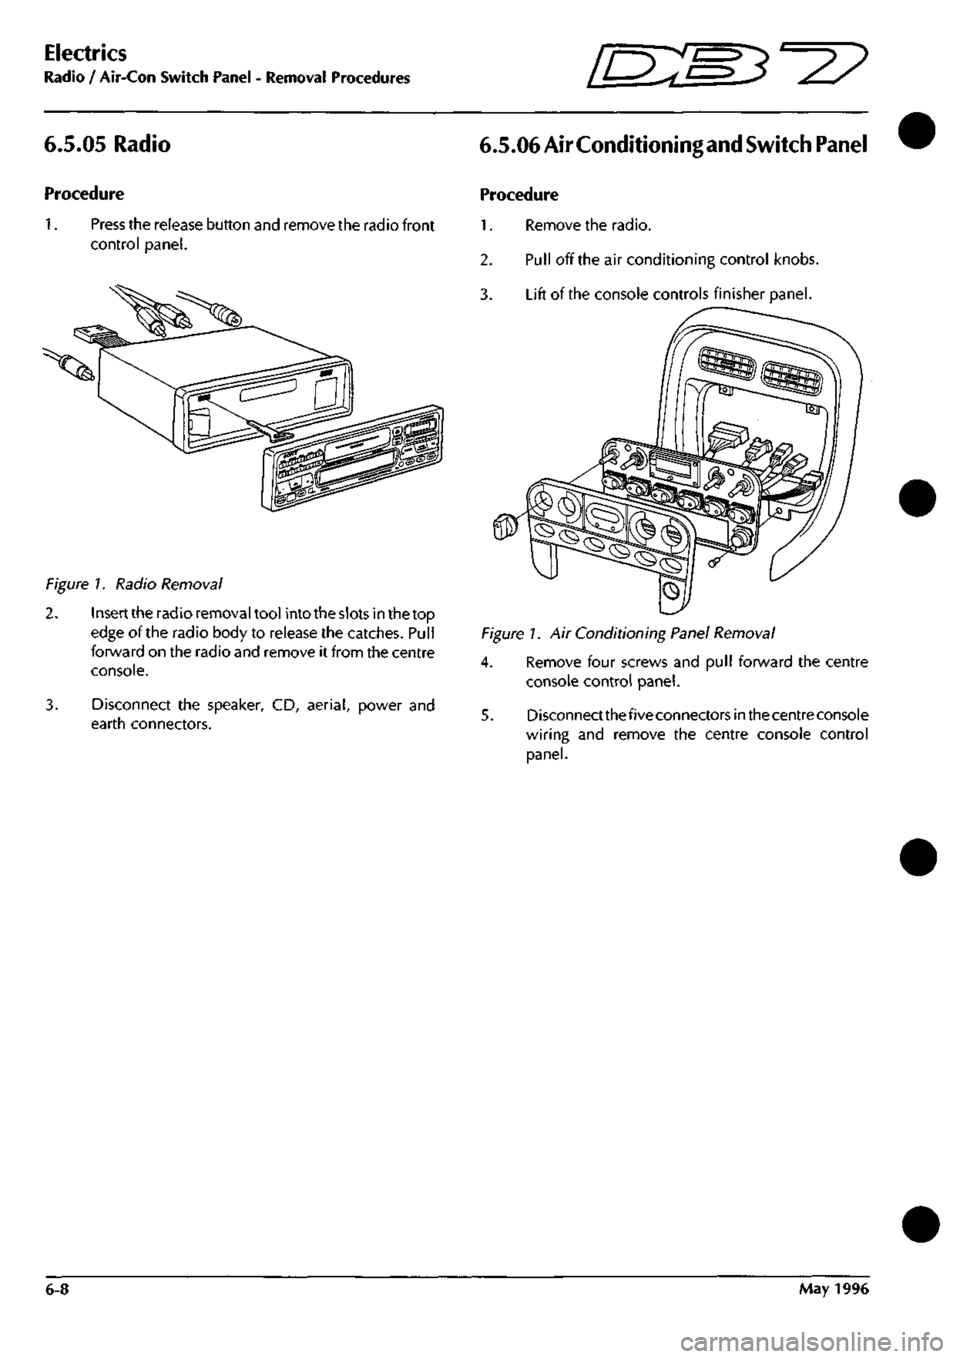
Press the release button and remove the radio front
control panel.
Figure
/. Radio Removal
2.
Insertthe radio removal tool intothe slots in thetop
edge of the radio body to release the catches. Pull
forward on the radio and remove it from the centre
console.
3. Disconnect the speaker, CD, aerial, power and
earth connectors.
6.5.06 AirConditioningand
Switch
Panel
Procedure
1.
Remove the radio.
2.
Pull off the air conditioning control knobs.
3. Lift of the console controls finisher panel.
Figure h Air Conditioning Panel Removal
4.
Remove four screws and pull forward the centre
console control panel.
5. Disconnectthefiveconnectorsinthecentreconsole
wiring and remove the centre console control
panel.
6-8 May 1996
Page 17 of 421
lEM^-^?
Electrics
Control Switch - Removal Procedures
6.5.07 Cruise Control, Window and
Gearshift Switches
Procedure
1.
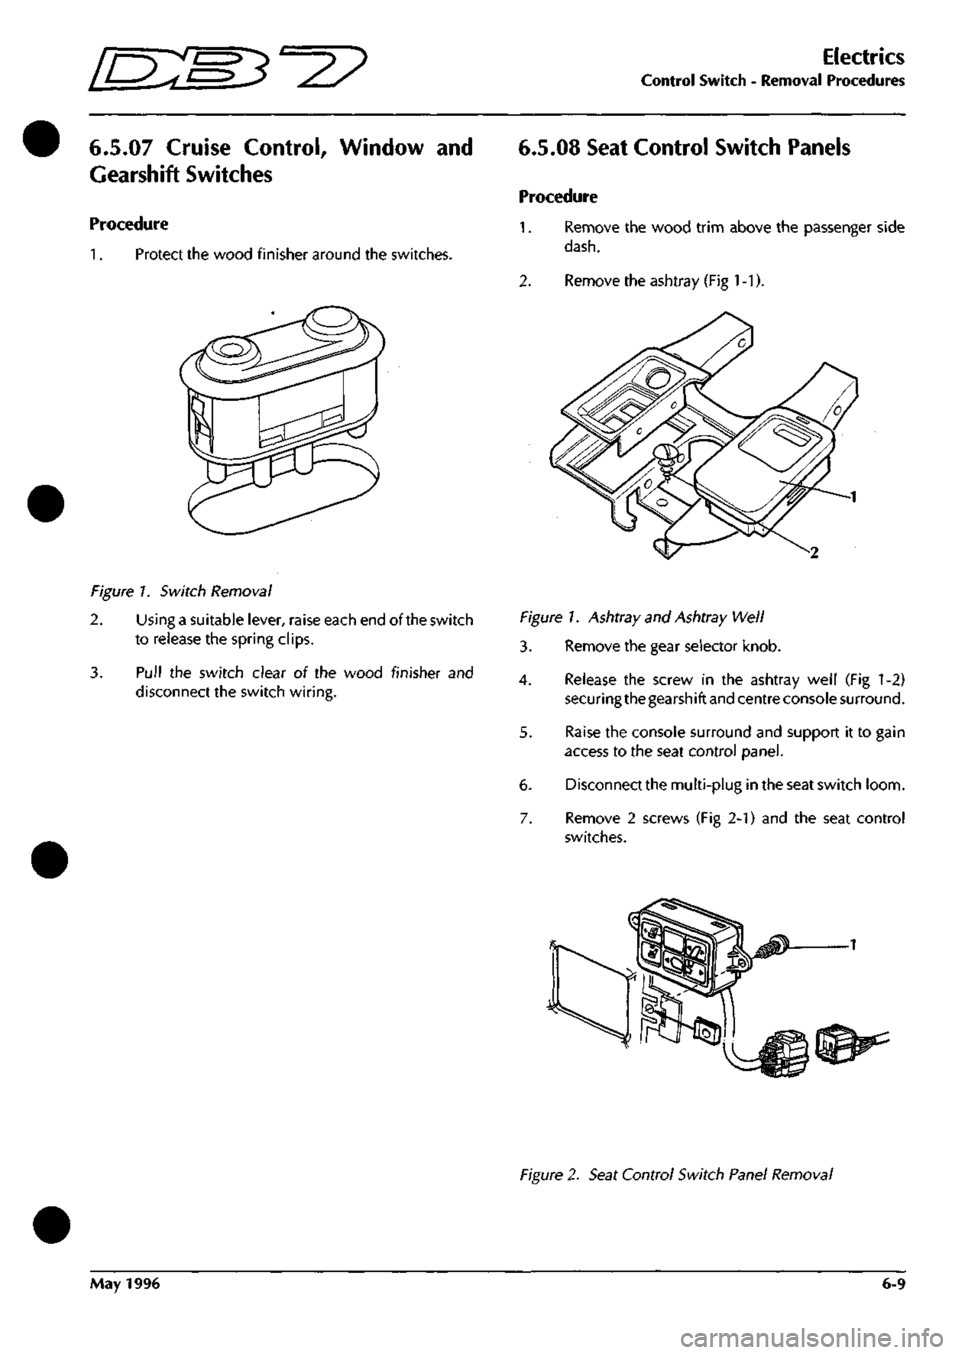
Protect the wood finisher around the switches.
6.5.08 Seat Control Switch Panels
Procedure
1.
Remove the wood trim above the passenger side
dash.
2.
Remove the ashtray (Fig
1
-1).
Figure 7. Switch Removal
2.
Using a suitable lever, raise each end of the switch
to release the spring clips.
3. Pull the switch clear oi the wood finisher and
disconnect the switch wiring.
Figure!. Ashtray and Ashtray Well
3. Remove the gear selector knob.
4.
Release the screw in the ashtray well (Fig 1-2)
securing the gearshift and centre console surround.
5. Raise the console surround and support it to gain
access to the seat control panel.
6. Disconnect the multi-plug in the seat switch loom.
7. Remove 2 screws (Fig 2-1) and the seat control
switches.
Figure 2. Seat Control Switch Panel Removal
May 1996 6-9
Page 18 of 421
Electrics
Interior Lamps and Front Seat - Removal Procedures EM^^^
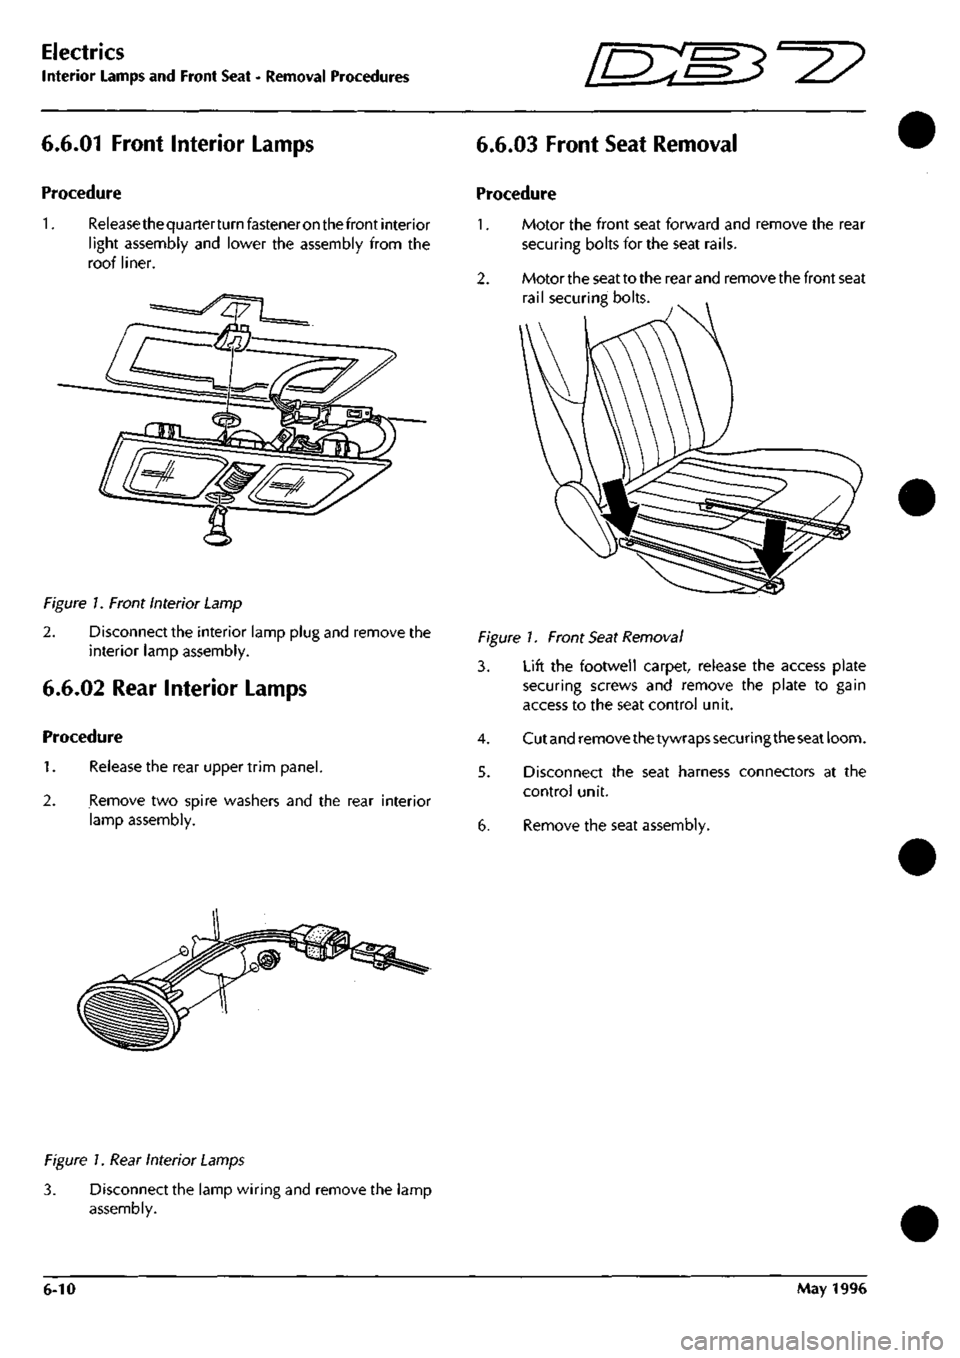
6.6.01 Front Interior Lamps
Procedure
1.
Releasethequarterturnfasteneronthefrontinterior
light assembly and lower the assembly from the
roof liner.
Figure 7. Front Interior Lamp
2. Disconnect the interior lamp plug and remove the
interior lamp assembly.
6.6.02 Rear Interior Lamps
Procedure
1.
Release the rear upper trim panel.
2.
Remove two spire washers and the rear interior
lamp assembly.
6.6.03 Front Seat Removal
Procedure
1.
2.
Motor the front seat forward and remove the rear
securing bolts for the seat rails.
Motor the seat to the rear and remove the front seat
rail securing bolts.
Figure 1. Front Seat Removal
3. Lift the footweil carpet, release the access plate
securing screws and remove the plate to gain
access to the seat control unit.
4.
Cutand remove thetywrapssecuringtheseat loom.
5. Disconnect the seat harness connectors at the
control unit.
6. Remove the seat assembly.
Figure 7. Rear Interior Lamps
3. Disconnect the lamp wiring and remove the lamp
assembly.
6-10 May 1996
Page 20 of 421
Electrics
Lumbar Support, Recline Motor and Seat Control Unit - Removal Procedures
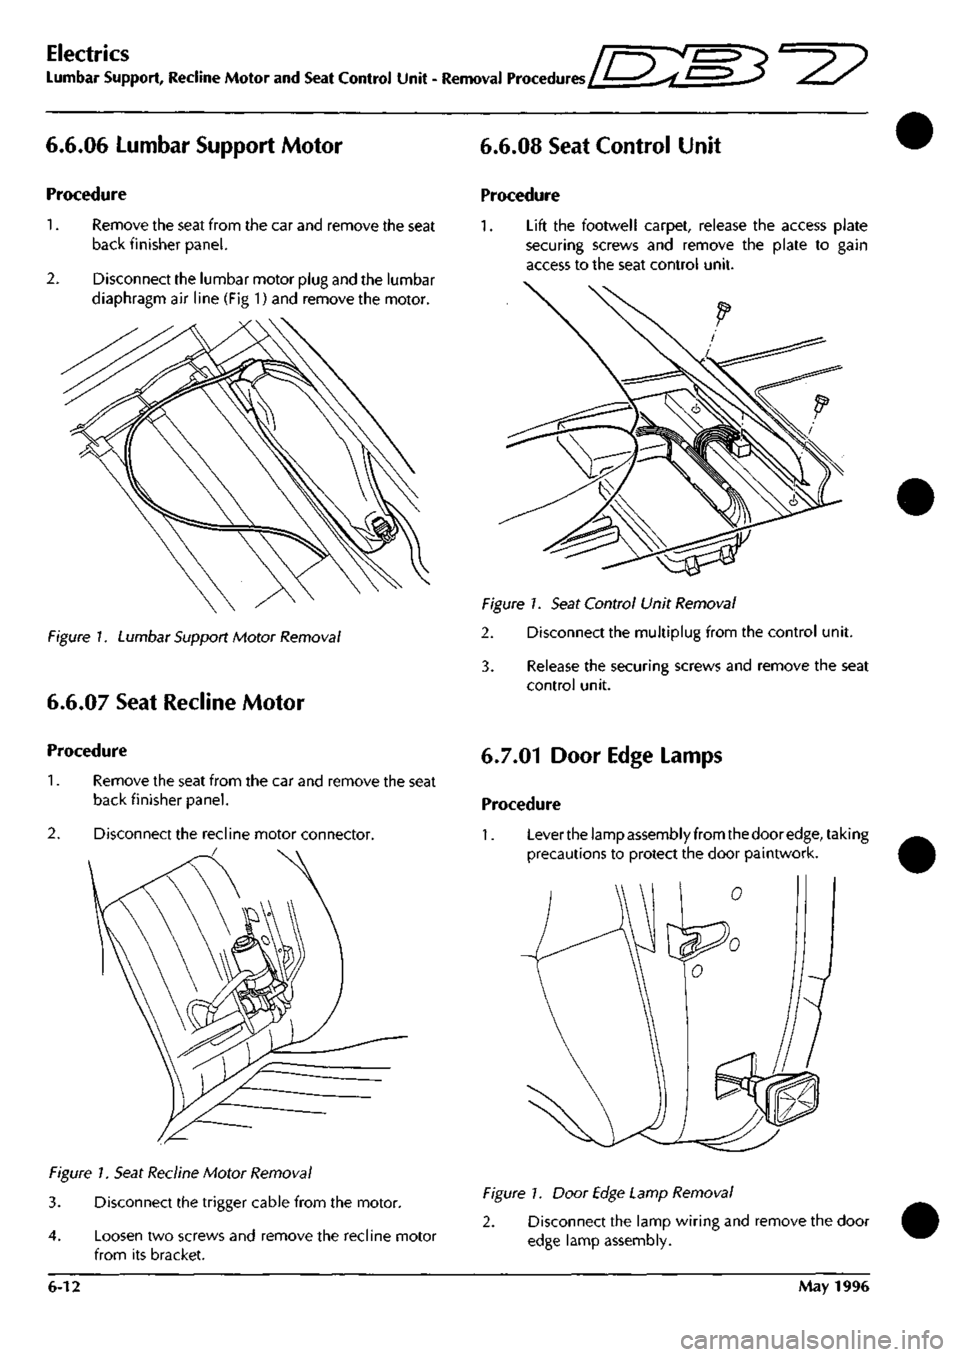
6.6.06 Lumbar Support Motor
Procedure
1.
Remove the seat from the car and remove the seat
back finisher panel.
2.
Disconnect the lumbar motor plug and the lumbar
diaphragm air line (Fig 1) and remove the motor.
Figure /. Lumbar Support Motor Removal
6.6.07 Seat Recline Motor
6.6.08 Seat Control Unit
Procedure
1.
Lift the footwell carpet, release the access plate
securing screws and remove the plate to gain
access to the seat control unit.
Figure 1. Seat Control Unit Removal
2. Disconnect the multiplug from the control unit.
3. Release the securing screws and remove the seat
control unit.
Procedure
1.
Remove the seat from the car and remove the seat
back finisher panel.
2.
Disconnect the recline motor connector.
Figure 1. Seat Recline Motor Removal
3. Disconnect the trigger cable from the motor.
4.
Loosen two screws and remove the recline motor
from its bracket.
6.7.01 Door Edge Lamps
Procedure
1.
Lever the lamp assembly from the door
edge,
taking
precautions to protect the door paintwork.
Figure 1. Door Edge Lamp Removal
2. Disconnect the lamp wiring and remove the door
edge lamp assembly.
6-12 May 1996
Page 22 of 421
Electrics
Electric Windows - Fault Analysis / Window Motor Removal
[n:m3^^
Electric Windows
Description
Power to the window wind circuits is available
when the ignition switch is on and is supplied
through a thermal cut-out to the left and right
window switches. The switches are double pole
plus earth so that the current through a window
motor may be switched in either direction to raise
or lower the window.
DB7 uses frameless door windows which seal
against rubber strips around the body shell door
opening.
To avoid damaging these seals during
door opening, the door glass must be lowered
before the door can be opened. This function is
controlled by the window control units. The units
are mounted on the inside of each door frame and
will sense if a door handle is pulled to open the
door. Before releasing the door lock, the control
unit will drive the window wind motor briefly to
lower the door window glass down until it clears
the window seals. Similarly, after closing a door,
the window motor will be run to raise the door glass
to seat the glass against the body seals.
Fault Analysis Procedure
a) If a window fails to operate, check for fuse failure
and the connectors for poor or open contacts.
b) Check the thermal cut-out by shorting across it and
operating either window. If the windows operate
with the short
ci rcu
it but not without, the cut-out is
faulty.
c) With the ignition on, battery voltage should be
available between the inputterminalsof the switches
and chassis. Operate each switch and ensure that
battery voltage is available between the switch
output terminals and chassis.
d) Measure voltagefrom each switch inputterminalto
the switch earth return terminal. If no voltage is
measured,
the earth return line is open circuit.
e) Measure continuity through the wiring from the
switches to each motor. If continuity is correct,
remove the motor for bench testing.
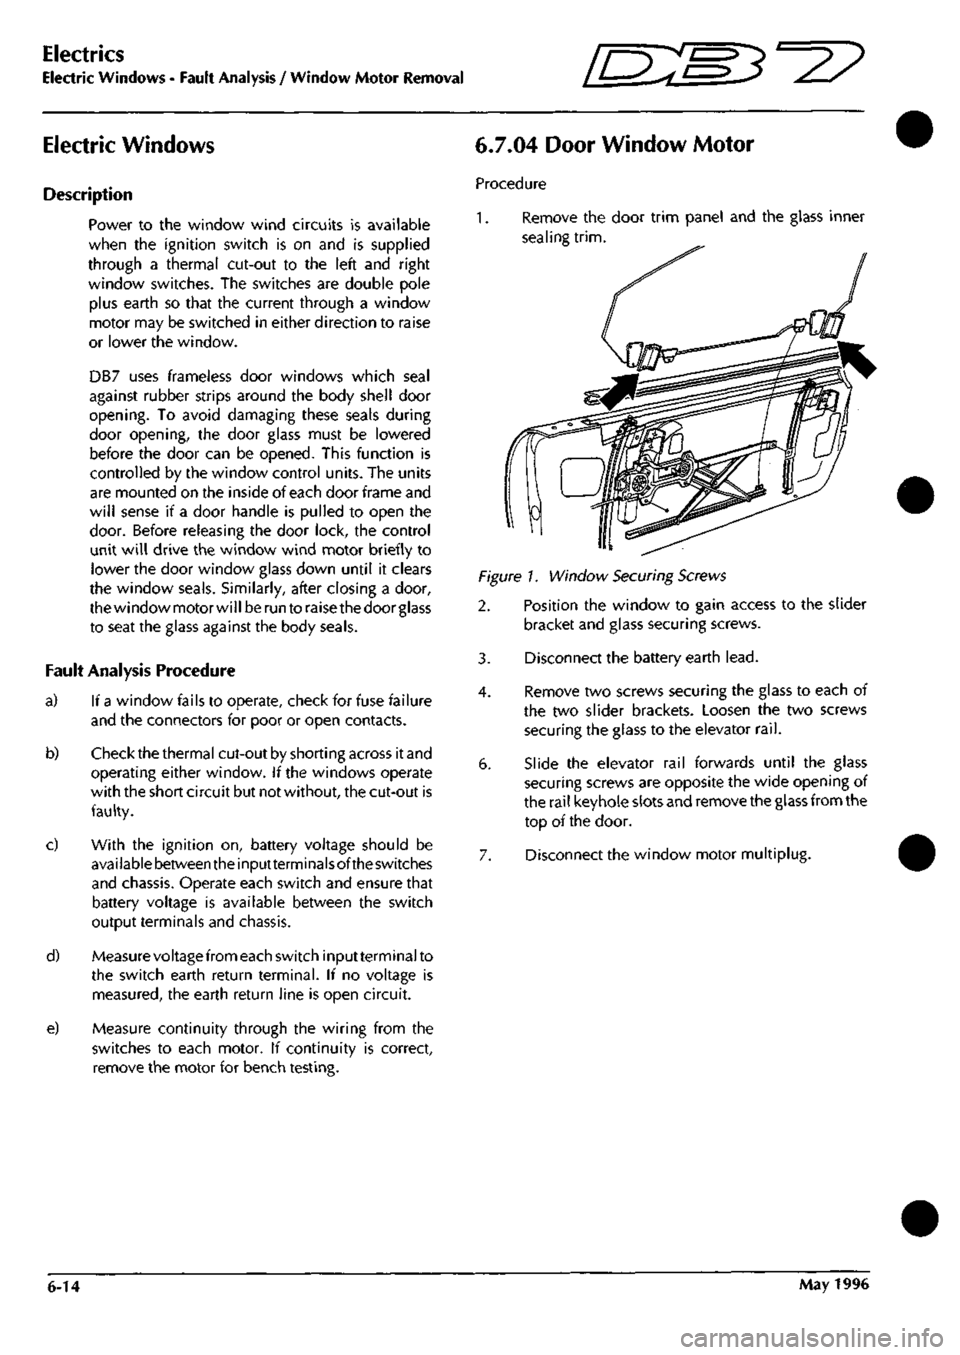
6.7.04 Door Window Motor
Procedure
1.
Remove the door trim panel and the glass inner
sealing
trim.
Figure!. Window Securing Screws
2. Position the window to gain access to the slider
bracket and glass securing screws.
3. Disconnect the battery earth
lead.
4.
Remove two screws securing the glass to each of
the two slider brackets. Loosen the two screws
securing the glass to the elevator
rail.
6. Slide the elevator rail forwards until the glass
securing screws are opposite the wide opening of
the rail keyhole slots and remove the glass from the
top of the door.
7. Disconnect the window motor multiplug.
6-14 May 1996
Page 23 of 421
in:s^^^
Electrics
Electric Door Mirrors
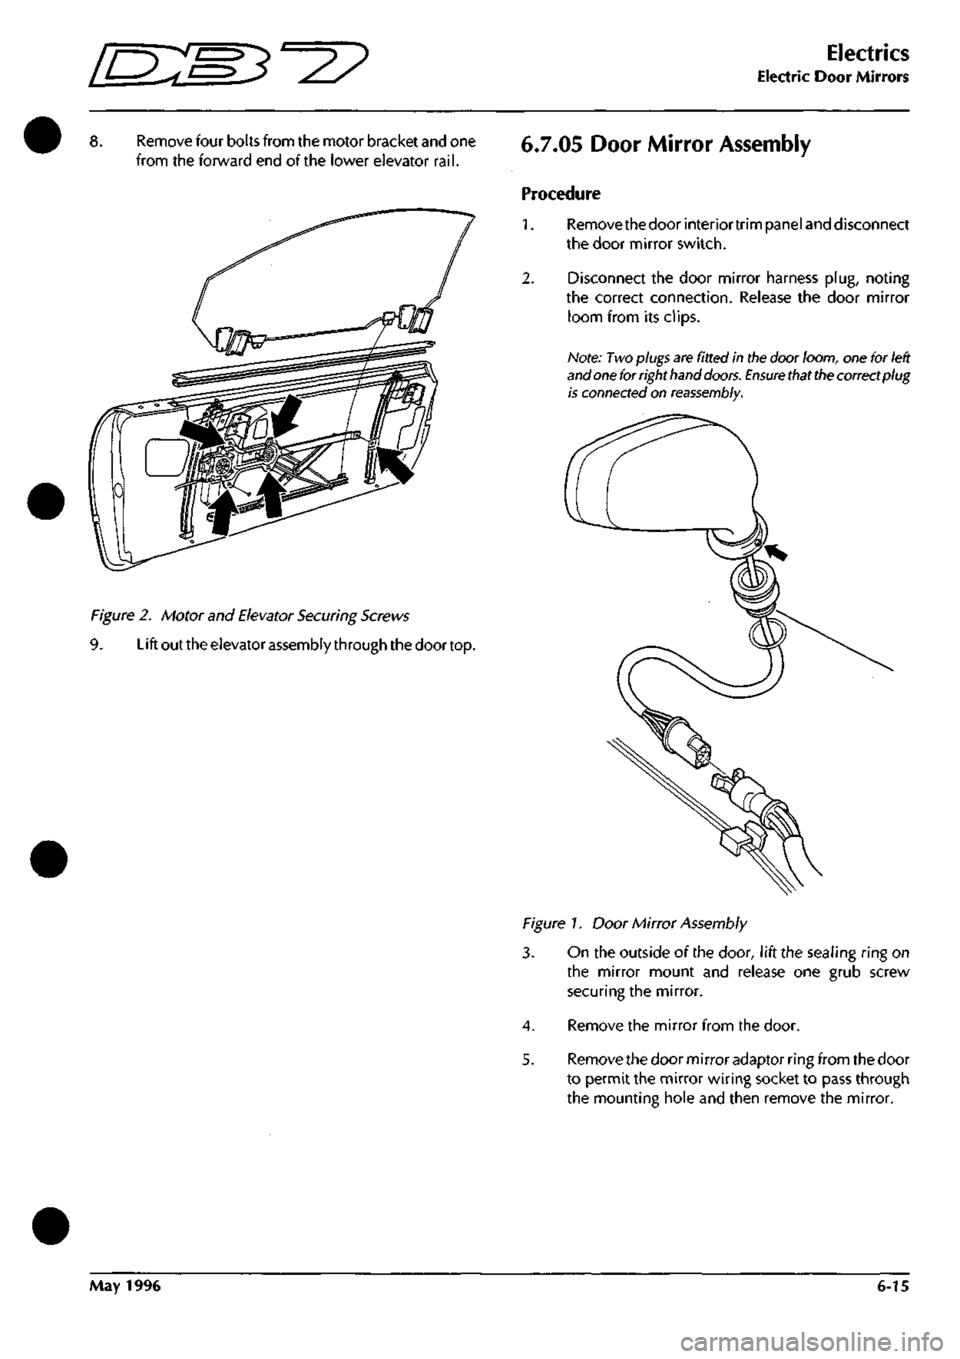
Remove four bolts from the motor bracket and one
from the forward end of the lower elevator
rail.
Figure 2. Motor and Elevator Securing Screws
9. Lift out the elevator assembly through the door top.
6.7.05 Door Mirror Assembly
Procedure
1.
2.
Removethe door interiortrim panel and disconnect
the door mirror switch.
Disconnect the door mirror harness
plug,
noting
the correct connection. Release the door mirror
loom from its clips.
Note:
Two
plugs are fitted in the door loom, one for left
and one for right hand
doors.
Ensure
that
the
correct plug
is connected on
reassembly.
Figure 7. Door Mirror Assembly
3. On the outside of the door, lift the sealing ring on
the mirror mount and release one grub screw
securing the mirror.
4.
Remove the mirror from the door.
5. Remove the door mirror adaptor ring from the door
to permit the mirror wiring socket to pass through
the mounting hole and then remove the mirror.
May 1996 6-15
Page 26 of 421
Electrics
Electrical Component Location and Wiring Information in::m3^?
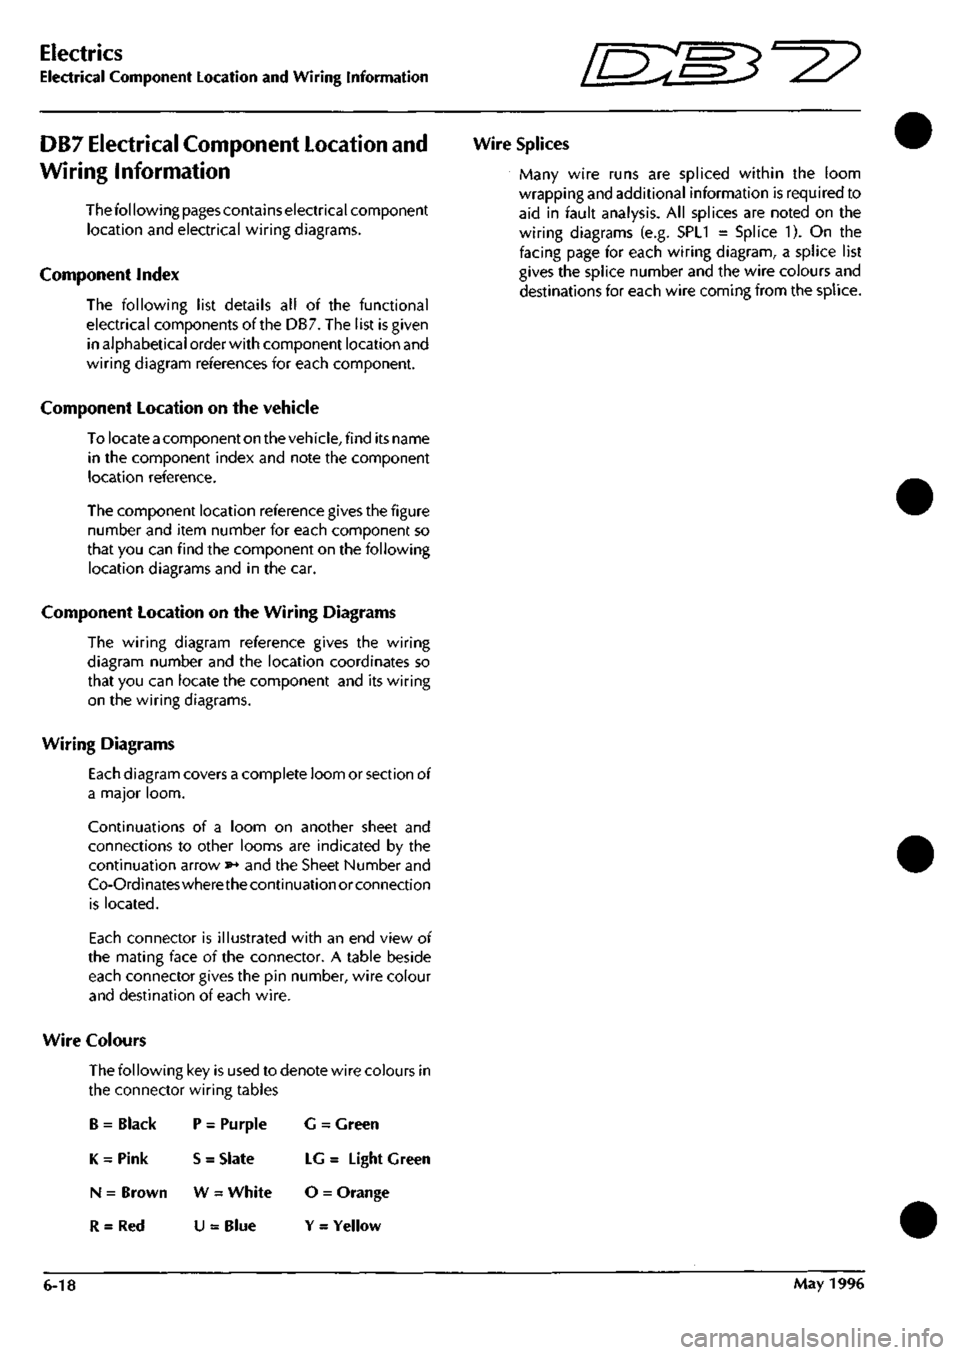
DB7 Electrical Component Location and
Wiring Information
Thefol lowing pages contains electrical component
location and electrical wiring diagrams.
Component Index
The following list details all of the functional
electrical components of the DB7. The list is given
in alphabetical order with component location and
wiring diagram references for each component.
Component Location on the vehicle
To locate a component on the veh
icie,
find its name
in the component index and note the component
location reference.
The component location reference gives the figure
number and item number for each component so
that you can find the component on the following
location diagrams and in the car.
Component Location on the Wiring Diagrams
The wiring diagram reference gives the wiring
diagram number and the location coordinates so
that you can locate the component and its wiring
on the wiring diagrams.
Wiring Diagrams
Each diagram covers a complete loom or section of
a major loom.
Continuations of a loom on another sheet and
connections to other looms are indicated by the
continuation arrow »* and the Sheet Number and
Co-Ordinateswherethecontinuation or connection
is located.
Each connector is illustrated with an end view of
the mating face of the connector. A table beside
each connector gives the pin number, wire colour
and destination of each wire.
Wire Colours
The following key is used to denote wire colours in
the connector wiring tables
B = Black P = Purple G = Green
K = Pink S = Slate LG = Light Green
N = Brown W = White O = Orange
R = Red U = Blue Y = Yellow
Wire Splices
Many wire runs are spliced within the loom
wrapping and additional information is required to
aid in fault analysis. All splices are noted on the
wiring diagrams (e.g. SPL1 = Splice 1). On the
facing page for each wiring diagram, a splice list
gives the splice number and the wire colours and
destinations for each wire coming from the splice.
6-18 May 1996
Page 27 of 421
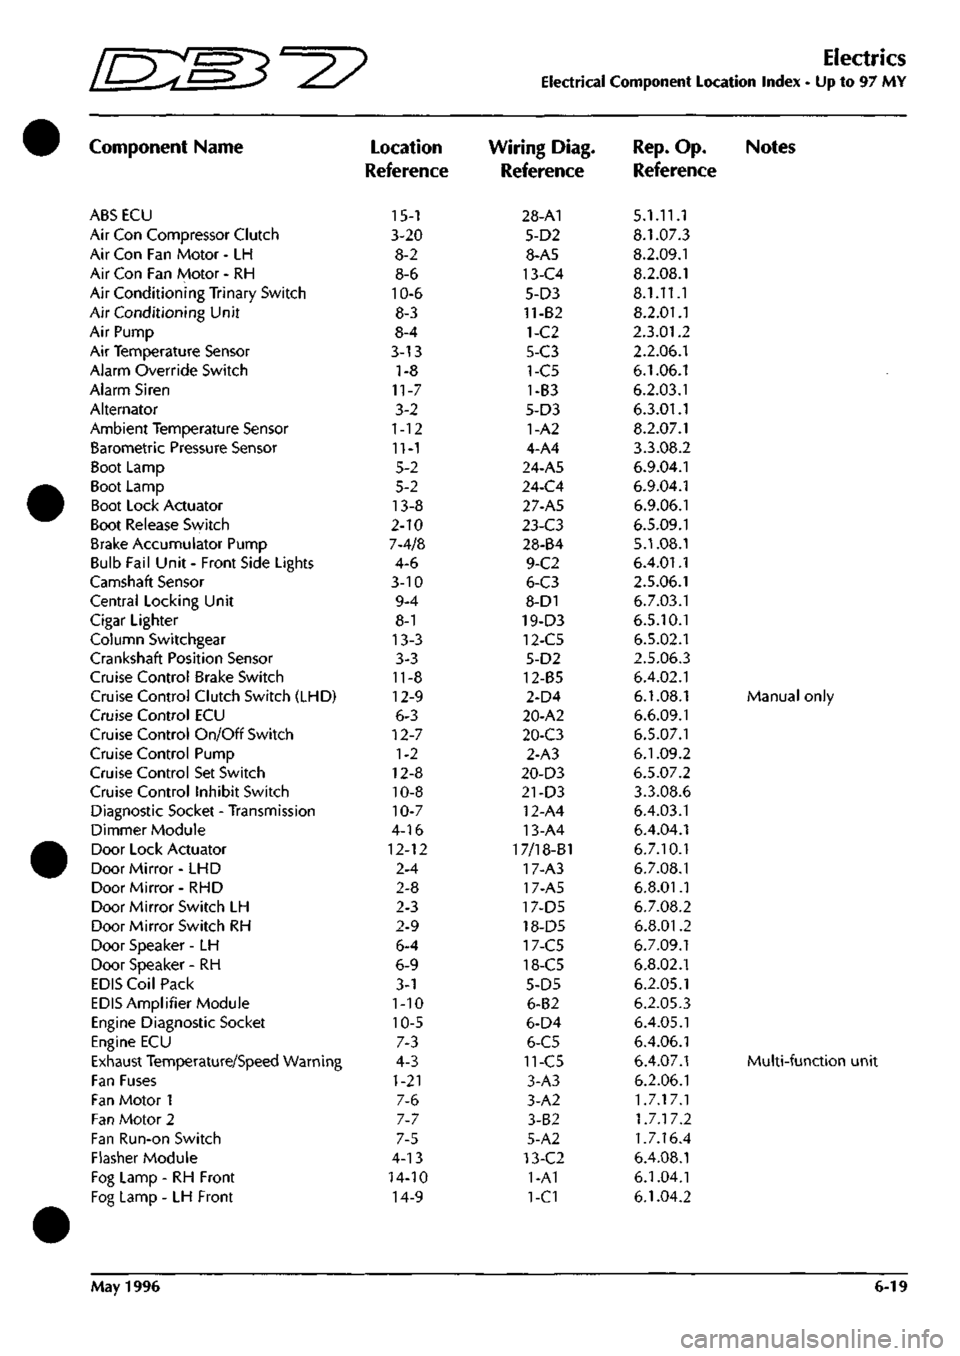
Electrics
Electrical Component Location Index - Up to 97 MY
Component Name
ABS ECU
Air Con Compressor Clutch
Air Con Fan Motor - LH
Air Con Fan Motor - RH
Air Conditioning Trinary Switch
Air Conditioning Unit
Air Pump
Air Temperature Sensor
Alarm Override Switch
Alarm Siren
Alternator
Ambient Temperature Sensor
Barometric Pressure Sensor
Boot Lamp
Boot Lamp
Boot Lock Actuator
Boot Release Switch
Brake Accumulator Pump
Bulb Fail Unit - Front Side Lights
Camshaft Sensor
Central Locking Unit
Cigar Lighter
Column Switchgear
Crankshaft Position Sensor
Cruise Control Brake Switch
Cruise Control Clutch Switch (LHD)
Cruise Control ECU
Cruise Control On/Off Switch
Cruise Control Pump
Cruise Control Set Switch
Cruise Control Inhibit Switch
Diagnostic Socket - Transmission
Dimmer Module
Door Lock Actuator
Door Mirror- LHD
Door Mirror- RHD
Door Mirror Switch LH
Door Mirror Switch RH
Door Speaker -LH
Door Speaker - RH
EDIS Coil Pack
EDIS Amplifier Module
Engine Diagnostic Socket
Engine ECU
Exhaust Temperature/Speed Warning
Fan Fuses
Fan Motor 1
Fan Motor 2
Fan Run-on Switch
Flasher Module
Fog Lamp - RH Front
Fog Lamp - LH Front
Location
Reference
15-1
3-20
8-2
8-6
10-6
8-3
8-4
3-13
1-8
11-7
3-2
1-12
11-1
5-2
5-2
13-8
2-10
7-4/8
4-6
3-10
9-4
8-1
13-3
3-3
11-8
12-9
6-3
12-7
1-2
12-8
10-8
10-7
4-16
12-12
2-4
2-8
2-3
2-9
6-4
6-9
3-1
1-10
10-5
7-3
4-3
1-21
7-6
7-7
7-5
4-13
14-10
14-9
Wiring Diag.
Reference
28-A1
5-D2
8-A5
13-C4
5-D3
11-82
1-C2
5-C3
1-C5
1-B3
5-D3
1-A2
4-A4
24-A5
24-C4
27-A5
l-i-C3
28-84
9-C2
6-C3
8-D1
19-D3
12-C5
5-D2
12-85
2-D4
20-A2
20-C3
2-A3
20-D3
21-D3
12-A4
13-A4
17/18-B1
17-A3
17-A5
17-D5
18-D5
17-C5
18-C5
5-D5
6-B2
6-D4
6-C5
11-C5
3-A3
3-A2
3-B2
5-A2
13-C2
1-A1
1-C1
Rep.
Op. Notes
Reference
5.1.11.1
8.1.07.3
8.2.09.1
8.2.08.1
8.1.11.1
8.2.01.1
2.3.01.2
2.2.06.1
6.1.06.1
6.2.03.1
6.3.01.1
8.2.07.1
3.3.08.2
6.9.04.1
6.9.04.1
6.9.06.1
6.5.09.1
5.1.08.1
6.4.01.1
2.5.06.1
6.7.03.1
6.5.10.1
6.5.02.1
2.5.06.3
6.4.02.1
6.1.08.1 Manual only
6.6.09.1
6.5.07.1
6.1.09.2
6.5.07.2
3.3.08.6
6.4.03.1
6.4.04.1
6.7.10.1
6.7.08.1
6.8.01.1
6.7.08.2
6.8.01.2
6.7.09.1
6.8.02.1
6.2.05.1
6.2.05.3
6.4.05.1
6.4.06.1
6.4.07.1 Multi-functio
6.2.06.1
1.7.17.1
1.7.17.2
1.7.16.4
6.4.08.1
6.1.04.1
6.1.04.2
May 1996 6-19