instrument panel ASTON MARTIN V8 VANTAGE 2010 Repair Manual
[x] Cancel search | Manufacturer: ASTON MARTIN, Model Year: 2010, Model line: V8 VANTAGE, Model: ASTON MARTIN V8 VANTAGE 2010Pages: 947, PDF Size: 43.21 MB
Page 797 of 947

Squeaks and Rattles Repair Manual
July 2010 Page 13 of 21
Sat-Nav Chatter
SRO: 19.07.CG
Safe VINs: DBS - E01840, DB9 - A12676, V8 Vantage - C13743
Repair:
Pre safe VIN
CAUTION:
BE CAREFUL WHEN YOU RELEASE THE INSTRUMENT PANEL VENEER BEZEL. THE SURFACE FINISH CAN BE EASILY DAMAGED.
1. Release the four clips that attach the centre-s tack instrument panel (refer to Figure 1).
Figure 1
2. Disconnect the electrical connectors from each of the fo ur transmission control switches (refer to Figure 2).
Figure 2
3. Disconnect the electrical connector from the igni tion start/stop switch (refer to Figure 3).
Page 798 of 947

Squeaks and Rattles Repair Manual
Page 14 of 21 Issue 3
Figure 3
4. Remove the centre-stack instrument panel (instrument panel) (refer to Figure 4).
Figure 4
5. Put the instrument panel on a work bench that has protective material to prevent damage.
6. Release the sat-nav top panel.
7. Remove the spring type “A” (refer to Figure 5).
8. Install the new spring type “B” in the top panel (refer to Figures 5 and 6).
Note: The wire of the spring has a larger diamet er and the spring has a different shape.
Figure 5
Page 799 of 947

Squeaks and Rattles Repair Manual
July 2010 Page 15 of 21
Figure 6
9. Install the sat-nav top panel.
10. Put the instrument panel into po sition (refer to Figure 7).
Figure 7
11. Connect the electrical connector to ignition start/stop switch (refer to Figure 8).
Figure 8
12. Connect the electrical connectors to each of the four transmission control switches (refer to Figure 9).
Page 800 of 947

Squeaks and Rattles Repair Manual
Page 16 of 21 Issue 3
Figure 9
13. Make sure that the heater vents are correctly aligned.
14. Push the centre-stack instrument panel until it engages with the four retaining clips.
Page 801 of 947

Squeaks and Rattles Repair Manual
July 2010 Page 17 of 21
Sat-Nav Rattle (Loose in the aperture)
SRO: 19.07.CJ
Safe VINs: DBS - E01610, DB9 - A12546, V8 Vantage - C13503, V12 Vantage - S00185
Repair
CAUTION:
BE CAREFUL WHEN YOU RELEASE THE INSTRUMENT PANEL VENEER BEZEL. THE SURFACE FINISH CAN BE EASILY DAMAGED.
1. Release the four clips that attach the centre-s tack instrument panel (refer to Figure 1).
Figure 1
2. Disconnect the electrical connectors from each of the fo ur transmission control switches (refer to Figure 2).
Figure 2
3. Disconnect the electrical connector from the igni tion start/stop switch (refer to Figure 3).
Page 802 of 947

Squeaks and Rattles Repair Manual
Page 18 of 21 Issue 3
Figure 3
4. Remove the centre-stack instrument panel (panel) (refer to Figure 4).
Figure 4
5. Put the panel on a work bench that has protective material to prevent damage.
6. Remove the screws that attach the left and right navi gation door hinge brackets to the panel. Remove the
brackets (refer to Figure 5).
Figure 5
7. Remove the hinge bracket gear from the le ft hinge bracket (refer to Figure 6).
Page 803 of 947

Squeaks and Rattles Repair Manual
July 2010 Page 19 of 21
Figure 6
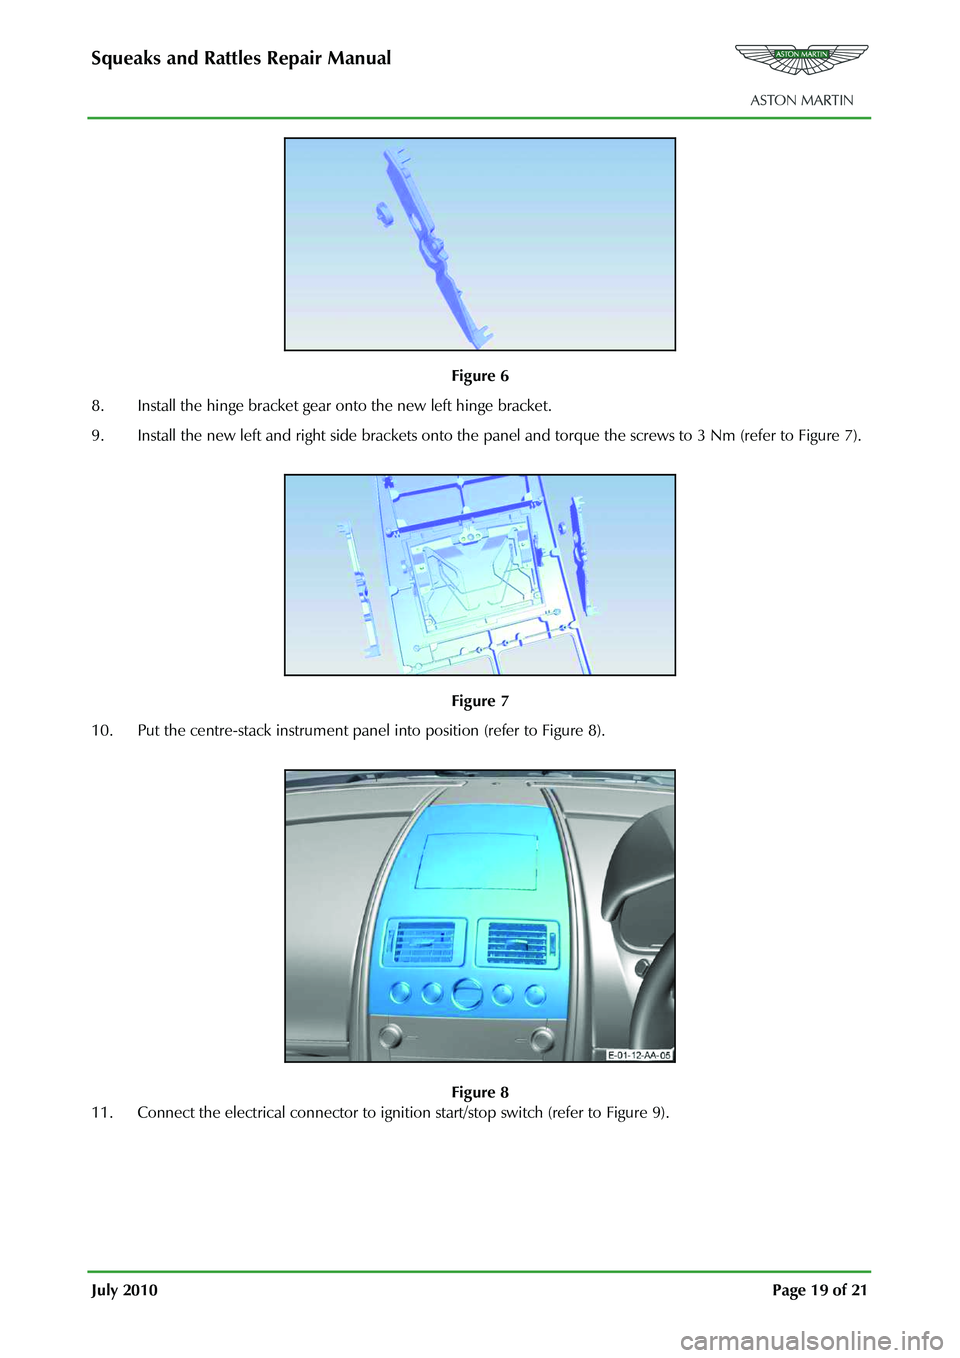
8. Install the hinge bracket gear onto the new left hinge bracket.
9. Install the new left and right side brackets onto the pane l and torque the screws to 3 Nm (refer to Figure 7).
Figure 7
10. Put the centre-stack instrument panel into position (refer to Figure 8).
Figure 8
11. Connect the electrical connector to ignition start/stop switch (refer to Figure 9).
Page 804 of 947

Squeaks and Rattles Repair Manual
Page 20 of 21 Issue 3
Figure 9
12. Connect the electrical connectors to each of the four transmission control switches (refer to Figure 10).
Figure 10
13. Make sure that the heater vents are correctly aligned.
14. Push the centre-stack instrument panel until it engages with the four retaining clips.
Page 881 of 947

AML EOBD System Operation Summary
Rory O’Curry Aston Martin Lagonda CONFIDENTIAL 1 May 2009
[email protected] AML EOBD Monitors 07 ROC.doc Page 35 of 43
Inspection Maintenance Readiness Code
I/M readiness information indicates whether a full diagnos tic check has been completed, i.e. the minimum
number of driving cycles necessary for MIL illumination has been completed since computer memory was
last cleared. Information available to the test equi pment or diagnostic tool includes all the non-continuous
monitors. Misfire, Fuel System and CCM monitors are assumed to complete if all the non-continues
monitors have completed.
A P1000 DTC is stored after an OBD reset is performed, until the I/M readiness check is complete.
Tamper Protection
The AML EOBD System shall meet ISO DIS 15031-7 / SAE J2186 - Diagnostic Data Link Security
requirements, to write-protect any re-programmable co mputer code. Additional data will be stored in the
PCM Vehicle Identification Block to enable retrieva l of VIN (although VIN may not be in the VID block
for all vehicles), CALID (CALibration ID identifi es the specific calibration) and CVN (Calibration
Verification Number, similar to an encrypted check sum). CALID and CVN will be tracked for all initial
releases, running changes and field fixes.
To achieve this data retrieva l J1979 Mode 09 will be implemented for VIN, CALD and CVN.
Serial Data Link Connector
The connection between the vehicle and the diagnostic tester shall comply with ISO DIS 15031-3 / SAE
J1962. Whereby the connector will be located in the passenger compartment in the area bounded by the
driver's end of the instrument panel to 300mm beyond the vehicle center line, attached to the instrument
panel and accessible from the driver's seat, and permit one handed / blind insertion of the mating
connector.
Serial Data Link Communication Protocol
The Communication Protocol used by the AML EOBD system will conform to ISO DIS 15031-4 / SAE
J1850, Class B Data Communication Network In terface (41.6kbps) / ISO DIS 15765-4 Diagnostics on
Controller Area Network (CAN).
Basic diagnostic data and bi-directional control inform ation will be provided using the format and units as
described in ISO DIS 15031-5 / SAE J1979 and will be av ailable to Test equipment and diagnostics tools
meeting the requirements of ISO DIS 15031-4 / SAE J1850.