alternator ASTON MARTIN V8 VANTAGE 2010 Workshop Manual
[x] Cancel search | Manufacturer: ASTON MARTIN, Model Year: 2010, Model line: V8 VANTAGE, Model: ASTON MARTIN V8 VANTAGE 2010Pages: 947, PDF Size: 43.21 MB
Page 3 of 947
Contents
Issue 5, January 2010 Workshop Manual 0-0-3
V8 Vantage Workshop Manual
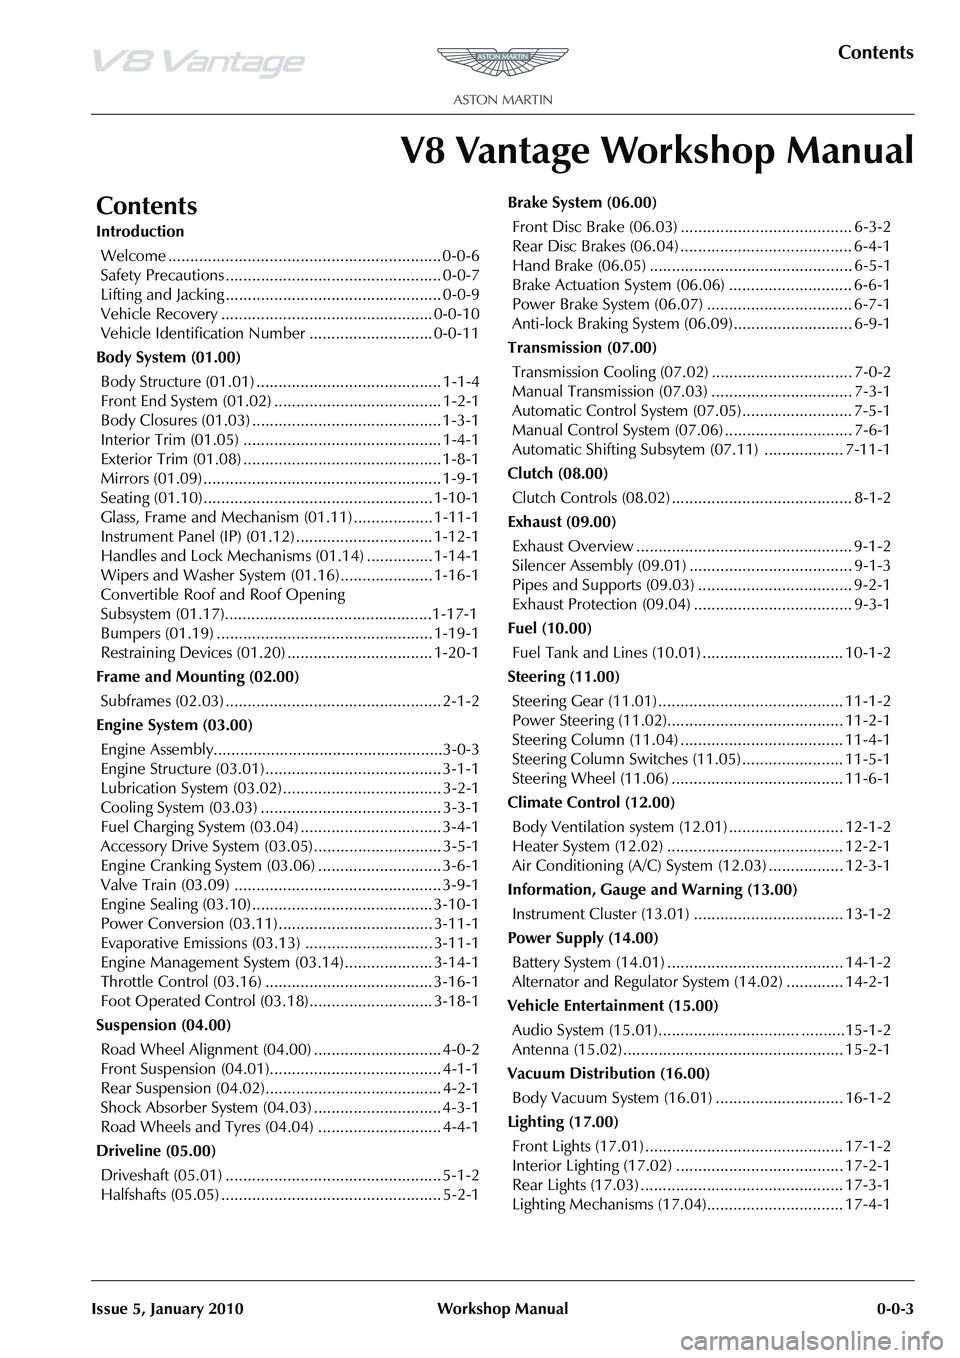
Contents
IntroductionWelcome .............................................................. 0-0-6
Safety Precautions ................................................. 0-0-7
Lifting and Jacking ................................................. 0-0-9
Vehicle Recovery ................................................ 0-0-10
Vehicle Identification Number ............................ 0-0-11
Body System (01.00) Body Structure (01.01) .......................................... 1-1-4
Front End System (01.02) ...................................... 1-2-1
Body Closures (01.03) ........................................... 1-3-1
Interior Trim (01.05) ............................................. 1-4-1
Exterior Trim (01.08) ............................................. 1-8-1
Mirrors (01.09) ...................................................... 1-9-1
Seating (01.10).................................................... 1-10-1
Glass, Frame and Mechanism (01.11) .................. 1-11-1
Instrument Panel (IP) (01.12) . .............................. 1-12-1
Handles and Lock Mechanisms (01.14) ............... 1-14-1
Wipers and Washer System (01.16)..................... 1-16-1
Convertible Roof and Roof Opening
Subsystem (01.17)................ ...............................1-17-1
Bumpers (01.19) ................................................. 1-19-1
Restraining Devices (01.20) .... ............................. 1-20-1
Frame and Mounting (02.00) Subframes (02.03) ................................................. 2-1-2
Engine System (03.00) Engine Assembly....................................................3-0-3
Engine Structure (03.01)........................................ 3-1-1
Lubrication System (03.02).................................... 3-2-1
Cooling System (03.03) ......................................... 3-3-1
Fuel Charging System (03.04) ................................ 3-4-1
Accessory Drive System (03.05)............................. 3-5-1
Engine Cranking System (03. 06) ............................ 3-6-1
Valve Train (03.09) ............................................... 3-9-1
Engine Sealing (03.10)......................................... 3-10-1
Power Conversion (03.11)................................... 3-11-1
Evaporative Emissions (03.13) ............................. 3-11-1
Engine Management System (0 3.14).................... 3-14-1
Throttle Control (03.16) ...... ................................ 3-16-1
Foot Operated Control (03.18)............................ 3-18-1
Suspension (04.00) Road Wheel Alignment (04.00) ............................. 4-0-2
Front Suspension (04.01)....................................... 4-1-1
Rear Suspension (04.02)........................................ 4-2-1
Shock Absorber System (04.03) ............................. 4-3-1
Road Wheels and Tyres (04.04) ............................ 4-4-1
Driveline (05.00) Driveshaft (05.01) ................................................. 5-1-2
Halfshafts (05.05) .................................................. 5-2-1 Brake System (06.00)
Front Disc Brake (06.03) ....................................... 6-3-2
Rear Disc Brakes (06.04) ....................................... 6-4-1
Hand Brake (06.05) .............................................. 6-5-1
Brake Actuation System (06.06 ) ............................ 6-6-1
Power Brake System (06.07) ................................. 6-7-1
Anti-lock Braking System (06.09)........................... 6-9-1
Transmission (07.00) Transmission Cooling (07.02) ................................ 7-0-2
Manual Transmission (07.03) ................................ 7-3-1
Automatic Control System (07.05)......................... 7-5-1
Manual Control System (07.06) ............................. 7-6-1
Automatic Shifting Subsytem (07.11) .................. 7-11-1
Clutch (08.00) Clutch Controls (08.02) ......................................... 8-1-2
Exhaust (09.00) Exhaust Overview ................................................. 9-1-2
Silencer Assembly (09.01) ..................................... 9-1-3
Pipes and Supports (09.03) ................................... 9-2-1
Exhaust Protection (09.04) .................................... 9-3-1
Fuel (10.00) Fuel Tank and Lines (10.01) ................................ 10-1-2
Steering (11.00) Steering Gear (11.01) .......................................... 11-1-2
Power Steering (11.02)........................................ 11-2-1
Steering Column (11.04) ..................................... 11-4-1
Steering Column Switches (1 1.05) ....................... 11-5-1
Steering Wheel (11.06) ....................................... 11-6-1
Climate Control (12.00) Body Ventilation system (12.01) .......................... 12-1-2
Heater System (12.02) ........................................ 12-2-1
Air Conditioning (A/C) System (12.03) ................. 12-3-1
Information, Gauge and Warning (13.00) Instrument Cluster (13.01) .................................. 13-1-2
Power Supply (14.00) Battery System (14.01) ........................................ 14-1-2
Alternator and Regulator System (14.02) ............. 14-2-1
Vehicle Entertainment (15.00) Audio System (15.01)................................ ..........15-1-2
Antenna (15.02).................................................. 15-2-1
Vacuum Distribution (16.00) Body Vacuum System (16.01) ............................. 16-1-2
Lighting (17.00) Front Lights (17.01) ............................................. 17-1-2
Interior Lighting (17.02) ...................................... 17-2-1
Rear Lights (17.03) .............................................. 17-3-1
Lighting Mechanisms (17.04). .............................. 17-4-1
Page 259 of 947

Engine Structure (03.01)
Issue 4, November 2008Workshop Manual 3-1-11
23. Install VVT solenoid multiplug, position coil and CMP
harness (1x edge clip).
24. Install corner cross brace (t orque bolts with vehicle on
level ground).
25. Install coil cover.
Installation LH Side
26. Connect breather hose to manifold (quickfit).
27. Connect IAT multiplug.
28. Install injector harness to cam cover (x2).
29. Connect injector multiplugs (x4).
30. Install pipe support bracket (nuts x2, bolts x2).
31. Install harness support bracket (bolt x1, nut x2) release harness clips (fir tree x3).
32. Connect booster hose to manifold and support clip.
33. Connect heater hose from pipe (quick fit).
34. Install heater hose (x2) and throttle body hose (x2) from support bracket.
35. Connect purge line to mani fold and into support clip.
36. Connect breather hoses (x2) to cam cover.
37. Feed harness into inner wing area.
38. Install fusebox to bracket.
39. Install earth lead to fusebox.
40. Install battery lead to fusebox (1x nut and rubber cover).
41. Install multiplugs to fuse box.
42. Install fusebox bracket fixings.
43. Install ECM (see Workshop Manual procedure 03.13.ND Module - Powe r Train Control - RHD -
Renew)
44. Install coil cover.
45. Refill coolant (see Workshop Manual procedure 03.03.AD Coolant - Drain and Refill).
46. Install cross brace. (torque bolts with vehicle on level
ground).
Intake Manifold Assembly - Remove for
Access and Refit (With Engine Removed
)
Removal
1. Remove RH coil cover.
2. Disconnect breather hose (quick fit).
3. Release alternator and injector harness fir tree clips (x3) from cylinder head.
4. Remove nut and bolts (x2) securing harness bracket to
engine, remove bracket.
5. Release heater hose (clips x2) and EGR vacuum line (clips x2) from bracket.
6. Release alternator and injector harness fir tree clips (x3) from coolant pipe bracket. 7. Disconnect multiplugs from EGR valve, fuel rail pressure
sensor and injectors (x4).
8. Remove nuts (x2) and bolts (x2) securing coolant pipe
bracket, remove bracket.
9. Disconnect EGR vacuum pipe from sensor and manifold.
10. Remove LH coil cover.
11. Disconnect breather hoses (x2) from LH engine cover.
12. Disconnect purge line from manifold (quickfit) and
support clip for access.
13. Disconnect heater hose from pipe (quick fit).
14. Release heater hose (x2) and throttle body hose (x2) from support bracket.
15. Remove bolt and nuts (x2) securing harness support bracket, release harness clips (fir tree x3). Remove
bracket.
16. Remove nuts (x2) and bolts (x2) pipe support bracket.
17. Disconnect injector multiplugs (x4).
18. Release injector harness clip s (x2) from LH engine cover.
19. Disconnect IAT multiplug.
20. Disconnect breather hose from manifold (quickfit).
21. Disconnect manifold heating hoses (x2).
22. Disconnect throttle body multiplug and harness clip.
23. Disconnect EGR vacuum hose.
24. Loosen and disconnect EGR pipe union from EGR valve.
25. Remove bolts (x2) securing EGR pipe to RH exhaust
manifold, remove pi pe, discard gasket.
26. Progressively loosen and remove bolts (x 10) securing intake manifold to cylinder heads (see Figure 1).
Figure 1
27. Carefully remove intake ma nifold from cylinder heads.
28. Remove and discard gaskets (x2).
Installation
1. Clean intake manifold and mating faces on cylinder heads.
2. Install new gaskets to cyli nder block (glue in place).
3. Install intake manifold (allowing access to install bolt for purge line P-clip).
4. Install and torque tighten in take manifold bolts (x10) in
the correct sequence.
5. Clean EGR pipe and mating face on exhaust manifold.
Repair Operation Time (ROT)
A030113
Page 260 of 947

Engine Structure (03.01)
3-1-12Workshop ManualIssue 4, November 2008
6. Install new gasket on exhaust manifold.
7. Install EGR pipe to exhaust manifold and EGR valve.,
8. Install EGR pipe to EGR valve, install pipe union. Do not
torque tighten at this stage.
9. Install and torque tighten bolts (x2), EGR pipe to exhaust manifold. Torque tighten pipe union.
10. Connect EGR vacuum hose.
11. Connect throttle body multiplug and harness clip.
12. Connect manifold heating hoses (x2).
13. Connect EGR vacuum pipe to sensor and manifold.
14. Install coolant pipe bracket, install and torque tighten bolts (x2) and nuts (x2).
15. Connect multiplugs to EGR valve, fuel rail pressure
sensor and injectors.
16. Install alternator and injector harness fir tree clips (x3) to coolant pipe bracket.
17. Install heater hose clips (x2) and EGR vacuum lines clips (x2) to bracket.
18. Install harness bracket to engine.
19. Refit harness fir tree clips to cylinder head.
20. Refit engine breather hose.
21. Install VVT solenoid multiplug, position coil and CMP harness (1x edge clip).
22. Install coil cover.
23. Connect breather hose to manifold (quickfit).
24. Connect IAT multiplug.
25. Secure injector harness clips (x2) to LH engine cover.
26. Connect injector multiplugs (x4).
27. Install pipe support bracket, install and tighten nuts (x2
and bolts(x2).
28. Install harness support bracket, install and tighten bolt (x1) and, nut (x1).
29. Install heater hoses (x2) an d throttle body hoses (x2) in
support bracket.
30. Connect breather hoses (x2) to engine cover.
31. Install coil cover.
RH/LH Cylinder Head Gasket - Renew
Removal
1. Re-install front subframe to body, install and tighten bolts (x6), remove support trolley.
2. Install and tighten engine mounting nuts (x2).
3. With assistance, remove engine lifting beam (SPX M553D). 4. Remove SAI pump and bracket assembly (see Workshop
Manual procedure 03.08.DB/03.08.DJ Pump and
Bracket Assembly - Secondary Air Injection - Renew).
5. Disconnect multiplugs (x2) from knock sensors.
6. Disconnect multiplug from camshaft timing sensor.
7. Remove RH/LH exhaust manifold (see Workshop Manual procedure 09.00.CC/09.00.CD Gasket -
Exhaust Manifold - RH/LH - Renew).
8. Remove RH/LH intake camshaft (see Workshop Manual procedure 03.09.AT/03.09.AV Camshaft - Intake - RH/
LH - Renew).
9. Remove RH exhaust camshaft bearing cap retaining bolts (x10) evenly and in stages (see Figure 1).
Figure 1
10. Note their orientation and markings and remove the RH
exhaust camshaft bearing caps.
11. Remove RH exhaust camshaft (see Figure 2).
12. Remove bolts (x2) securing front end of RH cylinder
head to cylinder block.
Repair Operation Time (ROT)
Figure 2
A0309258
A0309260
Page 279 of 947

Lubrication System (03.02)
Engine (03.00)
Issue 5, Janauary 2010 Workshop Manual 3-2-5
8. Press out alternator mounting bushes (x2) from sump (refer to Figure 7).
9. Remove dowels (x4) from sump for oil pressure and scavenge pumps location (refer to Figure 8). 10. Remove Torx screws (x2) that attach the oil pump(s)
chain guide, remove chain gu ide (refer to Figure 9).
11. Remove oil plug from sump.
Installation
1. Clean chain guide, oil filter adaptor, filters (x2), sump plug , pump(s) dowels and crankshaft timing sensor.
2. Install alternator bushes.
3. Install oil filter adaptor.
4. Install filters (x2), install oil filter plates (x2), install and
torque tighten Torx screws (x4).
5. Install oil plug.
6. Install oil pump(s) dowels (x4).
7. Clean old sealant from sensor threads (x2).
8. Apply sealant to engine electric coolant temperature sensor threads, install and torque tighten sensor.
9. Apply sealant to oil pressure sensor threads, install and torque tighten sensor.
10. Install oil pump(s) chain guid e, Install and torque tighten
Torx screws (x2).
11. Install crankshaft timing sensor, install and torque tighten bolt.
12. Install oil sump (refer to Workshop Manual procedure 03.02.BN Pan - Oil Sump - Remove and Reseal).
Oil Sump Pan - Remove and Reseal
Removal
1. Remove oil pump(s) drive chain (refer to Workshop Manual procedure 03.02.AJ Chain - Oil Pump - Renew).
Figure 7
Figure 8
A030206C
A0302307
Figure 9
Repair Operation Time (ROT)
A0302307A
Page 290 of 947
Lubrication System (03.02)
Engine (03.00)3-2-16 Workshop Manual Issue 5, Janauary 2010
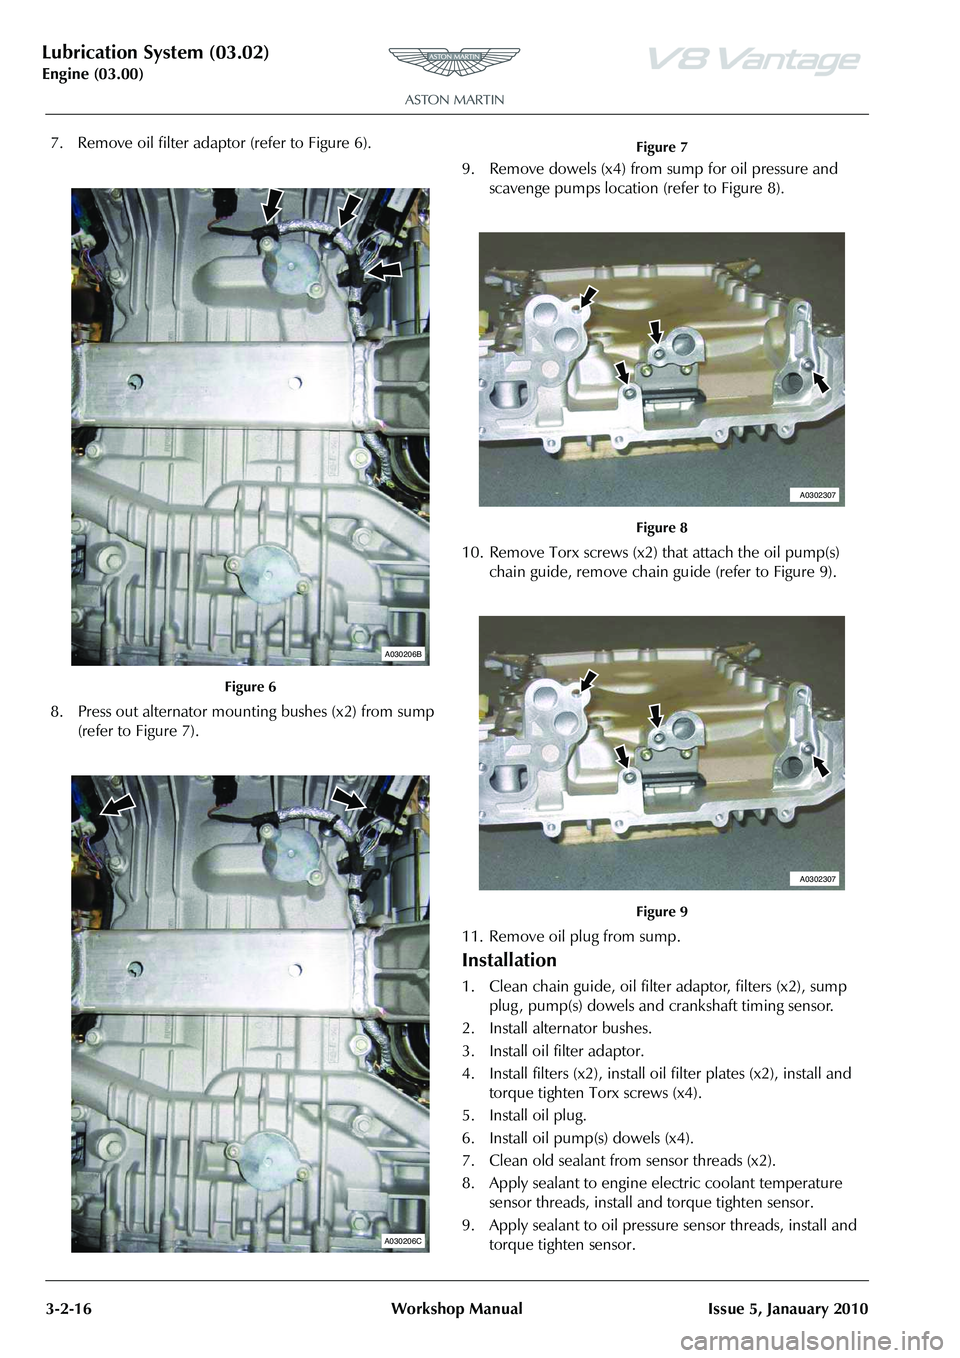
7. Remove oil filter adaptor (refer to Figure 6).
8. Press out alternator mounting bushes (x2) from sump (refer to Figure 7). 9. Remove dowels (x4) from
sump for oil pressure and
scavenge pumps location (refer to Figure 8).
10. Remove Torx screws (x2) that attach the oil pump(s)
chain guide, remove chain gu ide (refer to Figure 9).
11. Remove oil plug from sump.
Installation
1. Clean chain guide, oil filter adaptor, filters (x2), sump plug , pump(s) dowels and crankshaft timing sensor.
2. Install alternator bushes.
3. Install oil filter adaptor.
4. Install filters (x2), install oil filter plates (x2), install and
torque tighten Torx screws (x4).
5. Install oil plug.
6. Install oil pump(s) dowels (x4).
7. Clean old sealant from sensor threads (x2).
8. Apply sealant to engine electric coolant temperature sensor threads, install and torque tighten sensor.
9. Apply sealant to oil pressure sensor threads, install and torque tighten sensor.
Figure 6
A030206B
A030206C
Figure 7
Figure 8
Figure 9
A0302307
A0302307
Page 359 of 947
Engine Sealing (03.10)
Engine (03.00)
Issue 5, Janauary 2010 Workshop Manual 3-10-1
Engine (03.00)
Engine Sealing (03.10)
Specifications
Maintenance
Engine Timing Cover - Renew
1. Remove the front subframe (refer to Workshop Manual procedure 02.01.BA Subframe Assembly - Front -
Remove for Access and Refit).
2. Put an applicable container in position under the engine
to collect drained oil.
3. Remove the sump drain plug and drain the oil from the engine.
4. Remove the oil tank assembly (refer to Workshop Manual procedure 03.02.CA Tank Assembly - Oil
Cooler - Renew).
5. Drain cooling system (refer to Workshop Manual procedure 03.03.AD Coolant - Drain and Refill).
6. Remove the left cam cover (Refer to ’Left Side Cam Cover - Remove and Install’, page 3-10-4) 7. Remove the outer and inner seals from the left cam
cover.
8. Remove the right cam cover (Refer to ’Right Side Cam Cover - Remove and Install’, page 3-10-9).
9. Remove the outer and inner seals from the right cam cover.
10. Release the clips and disconnect the two coolant hoses from the coolant manifold.
11. Release the clip and disconnect the hose from oil the separator.
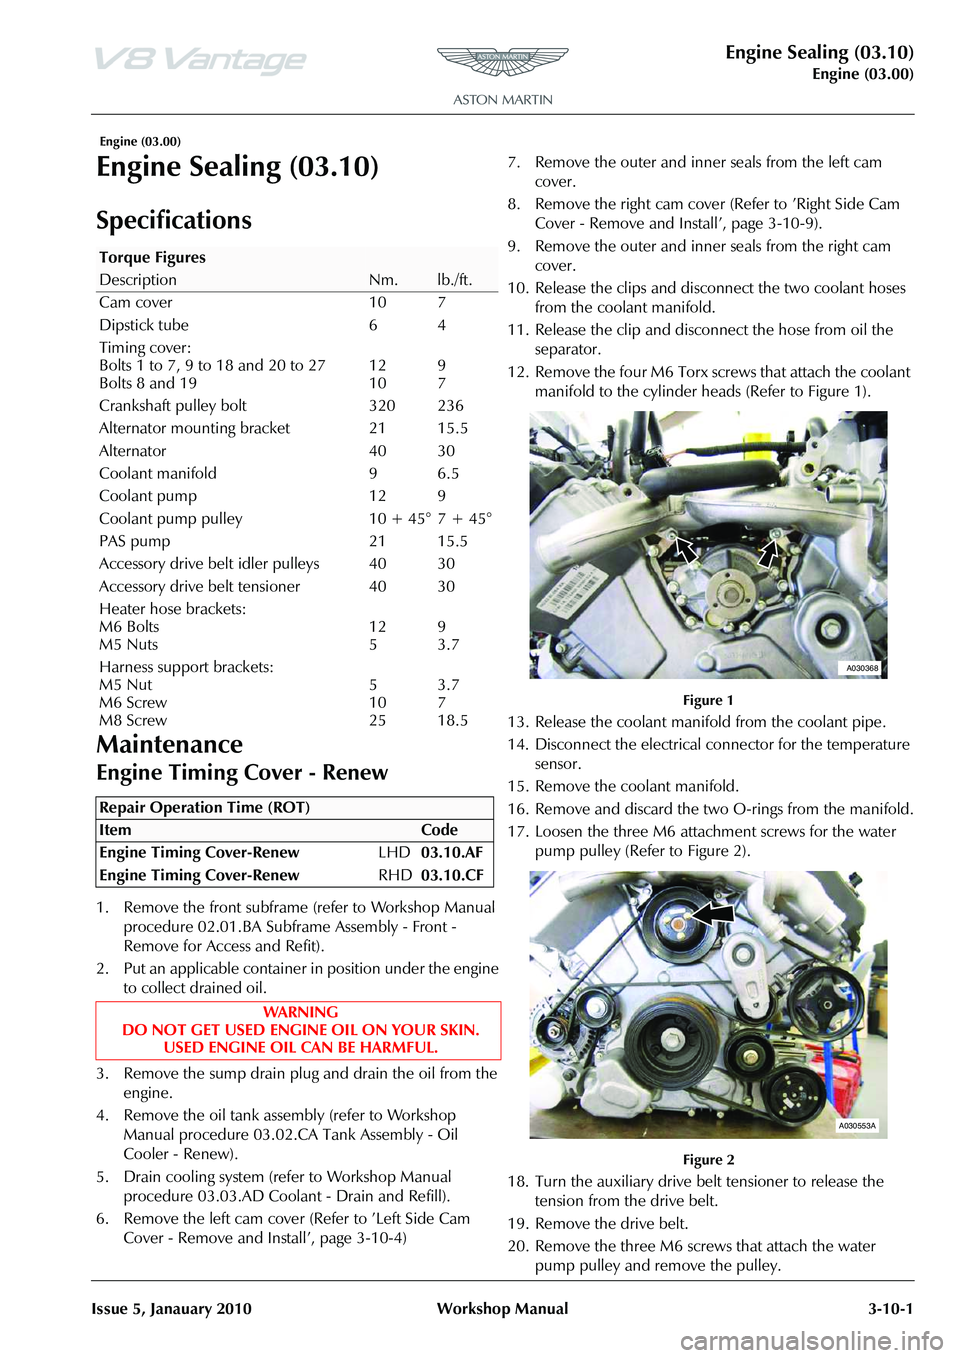
12. Remove the four M6 Torx screws that attach the coolant manifold to the cylinder heads (Refer to Figure 1).
Figure 1
13. Release the coolant manifold from the coolant pipe.
14. Disconnect the electrical connector for the temperature sensor.
15. Remove the coolant manifold.
16. Remove and discard the two O-rings from the manifold.
17. Loosen the three M6 attachment screws for the water pump pulley (Refer to Figure 2).
Figure 2
18. Turn the auxiliary drive be lt tensioner to release the
tension from the drive belt.
19. Remove the drive belt.
20. Remove the three M6 screws that attach the water pump pulley and remove the pulley.
Torque Figures
DescriptionNm.lb./ft.
Cam cover 10 7
Dipstick tube 6 4
Timing cover:
Bolts 1 to 7, 9 to 18 and 20 to 27
Bolts 8 and 19
12
10
9
7
Crankshaft pulley bolt 320 236
Alternator mounting bracket 21 15.5
Alternator 40 30
Coolant manifold 9 6.5
Coolant pump 12 9
Coolant pump pulley 10 + 45° 7 + 45°
PAS pump 21 15.5
Accessory drive belt idler pulleys 40 30
Accessory drive be lt tensioner 40 30
Heater hose brackets:
M6 Bolts
M5 Nuts
12
5
9
3.7
Harness support brackets:
M5 Nut
M6 Screw
M8 Screw
5
10
25
3.7
7
18.5
Repair Operation Time (ROT)
A030368
A030553A
Page 360 of 947
Engine Sealing (03.10)
Engine (03.00)3-10-2 Workshop Manual Issue 5, Janauary 2010
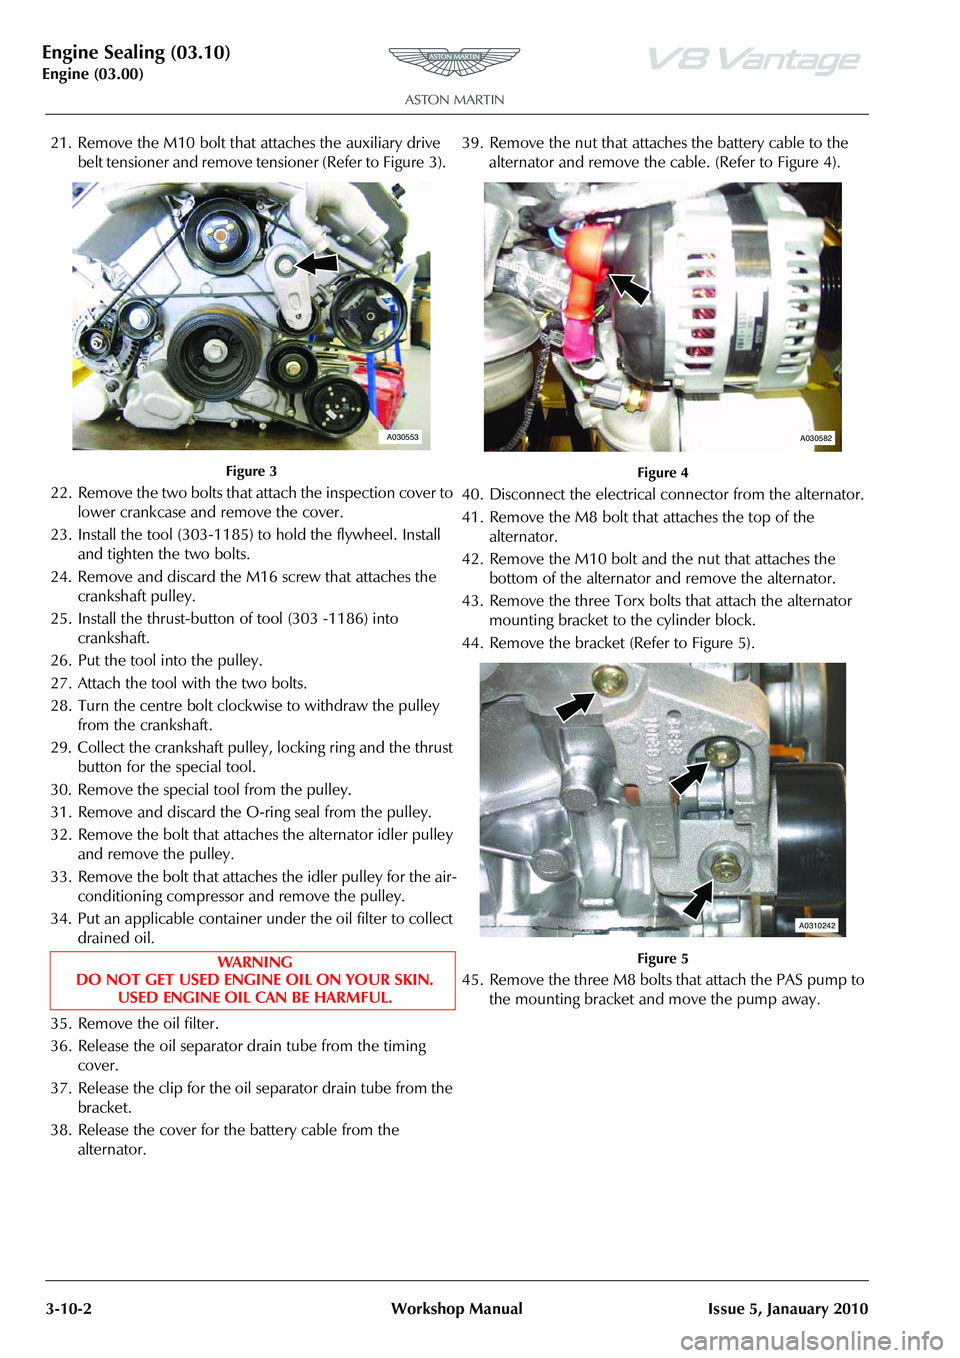
21. Remove the M10 bolt that attaches the auxiliary drive belt tensioner and remove tensioner (Refer to Figure 3).
Figure 3
22. Remove the two bolts that attach the inspection cover to lower crankcase and remove the cover.
23. Install the tool (303-1185) to hold the flywheel. Install and tighten the two bolts.
24. Remove and discard the M16 screw that attaches the crankshaft pulley.
25. Install the thrust-button of tool (303 -1186) into crankshaft.
26. Put the tool into the pulley.
27. Attach the tool with the two bolts.
28. Turn the centre bolt clockwise to withdraw the pulley from the crankshaft.
29. Collect the crankshaft pulley, locking ring and the thrust button for the special tool.
30. Remove the special tool from the pulley.
31. Remove and discard the O-ring seal from the pulley.
32. Remove the bolt that attaches the alternator idler pulley and remove the pulley.
33. Remove the bolt that attaches the idler pulley for the air- conditioning compressor and remove the pulley.
34. Put an applicable container under the oil filter to collect drained oil.
35. Remove the oil filter.
36. Release the oil separator drain tube from the timing cover.
37. Release the clip for the oil separator drain tube from the bracket.
38. Release the cover for the battery cable from the alternator. 39. Remove the nut that attaches the battery cable to the
alternator and remove the cable. (Refer to Figure 4).
Figure 4
40. Disconnect the electrical connector from the alternator.
41. Remove the M8 bolt that attaches the top of the alternator.
42. Remove the M10 bolt and the nut that attaches the bottom of the alternator and remove the alternator.
43. Remove the three Torx bolts that attach the alternator mounting bracket to the cylinder block.
44. Remove the bracket (Refer to Figure 5).
Figure 5
45. Remove the three M8 bolts that attach the PAS pump to the mounting bracket and move the pump away.
WAR NI NG
DO NOT GET USED ENGINE OIL ON YOUR SKIN.
USED ENGINE OIL CAN BE HARMFUL.
A030553A030582
A0310242
Page 361 of 947
Engine Sealing (03.10)
Engine (03.00)
Issue 5, Janauary 2010 Workshop Manual 3-10-3
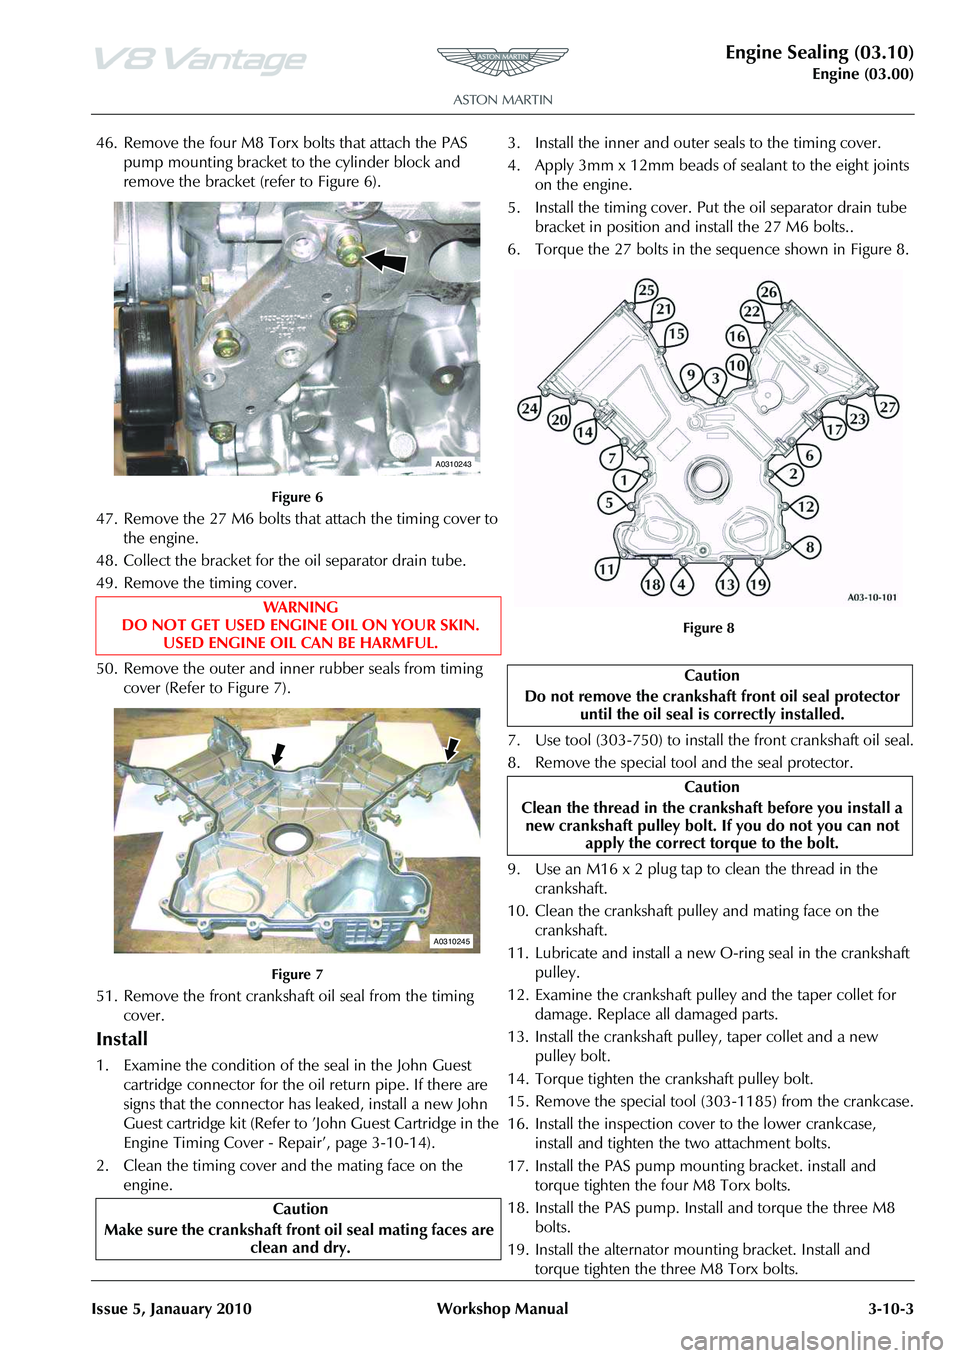
46. Remove the four M8 Torx bolts that attach the PAS pump mounting bracket to the cylinder block and
remove the bracket (refer to Figure 6).
Figure 6
47. Remove the 27 M6 bolts that attach the timing cover to the engine.
48. Collect the bracket for the oil separator drain tube.
49. Remove the timing cover.
50. Remove the outer and inner rubber seals from timing cover (Refer to Figure 7).
Figure 7
51. Remove the front crankshaft oil seal from the timing
cover.
Install
1. Examine the condition of the seal in the John Guest cartridge connector for the oil return pipe. If there are
signs that the connector has leaked, install a new John
Guest cartridge kit (Refer to ’John Guest Cartridge in the
Engine Timing Cover - Repair’, page 3-10-14).
2. Clean the timing cover and the mating face on the engine. 3. Install the inner and outer seals to the timing cover.
4. Apply 3mm x 12mm beads of sealant to the eight joints
on the engine.
5. Install the timing cover. Put the oil separator drain tube bracket in position and install the 27 M6 bolts..
6. Torque the 27 bolts in the sequence shown in Figure 8.
Figure 8
7. Use tool (303-750) to install the front crankshaft oil seal.
8. Remove the special tool and the seal protector.
9. Use an M16 x 2 plug tap to clean the thread in the crankshaft.
10. Clean the crankshaft pulley and mating face on the crankshaft.
11. Lubricate and install a new O-ring seal in the crankshaft pulley.
12. Examine the crankshaft pulley and the taper collet for damage. Replace all damaged parts.
13. Install the crankshaft pulley, taper collet and a new pulley bolt.
14. Torque tighten the crankshaft pulley bolt.
15. Remove the special tool (303-1185) from the crankcase.
16. Install the inspection cover to the lower crankcase, install and tighten the two attachment bolts.
17. Install the PAS pump mounting bracket. install and torque tighten the four M8 Torx bolts.
18. Install the PAS pump. Install and torque the three M8 bolts.
19. Install the alternator mounting bracket. Install and torque tighten the three M8 Torx bolts.
WA R N I N G
DO NOT GET USED ENGINE OIL ON YOUR SKIN.
USED ENGINE OIL CAN BE HARMFUL.
Caution
Make sure the cranks haft front oil seal mating faces are
clean and dry.
A0310243
A0310245
Caution
Do not remove the crankshaft front oil seal protector
until the oil seal is correctly installed.
Caution
Clean the thread in the cran kshaft before you install a
new crankshaft pulley bolt. If you do not you can not apply the correct torque to the bolt.
Page 362 of 947
Engine Sealing (03.10)
Engine (03.00)3-10-4 Workshop Manual Issue 5, Janauary 2010
20. Put the alternator in position.
21. Install the M8 bolt that attaches the top of the alternator.
22. Install the M10 nut and bolt that attaches the bottom of the alternator.
23. Torque tighten the alternator attachment bolts.
24. Connect the battery cable to the alternator.
25. Install and torque the nut that attaches the battery cable.
26. Install the cover for the cable connection.
27. Connect the electrical connector to the alternator.
28. Apply new engine oil to the seal on a new oil filter.
29. Install the new oil filter.
30. Install the drain tube for the oil separator into the clip in the bracket.
31. Install the drain tube for the oil separator into timing cover.
32. Install the idler pulley for the air conditioning compressor.
33. Install and torque the M10 bolt that attaches the idler pulley.
34. Install the alternator idler pulley.
35. Install and torque the M10 bolt that attaches the idler pulley.
36. Install the auxiliary drive belt tensioner.
37. Install and torque the M10 bolt that attaches the tensioner.
38. Put the water pump pulley in position.
39. Install the three M6 bolts that attach the water pump pulley.
40. Turn the auxiliary drive be lt tensioner until you can
install the drive belt.
41. Torque tighten the three M6 water pump pulley bolts.
42. Clean the coolant manifold and the mating faces on the cylinder heads.
43. Install two new O-ring seals into the coolant manifold.
44. Put the coolant manifold in position.
45. Connect the electrical connector for the temperature sensor.
46. Install the coolant pipe in the manifold.
47. Install and torque tighten the four M6 Torx bolts that attach the coolant manifold to the cylinder heads.
48. Connect the three coolant hoses to the coolant manifold and install the hose clips.
49. Connect the engine breather to the oil separator.
50. Clean the left and right cam covers.
51. Install the inner and outer seals on the left cam cover.
52. Install the left cam cover (Refer to ’Left Side Cam Cover - Remove and Install’, page 3-10-4).
53. Install the inner and outer seals on the right cam cover.
54. Install the right cam cover (Refer to ’Right Side Cam Cover - Remove and Install’, page 3-10-9).
55. Install the front subframe (refer to Workshop Manual procedure 02.01.BA Subframe Assembly - Front -
Remove for Access and Refit). 56. Install the oil tank assembly
(refer to Workshop Manual
procedure 03.02.CA Tank Assembly - Oil Cooler -
Renew).
57. Fill the cooling system (refer to Workshop Manual procedure 03.03.AD Coolant - Drain and Refill).
Left Side Cam Cover - Remove and
Install
Removal
1. Disconnect the battery earth cable.
2. Remove the front crush brace. (Refer to procedure 01.01.LC - Front Crush Brace).
3. Remove the left side front crush bar for the body reinforcement. (Refer to procedure 01.01.AC - Left Side
Front Crush Bar for the Body Reinforcement).
4. Disconnect the breather pi pes from the cam cover and
the oil tank Y-piece.
5. Use applicable caps to seal the open ports.
6. Remove the ignition coil cover.
7. Disconnect the electrical connector from each of the four ignition coils.
8. Disconnect the electrical connector from the Variable
Valve Timing (VVT) solenoid.
9. Release the fir tree clip that attaches the wiring harness for the ignition coils.
10. Move the wiring harness for the ignition coils away.
11. Release the wiring harness for the injectors from the mounts.
12. Cut and remove the three cable ties that attach the rear of the wiring harness for the injectors.
13. Release the purge pipe an d heater pipe from the two
clips on the wiring harness bracket.
14. Remove the two nuts and three screws that attach the front bracket for the wiring harness.
15. Remove the three screws that attach the rear bracket for the wiring harness.
16. Cut and remove the four cable ties that attach the rear
of the wiring harness to the front bracket.
17. Remove the rear bracket for the wiring harness.
18. Remove the front bracket for the wiring harness.
19. Remove the screw that attaches each of the four ignition coils.
20. Remove the four ignition coils.
21. Remove the 14 screws that attach the cam cover to the
engine.
Repair Operation Time (ROT)
ItemCode
Left Side Cam Cover - Remove and
Install 03.10.AS
Note: When you remo ve the cam cover attachment bolts in
the step that follows , record their installed positions in the
cam cover.
Page 369 of 947
Engine Sealing (03.10)
Engine (03.00)
Issue 5, Janauary 2010 Workshop Manual 3-10-11
Removal
1. Remove the left side cam cover (Refer to ’Left Side Cam Cover - Remove and Install’, page 3-10-4).
2. Remove the right side cam cover (Refer to ’Right Side Cam Cover - Remove and Install’, page 3-10-9).
Install
1. Install the left side cam cover (Refer to ’Left Side Cam Cover - Remove and Install’, page 3-10-4).
2. Install the right side cam cover (Refer to ’Right Side Cam Cover - Remove and Install’, page 3-10-9).
Engine Timing Cover-Renew (with Engine
Removed
)
Removal
1. Remove the engine assembly (refer Workshop Manual procedure 03.00.AA Engi ne Assembly - Renew).
2. Position drain container.
3. Remove the drain plug and drain the oil from the sump.
4. Remove the left cam cover (Refer to ’Left Side Cam Cover - Remove and Install’, page 3-10-4).
5. Remove the right cam cover (Refer to ’Right Side Cam Cover - Remove and Install’, page 3-10-9).
6. Release the hose clips and disconnect the two coolant hoses from the coolant manifold.
7. Release the hose clip and di sconnect the hose from the
oil separator.
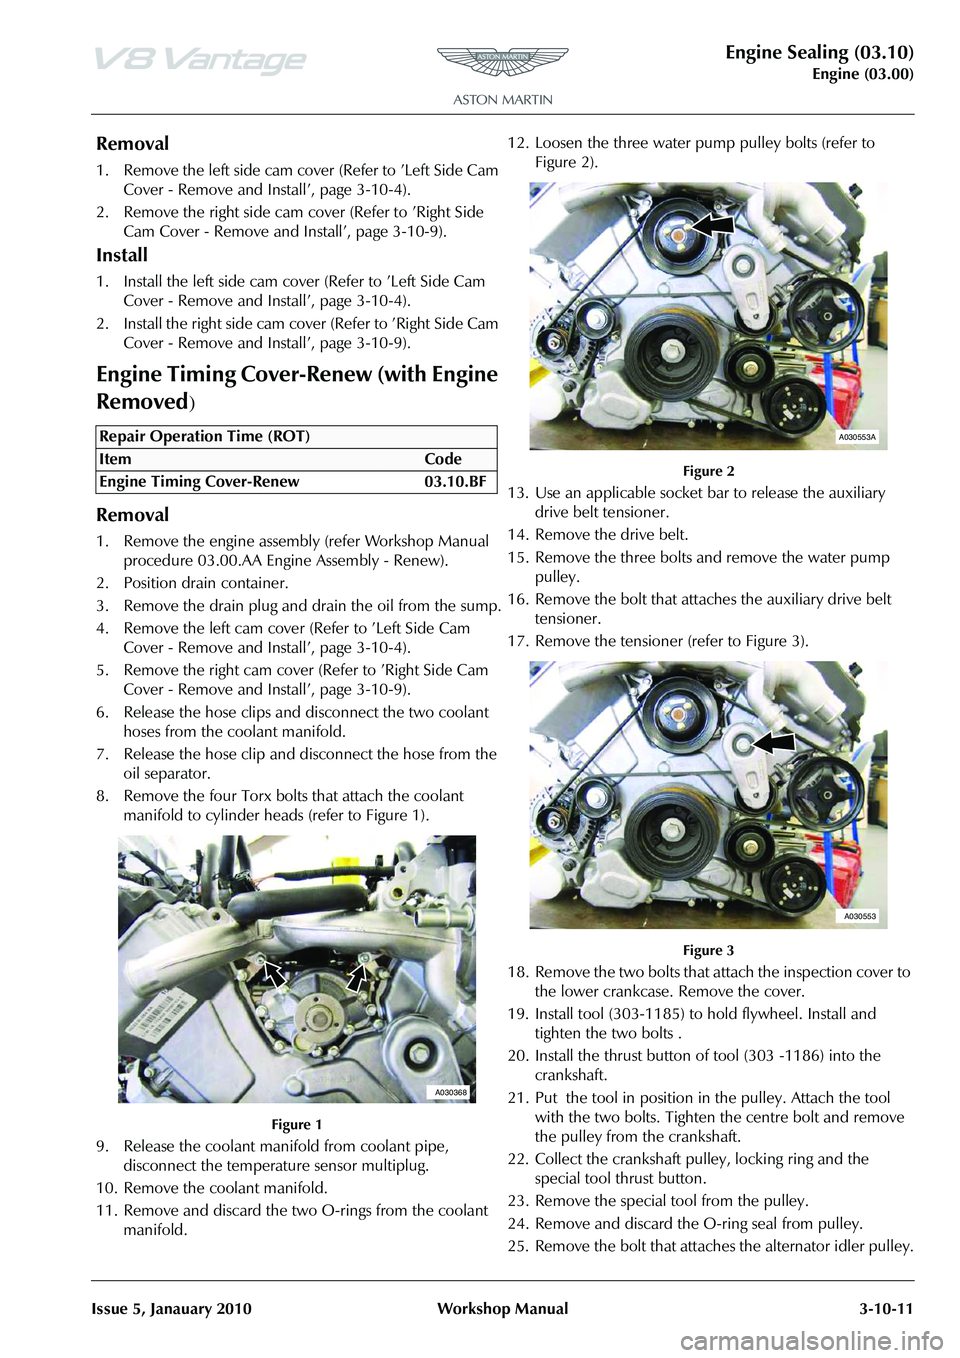
8. Remove the four Torx bolts that attach the coolant manifold to cylinder heads (refer to Figure 1).
Figure 1
9. Release the coolant mani fold from coolant pipe,
disconnect the temperature sensor multiplug.
10. Remove the coolant manifold.
11. Remove and discard the two O-rings from the coolant manifold. 12. Loosen the three water pump pulley bolts (refer to
Figure 2).
Figure 2
13. Use an applicable socket bar to release the auxiliary
drive belt tensioner.
14. Remove the drive belt.
15. Remove the three bolts and remove the water pump pulley.
16. Remove the bolt that attaches the auxiliary drive belt tensioner.
17. Remove the tensioner (refer to Figure 3).
Figure 3
18. Remove the two bolts that attach the inspection cover to the lower crankcase. Remove the cover.
19. Install tool (303-1185) to hold flywheel. Install and tighten the two bolts .
20. Install the thrust button of tool (303 -1186) into the crankshaft.
21. Put the tool in position in the pulley. Attach the tool with the two bolts. Tighten the centre bolt and remove
the pulley from the crankshaft.
22. Collect the crankshaft pulley, locking ring and the special tool thrust button.
23. Remove the special tool from the pulley.
24. Remove and discard the O-ring seal from pulley.
25. Remove the bolt that attaches the alternator idler pulley.
Repair Operation Time (ROT)
A030368
A030553A
A030553