AUDI A3 2011 Owner´s Manual
Manufacturer: AUDI, Model Year: 2011, Model line: A3, Model: AUDI A3 2011Pages: 320, PDF Size: 75.79 MB
Page 291 of 320
_____________________________________________ E_ m_ e_r-= g ::.. e_ n_c-= y'- s_ i_t _u _a_ t_ i_ o _ n_ s __ _
13. Disconnect the cable w hile the engine is runn ing exactly
in
reverse or der to t hat described in~ page 288,
"Connec ting/discon nect ing the jumper cable" . When
doi ng so , ma ke sure that t he cab le ca nnot contact rotat ing
eng ine parts .
14 . T urn the h eater bl ower a nd th e re ar w indow hea tin g off
a gain.
Th e bat tery is ven ted to the o utsi de to p reven t ga ses from en ter ing
the ve hicle interior .
M ake s ure that the jumpe r clamps a re well connected w ith their
metal parts in full contact with t he battery termi na ls .
& WARNING
To avoid serious personal injury and damage to the vehicle, heed
all warnings and instructions of the jumper cable manufacturer . If
in doubt, call for road service.
• Jumper cable s mu st be long enough so that the vehicles do not
touch.
• When connecting jumper cable s, make sure that they cannot
get caught in any moving parts in the engine compartment.
• Before you check anything in the engine compartment, always
read and heed all WARNINGS=>
page 218, "Engine compart
ment ".
0 Note
Im pro perly con ne cte d jum per c abl es c an dam age or destroy the
generator.
• Do not use the ba ttery nega tive term inal for jum p star ting or a
ma lf u nction co uld occ ur in the vehicle electrica l system .
• Always co nnect POSITIV E(+) to POSI TIVE( +), a nd NEGATIVE( -)
to N EGATIVE{ -) termina l.
Safety first
• Check that all screw p lugs on the battery cells are screwed in
fir mly . If no t, tig hten plugs pr ior to connectin g clamp o n negative
battery term inal.
• P lease note that the pr ocedur e fo r connecting a jumper cable as
described above app lies specifically to the case of your vehicle being
jum p st ar te d . When you are giving a jump start to anot her vehi cle, do
not conn ect the m in u s (-) cable to t he minus( -) term inal on the
discharged battery ©=>
page 288, fig. 197 . In stea d, sec urely
connect the mi nus( -) cable to either a massive metal component
that is f irm ly bo lte d to t he eng ine block or to the engine bloc k itse lf .
If the battery that i s bei ng charged does not ven t to t he ou tside,
escaping battery gas could ignite and explode! •
Emergency towing with
commercial tow truck
c;eneral hints
Your Audi requires s pecial h andling for to win g.
The follow ing informat ion is to be used by commercial tow truck
oper ator s w ho know how to oper ate th eir equipmen t sa fe ly.
• Never tow your Audi, towing will cause damage to the engine
and transmission.
• Never wrap the safety chains or winch cables around the brake
lines.
• To prevent unnecessary damage, your Audi must be transported
with a car carrier (flat bed truck ).
• To load the vehicle on to the flat bed, use the towing loop found
in the vehicle tools and attach to the front or rear anchorage
=> page 290 and=> page 290 . ..
Vehicle care Do-it-yourself service Technical data
Page 292 of 320
llffl!l.,___E_ m_ e_r-=g :.. e_ n_c -=y '-- s_i_t _u _a _ t_ i_ o _ n_ s ____________________________________________ _
& WARNING
A vehicle being towed is not safe for passengers. Never allow
anyone to ride in a vehicle being towed, for any reason. •
Front towing loop
Do not install the front towing loop until it is needed .
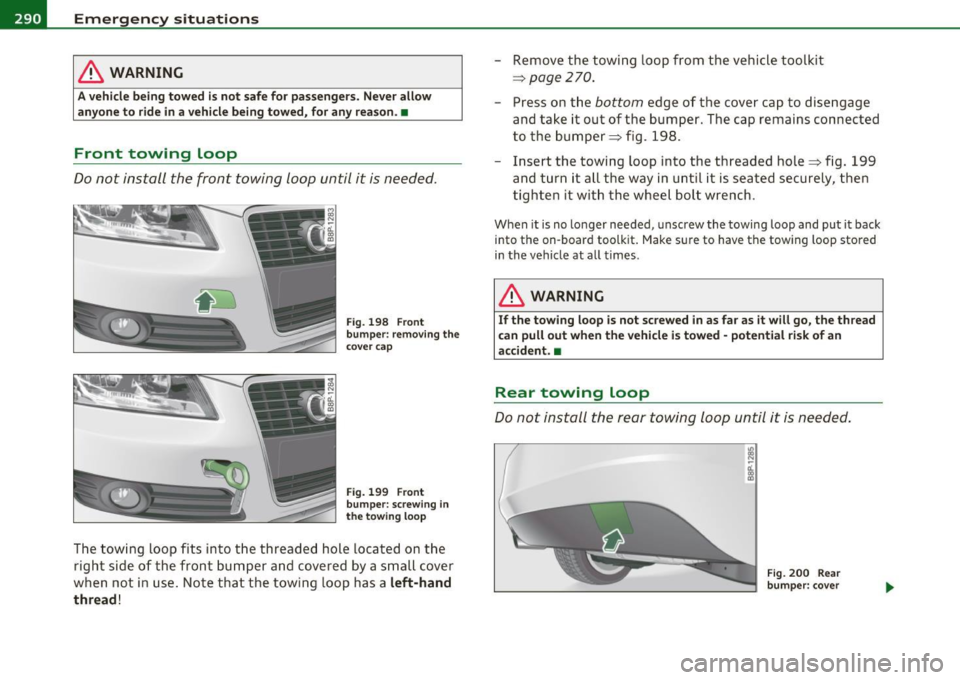
Fig. 198 Front
bumper: removing the
cover cap
Fig. 199 Front
bumper: screwing in
the towing loop
The towing loop fits into the threaded hole located on the
right side of the front bumper and covered by a small cover
when not in use. Note that the towing loop has a
left-hand
thread!
- Remove the towing loop from the vehicle toolkit
=> page 270.
-Press on the bottom edge of the cover cap to disengage
and take it out of the bumper. The cap remains connected
to the bumper => fig. 198.
- Insert the towing loop into the threaded hole=> fig. 199
and turn it all the way in unt il it is seated securely, then
tighten it with the wheel bolt wrench .
When it is no longer needed , unscrew the towing loop and put it back
into the on-board toolkit. Make sure to have the towing loop stored
in the vehicle at all times .
& WARNING
If the towing loop is not screwed in as far as it will go, the thread
can pull out when the vehicle is towed -potential risk of an
accident. •
Rear towing loop
Do not install the rear towing loop until it is needed.
Fig. 200 Rear
bumper: cover
Page 293 of 320
_____________________________________________ E_ m __ e_r-=g =- e_ n_c -==y "- s_i_ t _u _a _ t_ i_ o _ n_ s _ __.fflll
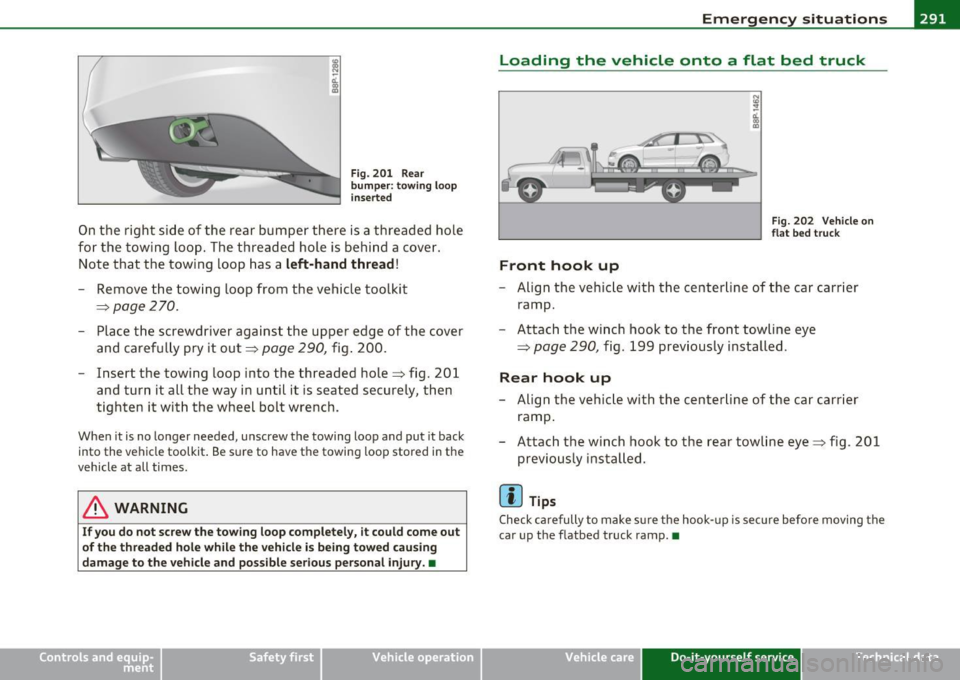
Fig. 201 Rear
bumper: towing loop
inserted
On the right side of the rear bumper there is a threaded hole
for the towing loop. The threaded hole is behind a cover.
Note that the towing loop has a
left-hand thread!
Remove the towing loop from the vehicle toolkit
=> page 270.
Place the screwdriver against the upper edge of the cover
and carefully pry it out :::>
page 290, fig. 200.
- Insert the towing loop into the threaded hole=> fig. 201
and turn it all the way in until it is seated securely, then
tighten it with the wheel bolt wrench.
When it is no longer needed, unscrew the towing loop and put it back
into the vehicle toolkit. Be sure to have the towing loop stored in the
vehicle at all times.
& WARNING
If you do not screw the towing loop completely, it could come out
of the threaded hole while the vehicle is being towed causing
damage to the vehicle and possible serious personal injury. •
Vehicle OP-eration
Loading the vehicle onto a flat bed truck
Front hook up
N (0 :? 0:. CD
"'
Fig. 202 Vehicle on
flat bed truck
- Align the vehicle with the centerline of the car carrier
ramp.
- Attach the winch hook to the front towline eye
=>
page 290, fig . 199 previously installed .
Rear hook up
-Align the vehicle with the centerline of the car carrier
ramp.
- Attach the winch hook to the rear towline eye=> fig. 201
previously installed.
rn Tips
Check carefully to make sure the hook-up is secure before moving the
car up the flatbed truck ramp. •
Vehicle care Do-it-yourself service iTechnical data
Page 294 of 320
IJIIL--___:E:::..:.. m:..:..: e..:.r-=g ~ e:::..:.. n:..:c ::=y :.....: s..:.i..:.t ..:.u :..:a :... t.:.; i:..: o :... n:..:..: s ____________________________________________ _
Lifting the vehicle
Important safety precautions
Be aware of the following hazards before lifting the vehicle with a
workshop hoist or floor jack:
• The vehicle should never be lifted or jacked up from underneath
the engine oil pan, the transmission housing, the front or rear axle
or the body side members. This could lead to serious damage.
• Use lifting equipment with padded contact surfaces to avoid
damage to the underbody or chassis frame.
• Alternatively, cover the contact surfaces on workshop hoist or
floor jack with rubber pads before lifting.
• Before driving over a workshop hoist, check that the vehicle
weight does not exceed the permissible lifting capacity of the hoist.
• Before driving over a workshop hoist, ensure that there is suffi
cient clearance between the hoist and low parts of the vehicle.
& WARNING
To reduce the risk of serious injury and vehicle damage:
• Always lift the vehicle only at the special workshop hoist and
floor jack lift points illustrated
~ fig. 203 and=> fig. 204.
• Failure to lift the vehicle at these points could cause the vehicle
to tilt or fall from a lift if there is a change in vehicle weight distri
bution and balance. This might happen, for example, when heavy
components such as the engine block or transmission are removed.
• When removing such heavy components, anchor vehicle to
hoist or add corresponding weights to maintain the center of
gravity. Otherwise, the vehicle might tilt or slip off the hoist,
causing serious personal injury. •
Lifting with workshop hoist and with floor
jack
The vehicle may only be lifted at the lifting points illus
trated.
-L==-=--=--=--=--=-----_-_- __,--~ cf..
,,
ex, m
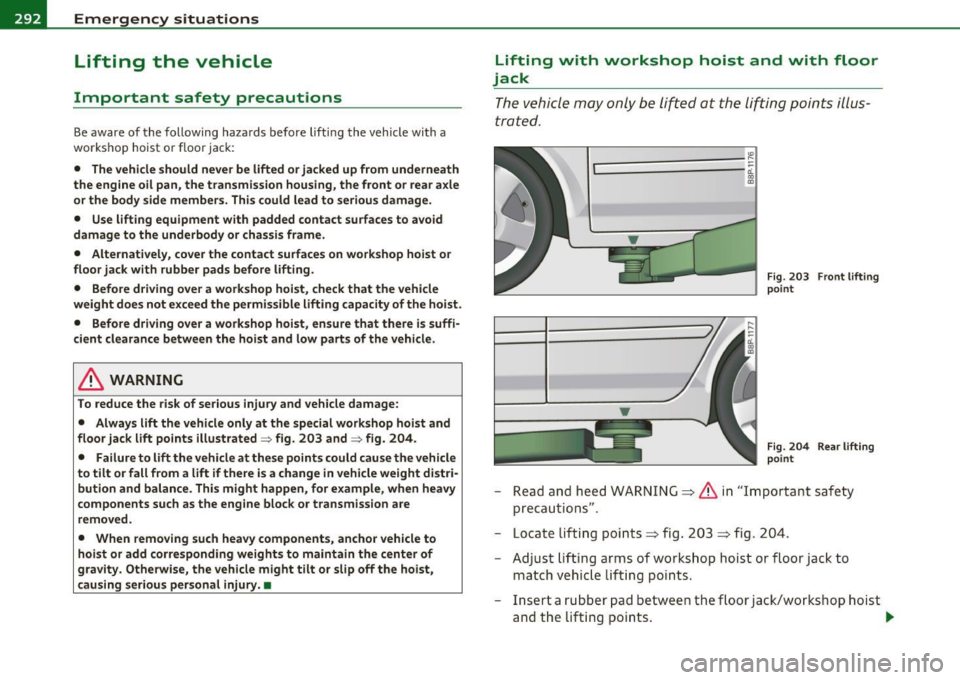
Fig. 203 Front lifting
point
Fig. 204 Rear lifting
point
- Read and heed WARNING=> & in "Important safety
precautions".
- Locate lifting points=> fig. 203 => fig . 204 .
- Adjust lifting arms of workshop hoist or floor jack to
match vehicle lifting points.
- Insert a rubber pad between the floor jack/workshop hoist
and the lifting points. -.,,
Page 295 of 320
_______________________________________________ E_ m_ e_r_, g::;._ e_n _ c""' y:.- s_ it_u_ a_t _ i_o _n_ s __ _
If you must lift your vehicle with a floor jack to work underneath,
be sure the vehicl e is safely supported on stand s intended for this
purpo se .
Front lifting point
The lifting point is located on the floor pan reinforcement about at
t he s ame leve l as the jack mo unting point~
page 292, fig. 2 03. Do
not lift the vehicle at th e vertical sill re inforcement.
Rear lifting point
The lifting po int is located on the ve rtical reinforcement of the lower
sill fo r the onboard ja ck ~
page 29 2, fig. 2 04.
Lifting with vehicle jack
Refe r to ~ page 2 76 .
0 Note
• Be aware of the following points before lifting the vehicle:
- The vehicle should never be lifted or jacked up from under
neath the engine oil pan , the tran smission housing , the front or
rear axle or the body side members. This could lead to serious
damage.
- To avoid damage to the underbody or chassis frame, a rubber
pad must be inse rted between the floor ja ck and the lift points.
- Before dr iving ov er a workshop hoist , check that the vehicle
weight does not exceed the permissible lifting capacity of the hoist.
- Before driving over a work shop hoi st, en sure that there is
sufficient clearance between the hoist and low parts of the
vehicle. •
Safety first Vehicle care Do-it-yourself service Technical data
Page 296 of 320
.,,___G_ e_ n _ e_ r_ a_ l_i_n _f_o _ r_ m __ a_t _ i_o _n _______________________________________________ _
General information
Explanation of technical data
Some of the technical data listed in this manual requires
further explanation.
The technical data for your vehicle is listed in the charts starting on
~ page 296. This sect ion prov ides genera l information, notes and
restrictions which app ly to this data .•
Veh icle identification
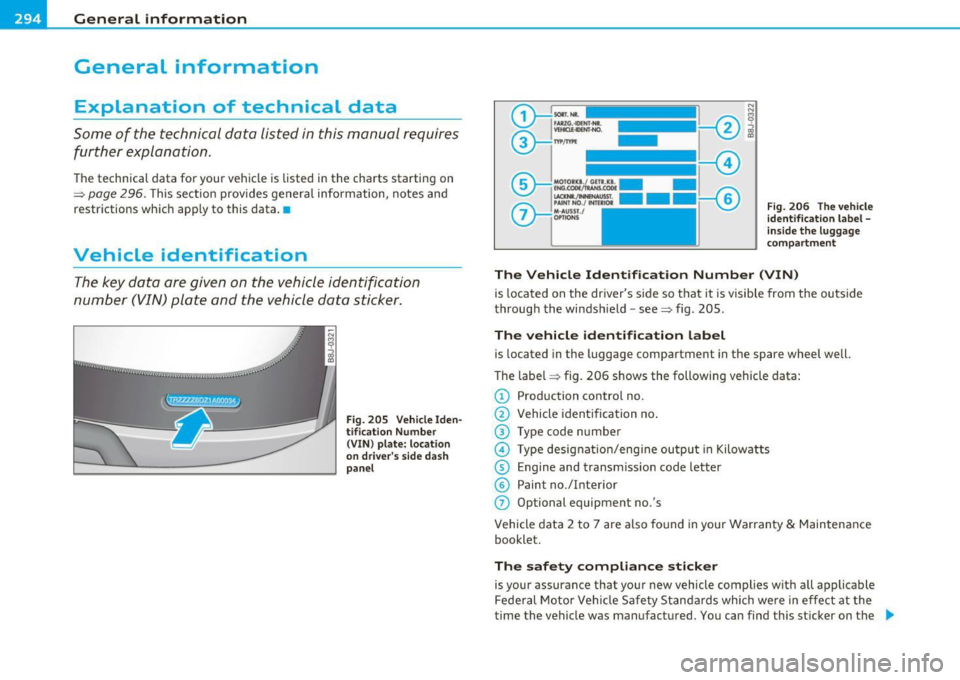
The key data are given on the vehicle identification
number (VIN) plate and the vehicle data sticker .
Fig. 20 5 Vehi cle I den
t ifi ca tion Nu mbe r
(VIN) pla te : loc atio n
o n d rive r's sid e d ash
p an el Fi
g. 2 06 Th e vehicle
identi ficati on l abel -
in side the l ugga ge
co mpa rtme nt
The Vehicle Ident ifi cat ion Number (VIN)
is located on the dr iver's s ide so that it is visible from the outside
through the windsh ield -see~ fig. 205 .
The vehicle identificati on label
is located in the luggage compartment in the spare wheel well.
The labe l~ fig. 206 shows the following vehicle data:
© Production control no.
@ Vehicle identification no.
@ Type code n umber
© Type designat io n/eng ine output in Kilowatts
© Engine and transmiss ion code letter
© Paint no./Interior
0 Optional equipment no.'s
Vehicle data 2 to 7 are also found in your Warranty & Maintena nce
booklet.
The safety comp liance stick er
is your assurance that your new vehicle complies w ith all applicable
Federal Motor Veh icle Safety Standa rds which we re in effect at the
time the vehicle was manufactured. You can find this sticker on the ._
Page 297 of 320

________________________________________________ G ..... e_ n_e ___ ra ___ l_i_n _ f_ o ___ r_m :....:....: a ..... t ..... i...: o ..... n---- --
left door jamb . It shows the month and year of production and the
vehicle iden tifica tion n umber of your veh icle ( perfo ration) as well as
the Gross Vehicle Weight Rating (GVWR) and the Gross Axle Weight Rating (GAWR).
The high voltage warning label
is loca ted on the loc k carr ier .
The spark ignition system complies with the
Canadian standard ICES-002. •
Weights
Gross Vehicle Weight Rating
The Gross Vehicle Weight Rating (GVWR), and the Gross Axle Weight
Ra ting (GAWR) for fron t and rear are listed on a st icker on the left
door jamb.
Th e Gross Vehicle Weight Rating includes the weight of the basic
vehicle plus f ull fue l tank, oil and coo la nt, plus max im um load, which
includes passenger we ight (150 lbs/68 kg per des ignated seating
position) a nd luggage weight .
Gross Axle Weight Rating
The Gross Axle Weight Rating is the maximum load that can be
applie d at each axle of the vehicle~& .
Vehicle capacity weight
The vehicle capacity weight (max. load) is liste d either o n the driver's
side B -pillar or inside the fuel f iller flap .
Roof weight
The maximum permiss ible roof weight is 165 lb (75 kg ). The roof
we igh t is ma de up o f the weig ht of the roof rack sys tem and the
we ight of the object being transported~
page 88, "Load ing the roof
rack" .
Safety first
& WARNING
• The actual Gross Axle Weight Rating at the front and rear axles
s hould not exceed the permis sible weights, and their combination
must not exceed the Gross Vehicle We ight Rating.
• Exceeding permi ssible weight rating s can result in vehicle
damage, accidents and personal injury .
0 Note
• The vehicle capac ity we ight figu res apply when the load is distrib
uted evenly i n the vehicle (passengers and luggage). When trans
porti ng a heavy load i n the l uggage compartment, ca rry the load as
near to the rear axle as possible so that the veh icle's handling is not
impa ired.
• Do not exceed the maximum permiss ible axle loads or the
maximum gross vehicle weig ht. Always remember that the vehicle's
hand ling will be affecte d by the extra load. Therefore, adjust your
speed a ccording ly .
• Always observe loca l reg ulations. •
Dimensions
The specifications refer to the basic mo de l. Differences may occur
depend ing on the model ty pe a nd options ordered, for exam ple, tir e
sizes .
0 Note
When d riving up steep ramps, on rough roads, over c urbs, etc . it is
impo rtan t to remember that some parts of yo ur vehicl e, s uch as
spoilers or ex haust system components, may be close to the ground.
B e careful not to d amage them .•
Do-it,yourself service Technical data
Page 298 of 320
___ D_ a_t _a _____________________________________________________ _
Data
Applie s to ve hicles : w it h 2.0 lit er TFS! 4- cy l. gaso line e ngine ,
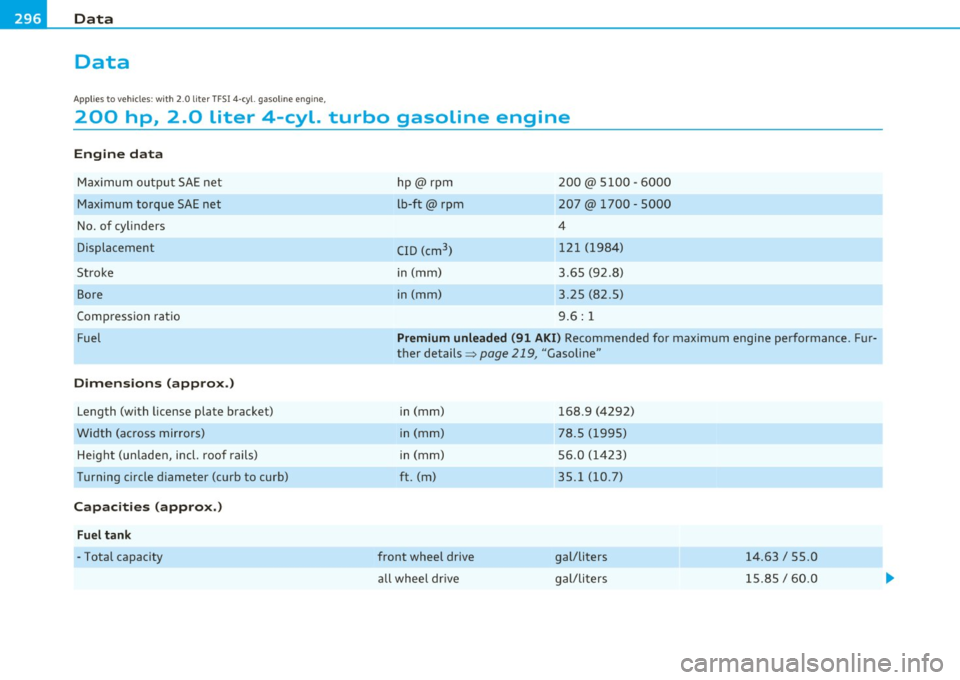
200 hp, 2.0 liter 4-cyl. turbo gasoline engine
Engine data
Max imum outpu t SAE net
Max imum torque SAE net
No. of cy linde rs
Displacement
Stroke
Bore
Compression rat io
Fu el
Dimensions (approx .)
Length (wi th license plate bracket)
Width (across mirro rs)
He ight (unladen, incl. roof rails)
Turning circle d iameter (curb to curb)
Capacities (approx.)
Fuel tank
- Total capacity hp@rpm
lb-ft@
rpm
CID (cm
3
)
in (mm)
in (mm)
200@ 5100 -6000
207 @ 1700 -5000
4
121 (198 4)
3.65 (92.8)
3.25 (82.5)
9 .6 : 1
Premium unleaded (91 AKI) Recomm end ed for maximum engine p erformanc e. Fu r
ther details ~
page 219, "Gasoline"
in (mm)
in (mm)
i n (mm)
ft. (m)
front wheel drive
all whee l dr ive
168 .9 (4292)
78.5 (1995)
56.0 (1423)
35.1 (10 .7)
gal/liters
gal/liters 14.63 / 55.0 15.85 / 60.0
Page 299 of 320
_________________________________________________ D_a_ t_ a __ B'I
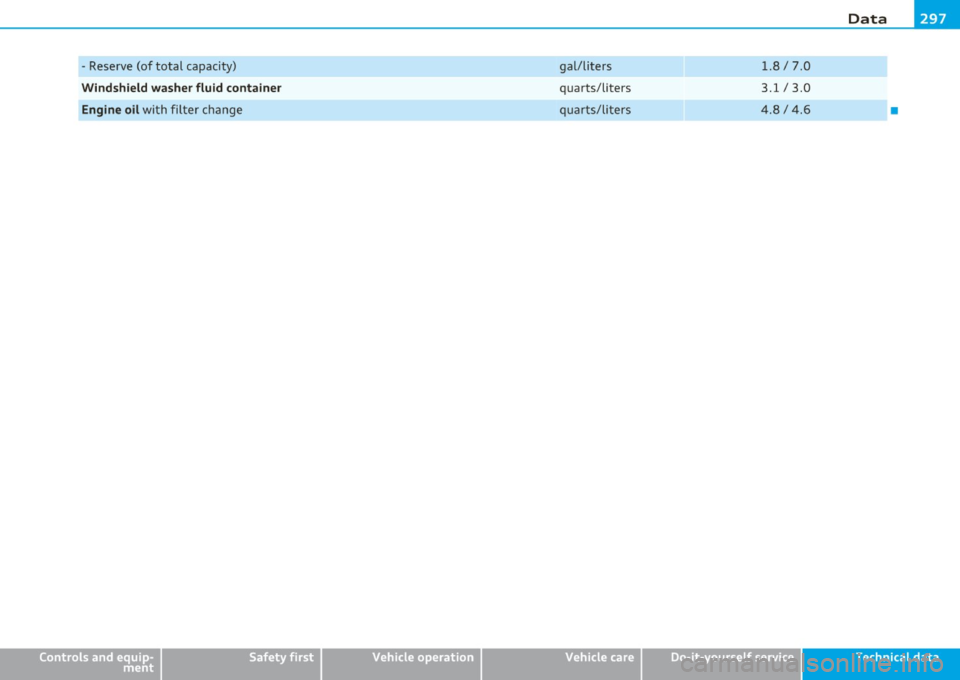
- Reserve (of total capacity)
Windshield washer fluid container
Engine oil with filter change
Safety first ga
l/liters
qu arts/liters
q uarts/liters 1.8 / 7 .0
3.1 / 3 .0
4. 8 I 4.6
Do-it,yourself service
•
Technical data
Page 300 of 320
___ D_ a_t _a _____________________________________________________ _
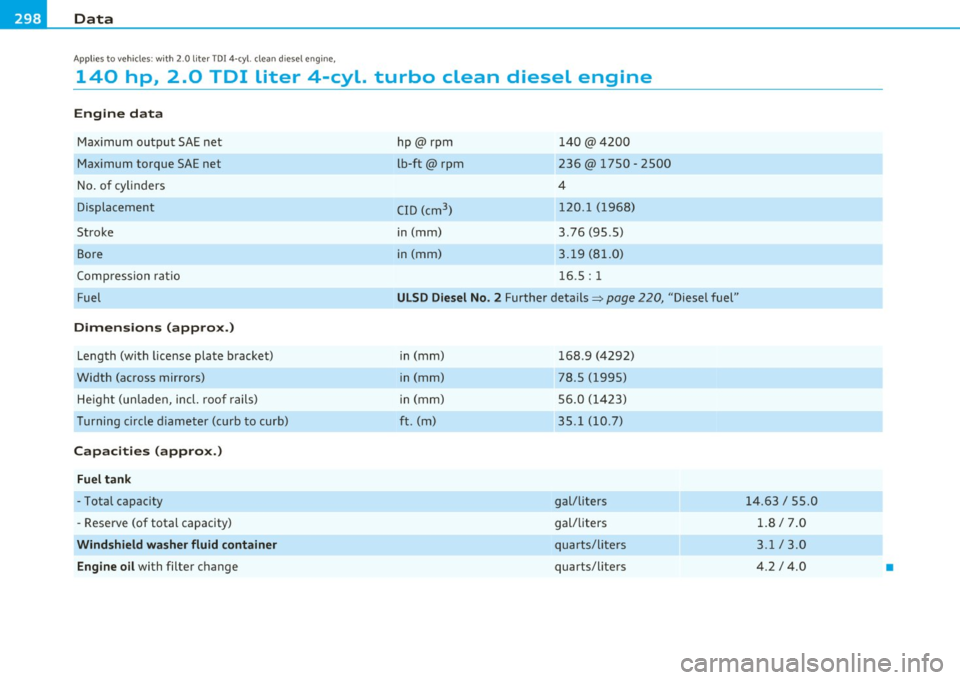
Applies to vehicles : w ith 2 .0 lite r TD! 4-cyl. clean d iesel eng ine,
140 hp, 2.0 TOI liter 4-cyl. turbo clean diesel engine
Engine data
Maximum output SAE net
Max imum torque SAE net
No. of cylinders
Displacement
Stroke
Bore
Compression ratio
Fuel
Dimensions (approx.)
Length (with license plate bracket)
Width (across mirrors)
He ight (unladen, incl. roof rails)
Turning circle diameter (curb to curb)
Capacities (approx.)
Fuel tank
- Total capac ity
- Reserve (of total capacity)
Windshield washer fluid container
Engine oil
with filter ch ange hp@rpm
lb-ft@
rpm
CID (cm
3
)
in (mm)
in (mm) 140@4200
236@ 1750 - 2500
4
120.1 (1968)
3.76 (95.5)
3 .19 (81.0)
16 .5: 1
ULSD Diesel No . 2 Further details~ page 220, "Diesel fuel"
in (mm)
in (mm)
in (mm)
ft. (m)
168 .9 (4292)
78.5 (1995)
56.0 (1423)
35.1 (10 .7)
gal/liters
gal/liters
quarts/liters
quar ts/li ters 14
.63 / 55.0
1.8 / 7.0
3.1/3.0
4 .2
I 4.0 •