sensor AUDI A3 2015 Owner's Guide
[x] Cancel search | Manufacturer: AUDI, Model Year: 2015, Model line: A3, Model: AUDI A3 2015Pages: 288, PDF Size: 71.46 MB
Page 162 of 288

160 Airbag system
Side airbags
Description of side airbags
The airbag system can provide supplemental
protection to properly restrained occupants .
Fig. 128 Side a irbag locat ion in the dr iver 's seat
The sid e airbags are located in the sides of the
front seat backrests ¢
fig. 128 and the rear
backrest facing the doors.
The side airbags installed for the front seating
positions have been designed and certified to
help reduce the risk of injury that can be
caused by airbags when they inflate, particu
larly when the occupant sitting next to it is
not seated properly. The side airbag for the
front passenger seat can be used with proper ly installed child restraints. Please be sure to
read the important information and warnings
whenever us ing a child restraint in a vehicle :
Safety belts
c::>page 131, Airbag system
c::>
page 140, Child safety ¢ page 166.
The side airbag system basically consists of:
-the electronic control module and external
side impact sensors
- the two airbags located in the sides of the
front backrests and the two airbags* located
in the rear backrest
- the airbag warning light in the instrument
cluster.
The airbag system is monitored electronically
to make certain that it is functioning properly
at all times. Each time you switch on the igni
tion, the airbag system indicator light will
come on for a few seconds (self diagnostics) .
The side airbag system supplements the safe
ty belts and can help to reduce the risk of in- jury
to the driver's, front and rear passenger's
upper torso on the side of the vehicle that is
struck in a s ide collision. The airbag dep loys
only in side impacts and only when the vehicle
accelerat ion reg istered by the control unit is
high enough. If th is rate is be low the refer
ence value p rogrammed into the control unit,
the side airbags will not be triggered, even
though the car may be badly damaged as a re
sult of the collision.
It is not possible to de
fine an airbag triggering range that will cover
every possible angle of impact, since the cir
cumstances will vary considerably between
one collis ion and another. Important factors
include, for example, the nature (hard or soft)
of the impacting object , the angle of impact,
vehicle speed, etc.¢
page 161, Important
safety instructions on the side airbag system .
Aside from their normal safety function, safe
ty belts work to help keep the driver or front
passenger in position in the event of a side
collision so that the side airbags ca n provide
protection.
The airbag system is
not a substitute for your
safety belt. Rather, it is part of the overall oc
cupant restraint system in your vehicle. Al
ways remember that the side ai rbag system
can only help to prote ct you if you are wearing
yo ur safe ty belt and wearing it properly. This
is another reason why you should always wear
your safety belts, not just because t he law re
quires yo u to do soc::>
page 131, General
notes.
It i s important to remember that while the
supplementa l side airbag system is designed
to reduce the likelihood of serious injuries,
other injuries, for example, swelling, bru is ing,
friction burns and m inor abrasions can a lso be
associated w ith deployed side airbags . Re
member too, side a irbags w ill deploy only
once and only in ce rtain kinds of accidents -
you r safety belts are always the re to offer pro
tection.
Vehicle damage, repair costs or even the lack
of vehicle damage are not necessarily an indi
cation of over-sensitive or failed airbag activa-
tion. In some coll isions, both front and side
lill>
Page 163 of 288
airbags may inflate. Remember too, that air
bags will dep loy only once and only in certain
kinds of collisions -your safety belts are al
ways there to offer protect ion in those acci
dents in whic h airbags are not supposed to
deploy or when they have already deployed .
The side airbag sy ste m will not depl oy :
- when the ignition is switched off
- in side collisions when the acce leration
measured by the sensor is too low
- in front -end co llisions
- in rear-end collisions
- i n ro llovers .
In some types of acc idents the front airbags,
side curtain a irbags and side airbags may be
tr iggered together .
A WARNING
-Safety belts and the a irbag sys tem will
only p rov ide p rotection when oc cupants
are in the proper sea ting posit ion
~page 161.
-If the airbag indica tor ligh t¢ page 21
turns on when the vehicle is being used,
have the system inspected immediately
by your a uthorized Audi dea ler .
It is pos
sible that the a irbag will inf late when it
is not supposed to, or wi ll not inflate
when it should.
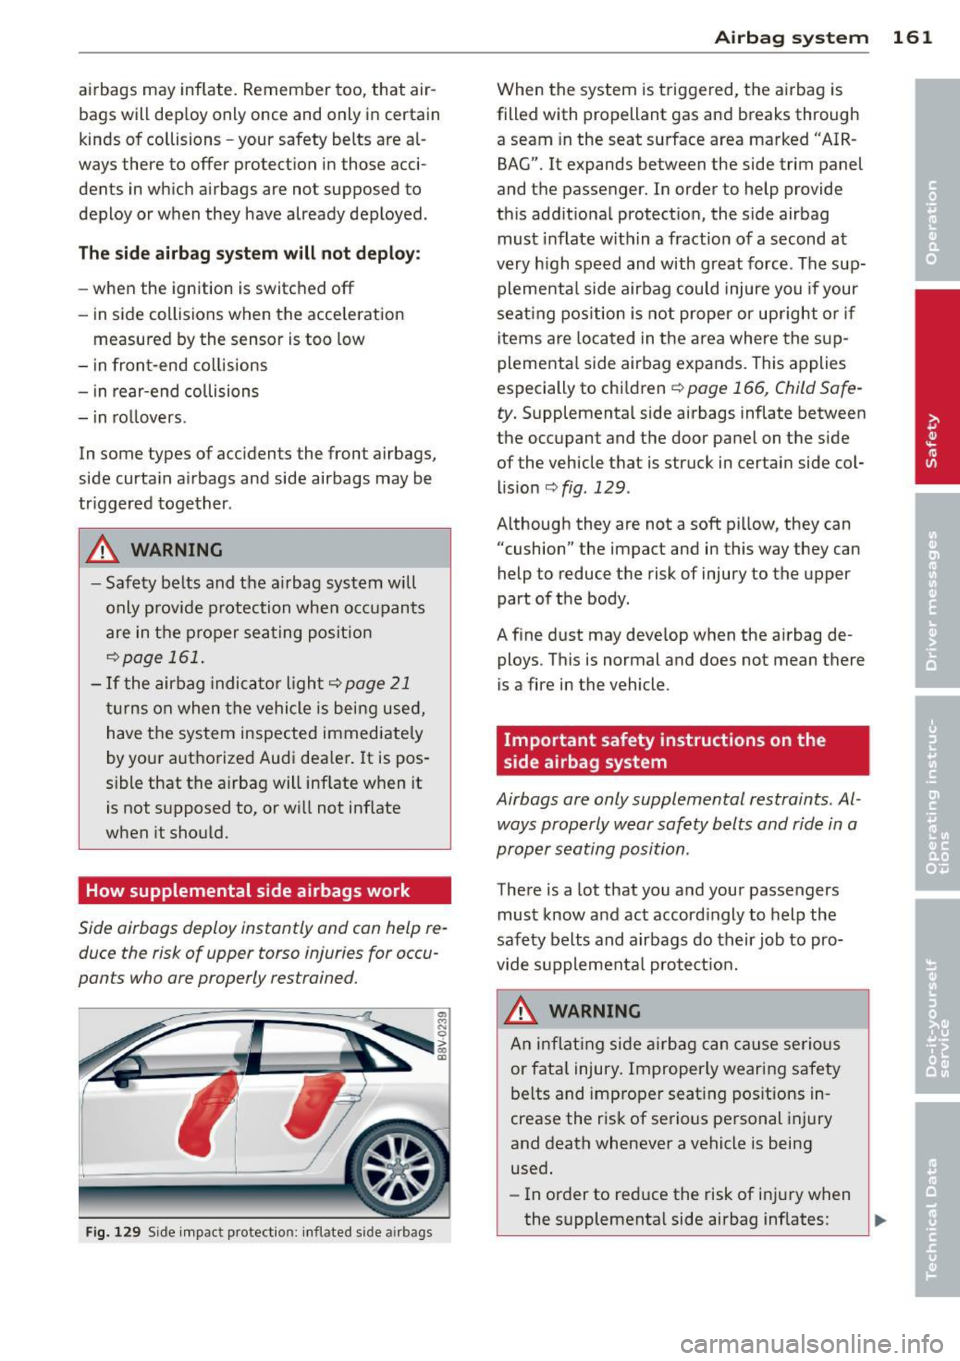
How supplemental side airbags work
Side airbags deploy instantly and can help re
duce the risk of upper torso injuries for occu
pants who are properly restrained.
Fi g. 12 9 Side impact p rotection: inflated s ide a irbags
A irba g system 161
When the system is triggered, t he a irbag is
filled with propellant gas and breaks through
a seam in the seat surface area marked "AIR
BAG". It expands between the side trim panel
and the passenger. In order to help provide
this add itiona l protect io n, the side airbag
must inflate with in a fraction of a second at
very high speed and with great force. The sup
plementa l side airbag could injure you if your
seat ing pos ition is not proper or up right o r if
items are located in the area where the sup
plementa l side airbag expands. This applies
especially to chi ldren
9 page 166, Child Safe
ty.
Supplementa l side airbags inflate between
the occ upant and the door panel on the side
of the vehicle that is struck in certain side col l is ion¢
fig . 129 .
Although they are not a soft pi llow, they can
"cushion" the impact and in this way they can
help to reduce the risk of injury to the upper
part of the body.
A f ine dust may deve lop when the airbag de
ploys . This is normal and does not mean there
is a fire in the vehicle.
Important safety instructions on the
side airbag system
Airbags are only supplemental restraints . Al
ways properly wear safety belts and ride in a
proper seating position.
There is a lot that you a nd your passengers
must know and act accord ingly to help the
safety be lts and airbags do their job to pro
v ide s upplementa l pro tect ion.
A WARNING
A n inflat ing si de a irbag can cause serious
or fata l injury. Improperly wearing safety
belts and improper seat ing pos itions in
crease the risk of serious personal injury
and death whenever a vehicle is being
used.
- In order to reduce the risk of inju ry when
the supplementa l side airbag inflates: .,_
Page 164 of 288
162 Airbag system
-Always sit in an upright position and
never lean against the area where the
supplemental side airbag is located.
- Never let a child or anyone else rest
their head against the side trim panel
in the area where the supplemental
side airbag inflates.
- Always make sure that safety belts are
worn correctly,
- Do not let anyone sitting in the front
seat put their hand or any other parts
of their body out of the window.
- Always make sure that the side airbag
can inflate without interference.
- Never install seat covers or replace
ment upholstery over the front seat
backs that have not been specifically
approved by Audi.
- Never use additional seat cushions that
cover the areas where the side airbags
deploy.
- Damage to the original seat covers or
to the seam in the area of the side air
bag module must always be repaired
immediately by an authorized Audi
dealer.
- Objects between you and the airbag can
increase the risk of injury in an accident
by interfering with the way the airbag
unfolds or by being pushed into you as
the airbag inflates .
- Never place or attach accessories or
other objects (such as cup holders, tel
ephone brackets, or even large, bulky
objects) on the doors, over or near the
area marked "AIRBAG" on the seat backrests.
- Such objects and accessories can be
come dangerous projectiles and cause
injury when the supplemental side air
bag deploys.
- Never carry any objects or pets in the
deployment space between them and
the airbags or allow children or other passengers to travel in this position.
- Always use the built-in coat hooks only
for lightweight clothing . Never leave any
heavy or sharp-edged objects in the pockets that may interfere with side air
bag deployment and can cause personal
injury in an accident.
- Always prevent the side airbags from be
ing damaged by heavy objects knocking
against or hitting the sides of the seat
backs.
- The airbag system can only be triggered
once . If the airbag has been triggered,
the system must be replaced by an au
thorized Audi dealership.
- Damage (cracks, deep scratches etc .) to
the original seat covers or to the seam in
the area of the side airbag module must
always be repaired immediately by an au
thorized Audi dealer.
- If children are seated improperly, their
risk of injury increases in the case of an
accident
¢ page 166, Child Safety.
-Never attempt to modify any compo
nents of the airbag system in any way.
- In a side collision, side airbags will not
function properly if sensors cannot cor
rectly measure increasing air pressure in
side the doors when air escapes through
larger, unclosed openings in the door
panel.
- Never drive with interior door trim pan
els removed .
- Never drive when parts have been re moved from the inside door panel and
the openings they leave have not been properly closed.
- Never drive when loudspeakers in the
doors have been removed unless the
speaker holes have been properly
closed.
- Always make certain that openings are
covered or filled if additional speakers
or other equipment is installed in the
inside door panels.
- Always have work on the doors done by
an authorized Audi dealer or qualified
workshop.
Page 165 of 288
Side curtain airbags
Description of side curtain airbags
The side curtain airbag system can provide
supplemental protection to properly restrain
ed occupants .
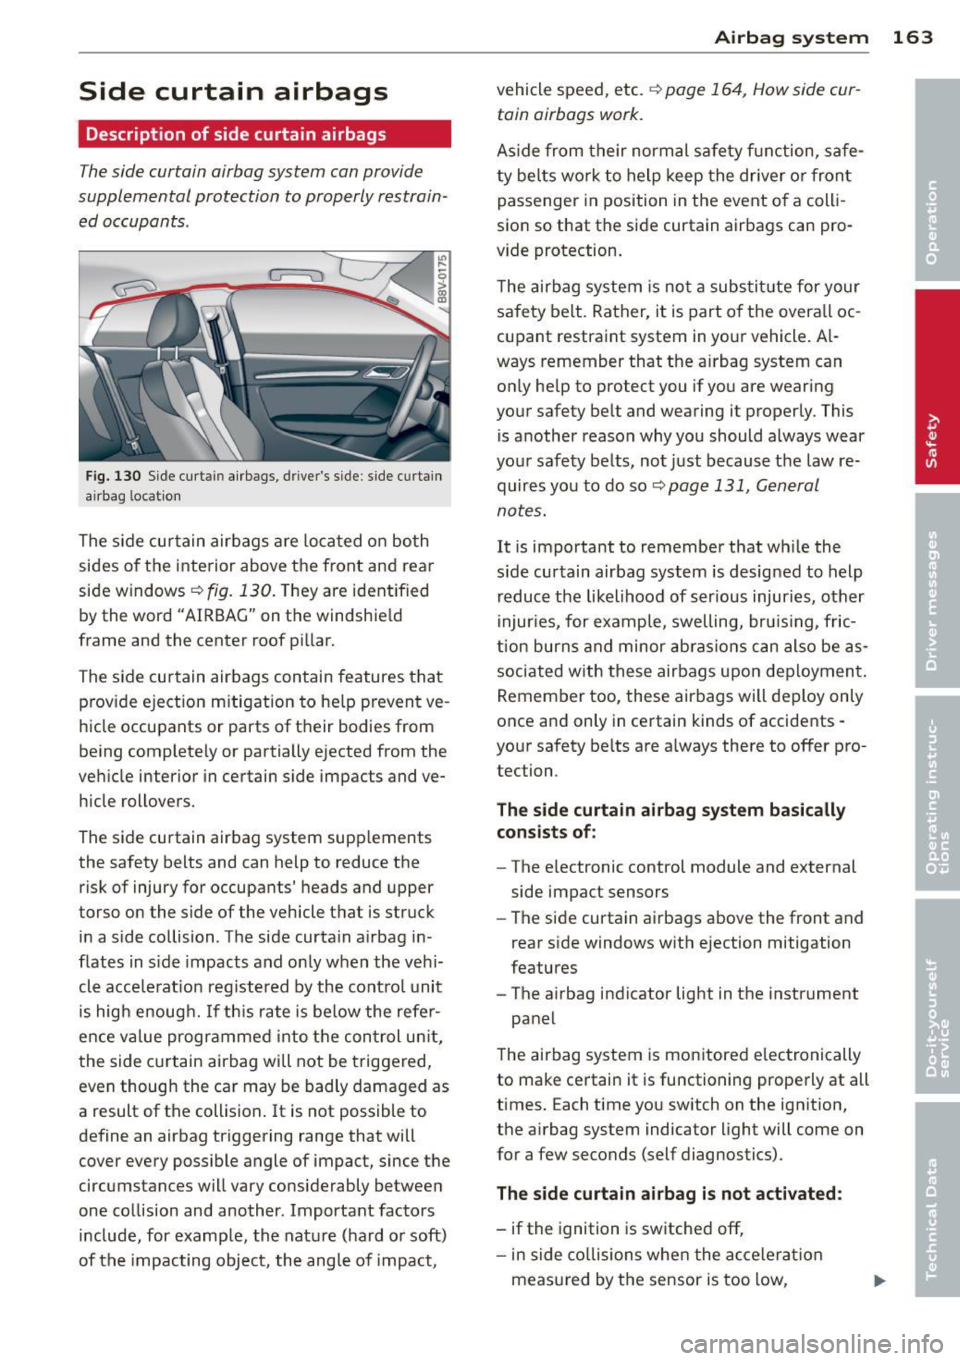
Fig. 130 Side cu rt ain airbags , d ri ver 's side : side curtain
air bag lo cat ion
The s ide cur tain airbags a re located on both
sides of the inte rior above the front and rear
side w indows ¢
fig. 130. They are ident ified
by the word "AIRBAG" on t he windshie ld
frame and the center roof pi llar.
The s ide cur tain airbags contain features that
prov ide e jection m itigation to he lp prevent ve
h icle occupants or parts of their bodies from
being completely or partially ejected from the
ve hicle interior in certain side impacts and ve
h icle rollovers.
The side curtain airbag system supp lements
the safety belts and can help to reduce the risk of injury for occupants ' heads and upper
t orso on the side of the vehicle that is struck
in a side collision . The side curta in a irbag in
flates in s ide impacts and on ly when the veh i
cle acce le rat ion reg istered by the contro l uni t
i s hig h enoug h. If th is rate is below the refe r
e n ce value programmed into the con trol un it,
the side c urtain airbag will not be triggered,
even though the car may be badly damaged as
a result of the collision . It is not possible to
define an airbag triggering range that will
cover every possible angle of impact, since the
circumstances will vary considerably betwee n
one collision and another . Important factors
include, for examp le, the nature (hard or soft)
of the impacting object, the angle of impact ,
Airba g sy stem 163
vehicle speed, etc. ¢ page 164, How side cur
tain airbags work.
As ide from their normal safe ty fun ction, safe
ty be lts wo rk to help keep the driver o r fron t
passenger in position in the event o f a colli
sion so that the side curtain airbags can pro
vide protection .
T he airbag system is no t a subs tit ute for your
sa fety belt. Rather, it is part of the overa ll oc
cupant restraint system in your veh icle . A l
ways remember that the a irbag system can
o nl y he lp to protect you if you are wearing
your safety belt and wearing it properly . This
is another reason why you should always wear
you r safety be lts, not just because t he law re
quires you to do so ¢
page 131, General
notes.
It is important to remember that w hile the
s ide curtain airbag system is designed to help
r educ e the likelihood of ser ious injuries, othe r
injur ies, for example, swelling, bru is ing, fric
t ion burns and minor ab ras ions c an also be as
sociated w ith these airbags upo n deploymen t.
Remember too, these air bags will deploy only
once and only in ce rtain kinds of accidents -
your safety be lts are a lways there to offer pro
tection .
The side curtain airbag system basically
consist s of:
- The e lectronic control module and external
side impact sensors
- The side curtain airbags above the front and
rear side windows w ith ejection mitigation
features
- The a irbag indicator light in the instrument
panel
The a irbag system is monitored e lec tronically
to make certain it is functioning properly at all
times. Each time you sw itch on the ign ition,
the airbag system indicator light will come on
for a few seconds (self diagnostics) .
The si de curtain airbag i s not activated:
- if the ignition is sw itched off,
- in side co llisions whe n the a cceleration
meas ured by the sensor is too low ,
Page 193 of 288
Your vehicle is equipped w ith an intelligent
energy management system for distrib uting
e lectricity. This sign ificantly improves the
start ing ability and increases the battery life.
The energy management system Is made up
of
battery diagnosis , idling current manage
ment
and dynamic ene rgy man agement.
Battery diagnosis
The b attery diagnos is determines the ba tte ry
cha rge leve l. The sensors de termine the bat
tery vo ltage, the battery c urrent , and the bat
tery temperature . The c urrent charge level
and the performance of the battery are deter
mined based on th is.
Idling current management
The idling current ma nagement decreases the
ene rgy used whi le par ked . W it h the engine
switche d off, it ma nages the ene rgy distribu
tion to the d ifferent e lectr ica l components.
Date from battery d iagnosis is taken into ac
count for th is .
D epending on t he battery charge level, elec
tr ica l equipment is sw itched off one item after
the ot her, to prevent the battery from dra in
i n g a nd to retain the starting abil ity.
Dynamic energy management
W hile dr iving, dynamic energy management
d istributes the approp riate amount of energy
to the electrical equipment. It contro ls the
battery c harge level so that more energy is
n ot used the n is being generated in o rder to
main tain an opt imal batte ry charge level.
{!) Tips
- Energy management cannot overcome
the laws of physics . Note that the charge
l eve l and length of the battery life are
li mi ted.
- Wh en the star ting ability is endangered,
the (•) indica to r li ght turns on
9page20.
Smart Technolog y 191
What you should know
Maintaining the starting ability is the highest
priority .
A lot of stress is placed o n the batte ry when
driv ing s hort d ista nces, in traffic, and at cold
times of the year . A lot of e ne rgy is used but
li ttle is generated .
It is also cr it ica l when the
engine is not r unning but electr ical eq uip
ment is switc hed on. In this case, e nergy is
u sed but none is gener ated.
In si tuat ions like this , energy management
will active ly r egu lated t he di st ribution of e n
ergy.
Long periods without use
If you do not d rive your vehicle for several
days or weeks, elect rical eq uipment is gradu
a lly scaled back or sw itched off. This reduc es
energy u se and en sures the ve hicl e w ill be
a ble to s tart aft er long per iod s of ti me . S ome
co nve nience fun ctions such as ope ning wi th
the remote con tro l key may not be available.
T hese convenience functions
will be ava ila bl e
again once you switch t he ignit io n on and
start the eng ine.
With the engine switched off
F o r example, if you listen to the r adio w hen
th e engine is swi tc h ed off, the bat tery will
drain .
If the st arting ability is en dangere d due to the
energy cons umption, an error message ap
p ears in vehicles wi th a driver informat ion sys
tem *.
T he mess age s hows th at y ou n eed to s tart t he
engine in order to c harge t he battery.
With the engine running
Althoug h elec trical en ergy is g enerate d while
driv ing , th e bat tery ca n dra in . T his can happen
whe n littl e e ne rgy is ge nera ted, a nd much is
u sed and th e ch arge leve l o f th e batt ery is no t
o ptimal.
IJI>
•
•
Page 204 of 288
202 Caring and cle aning
_& WARNING
- Only wash the vehicle when the ignition
is off and follow the instructions from
the car wash operator to reduce t he risk
of accidents.
- To reduce the risk of cuts, protect your
self from sharp meta l components when
wash ing the underbody or the inside of
the wheel housings.
- After washing the vehicle, the braking ef
fect may be de layed due to mo isture on
the brake rotors or ice in the winter. The
brakes must be dried first with a few
careful brake applicat ions .
@ Note
- If you wash t he vehicle in an automatic
ca r wash, you must fold the exterior m ir
r o rs in to reduce the r isk of damage to
t h e m irrors. Power foldi ng exterior m ir
r o rs* must on ly be folded in and o ut us
i ng the p ower folding function.
- To prevent pa int damage, do not wash
t h e ve hicle in direc t sunli ght. -
To reduce the ris k of damage to the sur
face, do not use insect removing spong
es, kitchen sponges or similar items.
- Matte finish painted veh icle compo
nents:
- To reduce the risk of damage to the
surface, do not use polishi ng agents or
h a rd wax.
- Never use protect ive wax. It can de
stroy the matte fi nish effec t.
- Do not place any stickers o r mag net ic
s igns on vehicle parts painted w ith
matte fi nish pa int. The paint cou ld be
d amaged when the sticke rs o r mag nets
ar e removed. @ For the sake of the environment
Only wash the ve hicl e in facilities spec ia lly
de signed for that purpose. This will red uce
the r is k of dirty w ate r contam ina ted with
oi l from entering the sewer sys tem.
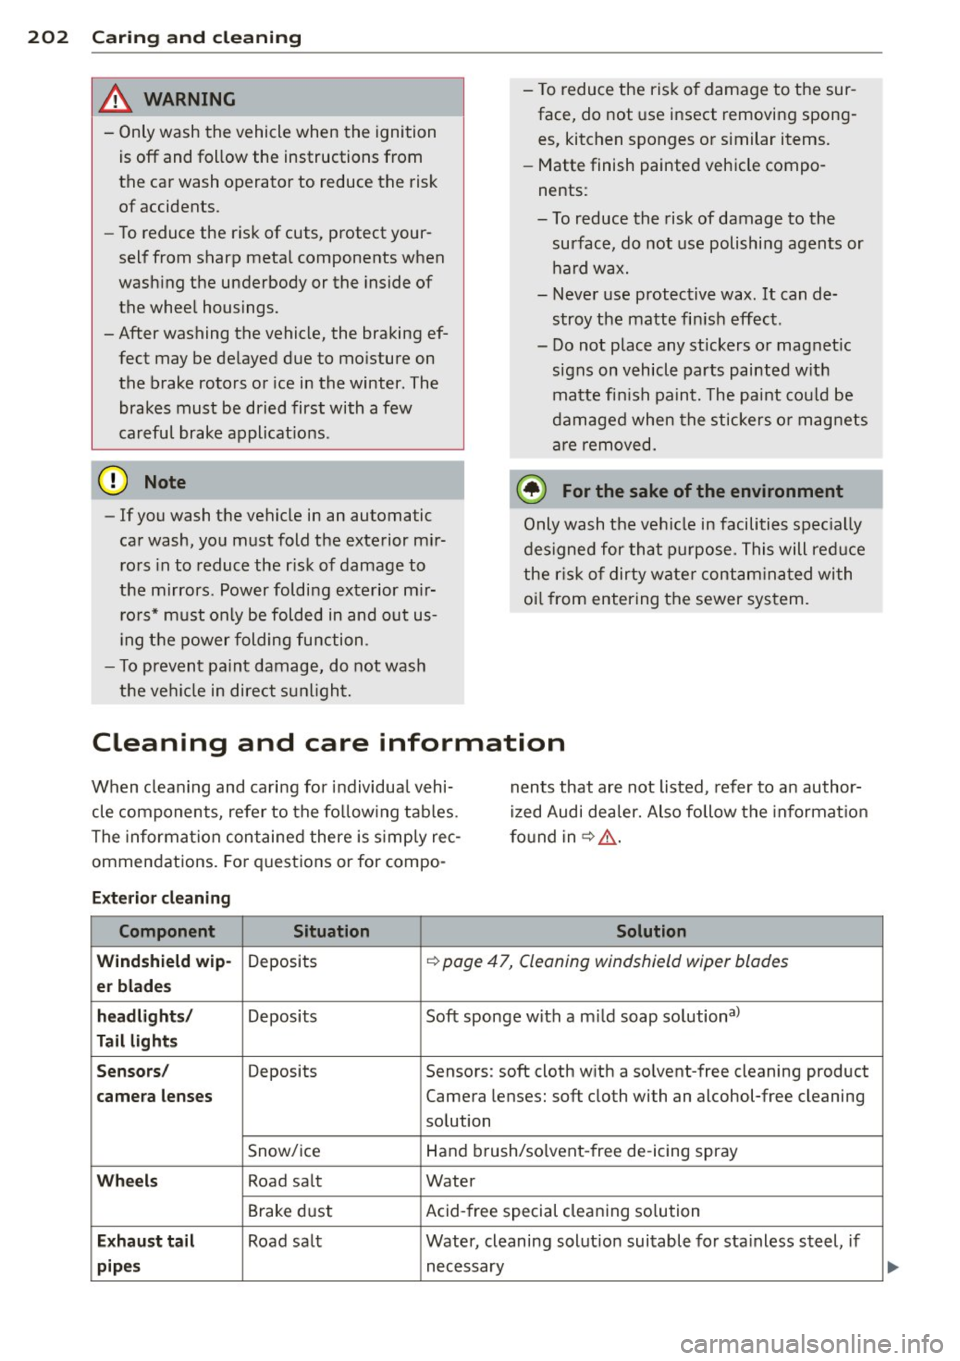
Cleaning and care information
When clea ning and ca rin g for individua l vehi
cle components, refer to the fo llow ing tab les.
The informa tion con taine d there is s imp ly rec
ommendations. Fo r quest ions or for compo -nents that ar
e not listed, refer to an author
i z ed Audi dea ler. Also follow the in format io n
f o und in¢ ,&..
Exterior cleaning
Component Situation Solution
Wind shield wip-
Deposi ts ¢ page 47, Cleaning windshield wiper blades
er blades
headlights /
Deposits Soft sponge with a m ild soap solutiona>
Tail lights
Sensors /
Deposits Sensors: soft cloth with a so lvent-free cleaning product
camera lenses Camera lenses: soft cloth with an alcohol-free cleaning
so lution
Snow/ ice Hand brush/solvent -free de -icing spray
Wheels Road sa lt Water
Brake d ust Acid-free special cleaning so lution
E x haust ta il Road sa lt Water, cleaning solut ion suitable fo r sta inless steel, if
pipes necessary
Page 246 of 288
24 4 T ire s and wheel s
signal low tire pressure as intended. TPMS
malfunctions may occur for a variety of rea
sons, includ ing the installat ion of replace
ment or a lternate tires or whee ls on the veh i
cle that prevent the TPMS from funct ioning
properly . Always check the TPMS malfunct ion
telltale after replacing one or more t ires or
wheels on your veh icle to ensure that the re
p lacement or a lternate tires and wheels allow
the TPMS to continue to function properly.
If the Tire Pressure Monitoring System
indicator appears
Applies to vehicles: with tire pressure monitoring system
The tire pressure indicator in the instrument
cluster informs you if the tire pressure is too
low or if there is a system malfunction.
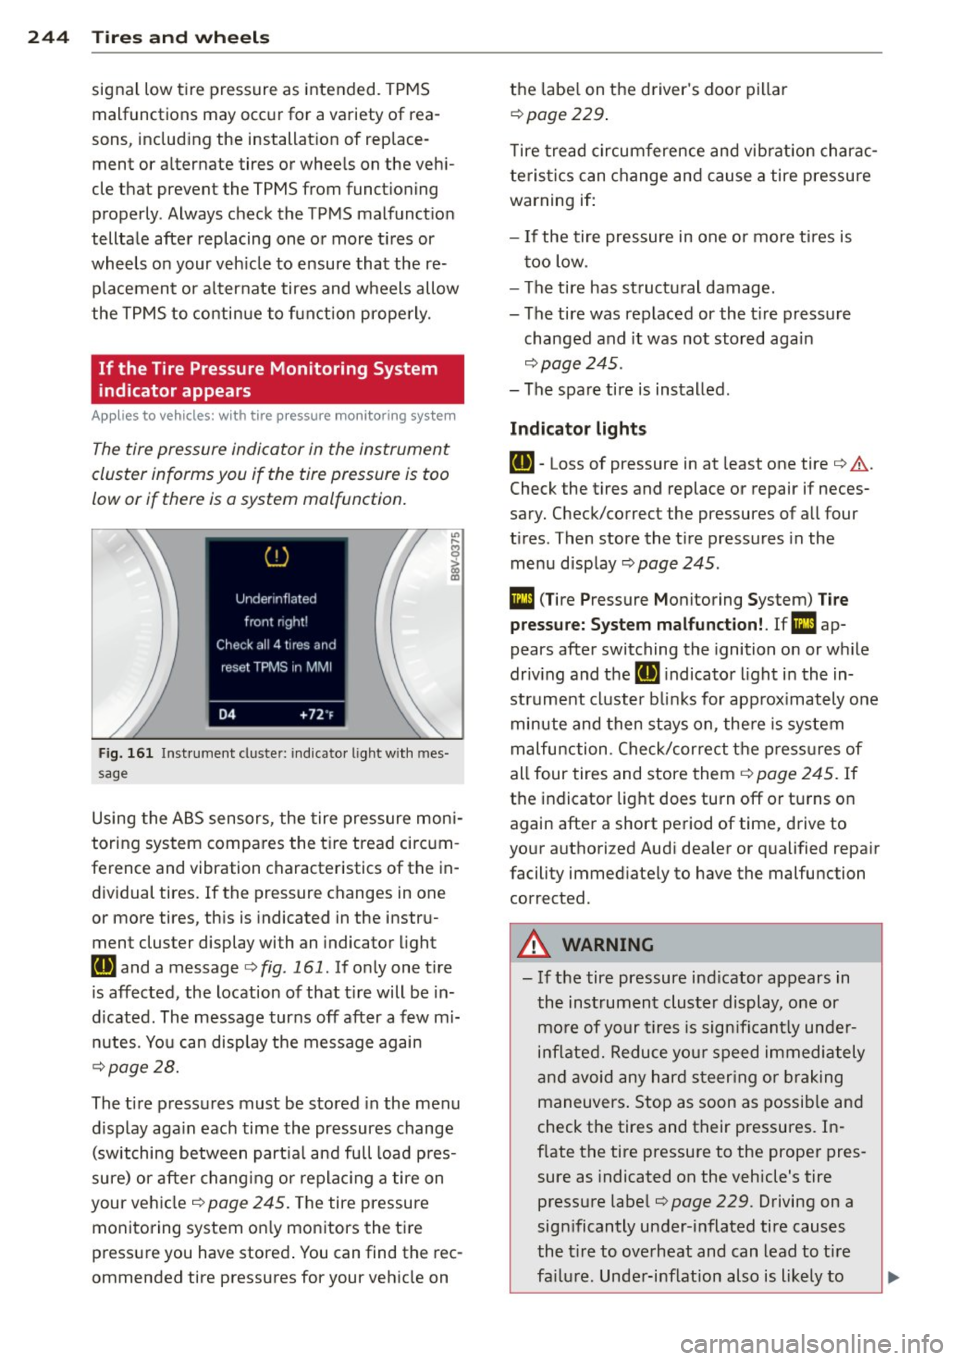
F ig. 161 Ins trumen t cluste r: ind icato r light w it h m es
s age
Using the ABS sensors, the tire pressure moni
toring system compa res the tire tread circum
ference and vibration characteristics of the in
dividual tires .
If the pressure changes in one
or more tires, th is is indicated in the instru
ment cluster display with an indicator light
IE and a message ¢ fig. 161 . If only one t ire
is affected, the location of that t ire will be in
d icated. The message turns off after a few mi
nutes. You can disp lay the message again
¢ page 28.
The tire pressures must be stored in the menu
d isplay aga in each time the pressures change
(switching between part ia l and full load pres
sure) or after chang ing or replac ing a tire on
your ve hicle ¢
page 245. The tire pressure
monitoring system on ly monitors the ti re
press ure you have stored . You can find the rec
ommended tire pressures for your vehicle on the
labe l on the driver's doo r pillar
¢ page 229 .
Tire tread circumference and vib ration charac
teristics can change and cause a tire pressure
warning if:
- I f the tire pressure in one or more ti res is
t oo low.
- The tire has structural damage.
- The tire was replaced or the t ire pressure
changed and it was not stored again
¢ page 245.
-The spare tire is installed .
Indicator lights
IE -Loss of pressure in at least one tire ¢ .&. .
Check the tires and replace or repair if neces
sary. Check/correct the pressures of all four
t ires . Then store the t ire pressures in the
menu display
¢ page 245.
Ill (T ire Pressure Monitoring System) T ire
pre ssure: S ystem mal function!. Ifm:!
ap
pears afte r switching the ignition on or w hile
driv ing and the [ti] indicato r light in the in
strument cluster b links for app rox imately one
minute and then stays on , the re is system
malfu nction . Check/cor rect the p ress ures of
all four tires and store them¢
page 245. If
t h e indicator lig ht does turn off or tu rns on
again after a short pe riod of time, drive to
your authori zed Aud i dea ler or qualified repair
facility immed iately to have the malfunction
corrected .
A WARNING
--- If the tire pressure ind icator appears in
the instrument cluster display , one or
mo re of your t ires is sign ifi cant ly unde r
i n flated. Reduce yo ur speed immedi ately
an d avoid any hard steer ing or b rak ing
maneuvers. Stop as soon as possib le and
check the tires and their pressures. In
f late the tire pressure to the proper pres
sure as indicated on the vehicle's tire
pressure labe l
¢page 229. Driving on a
significantly under-i nflated tire causes
the t ire to overheat and can lead to ti re
fa ilur e. Unde r-inflation also is li kely to
Page 258 of 288
256 Fuses and bulbs
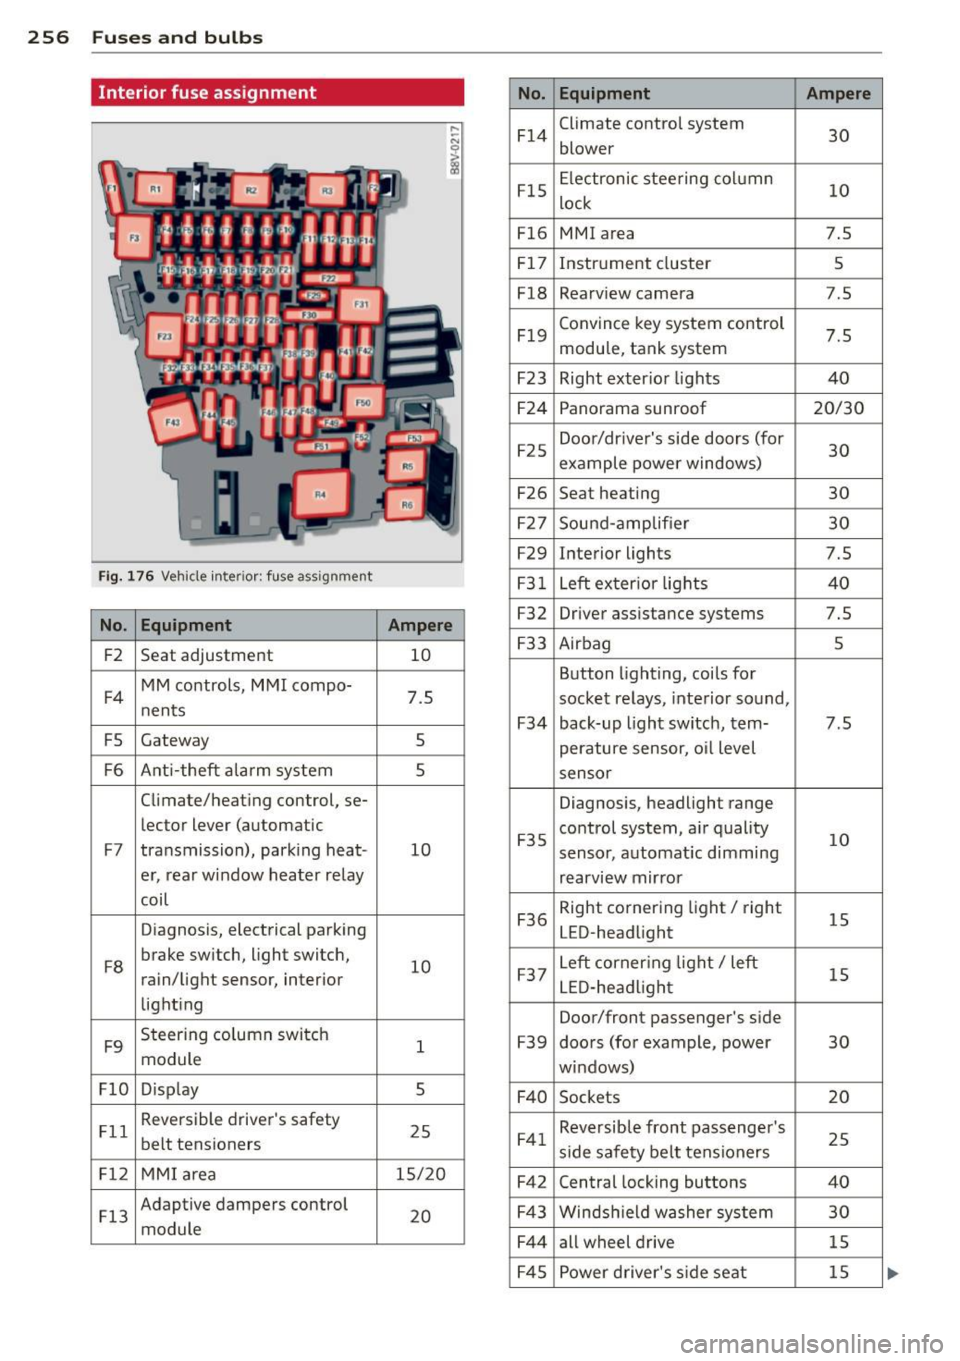
Interior fuse assignment
No. Equipment Ampere
F14
Climate control system
30 blower
F15
Electronic steering column
10 lock
F16 MMI area 7.5
F17
Instrument cluster 5
F18
Rearv iew camera 7 .5
F19
Convince key system control
7.5 module, tank system
F23 Right exter ior lights 40
F24
Panorama sunroof 20/30
F25
Door/driver's side doors (for
30 example power windows)
F26 Seat heating 30
F27
Sound-amp lifier 30
F29
Interior lights 7.5
Fig. 176 Vehicle inte ri or : fuse assignment F31 Left exter ior lights 40
No . Equipment Ampere F32 Driver assista nce systems 7.5
F2
Seat adjustment 10 F33 Airbag 5
F4
MM controls, MMI compo-
7.5 nents
F5 Gateway 5
Button lighting, coils for
socket relays, interior sound,
F34 back-up light switch, tern-7.5
perature sensor, o il level
F6 Ant i-theft alarm system 5 sensor
Climate/heating control, se-
Diagnosis, headlight range
le ctor lever (automatic
F7 transmission), parking heat -10 F35
control system, air quality
10 sensor,
automat ic dimming
er, rear window heater relay
rearview mirror
coil
Diagnosis, electrical parking
F36
Right cornering light/ right
15 LED-headlight
F8
brake switch, light switch,
10 rain/light sensor, interior
lighting
F9
Steering column switch
1 module
F37
Left corner ing light/ left
15 LED-headlight
Door/front passenger's side
F39 doors (for example, power 30
windows)
Fl0 D isp lay 5
F40 Sockets 20
Fll
Reversible driver's safety
25 belt tensioners F41 Reversible front passenger 's
25 side safety belt tensioners
Fl2 MMI area 15/20
F42 Central locking buttons 40
Fl3
Adaptive dampers control
20 module
F43 Windsh ield washer system 30
F44
all wheel drive 15
F45
Power driver's side seat 15
Page 259 of 288
No. Equ ipment Ampere
F49 Starter, clutch sensor
5
FS3 Rear window defogger 30
The power seats* are protected v ia
circ uit
br ea ker s
that automatically sw itch on after a
few seconds after the overload has been re
d uced.
(D Tips
Note that the following table was accurate
at the time of pr int ing and is subject to
change.
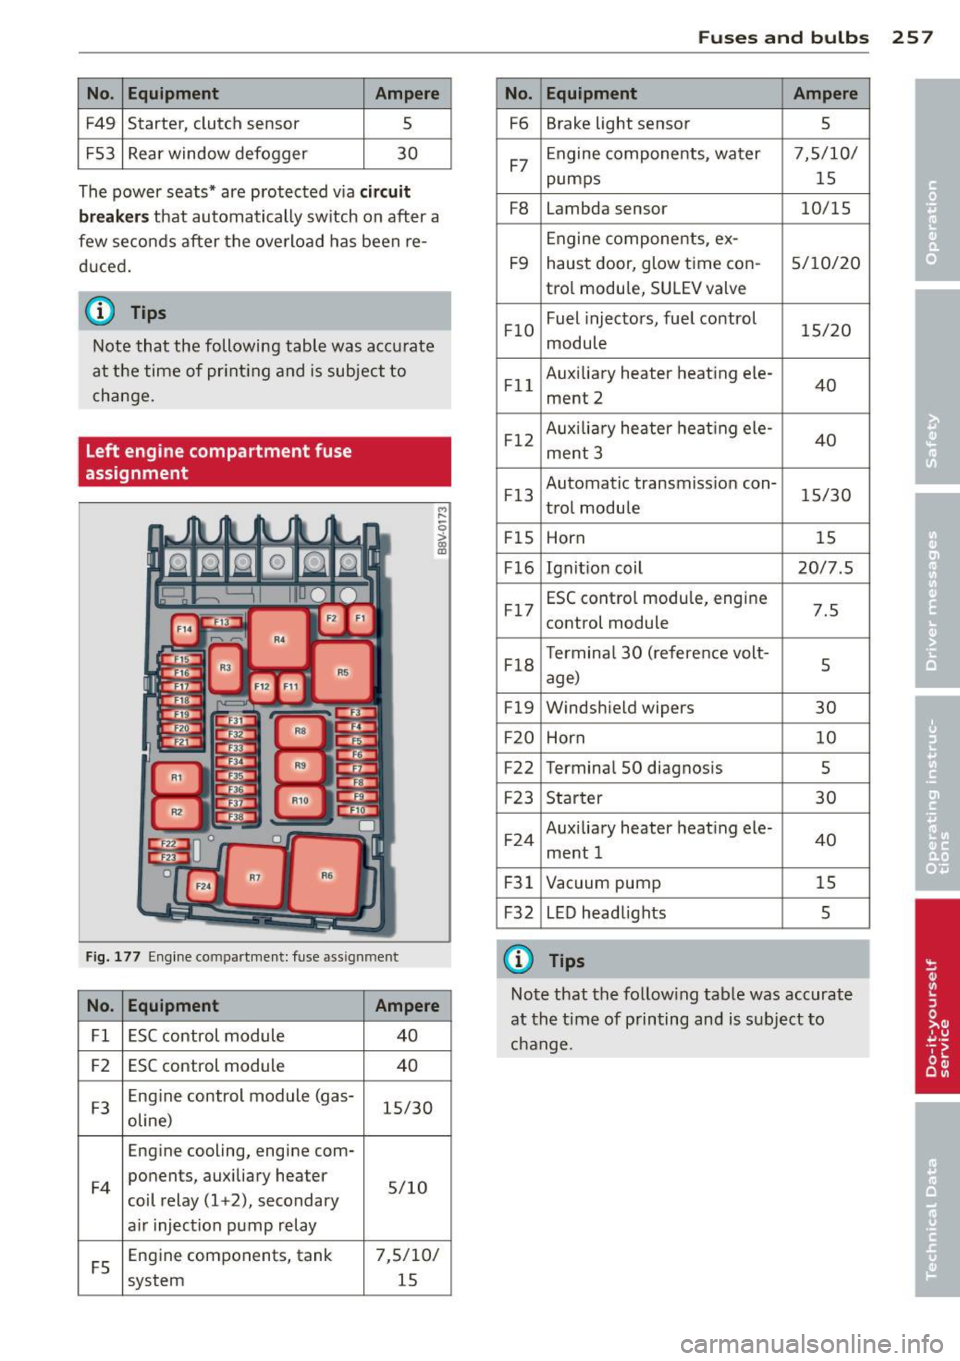
Left engine compartment fuse
assignment
F ig. 177 Eng ine compartment: fuse assignment
M ,.._
-0
!
No. Equ ipment Ampere
Fl ESC control module 40
F2 ESC control module
40
F3 Eng
ine control module (gas-
15/30
oline)
Engine cooling, engine com-
F 4 ponents, auxiliary heater
5/10
coil relay (1 +2), secondary
a ir injection pump relay
FS Eng
ine components, tank
7,5/10/
system 15
Fuse s and bulb s 257
No. Equipment Ampere
F6 Brake light sensor
5
F7 Engine components, water 7,5/10/
pumps
15
F8 Lambda sensor 10/15
Engine components, ex-
F9 haust door, glow time con-
5/10/20
tro l module, SU LEV valve
FlO Fuel
injectors, fuel control
15/20
module
Fl l Auxiliary heater heating ele
-
40
ment 2
F12 Auxilia
ry heater heat ing ele-
40
ment 3
F13 Automatic transmiss
ion con-
15/30
trol module
FIS Horn 15
F16 Ignit ion coil 20/7.5
F17 ESC contro
l modu le, engine
7.5
control module
F18 T
ermina l 30 (reference volt-
5
age)
F19 Windshield wipers
30
F20 Horn 10
F22 Termina
l SO diagnosis
5
F23 Starter 30
F24 Auxiliary heater heating ele-
ment 1 40
F31 Vacuum pump 15
F32 L ED head lights
5
(i} Tips
Note that the follow ing tab le was accurate
at the time of printing and is subject to
change.
Page 280 of 288
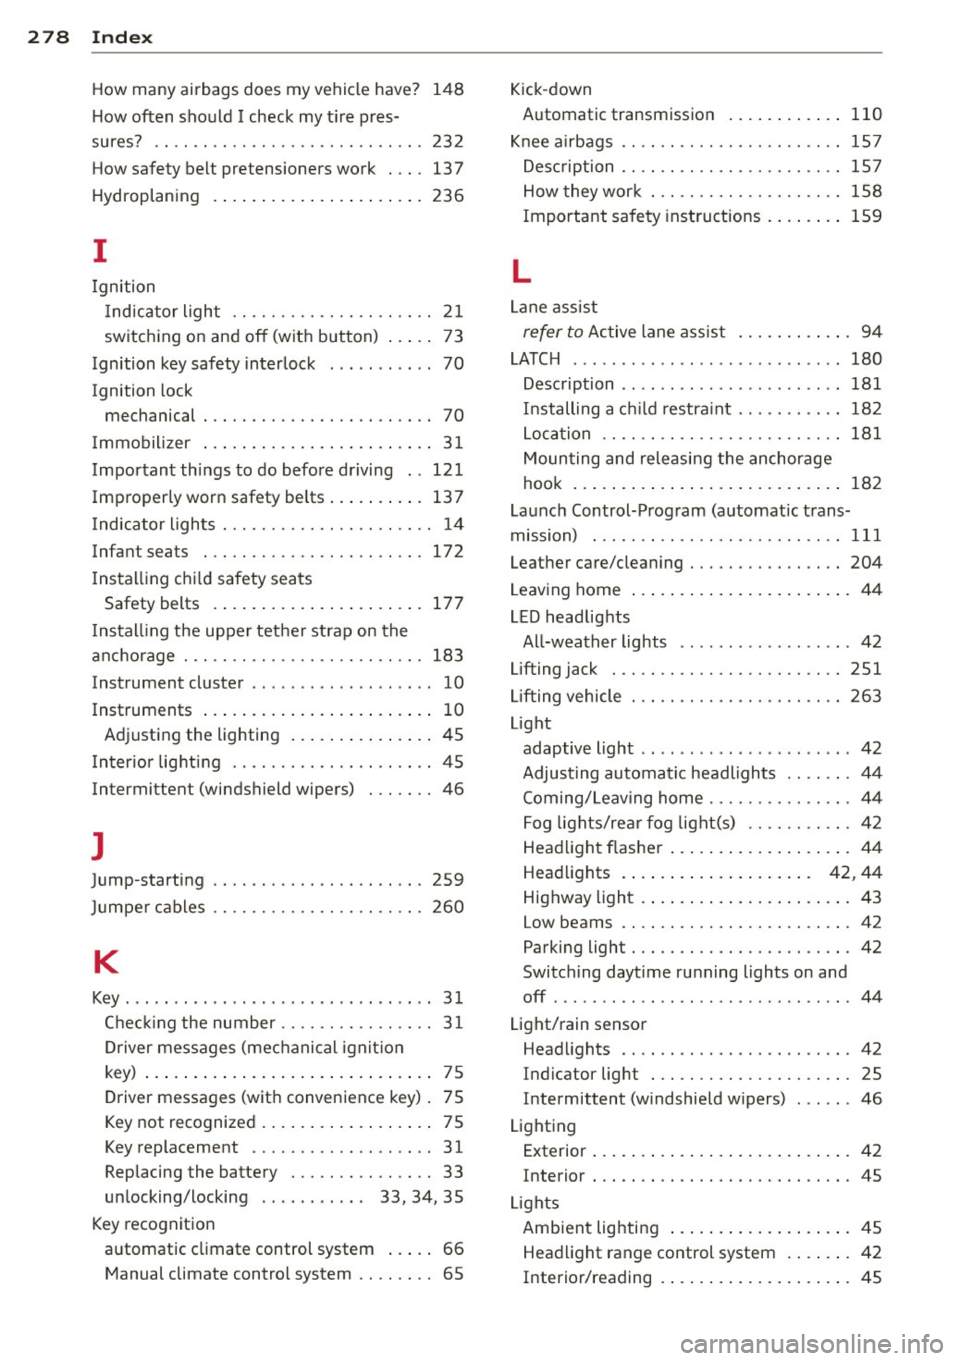
278 Index
How many airbags does my vehicle have?
How often should I check my tire pres-148
sures? .. .. .... ............. ...... . 232
How safety belt pretensioners work .... 137
Hydroplaning .............. ... .... . 236
I
Ignition
Indicator light . . . . . . . . . . . . . . . . . . . . .
21
switching on and off (with button) ... .. 73
Ignition key safety interlock . . . . . . . . . . . 70
Ignition lock
mechanical . . . . . . . . . . . . . . . . . . . . . . . .
70
Immobiliz er . . . . . . . . . . . . . . . . . . . . . . . . 31
Important things to do before driving .. 121
Improperly worn safety belts . . . . . . . . . . 13 7
Indicator lights . . . . . . . . . . . . . . . . . . . . . .
14
Infant seats .............. .... .... . 172
Installing child safety seats
Safety belts . . . . . . . . . . . . . . . . . . . . . .
177
Insta lling the upper tether strap on the
anchorage ..... ........... .... .... .
183
Instrument cluster ......... ...... .. .. 10
Instruments ................. ..... .. 10
Adjusting the lighting ........... ... . 45
Interior lighting ..................... 45
Intermittent (windshield wipers) ... .... 46
]
Jump-starting 259
Jump er cables ... .......... .. .. .. .. . 260
K
Key ......... ........ ........ ....... 31
Checking the number ................ 31
Driver messages (mechanical ignition
key) ..... .. ................ ..... ..
75
Dr iver messages (with convenience key). 75
Key not recognized ......... ... .... .. 75
Key replacement . . . . . . . . . . . . . . . . . . . 31
Replacing the battery ....... .. .. .. .. 33
un locki ng/locking . . . . . . . . . . . 33, 34, 35
Key recognition
automatic climate control system ... ..
66
Manual climate contro l system . . . . . . . . 65
Kick-down
Automatic transmission
110
Kn ee air bags ................... .... 157
Description .. .. .. ............. .. .. 157
How they work .................... 158
Important safety instructions ........ 159
L
Lane assist
refer to Active lane assist ........ ... . 94
LATCH ........ .... ............... . 180
Description .... .. .. .............. . 181
Installing a child restraint ........... 182
Location ......................... 181
Mounting and releasing the anchorage
hook ..... .... .. .. .............. .
182
Launch Control-Program (automatic trans-
m1ss1on) ....... .. .. ........... ....
111
Leather care/clean ing ................ 204
Leaving home ..... .................. 44
LED headlights
All-weather lights ..................
42
Lifting jack . .. .. .. ................. 251
Lifting vehicle .................. .... 263
Light
adaptive light .. .................. ..
42
Adjust ing automatic headlights ....... 44
Coming/Leaving home .............. . 44
Fog lights/rear fog light(s) ........... 42
Headlight flasher ................... 44
Headlights . . . . . . . . . . . . . . . . . . . . 42, 44
Highway light .... ................ ..
43
Low beams ..................... ... 42
Parking light .......................
42
Switching daytime running lights on and
off ........... .. .. .............. .. 44
Light/rain sensor
Head lights ....................... . 42
Indicator light .....................
25
Intermittent (windshield wipers) ...... 46
Lighting
Exterior . . . . . . . . . . . . . . . . . . . . . . . . . . . 42
Interior . . . . . . . . . . . . . . . . . . . . . . . . . . .
45
Lights
Ambient lighting ...................
45
Headlight range control system ... ... . 42
Interior/reading . ...................
45