display AUDI A3 2016 Owner´s Manual
[x] Cancel search | Manufacturer: AUDI, Model Year: 2016, Model line: A3, Model: AUDI A3 2016Pages: 328, PDF Size: 81.78 MB
Page 31 of 328

.... N
0 > CX)
rl I.Cl U"I
rl I.Cl ....
Speed warning ¢page 130
Selector lever positions C?page 89
On-board computer display ¢page29
Diesel engine*: remaining C?page 234
range for AdBlue
Plug-in hybr id drive*: d ig ital
C? page 29
tachometer
Plug-in hybrid drive*: range dis-
¢ page 102
play
On-board computer display
The on-board computer display monitors the dif
ferent memory levels:
- Sho rt-term memory (on-board computer 1)
- Long-term memory (on-boa rd computer 2)
- Efficiency program
The following information can be displayed con
secutively in the on-board computer:
- Tim e
- Date
- Estimated range based on current fuel level
- Estimated range based on current Ad Blue* level
- T ravel time
- Average consumption
- Average speed
- Distance
- Current fuel consumption
- Engine oil temperature indicator*
On-board computer O (short-term memory)
The short-term memory collects driving informa
tion from the t ime the ignition is switched on un
til it is switched off. If you cont inue dr iv ing
with
in two hours
after switching the ignition off, the
new values are included when calculat ing the cur
rent trip information. If stopped for more the
two hours, the short term memory is automati
cally eras ed once you begin driving .
On-board computer fJ (long-term memory)
Unlike the short-term memory, the long-term
memory is not erased automat ically. Yo u can se
l ect the time period for evaluating trip informa
tion yourself .
Driver informa tion system
Efficiency program i1
The eff iciency p rogram can help you to use less
fuel<=>page31.
(0 Tips
- Th e on-board computer is controlled by the
left button fields on the multifunction
steering whee l.
- For information on using the other button
fields, such as the audio, telephone* and
navigation* functions, see the MMI owner's
manual.
- Disconnecting the battery causes all the
memory data to be erased .
Operation
Applies to vehicles : wi th drive r info rmation system
The driver information system is controlled with
the multifunction steering wheel.
Fig. 9 Mult ifunct ion steering wheel: Drive r Info rmation
System controls
Fig. 10 Drive r infor mation syste m: open ing t he vehicle
functions menu
In addition to information about the on-board
computer (on-board computer 1 , 2 and the effi
ciency program) , informat ion about other sys
tems can also be shown in the display.
29
Page 32 of 328
Driver information system
You can identify which level (on-board computer
1, 2 or the efficiency program) is shown in the
d isp lay based on the small
0 , fJ or the nozzle
ii .
The tab@¢ page 28, fig. 8 is displayed once you
press the button
CD ~ fig. 9 on the mu ltifunction
steer ing wheel.
Operating
• Switch on the ignition. The last select function
is d isp layed.
• To switch between the tabs, press the rocker
button
CD to the left or right~ fig. 9.
• To access additional information below or
above, rotate the thumbwheel @down or up.
• To confirm a selection, press the thumbwheel
@ .
• To select a function programmed to a steering
wheel button, press the button
@ . For addi
tional information, see ¢
page 30, Assigning
a function to a programmable steering wheel
button
Opening the Vehicle functions
• Select the first tab with the button CD-
• Press the button@. The Vehicle functions
menu is displayed¢ fig. 10.
,.. To select a menu item, turn and press the
thumbwheel @.
Resetting values to zero
• In the Vehicle functions menu, select On
board computer or Efficiency program.
• Select a value in the desired trip computer or in
the efficiency program.
• To reset the values in a memory, press and hold
the thumbwheel @for one second .
Recalling indicator lights and messages
• Press the button CD repeatedly until the D tab
appears.
The
D tab is only v is ible when there is a mal·
function .
30
Assigning a function to a programmable
steering wheel button
• Select: the IM ENU I button > Car > Systems*
control button > Vehicle settings > Steering
wheel button programming .
The Q tab is only visible when there is at least
one indicator light or message displayed.
@ Tips
- If the vehicle battery is disconnected, all
memory values are erased .
- Information on the efficiency program
¢page 31.
- There is more information o n the multifunc
t ion steering whee l in the
MMI* owner's
manual.
Boost indicator
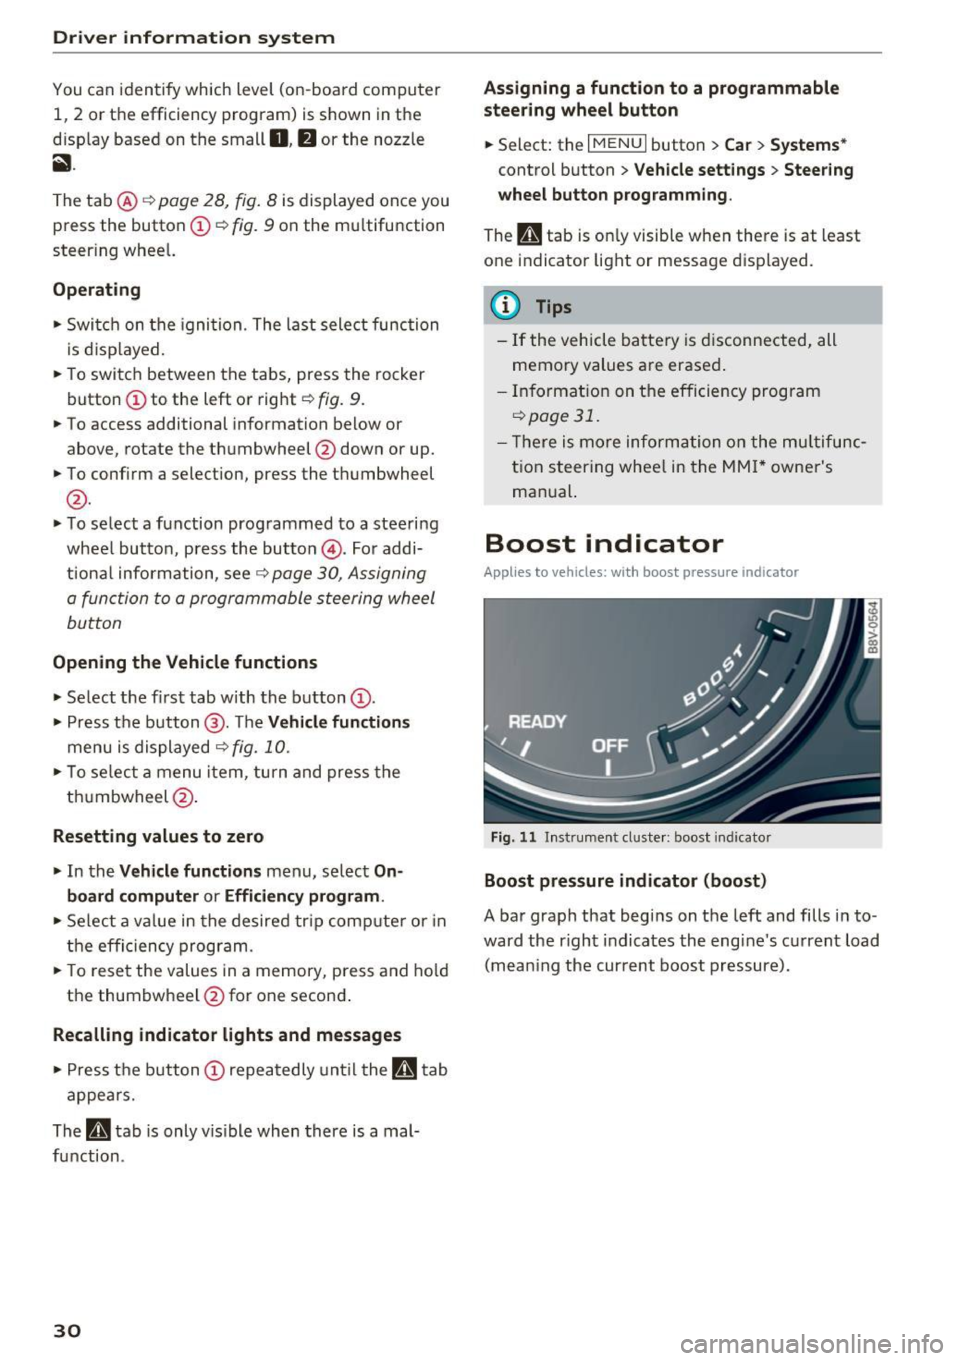
App lies to vehicles: wi th boos t pressure indicator
Fig. 11 Instrument cluster: boost indicator
Boost pressure indicator (boost)
A bar graph that begins on the left and fills in to
ward the r ight indicates the engine 's current load
(mean ing the current boost pressure).
Page 33 of 328
.... N
0 > CX)
rl I.Cl U"I
rl I.Cl ....
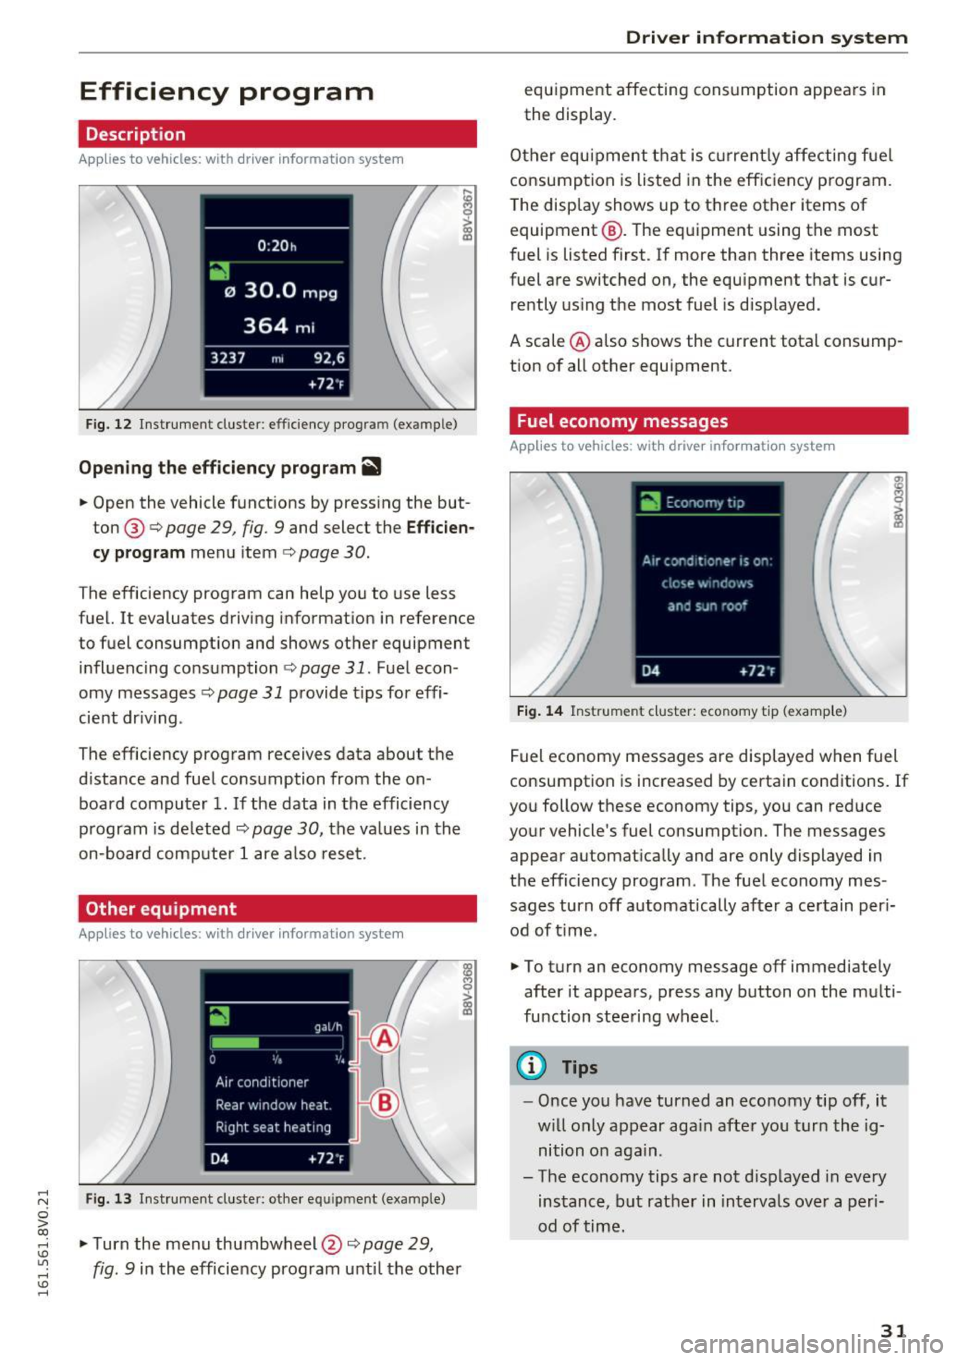
Efficiency program
Description
Appl ies to vehicles: with driver info rmation system
Fig . 1 2 Inst rument cluster : efficiency program (examp le)
Opening the efficiency program i1
.. Open the vehicle functions by press ing the but
ton ®¢
page 29, fig. 9 and select the Efficien
cy program menu item ¢ page 30.
The efficiency program can help you to use less
fuel. It evaluates driving info rmat ion in reference
to fu el consumption and shows other equipment
in fluenc ing co nsumption
¢ page 31. Fuel econ
omy messages ¢
page 31 provide tips for effi
cient dr iv ing .
The efficiency program receives data about the
d istance and fuel co nsumption from the on
board computer
1. If the data in the efficiency
p rogram is de leted c::>
page 30, the va lues in the
on-board com puter 1 are a lso rese t.
Other equ ipment
Applies to vehicles: with driver information system
Fig . 1 3 Inst rume nt cluster: o ther eq uipment (examp le)
.. Turn the menu thumbwheel@c::> page 29,
fig. 9 in the efficie ncy program u nti l the other
Driver in forma tion system
equipment affecting consumption appea rs in
the display.
Ot her equ ipment that is current ly affecting fue l
consump tion is lis ted in the effic iency p rogram.
T he disp lay shows up to t hree other items of
equipment @. T he equ ipment using the most
f uel is listed first. If more than three items using
fuel a re switched on, the equipment t hat is c ur
re ntly us ing the most fuel is d isp layed.
A scale @ also shows the current total consump
tion of all other equipment.
Fuel economy messages
Applies to vehicles: with driver information system
Fig. 14 Instrument cluste r: economy tip (examp le)
Fuel economy messages are displayed when fuel
consumption is increased by certain conditions. If
yo u follow these economy tips, you can red uce
your vehicle 's fuel consumption. The messages
appea r automatically and are only displayed in
the efficiency program . The fuel economy mes
sages turn off a utomatically a fter a ce rtain per i
o d of t ime.
.,. To turn an economy message off immediately
after it appears, p ress any button on the m ulti
fu nction stee ring wheel.
(D Tips
- Once you have turned an eco nomy tip off, it
w ill only appear aga in afte r you turn the ig
nition o n ag ain.
- Th e economy tips are not d isp layed in every
ins tanc e, bu t rather in in terva ls over a per i
od of time .
31
Page 34 of 328

Driver information system
Lap timer and engine oil
temperature indicator
Introduction
Applies to vehicles: with lap timer (S models)
The engine oil temperature is only shown in the
lap timer display.
Lap timer
You can record and evaluate lap times with the
lap timer in the display
i=:,page 32, fig. 16. Th e
time is measured in minutes, seconds and
1/10
seconds . With lap times longer than 60 minutes,
the hour is also shown and the display of
1/10 seconds is removed.
The time measurement on an individua l lap ends
after
99 hours 59 minutes and 59 seconds. A
new lap starts automatically after that .
The measurement ends after a maximum of
30
laps. You can then evaluated the lap times or
start a new time measurement .
Engine oil temperature indicator
I f the engine o il temperature is below
140 °F
(60 °C), the 'l=:1: symbol followed by three hy
phens"- --" and the °C un it is shown .
The engine has reached its operating tempera
ture when the engine oil temperature is between
176 °f (80 °C) and 248 °f (120 °C) under nor
mal d riving conditions. The engine oil tempera
ture may be higher if there is heavy eng ine load
and high temperatures outside. This is not a
cause for concern as long as the .¢
page 20 or
Ill i=:,page 24 indicator lights in the display do
not blink.
A WARNING
Your focus should always be on driving your
vehicle safely . As the driver, you have com
plete responsibility for safety in traffic . Only
use the functions such as the lap timer in such
a way that you always maintain complete con
trol over your vehicle in all traffic s ituations.
32
.
@ Tips
You can retrieve information from the trip
computer while the lap timer stopwatch is
running.
Opening the lap timer and measuring time
Applies to vehicles: with lap timer (S models)
Fig. 15 Multi functio n stee ring whee l: co ntro ls
Fig. 16 Instrumen t cluster: lap timer
Opening the lap timer
M 0,
0
> g;:
.. Press the button @ on the multifunction steer
ing wheel and turn the thumbwheel
®
i=:, fig. 15 until Lap timer ¢ fig. 16 appears.
.. Press the thumbwheel
® to confirm the selec
tion.
Timing laps
.. To start timing, press the thumbwheel @while
on the
Lap 1 - press OK menu item. The time
measurement is shown in line @¢
fig. 16.
.. To measure the lap time, press the thumb
wheel
® again while on the New lap· press OK
menu item. This starts timing the next lap at
the same time . The last time measurement
moves up to the top line@. Line @ contains
the current lap t ime .
Page 35 of 328
.... N
0 > CX)
.... I.Cl U"I
.... I.Cl ....
If the symbol . is green dur ing the current lap
time measurement, the cur rent time is faster
than the prev ious best time. If the symbol. is
red, the current time is slower @.
Display ing split time and pausing timing
.. To d is p lay a split time [~], turn t he thumb-
whee l@ unti l
Split time appears in line@.
Press the thumbwheel @to confirm the selec
t ion. The split t ime appears for approximately
10 seconds in line @. The t iming of the current
lap continues .
If yo u wou ld like to insert a pause
m immediate
l y after the sp lit time, first press the th umb
wheel @and then the menu item
Press OK to go
back to confirm.
.. To insert a pa use, tur n the thumbwhee l@ unti l
Pause appea rs in the line @. P ress the thumb
wheel @to confirm the select ion. T he pa use
symbol mappea rs in l ine @.
.. To continue timi ng, press the thumbwhee l@ .
I f t iming is paused, yo u can co ntinue i t late r even
if you swi tch the ig nition off .
Meaning of the i ndicators i n the center display
~ fig. 16:
CD Displ ay of last recor ded time
@ Symbols
:
-[OJ: start of t ime record ing
- •: slowest recorded t ime
-(i): fa stest recorded t ime
- r6J1 : spli t tim e
-m : pause
® Current t ime measurement
@ Men
u:
- Lap 1 (start)
- New lap (start anot her lap)
- Split time (time within section of the
route)
- Pause (interrupts measureme nt)
- Statistics (evaluation of lap t imes)
- Reset (all va lues are de leted)
Driver in forma tion system
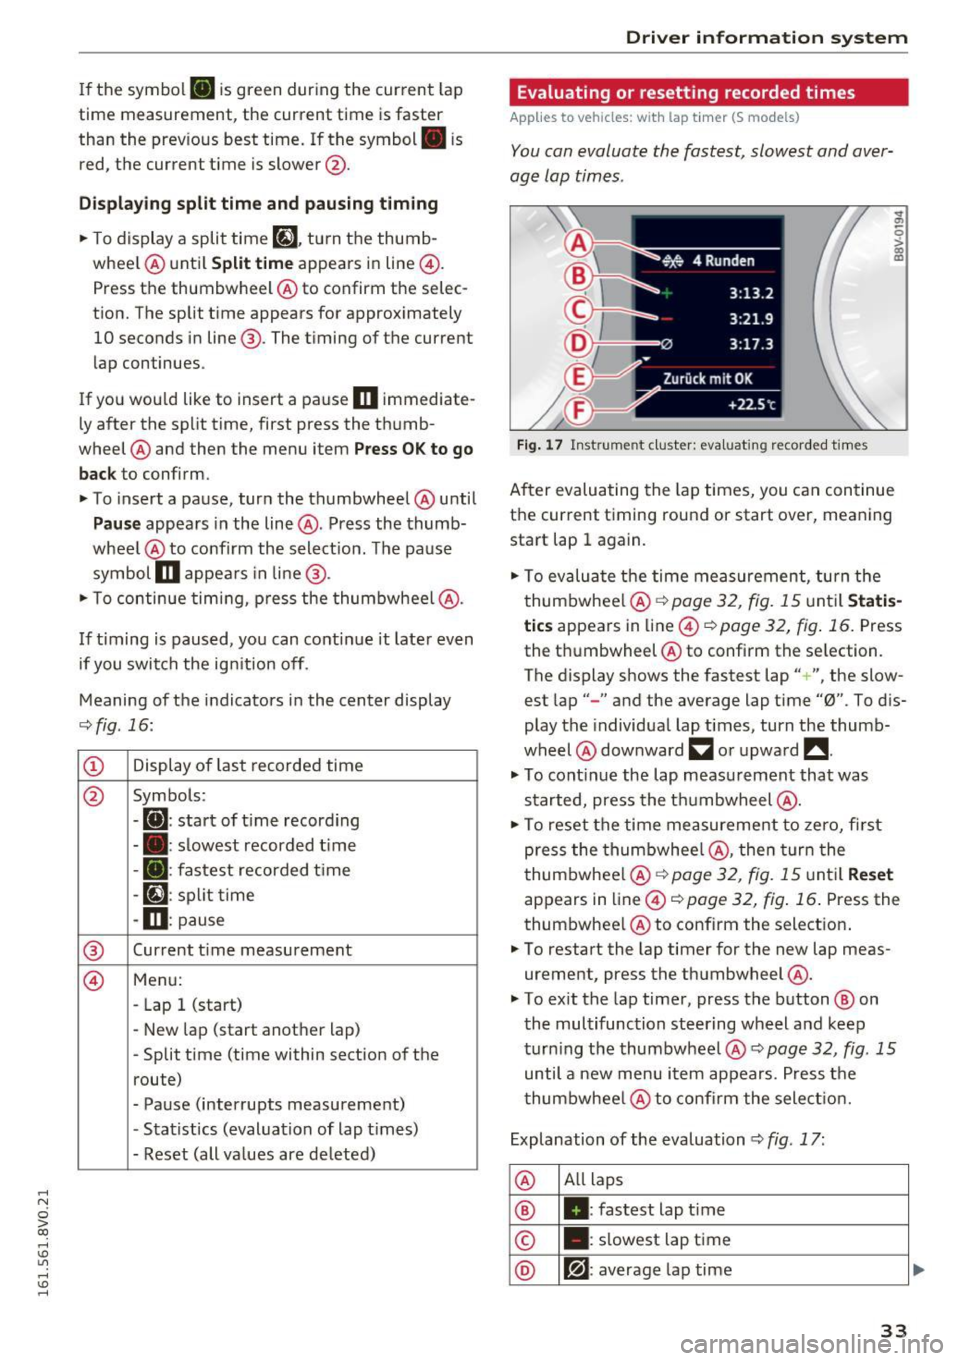
Evaluating or resetting recorded times
Applies to vehicles: with lap tim er (S models)
You can evaluate the fastest, slowest and aver
age lap times .
Fig. 17 Instrume nt cluste r: eva luat ing reco rde d tim es
..
"' 0 ;;,. CX) m
Aft er evalu ating the la p times, you c an con tinue
the current timing round or start over, mea ning
start lap 1 again.
.. To ev alu at e the ti me m eas uremen t, tu rn the
t humbwhee l@ ~
page 32 , fig. 15 unt il Statis
tics appears in line@¢ page 32, fig . 16. Press
the t humbwheel @to confirm the se lection.
The dis play shows the fastest lap
" + ", the slow
est lap" -" and the average lap time "0". To d is
play t he individua l lap times, turn the thumb
wheel @dow nward
C3 o r upwa rd !! .
.. To cont in u e the lap measurement that was
s tarted, press the t humbwheel @.
.. To re set t he time measureme nt to zer o, fi rst
p re ss the thum bwhee l@ , then tur n t he
t humbwhee l@
~ page 32 , fig. 15 unt il Reset
ap pears in line @ ¢ page 32, fig . 16 . Press the
thumbwhee l@ to confirm the select ion .
.. To restart the lap timer f or the new lap meas
urement, press the th umbwheel @.
.. To ex it t he lap time r, press the b utton @ on
th e multifunction steering wheel an d kee p
t ur ning the thumbwhee l@ ¢
page 32, fig . 15
until a new menu i tem appears. Press t he
t humbwhee l@ to confirm the sele ct io n.
E xplanation of the evaluation¢
fig. 17:
@ A
ll laps
® II: fastest lap t ime
© . : s lowest lap t ime
@ rpj : aver age la p time
33
Page 39 of 328
..... N
0 > CX)
..... I.Cl U"I
..... I.Cl .....
.. The LED blinks several times when you press a
button longer (convenience opening*) .
.. If the LED does not blink, the remote control
key battery is dead. The message
1:1 Please
change key battery
may also appear in the in
strument cluster display . Replace the battery .
Replacing the remote control key battery
.. Pry the cover @off of the key (Dusing a coin
c::>fig . 20 .
.,. Insert the new battery with the "+" facing up .
.. Press the cover back onto the key until it clicks
into place .
We recommend having the battery replaced by
an authorized Audi dealer or authorized Audi
Service Facility .
@ For the sake of the environment
Dead batteries must be disposed of using
methods that will not harm the env ironment.
Do not dispose of them in household trash .
@ Tips
The replacement battery must meet the same
specifications as the orig inal battery.
Remote control key synchronization
The remote control key must be synchronized if
the vehicle does not lock and unlock with the re
mote control.
.. Press the remote control key button~-
.. Insert the key in the driver's door lock within 30
seconds .
.,. Press the~ button or~ button .
Open ing and closing
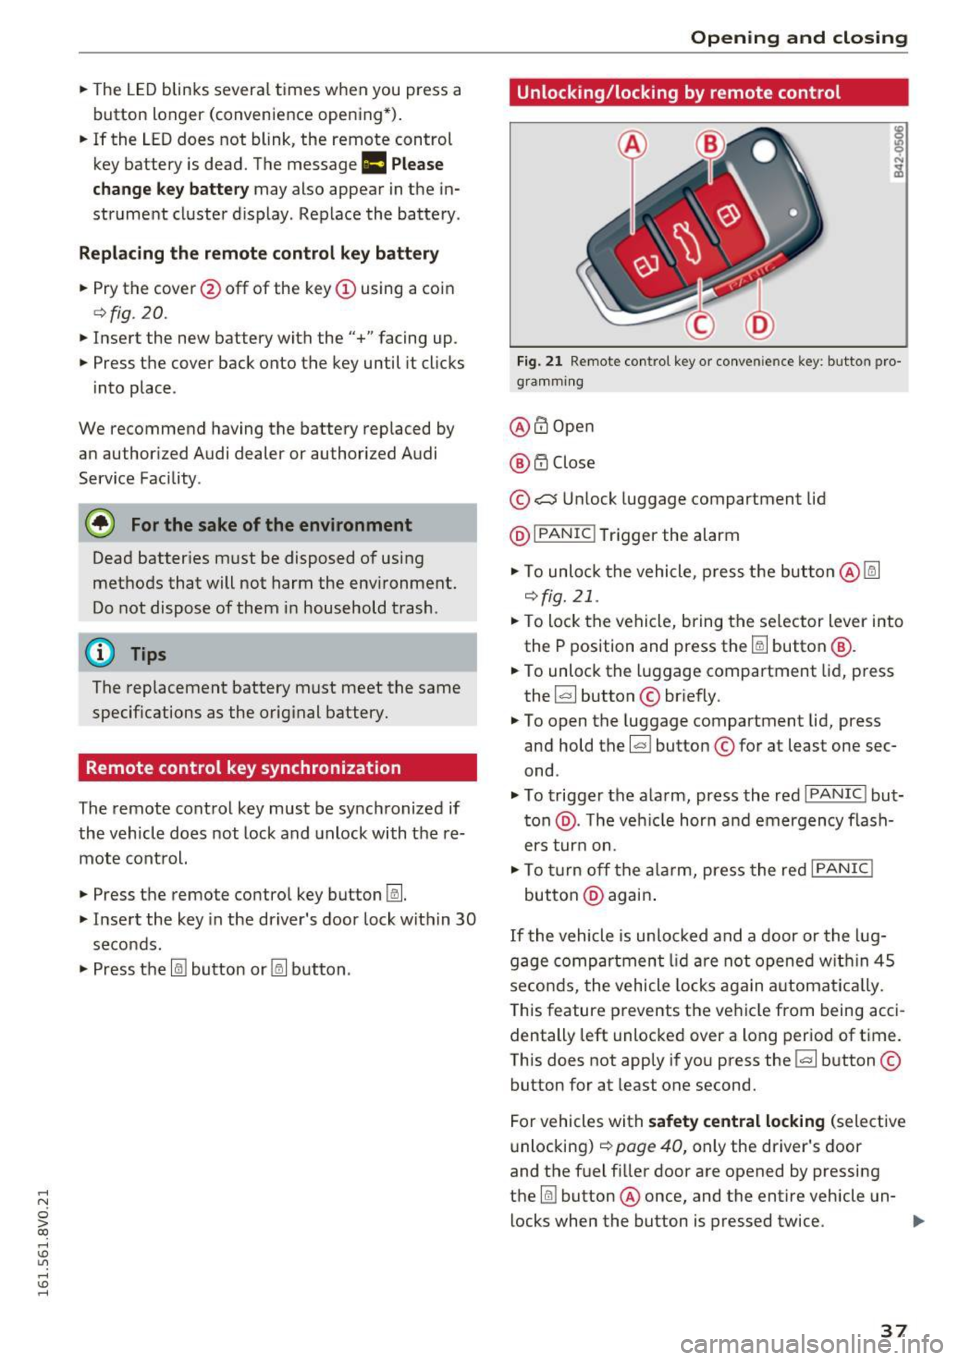
Unlocking/locking by remote control
Fig. 21 Remote control key or conve nien ce key : button pro
gramm ing
@ m Open
@ i'.D Close
© .:::::$Unlock luggage compartment lid
@ IPANIC !T rigger the alarm
... To unloc k the vehicle, press the button@~
c::>fig. 21 .
.. To lock the vehicle, bring the selector lever into
the P position and press the~ button
@.
.. To unlock the luggage compartment lid, press
the ~ button © briefly.
.,. To open the luggage compartment lid, press
and hold the~ button © for at least one sec
ond .
... To trigger the alarm, press the red I PANIC ! but
ton @. T he veh icle horn and emergency flash
ers turn on.
.. To turn off the alarm, press the red I PANIC !
button @again .
If the vehicle is unlocked and a door or the lug
gage compartment lid are not opened w ithin 45
seconds, the vehicle locks again automat ically.
This feature prevents the vehicle from being acci
dentally left unlocked over a long period of time.
This does not apply if you press the~ button ©
button for at least one second.
For vehicles with
safety central locking (selective
unlocking)
c::> page 40, only the driver's door
and the fuel f iller door are opened by pressing
the ~ button @ once, and the entire vehicle un-
locks when the button is pressed twice .
Ill>
37
Page 57 of 328

.... N
0 > CX)
.... I.Cl U"I
.... I.Cl ....
A WARNING
For safety reasons, the windshield wiper
blades should be replaced once or tw ice each
year.
Digital compass
Switching the compass on and off
Appl ies to vehicles: with digital compass
Fig. 45 Rea rview mirro r: digital compass activated
0
~ 0
rt (0
.. To turn the compass on or off, press the button
@ until the compass in the mir ror appears o r
disappears.
The digital compass only works when the ign ition
is turned on. The direct ions are indicated with ab
breviations : N (north), NE (northeast), E (east),
SE (southeast), S (south), SW (southwest), W
(west), NW (northwest).
You must recalibrate the compass if it does not
display the correct direction
¢ page 55, Cali
brating the compass.
@ Tips
To prevent inaccu rate compass readings, do
not bring any remote controls , e lectr ical devi
ces or metallic objects near the mirror.
Lights and V ision
Adjusting the magnetic zone
Applies to vehicles: with digita l compass
The magnetic zone must be adjusted correctly
for the compass to read accurately.
Fig. 46 North Amer ica: mag netic zone map
.. Press and hold the button@¢ page 55, fig. 45
until the number of the magnetic zone appears
in the rearview m irror.
.. Press the button @ repeatedly to select the
correct magnetic zone. The se lection mode
turns off after a few seconds.
Calibrating the compass
Applies to vehicles: with digital compass
You must recalibrate the compass if it does not
display the correct direction.
.. Press and hold the button @¢ page 55, fig . 45
until a C appears in the interior rearv iew mirror .
.. Dr ive in a circle at about 5 mph (10 km/h) until
a direction is displayed in the rearv iew mirror.
.8_ WARNING
- To avoid endangering yourself and other
d rivers, calibrate the compass in an area
where there is no traffic .
55
Page 75 of 328
....
Eco is shown in the display. To exit "Eco" mode*,
press the
I AUTOI button again.
I• I • I Setting the temperature
The temperature can be adjusted individually for
the driver and front passenger using the dials.
Temperatures between 60 °F ( +16 °C) and 84 °F
(+28 °C) can be set. If outside of this range, LO or
HI will appear in the climate control system dis
p lay. In both settings, the climate control runs
with constantly at the maximum cooling or heat ing level. The temperature is not regulated.
Synchronization: by pressing the IAUTOI button
for two seconds, the temperature setting for the
driver's side is transferred to the front passeng
er's side. This applies a temperature change to
the front passenger's side.
~ Adjusting the blower
To prevent the windows from fogging over, the b lower should a lways run at a low speed. You can
adjust the volume of air generated by the blower
to your preference. To have the blower regulated
automatically, press the IAUTO ! button .
Adjusting the air distribution
The air distribution is adjusted with the~, U!J
and ~ buttons. To have the air distribution regu
lated automatically, press the
IAUTOI button.
The round air vents in the cockpit are adjustable
¢page 74.
To keep the windows from fogging in damp
weather, we recommend opening the side air
vents and tilting them to the side¢
page 74,
Adjusting the air vents .
Foot vents are located under the front seats and
adjustable vents on the end of the center console
to heat the rear of the vehicle.
~ Switching the defroster on and off
The winds hield and side windows are defrosted
or cleared of condensation as quickly as possible.
The maximum amount of air flows mainly from
"' the vents below the windshield. Recirculation
0
ii; mode switches off . The temperature is controlled
~ automatically. In the [!] sett ing, the IA/Cl cooling
.... v:, ....
Warm and cold
mode switches on automatically, depending on
the outside air temperature .
T he
IAUTOI button switches the defroster off .
l"""I Switching recirculation mode on and off
The rec irculat ion mode can be turned on manual
ly or automatically* .
- Switching manual recirculation mode on and
off: press
l"""I The LED light up when sw itched
on.
- Automatic* rec irculat ion mode: auto recircula
tion needs to be activated in the
MMI. Select:
the
I MENU I button> Car > Systems* control
button
> AC > Auto recirculation . The air quali
ty sensor that is designed for diesel and gaso
line exha ust automatically switches the recircu
lation mode on or off depending on the level of
pollutants in the outside air .
In rec ircu lation mode, the air inside the vehicle is
circulated and filtered. This prevents the unfi l
tered air outside the vehicl e from enter ing the
vehicle interior. We recommend switching recir
cu lation mode on when driving through a twnnel
or when sitting in traffic¢ .&..
T he
1-1 button, IAUTOI or the [ii button switches
recirculation mode off.
T he system switches to recirculation mode when
driv ing in r everse when the engine is cold.
_&. WARNING
You should not use the recirculation mode for
an extended period since no fresh air is drawn
in. With the air-conditioning switched off, the
windows can fog up, which increases the risk
of an acc ident.
73
Page 86 of 328
Driving
_& WARNING
- Never turn off the engine before the vehicle
has come to a complete stop. The full func
tion of the brake booster and the power
steering is not guaranteed. You must use
more force to turn or brake if. Because you
cannot steer and brake as you usually
would, this could lead to accidents and seri
ous injuries.
- Please note that the brake booster and pow
er steering only work when the engine is
running. When the engine off, you must use
more force to steer or brake the vehicle. Be
cause the usual steering and brak.ing capa
bility is not available, the risk of accidents or
injuries increases .
- Always take the vehicle key with you when
leaving the vehicle, even for a short period
of time. This applies particularly when chil
dren remain in the vehicle . Otherwise the
children could start the engine or operate
electrical equipment such as power win
dows.
- For safety reasons, always park the vehicle
with the selector lever in the P position.
Otherwise, there is the risk that the vehicle
could roll.
- After the engine has been switched off, the
radiator fan can continue to run for up to 10
minutes -even with the ignition switched
off. It can also switch on again after some
time if the coolant temperature rises as the result of heat buildup or if the engine com
partment is heated by the sun's rays and the
engine is hot.
(D Note
If the engine has been under heavy load for
an extended period of time, heat builds up in
the engine compartment after the engine is
switched off- there is a risk of damaging the
engine. For this reason, let the engine run for
at idle for approximately two minutes before
shutting it off.
84
Starting the engine if there is a
malfunction
Applies to vehicles: with convenience key
It may not be possible to start the engine under
certain circumstances, for example if the battery
in the vehicle key is drained, if interference is af
fected the key or if there is a system malfunc
tion.
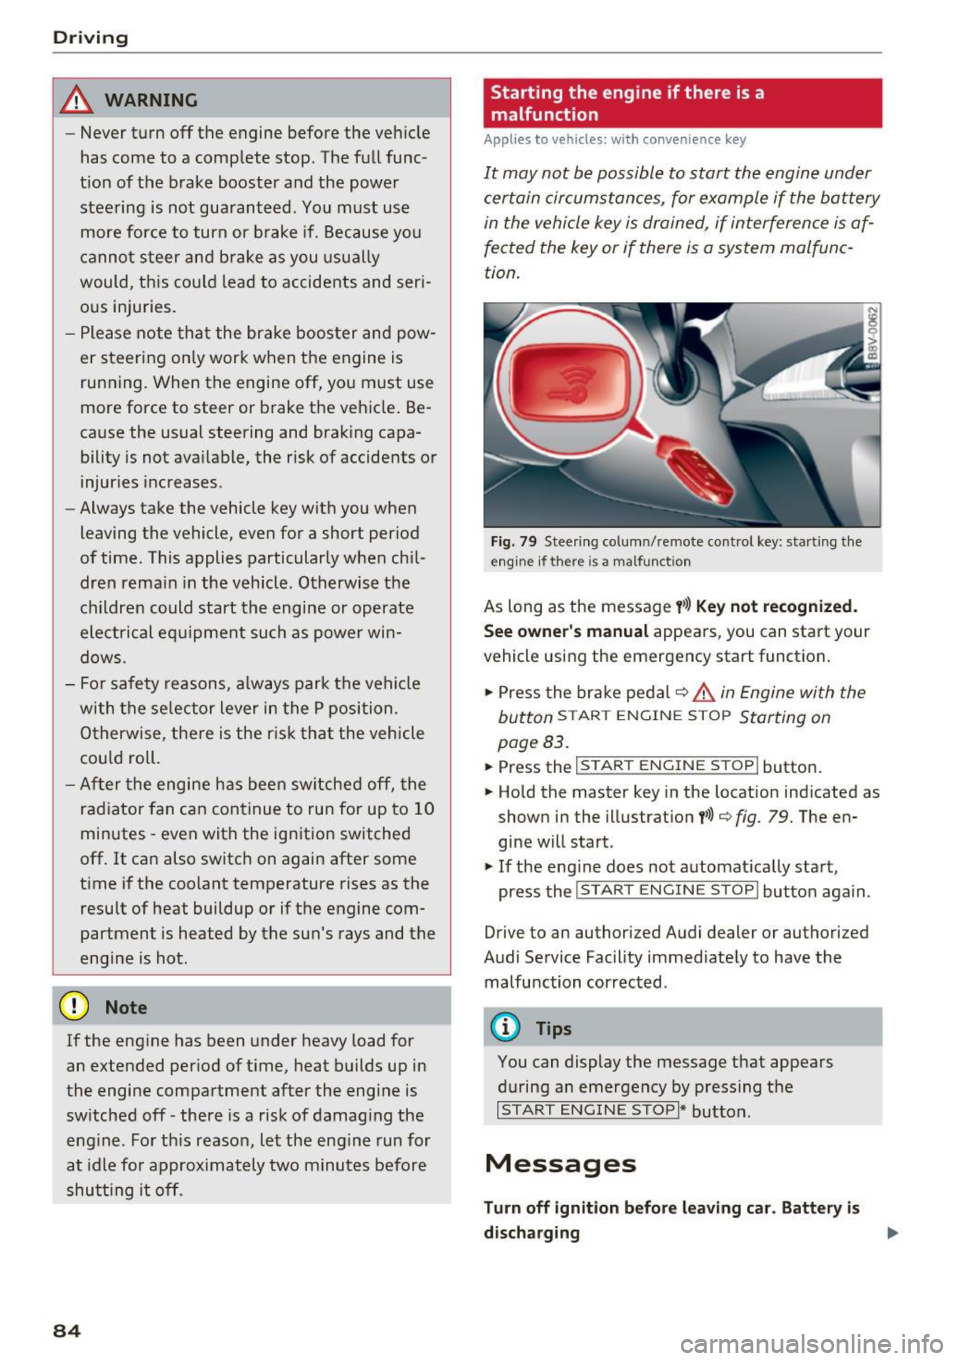
Fig. 79 Steering column/remote control key: starting the
e ngin e if there is a malfunct ion
As long as the message y>>) Key not recognized.
See owner's manual
appears, you can start your
vehicle using the emergency start function.
.,. Press the brake pedal¢ ,&.
in Engine with the
button
START ENGINE S TOP Starting on
page 83.
.,. Press the ~1s=T-A~R~T~E-N~G=r-N~E~S~T~O~P~ I button.
.,. Hold the master key in the location indicated as
shown in the illustration
t>>) ¢ fig. 79. The en
gine will start.
.,. If the engine does not automatically start,
press the
I START ENGINE STOPI button again .
Drive to an authorized Audi dealer or authorized
Audi Service Facility immediately to have the
malfunction corrected .
@ Tips
You can display the message that appears
during an emergency by pressing the
I START ENGINE STOPI* button.
Messages
Turn off ignition before leaving car. Battery is
discharging .,.
Page 87 of 328
.... N
0 > CX)
rl I.Cl U"I
rl I.Cl ....
This message appears and a warning tone sounds if you open the driver's door when the ignition is
switched on. Switch the ign ition off so that the
battery will not d ischarge.
Pressing start/stop button again will switch off
engine!
This message appears when you press the
ISTART ENGINE STOPI* button while driving
¢ page 83, Emergency off function.
Engine start system malfunction. Please con
tact Service
The engine automatic start system has a mal
function . Drive to an author ized Audi dealer or
author ized Audi Service Facility immediate ly to
have the malf uncti on corrected. To start the en
g ine, press and hold the
!START ENGINE STOPI
button.
DJ Key not recognized. See owner's manual
This message appears if there is no convenience
key inside the vehicle or if the system does not
recognize the key. The conven ience key may not
be recognized, for example, if it is covered by an
object that
disrupts the signal (such as a brief
case), o r if the key battery is weak. Electronic de
vices such as cell phones can also interfere with
the signal.
To still be able to start or stop the engine, refer
to "Cor rect ing a malfunction" ¢
page 84.
Ill Key not in vehicle?
The Ill indicator light turns on and this message
appears if the convenience key was removed from
the vehicle when the eng ine was running . If the
conven ience key is no longer in the vehicle, you
cannot switch the ignition on o r start the engine
once yo u stop it. In addition, you cannot lock the
ve hicl e from the outside .
Press brake pedal
This message appears if you do not press the
brake pedal when starting the eng ine .
Please engage N or P
This message appears when starting or s topping
the engine if the selector lever is not in the Nor P
position . The engine will not start/stop .
Driving
Shift to P, vehicle can roll away . Doors can only
be locked in P
T his message appears for safety reasons along
with a warning tone. It appears if the selec to r
lever for the automat ic transmission is not in the
P position when switching the ignition off with
the
I START ENGINE STOPI * button. Shift these
lector lever to the P position. Otherwise, the vehi
cle could roll. You also cannot lock the vehicle us
ing the locking sensor o n the door hand le or us
ing the conven ience key.
Electromechanical
parking brake
Operating
The electromechanical parking brake replaces
the hand brake.
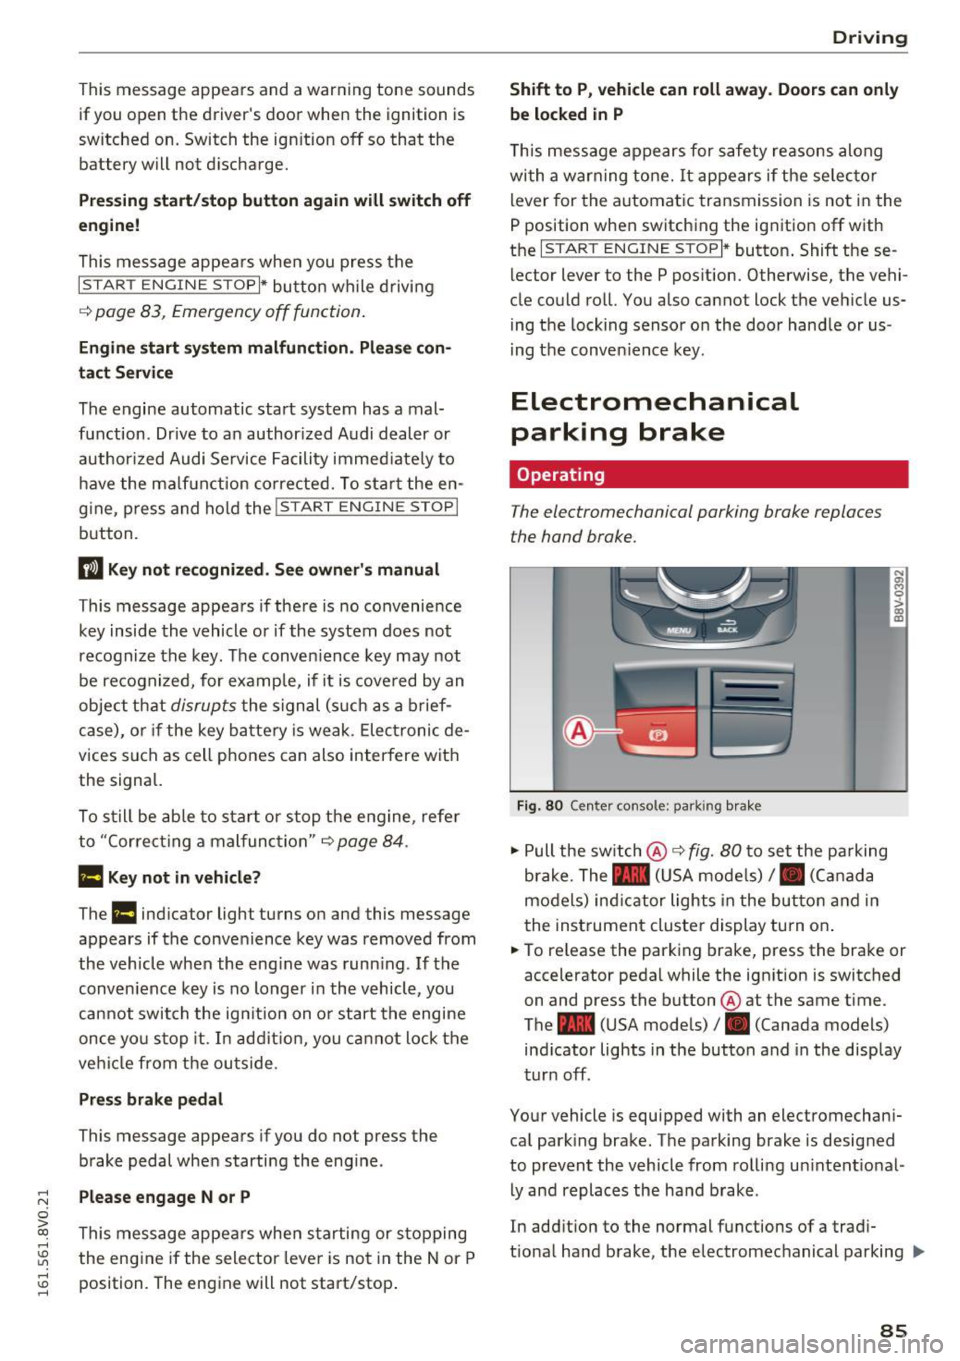
Fig . 80 Center console : pa rk ing brake
" Pull the switch @¢ fig. 80 to set the parking
brake. The - (USA models),. (Canada
models) ind icator lights in the button and in
the instrument cluster display turn on .
" To release the parking brake, press the brake or
accelerator pedal while the ign ition is switched
on and press the button @at the same time.
The - (USA models), . (Canada models)
ind icator lights in the button and in the display
turn off.
Your vehicle is equipped with an electromechani
cal park ing brake. The parking brake is designed
to prevent the vehicle from rolling un intent io nal
ly and replaces the hand brake .
In addition to the normal functions of a tradi
t ional hand brake, the electromec hanical parking ..,.
85