change time AUDI A3 SEDAN 2017 User Guide
[x] Cancel search | Manufacturer: AUDI, Model Year: 2017, Model line: A3 SEDAN, Model: AUDI A3 SEDAN 2017Pages: 400, PDF Size: 67.32 MB
Page 138 of 400
Assistance systems
by this. Have an authorized Audi dealer or au
thorized Audi Service Facility check their func
tion.
(D Tips
- You can cancel the braking with increasing
force that is initiated by the system by brak
ing yourself, by accelerating noticeably or
by swerving.
- Certain pre sense front functions switch off
when ESC is switched off (sport mode) or
when driving in reverse.
- If you restrict or switch off the ESC, the pre
sense also switches itself off ¢
page 152.
Settings in the Infotainment system
Applies to: vehicles with Audi pre sense front/Audi adaptive
cruise control
~ Select in the Infotainment system: I MENU I but
ton
> Vehicle > left control button > Driver as
sistance
> Audi pre sense.
System -
the pre sense functions can be switched
on/off.
If the system is switched off, it switches on again
automatically once the ignition is switched on
again.
Prewarning -the early warning can be switched
off permanently or the pre sense front warning
point can be set
(Early/Medium/Late).
Messages
Applies to: vehicles with Audi pre sense
IIJ Audi pre sense: malfunction! Please contact
Service
This message appears when the pre sense func
tion is affected. For example, this could be
caused by a faulty sensor. If the message stays
on, drive immediately to an authorized Audi deal
er or authorized Audi Service Facility to have the
malfunction corrected.
IIJ Audi pre sense currently restricted. Restrict
ed sensor vision due to surroundings.
This message appears if the sensor view is ob
structed, for example by leaves, snow, heavy
136
spray or dirt. Clean the sensor if necessary
¢page 127, fig. 129.
II] Audi pre sense: currently restricted
This message appears if the ESC is restricted or
switched off, for example .
II] Audi pre sense: currently restricted. See
owner's manual
This message appears when there is a temporary
failure in a subsystem, such as the ESC. If this
message appears repeatedly, drive to an author
ized Audi dealer or authorized Audi Service Facili
ty to have the malfunction corrected .
fl] Audi pre sense: emergency braking system
off
This message appears if the pre sense functions
are switched off through the Infotainment sys
tem or if the system is not ready.
Audi active lane assist
Description
Applies to: vehicles with Audi active lane assist
Active lane assist (lane departure warning) de
tects lane marker lines within the limits of the
system using a camera in the windshield. If you
are approaching a detected lane marker line and
it appears likely that you will leave the lane, the
system will warn you with corrective steering.
You can override this steering at any time. If you pass over a line, the steering wheel will vibrate
lightly. In order for this warning vibration to oc
cur, it must first be switched on in the Infotain
ment system. Active lane assist is ready for oper
ation when the lane marker line is detected on at
least one side of the vehicle.
The system is designed for driving on express
ways and highways and therefore only activates
at speeds above approximately 40 mph (65 km/
h).
Applies to: vehicles with Audi side assist
If you activate a turn signal when active lane as
sist is ready and it classifies a lane change as crit
ical because of vehicles traveling alongside you or
approaching you, there will be noticeable
.,.
Page 142 of 400
Assistance systems
warn you about detected vehicles that it has clas
sified as critical.
@ Tips
You can adjust the brightness on of the dis
play on the rearview mirror¢
page 141.
General information
App lies to: ve hicles w ith Audi side assist
@
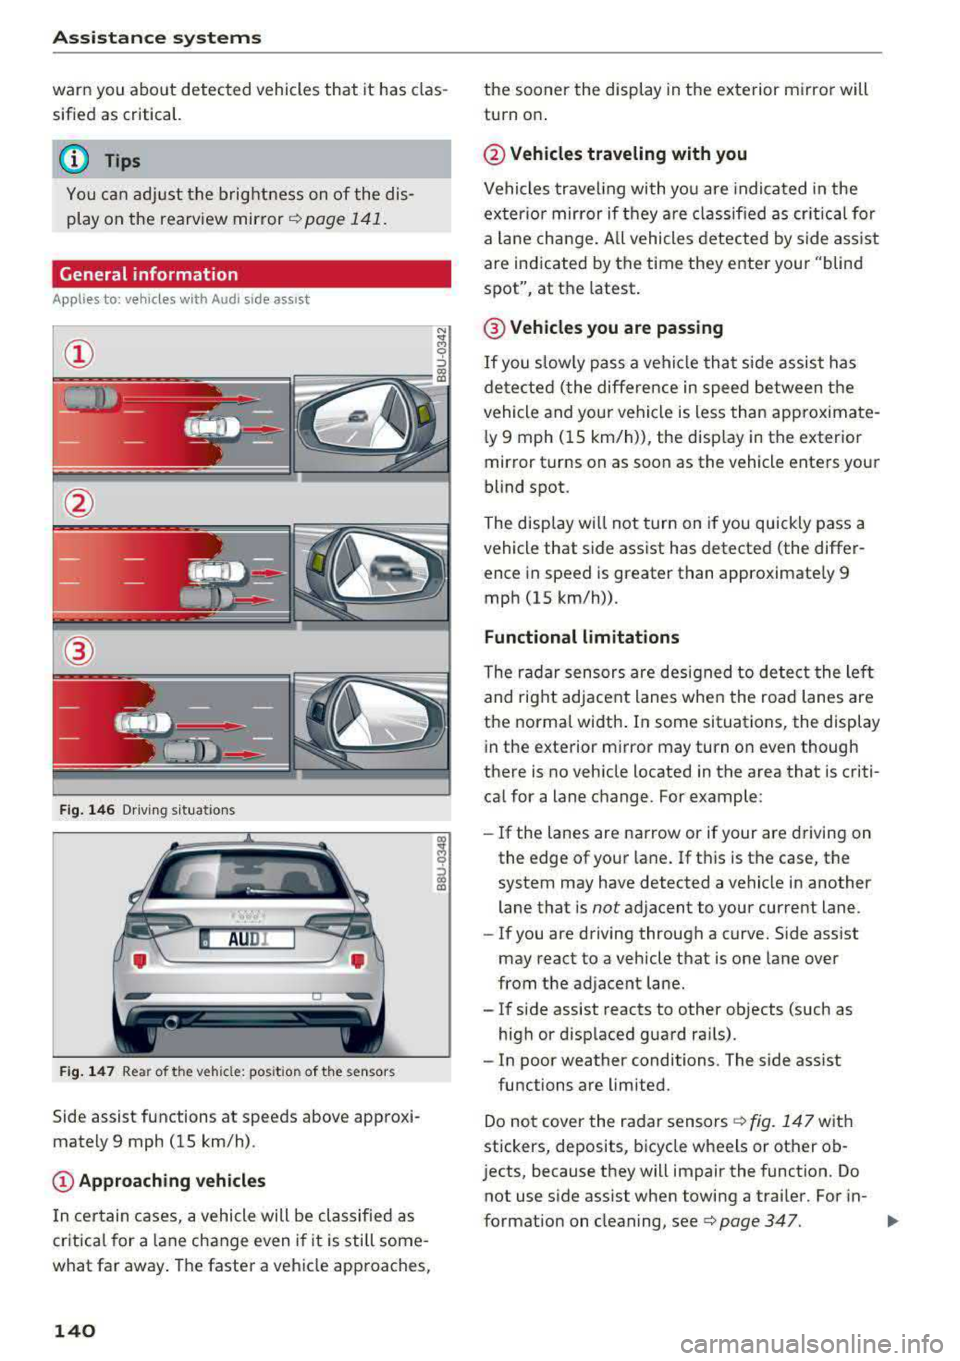
Fig. 146 Driving s it u ations
Fig. 147 Rear of the veh icle: pos it ion of the sensors
Side assist functions at speeds above approxi
mately 9 mph (15 km/h) .
@Approaching vehicles
In certain cases, a vehicle will be classified as
critical for a lane change even i f it is still some
what far away. The faster a vehicle approaches,
140
the sooner the display in the exterior mirror will
turn on .
@Vehicles traveling with you
Vehicles traveling with you are indicated in the
exter ior mirror if they are classified as critical for
a lan e change . All vehicles detected by side assist
are indicated by the time they enter your "blind
spot", at the latest .
@ Vehicles you are passing
If you slow ly pass a vehi cle that side assist has
detected (the differe nce in speed between the
vehicle and your vehicle is less than approximate
l y 9 mph (15 km/h)), the disp lay in the exterior
mirror turns on as soon as the vehicle enters your
blind spot.
The display wi ll not turn on if you quickly pass a
vehicle that side assist has detected (the differ ence in speed is greater than approximate ly 9
mph (15 km/h)) .
Functional limitations
The radar sensors are designed to detect the lef t
and right adjacent lanes when the road lanes are
the normal width . In some situations, the display
in the exterior m irror may turn on even though
there is no vehicle located in the area that is criti
ca l for a lane change. For example:
- If the lanes are narrow or if your
are dr ivin g on
the edge of your lane. If this is the case, the
system may have detected a vehicle in another
lane that is
not adjacent to your cur rent lane.
- If you are driving through a curve. Side ass ist
may react to a vehicle that is one lane over
from the adjacent lane.
- If side assist reacts to other objects (such as
high or displaced guard ra ils).
- In poor weather conditions. The side ass ist
functions are limited.
Do not cover the radar
sensors ¢ fig. 147 with
stickers, deposits, bicycle wheels or other ob
j ects, because they will impair the function. Do
not use s ide assist when towing a trai ler. For in-
format ion on cleaning,
see ¢ page 347. .,..
Page 143 of 400
CXl CXl .... N r--N .... 0 N > 00
A WARNING 1=
- Always pay attention to traffic and to the
area around your vehicle. Side assist cannot
replace a dr iver's attention. The dr iver alone
is always responsible for lane changes and
similar driving maneuvers.
- In some situat ions, the system may not
function or its funct io n may be limited. For
example:
- If vehicles are approaching or being left
behind very quickly. The display may not
turn on in time.
- In poor weather conditions such as heavy
rain, snow or heavy mist.
- On very wide lanes, in tight curves, or if
there is a rise in the road surface. Vehicles
in the adjacent lane may not be detected
because they are outside of the sensor
range.
(D Note
The sensors can be displaced by impacts or
damage to the bumper, wheel housing and
underbody. Th is can impa ir the system. Have
an authorized Audi dealer or authorized Audi
Serv ice Facility check their function .
(Di Tips
If the window glass in the driver's door or
front passenger's door has been tinted, the
disp lay in the exterior mirror may be incor
rect.
Switching on/off
A ppl ies to: ve hicles with Audi side assis t
The system can be switched on/off in the Info
tainment system.
-
If the system is activated, the displays in the ex
terior mirrors will turn on briefly when the ign i
tion is sw itched on .
.,. Select in the Infotainment system: !MENUI but
ton
> Vehicle > left control button > Driver as
sistance
> Audi side assist . Off switches the
system off.
Assistance systems
Setting the display brightness
Applies to : vehicles wi th Audi side ass ist
The display brightness can be adjusted in the In
fotainment system .
.. Select in the Infotainment system: I MENU! but
ton
> Veh icle > left control button > Driver as
sistance
> Audi side assist .
The display brightness adjusts automatically to
the brightness of the surroundings, both in the
information and in the warning stage. In very
dark or very bright surround ings, the automatic
adjustment will set the display to the minimum
or max imum level. In such cases, you may notice
no change when adjusting the brightness, or the
change may only be noticeab le once the sur
roundings change.
Adjust the br ightness to a level where the display
in the information stage will not disrupt yo ur
view ahead. If you change the brightness, the dis
play in the exterior mirror will briefly show the
brightness level in the information stage. The
brightness of the warning stage is linked to the
brightness in the information stage and is adjust
ed along with the information stage.
Q') Tips
- Side ass ist is not act ive while you are mak
ing the adjustment.
- Your settings are automatically stored and
assigned to the remote control key being
used.
141
Page 148 of 400
Parking systems
Parking systems
General information
A ppl ies to: ve hicles w ith parking system plus/rearview cam
era
Depending on your vehicle's equipment , various
parking aids will help you when parking and ma
neuvering.
The
parking system plus assists you when park
ing by audibly and visually indicating objects de
tected
in front of and behind the vehicle
¢page 147.
The rearview camera shows the area behind the
vehicle in the Infotainment system display. This display assists you when you are cross or parallel parking. The parking system plus functions are
also available ¢
page 148.
A WARNING
-
-Always look for traffic and check the area
around your vehicle by looking at it directly
as well. The parking system cannot replace
the driver's attention. The driver is always
responsible when entering or leaving a park
ing space and during similar maneuvers .
-Please note that some surfaces, such as
clothing, are not detected by the system .
-Sensors and cameras have blind spots in
which people and objects cannot be detect
ed . Be especially cautious of small children
and animals .
-Always pay attention to the area around the
vehicle -us ing the rearview mirror, too.
-The sensors can be displaced by impacts or
damage to the radiator grille, bumper,
wheel housing and the underbody . The park
ing system may be impaired as a result.
Have an authorized Audi dealer or author
ized Audi Service Facility check their func
tion .
(D Note
-Some objects are not detected or displayed
by the system under certain circumstances:
-objects such as barrier chains, trailer draw
bars, vertical poles or fences
146
-objects above the sensors such as wall ex
tensions
-objects with certain surfaces or structures
such as chain link fences or powder snow
-If you continue driving closer to a low ob
ject, it may disappear from the sensor range. Note that you will no longer be
warned about this obstacle.
-Keep enough distance from the curb to re
duce the risk of damage to the rims.
(D Tips
-T he system may provide a warning even
though there are no obstacles in the cover age area in some situations, such as:
-certain road surfaces or when there is tall
grass .
-external ultrasonic sources such as from
cleaning vehicles.
-in heavy rain, snow, or thick vehicle ex
haust.
-We recommend that you practice parking in
a traffic-free location or parking lot to be
come familiar with the system . When doing
this, there shou ld be good light and weath
er conditions.
-You can change the volume and pitch of the
signals as well as the display¢
page 150.
-What appears in the infotainment display is
somewhat time-delayed .
-The sensors must be kept clean and free of
snow and ice for the parking aid to operate .
Page 176 of 400
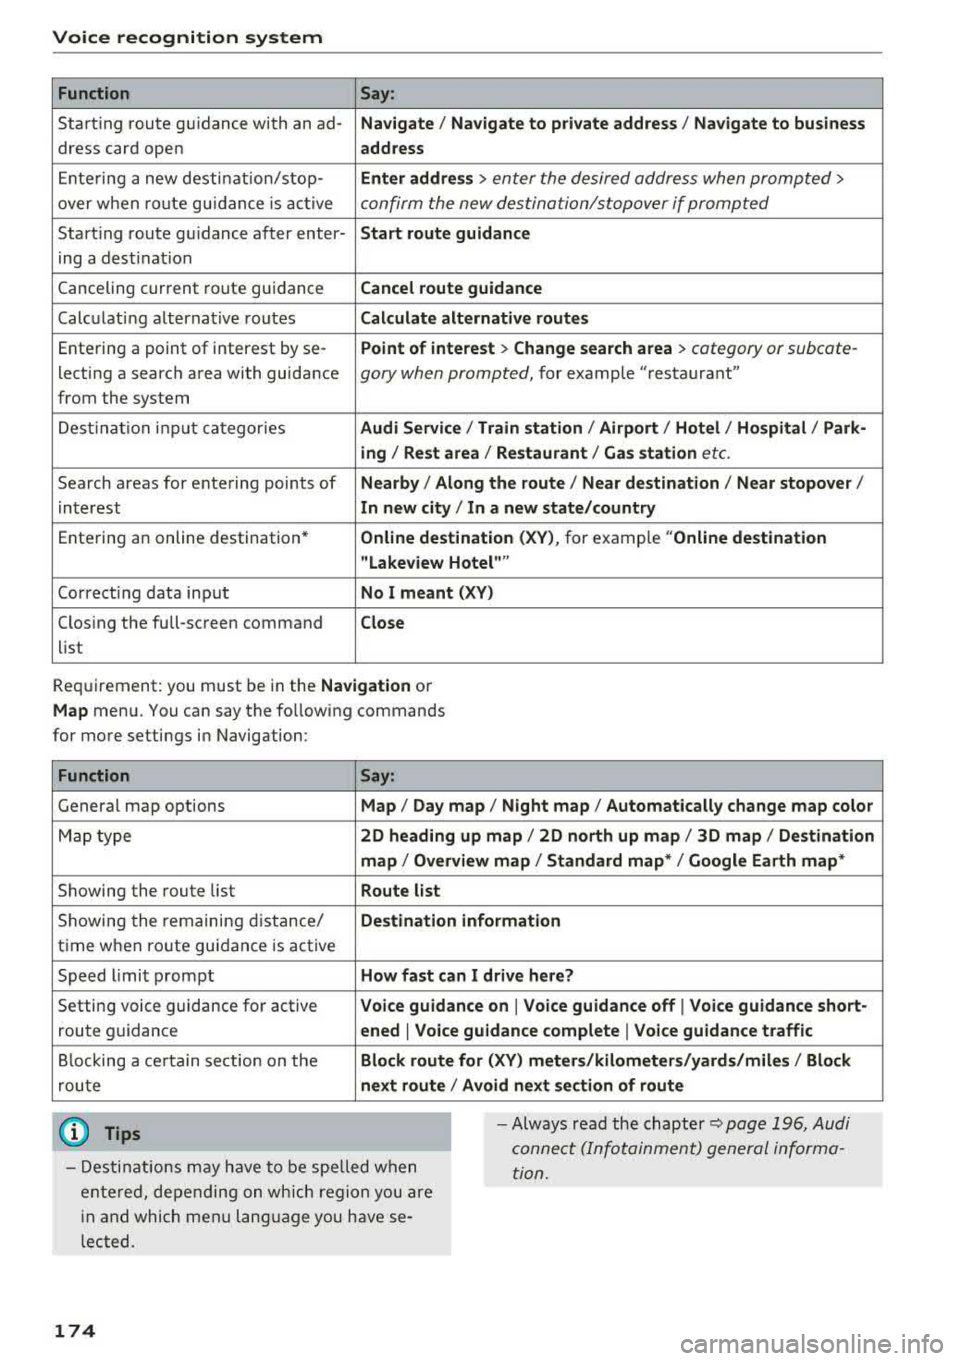
Voice recognition system Function Say:
Start ing route g uidance with an
ad-Na vigate / Navigate to p riv ate addre ss / Na vig ate to bu sin ess
dress card open address
E nte ring a new desti nation/stop- Enter address >
enter the desired address when prompted>
over when ro ute gu idance is ac tive confirm the new destination/stopover if prompted
Start ing route gu idance after enter- Start route guidance
ing a dest inat ion
Canceling current route gu idance Cancel route guidance
Calc ulating alternative routes Calculate alternati ve route s
Entering a point of interest by
se-Point of interest > Change search area > category or subcate-
lecting a searc h area with guidance gory when prompted, for example "restaurant"
from the system
Dest ina tion input categor ies Audi Service / Train station
I Airport / Hot el / Ho spital / Park -
ing / Re st area /Restaurant / G as sta tion
etc.
Search areas for entering points of Nearb y/ Along the route I Near destination / Near stopove r/
interest In new city/ In a new state /country
Ente ring an online destination * Online destina
tion ( XV), for example "Online de stin ation
" Lake view Hotel ""
Co rrect ing data input No I meant (XV)
Clos ing the full-screen command
Clo se
list
Requirement: you must be in the Navigation or
M ap menu. You can say the following commands
for more settings in Navigation:
Function Say:
General map options Map/ Da y map / N ight map / Automa tically change map colo r
Map type 2D heading up map
I 2D north up map/ 3D map / Destination
map
I Ov erview ma p/ Standard map */ Googl e Earth map *
Showing the route list Route list
Showing the remaining d istance/ Destin ation information
time when route guidance is active
Speed l imit prompt How fast can I dri ve here ?
Setting voice g uidance for active Voice guidance on
I Vo ice guidan ce off I Vo ice guidance short-
route guidance ened
I Voice guidance complete I V oi ce guidance traffic
B locking a ce rtain sect ion on the Block route for (XV ) m eter s/kilometers /yard s/miles / Block
rou te next route
I A void n ext se ction of r oute
(D Tips
- Destinations may have to be spe lled when
entered, depending on which region you are
i n and which men u language you have se
l ected. -
Always read the
chapter~ pag e 196, Audi
connect (Infotainment) general informa
tion.
174
Page 179 of 400
CXl CXl .... N r--N .... 0 N > 00
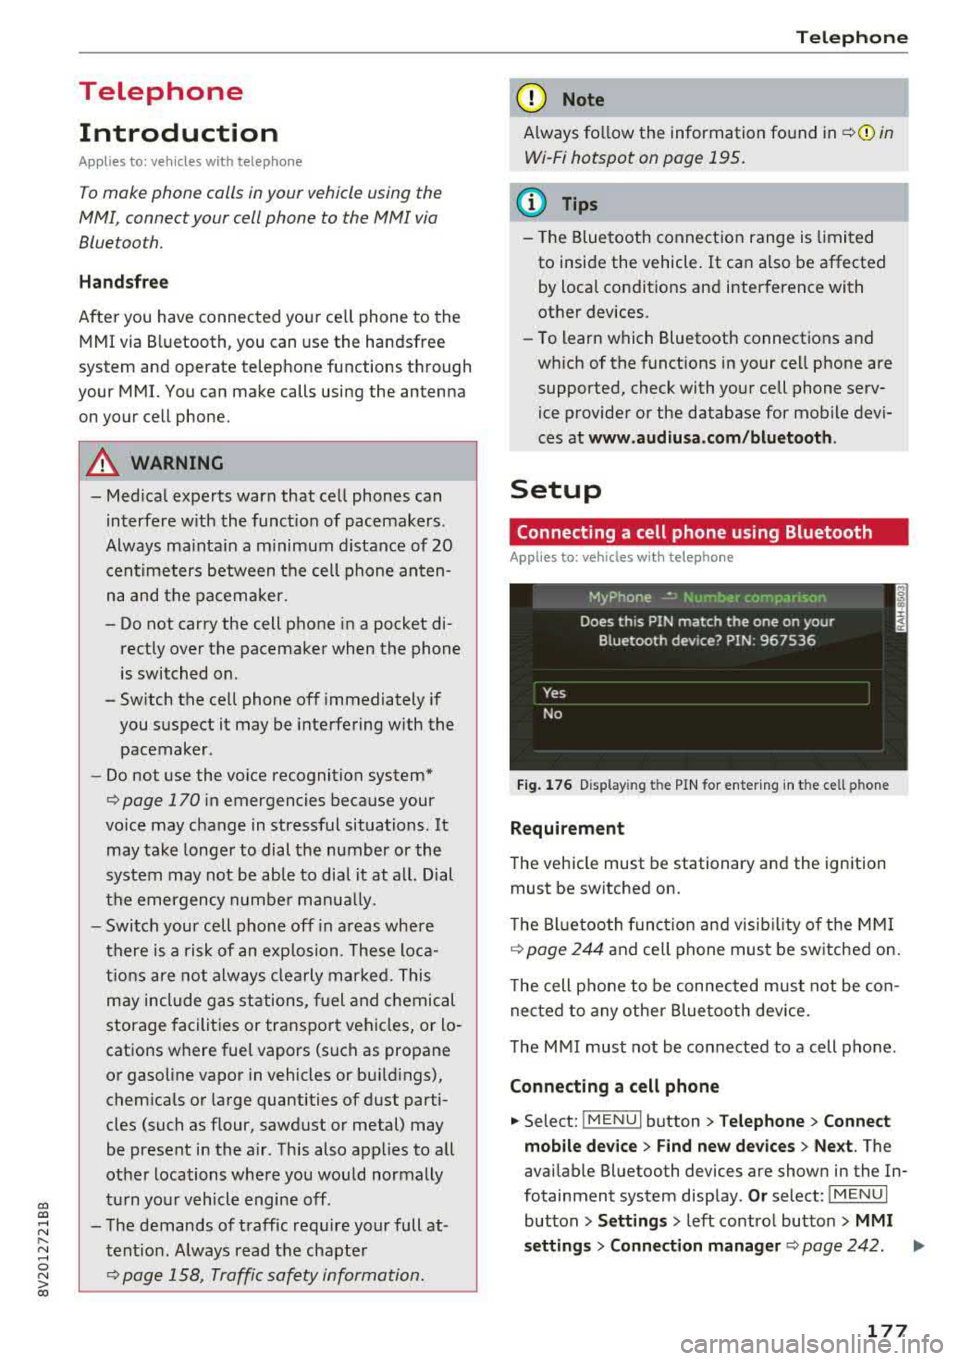
Telephone Introduction
A pp lies to: ve hicles with telep hone
To make phone coils in your vehicle using the
MMI, connect your cell phone to the
MMI via
Bluetooth.
H and sfree
Afte r you have connected your cell phone to the
MMI via Bluetooth, you can use the handsfree
system and operate telephone functions through
your MMI. You can make calls using the antenna
on your cell phone.
A WARNING
- Medical experts warn that cell phones can
interfere w ith the function of pacemakers.
Always ma inta in a m inimum distance of 20
centimeters between the cell phone anten
na and the pacemaker.
- Do not carry the cell phone in a pocket di
rectly over the pacemaker when the phone
is switched on.
- Sw itch the cell phone off immediately if
you suspect it may be interfering with the pacemaker.
- Do not use the voice recognition system*
c::> page 170 in emergencies because your
voice may change in stressful situations. It may take longer to dial the number or the
system may not be able to dia l it at all. Dial
the emergency n umber manua lly.
- Switch your cell phone off in areas where
there is a risk of an exp losion. These loca
tions are not always clea rly marked. This
may include gas stations, fuel and chemical
storage facilities or transport vehicles, or lo
cations where fuel vapors (such as propane
or gasoline vapor in vehicles or bu ildings),
chem icals or large quantities of dust parti
cles (such as flour, sawdust or metal) may
be present in the air. Th is also applies to all
other locations where you would normally
tu rn your vehicle engine off .
- The demands of traffic requ ire your full at
tent io n. Always read t he chapter
c::> page 158, Traffic safety information.
-
T e le ph on e
(D Note
Always fo llow the information found in Q (!) in
Wi-Fi hotspot on page 195.
(D Tips
- The Bluetooth connect ion range is limited
to inside the vehicle. It can also be affected
by local condit ions and interference with
other devices.
- To learn which Bluetooth connections and
wh ich of the functions in your cell phone are
supported, check with your cell phone serv
ice provider or the database for mobile devi
ces at
www .audiu sa.com /bl uetooth .
Setup
Connecting a cell phone using Bluetooth
Applies to: vehicles wi th telepho ne
Fig . 17 6 Display ing t he PIN for enter ing in t he cell ph one
R equirem ent
The vehicle must be stationary and the ignition
must be switched on.
T he Bl uetoo th funct ion and v isib ility o f the MMI
¢ page 244 and cell phone must be sw itched on.
T he cell phone to be connected must not be con
nected to any other Bluetooth device.
T he
MMI must not be connected to a cell phone .
Connecting a cell phone
.,. Select: !MENU I button> Telephone > Co nnect
mobile dev ice
> Find new de vices > Ne xt. The
avai lable Bluetooth devices are shown in the In
fotainment system display .
Or select: !MENUI
button > S etting s> left contro l button > MMI
s ettin gs> Connec tion manag er ¢
page 242 . .,..
177
Page 180 of 400
Telephone
"'Se lect and confirm the desired ce ll phone from
the list of disp layed Bluetooth devices.
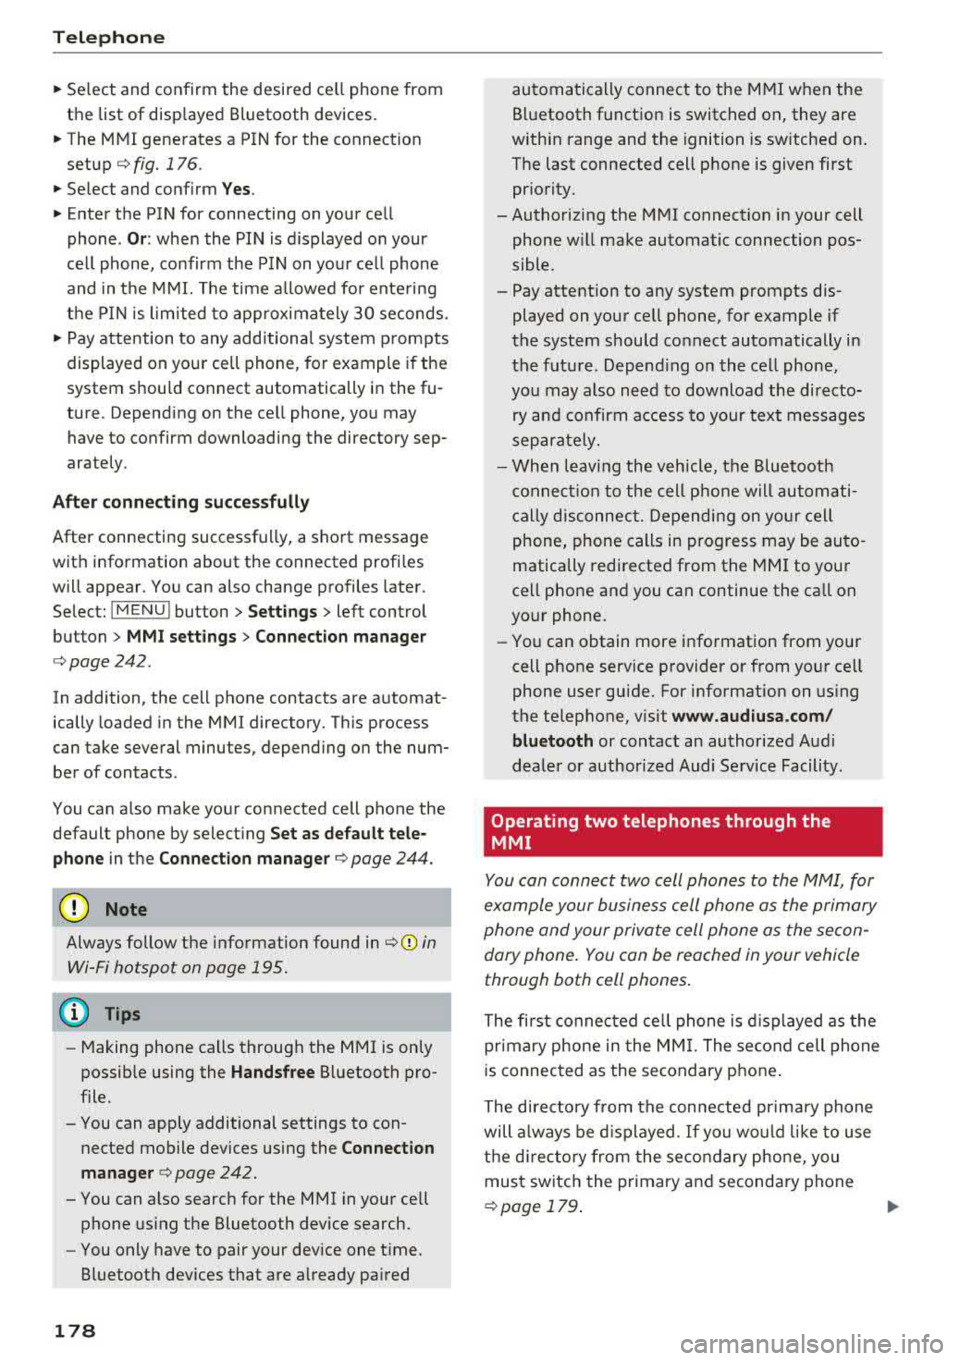
"' The MMI generates a PIN for the connect ion
setup
¢ fig. 176 .
"' Select and confirm Y es.
"' Enter the PIN for connecting on your cell
phone .
Or: when the PIN is d isplayed on your
ce ll phone, confirm the PIN on you r ce ll phone
and in the MMI. The time a llowed for ente ring
the PIN is l im ited to app rox imately 30 seconds.
"' Pay attention to any additiona l system prompts
displayed on your cell phone, for example if the
system should connect automatically in the fu
ture . Depending on the ce ll phone, you may
have to confirm downloading the directory sep
arately .
After connect ing succ essfull y
After connecting successfully, a short message
with information about the connected profi les
will appear . You can also change profiles later.
Select:
! MENU ! button> Sett ings> left control
button
> MMI sett ings > Conn ection man ag er
c:::;, page242 .
In addition, the cell phone contacts are automat
ically loaded in the MMI directory. Th is process
can take several minutes, depend ing on the num
ber of contacts .
You can a lso make your connected cell phone the
default phone by select ing
Se t as de fault tel e
phone
in the Conne ct ion man ager c:::;, page 244 .
Q) Note
Always follow the information found in c:::;,(D in
Wi-Fi hotspot on page 195.
(D Tips
- Making phone calls through the MMI is only
possib le using the
Handsfree Bluetooth pro
file.
- You can apply additional settings to con nected mobile devices using the
Connection
manager
c:::;, page 242.
- You can also search for the MMI in your cell phone us ing the Bluetooth device search.
- You only have to pair your device one t ime.
Bluetooth devices that are already paired
178
automatically connect to the M MI when the
Bluetooth function is switched on, they are
within range and the ignition is sw itched on.
The last connected cell phone is given first pr iority.
-Authoriz ing the MMI connect ion in your cell
phone wi ll make automatic connection pos
sible .
- Pay attention to any system prompts dis played on your cell phone, for example if
the system should connect automatically in
the future. Depend ing on the cell phone,
you may also need to download the directo
ry and confirm a ccess to your text messages
separately.
- When leaving the vehicle, the Bluetooth
c onnect ion to the cell phone will automati
cally disconnect. Depending on yo ur cell
phone, phone calls in progress may be auto
matically redirected from the MM I to your
cell phone and you can continue the ca ll on
your phone.
- You can obtain more info rmation from your
cell phone service provider or from yo ur ce ll
phone user guide. For information on us ing
the te lephone, v isit
ww w.audiu sa.com /
bluetooth
or contact an authorized Audi
dealer or author ized Audi Service Facility.
'
Operating two telephones through the
MMI
You can connect two cell phones to the MMI, for
example your business cell phone as the primary
phone and your private cell phone as the secon dary phone. You can be reached in your vehicle
through both cell phones .
The first connected cell phone is d isplayed as the
primary phone in the MM I. The second cell phone
i s connected as the secondary phone .
The directory from the con nected prima ry phone
will a lways be d isplayed . If yo u wo uld like to use
the d irecto ry from the secondary phone, you
must switch the primary and secondary phone
¢ page 179 .
Page 193 of 400
a, co ..... N
" N ..... 0
.. Confirm your entry with OK.
Then you can open your personal sett ings from
your myA udi account in your vehicle.
@ Tips
You can receive your myAud i PIN if you have
set up a myA udi account. For additional infor
mat ion, see
my.audi usa.com .
Opening Audi connect
(Infotainment)
A ppl ies to: ve hicles with Audi co nnect (Infota inment)
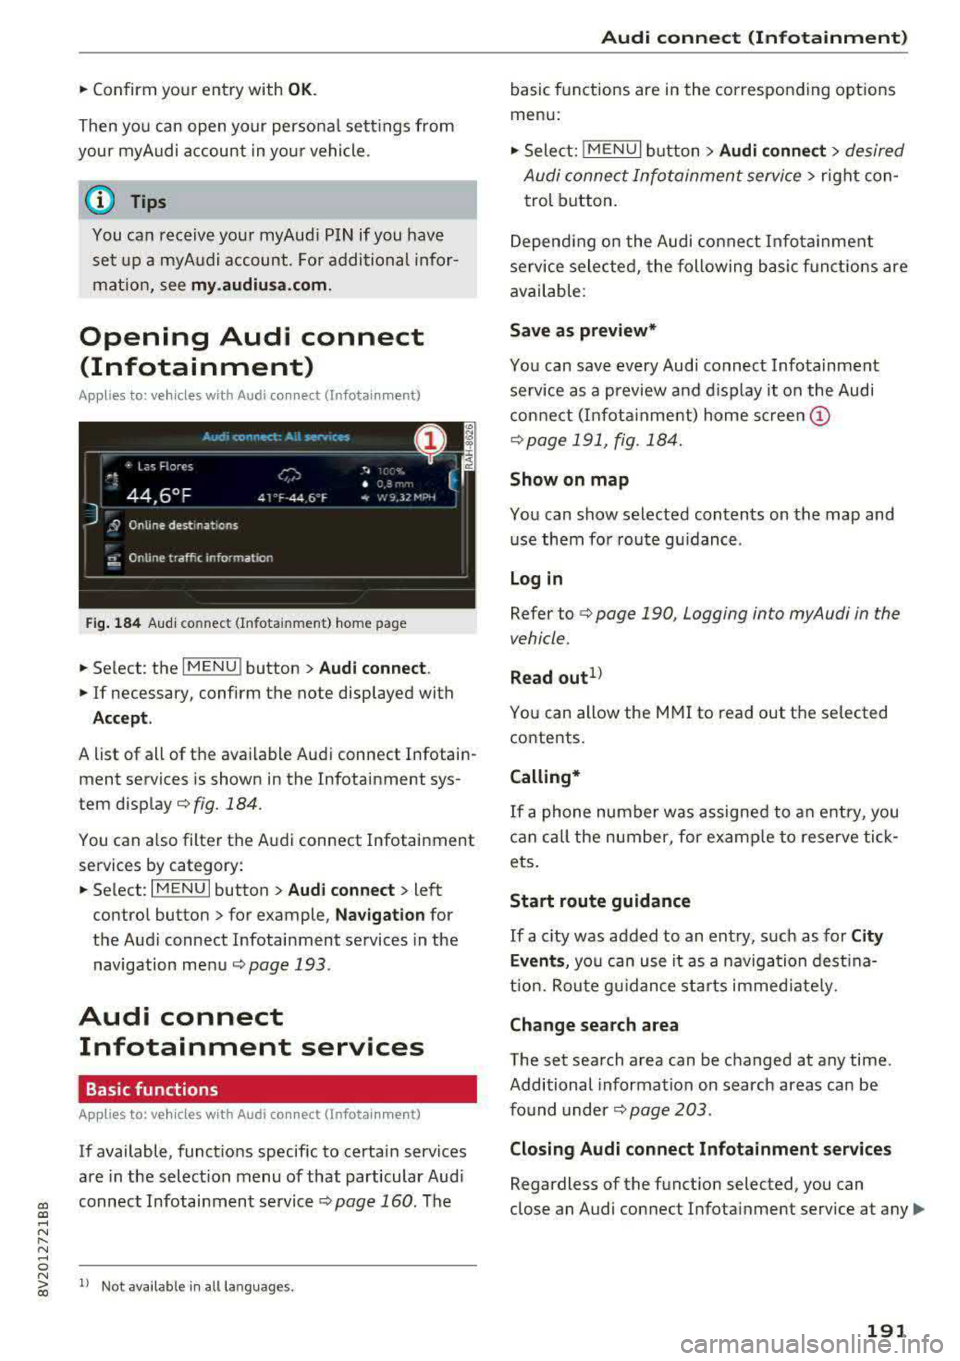
Fig . 184 Aud i co nnect (Infota inment) home page
.. Select: the I MENU ! button > Audi connect .
.. If necessary, confirm the note displayed with
Acce p t.
A list of all of the available Audi connect Infotain
ment services is shown in the Infotainment sys
tem
display¢ fig. 184 .
You can a lso filter the Audi connect Infotainment
services by category:
.. Select : I MENU I button > Audi connect > left
contro l button
> for example, N avi gat ion for
the Audi connect Infotainment services in the
navigation
menu ¢ page 193 .
Audi connect
Infotainment services
Basic functions
Ap plies to: ve hicles w ith Audi co nnect (Infot ainment)
If available, funct ions specific to certain services
are in the select ion menu of that particular Aud i
connect Infotainment
service ¢ page 160. The
N ~ 1> Not availab le in all la nguages.
Audi conne ct (Inf otainment )
basic functions are in the corresponding options
menu:
,. Select: ! MENUI button> Audi connect > desired
Audi connect Infotainment service>
right con
trol button.
Depend ing on the Audi conne ct Infota inment
service selected, the following basic funct ions are
available :
Save as prev iew*
You can save every Aud i connect Infotainment
service as a preview and d isplay it on the Audi
connect (I nfota inment) home
s c ree n@
¢ page 191 , fig . 184.
Show on map
You can show selected contents on the map and
use them for route gu idance .
Lo g in
Refer to ¢ page 190, Logging into myAudi in the
vehicle .
Read out1>
You can allow the MMI to read out the selected
contents.
Calling*
If a phone number was assigned to an e ntry, you
can call the number, for examp le to reserve tick
ets.
Start route guidance
If a c ity was added to an ent ry, such as for C ity
Ev ent s,
yo u can use it as a navigation dest ina
t ion. Rou te g uidance sta rts immed iately.
Change sea rch area
The set search area can be changed at any time.
Additional information on search areas can be
found
under ¢ page 203 .
Closin g Audi connect Infotainment ser vices
Regardless of the funct ion selected, you can
close an Audi connect Infotainment service at any
Ill>
191
Page 195 of 400
CXl CXl .... N r--N .... 0 N > 00
Different functions are available depending on
the Twitter category you have selected:
- New twe et: you can post a new tweet using
pre-made temp lates or using myAudi tem
plates that you have created yourse lf .
- Refr es h: the selected Tw itter function is re
freshed.
- Favori te: mark a Tweet as favo rite to show you
l ik ed it.
- Retw eet: you can quote a Tweet to share it with
others.
(j) Tips
- Other settings such as account, language,
Tweet security and location settings
cannot
be changed in the MMI. These changes must
be made on the Twitter website .
- You can only connect
one Twitter account
wi th you r myAudi account.
- Audi connect (Infotainment) makes it possi
ble to access Tw itter. Permanen t ava ilability
cannot be guaranteed, because that de
pends on Twitter.
Travel (travel guide)
Applies to: vehicles with Audi connect (Infotainmen t)
You can use the Audi MMI connect opp to store
points of interest on your mobile device (such as
a smartphone) and then use them for route
guidance in the MMI .
Requirement:
The
A udi MM I connect app must be installed and
open on your mobile device .
You must be logged i nto your myAud i account in
the
A udi MMI conn ect app and you must have se
l ected your vehicle.
The Wi-Fi funct ion on your mobile device and on
the MMI must be switched on.
The MMI must be connected to the network.
.,. Press: I MENU I button > Audi conne ct > left con-
t ro l button
> Inf ormati on category > Tra ve l.
Afte r opening the travel guide, travel tips in yo ur
a rea will be displayed incl uding c urrent rat ings as
well as the correspond ing category.
Audi c onn ect ( Inf ota inm ent )
.,. Press the le ft control button to change the cat
egory (such as bars nearby) .
A WARNING
= -
-It is only safe to use tablets, laptops, mo
b ile dev ices and other similar devices when
the vehicle is stationary because, like all loose objects, they co uld be thrown around
the inside of the vehicle in a crash and cause
serious inju ries. Store these types of devices
securely while d riving.
- Do not use any wireless devices on the front
seats within range of the airbags while dr iv
ing. Also read the warnings in the chapte r
¢ page 271, Front airbags.
(D Tips
-Units of measurement, language settings
and time are shown in the Infotainment sys
tem display based on how they were set in
the system settings
¢ page 241.
Audi connect (Infotainment) in navigation
Applies to: vehicles with navigation system and Audi connect
(Infotainment)
.,. Select : !MENUI button> A udi conn ect > left
control button >
Na vig atio n.
The following Audi connect Infotainment services
are currently ava ilable:
- Navigation with
online m ap vie w and Street
Vi ew
¢ page 212.
- Point of Intere st (POI) on line sea rch with
v oi ce re cognit ion
(such as restaurants): plan
route guidance using the MMI contro l pane l
¢ page 203 and the voice recogn ition system
¢ page 170 .
-Set up destinations in your MMI using your
myAu di account or onl in e map vie w
¢page 212 .
-On line traff ic informat ion : receive up-to-the
m inute traffic informat ion about acc idents,
road construction and other inc idents
¢ page 215 .
-Map update: import navigation map updates
direct ly to your veh icle using an SD card or as
an online update
¢ page 213.
193
Page 206 of 400
Navig ation
-Se arching for onl ine d estination s in a specific
categor y:
select and confirm Se lect catego ry.
Se lect and confirm a category, such as Rest au
r a nts .
Find which search areas are available under
¢ page 203, Point of interest search.
You can sea rch fo r on line dest ina tions using the
voice recognition system
¢ table on page 173.
{I) Tips
Always read t he chapte r¢ page 196, Audi
c onnect (Infotainment) general informa tion.
Accessing destinations from myAudi
account
A pp lies to: ve hicles w ith naviga tion sys tem and Audi co nn ect
(I nfota inmen t)
Import individual destinations from your myAudi
account into the
MMI.
Requirement:
The requirements for Audi connect (Infotain ment) must be met
¢ page 190.
You must have a registered myAudi account at
my.aud iusa.com . You must have a vehicle as
signed to your myAudi acco unt and you must
have stored one or more destinations .
~ Press the I NAV/MAPI button repeatedly until
the
Enter de stin ation menu is displayed
¢ page 200, fig. 185.
~ Se lect: left control button > m yAudi cont act s.
~ If necessary, enter your myAudi user data or
your myAud i PIN¢
page 190 . The contacts
stored in myAudi are d isp layed .
-Select and confirm a contact .
-Select and confirm a private or business desti -
nation.
- Se lect and confirm
Start route guidance .
(D Tips
-You only need to enter the myAud i user data
one time .
-You can receive your myA udi PIN if you have
set up a myAudi account.
204
- Additiona l information can be found under
www.audiu sa .com /audiconnect .
Entering a destination using geo
coordinates
App lies to : vehicles wit h navigat ion syste m
~ Press the I NAV/MAPI button repeatedly until
the
Enter dest inat ion me nu is displayed
¢ page 200, fig . 185 .
~ Sele ct: left control button > Geographi cal coor ·
dinate s.
-Select latitud e/longitude .
-Press the contro l knob to set the individual val -
ues .
- Turn the control knob to the left/right to
change the selected va lue.
- Select and confirm
Start route guidance .
Adding a stopover
App lies to : vehicles wit h naviga tion syste m
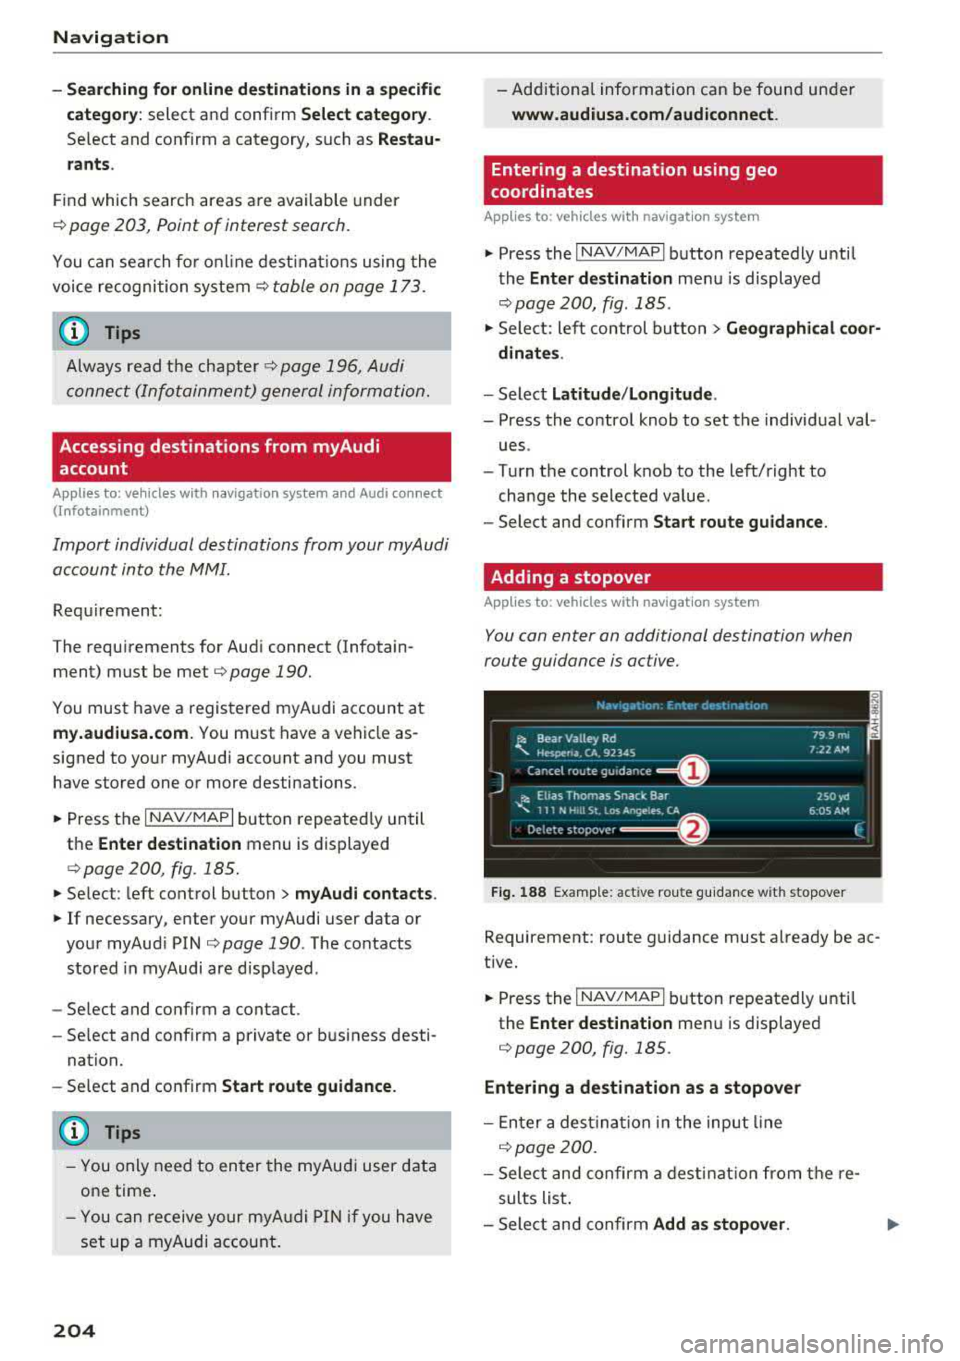
You con enter an additional destination when
route guidance is active.
Nac,,gat1on Er.tcr de'iot1r.ar.1on ~-
---------== = ==----,:.-jl: Bear Valley Rd 79 9 mi
'-,. Hesperia. CA, 9234S 7:22 AM
Cancel route gu idance ______ _
::, Elias Thomas Snack Bar
-..;: 111 N Hill St. Los Angeles. CA
De lete stopovc-r ====~ If}
J 250yd
6:05 AM
Fig. 188 Examp le: act ive route g uidance w it h stopover
Requirement: route guidance must already be ac
tive.
~ Press the I NAV/MAPI b utton repeatedly unti l
the
Ente r dest ination me nu is displayed
¢ page 200, fig. 185.
Entering a destination as a stopover
-En ter a des tina tion in the input line
q poge 200 .
-Select and confirm a desti nat ion from the re
sults list .
-Select and confirm Add as stopo ver . jll,,