AUDI A3 SEDAN 2017 Owners Manual
Manufacturer: AUDI, Model Year: 2017, Model line: A3 SEDAN, Model: AUDI A3 SEDAN 2017Pages: 400, PDF Size: 67.32 MB
Page 371 of 400
a, a, ..... N
" N ..... 0 N > 00
(D Note
-Applying a higher voltage booster battery
will cause expensive damage to sensitive electronic components, such as control
units, relays, radio, etc.
- There must be no electrical contact between the vehicles as otherwise current could al
ready start to flow as soon as the positive
(+) terminals are connected .
@ Tips
The discharged battery must be properly con
nected to the vehicle's electrical system.
When jump starting or charging the battery,
never connect the negative ground cable to
the battery negative post because the battery
manager system must be able to detect the
battery's state of charge. Always connect the
negative ground cable to the negative ground
post of the battery manager control unit.
Using jump start cables
Connect the jump start cables in the exact order
described below.
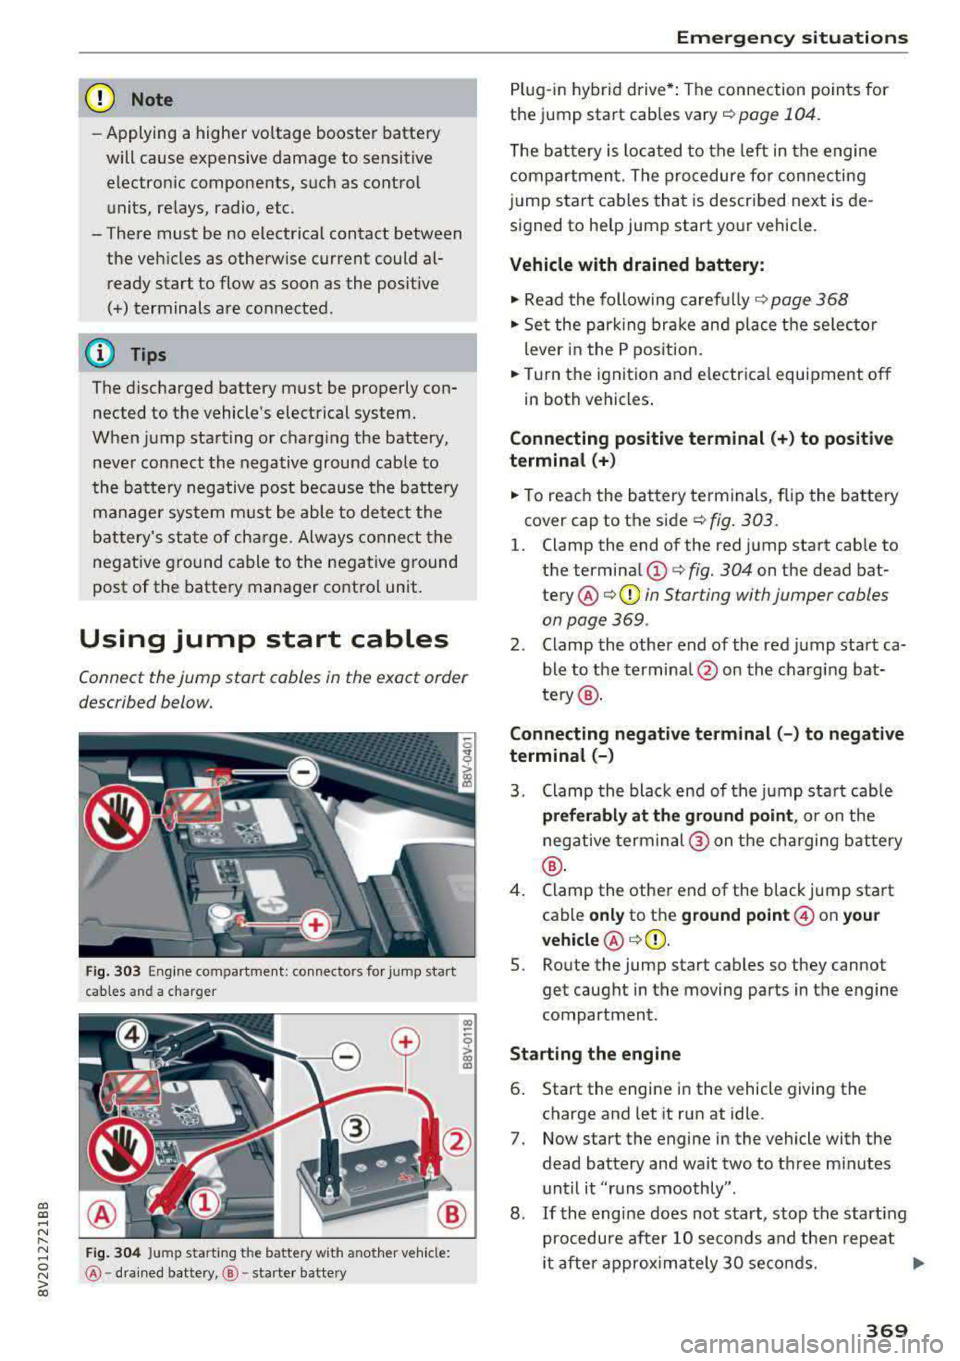
Fig. 303 Engine compartment: connectors for jump start
cables and a charger
Fig . 304 Ju mp starting t he battery wit h another vehicle:
@ -dra in ed battery, @-starter batte ry
Emergency situations
Plug-in hybrid drive*: The connection points for
the jump start cables
vary ¢ page 104.
The battery is located to the left in the engine
compartment. The procedure for connecting
jump start cables that is described next is de
signed to help jump start your vehicle.
Vehicle with drained battery:
.. Read the following carefully 9 page 368
.. Set the parking brake and place the se lector
lever in the P position .
.. Turn the ignition and electrical equipment off
in both vehicles .
Connecting positive terminal(+) to positive
terminal (+)
.. To reach the battery terminals, flip the battery
cover cap to the side¢ fig. 303 .
l. Clamp the end of the red jump start cab le to
the terminal
(D c> fig. 304 on the dead bat
tery @¢ 0 in Starting with jumper cables
on page 369 .
2. Clamp the other end of the red jump start ca
ble to the terminal @on the charging bat
te ry @ .
Connecting negative terminal(-) to negative
terminal (-)
3. Clamp the black end of the jump start cab le
preferably at the ground point, or on the
negative terminal @ on the charging battery
®·
4. Clamp the other end of the black jump start
cable
only to the ground point @ on your
vehicle @c>(D.
5. Route the jump start cables so they cannot
get caught in the moving parts in the engine
compartment.
Starting the engine
6. Start the engine in the vehicle giving the
charge and let it run at idle .
7. Now start the engine in the vehicle with the
dead battery and wait two to three m inutes
until it "runs smoothly" .
8.
If the engine does not start, stop the start ing
procedure after 10 seconds and then repeat
it after approx imately 30 seconds.
Ill>
369
Page 372 of 400
Emerg enc y s it uati ons
9. In the ve hicle that is being jump started,
switch the heater fan and rear window de
froster on to reduce any voltage peaks that
may occur when disconnecting the jumper
cables. The headlights must be switched off.
10. With the engines running, remove the cables
i n
reverse order of the way they were instal
l ed. Make sure the cables do not get caught
in mov ing engine components.
11. Sw itch the heater fan and rear w indow de-
froster off.
12. C lose the battery cover .
The battery is vented to the outside so that gases
do not enter the passenger compartment. Make
sure that the connected positive termina l clamps
on the jump start cab le have sufficient contact
with metal.
A WARNING
Follow the warnings and instructions from
the jump start cab le manufacturer to reduce
the risk of ser ious injuries and vehicle dam
age. If you are unsure about anything, call
roads ide ass istance.
- The jump start cables must be long enough
so that the veh icles do not touch.
-
- Route the jump start cables so they cannot
get caught in the moving parts in the engine
compartment.
- Always read and follow the warnings before check ing anything in the engine compart
ment
~page 316.
(D Note
Connecting jump start cables incorrectly can
damage the alternator .
- Always connect the positive terminal(+) to
the positive term inal(+) and the negative
term inal(-) to the negat ive terminal(-) on
the body ground po int, but not the negative
terminal on the battery.
- Make su re the screw plugs on the battery
cells are installed securely. If not, tighten
the plugs before connecting the clamps to
the negat ive termina l on the b attery.
- Please note t hat the connecting p rocess de
scribed below for the jump sta rt cab les is
in-
370 tended for when your vehicle is being jump
started. If you are jump starting another ve
hicle, do not connect the negat ive cab le to
the negative term inal (-) on the dra ined
battery, but rather connect it to a large
metal component that is bolted secure ly to
the engine block, or to the engine block it
self.
If the battery in the vehicle being jump
sta rted is not vented to the outside, there is
a risk of explosion due to hyd rogen gas.
- Make sure that the connected pos itive ter
minal clamps have suff icient contact with
metal.
- Do not use the battery negative terminal fo r
jump starting or a ma lfunction co uld occ ur
in the vehicle electrical system.
Towing with a tow truck
General tips
Your Audi requires special handling for towing.
The following information is to be used by com mercia l tow truck operators who know how to op
erate their equipment safely.
-Never tow your Audi. Towing will cau se dam
age to the engine and t ran smi ssi on.
- Nev er wrap the safet y ch ains or winch cables
aroun d the br ake lines .
- To pr event unne ce ssa ry damag e, your Audi
must be tran sported with a flat be d tru ck .
- To load th e vehicle on to the flat bed , use th e
towing l oop found in the vehicl e tool s and at
t a ch to the front or rear an chorage
.=;,page 371 and ~page 371.
A WARNING
A veh icle being towed is not safe for passen
gers. Never allow anyone to ride in a vehicle
being towed, fo r any reason.
Page 373 of 400
a, a, ..... N
" N ..... 0 N > 00
Front towing loop
____
•
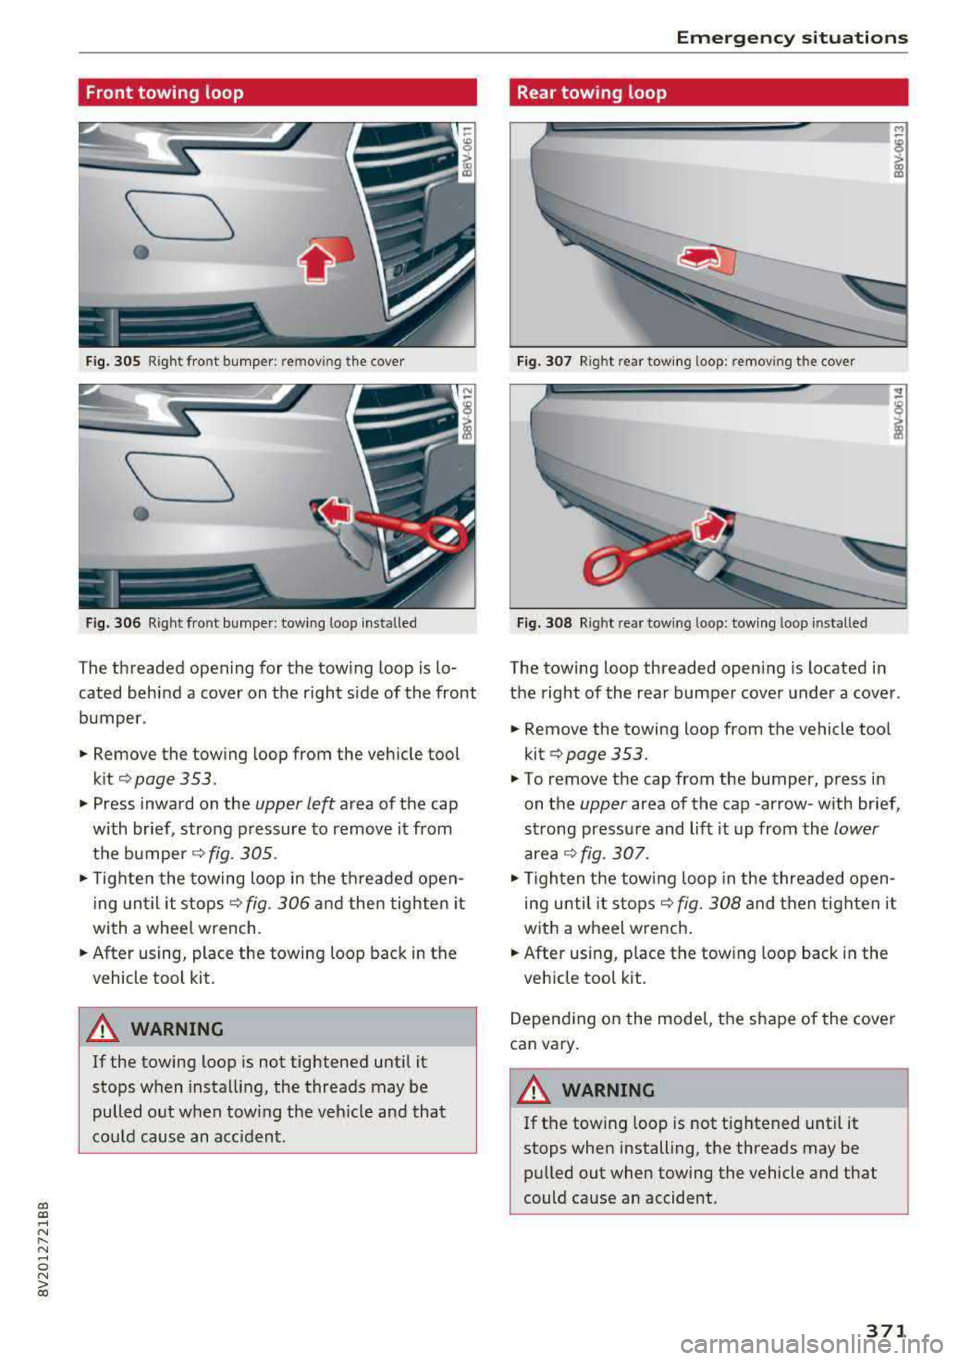
Fig. 305 Right fro nt bumper : rem ov ing the cover
\___,
•
Fig. 306 Right front bumper: towing loo p installed
The threaded opening for the towing loop is lo
cated behind a
cover on the right side of the front
bumper .
• Remove the towing loop from the vehicle tool
kit
¢ page 353 .
• Press inward on the upper left area of the cap
with br ief , strong pressure to
remove it from
the
bumper ¢ fig. 305 .
• Tighten the towing loop in the threaded open
ing until it stops
¢ fig. 306 and then tighten it
with a whee l wrench.
• After using, place the towing loop back in the
v ehicl e tool kit.
A WARNING
If the towing loop is not tightened until it
stops when installing, the threads may be
pulled out when tow ing the veh icle and that
could cause an accident .
-
Emergency situations
Rear towing loop
Fig. 307 R ig ht re ar towing loo p: remov ing the cover
Fig. 308 Right rea r towing loop: towing loop insta lled
The towing loop threaded opening is located in
the right of the rear bumper cover under a cover .
• Remove the tow ing loop from the vehicle tool
kit ¢
page 353 .
.,. To remove the cap from the bumper, press in
on the
upper area of the cap -arrow -with br ief,
strong pressure and lift it up from the
lower
area¢ fig. 307.
• Tigh ten the towing loop in the threaded open
ing until it stops ¢
fig. 308 and then tighten it
with a wheel wrench .
• After using, place the tow ing loop back in the
v e hicle tool k it.
Depending on the model, the shape of the cover
can vary.
WARNING
If the tow ing loop is not tightened until it
stops when installing, the threads may be
pulled out when towing the vehicle and that
could cause an accident .
371
Page 374 of 400
Emergency situations
Loading the vehicle onto a flat bed truck
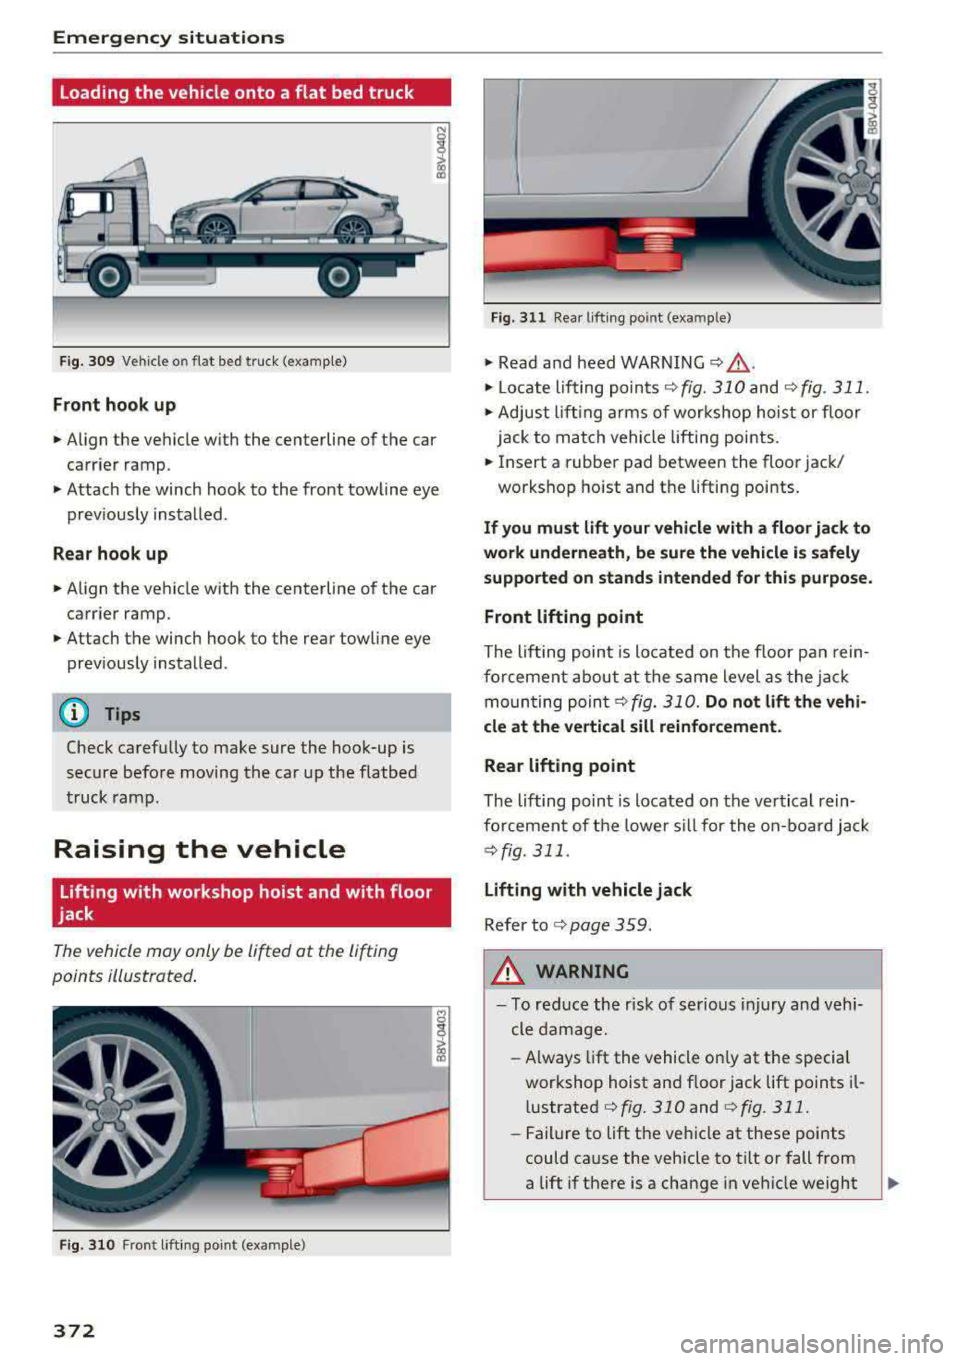
Fig. 309 Veh icle o n flat bed truck (example)
Front hook up
.. Align the vehicle with the centerline of the car
carrier ramp .
.. Attach the winch hook to the front towline eye
prev iously installed.
Rear hook up
.. Align the vehicle with the centerline of the car
carrier ramp .
.. Attach the winch hook to the rear towline eye
previously installed .
@ Tips
Check carefully to make sure the hook-up is
secure before moving the car up the flatbed
truck ramp.
Raising the vehicle
Lifting with workshop hoist and with floor
jack
The vehicle may only be lifted at the lifting
points illustrated.
Fig. 310 Front lifting point (example)
372
Fig. 311 Rear lifting point (exa mple )
.. Read and heed WARNING ¢&_ .
.. Locate lifting points <;!)fig. 310 and <;!) fig . 311.
.. Adjust lifting arms of workshop hoist or floor
jack to match vehicle lifting points .
.. Insert a rubber pad between the floor jack/
workshop hoist and the lifting points .
If you must lift your vehicle with a floor jack to
work underneath, be sure the vehicle is safely
supported on stands intended for this purpose .
Front lifting point
The lifting point is located on the floor pan rein
forcement about at the same level as the jack
moun ting poin t¢ fig.
310. Do not lift the vehi
cle at the vertical sill reinforcement.
Rear lifting point
The lifting point is located on the vertical rein
forcement of the lower sill for the on-board jack
¢fig. 311.
Lifting with vehicle jack
Refer to c> page 359.
,&. WARNING
-To reduce the r isk of serious injury and vehi
cle damage.
- Always lift the vehicle on ly at the special
workshop hoist and floor jack lift points il
l ustrated
c> fig. 310and c>fig. 311.
-Failure to lift the vehicle at these points
could cause the vehicle to tilt or fall from
a lift if there is a change in vehicle weight
Page 375 of 400
CXl CXl .... N ,.__
N .... 0 N > 00
distr ibut ion an d ba lance . This might hap
pen, for exam ple, when heavy compo
nents such as the engine b lock or trans
miss io n are removed.
- When removing heavy components like
t h ese, anc hor vehicle t o hoist o r add corr e
sponding weights to maintain the center of
grav ity. Oth erwise, the ve hicle might ti lt or
s li p off the hois t, causing s eriou s perso na l
lnJUry.
(D Note
- Be awar e of the fo llowing poi nts before lift
i ng t he vehicle:
- The vehicle should never be lifted or
jacked up from underneath the engine oil pan , the transmission housing, the front
or rear axle or the body side members .
This could lead to serious damage.
- To avoid damage to the unde rbody or
chassis frame, a rubber pad must be in
serted between the floor jack and the lift
points.
- Before driv ing over a workshop hoist,
check that the vehicle weight does not
exceed the permissible lifting capacity of
the hoist .
- Before driving over a workshop hoist, en
sure that there is sufficient clearance be
tween the hoist and low parts of the ve
hicle.
Emergency situations
373
Page 376 of 400
Techni cal data
Technical data
Vehicle data
XXXXX XX -X -X X XX XXX XX
®-+ : :::ti/:: XXXXXXXX XX X X X XX XXXX
IYP /l'YP! XXX XXX
XX XXXXXXX XX X X XX
XXX
K W XXX
f,\__J_ I IIJIORl
1
:tr:l~
1
XXXX I XXXX XXX I XX
II. -AlJSliT. / OPTIONS
EOA 7D5 4U B 6XM SS G SR W
2 EH JO Z l lB lAS lBA
3FC 5 MU 7X l
FDA 9G3 OG7 O YH OJF
TL 6 3 KA 8EH UlA X 9B O Z7
lX W
80 3 908 8Z4 02D
7T6 C V7
7KO 4 X3
2K2
3 l4 4 KC 3Y O 413 5 D2
lS A 7GB 0 1A 4GO
XX . X XX X XX X XXXX
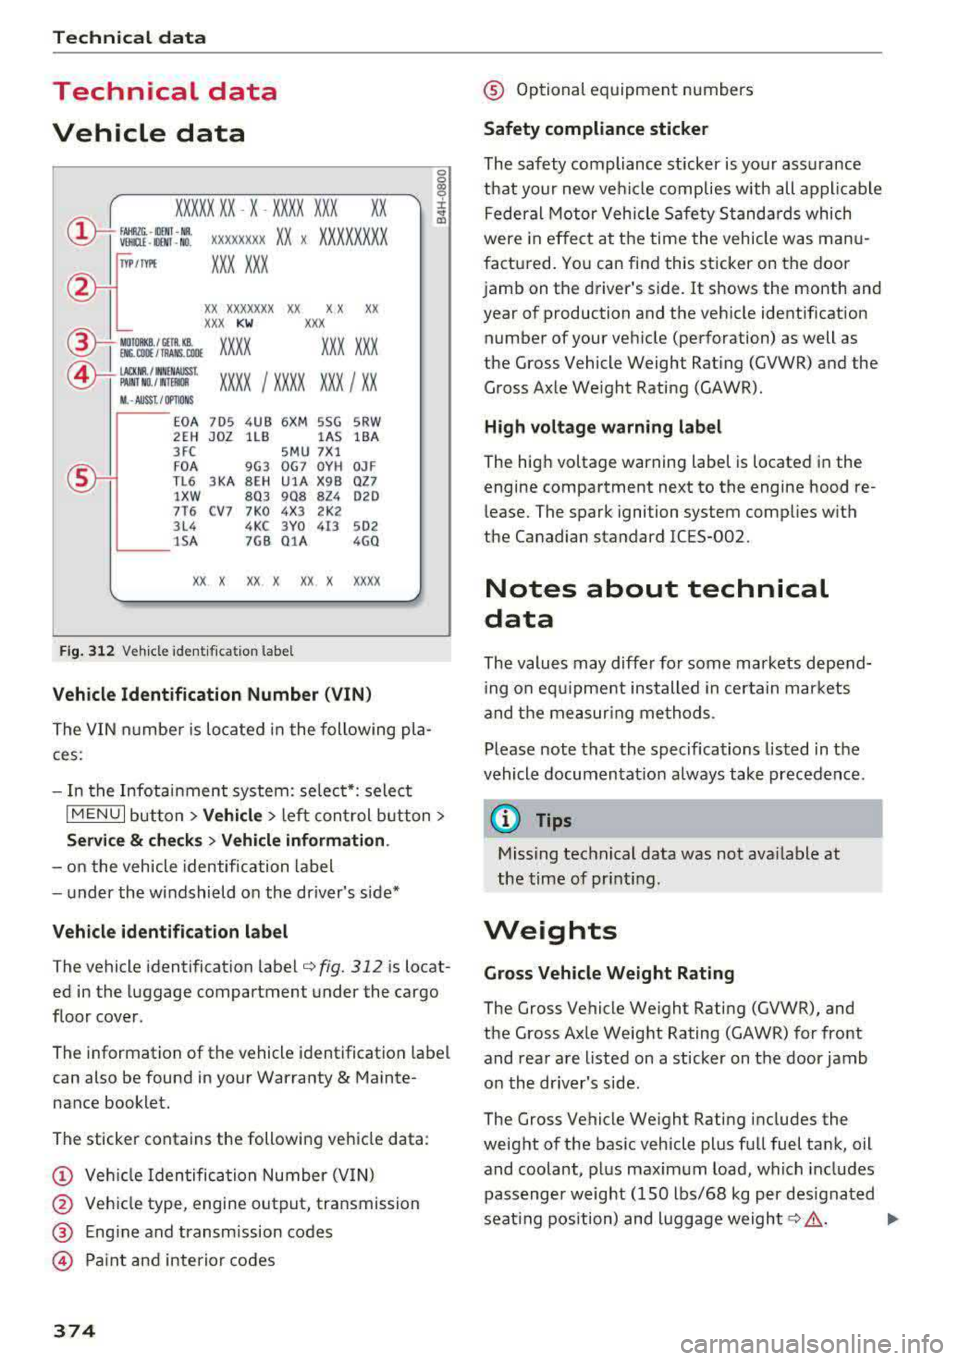
Fig. 312 Veh icl e ident if ic ation labe l
Vehicle Identification Number (VIN )
The VIN numbe r is lo cated i n the following pla
ces :
0
0
~ :x: ... IX)
- In the Infotainment system: selec t*: select
IM ENU I button > Vehicle > left control b utton>
Ser vice & che cks > Vehicl e information .
-on the vehicle identification label
- u nder the windshield on the driver's side*
Vehicle identification label
The vehicle identification label ¢ fig. 312 is locat
ed in the luggage compartment under the cargo
floor cover.
The information of the vehicle identification label
can also be found in your Warranty
& Mainte·
nance booklet.
The sticker contains the following vehicle data :
(D Vehicle Iden tifica tion Number (VIN)
@ Vehicle type, engine output, transmission
@ Eng ine and transm ission codes
@ Pa int and interior codes
374
@ Optional equipment numbers
Safety compliance sticker
The safety compliance sticker is your assurance
that your new vehicle complies with all applicable Federal Motor Veh icle Safety S tandards which
were in ef fect at the time the vehicle was manu
factu red. You can find this sticker on the door
jamb on the driver's side. It shows the month and year of production and the veh icle identification
number of your veh icle (perforation) as well as
the Gross Vehicle Weight Ra ting (GVWR) and the
Gross Axle We ight Rating (GAWR).
H igh volt age warning label
The hig h voltage warn ing label is located in the
engine compartment next to the engine hood
re
lease. The spark ignition system complies w ith
the Canadian s tandard ICES-002.
Notes about technical
data
The values may diffe r for som e markets depend
i ng o n eq uipment installed in certa in mar kets
and the me asur ing me thods .
Please note that the specifica tions listed in the
vehicle documentat ion a lways take precedence .
(D Tips
Missing technical data was not ava ilable at
the time of pr int ing .
Weights
Gross Vehicle Weight Rating
The Gross Vehicle We ight Rating (GVWR), and
the Gross Axle Weig ht Rating (GAWR) for front
and rea r are listed on a sticker on the door jamb
o n the dr iver's side .
The Gross Vehicle We ight Rating includes the
weight of the bas ic vehicle plus full fuel tank, oil
and coolant , plus maximum load, which includes
passenger weight ( 150 lbs/68 kg per des ignated
seat ing pos ition) and luggage
weight ¢& . ..,_
Page 377 of 400
CXl CXl .... N ,.__
N .... 0 N > 00
Gross Axle Weight Rating
The G ross Axle We igh t Rating is the max imum
l oad that can be applied at each axle of the vehi
cle~.& .
Vehicle capacity weight
The vehicle capac ity we ight (max. load) is listed
e ithe r o n the dr iver's side B-pillar o r inside the
f u el fi ller flap.
& WARNING
-T he actual Gross Ax le Weight Rating at the
front and rear axles sho uld not exceed the
permissible weights, and their comb inat ion
must not exceed the Gross Vehicle We ight
Rat ing.
Dimensions
Techn ical data
-Exceeding permissible weight ratings can
res ult in vehicle damage, accidents and per
sonal injury.
(D Note
-T he vehi cle capacity weig ht figu res apply
when the load is d istributed evenly in the
vehicle (passengers and luggage). When
transport ing a heavy load in the luggage
compartment, ca rry the load as near to the
rear axle as possib le so that t he veh icle's
hand ling is no t impaired .
-Do not exceed the maximum perm iss ible
ax le loads or the maximum gross vehicle
we igh t. Always remember that the veh icle's
han dling will be affe cted by the extra load.
Th erefore, adjust your spee d accordingly.
-Always observe local regulations.
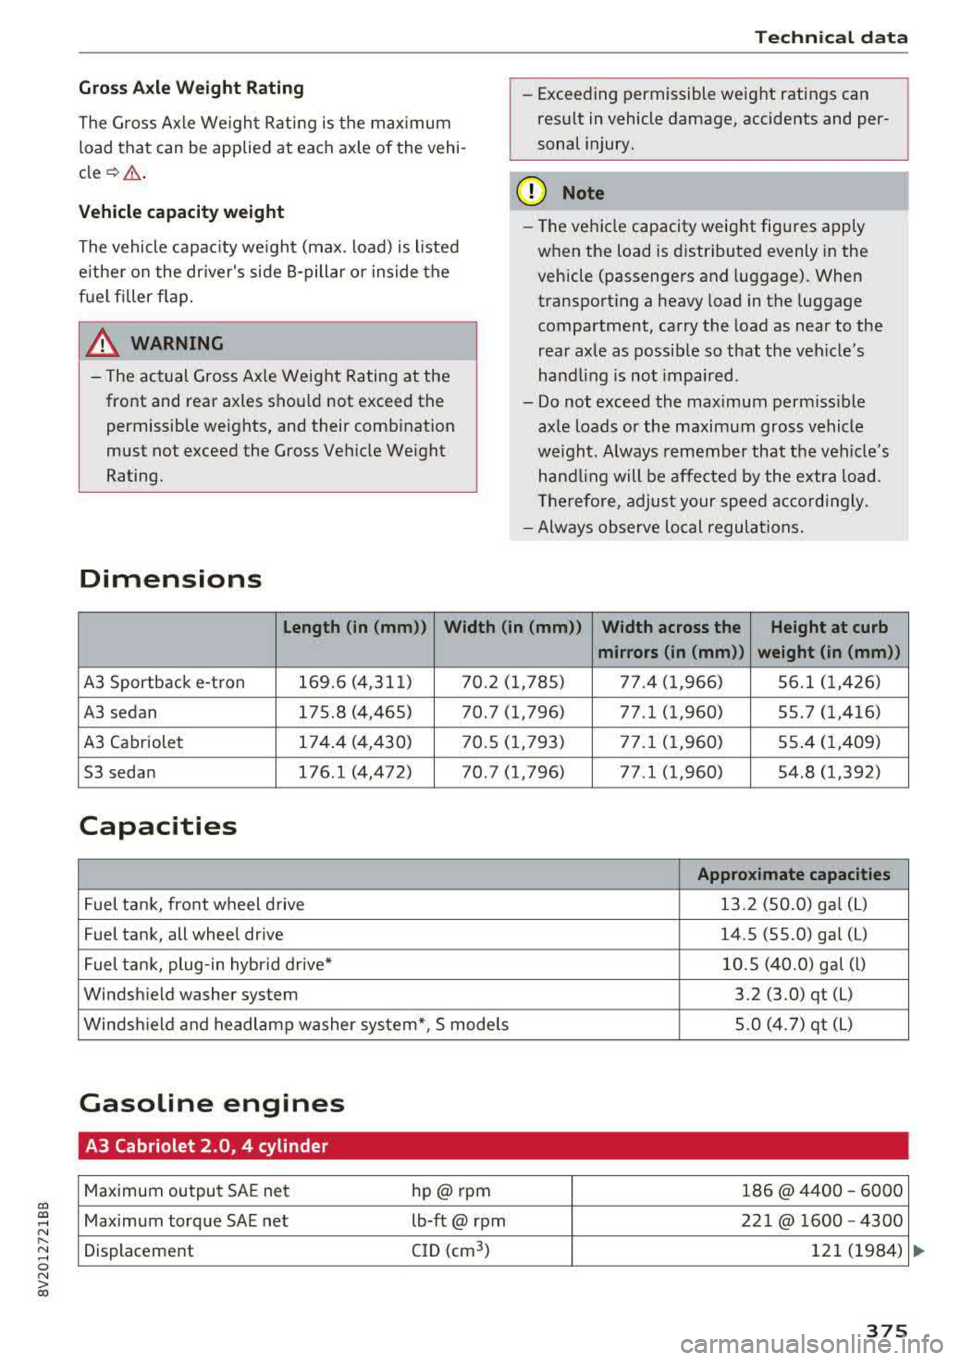
Length (in (mm)) Width (in (mm )) Width across the Height at curb
mirrors (in (mm )) weight (in (mm))
A3 Sportback e-t ron 169.6 (4,31
1) 7 0.2 ( 1,785) 77.4 ( 1,966) 56.1 (1, 426)
A3 sedan 175.8 (4,465) 70.7 (1,796) 77.1 (1,960) 55.7 (1,416)
A3 Cabriole t 174
.4 (4,430) 7 0.5 ( 1,793) 77 .1 ( 1,960) 55.4 ( 1,409)
53 seda n 176.1 (4,472) 70.7 (1,796) 77.1 (1,960) 54 .8 (1,392)
Capacities
Appro ximate capacities
Fuel ta nk, front w heel d rive 13
.2 (50.0) ga l (L )
Fuel tank, all wheel drive 14.S (55.0) gal
(L)
Fuel tank, plug -in hybr id drive* 10
.5 (40.0) g al (l)
Windshield washer system 3.2 (3.0) qt (L)
Winds hield and headlamp washer sys tem*, S mode ls 5.0 (4.7) qt
(L)
Gasoline engines
A3 Cabriolet 2.0, 4 cylinder
Maximum output SA
E net hp@rpnn 186@ 4400 -6000
Maximum torque SAE net lb-ft@ rpm 221@ 1600
-4300
Displacement C
ID (cm
3
) 12 1 (1984)
375
Page 378 of 400
Tech nical data
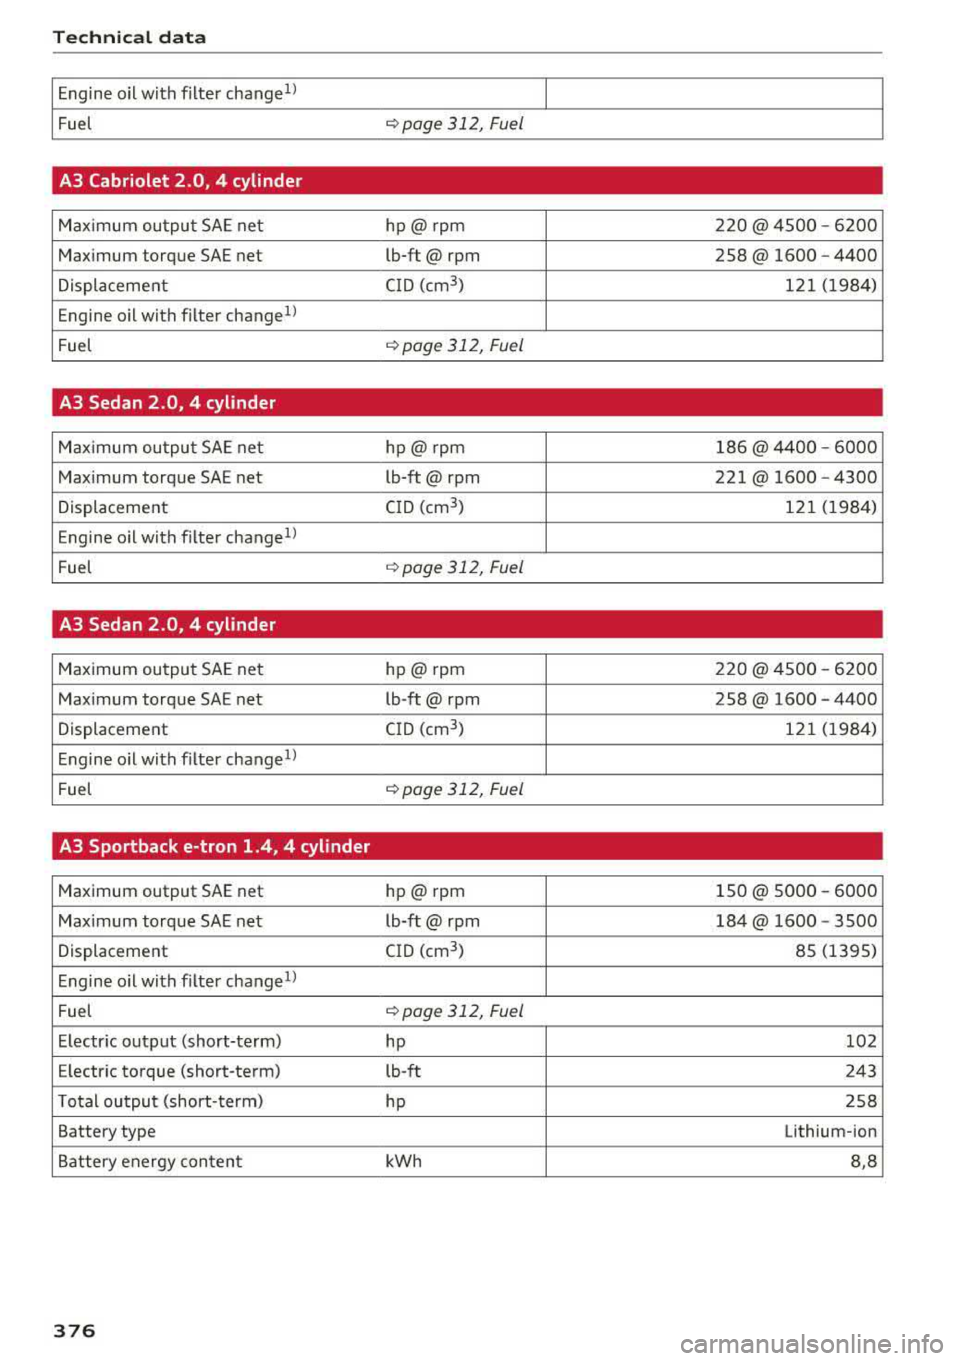
Engine oil with filter change1l I
Fuel <:!)page 312, Fuel
A3 Cabriolet 2.0, 4 cylinder
Maximum output SA E net hp@ rpm 220@ 4500 -6200
Maximum torque SAE net lb-ft@ rpm 258@ 1600
-4400
Displacement C
ID (cm
3
) 12 1 (1984)
Engine oil with f ilter change
1l
Fuel
qpage 312, Fuel
A3 Sedan 2.0, 4 cylinder
Maximum ou tput SA E net hp@ rpm 186@ 44
00 -6000
Maximum torque SAE net lb-ft@ rpm 221@ 1600
-4300
Displacement C
ID (cm
3
) 121 (1984)
Engine oil with f ilter change
1l
Fuel
q page 31 2, Fuel
A3 Sedan 2.0, 4 cylinder
Maximum ou tput SA E ne t hp@ rpm 220@ 4500 -6200
Max imum torque SAE net lb-ft@ rpm 258@ 1600
-4400
Displacement C
ID (cm
3
) 12 1 (1984)
Engine oil with filter change
1l
Fuel
q page 312, Fuel
A3 Sportback e-tron 1.4, 4 cylinder
Maximum output SAE net hp@ rpm 150@ 5000 -6000
Max imum torque SAE net lb-ft@ rpm 184@ 1600
-3500
Displacement CID (cm
3
) 85 (1395)
Engine oil w ith filter
change1l
Fuel qpage 312, Fuel
E lectr ic output (short-term)
hp 1
02
E lectr ic torque (short-term) lb-ft 243
T otal output (short- term) hp 258
Battery type Lithium-ion
Battery energy conten t kWh 8,8
376
Page 379 of 400
CXl CXl .... N ,.__
N .... 0 N > 00
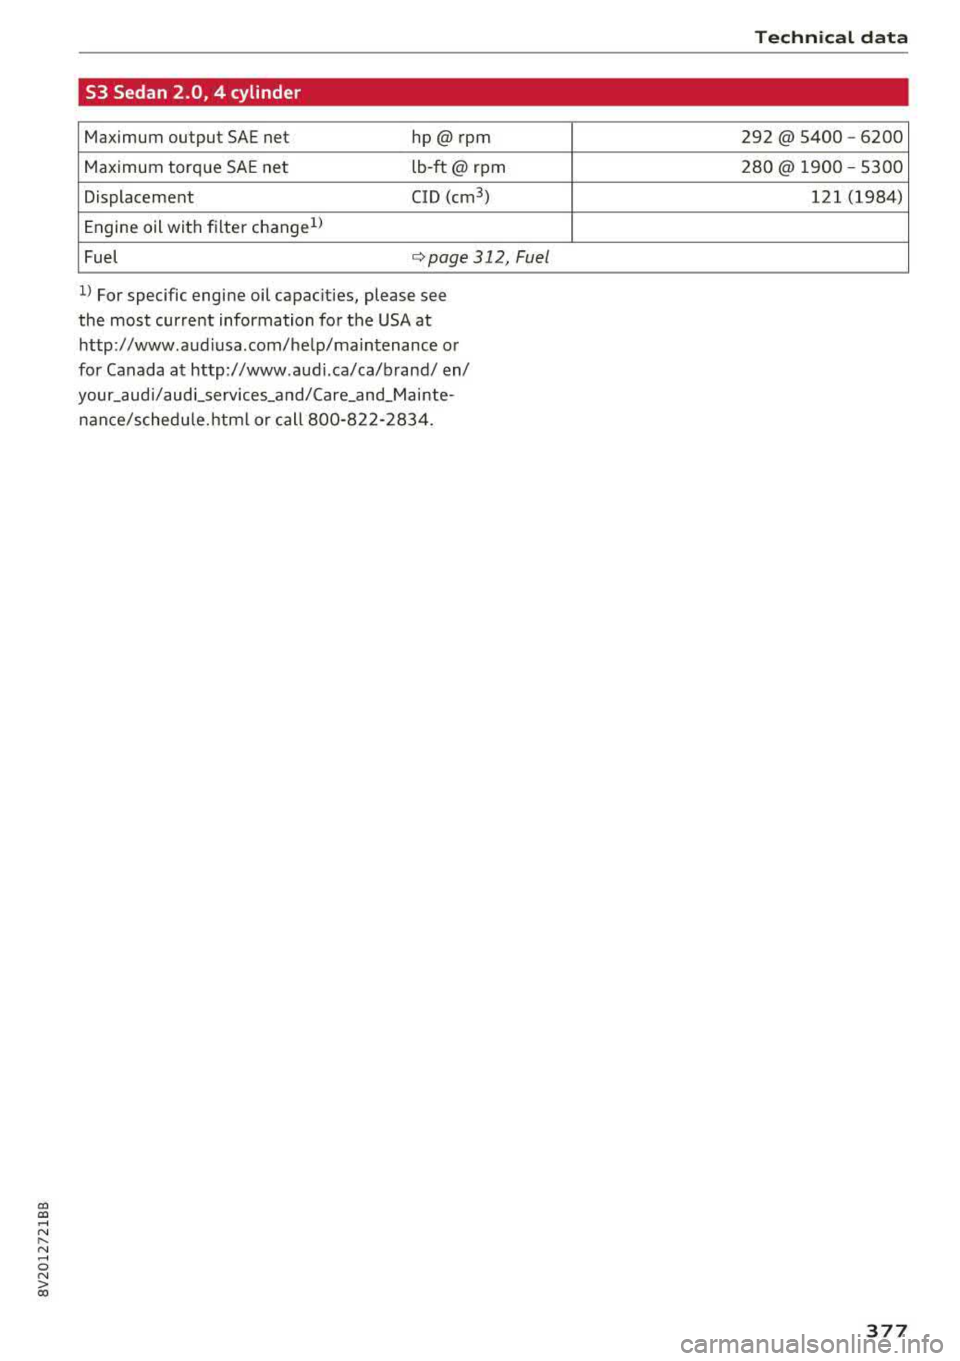
53 Sedan 2.0, 4 cylinder
Maximum output SAE net hp@rpnn
Maximum torque SAE net lb
-ft@ rpm
Displacement CID (cm
3
)
Engine oil with f ilter change1>
Fuel <=> page 312, Fuel
ll For specific engine oil capacities, please see
the most current information for the USA at
http:/ /www.audiusa.com/help/ma intenance or
for Canada at http:/ /www.audi.ca/ca/brand/ en/
your _aud i/ aud i_services_a nd/Ca re_and_M a i nte
na nce/ schedu le.html or call 800-822-2834.
Techn ical dat a
292 @ 5400 -6200
280@ 1900 - S300
121 (1984)
377
Page 380 of 400
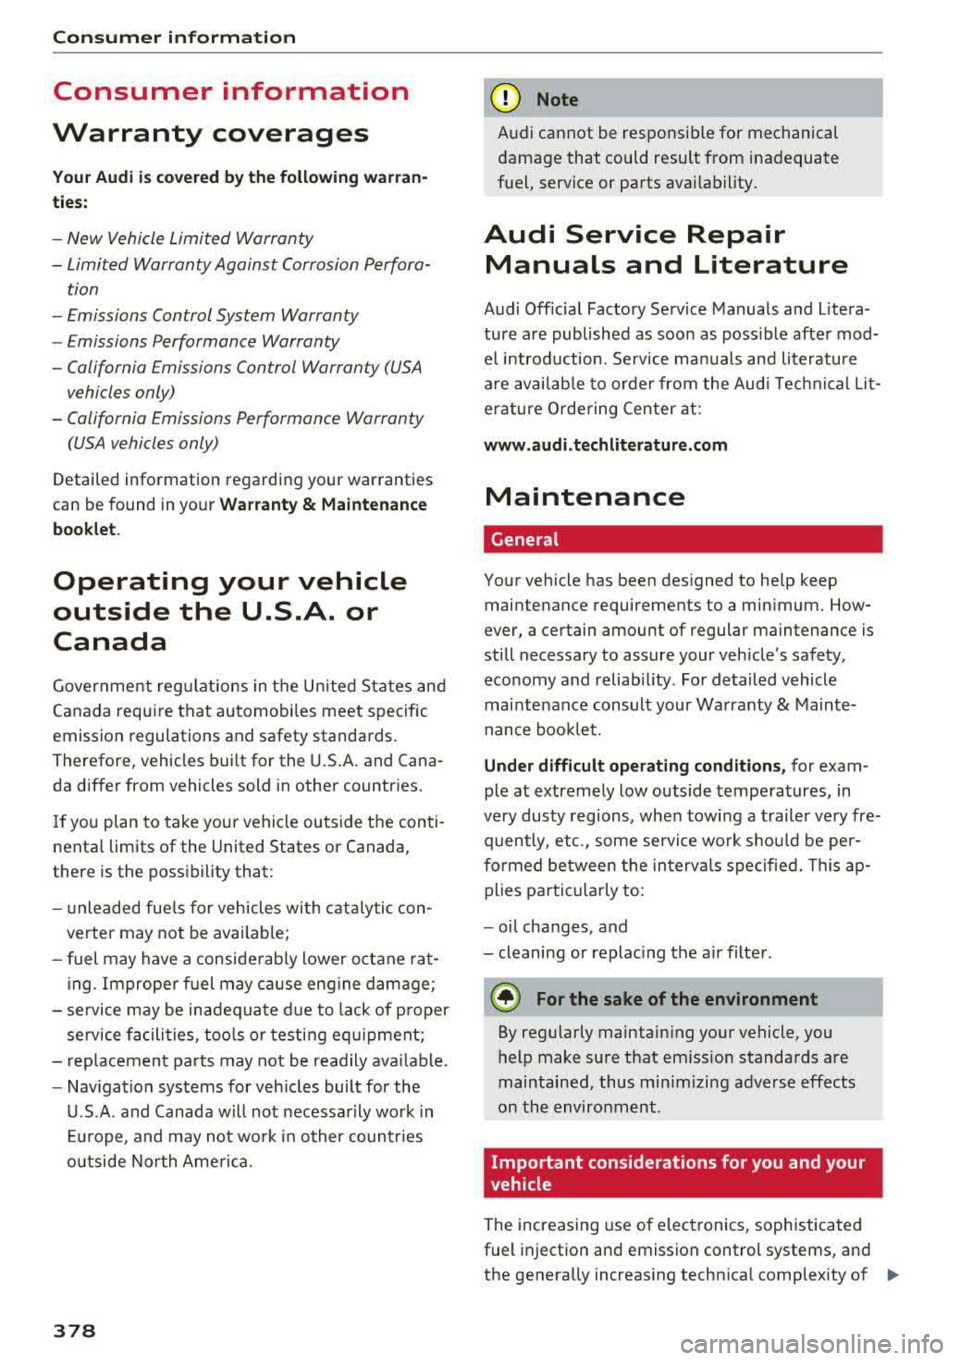
Consumer information
Consumer information
Warranty coverages
Your Audi is covered by the following warran
ties:
- New Vehicle Limited Warranty
- Limited Warranty Against Corrosion Perfora-
tion
- Emissions Control System Warranty
- Emissions Performance Warranty
- California Emissions Control Warranty (USA
vehicles only)
- California Emissions Performance Warranty
(USA vehicles only)
Detailed information regarding your warranties
can be found in your
Warranty & Maintenance
booklet .
Operating your vehicle
outside the U.S.A. or
Canada
Government regulati ons in the United States and
Canada require that automobi les meet specific
emission regulations and safety standards.
Therefore, vehicles built for the U.S.A. and Cana
da differ from vehicles sold in other countries.
If you plan to take your vehicle outside the conti
nenta l limits of the United States or Canada,
there is the poss ibility that:
- un leaded fue ls for vehicles with catalytic con
verter may not be available;
- fuel may have a considerably lower octane rat
ing . Improper fuel may cause engine damage;
- service may be inadequate due to lack of proper
service facilities, tools or testing equipment;
- r eplacement parts may not be readily available.
- Nav igation systems for veh icles built for the
U.S .A . and Canada will not necessarily work in
Europe, and may not work in other countries
outside North America.
378
(D Note
Audi cannot be responsib le for mechanical
damage that could result from inadequate
fuel, service or parts ava ilability.
Audi Service Repair
Manuals and Literature
Audi Official Factory Service Manuals and Litera
ture are published as soon as poss ible after mod
el introduction . Service manuals and literature
are available to order from the Audi Technical Lit
erature Ordering Center at :
www.audi.techliterature .com
Maintenance
General '
Your vehicle has been designed to help keep
maintenance requirements to a minimum. How
ever, a certain amount of regular maintenance is
still necessary to assure your vehicle's safety,
economy and reliability . For detailed vehicle
maintenance consult your Warranty & Mainte
nance booklet .
Under difficult operating conditions, for exam
ple at extremely low outside temperatures, in
very dusty regions, when towing a trailer very fre
quently, etc., some service work should be per
formed between the intervals specified. This ap
plies particularly to:
- oil changes, and
- cleaning or replac ing the a ir filter .
'
@) For the sake of the environment
By regularly maintain ing your vehicle, you
help make sure that em iss ion standards are
maintained, thus minimizing adverse effects
on the environment .
Important considerations for you and your
vehicle
The increasing use of electronics, sophisticated
fuel injection and emission control systems, and
the generally increas ing technica l complexity of
..,_