MMI AUDI A3 SEDAN 2017 Owners Manual
[x] Cancel search | Manufacturer: AUDI, Model Year: 2017, Model line: A3 SEDAN, Model: AUDI A3 SEDAN 2017Pages: 400, PDF Size: 67.32 MB
Page 5 of 400
CXl CXl .... N ,.__
N .... 0 N > 00
Rearview camera . . . . . . . . . . . . . . . . . . . . 148
Adjusting the parking aid . . . . . . . . . . . . . 150
Error messages . . . . . . . . . . . . . . . . . . . . . 150
Intelligent Technology . . . . . . . . . . 151
Electronic Stabilization Control (ESC) . . . . 151
Brakes. .. .. .. ............... .. .... . 153
Electromechanical steering . . . . . . . . . . . . 154
All wheel drive (quattro) . . . . . . . . . . . . . . 154
Energy management . . . . . . . . . . . . . . . . . 155
Notice about data recorded by the Event
Data Recorder and vehicle control
modules . . . . . . . . . . . . . . . . . . . . . . . . . . . 156
Infotainment system . . . . . . . . . . . . 158
Multi Media Interface . . . . . . . . . . . . 158
Traffic safety information . . . . . . . . . . . . . 158
Introduction . . . . . . . . . . . . . . . . . . . . . . . . 158
MMI On/Off knob with joystick function . . 158
Infotainment system display . . . . . . . . . . 159
MMI operation . . . . . . . . . . . . . . . . . . . . . . 159
MMI touch . . . . . . . . . . . . . . . . . . . . . . . . . 161
Control knob with joystick function . . . . . 163
Letter/number speller . . . . . . . . . . . . . . . . 165
Free text search . . . . . . . . . . . . . . . . . . . . . 166
Menus and Symbols . . . . . . . . . . . . . . . . . . 167
Voice recognition system . . . . . . . . 170
Operating . . . . . . . . . . . . . . . . . . . . . . . . . . 169
Command overview information . . . . . . . . 170
Commands . . . . . . . . . . . . . . . . . . . . . . . . . 171
External voice operation 175
Telephone . . . . . . . . . . . . . . . . . . . . . . . . 177
I ntroduction . . . . . . . . . . . . . . . . . . . . . . . . 177
Setup . . . . . . . . . . . . . . . . . . . . . . . . . . . . . 177
Using the te lephone . . . . . . . . . . . . . . . . . 179
Favorites . . . . . . . . . . . . . . . . . . . . . . . . . . . 182
Messages . . . . . . . . . . . . . . . . . . . . . . . . . . 182
Listening to voicemail . . . . . . . . . . . . . . . . 185
Directory . . . . . . . . . . . . . . . . . . . . . . . . . . . 185
Addit ional settings . . . . . . . . . . . . . . . . . . 187
Troubleshoot ing. . . . . . . . . . . . . . . . . . . . . 189
Audi connect (Infotainment) . . . . 190
Introduction . . . . . . . . . . . . . . . . . . . . . . . . 190
Setup . . . . . . . . . . . . . . . . . . . . . . . . . . . . . 190
Configuration through myAudi . . . . . . . . . 190
Table of contents
Opening Audi connect (Infotainment) . . . 191
Audi connect Infotainment services . . . . . 191
Wi-Fi hotspot . . . . . . . . . . . . . . . . . . . . . . . 195
Configuring the data connection. . . . . . . . 195
Audi connect (Infotainment) general
information . . . . . . . . . . . . . . . . . . . . . . . . 196
Troubleshooting . . . . . . . . . . . . . . . . . . . . . 197
Audi connect e-tron services . . . . 198
Introduction ... .. .. ...... ....... .. .. 198
Setup . . . . . . . . . . . . . . . . . . . . . . . . . . . . . 198
T rip data . . . . . . . . . . . . . . . . . . . . . . . . . . . 198
Doors and lights .. ............... .. .. 198
Vehicle status report . . . . . . . . . . . . . . . . . 199
Car Finder . . . . . . . . . . . . . . . . . . . . . . . . . . 199
Charging . . . . . . . . . . . . . . . . . . . . . . . . . . . 199
Temperature control . . . . . . . . . . . . . . . . . 199
Navigation . . . . . . . . . . . . . . . . . . . . . . . . 2 00
Opening navigation . . . . . . . . . . . . . . . . . . 200
Entering a destination . . . . . . . . . . . . . . . . 200
Personal route assistance . . . . . . . . . . . . . 206
Home address . . . . . . . . . . . . . . . . . . . . . . 207
Favorites . . . . . . . . . . . . . . . . . . . . . . . . . . . 207
Directory contacts . . . . . . . . . . . . . . . . . . . 207
Alternative routes . . . . . . . . . . . . . . . . . . . 208
Additional settings . . . . . . . . . . . . . . . . . . 208
Map . . . . . . . . . . . . . . . . . . . . . . . . . . . . . . . 209
Online map display . . . . . . . . . . . . . . . . . . 212
Map update . . . . . . . . . . . . . . . . . . . . . . . . 213
Accessing traffic information . . . . . . . . . . 214
e-tron navigation functions . . . . . . . . . . . . 216
Troubleshooting .. .. ............... .. 216
Radio ............................. 217
Opening the radio . . . . . . . . . . . . . . . . . . . 217
Radio functions . . . . . . . . . . . . . . . . . . . . . 218
Radio menu . . . . . . . . . . . . . . . . . . . . . . . . 220
Presets . . . . . . . . . . . . . . . . . . . . . . . . . . . . 220
Additional settings . . . . . . . . . . . . . . . . . . 221
Troubleshooting .. .. ............. .. .. 221
Media . . . . . . . . . . . . . . . . . . . . . . . . . . . . . 222
Introduction . . . . . . . . . . . . . . . . . . . . . . . . 222
Notes .... .. .. .. .. ............... .. 222
Media drives . . . . . . . . . . . . . . . . . . . . . . . . 223
Bluetooth audio player . . . . . . . . . . . . . . . 225
Wi-Fi audio player . . . . . . . . . . . . . . . . . . . 226
3
Page 6 of 400
Table of content s
Online media and Internet radio . . . . . . . . 227
Mu ltim edia connections . . . . . . . . . . . . . . 228
Playing media . . . . . . . . . . . . . . . . . . . . . . . 230
Addit ional se ttings . . . . . . . . . . . . . . . . . . 233
Supported media and file formats . . . . . . 235
Troubleshoot ing ................. ... . 237
Audi smartphone interface . . . . . . 239
Setup . . . . . . . . . . . . . . . . . . . . . . . . . . . . . 239
Operating . . . . . . . . . . . . . . . . . . . . . . . . . . 240
Troubleshoot ing . . . . . . . . . . . . . . . . . . . . . 240
System settings . . . . . . . . . . . . . . . . . . 241
Sett ing the date and time . . . . . . . . . . . . . 24 1
MMI se ttings . . . . . . . . . . . . . . . . . . . . . . . 241
Con nection ma nager . . . . . . . . . . . . . . . . . 242
System update . . . . . . . . . . . . . . . . . . . . . . 244
Sound settings . .... .. ..... ... .. .. .. .
Volume settings .... .. ..... ... .. .. .. .
Restarting the
MMI . .. ..... ... .. .. .. .
Software license information 2
4 5
245
246
246
Safety first . . . . . . . . . . . . . . . . . . . . . . . 247
Driving safety . . . . . . . . . . . . . . . . . . . . 247
Basics . . . . . . . . . . . . . . . . . . . . . . . . . . . . . 247
Correct passenger seating positions . . . . . 248
Driver 's and front passenger's footwell . . 252
Pedal area . . . . . . . . . . . . . . . . . . . . . . . . . . 252
Sto ring cargo co rrectly . . . . . . . . . . . . . . . 253
R epo rting Safety Defects . . . . . . . . . . . . . . 255
Ac tive rollove r prote ct io n system 256
Safety belts . . . . . . . . . . . . . . . . . . . . . . 258
Gene ral notes . . . . . . . . . . . . . . . . . . . . . . . 258
W hy use safety belts? . . . . . . . . . . . . . . . . 259
Safety belts . . . . . . . . . . . . . . . . . . . . . . . . 262
Belt tensione rs . . . . . . . . . . . . . . . . . . . . . . 265
Airbag system . . . . . . . . . . . . . . . . . . . . 26 7
Important information . . . . . . . . . . . . . . . 267
Front airbags ... ... ... .... ... .. .. .. . 271
Mon itor ing the Advanced Airbag System . 279
K nee airbags . . . . . . . . . . . . . . . . . . . . . . . . 283
4
S ide a irbags . . . . . . . . . . . . . . . . . . . . . . . . 285
Side curtain airbags . . . . . . . . . . . . . . . . . . 288
Child safety . . . . . . . . . . . . . . . . . . . . . . 292
Important information . . . . . . . . . . . . . . . 292
Child safety seats . . . . . . . . . . . . . . . . . . . . 298
Securing child safety seats . . . . . . . . . . . . 303
LATCH system (lower anchorages and
tethers for c hildren) . . . . . . . . . . . . . . . . . 306
Additional informat ion ........ ..... .. 311
Maintenance and Care ........... 312
Checking and Filling . . . . . . . . . . . . . 312
Fuel ......... .... ... ............... 312
Refueling . . . . . . . . . . . . . . . . . . . . . . . . . . 313
Ca talytic conve rter .. .. .. ........... .. 316
Engine compar tment .. ... .......... .. 316
Engine o il . . . . . . . . . . . . . . . . . . . . . . . . . . 3 19
Cooling system . . . . . . . . . . . . . . . . . . . . . . 323
Brake fluid . . . . . . . . . . . . . . . . . . . . . . . . . 325
Battery . . . . . . . . . . . . . . . . . . . . . . . . . . . . 325
Windshie ld washer system . . . . . . . . . . . . 327
Service interva l display 327
Wheels .... .. . ... .. .. ........... .. 328
Wheels and Tires . . . . . . . . . . . . . . . . . . . . 328
Tire pressure monitoring system 344
Care and cleaning . . . . . . . . . . . . . . . . 347
Genera l information . . . . . . . . . . . . . . . . . 347
Car washes . . . . . . . . . . . . . . . . . . . . . . . . . 347
Cleaning and care informat ion . . . . . . . . . 348
Plac ing your vehi cle ou t of serv ice 352
Do It Yourself . . . . . . . . . . . . . . . . . . . . 353
Emergency assistance . . . . . . . . . . . 353
T ru nk escape la tch . . . . . . . . . . . . . . . . . . . 353
Genera l info rmation . . . . . . . . . . . . . . . . . 353
Eq uipment . . . . . . . . . . . . . . . . . . . . . . . . . 353
T ire mobility kit . . . . . . . . . . . . . . . . . . . . . 354
Replacing wheels . . . . . . . . . . . . . . . . . . . . 356
Spare t ire . . . . . . . . . . . . . . . . . . . . . . . . . . 362
Page 15 of 400
a, co .... N
" N .... 0 N > 00
be slightly higher than the actual temperature
outside due to the heat radiating from the en
g ine.
At temperatures below 41 °F (+5 °C), a snowflake
symbol appears in front of the temperature dis
p lay
c::> .&. .
A WARNING
Do not assume the roads are free of ice based
on the outside temperature display. Be aware
that there may be ice on roads even when the
outs ide temperature is around 41 °F (+5 °C)
and that ice can increase the risk of accidents.
Multifunction steering
wheel plus
Operating
A ppl ies to : ve hicl es with Audi virtual cockpit
You con use the multifunction steering wheel
plus to operate the driver information system and the MMI functions, adjust the volume and
switch the voice recognition system on and off
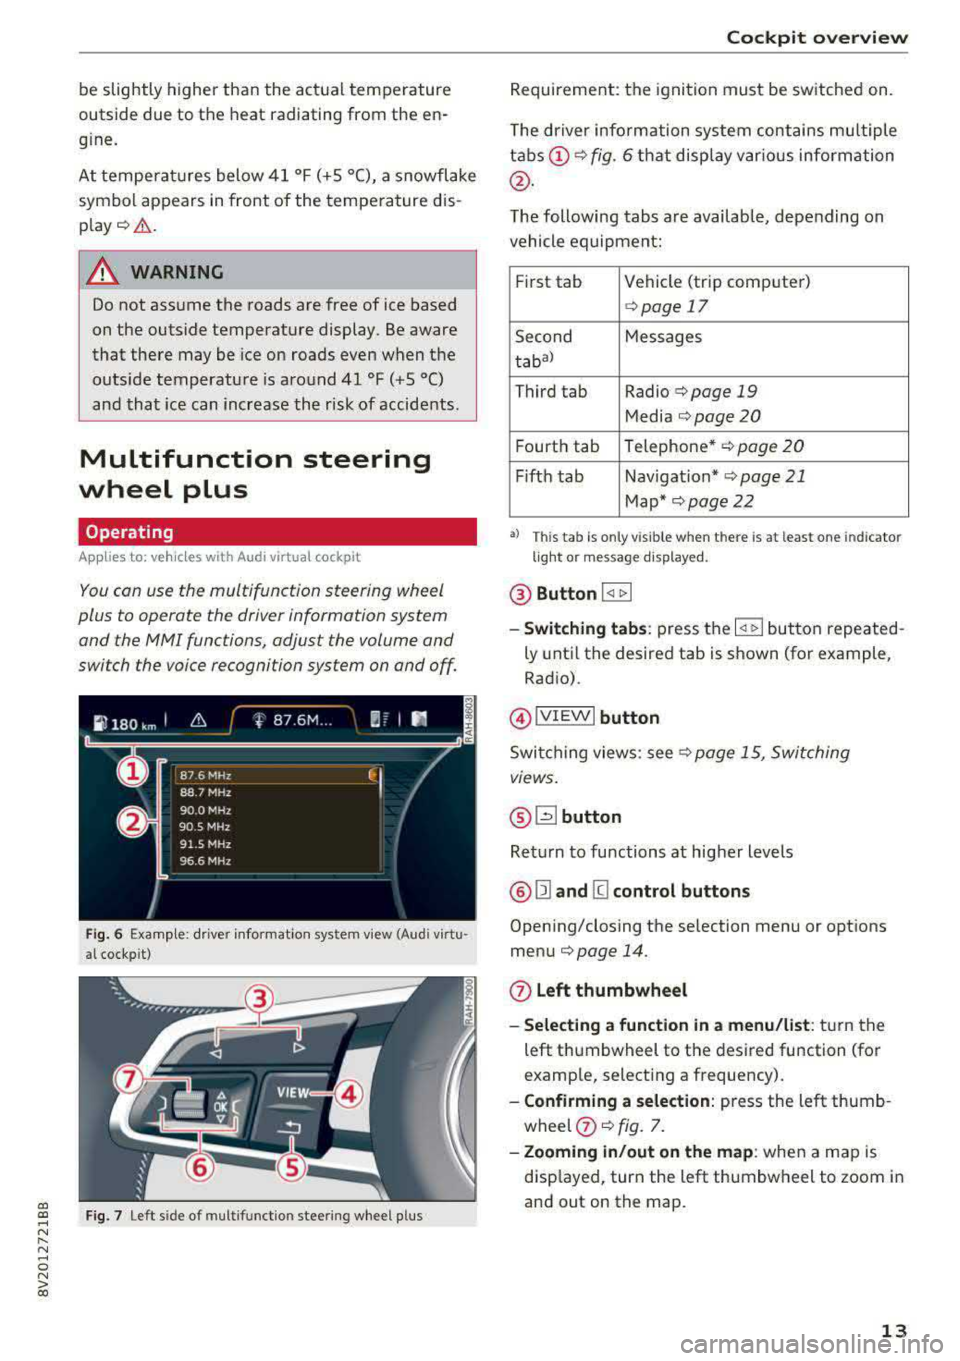
Fig. 6 Example : drive r informat ion system v iew (Aud i virtu ·
al cockp it )
F ig. 7 Le ft sid e of multifunctio n stee ring wheel p lus
Cockpit overview
Requirement: the ignition must be switched on.
The driver information system contains mu ltiple
tabs (!) c::> fig. 6 that display var ious information
@ .
The following tabs are available, depending on
vehicle equipment:
First tab Vehicle (trip computer)
c::> page 17
Second Messages
tabal
Third tab Radio c::>page 19
Media c::> page 20
Fourth tab Telephone* c::> page
20
Fifth tab Navigation* c::> page 21
Map* c::> page 22
•> This tab is only v is ible when t here is at leas t on e indi ca to r
light or mes sage displayed .
@ Button I
-Switching tabs: press the I
ly until the desired tab is shown (for example,
Radio).
@ !VIEWI button
Switching views: see c::> page 15, Switching
views.
@ ~button
Return to functions at higher levels
@ 121 and [g control buttons
Opening/closing the selection menu or options
menu
c::> page 14.
0 Left thumbwheel
- Selecting a function in a menu/list : turn the
left thumbwheel to the desired function (for
examp le, selecting a frequency).
- Confirming a selection: press the left thumb
wheel
(j) c::> fig. 7.
- Zooming in/out on the map : when a map is
disp layed, turn the left thumbwheel to zoom in
and out on the map.
13
Page 18 of 400
Cockpit overview
-Muting or pausing: turn the right thumbwheel
down.
Or : press the right thumbwheel.
-Unmuting or resuming: turn the right thumb
whee l up .
Or: press the right thumbwheel.
@ l1<1
-Selecting the previous/next track or station:
press the l1<1<1! or lt>~ I button.
-Fast forwarding /rewinding audio files : press
and hold the
! 1«1 1 or lt>t> ll button until the desired
location in the file is reached.
@m button / steering wheel heating [ii
-Steering wheel heating*: For additional infor
mation, see ¢
page 73.
-Programmable steering wheel button -open
ing a function :
press the@ button on the mul
tifunction steer ing wheel.
-Programmable steering wheel button -re
questing a function :
press and hold the@ but
ton .
-Programmable steering wheel button -chang
ing a function :
Select in the Infotainment sys
tem:
I MENU I button > Vehicle > left cont rol
button >
Vehicle settings > Steering wheel
button assignment.
@ l~"· I button
-Repeating the last navigat ion prompt : press
the
1 ~ .. v l button when route guidance is act ive.
-Changing the voice guidance volume: when
route g uidance is active, turn the right thumb
wheel upward or downward during a navigation prompt.
16
Multifunction steering
wheel
Operating
Applies to: vehicles with analog instrument cluster
With the multifunction steering wheel , you can
operate the driver information system as well as
the
MMI functions and you can also adjust the
volume.
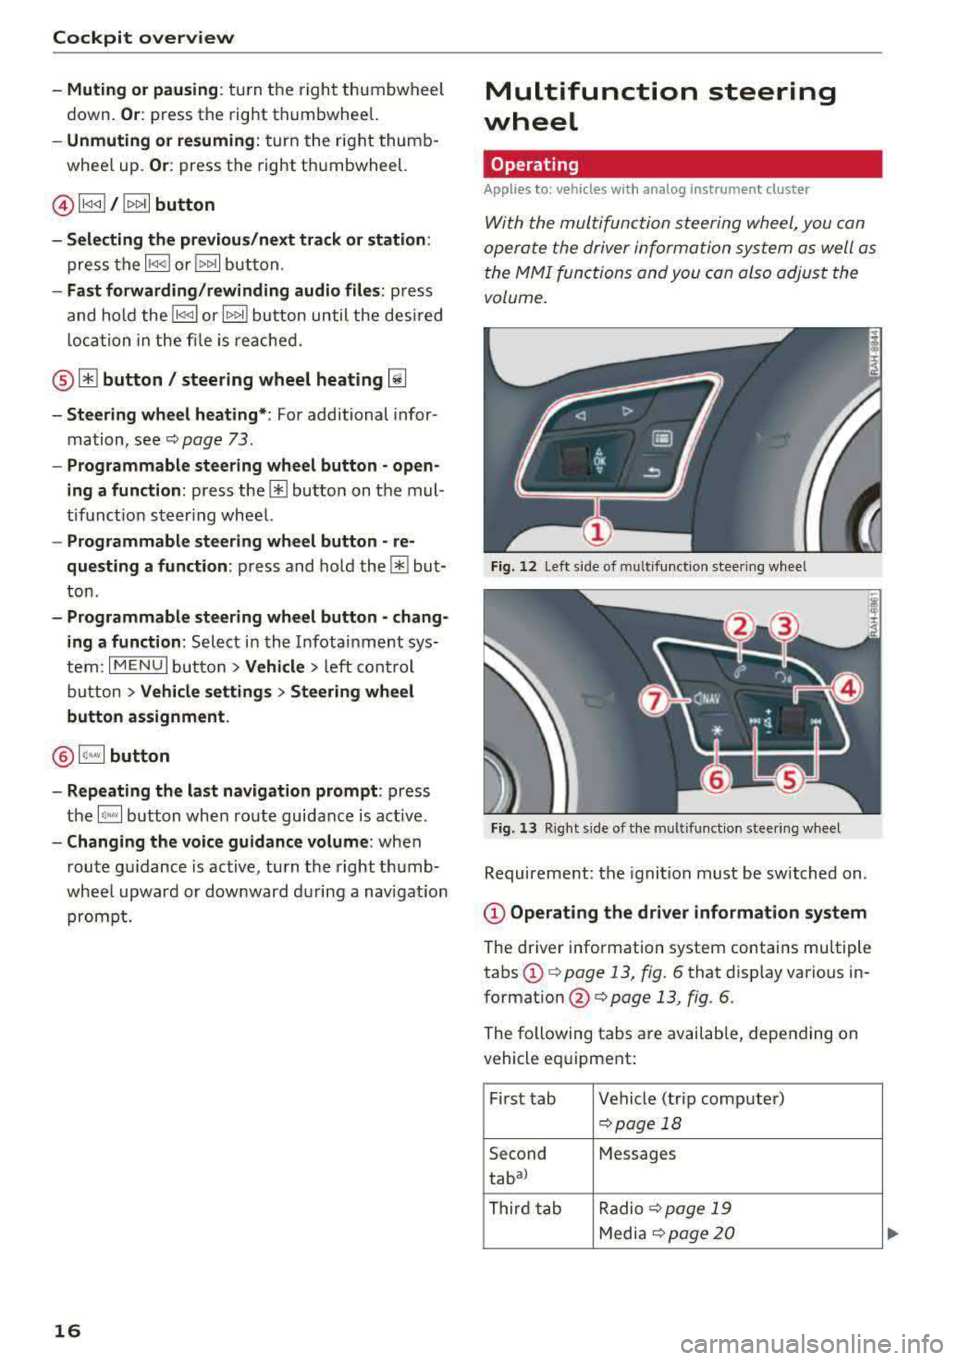
Fig. 12 L eft s ide of multifun ction stee ring wheel
Fig. 13 Right s ide of the multifunct ion steer ing wheel
Requirement : the ignition must be switched on .
@Operating the driver information system
The driver information system contains mu ltiple
tabs
(D q page 13, fig. 6 that display various in
formation
@ c> page 13, fig. 6.
The following tabs a re available, depending on
vehicle equipment:
First tab Vehicle (tr ip computer)
c>page 18
Second Messages
tabal
Third tab Radio c>
page 19
Media ¢ page 20
Page 22 of 400
Cockpit overview
-Selecting a station from the presets li st* : se
l ect :
Presets > the desired radio station.
-Selecting a station from the station list* : se
l ect and co nfirm a radio station.
-Selecting a station from the favorites list : se
lect :
Preset s> the desired radio station.
-Opening a media source : select an d co nfirm
Switch to media .
Additional settings
Applies to: vehicles with Aud i v irtual cockp it
-Se lect: rig ht contro l bu tton > desired entry .
Depending on the function selected, the follow
i n g addit io nal settings may be poss ible:
-Show "Now Playing " screen : see c:!) page 221.
Media
Requir ement: a media dr ive m ust conta in a udio/
video fi les
¢ page 223 and the radio/media tab
m ust be displayed .
~ Press either the @lbutton or the left cont rol
button ¢ page 14, depend ing on ve hicle eq uip
ment .
Depending on vehicle equipment, the following
f u nctions may be availab le in the d river in fo rma
tion system.
-Selecting a media source : select and confi rm a
source such as the
"SO car d".
-Playing an audio/video file : selec t and conf irm
a track/file.
-Pau sing/resuming playback: p ress the r ight
th umbwheel @¢page 15, fig . 11. To resume
p layback, p ress the r ight thum bw heel again.
-Restarting playback of an audio file : select the
file that is currently playing, if necessary . Press
the left th umbwhee l.
Applies to: vehicles with analog instrument cluster
-Switching to radio: select and confirm a fre
quen cy band (such as
FM ).
App lies to: vehicles with Aud i v irtual cockp it
-Switching to the radio : select and confirm
Switch to radio .
-Opening additional track information: select:
rig ht cont ro l button
> Show "Now Playing"
20
screen . Fo r additiona l informa tion, see
¢ page 233.
(D Tips
-Th e me dia dr ives d o no t pla y files that a re
protec te d by ORM and that are i dent ified
with the symbol
1'.D .
-Ple ase note th at within a medi a source in
t h e drive r informat io n system, only p lay lists
t h at were selected thro ugh the MMI control
p ane l can be
p layed <=> page 231 .
-Al wa ys pay attent io n to the I nfot ainme nt
system display. Addi tional ope ration
throug h the MMI control pane l may be nec
essary, depending on the se lected function.
Telephone
Applies to: vehicles with telephone
Requireme nt: a cell phone must be connected to
t he M MI
<=> page 177 and the te lep hon e tab
mus t be displ ayed .
~ Press either the @lbutton or the left control
but ton
<=> p ag e l4, dep en ding on vehicle equip
m ent .
Depend ing on veh icle equipment , the following
funct io ns may be ava ila ble in the dr ive r informa
t ion sys tem .
-Accessing a contact : select and con firm Call
list / Favorites / Directory .
Select and confirm
a contact.
-Directory contacts : the driver information sys
tem only d isplays d irecto ry contacts that have a
phone number sto red. If s eve ral ph one num
bers a re stored wi th a con tact , the list of sto re d
numb ers is dis play ed first w he n the e ntry is se
le cted. For more inform ation a bout the dis
pl aye d sy mbols , refe r to
<=> page 185.
-Recent calls : the recen t ca lls list contains a ll in
c oming, outg oi ng and mis se d ca lls.
-Caller information *: the name, pho ne numb er
or Unknown ap pea rs in t he dr iver in form ation
syste m displ ay depe nding on whe ther the calle r
h as bee n sto red in t he di rec tory an d if th e
phone number has bee n transmitted.
Functions during an incoming call II>-
Page 23 of 400
CXl CXl .... N ,.__
N .... 0 N > 00
-Accepting a call : press the left thumbwheel
when there is an incoming ca ll.
-D eclining a call: select and confirm Declin e
when there is an incoming call.
-Ending a phone call : select and confi rm End
call .
Funct ion s du ring a phon e ca ll
Applies to: ve hicles with analog instrument clus ter
-Making an addition al call : select Hold > ~
button > Directo ry or C all list > an entry in the
list.
- Ac cepting an incom ing call when there is an
act ive call and a call on hold :
select and con
firm
Replace . The active call is replaced with
the incoming call.
Applies to: vehicles with Audi virtual cockpit
-Making an additional call : selec t: Hold call >
le ft control b utton > Director y or Call list > an
entry .
-Acc epting an inc oming call when there i s an
acti ve call and a call on hold :
select and con
firm
An sw er. The active call is replaced with the
incoming call.
Addit ional functions incl ude:
Mute : if you se lect and co nfirm this function , the
o ther pe rson on the phone cannot hear yo u. You
can hea r the other person.
Holding or r esumin g a call : you can put an ex ist
i ng phone call o n hold and resume it .
S w ap call : you can alternate between two phone
calls at the same time . One of the calls w ill be on
hold.
End call ends the active phone call. A call
that was placed on hold stays on ho ld a nd can be
taken off hold with
Re sume .
Confe rence call :
a call on hold and up to five ac
tive parties (depending on the cell phone service p rovider) can be added to a conference ca ll. To
make an addit ional call, put all pa rti ci pants in
the curren t confe rence ca ll on ho ld using
Hold .
By pressing the left contro l button, yo u can make
additional calls from the directory or the call list.
Re sume takes all parties off ho ld .
Coc kpit o ve rv iew
{!) Tips
-The telephone functions can on ly be con
trolled with the multif unction steering
wheel if the telephone equipment was in
stalled
at the factory.
- The telephone functions depend on the cell phone and whether they are supported by
your cell phone service provider or not.
- The
Call waiting function must be act ivated
in your cell phone and in the MMI to be
alerted when there is an incoming call dur
ing an act ive call. The call options depend
on the cell phone and se rvice provide r. You
can obta in mo re information from your cell
phone serv ice provider.
Navigation
Applies to: vehicles wi th naviga tion system
Requirement: the navigation tab must be dis
played.
If you have not star ted rou te guidance, a com
pass will disp lay in the drive r information sys
tem. The map is displayed in the Audi v irtual
cockpit *.
.,. Press eithe r the ~ button o r the left contro l
but ton
q page 14, depending on vehicle equip
ment .
Depend ing on veh icle equ ipment, the followi ng
funct ions may be ava ilable i n the dr iver informa
t ion system.
-A ccessing last d estinations : select and confirm
Last destinations > the desired destination.
-Accessing favorites ": select and confirm F av or
ite s>
the desired destination.
Applies to: vehicles with analog instru men t cluster
-Showing na vigation when route guidance is
a cti ve :
select and confirm Route gu idance .
-Showing compas s when route guidance is not
a ctive:
select and confirm Compass .
- Starting route guidance to the stored home
add re ss :
if necessary, first select and confirm
Stop route guidance and then Fav orite s >
Home a ddre ss .
- Canceling act ive route guidan ce :
se lect and
confirm
Stop route guidance .
21
Page 25 of 400
a, a, ..... N
" N .... 0 N > 00
of the street name, you should turn onto the
street shown .
® Direction arrow for the upcoming maneuver
@ La ne recommendat ion
(J) A bar graph appears when a direction arrow
is displayed. The fewer bars are shown, the
shorter the distance is until the turn .
The fo llowing functions are also available when
route guidance is active:
- Repeating the last navigation prompt: press
the~ button.
-Changing the voice guidance volume : turn the
right thumbwheel up or down during voice
guidance.
A WARNING
The route calc ulated by the navigation system
is a recommendation for reaching your desti
nation. Obey traffic lights, stopping restric
tions, one-way streets, lane change restr ic
tions, etc.
{!) Tips
-Also refer to the chapter ¢ page 8, Controls
at a glance
- An exclamation point" !" in front of the
street name indicates that the informat ion
about this street or this section of the route
i s not complete in the navigation data con
tained in the MMI. Obey traffic laws in one
way streets and pedestrian zones.
On Board Diagnostic
System (OBD)
Malfunction indicator lamp (MIL)
The malfunction indicator lamp (MIL) ¢4 in the
in strument cluster is part of the On Board Diag
n ostic System (080 II).
The indicator light turns on when the ign ition is
switched on and turns off once the engine is
started and is running in idle at a stab le speed.
This indicates that the MIL is functioning correct
l y .
Cockpit overview
If the light does not turn off after starting the
engine
or turns on while driving, this may indi
cate there is a malfunction in the engine.
If the
indicator turns on, the cata lytic converter may be
damaged .
Drive
with reduced engine performance (avoid
high speeds for extended periods of time and/or
fast acceleration) and have the malfunction cor
rected . See an authorized Audi dealer or author
ized Audi Service Facility.
The electronic speed limiter may be fau lty if the
indicator light turns on. For additional informa
tion, see
Q page 23 .
The MIL may also turn on if the fuel filler cap is
not closed correctly
Q page 314.
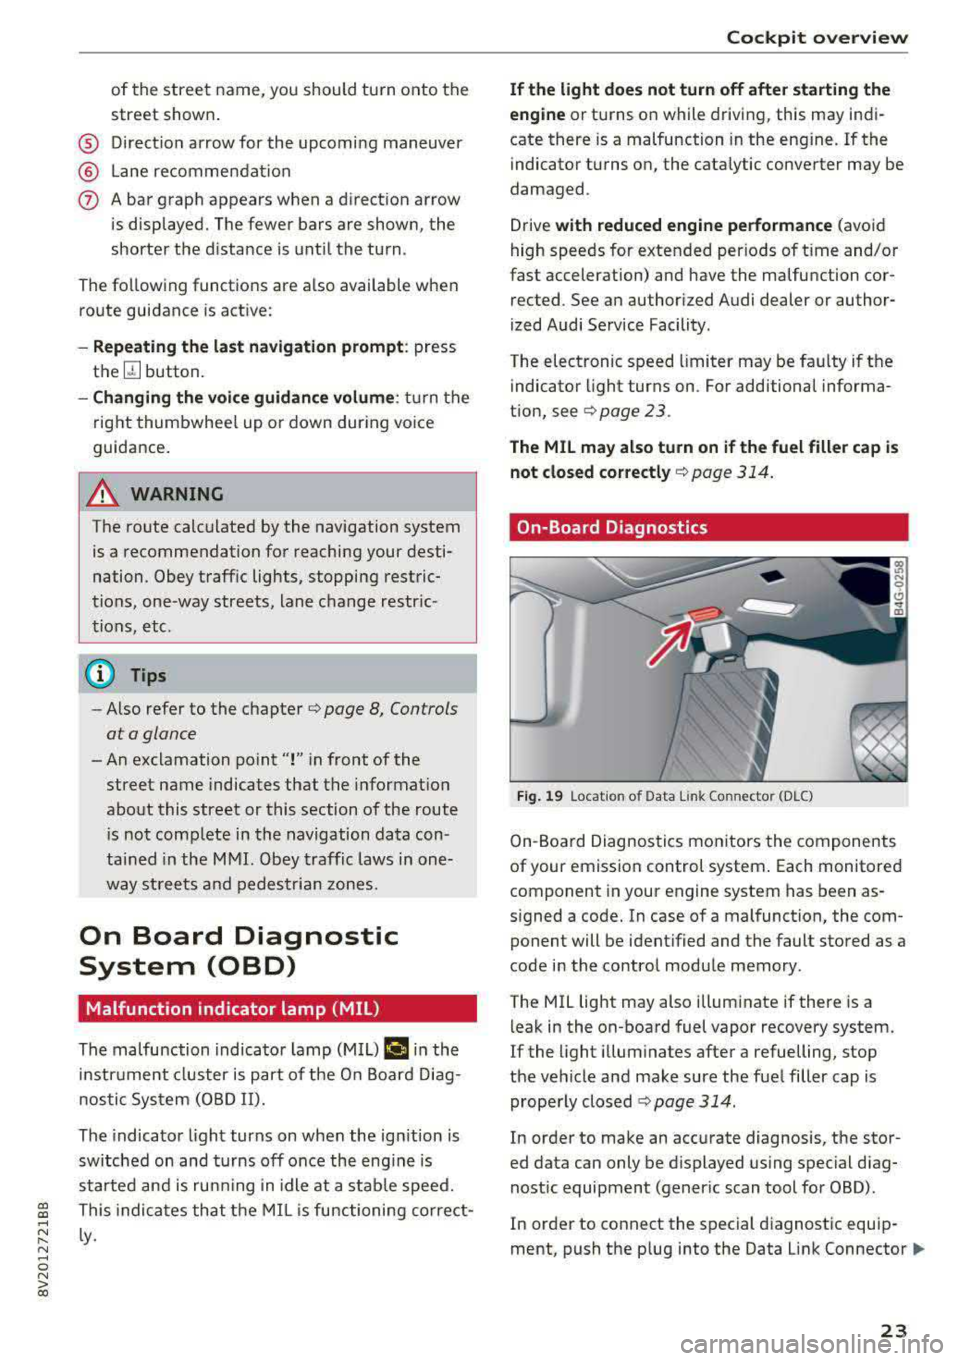
On-Board Diagnostics
Fig. 19 Locat ion of Data Link Co nnector (D LC)
On-Boa rd Diagnostics monitors the components
of your emission control system . Each monitored
component in your engine system has been as
signed a code. In case of a malfunction, the com ponent will be identified and the fault stored as a
code in the control module memory .
The MIL light may also illuminate if there is a
leak in the on-board fuel vapor recovery system.
If the light illuminates after a refuelling, stop
the vehicle and make sure the fuel filler cap is properly closed
¢ page 314.
In order to make an accurate diagnosis, the stor
ed data can only be displayed using special diag
nostic equipment (generic scan tool for 080) .
In order to connect the special diagnostic equip
ment, push the plug into the Data Link
Connector .,.
23
Page 38 of 400
Opening and closing
@ Tips
The replacement battery must meet the same
specifications as the orig inal battery in the re
mote control key.
Synchronizing the remote control key
The remote control key must be synchronized if
the vehicle does not lock/unlock with the remote
control.
• Press the remote control key button [@].
• Insert the key in the driver's door lock within 30
seconds¢
page 38 .
• Press the !ill button or~ button.
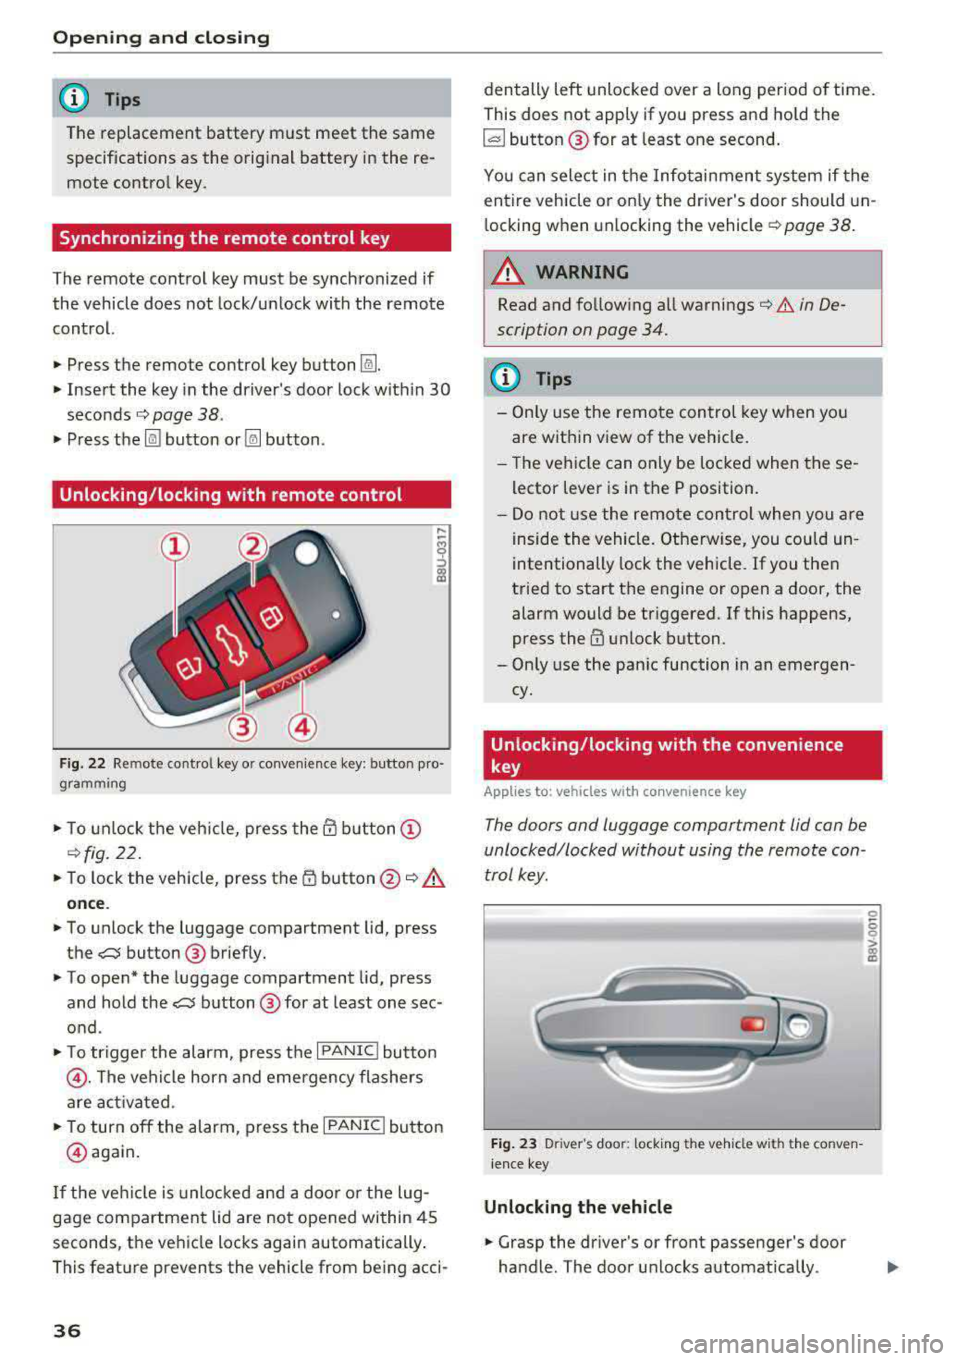
Unlocking /locking with remote control
Fig . 22 Remote contro l key or conven ience key: button pro
gramming
• To unlock the vehicle, press the @ button @
¢fig. 22.
• To lock the vehicle, press the 1D button @~.&.
once .
• To unlock the luggage compartment lid, press
the
,c::j button @ briefly.
• To open* the luggage compartment lid, press
and hold the
,c::j button @ for at least one sec
ond .
• To tr igger the alarm, press the I PANIC I button
@ . The vehicle horn and emergency flashers
are activated .
• To turn off the alarm, press the I PANIC ! button
@ aga in.
If the vehicl e is unlocked and a door o r the lug
gage compartment lid are not opened within 45
seconds, the vehicle locks again automatically .
This feat ure prevents the vehicle from being acci-
36
den tally left unlocked over a long period of time.
This does not apply if you press and hold the
~button ® for at least one second.
You can select in the Infotainmen t system if the
entire vehicle or on ly the driver's door should un
l ocking when unlocking the vehicle ¢
page 38.
A WARNING
Read and fo llowing all warnings¢ .& in De
scription on page 34.
(D Tips
-Only use the remote control key when you
are within view of the veh icle.
-Th e vehicle can only be locked when the se
lector lever is in the P position.
- Do not use the remote control when you are
inside the vehicle. Otherwise, you could un
intentionally lock the vehicle. If you then
tried to start the engine or open a door, the
alarm would be triggered. If this happens,
press
the@ unlock button.
-Only use the panic function in an emergen
cy.
Unlocking /locking with the convenience
key
App lies to: vehicles wit h co nvenience key
The doors and luggage compartment lid can be
unlocked/locked without using the remote con
trol key.
Fig. 23 Driver's door: lock ing t he ve hicle w ith th e conve n
i ence key
Unlocking the vehicle
• Grasp the driver's or front passenger's door
handle. The door unlocks automatically .
-
0
6
I
Page 56 of 400
Lights and Vision
The emergency flashers makes other drivers
aware of your veh icle in dangerous situations.
• P ress t h e ~ button to switch the eme rgency
f lashers on o r off.
You can indicate a lane change or a tu rn when the
emergency flas hers are sw itched on by using the
tur n sig nal lever. The emergency flashers stop
tempo rarily .
The emergency flashers also work when the igni
tion is turned off.
Interior lighting
Front interior lighting
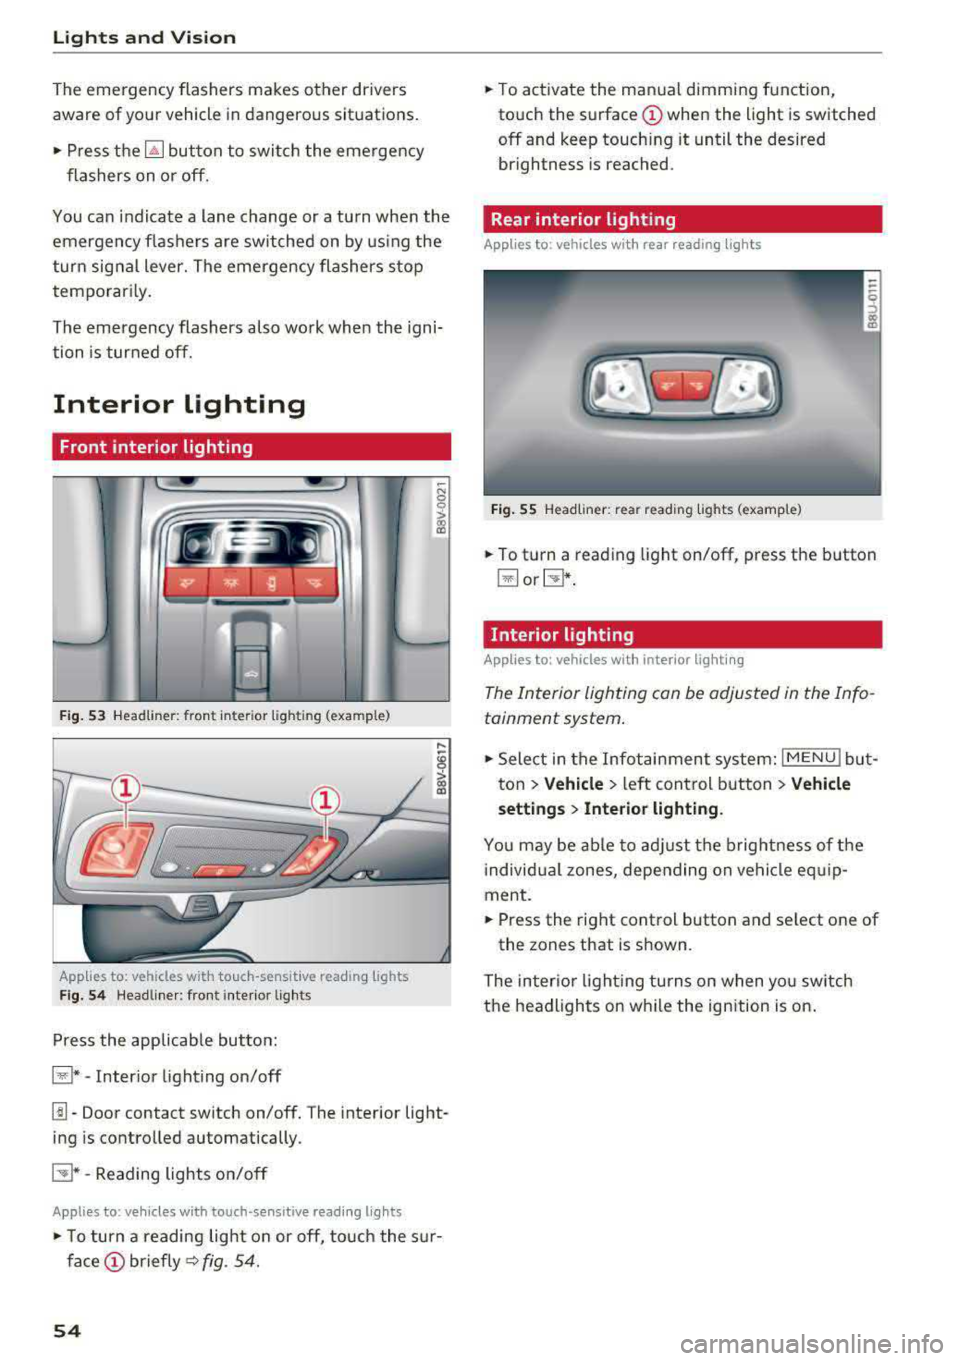
F ig. 53 Headli ner : fr on t in te ri or l ig htin g (exa mple )
Applie,s to: vehicles with touch -sensitive reading lights
Fig . 5 4 Headli ner: fro nt i nte rior lig hts
Press the app licab le bu tton:
@ * -Inter ior light ing on/off
~ N 0
0
> ~
l!I -Door contact switch on/off. The interior light
ing is controlled automatically.
E:!J* -Reading lights o n/o ff
Applies to: vehicles with touch-sensitive reading lights
• T o turn a reading lig ht on or off, to uch the s ur
face (!) briefly ~ fig. 54.
54
• To activate the man ua l dimming function,
to uch the
surface (!) when the light is switched
off and keep touch ing it until the desired
brightness is reached.
Rear interior lighting
Applies to : vehicles with rear reading lights
Fig. 55 Headliner : re ar reading lig hts ( example)
• To t urn a reading light on/off , press the b utton
@ or~ .
Interior lighting
Applies to: vehicles with interior lighting
The Interior lighting can be adjusted in the Info
tainment system .
• Select in the Infotainment system : IMENU! but
t on
> Vehicle > left control b utton > Vehicle
setting s
> Interior lighting.
You may be ab le to ad just the b rig htness of t he
i ndivid ua l zones, depending on ve hicle eq uip
ment .
• Press the right cont rol button and se lect one of
the zones that is shown .
The inter io r li ght ing turns o n when yo u sw itch
t h e headlights on w hile the ignition is on .
Page 58 of 400
Lights and Vision
hand because this would impair the func
tion of the mirror mechanism.
- Applies to vehicles without power folding
exterior mirrors: if the mirror housing was
moved by outside forces (such as an impact
when maneuvering), you must move it back in place by hand.
- If you wash the vehicle in an automatic car
wash, you must fold the exterior mirrors in
to reduce the risk of damage to the mirrors.
Never fold power folding exterior mirrors*
by hand. Only fold them in and out using
the power controls.
(D) Tips
If the power adjustment fails, both mirrors
can be adjusted by hand by pressing on the
edge of the mirror surface.
Dimming the mirrors
Your vehicle is equipped with a manual or auto
matic* dimming rearview mirror .
Manual dimming rearview mirror
• Pull the lever on the bottom of the mirror back .
Automatic dimming mirrors*
• The interior and exterior mirrors dim automati
cally when light shines on them, for example
from headlights on a vehicle behind you.
& WARNING
Applies to: vehicles with automatic dimming rearview
mirror
Electrolyte fluid can leak out from broken
mirror glass. This liquid can irritate the skin,
eyes and respiratory system. If there is con
tact with the fluid, flush immediately with
plenty of water . Consult a physician if neces
sary.
- Repeated or long-term exposure to electro
lyte fluid can lead to irritation of the air
ways, especially in people with asthma or
other respiratory conditions. Take deep
breaths immediately after leaving the vehi
cle or, if this is not possible, open all of the
doors and windows as wide as possible.
56
-
- If electrolyte fluid enters the eyes, flush
them thoroughly with a large amount of clean water for at least 15 minutes and then
seek medical attention.
- If electrolyte fluid comes into contact with
the skin, flush the affected area with clean
water for at least 15 minutes and then clean
with soap and water and seek medical at
tention. Clean affected clothing and shoes
thoroughly before wearing again.
- If the fluid was swallowed and the person is
conscious, flush the mouth with water for at
least 15 minutes. Do not induce vomiting
unless this is recommended by medical pro
fessionals. Seek medical attention immedi
ately.
(D Note
Applies to: vehicles with automatic dimming rearview
mirror
Electrolyte fluid can leak out from broken
mirror glass. This liquid damages plastic sur
faces. Clean this liquid as quickly as possible
with a wet sponge.
(D Tips
Applies to: vehicles with automatic dimming rearview
mirror
- If the Light reaching the rearview mirror is
obstructed, the automatic dimming mirror
will not function correctly,
- The automatic dimming mirrors do not dim
when the interior lighting is turned on or
the reverse gear is selected.
, Sun visors
('--__ ___,)
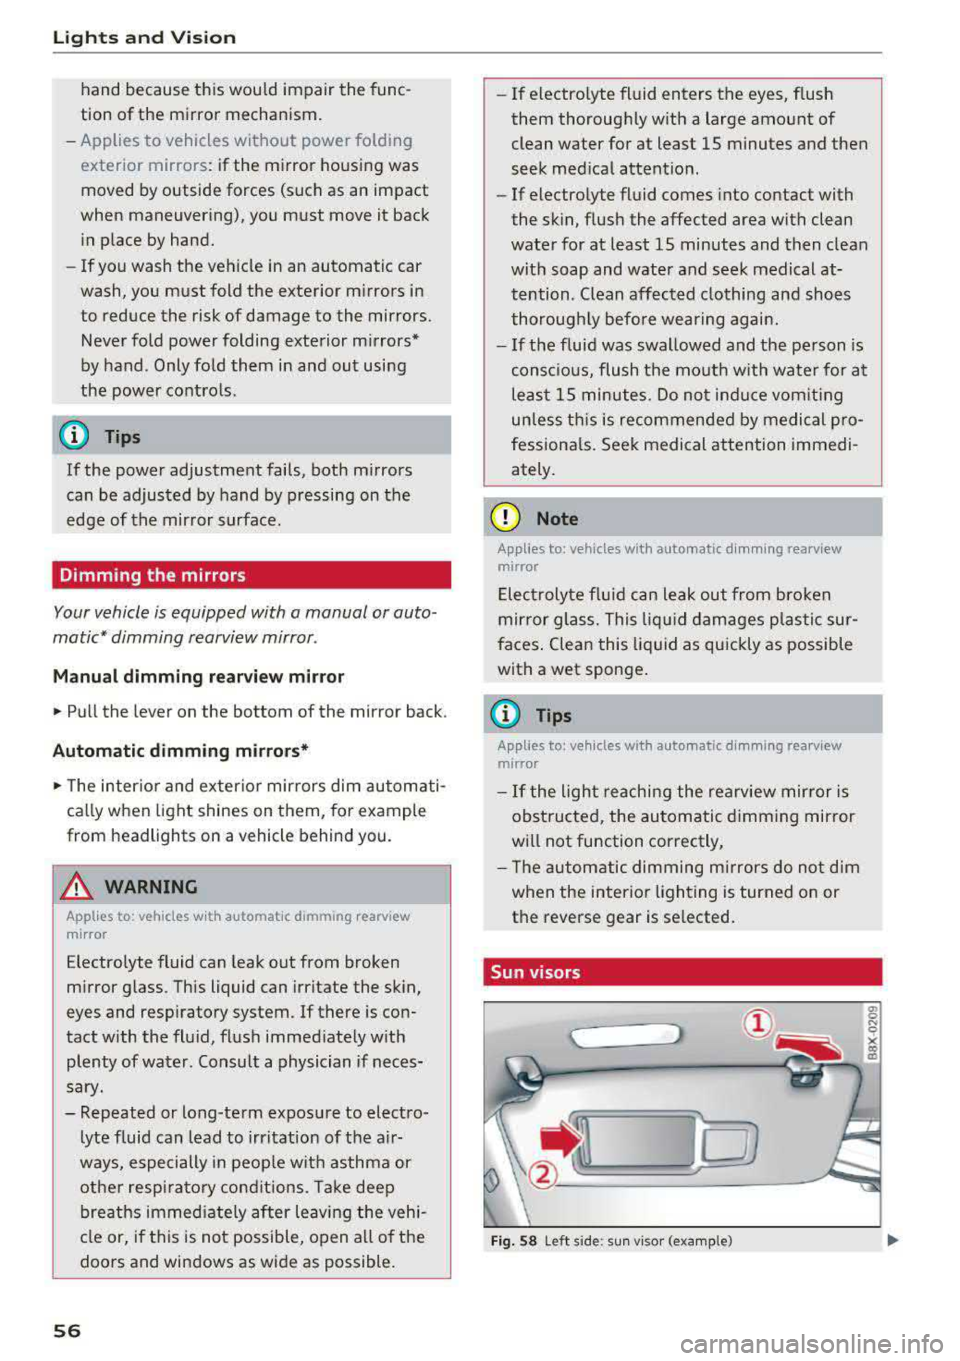
Fig. 58 Left side: sun visor (example)