service indicator AUDI A3 SEDAN 2018 User Guide
[x] Cancel search | Manufacturer: AUDI, Model Year: 2018, Model line: A3 SEDAN, Model: AUDI A3 SEDAN 2018Pages: 404, PDF Size: 62.3 MB
Page 99 of 404
LL co ..... N
" N ..... 0 N > co
Faci lity immedi ately to have t he m alfunc tion cor
rected .
IIJII Battery temperature too low . Vehicle
cannot be started. See owner's manual
Th e outside tempe rature is too low . The vehicle
can no longe r st art at tempe ra tur es below - 18 °F
(- 28 °C). Con ta ct an a utho riz e d Audi d ealer o r au
thor ized A udi Se rvice Fac ility.
POWER LIMIT Warning! Limited performance
If t he indicator lig ht turns on and th is message
appears , th ere may be a n engine co ntro l ma l
f u nction. The
[3B* in d icator light in t he instr u
men t clus ter also tur ns on . The engine ou tput is
r educed . Dr ive to a n au thor ized Audi dealer or
a uthor ized Audi Se rvice Facili ty i mme diate ly to
ha ve the m alfunct ion co rre cted.
II e-tron mode: EV currently unavailable
This message appea rs whe n the 1.,,..1 button is
p ressed and the con ditions for elect ric d rive
mode a re not met.
Ill Vehicle sound: malfunction! Pedestrians
cannot hear vehicle . Please contact Service
The vehicle sou nd is no longer f unctio ning. D rive
e xtremely care fully, since ot he rs may not hea r
your veh icle. Dr ive to an author ized Audi dealer
or author ized Audi Se rvice Facility immed iate ly to
have the ma lf u nction corrected .
Range display
Applies to: ve hicles with plug-in hybrid drive
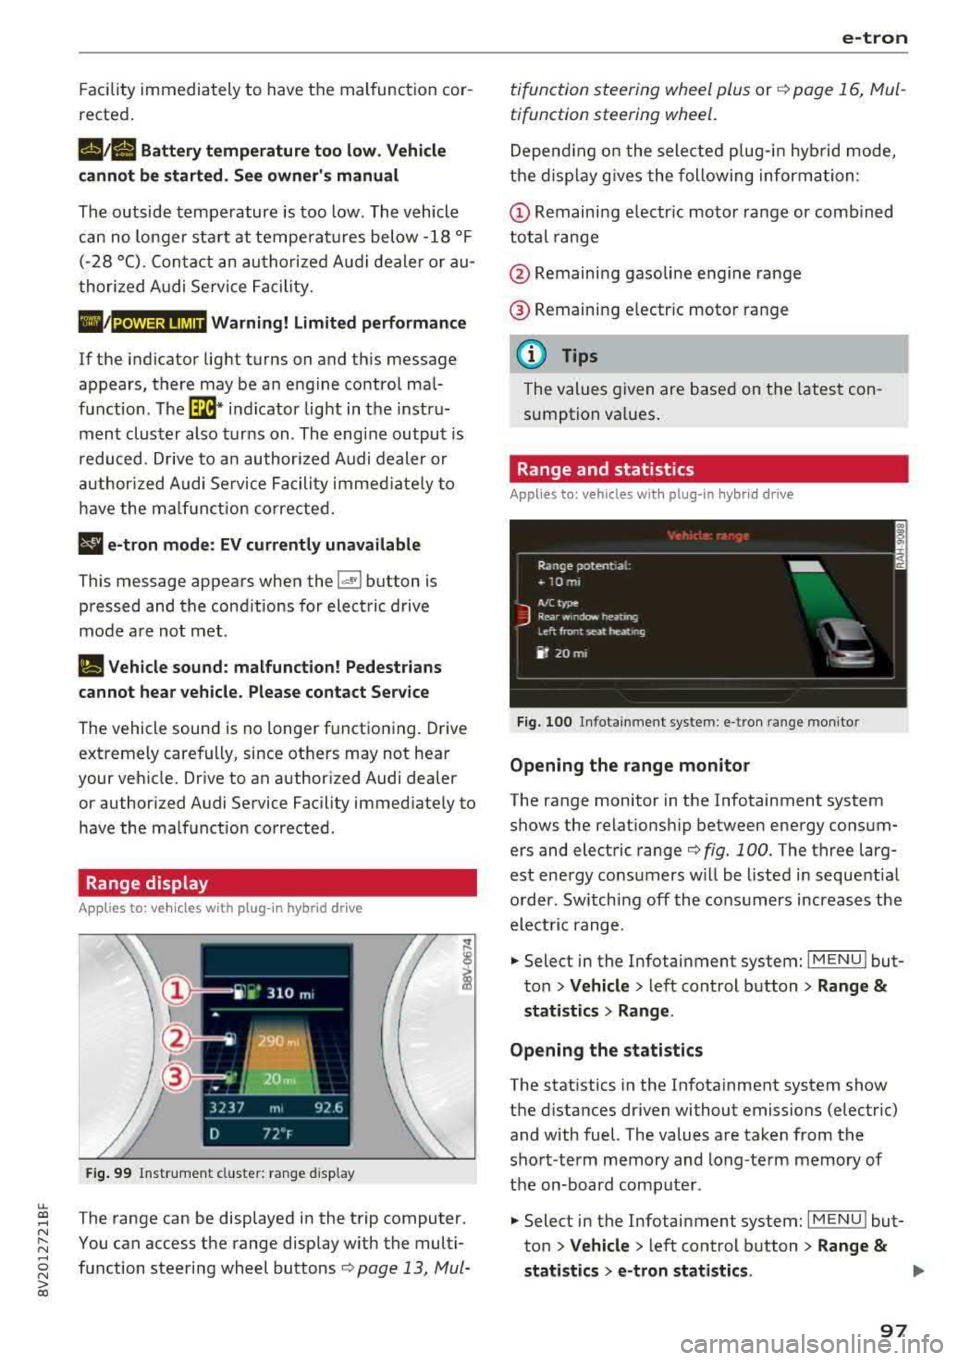
Fig. 99 Instr ume nt cluste r: ra nge disp lay
The range can be disp layed in the trip computer .
You can access t he range disp lay w ith the multi
fu nction steeri ng wheel buttons
c:;> page 13 , Mui-
e-tron
ti function s teeri ng whee l plus or r:::;> page 1 6, M ul
tifunction steering wheel.
D epen ding on t he sele cte d plug -in hy brid mo de,
t he disp la y g ives the foll owing informa tion:
(D Remaini ng e lec tric m otor range or comb ined
total range
@ Remaini ng gasoline eng ine range
® R emaini ng e lectr ic moto r ra nge
(D Tips
The va lues given are b ase d on t he lates t con
sum ption va lues .
Range and statistics
Applies to: vehicles with plug-in hybrid drive
Fig. 100 In fotainmen t system : e -tro n range mo nitor
Opening the range monitor
The range monitor in the Infotainment system
shows the relat ions hip between ene rgy co nsum
ers and elect ric range
c:;> fig. 100 . The three larg
est ene rgy consu mers w ill be l ist ed in sequent ia l
o rder. Sw itching off the cons umers increases the
elect ric range .
.. Select in the Infotai nment system: I MENU ! but
t o n
> Vehicle > left con trol button > Range &
statist ics > Range .
Opening the statistics
The stat istics in the In fotainment system show
t h e d ista nces dr iven without emissions (electric)
and with fuel. The values are taken from the
sho rt-term memory and long-te rm m emory of
the on-board comp ute r.
.. Select in the Infotai nment system: I MENU ! but
ton
> Vehicle > left con trol b utton > Range &
statistics > e-tron statistics . IJ,,
97
Page 117 of 404
(D Tips
- Multip le versions of charging cables are of
fered d ue to the different power s upply sys
tems in d ifferent countries. The maximum
charging power may potentially be unavaila
ble because of this . Contact an author ized
Audi dealer or authorized Aud i Service Fa
c ility fo r more info rmat ion .
- Charg ing may take longer when tempera
tures a re extremely high o r low .
- The charging t ime at pub lic charging sta
t ions may vary from the times g iven in the
tab le
o table on page 114 .
Audi e-tron charging system PIN
Applies to: vehicles with plug-in hybrid drive
The contro l unit ca n be loc ked by enter ing a 4-
d ig it PI N of yo ur cho ice. If a PIN is act ivated, the
se lected PIN must be entered before every use.
We recommend lock ing you r contro l unit to pro
tect it against unautho rized access by a third pa r
ty .
Activating the PIN
.,. Press the I OKI @ o page 109, fig . 1 1 S button
on the control un it .
POWER and SET P IN ap
pear in the display field .
.,. Select SET PIN u sing the a rrow b utton @.
.,. Press t he IOK I button @. ENTER PIN appea rs in
the disp lay fie ld .
.. Se lect the desired value by pressing the arrow
buttons © up or down .
.. Use the right arrow button © to go to the next
digi t .
.. Press the left arrow button © to go to the pre-
v ious menu .
.,. Enter a ll of the d ig its .
.,. Press t he IOKI button @afte r the last d ig it.
.,. REPEAT PIN appears in the display field .
.,. Ente r th e PI N aga in using the arrow but tons
© -
.. Press th e IOK I button @ .
.. PIN OK appears in the display field if both en-
::li tries match. ...
~ .. The PIN is now activ ated.
N ... 0 N > 00
e-tron
D eactivating the PIN
Requirement: the con trol uni t must be unloc ked.
.,. Enter the numerical code 0 000 . Proceed as if
you were activating the PIN
o page 115.
.. The PIN is deactivated.
Locking the control uni t
Requirement: the PIN must be activated .
.,. Press the Iii button @ o page 109, fig. 11 Son
the contro l unit .
Unlocking th e control unit
Requirement: the PIN must be act ivated .
.,. Press any button on the control unit .
.,. PIN? appears in the display field.
.,. Enter the PIN .
.. Press the I OK! button @.
(j) Tips
- Th e PI N is deactivated in t he factory defa ult
se tt ings.
- If you do not remembe r yo ur PIN, contact
an au tho riz ed A ud i d ealer o r autho rized
Audi Serv ice Facili ty .
- If the fi rst PIN entry differs from the second
en try, the first PIN en try is d isplayed .
- If nothi ng is entered within 20 seconds of
t his, the se t val ue is not changed .
Indicator Lights and
messages
Applies to: vehicles with plug-in hybrid drive
If the B indicator light turns on, the high -volt
age battery is charging or is a lready comp letely
charged .
If
the . indicator light stays on , there is a ma l
function in the charging system . Have the prob
l em corrected immediately by an a uthorized Audi
dealer or authorized Audi Service Facility.
l!i1 Ch arging conn ecto r still attached . Vehicle
cannot be dri ven
T his message appears when t he cha rging system
is s till connec ted to the vehicle. Remove the con -
nector
o page 112, A~er charging . ..,.
115
Page 137 of 404
LL co .... N
" N .... 0 N > co
Analog instru- Audi virtual Meaning on ment cluster cockpit* the corre-
sponding side
Green lines Green li ne(s) Active lane as-
'/ \' (left/right) sist is activat-
'/ 'r ed and ready
to prov ide
warnings.
-Red line Active lane as-
(left/right) sist warns you
'/ \ · before leaving
a lane . In add i-
tion , the steer-
ing wheel vi-
brates lightly.
Yellow lines Yellow line(s) Active lane as-
(left/right) sist is act ivat-
'/ \· ed, but is not
ready to give
warning
If the system is switched on but is not ready to
p rovide warnings, one of the following cou ld be
the cause:
-There is no lane marker line.
-The relevant lane marker lines are not detected
(for example, mark ings in a construction zone
or because they are obstructed by snow, dirt,
water or lighting).
-The veh icle speed is below the activation speed
of approx imately 40 mph (65 km/h) .
-The lane is too narrow or too wide .
-The curve is too narrow.
-The driver's hands are not on the steering
wheel.
@ Tips
-Make sure the camera's field of view
¢ fig. 136 is not obstructed by stickers or
anything else. For informat ion on cleaning,
see
¢ page 354.
-In certain markets: if the system is switched
on, it will switch on automatically each t ime
the ignit ion is switched on.
Assistance systems
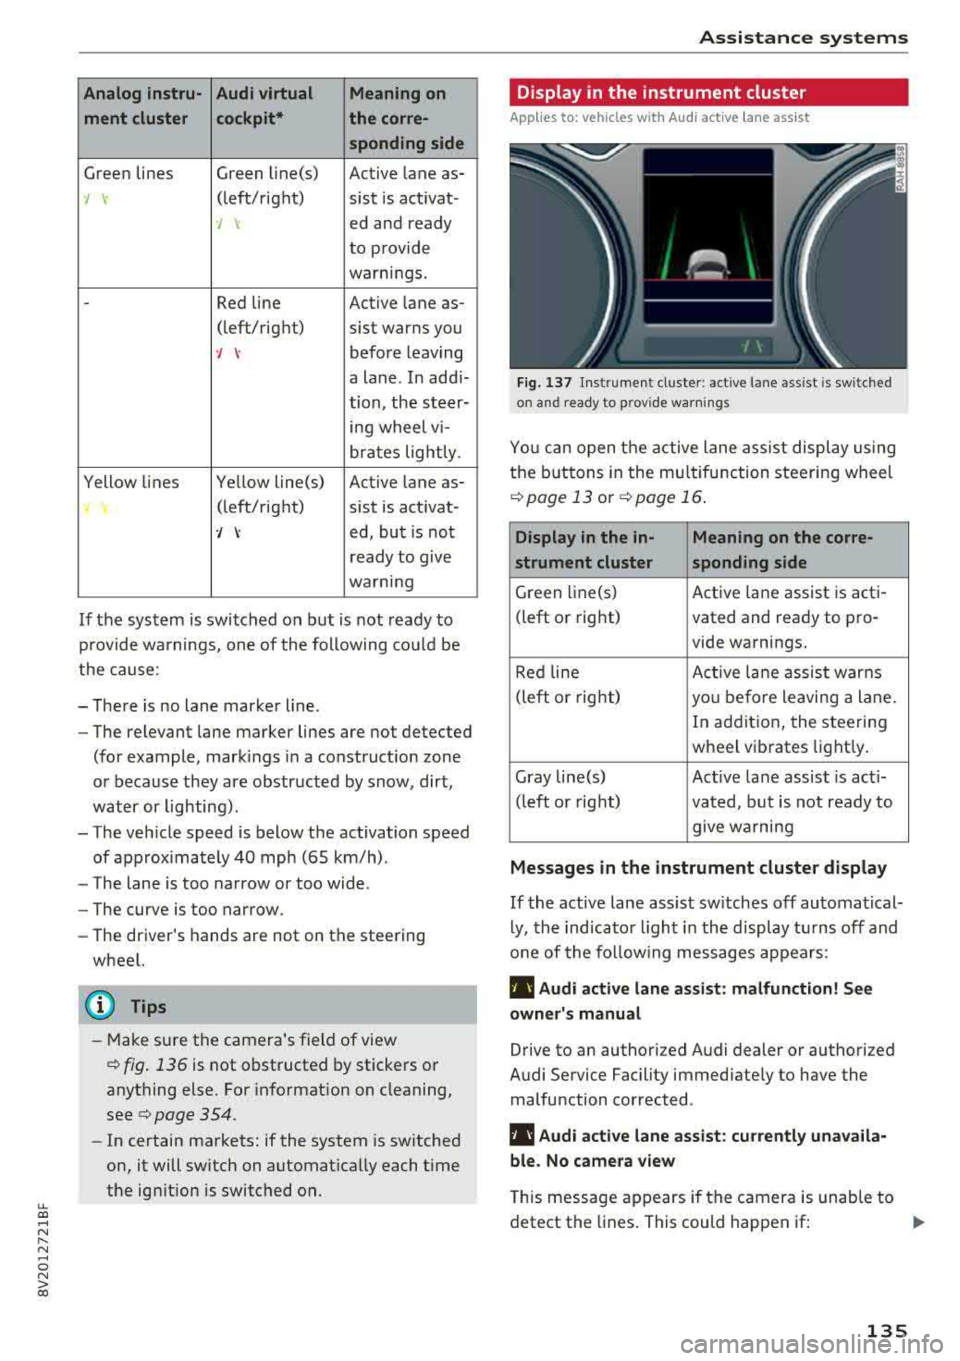
Display in the instrument cluster
Applies to : veh icles w it h Audi act ive la ne ass ist
Fig . 137 Ins trumen t cluster: active lane assist is sw it c hed
on and ready to prov ide warnings
You can open the active lane ass ist display using
the buttons in the multifu nction steering wheel
¢ page 13 or¢ page 16.
Display in the in- Meaning on the corre-
strument cluster sponding side
Green li ne(s) Active lane assist is acti-
(left or right) vated and ready to pro-
vide warnings.
Red line Active lan e assist warns
(left or right)
you before leaving a lane.
In addition, the steering
wheel vibrates lightly.
Gray line(s) Act ive lane assist is act i-
(left or right)
vated, but is not ready to
give wa rning
Messages in the instrument cluster display
If the active lane assist sw itches off automatical
ly, the indicator light in the display turns off and
one of the following messages appears:
Ill Audi active lane assist : malfunction! See
owner's manual
Drive to an authorized Audi dealer or authorized
Audi Service Facility immed iate ly to have the
malfunction corrected .
Ill Audi active lane assist : currently unavaila
ble. No camera view
This message appears if the camera is unable to
detect the lines. This could happen if:
.,.
135
Page 153 of 404
u. 00 .-< N l' N .-< 0 N > 00
Brake booster
The brake booster amplifies the pressu re yo u ap
p ly to the brake pedal. It only operates while the
engine is running or when the ignition is switched
on (plug-in hybrid drive*) .
A WARNING
- Only apply the brakes for the purpose of
cleaning the brake system when road and
traff ic conditions permit. You must not en
danger other road users. This increases the
r isk of an accident .
-
-Never let the vehicle roll while the engine is
stopped because this increases the risk of an
acc ident.
- Depend ing on the veh icle equipment, the
brake pedal may be pulled downward when
the vehicle automatically initiates b rak ing.
- Never place objects in the driver's footwell.
An object could end up in the area around
the pedals and prevent you from using
them. You wo uld not be able to use the ped
als if sudden driving or braking mane uvers
were needed, which increases the risk of an
accident.
- Only use floor mats that do not obstruct the
area around the pedals and that can be se
curely fastened in the footwe lls.
- T o reduce the risk of injury, do not place
your foot under the brake pedal.
(Llj) Note
-Never let the brakes "rub" by pressing the
pedal lightly when braking is not actually
necessary. This causes the brakes to over
heat and increases braking distance and
causes wear.
- Before driving on a long stretch with steep
slopes, reduce your speed and shift to the
next lower gear This makes use of the en
gine braking effect and relieves the brakes.
If you need to brake add it ionally, brake in
i ntervals and not cont inuously.
Intelligent Technology
(D Tips
- If the brake booster is not working, you
must press the brake pedal with much more
force than normal.
- If you retrofit your vehicle with a front spoi l
er, wheel covers or simi lar items, make sure
that the air flow to the front wheels is not
interrupted. Otherwise the brake system
can become too hot.
Electromechanical
steering
The electromechanical steering supports the
driver's steering movements.
Power steering adapts electronically based on
the ve hicle speed.
Indicator lights and messages
• Do not drive vehicle: steering defective
If this indicator light turns on and stays on and
th is message appears, the power steering may
have failed .
Stop the vehicle in a safe location as soon as pos
s ible. Do
not cont inue driving. See an authorized
Audi dealer or authorized Audi Service Fac ility for
ass istance .
l;r-ij Steering: system fault! You can continue
driving
If the indicator light turns on, the steering wheel
may be more difficult to move or more sensitive
than usual. The steering whee l may also be at an
angle when driving straight.
Drive slowly to an authorized Audi dea ler or au
thorized Audi Service Facility to have the mal
function corrected.
(D Tips
If the. or 'Tij indicator light on ly stays on
for a short time, you may continue driving .
151
Page 331 of 404
u. 00 .-< N l' N .-< 0 N > 00
-Inspection or oil change reminder: after a cer
tain distance driven, a message appears in the i nst rument cluste r display each time the ign i
t ion is switched on or off. The rema ining dis
tance or time is displayed briefly .
-Inspection or oil change due: if your vehicle
has reached an inspection or o il change interval
or bot h intervals at t he same time, the mes
sage
Inspection due! or Oil change due! or Oil
change and in spection due!
appears briefly a f
te r swi tc h ing t he ignition on/off.
Checking service intervals
You can check the rema ining distance or time un
til the nex t oil change o r next inspection in the
Info tainmen t sys tem. Select in the Infotainmen t
sys tem: th e
I MENU I button > Vehicle > left con
tro l button
> Service & checks > Service inter
vals .
Resetting the indicator
An author ized A udi dealer or author ized A udi
Serv ice Fac ility will reset the serv ice inte rval dis
p lay after pe rforming serv ice .
If you have changed t he oil you rself, you must re
set t he oil change interva l.
To reset the display, se lect in the Infotainment
system: the
I MENU I button > Vehicle > left con
tro l button
> Service & checks > Service intervals
> Reset oil change interval.
@ Note
- Only reset the oil c hange indicato r if the oil
was c hanged.
- Fo llow ing the service inte rvals is c ritical to
maintai ning the fu nction, serv ice li fe, and
va lue of yo ur ve hicle , es pecially the eng ine.
Eve n if th e m ile ag e on the v ehicle is low, do
not exc eed t he ti me f or th e next ser vic e.
Checking and Filling
329
Page 341 of 404
u. Cl) ... N
" N .... 0 N > co
-Do not use run-flat tires on your vehicle. Using them when
not permitted can lead to ve
hicle damage or accidents.
-If you install wheel covers on
the vehicle, make sure they al low enough air circulation to
cool the brake system. If they
do not, this could increase the risk of an accident.
Tire wear/damage
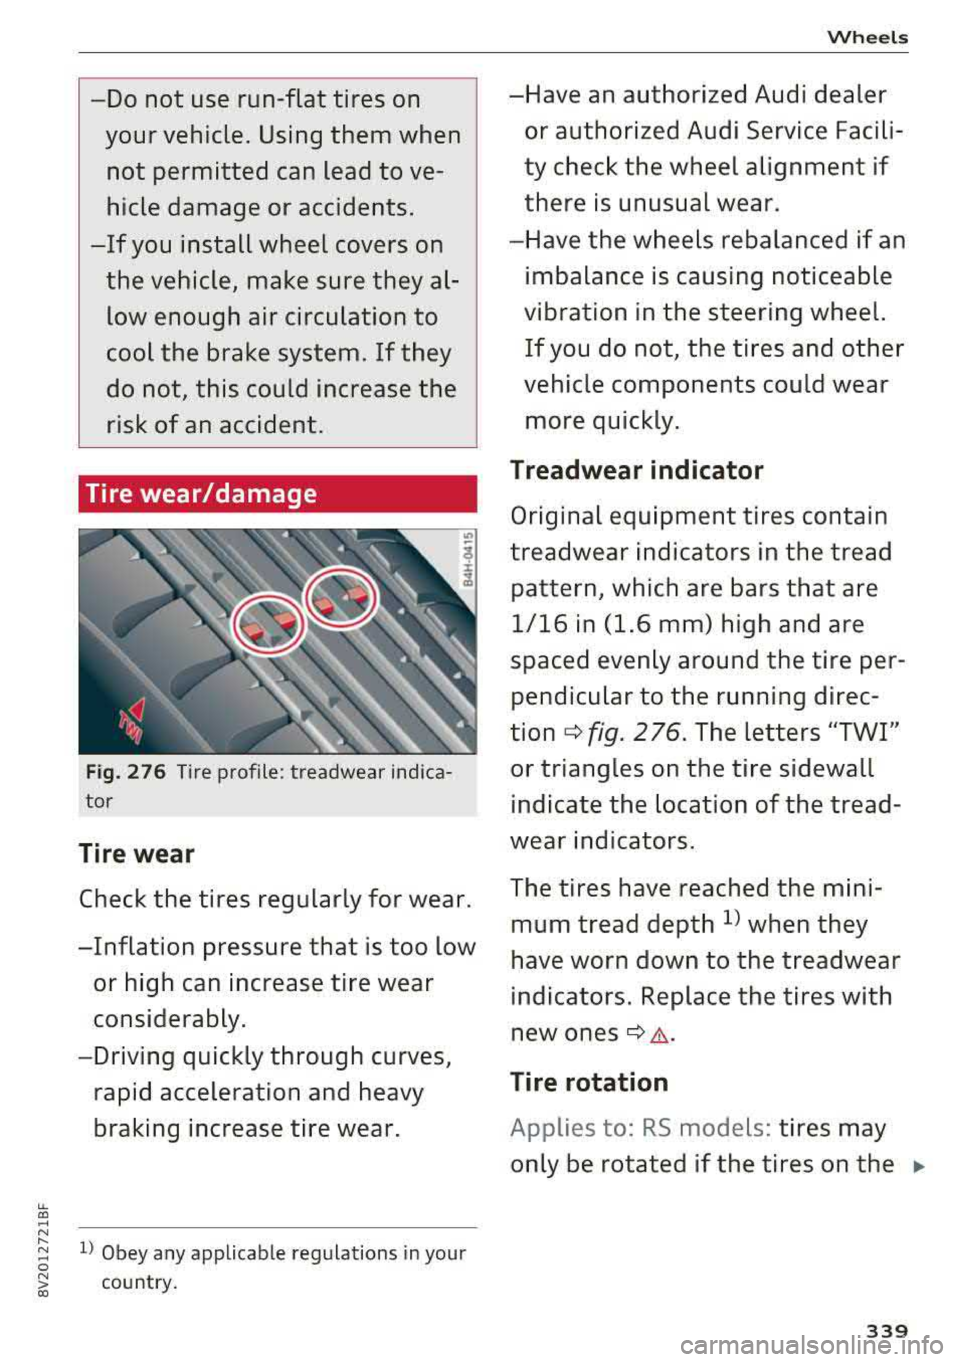
Fig. 276 T ire profile : treadwear indica
tor
Tire wear
Check the tires regular ly for wear.
-Inflation pressure that is too low or high can increase tire wear
considerably.
-Driving quickly through curves,
rapid acceleration and heavy
braking increase tire wear.
l ) Obey any applicable regulations in your
country.
Wheels
-Have an authorized Audi dealer or authorized Audi Service Facili
ty check the wheel alignment if
there is unusual wear.
-Have the wheels rebalanced if an imbalance is causing noticeable
vibration in the steering wheel. If you do not, the tires and other
vehicle components could wear more quickly.
Treadwear indicator
Original equipment tires contain
treadwear indicators in the tread
pattern, which are bars that are 1/16 in (1.6 mm) high and are
spaced evenly around the tire per pendicular to the running direc
tion
c::> fig. 2 76. The letters "TWI"
or triangles on the tire sidewall indicate the location of the tread
wear indicators.
The tires have reached the mini
mum tread depth
l) when they
have worn down to the treadwear
indicators. Replace the tires with
new ones
c::> .&.-
Tire rotation
Applies to: RS models: tires may
only be rotated if the tires on the
..,.
339
Page 352 of 404
Wheels
~ Select in the Infotainment system: IMENUI but
ton
> Vehicle > left control button > Service &
checks > Tire pressure monitoring > Store tire
pressure> Yes, store now.
(D Tips
Do not store the tire pressures if snow chains
are installed.
Tire pressure monitoring
system
(.L) General notes
Each tire, including the spare (if provided),
should be checked monthly when cold and inflat
ed to the inflation pressure recommended by the
vehicle manufacturer on the vehicle placard or
tire inflation pressure label. (If your vehicle has
tires of a different size than the size indicated on
the vehicle placard or t ire inflation pressure la
bel, you should determine the proper tire infla
tion pressure for those tires).
As an added safety feature, your vehicle has been
equ ipped w ith a t ire pressure monitoring system
(TPMS) that illuminates a low tire pressure tell
tale when one or more of your tires is significant
ly under-inflated. Accordingly, when the low tire
pressure telltale illuminates, you should stop and
check your tires as soon as possible, and inflate
them to the proper pressure. Driving on a signifi
cantly under-inflated tire causes the tire to over heat and can lead to tire failure . Under -inflation
also reduces fuel efficiency and tire tread life,
and may affect the vehicle's handling and stop
p in g ability.
Please note that the TPMS is not a substitute for
proper tire maintenance, and it is the driver's re
sponsibility to maintain correct tire pressure,
even if under-inflation has not reached the leve l
to trigger illuminat ion of the TPMS low tire pres
sure telltale .
Your vehicle has also been equipped with a TPMS
malfunct ion indicator to indicate when the sys
tem is not operating properly. The TPMS mal
function indicator is combined with the low tire
pressure telltale. When the system detects a
350
malfunction, the telltale will flash for approxi
mately one minute and then remain continuously
illuminated. This sequence will continue upon
subsequent vehicle start-ups as long as the mal
function exists.
When the malfunction indicator is illuminated,
the system may not be able to detect or signal
low tire pressure as intended. TPMS malfunctions
may occur for a variety of reasons, including the
installation of replacement or alternate tires or
wheels on the vehicle that prevent the TPMS
from functioning properly. Always check the
TPMS malfunction tel ltale after replac ing one or
more tires or wheels on your vehicle to ensure
that the replacement or alternate tires and
wheels allow the TPMS to continue to function
properly.
Description
Applies to: vehicles with tire pressure monitoring system
The tire pressure monitoring system monitors
the pressure in the four tires when driving.
The system uses sensors that measure the tema
perature and pressure in the tires. The data is
sent from these sensors to the control module by
radio frequency .
The tire pressure monitoring system shows the
current pressures and temperatures of the tires
in the Infotainment system while driving
¢ page 351. It also compares the current tire
pressures with the stored tire pressures and
gives a warning if the tire pressure is different
from what is stored
¢ page 351.
The system does not detect if the stored tire
pressures match the recommended tire pres
sures . You must store the tire pressures again
¢ page 352:
- every time the tire pressures change, for exam
ple when the load in the vehicle changes,
- after replacing a tire, or
- if wheels with new wheel sensors are used.
Page 353 of 404
u. 00 .-< N l' N .-< 0 N > 00
A WARNING
-The tire pressure monitoring system assists
the driver in monitoring tire pressures . The
driver is responsible for having the tires in
flated to the correct pressure.
- Do not change the tire pressure when the
temperature of the tire is extremely high.
This could result in serious damage to the
tire and even cause the tire to burst, in
creasing the risk of an accident.
- A tire with low pressure flexes more. This
heats the tire up too much. This could cause
the tread to separate and even cause the
tire to burst, increasing the risk of an acci
dent.
- The tire pressure monitoring system does
not warn about damage or defects in the
tire construction that could cause the tire to burst, for example . Inspect your tires regu
larly .
(D Tips
-If tires are replaced, the sensors/valves do
not need to be removed or replaced. Just re
placed the valve stem and, if necessary, the
valve and the wheel electronics. If you have
questions, see an authorized Audi dealer or
authorized Audi Service Facility .
- An incorrect display or a malfunction in the
tire pressure monitoring system can occur
after using the tire mobility kit . Have the
sensors replaced by an authorized Audi
dealer or authorized Audi Service Facility.
- For an explanation on conformity with the
FCC regulations in the United States and the
Industry Canada regulations, see
r=;,page 386.
Displaying tire pressures/temperatures
Applies to: vehicles with tire pressure mo nito ring system
Requirement: you must be driving the vehicle.
"'Select in the Infotainment system: the I MENU I
button > Vehicle > left control button > Service
& checks > Tire pressure monitoring > Display
tire pressures.
Wheels
The current tire pressures are shown in green,
yellow or red numbers in the Infotainment sys
tem:
- Green: the current tire pressure and the speci
fied tire pressure are approximately the same.
- Yellow: the current tire pressure is too low
compared to the specified tire pressure.
-Red: the current tire pressure is extremely low
compared to the specified tire pressure .
The specified tire pressure is the last tire pres
sure that was stored
r=;, page 352.
Note that the tire pressure also depends on the
temperature of the tire. The tire pressure in
creases as the engine becomes warmer while
driving.
A WARNING
Read and follow the important information
and notes
"*page 350.
(D Tips
The tire pressure or temperature is not dis
played while the vehicle is stationary and in
adaptation mode. Dashes--.-- are shown in
place of the pressure and temperature.
ill Tire pressure loss
Applies to: vehicles with tire press ure mo nito ring system
-
If the [tE indicator light turns on, the pressure in
at least one tire is too low or new sensors were
not adapted:
RE Indicator light turns on after turning the
ignition on
The tire pressure is too low compared to the
specified pressure .
.,. Check and store the tire pressure(s) the next
time it is possible
"*page 352.
RE Indicator light turns on while driving
Wheels with new sensors were not adapted or
the tire pressure has reached a critical level com
pared to the specified pressure.
"'Avoid unnecessary steering and braking maneu-
vers.
..,_
351
Page 355 of 404
u. 00 .-< N l' N .-< 0 N > 00
The @m indicator light and t he message tu rn o ff
once the tire pressure monitoring system is ava il
ab le aga in . If yo u can not cor rect the ma lf u nct io n
and the
mm indicator lig ht stays on, dr ive imme
d iate ly to an author ized A udi dealer or autho r
i zed A udi Service Fac ility to have the ma lfunction
repaired .
Wheels
353
Page 389 of 404
u. 00 .-< N l' N .-< 0 N > 00
A
A/C (automatic climate control system)
Accessories
. . .. ................ ...
Active lane assist ..
.. 69
62 ,385
refer to Audi active lane assist . . . . . . . . . 133
Active rollover protection system . . . . . . . . 257
Retracting rollover protection . . . . . . . . . . 257
Adapt ive cruise control
refer to Audi adaptive cruise control . . . . 123
Adaptive light
refer to Audi adaptive light . . . . . . . . . . . . . 49
Adjusting the additiona l display . . . . . . . . . . 15
Adjusting the air d istr ibut ion
Automatic climate control system . . . . . . . 70
Adjusting the air vents . . . . . . . . . . . . . . . . . . 71
Automatic climate control system . . . . . . . 70
Adjusting the sound . . . . . . . . . . . . . . . . . . . 247
Advanced key
refer to Convenience key . . . . . . . . . . . . . . . 76
Airbag .. .. .. .. ............... .. .. .. . 269
Airbag system . . . . . . . . . . . . . . . . . . . . 269, 289
Advanced Airbag System components . . . 276
Care . . . . . . . . . . . . . . . . . . . . . . . . . . . . . . 284
Children
Child restraints 296
297
Components (front airbags) . . . . . . . . . . . 276
Danger of fitting a child seat on the front
passenger seat . . . . . . . . . . . . . . . . . . . . . .
2 70
Disposal . . . . . . . . . . . . . . . . . . . . . . . . . . . 284
Fr ont airbags . . . . . . . . . . . . . . . . . . . . . . . 274
How do the front airbags work? . . . . . . . . 279
How many airbags does my vehicle have? 276
How the Advanc ed Airbag System compo-
nents wo rk together . . . . . . . . . . . . . . . . . 278
Important safety instructions on the knee
airbag system . . . . . . . . . . . . . . . . . . . . . . . 287
Knee airbags . . . . . . . . . . . . . . . . . . . . . . . . 285
Monitoring . . . . . . . . . . . . . . . . . . . . . . . . . 281
PASSENGER AIR BAG OFF light . . . . . . . . . 281
Repairs . . . . . . . . . . . . . . . . . . . . . . . . . . . . 284
Safety instructions . . . . . . . . . . . . . . . . . . . 283
Side airbags . . . . . . . . . . . . . . . . . . . . . . . . 287
Warning/Indicator lights . . . . . . . . . . . . . 281
Wh en must the system be inspected? . . . 281
Air pressure
Tire Pressure Monitoring System indicator 348
Index
Alarm system
refer to Anti-theft alarm system . . . . . . . . . 36
Al ignment pin (tire change) . . . . . . . . . . . . . 360
All-weather lights . . . . . . . . . . . . . . . . . . . . . . 49
All season tires . . . . . . . . . . . . . . . . . . . . . . . 346
All wheel drive
refer to quattro (all wheel drive) . . . . . . . 152
AMI
refer to Audi music interface . . . . . . . 229, 230
Android Auto
refer to Audi smartphone interface 241
Anti-freeze Windshield washer system . . . . . . . . . . . . 328
Anti-Lock Braking Sys tem (ABS) . . . . . . . . . 148
Anti-Slip Regu lation (ASR) . . . . . . . . . . . . . . 148
Anti-theft alarm system . . . . . . . . . . . . . . . . . 36
Apple CarP lay
refer to Audi sm artphone interface . . . . . 241
ASR
refer to Anti-Slip Regulation (ASR) . . . . . . 148
Audi active lane assist Cleaning the camera area
Messages ... .. .. .. ............... . .
Audi adaptive cruise control ............ .
Cleaning the sensor ................. .
Distance display, distance warning .. .. . .
Messages ... .. .. .. ............. .. . .
Audi adap tive light ... ............... . .
Audi connect e-tron services
............
Doors and lights .... ................ . 133
355
135
123
355 129
130
140
199
199
Audi connect (Infotainment) ........ 190, 196
Data protection . . . . . . . . . . . . . . . . . . . . . 197
Services overview . . . . . . . . . . . . . . . . . . . . 191
Starting . . . . . . . . . . . . . . . . . . . . . . . . . . . 191
Audi drive select . . . . . . . . . . . . . . . . . . . . . . 140
Audi magnetic ride
refer to Suspension control . . . . . . . . . . . . 140
Audi music interface . . . . . . . . . . . . . . . . . . . 229
Audi music stream
refer to Wi-Fi . . . . . . . . . . . . . . . . . . . . . . . 227
Audio files . . . . . . . . . . . . . . . . . . . . . . . . . . . 232
Audio player
Bluetooth audio player . . . . . . . . . . . . . . . 226
Wi-Fi audio p lay er . . . . . . . . . . . . . . . . . . . 227
Audio track 235
387