interior lights AUDI A3 SEDAN 2018 Owners Manual
[x] Cancel search | Manufacturer: AUDI, Model Year: 2018, Model line: A3 SEDAN, Model: AUDI A3 SEDAN 2018Pages: 404, PDF Size: 62.3 MB
Page 54 of 404
Lights and Vision
turn signal lever. The emergency flashers stop
temporarily .
The emergency flashers also wo rk when the igni
tion is turned off.
Interior lighting
Front interior lighting
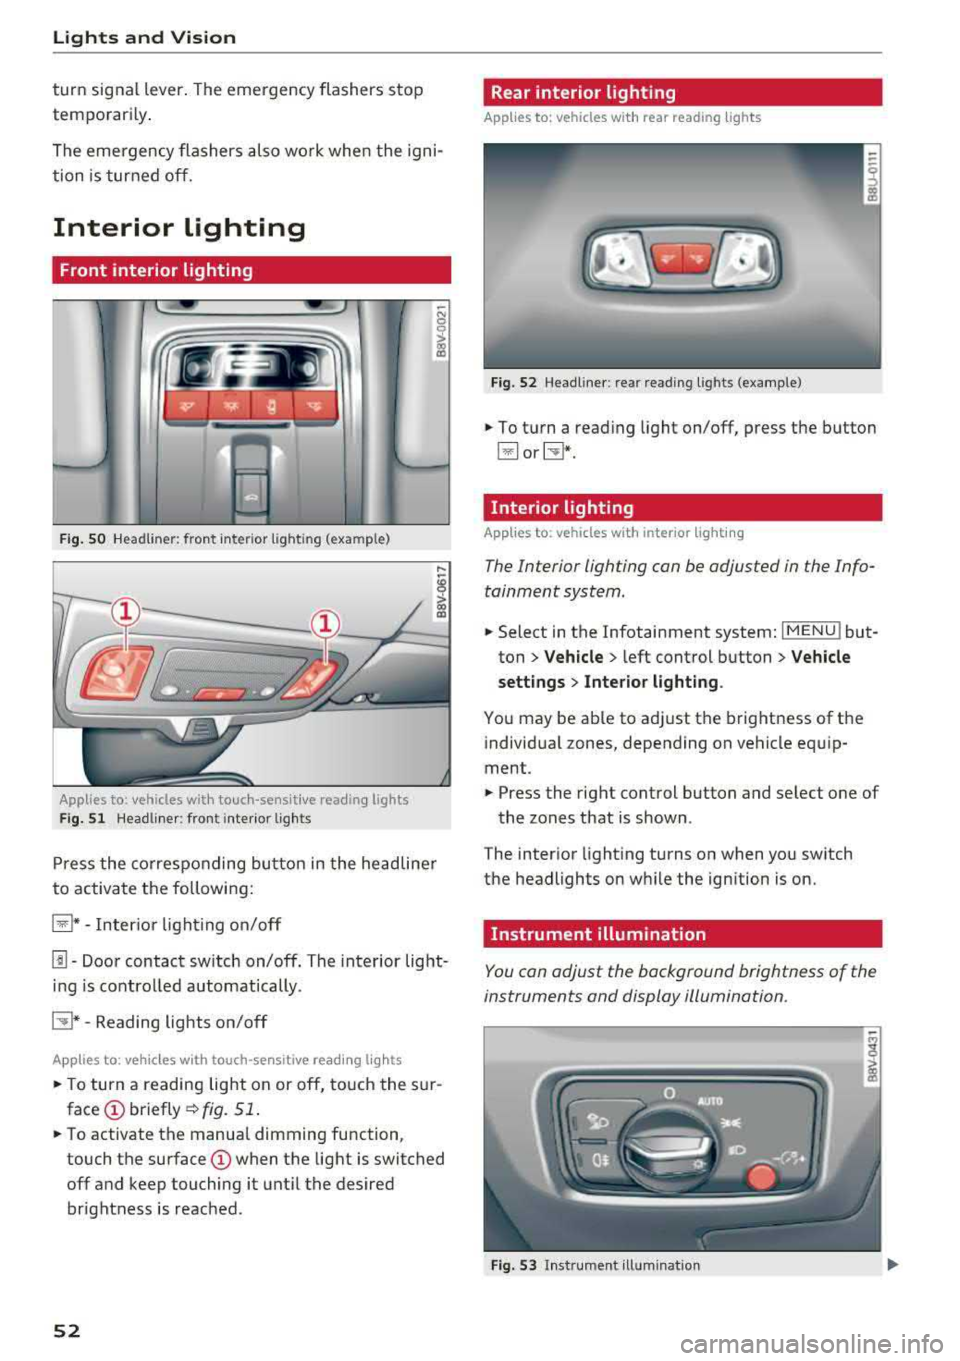
F ig . SO Headl iner: fr ont inte rior lig htin g (exa mple)
:ti ?
Applies to: vehicles with touch-sensitive reading lights
F ig. 51 Headli ner: front inte rior lig hts
Pr ess the co rres ponding bu tton in the he adline r
to activate the following:
~ * -Inter io r li ght ing o n/off
[!] -Door contact sw itch on/off. The interior light
i n g is controlled automatically.
CTI* -Reading lights on/off
App lies to: veh icles with touch-sensitive reading lights
.. T o turn a reading lig ht on or off, to uch the s ur
face (!) briefly ¢fig. 51 .
.. To activate the manua l dimming function ,
touch the
surface (!) when the light is switched
off and keep touching it unt il the desired
brightness is reached .
52
Rear interior lighting
Applies to: vehicles with rear reading lights
Fi g. 52 Headli ne r: re ar reading l ights (example)
.. To t urn a read ing light on/off, press the button
~ or~ *-
Interior lighting
Applies to: vehicles with interior lighting
The Interior lighting can be adjusted in the Info
tainment system .
.. Select in the Infotainment system: IMENU ! but
ton
> Vehicle > l eft cont rol button > Vehicle
settings
> Inte rior light ing .
You may be ab le to ad just the brightness of the
i ndivid ua l zones, depending on vehicle eq uip
ment .
.. Press the right control button and se lect one of
the zones that is shown .
The inter ior light ing turns on when you sw itch
the headlights on w hile the ign ition is on.
Instrument illumination
You can adjust the background brightness of the
instruments and display illumination.
Fi g. 53 In st ru m en t ill uminat ion
Page 56 of 404
Lights and Vision
by hand. Only fo ld them in and out using
the power controls.
(D Tips
If the power adjustment fails, both mirrors
can be adjusted by hand by pressing on the
edge of the mirror surface .
Dimming the mirrors
Your vehicle is equipped with a manual or auto
matic* dimming rearview mirror .
Manual dimming rearview mirror
~ Pull the lever on the bottom of the mirror back .
Automatic dimming rearview mirror*
~ The interior and exterior mirrors dim automati
cally when light shines on them, for example
from headlights on a vehicle behind you .
.&_ WARNING
Applies to: vehicles with automa tic dimming rearview
m irror
Electro lyte fluid can leak out from broken
m irror glass. This liquid can irritate the skin,
eyes and resp iratory system.
If there is con
tact with the fluid, flush immediate ly with
plenty of water. Consult a physician if neces
sary.
- Repeated or long-term exposure to electro
lyte fluid can lead to irritation of the air
ways, especially in peop le with asthma or
other respiratory condit ions. Take deep
breaths immediate ly after leaving the vehi
cle or, if this is not possible, open all of the
doors and windows as wide as possible.
- If electrolyte fluid enters the eyes, flush
them thoroughly with a large amount of
clean water for at least 15 minutes and then
seek medical attention .
- If electrolyte flu id comes into contact w ith
the skin, flush the affected area with clean
water for at least 15 minutes and then clean
with soap and water and seek med ica l at
tention. Clean affected clothing and shoes
tho roughly before wearing again.
54
-
-If the fluid was swallowed and the person is
conscious, flush the mouth w ith water for at
least 15 minutes. Do not induce vomiting
unless this is recommended by medical pro
fessionals . Seek medical attention immedi
ately .
(D Note
Applies to: veh icles with automatic d imming rearv iew
mirro r
Electrolyte fluid can leak out from broken
mirror glass. This liquid damages plastic sur
faces . Clean this liquid as quickly as possible
with a wet sponge.
@ Tips
App lies to: veh icles with automatic d imm ing rearv iew
mirro r
-If the light reaching the rearview mirror is
obstructed, the automatic d imm ing mirror
will not function correctly,
- The automatic dimming m irrors do not dim
when the interior lighting is turned on or
the reverse gear is selected.
Sun visors
(~--- )
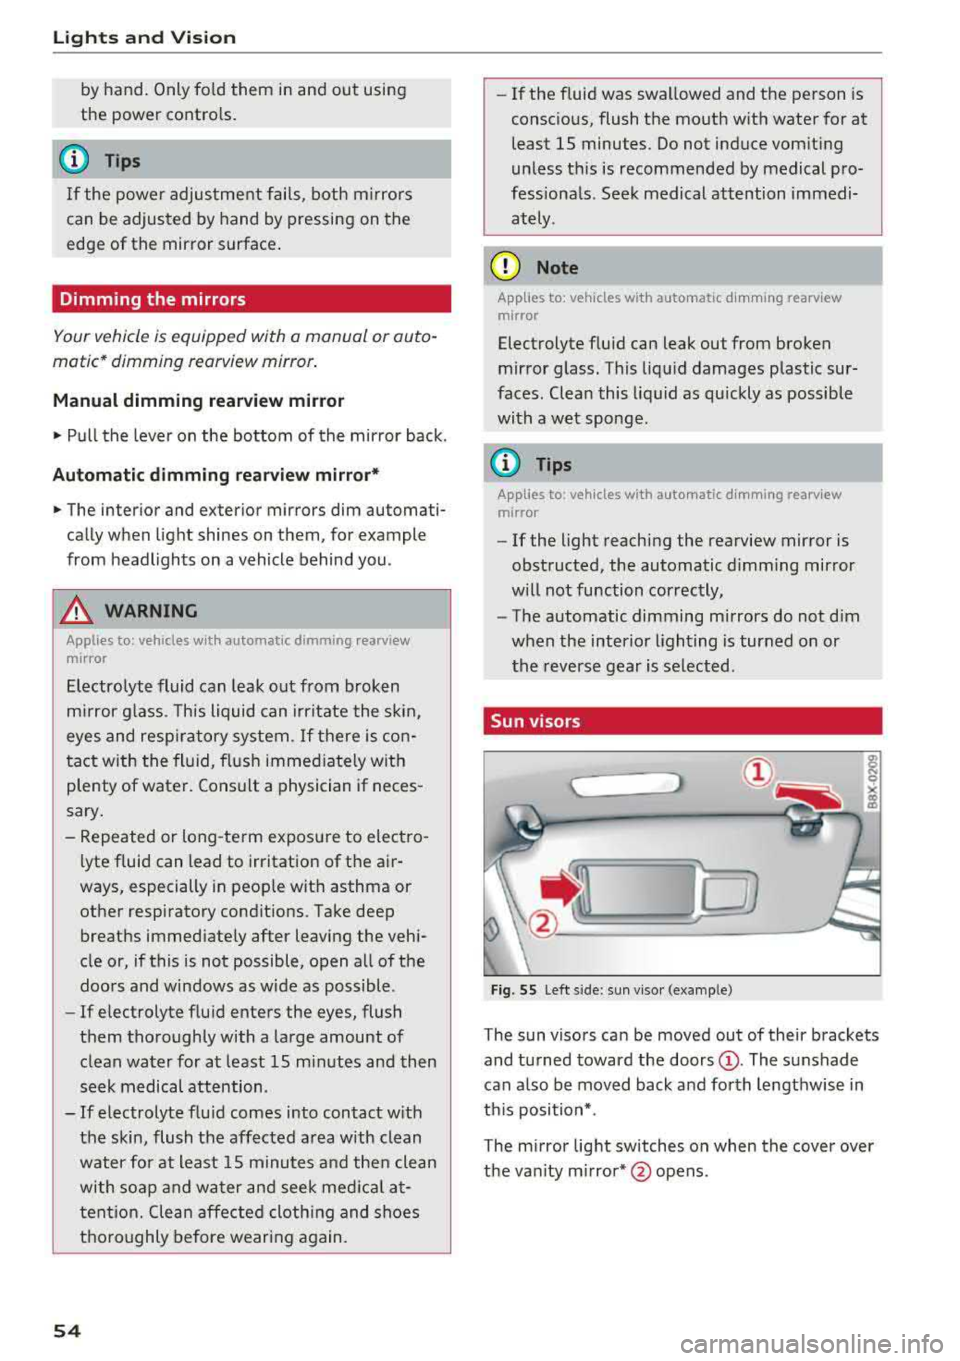
Fig. 55 Left side: sun viso r (example)
The sun visors can be moved out of their brackets
and turned toward the doors
(D. The sunshade
can a lso be moved back and forth lengthwise in
th is position*.
The mirror light switches on when the cover over
the van ity m irror* @opens .
Page 60 of 404
Lights and Vision
Adjusting the magnetic zone
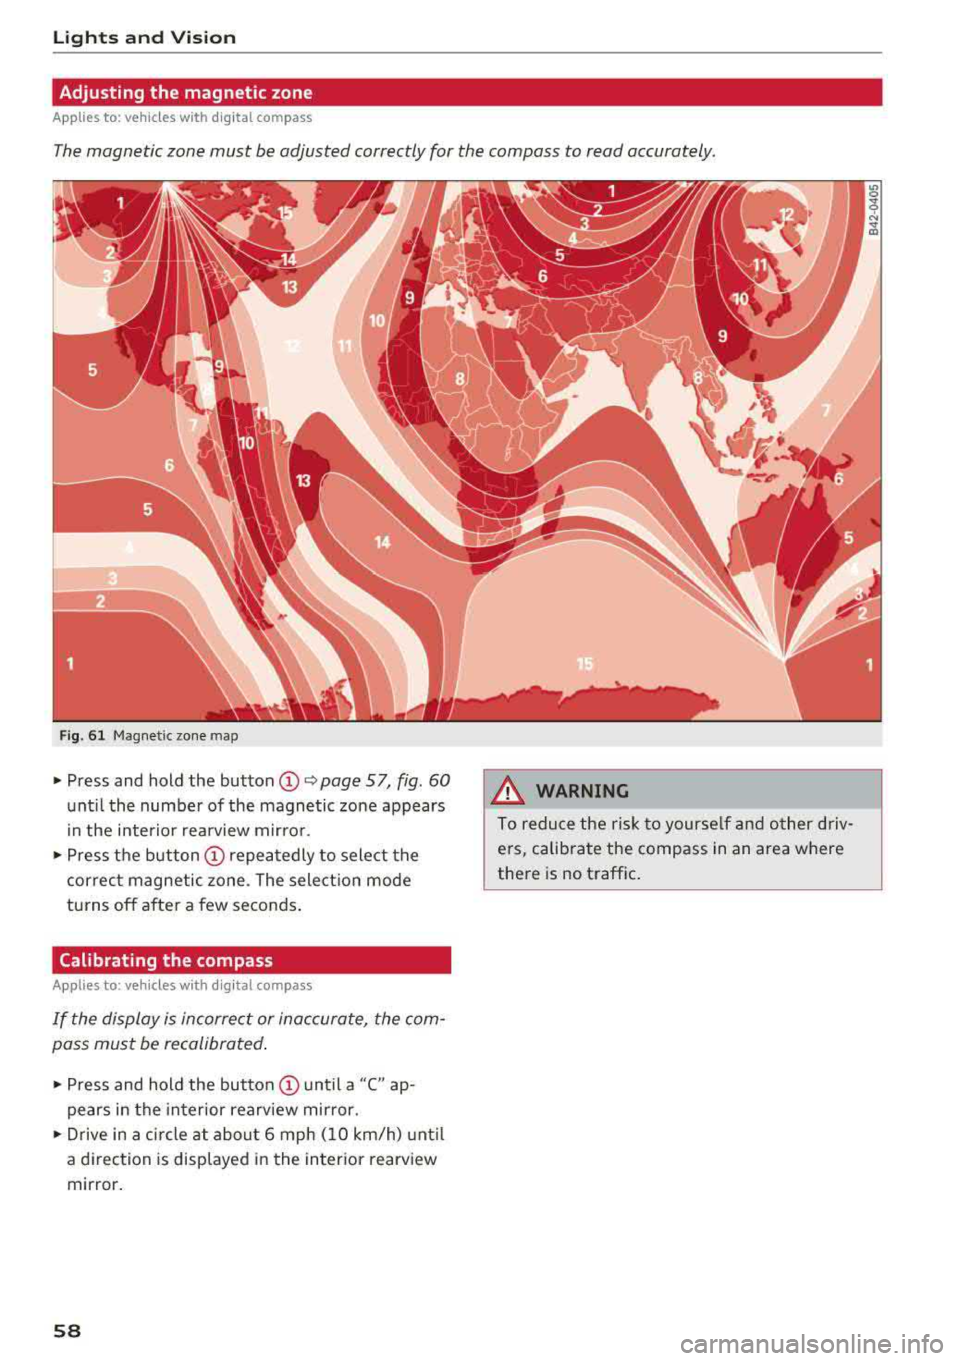
Applies to: ve hicles w ith d ig ital compass
The magnetic zone must be adjusted correctly for the compass to read accurately.
Fig. 61 Magnetic zone map
~ Press and hold the button CD~ page 57, fig . 60
until the number of the magnetic zone appears
in the interior rearview mirror.
~ Press the button CD repeatedly to select the
correct magnetic zone . The selection mode
turns off after a few seconds.
Calibrating the compass
A pp lies to: ve hicles w ith d ig ital compass
If the display is incorrect or inaccurate, the com
pass must be recalibrated.
~ Press and hold the button CD until a "C" ap
pears in the interior rearview mirror.
~ Drive in a circle at about 6 mph (10 km/h) until
a dir ection is displayed in the in terior rearview
mirror.
58
A WARNING
To reduce the risk to yourself and other driv·
ers, calibrate the compass in an area where
there is no traffic.
Page 82 of 404
Drivin g
~ Brake the vehicle to a stop . The engine stops
shortly before the vehicle comes to a stop or if
the ve hicle is stationary
1>. Keep your foot on
the brake pedal. The
D] ; D] ind icator light ap
pears in the display. The need le in the tachome
ter also moves into the
READ Y position .
~ The engine starts again when you take your
foot off the brake pedal. The ind icator light
tu rns off.
Add ition al informa tion
The engine stops in the "P", "N" and "D" selector
lever positions .
If you select the "R" selector lever position during
a Stop phase, the engine will start again.
Shift to "P" quickly to prevent the engine from
starting unintentiona lly when shifting t hrough
IIRII.
You can determ ine for you rself if the engine will
stop or not by reducing or increasing the amount
of force you use to press the brake pedal. For ex
ample, if you only light ly press on the brake ped
al in stop-and-go traff ic or when turning, the en
g ine will not switch off when the vehicle is sta
tionary . As soon as you press the brake down
harder, the eng ine will switch off .
(D Tips
-Press the brake pedal during a Stop phase
to keep the veh icle from roll ing.
- The ignition will turn off if you press the
I STAR T ENGINE ST OP ! button* during a
stop phase . The needle in the tachometer
moves into the
OFF pos it ion .
General information
App lies to: ve hicles w ith Sta rt/Stop system
Engine does not switch off
Before and during each stop phase, the system
checks if certa in cond itions have been met. If the
fjj i ndicato r light appears in the instr ument clus
t er d isp lay, the engine w ill no t be s topped, for
examp le in the fo llowing situations:
1) Ma rket -spe cific
80
- T he engine has not reached the minim um re
quired temperature for Start/Stop mode.
- The interior temperature selected by the cli-
mate control system* has not been reached.
- The ou tside tempe rat ure is extremely high/low.
- The windsh ield is being
defrosted® .
-The parking system* is switched on .
- The vehicle battery charge level is too low .
- The steering wheel is turned at a sharp angle or
is moving.
- After engaging the reverse gear.
- On sharp inclines .
- At high altitudes .
Engine automaticall y restarts
The standard Start/Stop mode w ill be canceled
d u ring a stop p hase in the following situat ions.
The eng ine res tarts witho ut any act ion by the
drive r.
- The vehicle ro lls, for example while on a slope .
- The interior temperature differs from the tem -
peratu re selected in the A/C system .
- The windsh ield is being
defrosted® .
-The brake pedal is pressed several times in a
row.
- The vehicle battery charge level is too low.
- Power consumption is hig h.
The eng ine ca n tur n off aga in when the cond i
t ions for Sta rt/S top mode a re met
l ).
Ignition is switched off automaticall y
To prevent the vehicle battery from dra ining, the
i gnition will sw itch off
a ut omaticall y under the
fo llow ing cond it ions:
- The Start/Stop system has stopped the engine .
- The vehicle is stationary.
- You exited the vehicle .
In this case, the activated low beam is rep laced
by the pa rking light . The parking lights wi ll
switch off after approximately 30 minutes or
when you lock the veh icle.
.,.
Page 172 of 404
Voice recognition s ystem
Voice recognition system
Operating
A pplies to: ve hicles w ith vo ice recognition system
You con operate many Infotainment functions
conveniently by speaking.
R equirements: the ignition and the MMI must be
switched
on <=> page 154, there must not be any
phone call in progress and the parking system
must not be active .
~ Switching on: press the~ button @
<=> page 15, fig. 11 or@ <=> page 16, fig . 13
briefly on the mult ifunct ion steer ing whee l and
say the desired command after the
Beep .
~ Sw itching off : press and hold the~ button.
Or: press the [21 butto n.
~ Pausing : say the command Pau se . To res ume,
press
the~ button .
~ Correcting : say the command Corre ction .
Input assis tance
The system gu ides you through the input with
visual and audio feedback .
-Visual input a ssistance : after switching on
vo ice recognit ion, a display with a se lection of
poss ible commands appears . This command
display can be sw itched on or off . Select:
IMENU I button> Settings> left control button
> MMI settings > Sp eech dialog system .
- Audio input a ssis tance :
to have the poss ible
commands read, turn the voice recogn ition sys
tem o n and say
Help .
For the s ystem to under stand you:
Speak clearly and dist inct ly at a normal volume.
Speak louder when driving faster .
E mphasi ze the words in the commands even ly
and do not leave long pauses.
Close the doors, the windows and the sunroof* to reduce background noise . Make sure t hat passen
gers are not speaking when you are giving a voice
command.
Do not direct the vents toward the hands -free mi
crophone, which is in the roof headliner near the
front interior lights.
170
Only use the system from the dr iver's seat be
ca use the hands -free microphone is directed to
ward that seat .
Additional settings
See<=> page 248.
_8. WARNING
- Direct yo ur full attention to dr iv ing. As the
d river, you have complete responsibility fo r
safety in t raffic. On ly use the functions in
such a way that you a lways maintain com
plete contro l over your vehicle in a ll traffic
situations.
- Do not use the voice recognition system in
emergencies because your voice may change
in s tressful s ituations .
It may take longer to
d ia l the numbe r or th e system may not be
ab le to d ia l it at all. Dial the emergency
number manually.
(D Tips
- The d ia log pauses when there is a n incom
ing phone call a nd will cont inue if you ig
nore the ca ll. The d ia log ends if yo u answer
t h e ca ll.
- Th ere are no vo ice gu idance* prompts when
a dialog is act ive.
- You can select an i tem in the list using ei
ther the vo ice recognit ion system o r the
cont ro l knob .
Command overview
information
App lies to : vehicles wi th voice recog nitio n system
The following overv iews describe the commands
that can be used to operate the MMI using the
voice recog nition system.
Alte rnative commands a re separ ated using a"/ ",
for example say:
Telephone / (or) Navigati on /
(or) Radio .
Sequences of commands used to perform an ac
t ion are iden tified w ith a
"> ", fo r example say:
Enter addre ss > (t hen) Enter country /state. .,..
Page 374 of 404
Fuses and bulbs
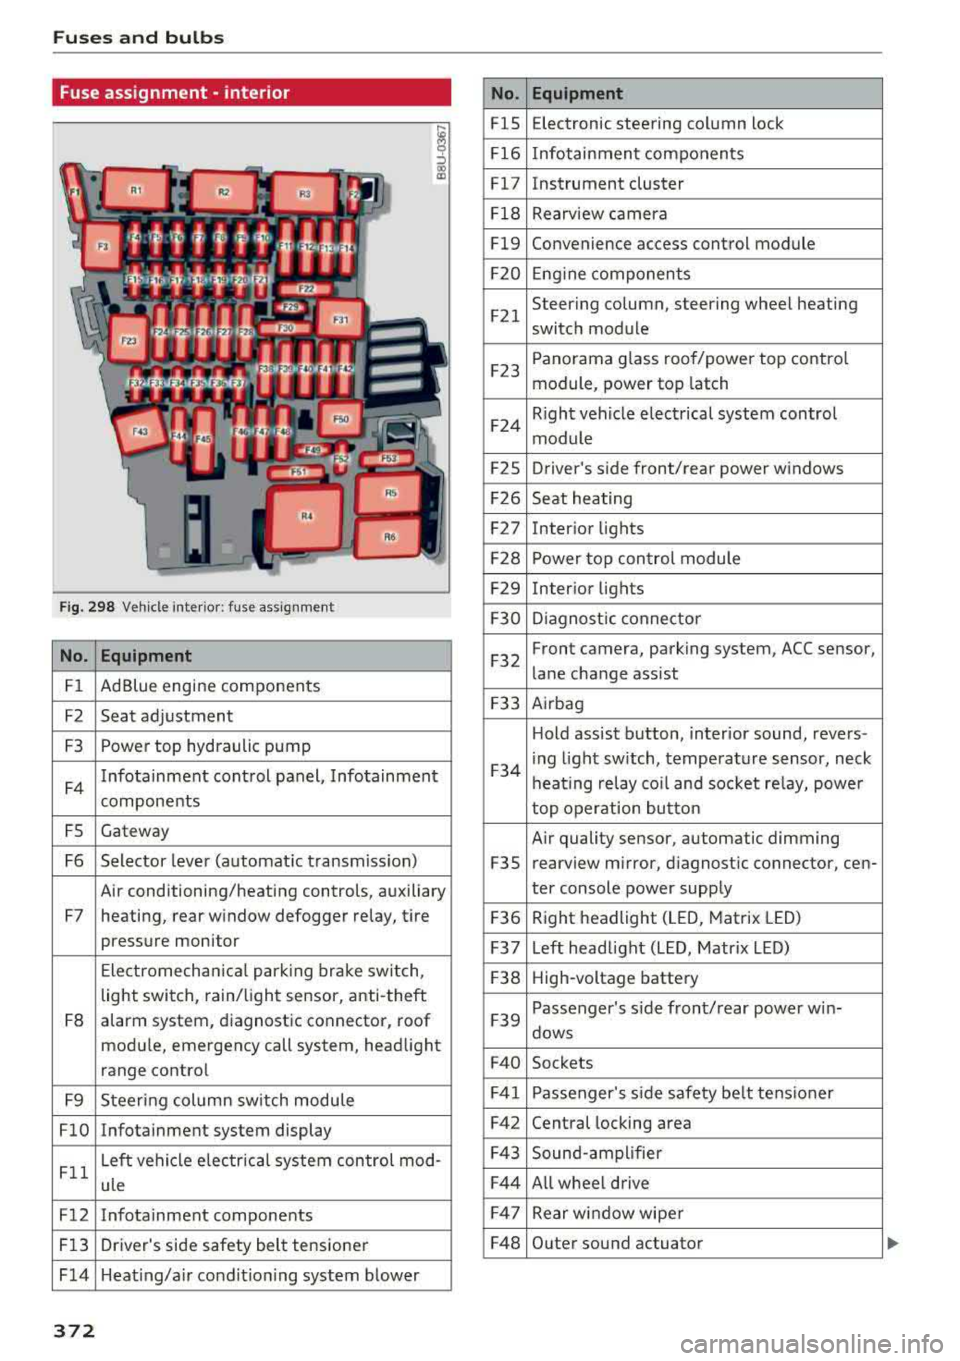
Fuse ass ignment - interior
ij
::, CX) ID
F ig. 298 Vehicle interior: fuse assignment
No. Equipment
Fl Ad Blue engine components
F2 Seat adjustment
F3 Power top hydraulic pump
F4 Infotainment control panel,
Infotainment
components
FS Gateway
F6 Selector lever (automat ic transm iss ion)
Air conditioning/heating controls, auxiliary
F7 heating, rear window defogger relay, tire pressure monitor
Electromechan ical park ing brake switch,
light switch, rain/light sensor, anti-theft
F8 alarm system,
diagnostic connector, roof
module, emergency call system, head light
range control
F9 Steering col umn sw itch module
FlO Infotainment system display
Fll Left vehicle electrica
l system control mod-
ule
F12 Infotainment components
F13 Driver's side safety belt tensioner
F 14 Heat ing/a ir condit ion ing system blower
372
No . Equipment
FlS Electronic
steering column lock
F16 Infotainment components
Fl7 Instrument cluster
Fl8 Rearview camera
Fl9 Convenience access control module
F20 Engine components
F21 Steering column, steering wheel heating
switch module
F23 Panorama glass
roof/power top control
module, power top latch
F24 R
ight vehicle electrical system control
module
F2S Driver
's side front/rear power windows
F26 Seat heating
F27 Interior
lights
F28 Power top control module
F29 Interior lights
F30 Diagnostic connector
F32 Front camera, parking
system, ACC sensor,
lane change assist
F33 Airbag
Hold assist button, interior sound, revers-
F34 i
ng light sw itch, temperature sensor, neck
heating relay coil and socket relay, power
top operation button
Air quality sensor, automatic dimming
F3S rearview
mirror, diagnostic connector, cen-
ter console power supply
F36 Right
headlight (LED, Matrix LED)
F37 Left headlight (LED, Matrix LED)
F38 High-voltage battery
F39 Passenger
's side front/rear power w in-
dows
F40 Sockets
F41 Passenger's sid e safe ty be lt tens ioner
F42 Central locking area
F43 Sound-amplifier
F44 All wheel drive
F47 Rear window wiper
F48 Outer sound actuator
Page 395 of 404
u. 00 .-< N l' N .-< 0 N > 00
How are child restraint system anchors re lat -
ed to chi ld safety . . . . . . . . . . . . . . . . . . . . . 308
H ow many airbags does my vehicle have? . . 2 76
H ow safety belt pretensioners work . . . . . . 267
I
Ignition
Establishing drive ready mode (plug-in hy-
brid drive) . . . . . . . . . . . . . . . . . . . . . . . . . . . 94
Switching on/off (plug-in hybrid drive) . . . 94
Sw itching on/off (us ing the button) . . . . . . 76
Sw itch ing on/off (us ing the key) . . . . . . . . . 75
Imba lance (wheels) . . . . . . . . . . . . . . . . . . . 339
I mmobilizer
refer
to Electronic immobilizer . . . . . . . . . . 32
Important things to do before driving . . . . 249
Importing and exporting (contacts) . . . . . . 187
I mproperly worn safety belts . . . . . . . . . . . 266
Indicator lights . . . . . . . . . . . . . . . . . . . . . . . . 20
A irbag system . . . . . . . . . . . . . . . . . . . . . . 28 1
PASSENGER AIR BAG OFF . . . . . . . . . . . . . 281
Indicator lights (plug-in hybrid drive) . . . . . . 96
I nfant seats . . . . . . . . . . . . . . . . . . . . . . . . . 300
Input Using the MMI touch . . . . . . . . . . . . . . . . . 157
Using the speller . . . . . . . . . . . . . . . . . . . . 161
Input level (media) . . . . . . . . . . . . . . . . . . . . 235
I nspection interval . . . . . . . . . . . . . . . . . . . . 328
Install ing the upper tether strap on the an-
chorage . . . . . . . . . . . . . . . . . . . . . . . . . . . . . 312
Instrument cluster . . . . . . . . . . . . . . . . . . . . . 10
Cleaning . . . . . . . . . . . . . . . . . . . . . . . . . . . 357
Messages . . . . . . . . . . . . . . . . . . . . . . . . . . . 20
Plug -in hybrid dr ive . . . . . . . . . . . . . . . . . . . 95
Instruments Adjusting illumination . . . . . . . . . . . . . . . . . 52
I nterior lighting . . . . . . . . . . . . . . . . . . . . . . . 52
Internet refer
to Audi connect (Infotainment) . . . . 190
Internet radio . . . . . . . . . . . . . . . . . . . . . . . . 228
I nterva l mode (w indshie ld w ipers) . . . . . . . . 55
iPhone refer
to Audi music interface . . . . . . . 229, 230
iTunes tagging ................. ..... . 218
Index
J
Jukebox . . . . . . . . . . . . . . . . . . . . . . . . . . . . . 225
Jump start . . . . . . . . . . . . . . . . . . . . . . . . . . . 102
Jump starting . .. .. ............... 102,375
K
Key......... ....... ................ .. 32
Key not recognized . . . . . . . . . . . . . . . . . . . 79
Key recognition . . . . . . . . . . . . . . . . . . . . . . 68
Messages . . . . . . . . . . . . . . . . . . . . . . . . . . . 78
Kick-down (automatic transmission) . . . . . . . 88
Knee a irbags . . . . . . . . . . . . . . . . . . . . . . . . . 285
Description . . . . . . . . . . . . . . . . . . . . . . . . . 285
How they work . . . . . . . . . . . . . . . . . . . . . . 286
Important safety instructions . . . . . . . . . . 287
L
Lane assist
refer to Audi active lane assist . . . . . . . . . 133
Lap timer. . . . . . . . . . . . . . . . . . . . . . . . . . . . 122
LATCH . . . . . . . . . . . . . . . . . . . . . . . . . . . . . . 308
Description . . . . . . . . . . . . . . . . . . . . . . . . . 309
Installing a child restraint............ . 310
Location . . . . . . . . . . . . . . . . . . . . . . . . . . . 309
Mounting and releasing the anchorage
hook . . . . . . . . . . . . . . . . . . . . . . . . . . . . . . 310
Launch control program . . . . . . . . . . . . . . . . . 89
Leather care and cleaning . . . . . . . . . . . . . . 357
Left control button . . . . . . . . . . . . . . . . . . . . . 14
Licensing agreements (MMI) . . . . . . . . . . . . 248
Lifting jack . . . . . . . . . . . . . . . . . . . . . . . . . . 366
Light/rain sensor Automatic headlights . . . . . . . . . . . . . . . . . 49
Switching the rain sensor on/off. . . . . . . . . 55
Lighting Exterior . . . . . . . . . . . . . . . . . . . . . . . . . . . . . 49
Interior . . . . . . . . . . . . . . . . . . . . . . . . . . . . . 52
Lights . . . . . . . . . . . . . . . . . . . . . . . . . . . . . . . 49
Interior/read ing lights . . . . . . . . . . . . . . . . 52
Listening to music
refer to Media ... .. ............. 223, 232
Load....... .. .. .. .. ............... .. 382
Locking/unlocking
refer to Unlock ing/ locking ....... 31, 33, 34
Low beam headlights . . . . . . . . . . . . . . . . . . . 49
393