AUDI A4 1998 B5 / 1.G 01A Transmission Input Shaft Assembly Workshop Manual
Manufacturer: AUDI, Model Year: 1998,
Model line: A4,
Model: AUDI A4 1998 B5 / 1.G
Pages: 17, PDF Size: 0.44 MB
AUDI A4 1998 B5 / 1.G 01A Transmission Input Shaft Assembly Workshop Manual
A4 1998 B5 / 1.G
AUDI
AUDI
https://www.carmanualsonline.info/img/6/1245/w960_1245-0.png
AUDI A4 1998 B5 / 1.G 01A Transmission Input Shaft Assembly Workshop Manual
Trending: tow, warning, checking oil, check oil, ECU, height, oil
Page 1 of 17
35-1
Input shaft, disassembling
and assembling
Special tools and equipment
VW222A pilot drift
VW295 needle bearing drift
VW295A needle bearing drift
VW401 thrust plate and VW402 thrust plate
VW407 punch and VW408A punch
VW415A tube and 416B tube
VW447I thrust pad
VW771 slide hammer-complete set
30-24 drift
30-100 press tube
Pa
ge 1 of 17
11/19/2002 file://C:\DOCUME~1\Bear\LOCALS~1\Tem
p\triJBHHO.htm
Page 2 of 17
40-105 thrust piece
40-202 press-out piece
Kukko 17/2 separating tool
Kukko 21/4 extractor
Pa
ge 2 of 17
11/19/2002 file://C:\DOCUME~1\Bear\LOCALS~1\Tem
p\triJBHHO.htm
Page 3 of 17
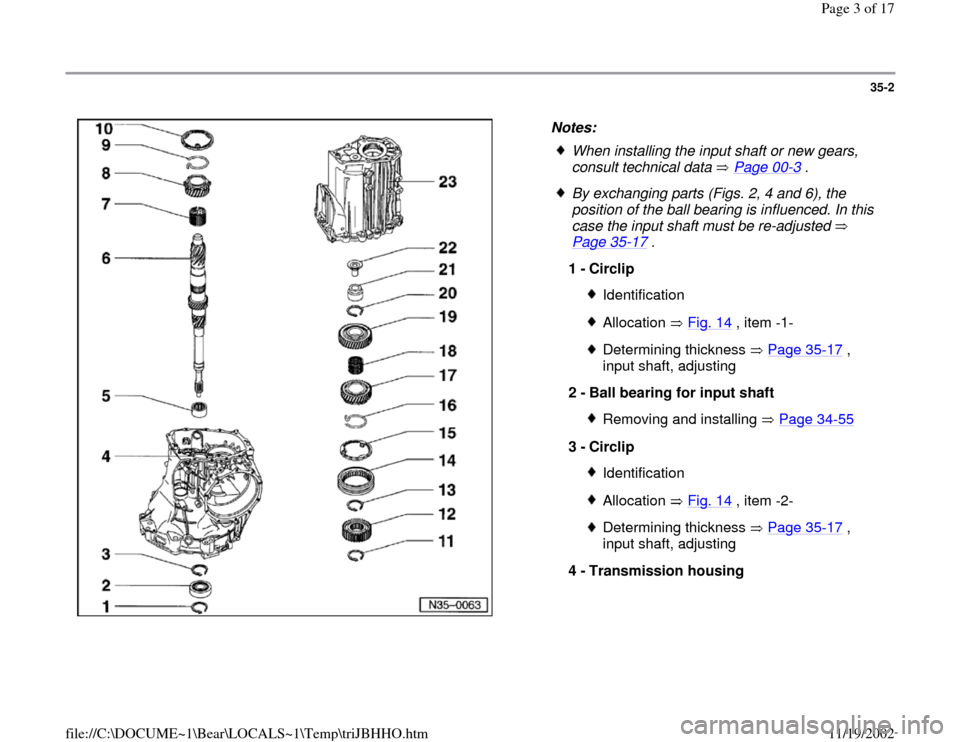
35-2
Notes:
When installing the input shaft or new gears,
consult technical data Page 00
-3 .
By exchanging parts (Figs. 2, 4 and 6), the
position of the ball bearing is influenced. In this
case the input shaft must be re-adjusted
Page 35
-17
.
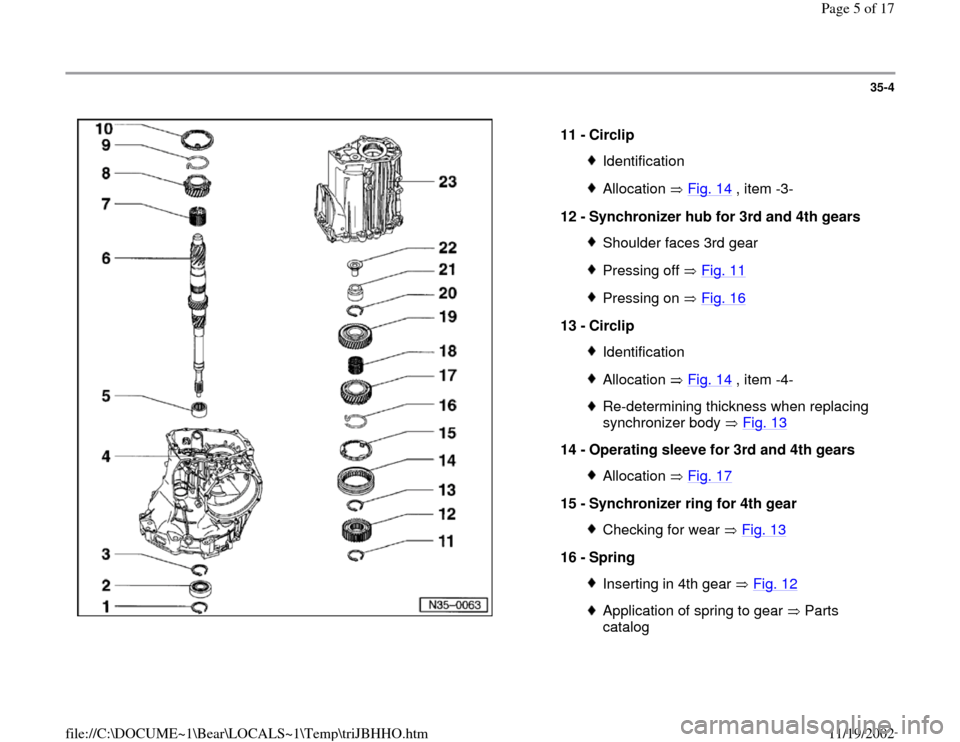
1 -
Circlip
IdentificationAllocation Fig. 14
, item -1-
Determining thickness Page 35
-17
,
input shaft, adjusting
2 -
Ball bearing for input shaft
Removing and installing Page 34
-55
3 -
Circlip
IdentificationAllocation Fig. 14
, item -2-
Determining thickness Page 35
-17
,
input shaft, adjusting
4 -
Transmission housing
Pa
ge 3 of 17
11/19/2002 file://C:\DOCUME~1\Bear\LOCALS~1\Tem
p\triJBHHO.htm
Page 4 of 17
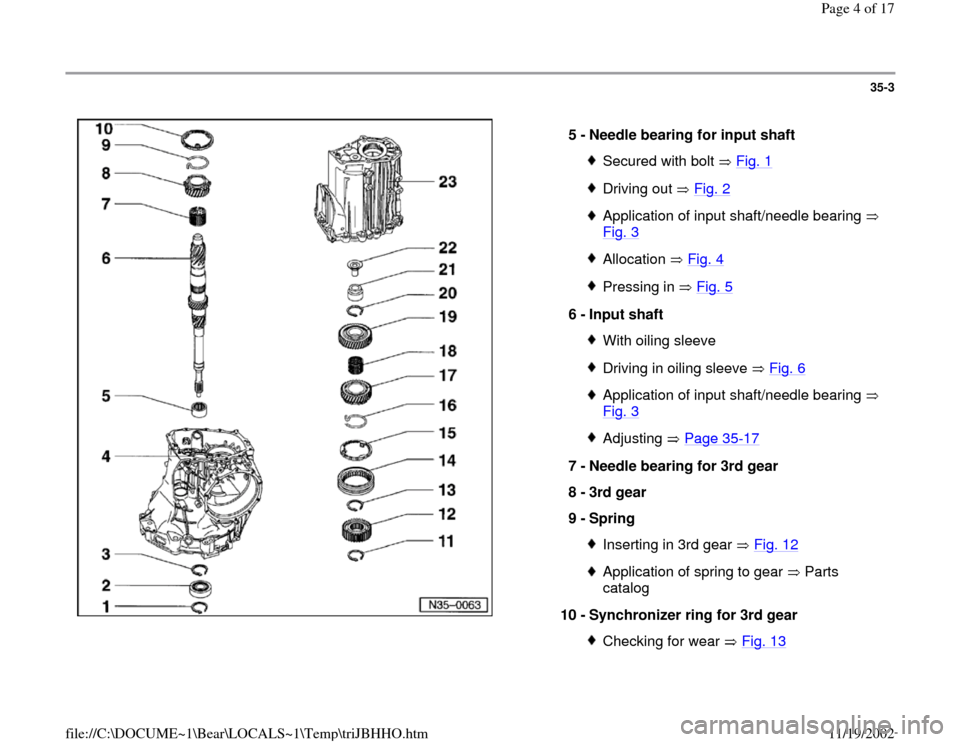
35-3
5 -
Needle bearing for input shaft
Secured with bolt Fig. 1Driving out Fig. 2Application of input shaft/needle bearing
Fig. 3
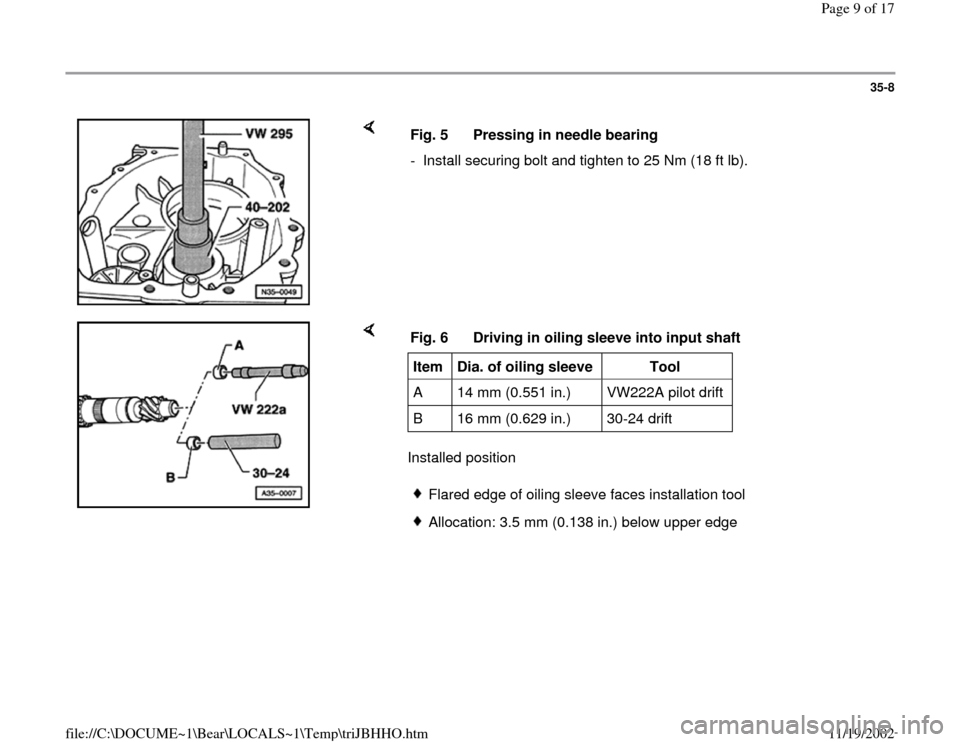
Allocation Fig. 4Pressing in Fig. 5
6 -
Input shaft
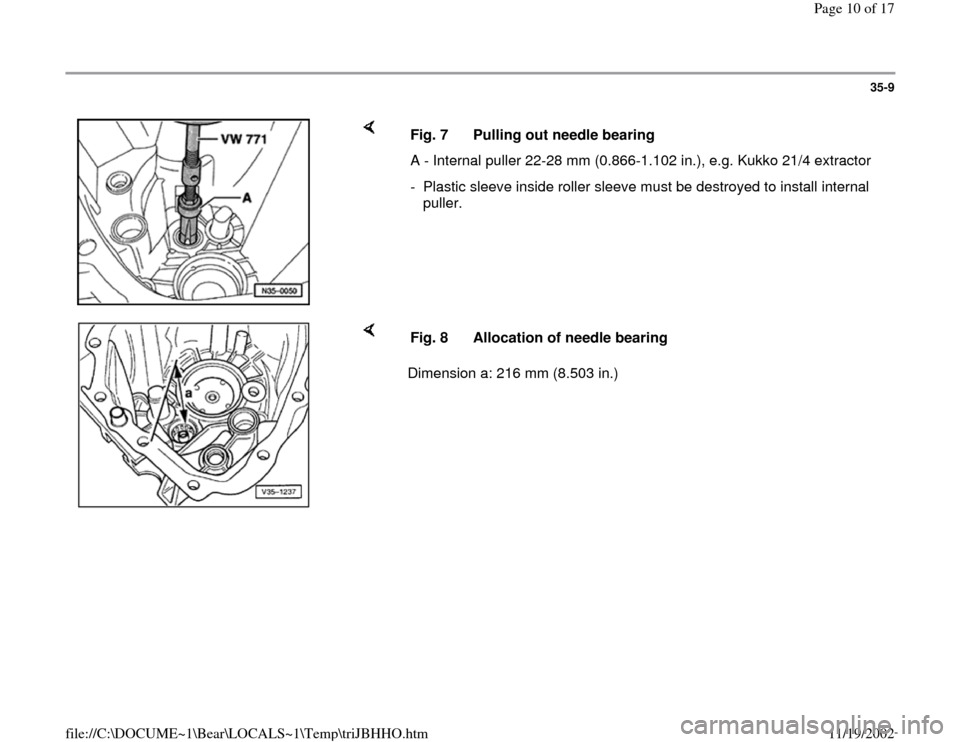
With oiling sleeveDriving in oiling sleeve Fig. 6Application of input shaft/needle bearing
Fig. 3
Adjusting Page 35
-17
7 -
Needle bearing for 3rd gear
8 -
3rd gear
9 -
Spring
Inserting in 3rd gear Fig. 12Application of spring to gear Parts
catalog
10 -
Synchronizer ring for 3rd gear
Checking for wear Fig. 13
Pa
ge 4 of 17
11/19/2002 file://C:\DOCUME~1\Bear\LOCALS~1\Tem
p\triJBHHO.htm
Page 5 of 17
35-4
11 -
Circlip
IdentificationAllocation Fig. 14
, item -3-
12 -
Synchronizer hub for 3rd and 4th gears
Shoulder faces 3rd gearPressing off Fig. 11Pressing on Fig. 16
13 -
Circlip
IdentificationAllocation Fig. 14
, item -4-
Re-determining thickness when replacing
synchronizer body Fig. 13
14 -
Operating sleeve for 3rd and 4th gears
Allocation Fig. 17
15 -
Synchronizer ring for 4th gear
Checking for wear Fig. 13
16 -
Spring
Inserting in 4th gear Fig. 12Application of spring to gear Parts
catalog
Pa
ge 5 of 17
11/19/2002 file://C:\DOCUME~1\Bear\LOCALS~1\Tem
p\triJBHHO.htm
Page 6 of 17
35-5
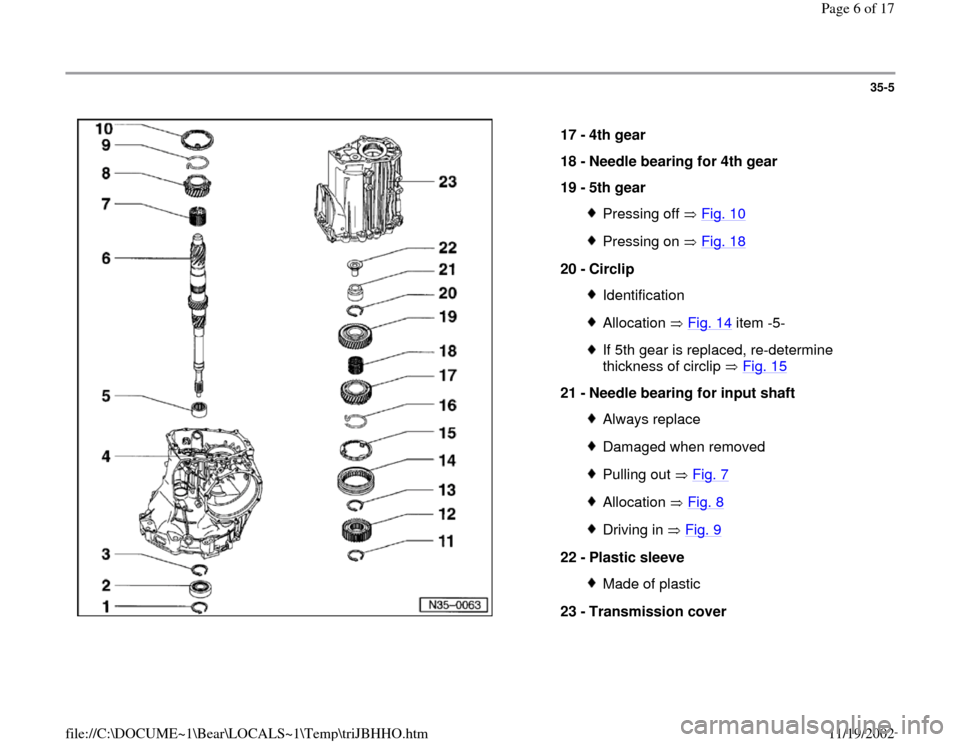
17 -
4th gear
18 -
Needle bearing for 4th gear
19 -
5th gear
Pressing off Fig. 10Pressing on Fig. 18
20 -
Circlip
IdentificationAllocation Fig. 14
item -5-
If 5th gear is replaced, re-determine
thickness of circlip Fig. 15
21 -
Needle bearing for input shaft
Always replaceDamaged when removedPulling out Fig. 7Allocation Fig. 8Driving in Fig. 9
22 -
Plastic sleeve
Made of plastic
23 -
Transmission cover
Pa
ge 6 of 17
11/19/2002 file://C:\DOCUME~1\Bear\LOCALS~1\Tem
p\triJBHHO.htm
Page 7 of 17
35-6
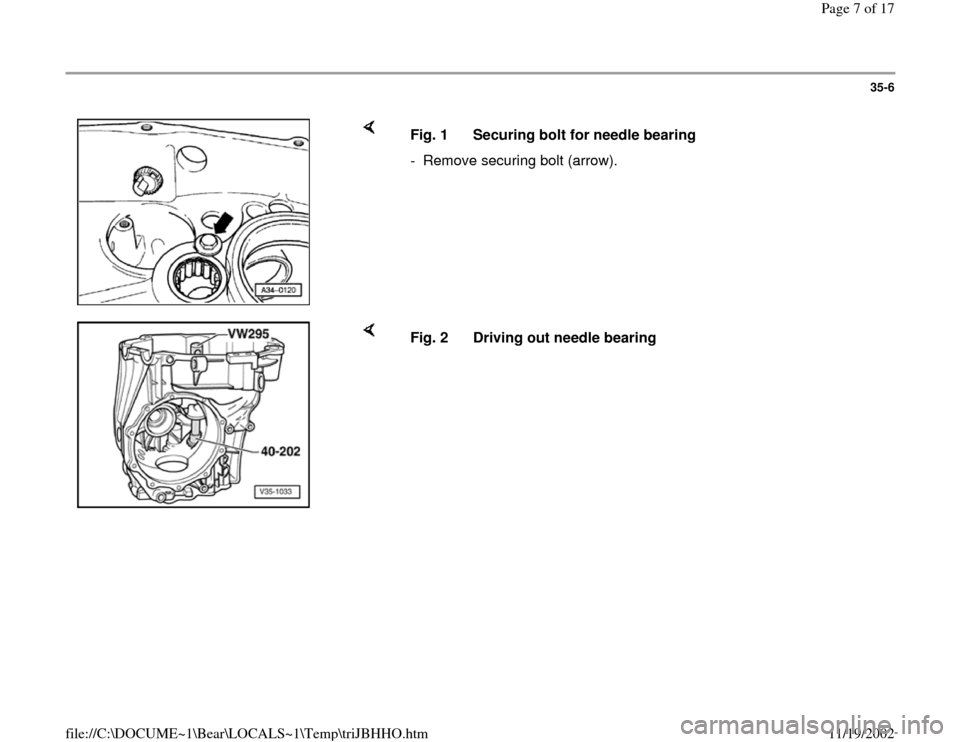
Fig. 1 Securing bolt for needle bearing
- Remove securing bolt (arrow).
Fig. 2 Driving out needle bearing
Pa
ge 7 of 17
11/19/2002 file://C:\DOCUME~1\Bear\LOCALS~1\Tem
p\triJBHHO.htm
Page 8 of 17
35-7
CAUTION!
Part numbers are listed here for reference only. Always check with
your Parts department for the latest information.
In order to avoid damage due to improper assembly, check the
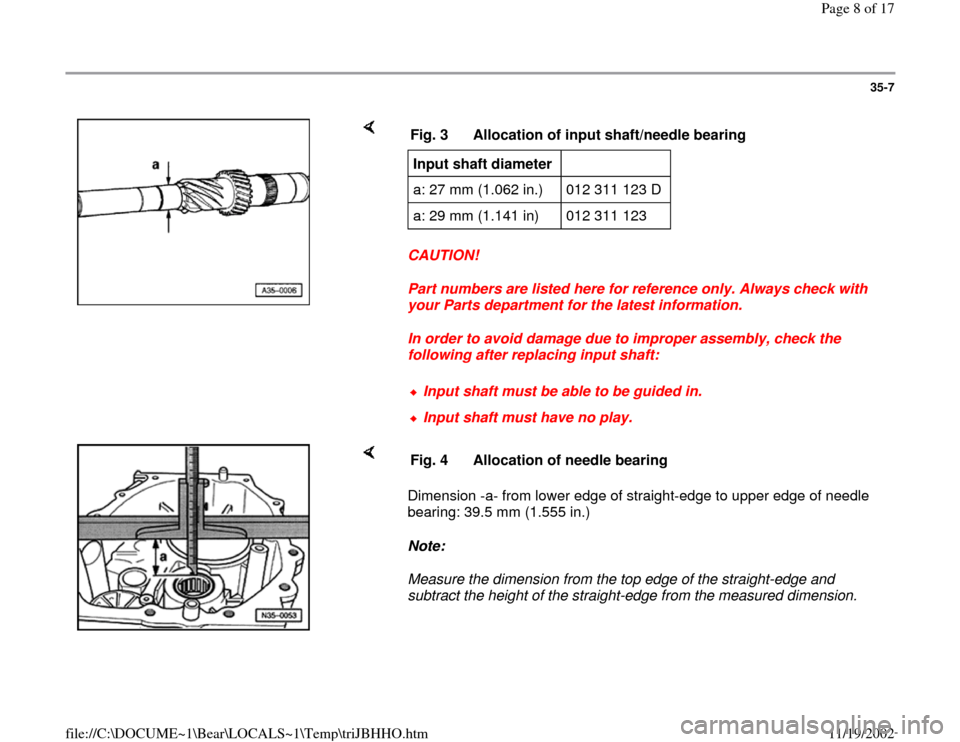
following after replacing input shaft: Fig. 3 Allocation of input shaft/needle bearingInput shaft diameter
a: 27 mm (1.062 in.) 012 311 123 D
a: 29 mm (1.141 in) 012 311 123 Input shaft must be able to be guided in.Input shaft must have no play.
Dimension -a- from lower edge of straight-edge to upper edge of needle
bearing: 39.5 mm (1.555 in.)
Note:
Measure the dimension from the top edge of the straight-edge and
subtract the height of the straight-edge from the measured dimension. Fig. 4 Allocation of needle bearing
Pa
ge 8 of 17
11/19/2002 file://C:\DOCUME~1\Bear\LOCALS~1\Tem
p\triJBHHO.htm
Page 9 of 17
35-8
Fig. 5 Pressing in needle bearing
- Install securing bolt and tighten to 25 Nm (18 ft lb).
Installed position Fig. 6 Driving in oiling sleeve into input shaftItem
Dia. of oiling sleeve
Tool
A 14 mm (0.551 in.) VW222A pilot drift
B 16 mm (0.629 in.) 30-24 drift
Flared edge of oiling sleeve faces installation toolAllocation: 3.5 mm (0.138 in.) below upper edge
Pa
ge 9 of 17
11/19/2002 file://C:\DOCUME~1\Bear\LOCALS~1\Tem
p\triJBHHO.htm
Page 10 of 17
35-9
Fig. 7 Pulling out needle bearing
A - Internal puller 22-28 mm (0.866-1.102 in.), e.g. Kukko 21/4 extractor
- Plastic sleeve inside roller sleeve must be destroyed to install internal
puller.
Dimension a: 216 mm (8.503 in.) Fig. 8 Allocation of needle bearing
Pa
ge 10 of 1711/19/2002 file://C:\DOCUME~1\Bear\LOCALS~1\Tem
p\triJBHHO.htm
Trending: warning, oil, ECU, tow, checking oil, check oil, technical data
